Хост windows shell experience грузит процессор

В диспетчере задач Windows 11 или Windows 10 вы можете обратить внимание на процесс «Хост Windows Shell Experience» и соответствующий ему исполняемый файл ShellExperienceHost.exe — обычно процесс приостановлен, но в некоторых случаях вызывает проблемы: может нагружать процессор или вызывать подозрения о том, что процесс — вредоносный.

В этой инструкции подробно о том, что представляется собой процесс ShellExperienceHost.exe, для чего он используется и о решении возможных проблем с этим процессом.

Назначение процесса ShellExperienceHost.exe

Оригинальный процесс ShellExperienceHost.exe является родным системным процессом Windows 11 или Windows 10 и не представляет какой-либо угрозы. В изначальных версиях Windows 10 он полностью обеспечивал работу меню «Пуск» и работу универсальных приложений в оконном режиме.

Процесс ShellExperienceHost.exe в диспетчере задач

В текущих версиях ОС для меню «Пуск» выделен отдельный процесс — StartMenuExperienceHost.exe, однако и ShellExperienceHost.exe продолжает использоваться, в частности для:

  • Всплывающих панелей меню Пуск — например, при нажатии по дате и времени в панели задач, открытии панели быстрых действий.
  • Для функций «виртуальный тачпад» и «меню пера».
  • Отображения системного меню «Поделиться».
  • Показа системных уведомлений.

Файл оригинального системного процесса ShellExperienceHost.exe располагается в папке

C:\Windows\SystemApps\ShellExperienceHost_cw5n1h2txyewy
Папка с оригинальным ShellExperienceHost.exe

При иных расположениях (определить папку можно, нажав правой кнопкой мыши по процессу в диспетчере задач и выбрав пункт «Открыть расположение файла») имеет смысл проверить файл процесса на вирусы, например, с помощью VirusTotal.com и выполнить проверку компьютера на наличие вредоносных программ.

Вы можете принудительно завершить (снять задачу) этот процесс в диспетчере задач, в современных версиях Windows 11 и 10 это не приводит к сбоям, однако, при некоторых действиях, таких как нажатие по часам в панели задач Хост Windows Shell Experience будет запущен снова.

Решение возможных проблем с ShellExperienceHost.exe

В большинстве случаев Windows Shell Experience не вызывает каких-либо проблем при работе системы, однако, если вы наблюдаете высокую нагрузку на процессор с его стороны, сбои, либо «странное» поведение этого процесса, разобраться с проблемами могут помочь следующие пункты:

  • При высокой нагрузке на процессор со стороны ShellExperienceHost.exe — попробуйте отключить (удалить) сторонние средства, модифицирующие внешний вид Windows 11/10, в старых версиях Windows 10 также может помочь отключение функций слайд-шоу для обоев рабочего стола и автоматического контрастного цвета в параметрах персонализации.
  • Если на компьютере появляются уведомления с рекламой в рамках процесса ShellExperienceHost.exe, вероятнее всего дело не в самом процессе, а в том, что он используется для уведомлений браузеров. Проверьте настройки уведомлений в них, например, в Google Chrome для этого требуется зайти в Настройки — Конфиденциальность и безопасность — Настройки сайтов — Уведомления (и отключить уведомления для нежелательных сайтов). В Edge нужные настройки можно найти в «Параметры» — «Файлы cookie и разрешения для сайтов» — пункт «Все сайты» в разделе «Разрешения для сайтов».
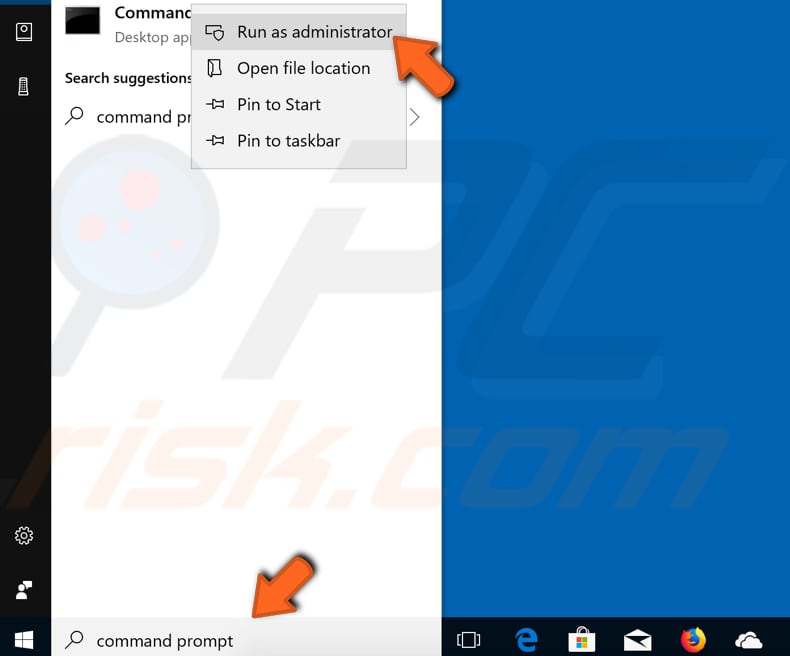
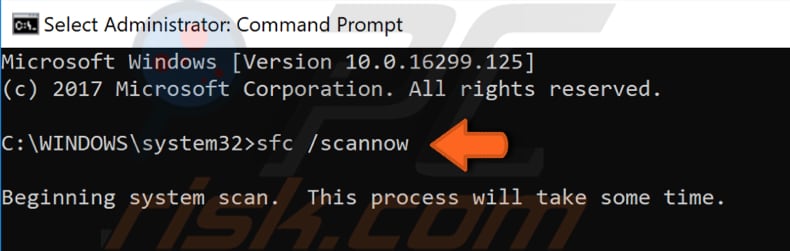
  • При постоянных сбоях процесса попробуйте установить последние доступные обновления Windows, а также выполнить проверку целостности системных файлов Windows с помощью команды sfc /scannow, запущенной в командной строке от имени администратора. Подробнее: Восстановление системных файлов Windows 11 (подойдет и для Windows 10).
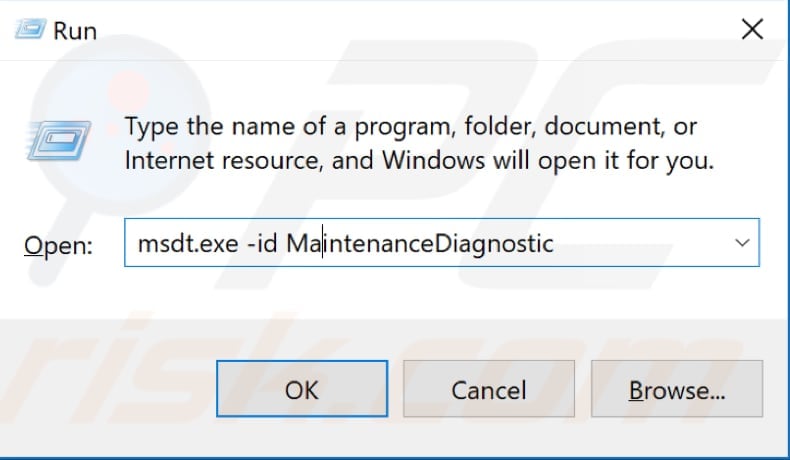
  • В дополнение к предыдущему пункту, можно попробовать следующую команду PowerShell для перерегистрации приложения Windows Shell Experience Host:
    Get-AppxPackage -AllUsers Microsoft.Windows.ShellExperienceHost | Foreach {Add-AppxPackage -DisableDevelopmentMode -Register "$($_.InstallLocation)AppXManifest.xml"}
  • Если есть основания полагать, что проблемы с процессом — результат наличия вирусов, выполните сканирование компьютера, например, с помощью Kaspersky Virus Removal Tool (не требует установки и не конфликтует с уже имеющимися антивирусами).

Если у вас есть другие вопросы, касающиеся процесса ShellExperienceHost.exe, вы можете задать их в комментариях ниже — я постараюсь помочь.

Продолжаем серию статей, где разбираем предназначение различных процессов, найти которые вы можете внутри Диспетчера задач. Потребность в подобных статьях объясняется простым любопытством пользователей (многим интересно, зачем нужны эти десятки процессов) или необходимостью узнать, почему тот или иной процесс в определенных условиях начинает больше потреблять ресурсы компьютера, а именно память, процессор, диск или сеть. Эта статья рассказывает о том, что такое Хост Windows Shell Experience и что делать, если он постоянно грузит процессор.

Хост Windows Shell Experience – что это?

Сразу же отметим, что этот процесс является частью Windows 10. Это системный компонент, который работает всегда и обеспечивает вам работу универсальных приложений Windows. Кроме того, на его цифровые плечи возложена задача управлять графическими элементами интерфейса, вроде меню Пуск, прозрачности панели задач, всплывающие меню сетевого подключения, громкости, центра уведомлений и так далее. Хост Windows Shell Experience также управляет изменением фонового изображения рабочего стола, если пользователь активировал слайд-шоу.

Windows Shell Experience Host (1)

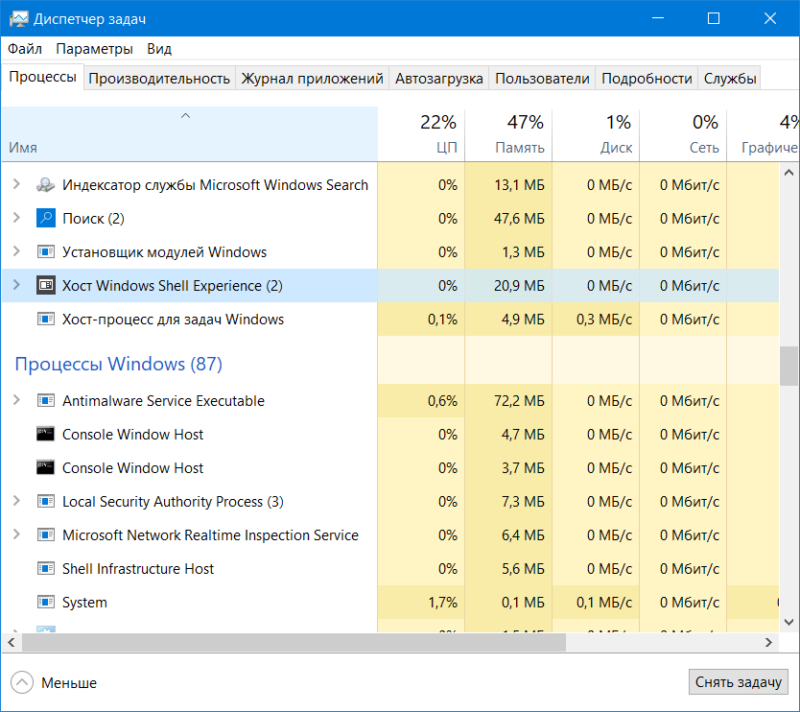
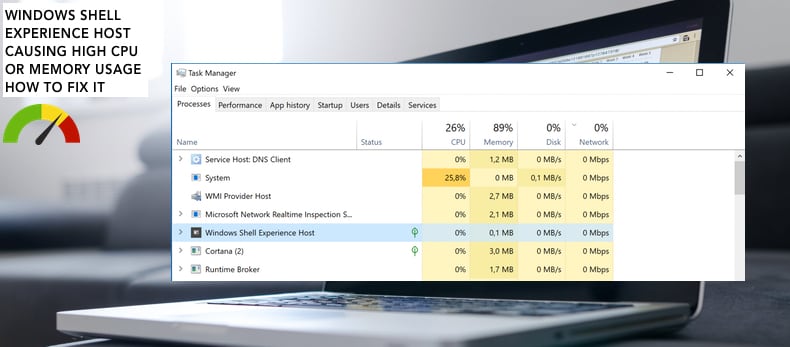
Хост Windows Shell Experience в своей привычной среде обитания. 0% нагрузки на ЦП и десяток мегабайт в оперативке.

Само имя процесса подсказывает его предназначение. Windows Shell – оболочка Windows. Окна, панели, кнопки и другие элементы интерфейса – все это работа Хост Windows Shell Experience.

Windows Shell Experience Host (2)

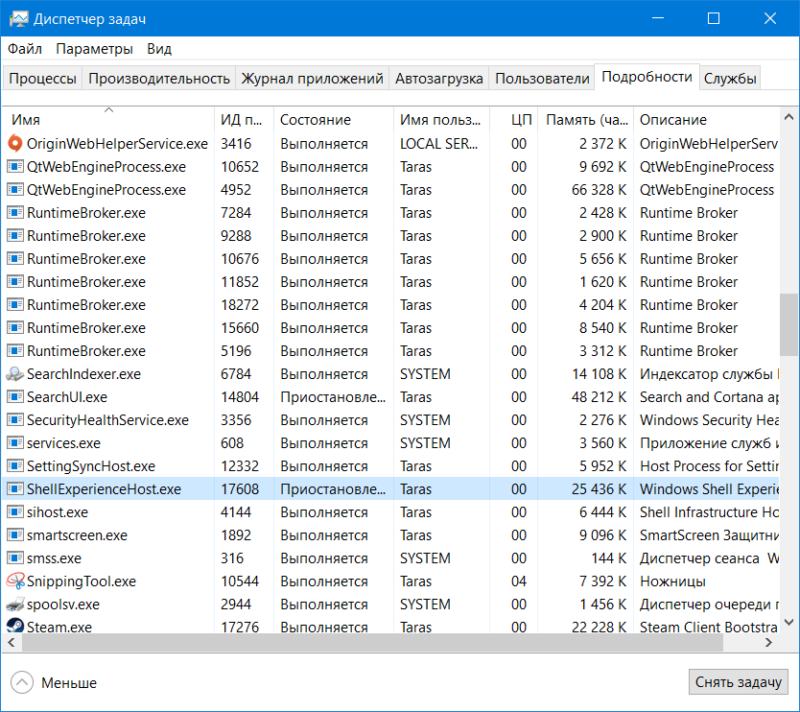
Вид сбоку, а точнее — из вкладки «Подробности».

Когда Windows 10 только появилась на свет и начала распространятся в виде бесплатного обновления, многие пользователи жаловались на неадекватное поведение процесса Хост Windows Shell Experience. Он сильно грузил процессор, а также потреблял много памяти. Хотя эти проблемы (они в основном были связаны с процессом апгрейда с Windows 7 / 8.1 до Windows 10) уже исправили, пользователи иногда все-таки сталкиваются с тем, что Хост Windows Shell Experience начинает дичать.

Хост Windows Shell Experience грузит процессор

В обычных условиях Хост Windows Shell Experience фактически никак не влияет на производительность компьютера. Несмотря на важность его существования, нормально работающий процесс Хост Windows Shell Experience не грузит процессор вообще, а объем потребляемой памяти не превышает нескольких десятков мегабайт. Нагрузка на процессор может слегка подскочить, когда вы открываете приложения или перемещаете окна, но она опять же, не должна превышать лишь пары процентов.

Как уже было сказано выше, бывают случаи, когда Хост Windows Shell Experience начинает постоянно напрягать процессор на уровне 20-30%, а объем потребляемой памяти вырастает до пары сотен мегабайт. В таком случае вам надо попытаться собственноручно решить ситуацию.

Как отключить Хост Windows Experience Host

Вручную вам не стоит его отключать, да и вы не сможете это сделать. Это важный системный процесс, отвечающий за графику в Windows 10. Даже если вы снимите эту задачу в диспетчере задач, система активирует ее повторно буквально спустя несколько секунд. Причину повышенной нагрузки таким образом не решить. Для этого есть другие методы.

Прежде всего проверьте наличие обновлений для операционной системы и установленных приложений. Быть может, обновление Windows или какого-нибудь из установленных приложений исправит ситуацию. После обновления дайте компьютеру пару минут на то, чтобы прийти в чувство. Можно также попробовать перезагрузить систему (в очень большом количестве случаев помогает именно перезагрузка) и затем понаблюдать за поведением процесса. Если ничего из этого не помогло, двигайтесь далее.

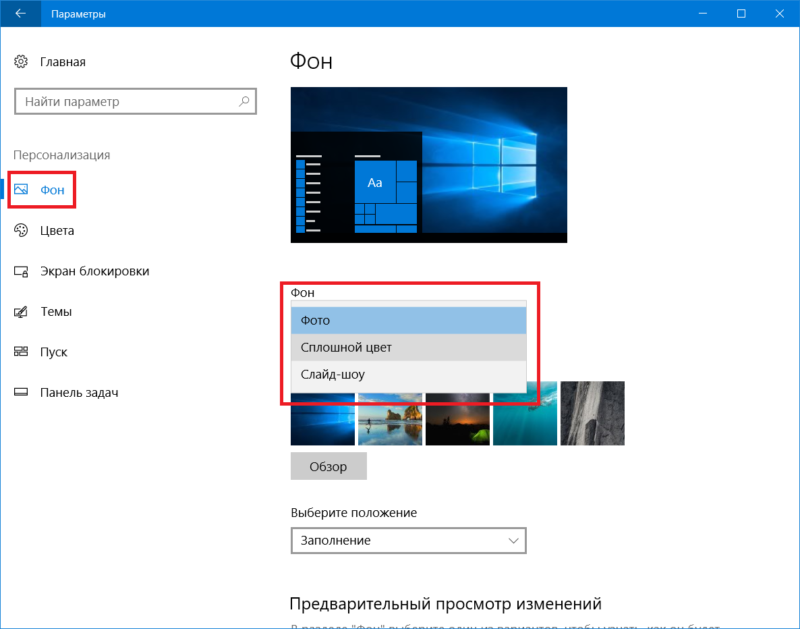
Зачастую проблемы в работе процесса Хост Windows Shell Experience спрятаны в системе слайд-шоу рабочего стола. Вполне нормально, если в процессе смены фонового изображения процесс немного нагружает процессор / память. Но после этого нагрузка должна упасть до минимума. Если не падает, сделайте следующее:

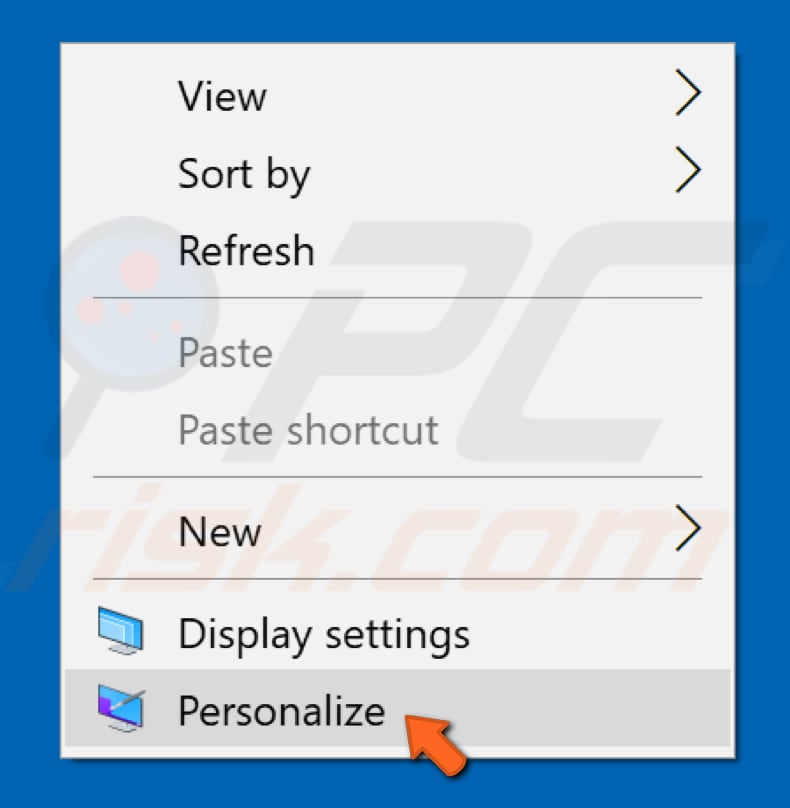
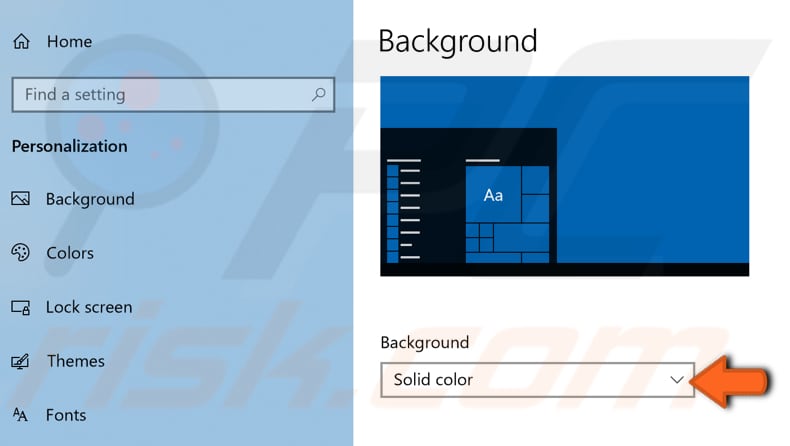
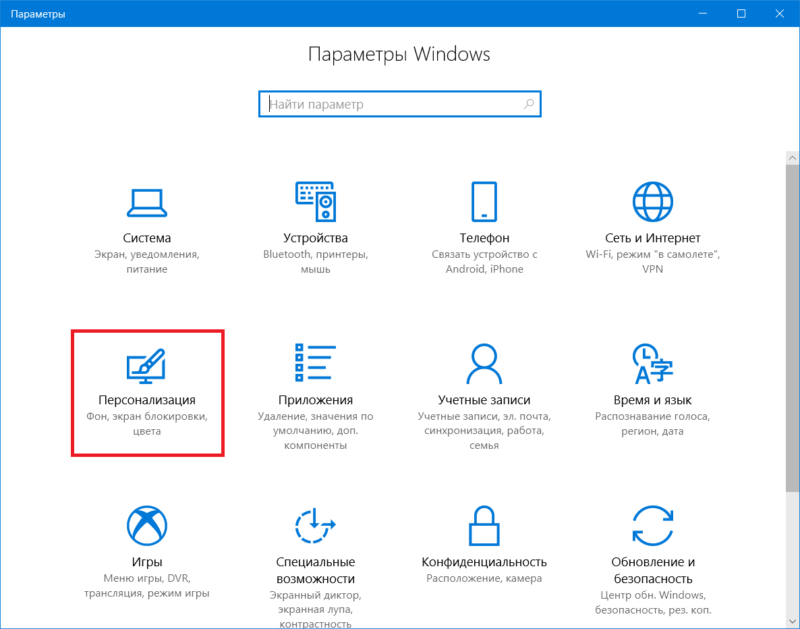
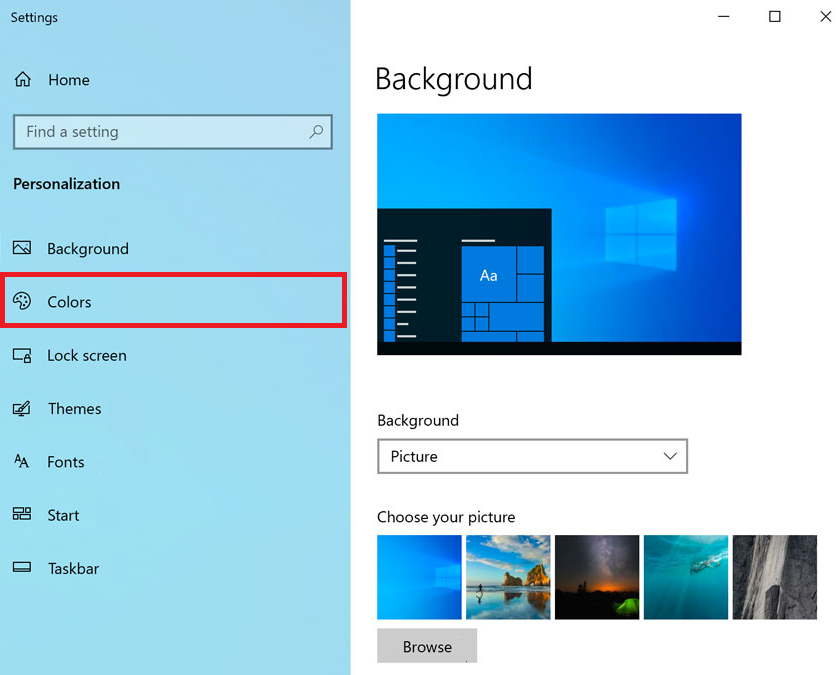
  1. Нажмите Win + I (вы можете открыть Параметры любым удобным вам способом) и перейдите в раздел Персонализация – Фон.
    Windows Shell Experience Host (6)

  2. Вместо Слайд-шоу установите параметр Сплошной цвет. После этого понаблюдайте за работой процесса. Если нагрузка упала до минимальной и держится в пределах нормы, можно попробовать установить одно изображение в качестве фоновой картинки.
    Windows Shell Experience Host (7)

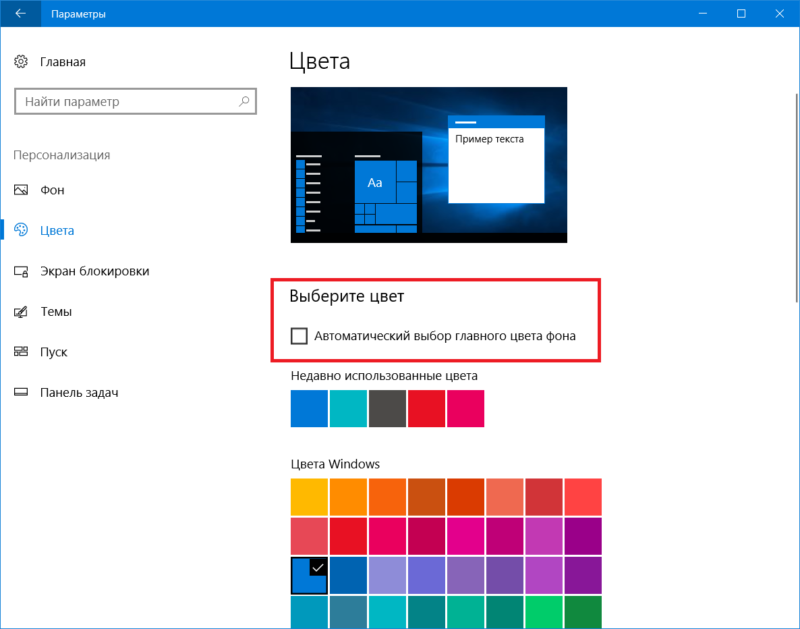
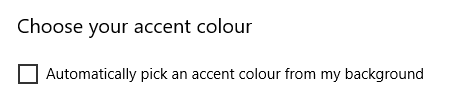
Другая причина может прятаться в система автоматического подбора акцентного цвета в зависимости от установленного изображения. Если на рабочем столе у вас картинка с синими цветами, цвет системы будет автоматически установлен на синий. Попробуйте отключить эту функцию.

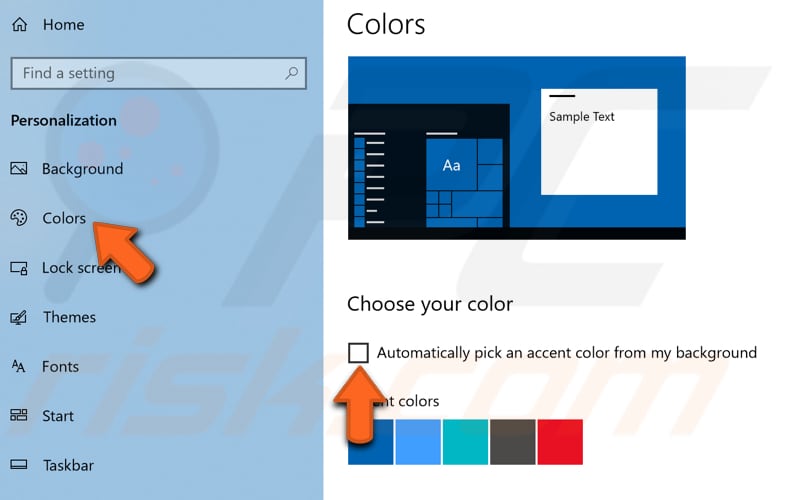
  1. Откройте параметры (Win + I) и затем перейдите в раздел Персонализация – Цвета.
    Windows Shell Experience Host (6)

  2. Снимите флажок с параметра Автоматический выбор главного цвета фона. Можете также установить любой другой цвет, чтобы сбросить этот параметр. Опять же, пару минут последите за процессом. Если все пришло в нормальное состояние, значит вы нашли причину повышенной нагрузки на процессор. Если же не помогло, двигайтесь далее.
    Windows Shell Experience Host (8)

Третий вариант – отключение параметров прозрачности. Он расположен на том же экране, что и автоматический выбор главного цвета фона. Отключите параметр Эффекты прозрачности и посмотрите на эффект.

Windows Shell Experience Host (9)

Хост Windows Experience Host – вирус?

Скорее всего нет. На момент написания этой статьи не было случаев, когда какой-то вирус выдавал себя за системный процесс Хост Experience Host. Все же есть способом, который поможет вам лишний раз убедиться в том, что вы имеете дело с подлинным системным компонентом, а не какой-то заразой.

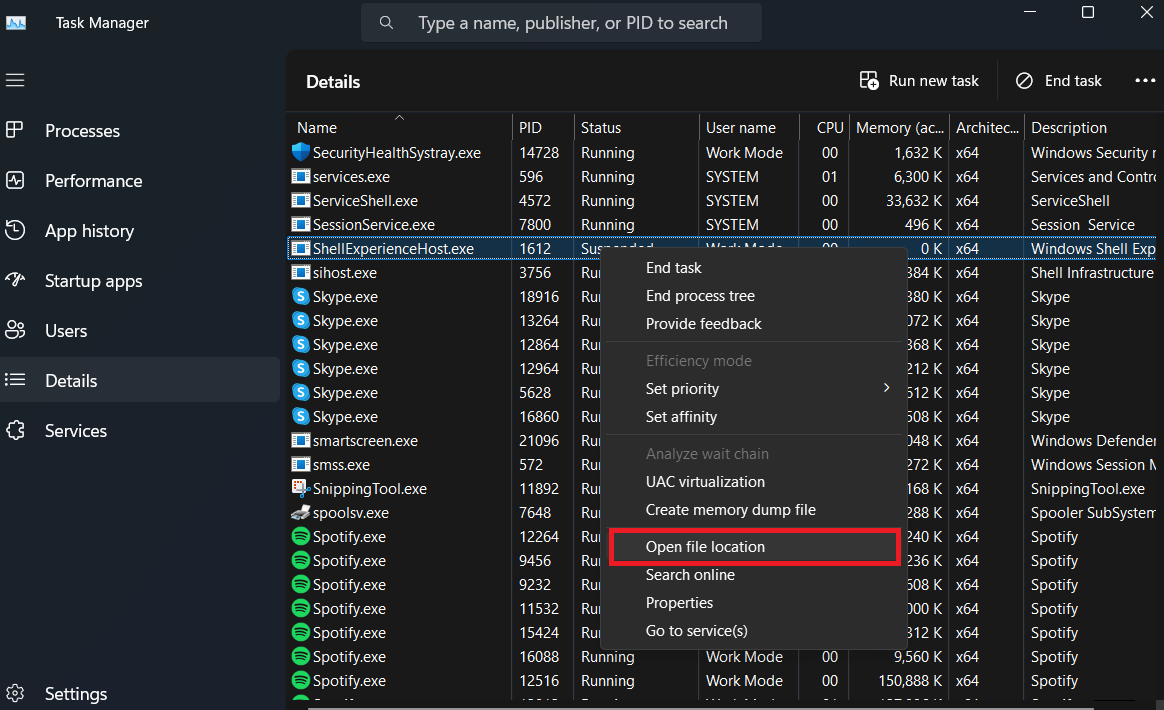
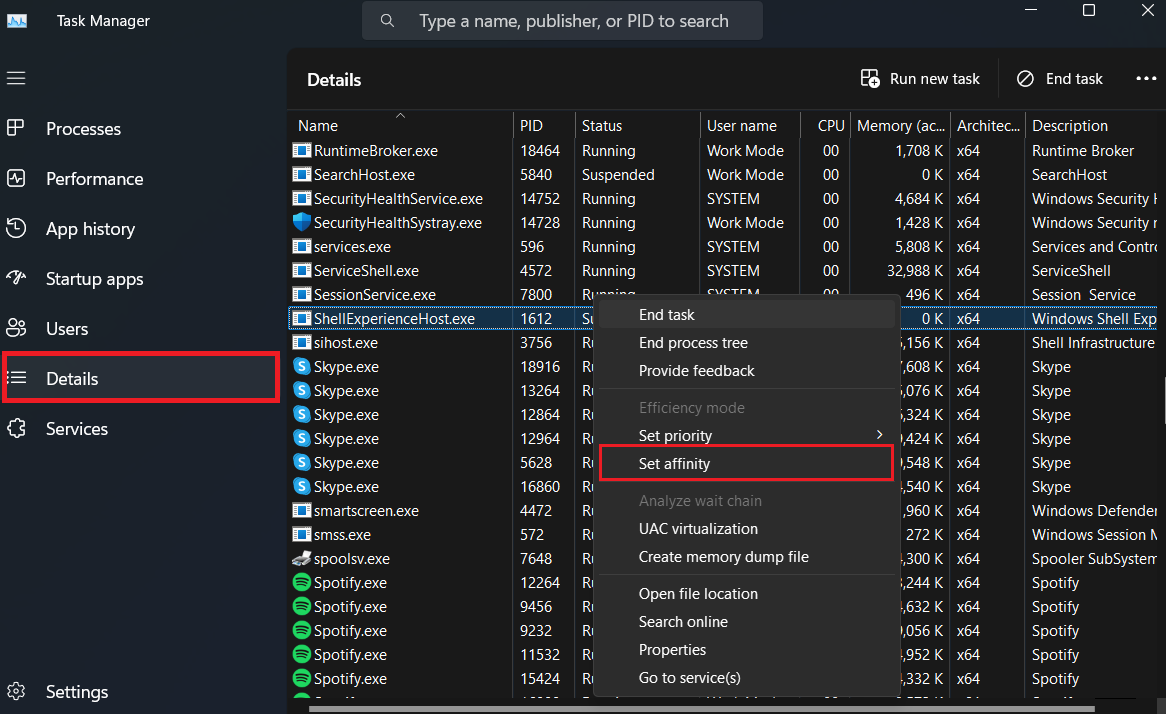
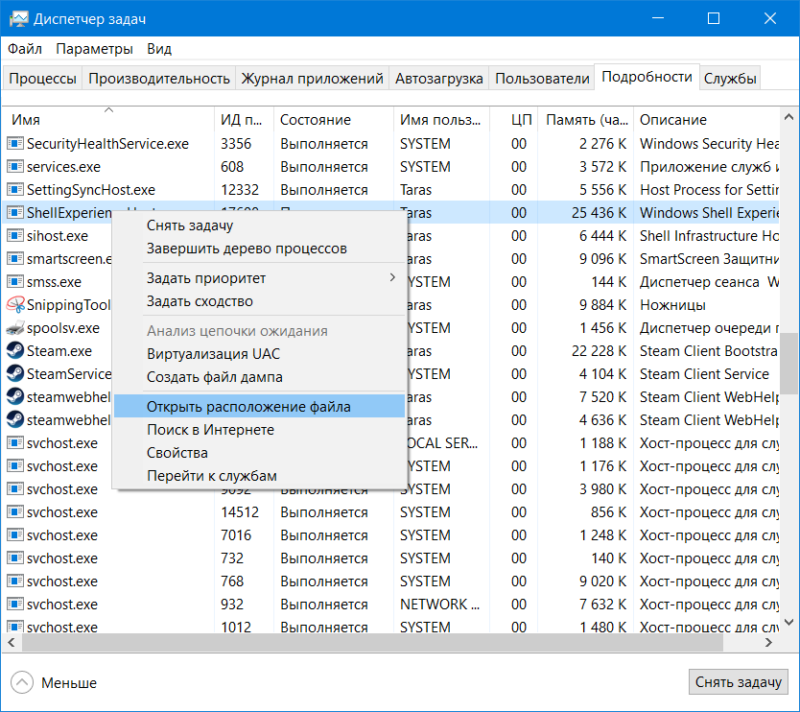
  1. Откройте Диспетчер задач (все возможный способы открыть Диспетчер задач описаны в статье «Как открыть Диспетчер задач») и перейдите на вкладку Подробности.
  2. Найдите в списке процессов ShellExperienceHost.exe. Кликните на строчку Имя, чтобы отсортировать процессы по алфавитному порядку и скорее найти нужный вам.
  3. Нажмите правой кнопкой мыши по ShellExperienceHost.exe и выберите Открыть расположение файла.
    Windows Shell Experience Host (3)

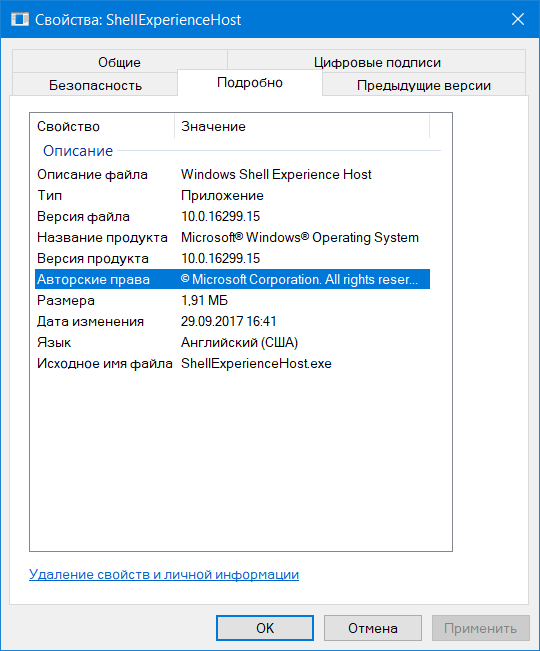
  4. Система должна открыть Проводник по адресу C:\Windows\SystemApps\SHellExperienceHost_cw5n1h2txyewy. Файл ShellExperienceHost будет автоматически выделен.
    Windows Shell Experience Host (4)

  5. Далее кликните по файлу правой кнопкой мыши и выберите Свойства. Откройте вкладку Подробно и убедитесь, что описание соответствует аналогичному на скриншоте.
    Windows Shell Experience Host (5)

Если у вас все именно так, как мы описали, тогда Хост Windows Shell Experience точно не является вирусом, а причина повышенной нагрузки или потребления ресурсов заключается в другом. Попробуйте описанные выше способы, чтобы привести этот системный процесс в адекватное состояние.

Table of contents

  • What Is the Windows Shell Experience Host?
  • How to Fix the Windows Shell Experience Host High CPU Usage
    • Method 1: Update your operating system
    • Method 2: Turn off automated accent colors
    • Method 3: Disable slideshow background
    • Method 4: Disable transparency effects
    • Method 5: Check if the Shell Experience Host is malware
    • Method 6: Run an SFC scan
    • Method 7: Set a CPU usage limit for ShellExperienceHost.exe
    • Method 8: Delete recently installed applications
    • Method 9: Boot Windows in a clean environment
  • Causes of the High Windows Shell Experience Host CPU Usage
  • The Windows Shell Experience Host High CPU Usage: Fixed
  • FAQ

If you experience the high Windows Shell Experience Host CPU usag e occasionally, it’s usually not a big deal if it resolves quickly. However, if it starts affecting your system’s performance, triggers crashes, or makes Windows nearly unusable, you need to fix it right away.  Of course, regardless of the severity, you need to get to the bottom of it before it gets worse. If your memory usage is high because of the W indows Shell Experience Ho st, I have the right solution for you.   Let’s begin.

What Is the Windows Shell Experience Host?

The Windows Shell Experience Host, also known as ShellExperienceHost.exe, is the Windows component responsible for the window display feature of universal Windows applications.

It is the component of the Windows shell (basically, the graphical user interface on Windows) that specifically handles universal apps.

The Windows Shell Experience Host process handles universal app interface behavior concerning elements like the taskbar, Start menu transparency, calendar, clock, background behavior, etc.

Important

Normally, you won’t even notice that the Windows Shell Experience Host exists.

This is because it is not designed to be noticed. It typically consumes little to no CPU resources. In fact, it usually doesn’t use anywhere near the amount of processor resources reported by annoyed users.

How to Fix the Windows Shell Experience Host High CPU Usage

If you are having a “Windows Shell Experience Host suspended” issue, use the methods discussed below to resolve the problem:

Method 1: Update your operating system

Being on the latest version of Windows can help solve many bugs and glitches in earlier versions.

So, make sure that you have installed all available OS updates. Some minor updates contain bug fixes and patches for system errors.

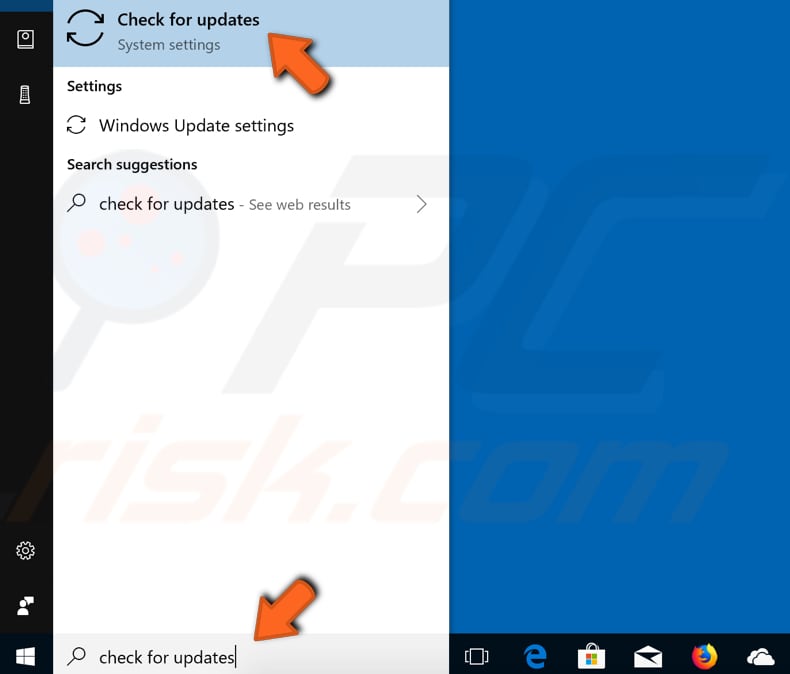
Here’s how to check for updates for your OS:

Windows 10

  • Right-click the Start menu icon and select Settings to launch the Settings app.
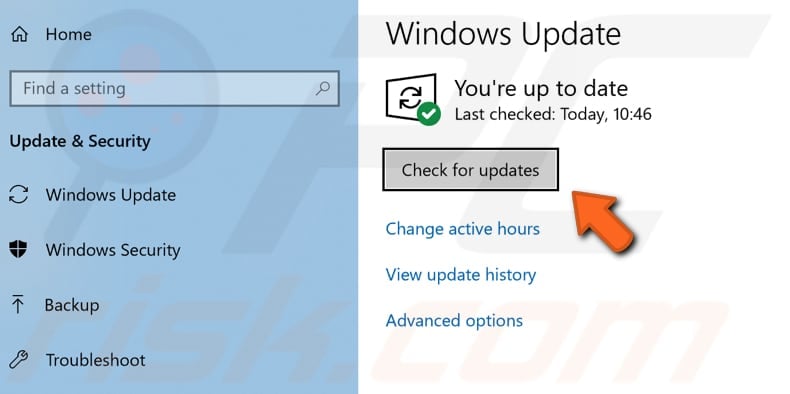
  • On the main Settings screen, select Update & Security .

Select Update & Security

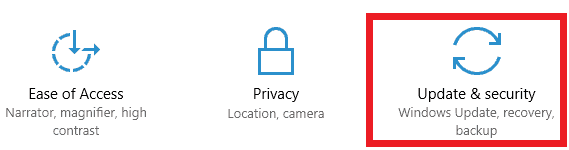
  • Switch to the Windows Update tab on the Update & Security screen and click the Check for updates button.
  • The OS will check the Windows Update servers and download any available updates.
  • After downloading the updates, you can reboot your system to start installing them or schedule the reboot for later.

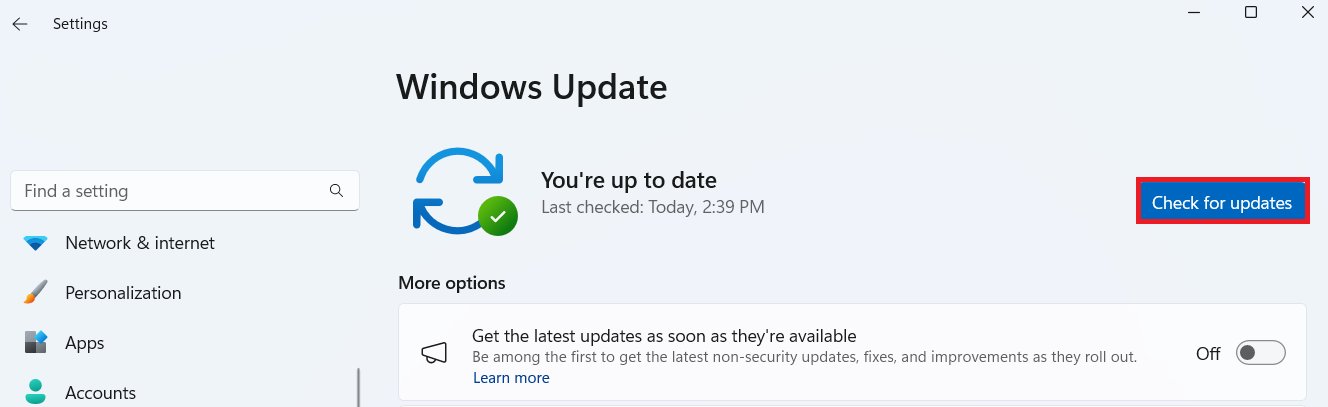
With the latest OS installed, ShellExperienceHost.ex e and other system processes should no longer use more than the expected CPU percentage.  Windows 11 

  • Open the Settings window and select Windows Update.  

Select Windows Update

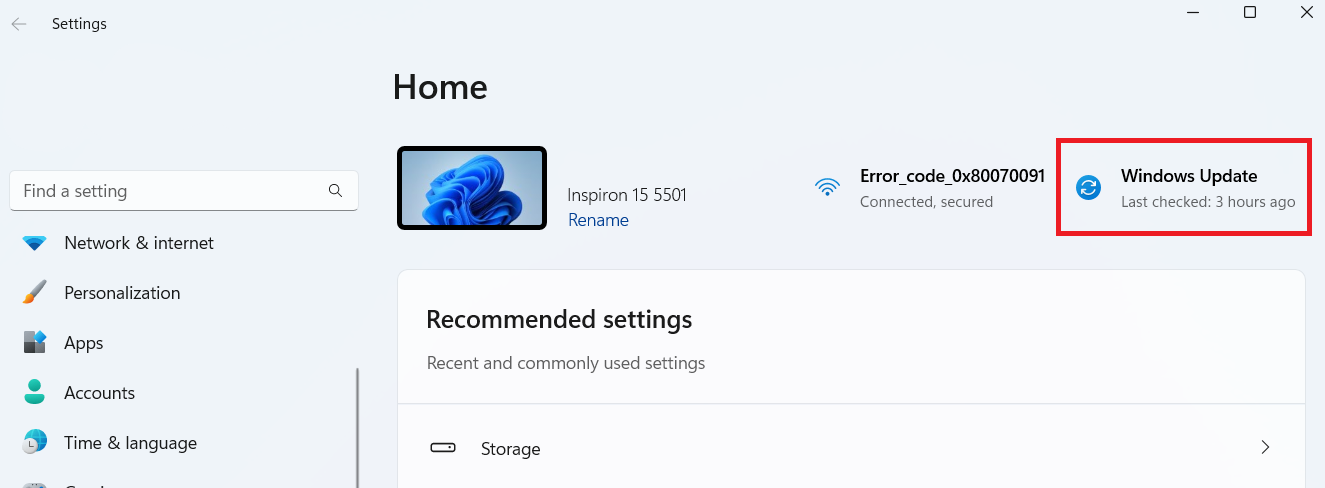
  • Click on Check for updates to install any available updates. 

Select Check for updates


Related: Timeline of All Windows OS Versions: From Start to Now


Method 2: Turn off automated accent colors

The Shell Experience Host process makes visual changes to your desktop and its background. The more changes are made on the desktop, like creating custom themes , the more work the process has to do and the more CPU it uses. This may be the cause of the S hell Experience Host’s high CPU usa ge on PCs whose desktop background is a slideshow.

In addition, your PC picks a new accent color by default to match the new background image. And that makes the process even more complicated.

Try turning off automatic accent colors to lessen the CPU consumption. Here’s how to do it:

  • Press Windows + I to open the Settings window. 
  • On the main Settings screen, select Personalization .
  • Then, switch to the Colors tab.

Switch to the Colors tab

  • Scroll down the Colors tab to the Choose your accent color section.
  • Untick the Automatically pick an accent color from my background checkbox.

Untick the Automatically pick an accent color from my background option

  • Exit the Settings app and check the CPU usage of ShellExperienceHost.exe in Task Manager after a few minutes. 
  • Your issue has been fixed if the Shell Experience Host process now uses a moderate to low CPU percentage.

However, if the CPU usage by S hellExperienceHost.exe keeps jumping, try the next solution.

Method 3: Disable slideshow background

If turning off automatic accent colors doesn’t help, changing your background style altogether may yield a better result.

You can switch the slideshow style to a solid color or choose a static picture instead. Since either alternative is fixed, the W indows Shell Experience Hos t will have less work to do, and this can stop the 100% CPU usage . 

Follow the steps below for Windows 11: 

Note

Windows 10 also has a similar process to turn off your slideshow background. 

  • Launch your Settings app by pressing Windows + I.
  • On the main Settings screen, select Personalization , and click on Background

Select  <i>Personalization </i>, and click on  <i>Background </i>» src=»https://www.auslogics.com/en/articles/wp-content/uploads/2024/03/Screenshot-7-1.png»></p>
<div class= Картинка с сайта: www.auslogics.com

  • Click on Picture or downward arrow to expand the options and select Solid color or Picture

Click on  <i>Picture </i> or downward arrow to expand the options and select  <i>Solid color </i> or  <i>Picture </i>» src=»https://www.auslogics.com/en/articles/wp-content/uploads/2024/03/Screenshot-8-1.png»></p>
<div class= Картинка с сайта: www.auslogics.com

Check the process in Task Manager after a few minutes. If the Shell Experience Hos t process now uses a moderate to low CPU percentage, the problem has been fixed.

Method 4: Disable transparency effects

Another reason you could be experiencing too much CPU usage on the Windows Input Experience is the transparency effects. Try turning it off to see if that fixes the problem:
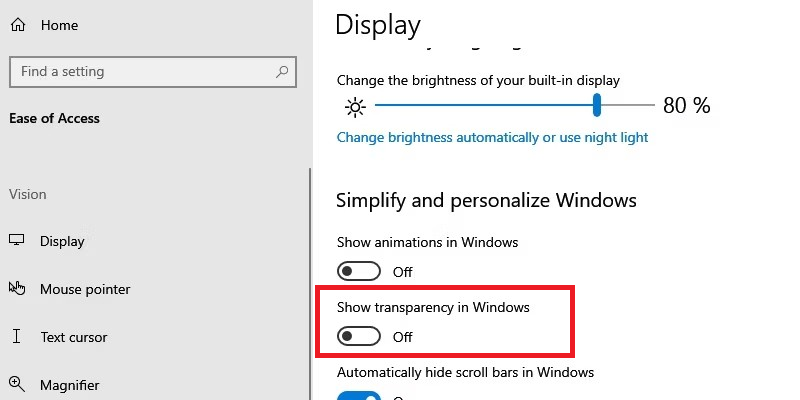
Windows 10 

  • Open the Settings window and head to System .
  • Select Ease of Access and select Display
  • There, you should see a Show transparency in Windows toggle.
  • Turn it off if it’s on. 

You will see the Show transparency in Windows toggle

Windows 11

  • Press Windows + I on your keyboard to open the Settings app.
  • Scroll down and select Accessibility .  
  • Then, choose Visual effects .

Select Visual effects

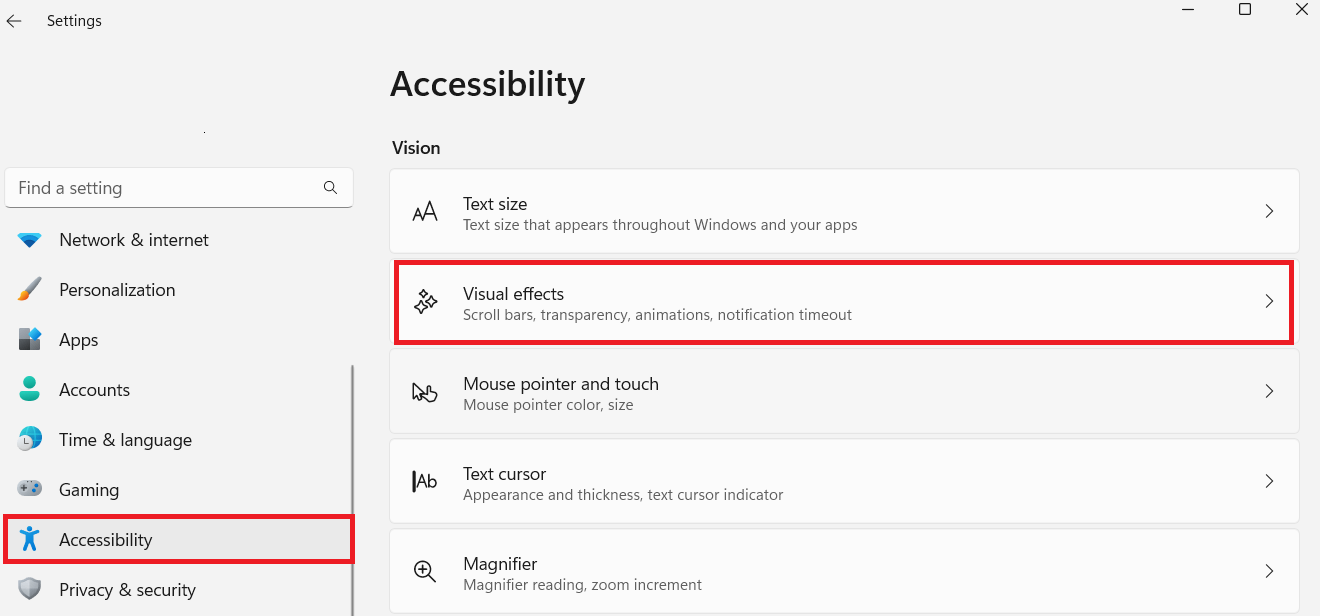
  • Toggle the On/Off button beside Transparency effects to disable it. 

Toggle the  <i>On/Off </i> button beside  <i>Transparency effects </i> to disable it » src=»https://www.auslogics.com/en/articles/wp-content/uploads/2024/03/Screenshot-17-2.png»></p>
<div class= Картинка с сайта: www.auslogics.com

Method 5: Check if the Shell Experience Host is malware

When you see that the process is acting up, it could be the workings of malware . The first step is to check if the Shell Experience Host is legit.  Follow the short steps below to check:

  • Right-click the process in Task Manager and select Open file location .
  • If Windows Explorer opens to this location path, it’s not malware:
C:\Windows\SystemApps\ShellExperienceHost_cw5n1h2txyewy 

Enter the following command: C:WindowsSystemAppsShellExperienceHost_cw5n1h2txyewy

However, other types of malware are more sneaky. You can use your Windows Defender or antivirus to check your PC. Here’s how: 

  • Open your Windows Security. Just type the name in your search bar to open it. 
  • Click on Virus & threat protection

Click on Virus & threat protection

  • Select Scan options , click on Full scan , and hit the Scan now button. 

Select  <i>Scan options </i>, click on  <i>Full scan </i>, and hit the  <i>Scan now </i> button » src=»https://www.auslogics.com/en/articles/wp-content/uploads/2024/03/Screenshot-20-1.png»></p>
<div class= Картинка с сайта: www.auslogics.com

Wait for the process to complete and check if the issues have been resolved.

PRO TIP

Even though Windows Defender has improved over the years, reputable third-party software, such as Auslogics Anti-Malware , performs a deeper scan.

It’s excellent at catching malicious items your antivirus may miss, from spyware and viruses to suspicious files. And it complements any app on your system.

Method 6: Run an SFC scan

If the methods above haven’t helped, you can run a System File Checker scan in Command Prompt or PowerShell to resolve the problem.

Note

The SFC utility is built into Windows and can repair system files. Since the W indows Input Experience is a system component, the usage jumps could result from problems with related system files.

Hence, you can use the SFC tool to find and fix system file errors. Follow the steps below to do so.

  • Right-click the Start menu and select Command Prompt (Admin) or PowerShell (Admin) . Any one will do. 
  • In the command-line window, type “sfc /scannow” and hit Enter to begin the scan.

Type in sfc /scannow

When the scan is done, reboot the computer. The SFC tool is good at finding and fixing corrupted system files .

However, if this solution doesn’t fix the S hellExperienceHost.exe’s high CPU usag e, you can still try a few possible fixes.

Method 7: Set a CPU usage limit for ShellExperienceHost.exe

Task Manager is much more than a simple process overview table. You can use it to perform specialized tweaks, such as setting a limit on how a process should use the CPU resource. When you limit the process’s CPU usage, it cannot use more than the percentage of processor power you have stipulated. This will free up processor power for other programs that need it. Here’s how you can limit the W indows Input Experience for Windows 11, but the same steps apply to Windows 10.

  • Right-click the Start menu and select Task Manager .
  • Click the Details tab.
  • Scroll down the list to the ShellExperienceHost.exe process. If you’re using Windows 11, you can use the search bar. Just enter the name, and it’ll pop up. 
  • Right-click the process and select Set affinity .

Select Set affinity

  • Under Which processors are allowed to run “ShellExperienceHost.exe”? set your processor affinity to one or two processor cores.

Under  <i>Which processors are allowed to run “ShellExperienceHost.exe”? </i> set your processor affinity to one or two processor cores » src=»https://www.auslogics.com/en/articles/wp-content/uploads/2024/03/Screenshot-11-2.png»></p>
<div class= Картинка с сайта: www.auslogics.com

The Shell Experience Host process doesn’t really perform any intensive tasks, and the CPU power it needs is modest at best. So, you can set affinity to one or two processor cores without any issues.

Method 8: Delete recently installed applications

Windows is a collection of programs and processes that run in the background. It is no big surprise that some of these programs occasionally conflict.

Unfortunately, some processes are critical to Windows’s operation. If a third-party program conflicts with a system component like the Windows Shell Experience Host, the PC can experience various issues.

If you started experiencing the issue after recently installing an application, delete it to see if that fixes the problem.

PRO TIP

However, the best method is to use a PC optimizer like Auslogics BoostSpeed . It can help you monitor the resource usage and system logs to pinpoint what’s causing the conflict.

Of course, it also helps to fix system issues, boost PC performance, tweak memory allocation, and make many other computer-enhancing changes.

Method 9: Boot Windows in a clean environment

To manually determine whether any programs conflict with the Shell Experience Host process, perform a clean boot and check whether the CPU usage of the Shell Experience Host is now stable.

Note

A clean boot disables third-party drivers and startup items and boots Windows, mostly exclusively with essential Microsoft services. 

This helps you to safely troubleshoot your issues without the risk that a third-party app will interfere.

To clean boot Windows, follow these steps:

Type in msconfig

Untick the  <i>Load startup items </i> checkbox » src=»https://www.auslogics.com/en/articles/wp-content/uploads/2024/09/screenshot-13.png»></p>
<div class= Картинка с сайта: www.auslogics.com

Hide all Microsoft services

Restart the computer to boot into a clean environment. Now, check how the Windows Shell Experience Host behaves during a clean boot.  If the CPU usage is minimal, one of the disabled services, drivers, or startup items might conflict with the S hell Experience Hos t process. You can narrow down the conflicting third-party items by returning to System Configuration, enabling half of the disabled services, and rebooting the machine.  Keep doing this until you’ve found the driver, startup item, or service causing the spike in the CPU usage by ShellExperienceHost.exe .


Also read:How to Reduce High CPU Usage by RAVBg64.exe


PRO TIP

If a corrupted driver is the cause of the issue, we recommend using Auslogics Driver Updater . This software checks your system for driver issues, gives you a detailed report on missing or outdated drivers, and lets you quickly update them to the latest manufacturer-recommended version.

Causes of the High Windows Shell Experience Host CPU Usage

Here are the reasons why you could be experiencing high memory utilization in your Shell Experience Host:

It is possible to mistake a rogue executable for the real ShellExperienceHost.exe. For example, cybercriminals have been known to use the Trojan miners ShellExperienceHost.exe and MicrosoftShellHost.exe to mine for the Monero cryptocurrency using victims’ CPUs.

Issues with the W indows Shell Experience Host high CPU usag e may also come from corrupted or outdated drivers . 

Although generally helpful, there are occasions when an update could bring about a bug that causes the W indows Shell Experience Ho st to use a lot of CPU power.

Software conflicts are usually caused by third-party tools that might not be compatible with your system or some programs on your computer.

The Windows Shell Experience Host High CPU Usage: Fixed

The Windows Shell Experience Host process is an essential system component. So, it’s not advisable to delete or disable it. However, you can disable it to prevent memory usage spikes.

That said, the solutions discussed in this guide should help you fix any Windows Input Experience issue you may be experiencing.

Would you be kind enough to let us know which solution worked for you? And share with your friends who might be having similar issues.

FAQ

It’s generally not a good idea to disable this process because it’s a crucial part of the Windows OS. It can cause system instability, and you may not be able to use your desktop environment. If the Shell Experience Host is causing your CPU resource to rise, implement the solutions discussed on this page to fix the problem.

Yes. Windows Explorer is tasked with managing graphical user interface and file systems. So, you can refresh it to fix the problem without causing any issues. To do that, go to Task Manager and search for the process. Then, right-click on it and select Restart.

Resetting your Windows is a viable option, but it is a drastic measure, which may not be necessary. You should be able to fix the problem by going through the steps we’ve outlined. 

However, if, for some reason, you’re still getting the high CPU usage, you can proceed with the rest. But you should back up your important data to be on the safer side.

No. The process itself is an official Windows component. However, some viruses and malware could infect your computer and pose as the S hellExperienceHost.ex e process. You can scan your system for malware just to be sure.

Источник

Windows Shell Experience host or shellexperiencehost.exe is a Microsoft Windows Process which is responsible for presenting built-in Universal apps in windows interface. It controls various graphical elements and handles desktop background behavior especially when it is set to the slideshow. Windows is running with hundreds of background processes. These processes will consume some part of your RAM and Processor but sometimes these services started to consume more processing power.

If you notice that any process on your Windows system is using more CPU than it required, then you have to fix it because it will produce more heat. This is the same reason for Windows Shell Experience Host that is using 30-35% of CPU. Today we are going to fix this shellexperiencehost.exe High CPU usage issue. First of all, make sure that you are using the latest version of Windows 10.

windows shell experience host

Fix Windows Shell Experience Host High CPU

Basically, Windows Shell Experience host process is supposed to use less CPU and memory resources, but according to some users sometimes it starts using high CPU  and memory resources as high as 200 MB memory space and 25-30% CPU. So to fix Windows Shell Experience host high CPU and memory usage, try the below solutions and resolve your issue.

Method 1 – Check for Updates

Step 1: Open Settings app from the Start menu.

Step 2: In the Settings tab, Click on Update & Security.

microsoft windows shellexperiencehost.exe

Step 3: Under Update Status, Click on Check for Updates.

shell infrastructure host

Step 4: If there are any updates available, then windows will download them for you.

windows shell experience host high cpu usage

Method 2 – Change your Desktop to Static Background

Step 1: Go to the Start menu and open the Settings app.

Step 2: In the Settings window, select Personalization.

Personalization settings

Step 3: Under the Background option, select Solid Color from the drop-down menu.

Tip: If this method solves your problem, then you can also try Picture from the drop down menu and choose any picture to set as your wallpaper.

windows shell experience host high memory usage

Method 3 – Turn off Automatic Color Changing

Step 1: Open settings from the start menu.

Step 2: Choose Personalization option from the settings window.

Personalization

Step 3: In the left pane, navigate to a Color section.

Step 4: Now Uncheck the option “Automatically pick an accent color from my background”.

Turn off Automatic Color Changing

Method 4 – Run System File Checker

Step 1: Press Windows + x and select Command Prompt (Admin).

Step 2: Then type the following command and hit Enter.

sfc/scannow

windows shell experience host high cpu and memory usage

Step 3:  Windows will look corrupt files to repair. if there are any corrupt files which windows can’t repair open the windows in safe mode and repeat the above steps.

Also Read:

Method 5 – Run the System Maintenance Troubleshooter

Step 1: Press Windows key + x at a time and select Control panel from the menu.

Step 2: In the control panel, go to view by options and choose Large icons.

Contol panel options

Step 3: Now, Scroll down and select the Troubleshooting option.

Troubleshooting

Step 4: Under System and Security, choose Run maintenance tasks.

How to fix windows shell experience host

Step 5: In the System Maintenance window, click on Next.

System maintenance

Step 6: Now choose “Try troubleshooting as an administrator”.

Troubleshoot as an administrator

Step 7: After the troubleshooting has completed, it will fix the issues if windows found any.

fix windows shell experience host

Method 6 – Perform Clean Boot

Step 1: Hold Windows key + r to open the run command

run dialog box

Step 2: Type msconfig and hit enter.

Step 3: From the General tab, click Selective startup and Uncheck the option “Load Startup items”.

PRO TIP: Make sure that Use original boot configuration and Load system services are checked.

System configuration

Step 4: Then, Go to Services tab, and check the “hide all Microsoft services” option. After that, Click on Disable all option.

system configuration

Step 5: To apply changes made, hit enter and then OK. Now, restart your system

Step 6: Check whether the problem solved or not, if still continues then this time uncheck both the options load system services and load startup items and repeat steps 4 and 5

fix shellexperiencehost.exe

Can I End or Disable Windows Shell Experience Host?

No, you cannot Disable Windows Shell Experience host. But to fix this problem you can temporarily End this process. But again windows will start the process within a few minutes.

To disable the Windows Shell Experience Host or shellexperiencehost.exe, follow the below steps:

Step 1: Hold Ctrl+Shift+Esc Keys at a time and open Task Manager.

Step 2: In the processes tab, find Windows Shell Experience host and right click on it. Now select End task to disable it

Thanks for reading this article! I hope this guide helps you in fixing your issue. if you still have any doubts, please don’t hesitate to ask us by commenting below.

Источник

How to Fix Windows Shell Experience Host High CPU or Memory Usage on Windows 10

Windows Shell Experience Host (shellexperiencehost.exe) is part of Microsoft Windows and is responsible for displaying universal apps in a ‘windowed’ interface. In some cases, this process may cause high CPU or Memory usage. In this article, we show how to fix this issue.

windows shell experience host high cpu usage

Under normal circumstances, the Windows Shell Experience Host process should not use any CPU resources, only having small usage when graphical units are changed (after which, CPU usage returns to normal — usually, zero). Having 25% or higher CPU usage caused by this process is abnormal behavior and indicates a problem that needs addressing.

As mentioned earlier, Windows Shell Experience Host is part of Microsoft Windows and is a genuine process. However, it could be a trojan using a very similar name to avoid raising suspicion in some cases. If it is not a virus, malware, or trojan, you can be reassured that it is a legitimate process.

You could kill the Windows Shell Experience Host process using Task Manager, but it will restart the next time Windows starts. There are other ways to reduce high CPU or Memory usage caused by this process, and these are detailed in the guide below.

Video Showing How to Fix Windows Shell Experience Host High CPU Usage:

Table of Contents:

Download Computer Malware Repair Tool

It is recommended to run a free scan with Combo Cleaner — a tool to detect viruses and malware on your device. You will need to purchase the full version to remove infections. Free trial available. Combo Cleaner is owned and operated by Rcs Lt, the parent company of PCRisk.com read more.

Update Windows

First, check for Windows Updates and update Windows if there are any outstanding. When Windows 10 was first released, the problem of high CPU or Memory usage caused by the Windows Shell Experience Host process was very common. The problem became less common with each Windows Update released.

To check for Windows Updates, type «check for updates» in Search and click the «Check for updates» result.

update windows step 1

You should be automatically directed to the Windows Update section. Click «Check for updates». Windows will start checking for updates. If there are updates available, install them.

After installing updates, restart your computer and see if Windows Shell Experience Host is now behaving normally.

update windows step 2

[Back to Table of Contents]

Run System Maintenance Troubleshooter

System Maintenance Troubleshooter is a Windows tool that automatically fixes any detected problems relating to maintenance tasks. It fixes broken shortcuts, disk volume errors, unused desktop icons, etc.

To run the System Maintenance Troubleshooter, open the Run dialog box (by pressing the Windows key + R) and type «msdt.exe -id MaintenanceDiagnostic», and then press Enter to run it.

run system maintenance troubleshooter step 1

Before you start troubleshooting maintenance problems, remember that you will need to use your administrator account to run System Maintenance Troubleshooter.

In the System Maintenance window, click «Advanced» and «Run as administrator». Click «Next» and follow the instructions.

run system maintenance troubleshooter step 2

[Back to Table of Contents]

Scan Your System for Malware

As mentioned in our introduction, it is possible that Windows Shell Experience Host is not genuine and is actually a trojan or some other threat. You can use Windows Defender (a built-in antivirus program), which protects your computer against viruses, spyware, and other malicious software. Alternatively, you can run other third-party antivirus software if installed.

To run a full system scan using Windows Defender, type «virus» in Search and click on the «Virus & threat protection» result.

scan your system for malware step 1

In the Virus & threat protection window, find and click the «Run a new advanced scan» option.

scan your system for malware step 2

You will see a list of advanced scans. We recommend that you choose the «Full scan» option, which will check all files and running programs on the hard disk but take some time (usually more than an hour) to complete.

To start a full scan, click «Scan now» when the «Full scan» option is selected.

scan your system for malware step 3

You can also choose a virus/malware scanner from our Top anti-malware list. The list consists of well-known top spyware removers and will help you choose the right software for your computer’s protection. Find the list by clicking this link.

[Back to Table of Contents]

Use a Static Background

A slideshow background is one of the most common reasons for high CPU or Memory usage caused by the Windows Shell Experience Host. If you are not using a slideshow background, skip to the next step.

If you are using the slideshow background, switch the background to static. Right-click on the desktop background and select «Personalize» from the contextual menu.

use static background step 1

Make sure that your background is set to the «Solid color» or «Picture» option.

use static background step 2

[Back to Table of Contents]

Disable Automatic Color Pick

If the «Automatically pick an accent color for my background» option is enabled, this could be why Windows Shell Experience Host uses higher CPU or Memory usage than normal.

To ensure this option is disabled, right-click on the desktop background and select «Personalize» from the contextual menu. Then select the «Colors» section on the left pane and ensure that the «Automatically pick an accent color for my background» feature is disabled.

Additional tip: also disable «Transparency effects». You can find this feature under «More options» in the Colors section.

disable automatic color pick

[Back to Table of Contents]

Run System File Checker

If none of the methods mentioned above solve the problem, run the System File Checker. System File Checker is a Windows utility that allows users to scan for corruptions in Windows system files and restore them. If there are any corrupted driver files, this tool might fix the problem. You must run an elevated Command Prompt to perform an SFC scan.

Open Command Prompt using administrative privileges by typing «command prompt» in Search, right-clicking the «Command Prompt» result, and selecting the «Run as administrator» option from the contextual menu.

run system file checker step 1

Now type the «sfc /scannow» command. Press Enter on your keyboard to execute this command. System File Checker will start and take some time to complete the scan. See if the Windows Shell Experience Host process CPU usage returns to normal.

run system file checker step 2

We hope that one of the methods above solves the problem and the Windows Shell Experience Host process no longer uses extensive CPU or Memory resources.

If you know of other solutions to this problem not mentioned in our guide, please share them with us by leaving a comment below.

[Back to Top]

Источник

Понравилась статья? Поделить с друзьями:
0 0 голоса
Рейтинг статьи
Подписаться
Уведомить о
guest

0 комментариев
Старые
Новые Популярные
Межтекстовые Отзывы
Посмотреть все комментарии
  • Настройка планшета wacom windows 10
  • Быстрое переключение пользователей windows 7 отключить
  • Пропали звуки на компьютере windows 11
  • 12 простых способов ускорить компьютер на windows 10
  • Не работают динамики на ноутбуке асус windows 10