
Host Process for Setting Synchronization High CPU is a common issue that many computer users face. It can cause slow performance, crashes, and overall frustration. But did you know that this problem is often caused by outdated or corrupted device drivers?
Host Process for Setting Synchronization High CPU is a process in Windows that handles the synchronization of system settings. When this process consumes too much CPU power, it can be a sign of underlying issues that need to be addressed. One possible solution to this problem is to update your device drivers. Keeping your drivers up to date can improve system performance and prevent issues like high CPU usage.
If you’re experiencing high CPU usage due to the «Host Process for Setting Synchronization,» here’s what you can do to resolve the issue:
- Open Task Manager by pressing Ctrl + Shift + Esc.
- Go to the «Processes» tab and locate «Host Process for Setting Synchronization.»
- Right-click on it and choose «End Task.»
- If the issue persists, open the «Services» tab in Task Manager.
- Scroll down and find «SysMain.»
- Right-click on it and select «Restart.»
By following these steps, you should be able to reduce the CPU usage caused by the «Host Process for Setting Synchronization.»

Introduction
The Host Process for Setting Synchronization (SettingSyncHost.exe) is a crucial component of the Windows operating system that manages the synchronization settings for various Microsoft services and applications. It runs in the background to ensure that your system settings are synchronized across devices and platforms.
However, some users have reported encountering high CPU usage by the Host Process for Setting Synchronization, causing their systems to slow down and become unresponsive. In this article, we will explore the possible causes of this issue and provide troubleshooting steps to help you resolve it.
Understanding the Host Process for Setting Synchronization
The Host Process for Setting Synchronization is responsible for managing the synchronization settings for various Microsoft services, such as OneDrive, Windows settings, and Universal Windows Platform (UWP) apps. It ensures that your system settings, including themes, passwords, language preferences, and app settings, are consistent across devices.
When you sign in to a Microsoft account on a Windows device, the synchronization process begins. The Host Process for Setting Synchronization collects the settings from your account and applies them to your system. It also monitors any changes you make to the settings and syncs them with your other devices.
This synchronization process allows you to have a seamless experience across different devices. For example, if you change your browser preferences on one device, the changes will be reflected on all other devices linked to the same Microsoft account.
While the Host Process for Setting Synchronization is an essential component, certain factors can cause it to consume excessive CPU resources, leading to high CPU usage.
Causes of High CPU Usage by the Host Process for Setting Synchronization
Several factors can contribute to the high CPU usage by the Host Process for Setting Synchronization:
- Incompatible or outdated software
- Corrupted system files
- Excessive synchronization activity
- Conflicts with other processes or services
- Malware or virus infections
Identifying the specific cause of the high CPU usage is crucial for implementing the appropriate solution. In the following sections, we will explore some troubleshooting steps to help you resolve this issue.
Troubleshooting Steps
Troubleshooting Steps
If you are experiencing high CPU usage by the Host Process for Setting Synchronization, you can try the following troubleshooting steps:
1. Update Windows and Apps
Ensure that your Windows operating system is up to date by installing the latest updates. Similarly, check for updates for the Microsoft Store apps and other Microsoft services that rely on synchronization. Outdated software can have compatibility issues and may trigger high CPU usage. Updating them can resolve such issues.
To update Windows:
- Open the Settings app by pressing Windows key + I.
- Navigate to «Update & Security» and click on «Windows Update» in the left sidebar.
- Click on «Check for updates» and install any available updates.
To update Microsoft Store apps:
- Open the Microsoft Store app.
- Click on the three-dot menu in the top-right corner and select «Downloads and updates.»
- Click on «Get updates» to update all installed apps.
After updating, check if the high CPU usage issue persists.
2. Run a Full System Scan for Malware
Malware or virus infections can also cause high CPU usage. Perform a full system scan using reliable antivirus software to detect and remove any malicious programs from your computer.
If you don’t have any antivirus software installed, consider using Windows Defender, the built-in antivirus program in Windows:
- Open the Settings app by pressing Windows key + I
- Navigate to «Update & Security» and click on «Windows Security» in the left sidebar.
- Click on «Virus & threat protection» and select «Quick scan» or «Full scan.»
- Follow the on-screen instructions to complete the scan and remove any detected threats.
After scanning and removing any malware, check if the high CPU usage issue is resolved.
3. Perform System File Checker Scan
Corrupted system files can also lead to high CPU usage. Fortunately, Windows provides a System File Checker (SFC) tool that can help repair and restore missing or corrupted system files.
Follow these steps to run an SFC scan:
- Open Command Prompt as an administrator. Press Windows key + X and select «Command Prompt (Admin).» If you’re using Windows 10 version 1903 or later, you can also use PowerShell (Admin).
- Enter the following command and press Enter:
sfc /scannow - Wait for the scan to complete. It may take some time.
- If any errors are found, the SFC tool will attempt to repair them automatically. Restart your computer after the scan completes.
After performing the SFC scan, check if the high CPU usage by the Host Process for Setting Synchronization is resolved.
Conclusion
The Host Process for Setting Synchronization plays a crucial role in synchronizing your system settings across devices, but it can encounter high CPU usage due to various factors. By following the troubleshooting steps outlined in this article, you can identify and resolve the causes of the high CPU usage issue.
Host Process for Setting Synchronization High CPU
The Host Process for Setting Synchronization, also known as ‘SettingSyncHost.exe’, is a system process in Windows that handles synchronization for various settings and preferences across different devices. This process runs in the background and is responsible for keeping settings up-to-date and consistent across multiple devices, such as PCs, laptops, and tablets.
However, in some cases, users may encounter high CPU usage by the Host Process for Setting Synchronization. This can result in slow system performance, increased heat, and excessive battery consumption.
To troubleshoot and resolve this issue, you can try the following steps:
- Disable sync for specific settings: Open the Settings app, go to «Accounts,» and disable sync for specific settings that you don’t require to be synchronized.
- Disable sync for all settings: If you don’t need any settings to be synchronized across devices, you can disable sync altogether.
- Update device drivers: Outdated or incompatible device drivers can sometimes cause high CPU usage. Update your drivers to their latest versions.
- Run a malware scan: Malware can also cause high CPU usage. Use a reliable antivirus software to scan your system for any malicious files or programs.
Key Takeaways — Host Process for Setting Synchronization High CPU
- The «Host Process for Setting Synchronization» is a Windows process that can sometimes cause high CPU usage.
- This process is responsible for synchronizing the settings of your computer and connected devices.
- High CPU usage by the «Host Process for Setting Synchronization» can lead to sluggish performance and reduced system responsiveness.
- One possible reason for high CPU usage is outdated device drivers, so updating them may help resolve the issue.
- You can use the Task Manager to identify and monitor the CPU usage of the «Host Process for Setting Synchronization.»
Frequently Asked Questions
Here are some commonly asked questions about the issue of Host Process for Setting Synchronization causing high CPU usage:
1. What is Host Process for Setting Synchronization?
The Host Process for Setting Synchronization is a Windows operating system process that is responsible for managing and synchronizing the settings of your computer. It helps ensure that changes made to settings are applied across all running applications and processes.
However, in some cases, this process can start using a high amount of CPU resources, causing your computer to slow down. This can happen due to various reasons, such as conflicts with other software or corrupted system files.
2. Why is the Host Process for Setting Synchronization consuming high CPU usage?
There can be several reasons why the Host Process for Setting Synchronization is consuming high CPU usage:
1. Conflicts with other software: The process may conflict with certain software installed on your computer, leading to high CPU usage.
2. Corrupted system files: If the system files required for the process to function properly are corrupted or damaged, it can result in high CPU usage.
3. Malware or viruses: In some cases, malware or viruses can hijack the Host Process for Setting Synchronization, causing it to use high CPU resources.
3. How can I fix the issue of high CPU usage caused by Host Process for Setting Synchronization?
To fix the issue of high CPU usage caused by the Host Process for Setting Synchronization, you can try the following solutions:
1. Restart your computer: Sometimes, a simple restart can resolve temporary issues and reduce CPU usage.
2. Update your operating system: Make sure your Windows operating system is up-to-date with the latest patches and updates. This can fix any known issues related to the Host Process for Setting Synchronization.
3. Scan for malware: Run a full system scan using a trusted antivirus program to check for any malware or viruses that may be causing the high CPU usage.
4. Check for conflicting software: Identify any recently installed software or updates that may be conflicting with the Host Process for Setting Synchronization. Uninstall or update these programs to resolve the issue.
5. Repair system files: Use the System File Checker tool to scan and repair any corrupted or damaged system files that may be causing the high CPU usage.
4. Can I disable the Host Process for Setting Synchronization?
Disabling the Host Process for Setting Synchronization is not recommended, as it plays a vital role in managing and synchronizing the settings of your computer. Disabling it can cause issues with the functioning of applications and system settings.
If you are experiencing high CPU usage caused by this process, it is better to troubleshoot and fix the underlying issue rather than disabling it.
5. Should I be concerned about the high CPU usage caused by Host Process for Setting Synchronization?
While high CPU usage caused by the Host Process for Setting Synchronization can be bothersome and slow down your computer, it is not necessarily a cause for immediate concern. However, it is recommended to investigate and fix the issue to restore normal system performance.
Continuously running at high CPU usage can strain your computer’s hardware and lead to increased power consumption and heat generation, which may impact its longevity. Therefore, it is advisable to address the issue to maintain optimal system health.
In conclusion, the Host Process for Setting Synchronization High CPU is a common issue that can cause your computer’s performance to slow down. Understanding the root causes, such as outdated drivers, software conflicts, or malware, is crucial in finding a solution.
To resolve this issue, you can start by updating your drivers and running a thorough virus scan. Additionally, disabling unnecessary startup programs and optimizing your computer’s performance settings may help alleviate the high CPU usage. If the problem persists, seeking professional help or contacting the software manufacturer for support is advised.
What is the Host Process for Setting Synchronization?
Popularly known as SettingSyncHost.exe, the file is used to sync system settings with other devices.
Therefore, when changes are made to one PC, they are reflected on other devices too. Windows Host Process can sync mail, wallpaper, scheduled services, Xbox, OneDrive, and other useful applications.
This process is found in the System32 folder and is known to be an important process on Windows. However, it causes various problems like High CPU Usage.

Many Windows users have reported facing this problem. Therefore, to resolve this problem, we explain how to fix 100% CPU usage caused due to settingsynchost.exe.
How to Fix the Host Process for Setting Synchronization with High CPU Usage Error?
Here, we explain the best methods to fix host processes for settings synchronization CPU usage.
Before we learn how to fix the Windows Host Process, let’s know about a tool that helps fix common Windows errors. This tool is called Advanced PC Cleanup. Using this best PC cleaning and optimization tool, you can fix PC problems and prevent various other problems from happening on the system. To use it, follow the steps below:
Step 1: Download and install Advanced PC Cleanup.
Step 2: Click “Start Scan Now” to start scanning the Windows registry system and other issues that could be causing PC problems.
Step 3: Click “Clean Now” to fix all issues.
That’s it. By following these 3 simple steps, you can fix most Windows-related problems. In addition to this, you will be able to recover space and speed up system performance.
To know more about Advanced PC Cleanup read the complete review.
Now, let’s come to the point and learn how to fix the host process for setting synchronization that has stopped working.
Method 1: Update Windows
To fix the Host Process for Setting Synchronization with high CPU usage error, we will try updating Windows. To do so, follow the steps below:
Note: When updating Windows, make sure you are connected to the Internet. If you are not online, you may not be able to update Windows.
Step 1: Press the Windows key + I and click Update & Security.

Step 2: Click Windows Update > Check for updates.

Step 3: If there are any pending updates, Windows will start downloading them. Once done, reboot the system to apply updates.
Now check the system and see if the settingsynchost.exe problem is resolved or not. If it still consumes High CPU resources move to the next step.
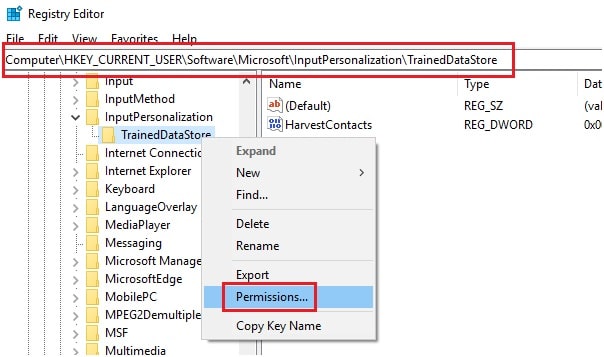
Method 2: Add Ownership for a Registry Key
When changes are made to Windows Registry Settings, the Host Process for Setting Synchronization problem occurs. To fix this problem, add ownership for a registry key. To do so, follow the steps below:
Step 1: Press the Win + R
Step 2: In Run Window, type regedit.exe and click OK. This will open the Registry Editor window.
Step 3: Now head to: HKEY_CURRENT_USER\Software\Microsoft\InputPersonalization\TrainedDataStore.

Step 4: Right-click TrainedDataStore > Permissions….
Step 5: Check the box next to Full Control > Apply > OK.
Step 6: Restart Windows and see if the Host Process for Setting Synchronization problem is resolved.
Additional Tip
PRO TIP: If you face High CPU Usage due to some problems with the system, try using Advanced PC Cleanup. You can download it by clicking here. This top PC cleaning tool will help fix most of the PC related errors in no time.
Method 3: Run Windows in Clean Boot
Running Windows in Clean Boot means only the essential services and drivers will run. To do so, follow the steps below:
1. Press Windows + R > type msconfig click on the OK. This will open the System Configuration window.
2. Click Services tab > check Hide All Microsoft Services option > Disable all.

Note: We recommend hiding Microsoft services because differentiating between essential and third party services is not easy for a novice.
3. Click Apply > OK to save settings.
4. Restart PC to apply changes. However, if you are doing something important, you can select Exit without restart.

5. After this, press the Ctrl+Shift+Esc key, and this will open the Task Manager window. Here click the Startup Tab.

6. Select apps and disable all startup items as there is no option to do this at once. You will have to disable them one by one.
7. Reboot your Windows 10 computer.
Your computer will now start with essential services. Now see if Host Process For Setting Synchronization High CPU is resolved or not.
If this too doesn’t work, you can try using PowerShell Script.
If you are a beginner, don’t try following this step. This is for only Advanced Users.
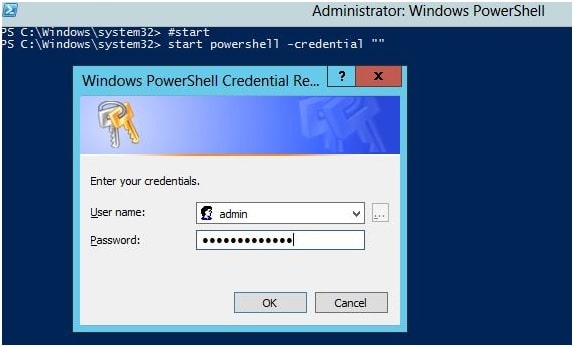
Method 4 – Run a PowerShell Script
The following script will kill the ‘SettingSyncHost.exe’ service from your computer every five minutes.
Note: You need to have admin rights to run PowerShell
1. Press Windows + X and select Windows PowerShell (Admin).
2. Paste the following code:
Get-ScheduledJob |? Name -eq “Kill SettingSyncHost” | Unregister-ScheduledJob

Register-ScheduledJob -Name “Kill SettingSyncHost” -RunNow -RunEvery “00:05:00” -Credential (Get-Credential) -ScheduledJobOption (New-ScheduledJobOption -StartIfOnBattery -ContinueIfGoingOnBattery) -ScriptBlock {

Get-Process | ?{ $_.Name -eq “SettingSyncHost” -and $_.StartTime -lt (::Now).AddMinutes(-5) } | Stop-Process -Force

}

3. When asked, enter admin account credentials.
4. After entering the details, check if SettingSyncHost is terminated. If it is still running, try restarting the PC.
5. Now check Host Process For Setting Synchronization should be stopped.
In addition to this, we suggest closing the host process to define synchronization. To do so, follow the steps below:
1. Press Windows key + I
2. Click Accounts
3. Select Sync your settings from left pane > disable synchronization settings.

Restart Windows and see settingsynchost.exe or Host Process For Setting Synchronization should now not be running.
Final Words
Using these simple steps, you can easily fix the Host Process for Setting Synchronization High CPU Usage. To fix other Windows-related errors, try using Advanced PC Cleanup. This excellent PC Cleaning tool can do wonders. You just need to give it a try.
Frequently Asked Questions-
Q1. How do I stop the host process for setting synchronization?
If you wish to stop the host process for Synchronization on your computer, follow the steps. Go to Start Menu>Settings>Accounts>Sync Your Settings. Here turn off the Sync Settings by clicking on the toggle button.
Q2. What is the host process for setting Synchronisation?
The host process for setting Synchronisation on your computer is located as SettingSyncHost.exe. It is used for syncing all the settings on your computer to all other devices.
Q3. What is SettingSyncHost EXE?
SettingSyncHost.exe is a system process that is required to synchronize the settings on your computer with other devices. Settings such as wallpaper, browsers, OneDrive, Xbox, Mail app services.
Q4. How do I disable Host Process for Windows Services?
If you see Windows Host Process consuming high CPU usage, you must not disable it as it is one of the important processes running for Windows.
Host Process for Setting Synchronization High CPU Usage: Understanding and Resolving the Issue
In the realm of computing, we often encounter various processes that operate in the background, ensuring that our systems run smoothly and efficiently. However, issues can arise, leading to performance hiccups and unexpected behavior. One such issue that many users have reported is high CPU usage by the «Host Process for Setting Synchronization.» This phenomenon can be perplexing, particularly for those who may not possess an in-depth technical understanding of system operations. This article aims to provide an in-depth exploration of this topic, detailing what the host process is, why it might be consuming excessive CPU resources, and potential measures to mitigate the issue.
Understanding the Host Process for Setting Synchronization
The «Host Process for Setting Synchronization» is part of the Windows operating system, specifically associated with the Windows Sync Center and the underlying functionalities that manage synchronization tasks. The Sync Center is a feature in Windows that allows users to manage data synchronization between their computer and network resources, such as offline files, mobile devices, or cloud storage services.
When multiple applications or services attempt to synchronize data, the host process serves as a facilitator, ensuring that data across different platforms remains consistent. It manages various synchronization tasks, such as file transfers, updates, and cataloging changes made in dual-access scenarios.
Why High CPU Usage Occurs
High CPU usage by the Host Process for Setting Synchronization can stem from multiple factors. Understanding these factors will provide insight into mitigating the issue effectively.
-
Frequent Synchronization Activities: If you’re working in an environment where frequent synchronization is necessary—like when you’re using OneDrive, SharePoint, or other cloud services—this process can become particularly active. Constant data changes can demand more resources to ensure updates are accurately reflected across platforms.
-
Corrupted Files: Corrupt files can cause the synchronization process to struggle, leading it to repeatedly attempt to sync these files. This continual struggle can significantly increase CPU load, as the process is forced to expend additional resources on a task that is ultimately failing.
-
Conflicts Within Sync Operations: When multiple services are trying to modify the same files or directories, conflicts can arise, causing the synchronization process to work overtime attempting to resolve these issues. This can lead to increased CPU usage.
-
Malware and Software Conflicts: Malware or conflicting software can sometimes latch onto system processes and exert undue stress on them. It is not uncommon for rogue software to exploit system resources for malicious purposes, leading to unusually high CPU consumption.
-
Outdated Software: An outdated version of Windows or the specific applications involved in syncing can lead to inefficiencies and bugs that cause high CPU usage.
-
Hardware Limitations: On systems with limited CPU resources or older hardware, even standard activities can lead to higher CPU utilization. When pushing the limits of your hardware, it’s not surprising that a routine task like synchronization can become a bottleneck.
Identifying High CPU Usage
To determine if the Host Process for Setting Synchronization is causing your high CPU usage, users can utilize the built-in Task Manager in Windows. The Task Manager allows you to view active processes and the resource consumption for each one. Here’s how you can check:
-
Open Task Manager: Right-click the taskbar and select «Task Manager» or press «Ctrl + Shift + Esc.»
-
Navigate to Processes: In the Task Manager, click on the «Processes» tab. This will display a list of running applications and processes, along with their CPU, memory, and disk usage.
-
Sort by CPU Usage: Click the CPU column to sort processes by their current CPU usage. Look for the «Host Process for Setting Synchronization» entry.
-
Monitor Usage: If this process consistently shows high CPU usage—typically over 50%—it may be an issue that requires further investigation.
Resolving High CPU Usage
Once you’ve identified that the Host Process for Setting Synchronization is consuming excessive CPU resources, there are several strategies you can employ to alleviate the issue.
-
Disable Offline Files: If you’re using Offline Files and do not need this feature, you can disable it. This action can significantly reduce the load on the synchronization process.
- Go to Control Panel > Sync Center > Manage Offline Files.
- Then click on the «Disable Offline Files» button.
-
Update Software and Windows: Keeping your operating system and applications up to date can mitigate bugs and inefficiencies that may cause high CPU usage.
- Go to Settings > Update & Security > Windows Update and check for updates.
- Similarly, check for updates for individual applications that might involve synchronization.
-
Check and Repair Corrupted Files: Use tools like the built-in System File Checker (SFC) or the DISM (Deployment Image Servicing and Management) tool to scan for and resolve system file corruption.
- Open Command Prompt as an administrator and run the command:
sfc /scannow - After that, you can use
DISM /Online /Cleanup-Image /RestoreHealth.
- Open Command Prompt as an administrator and run the command:
-
Review Sync Conflicts: Go through shared files and folders that may be involved in sync conflicts. Try to resolve any issues manually and avoid multiple applications modifying the same files simultaneously.
-
Temporarily Disable Syncing: If possible, temporarily disable syncing features in applications like OneDrive or SharePoint, and observe if this alleviates the CPU load.
- In OneDrive, for example, right-click the cloud icon in the taskbar, select «Pause syncing,» and choose a time frame.
-
Run a Malware Scan: Conduct a comprehensive malware scan using tools like Windows Defender, Malwarebytes, or other reputable antivirus software. Ensure your system is free from any potentially harmful programs that may exploit CPU resources.
-
Optimize Performance Settings: Adjust performance settings in Windows to better allocate resources. This can be done through the Control Panel under «System and Security» > «System» > «Advanced system settings» > Performance Settings.
-
Resource Allocation: On systems with limited hardware resources, consider closing other applications that consume high CPU resources or upgrading your hardware if consistent performance issues remain.
-
Monitor Disk Activity: Sometimes high disk usage can contribute to CPU load. Using the «Disk» column in Task Manager, monitor if any processes are excessively utilizing the disk and take action as needed.
-
Seek Technical Support: If you’ve tried the above methods and are still experiencing high CPU usage, consider seeking assistance from technical support or online forums for additional troubleshooting.
Preventing Future Issues
After resolving the immediate high CPU usage, there are best practices you can adopt to mitigate future occurrences:
-
Regular Maintenance: Periodically conduct system maintenance by updating software, checking for disk errors, and cleaning up unnecessary files.
-
Limit Third-Party Sync Applications: Avoid using multiple syncing applications simultaneously, as this can increase the risk of file conflicts and overload the host process.
-
Adjust Sync Frequency: If your work requires heavy syncing, consider adjusting how frequently devices sync or selecting fewer items to sync.
-
Use Cloud Services Wisely: Be discerning about which files you sync to the cloud and consider whether offline access is necessary.
-
Educate Yourself About Resource Management: Familiarize yourself with the basics of CPU and memory management. Understanding how resources work can empower you to make informed decisions about your system usage.
Conclusion
The Host Process for Setting Synchronization is an integral part of the Windows operating system, but when it starts consuming excessive CPU resources, it becomes a cause for concern. By understanding what this process is and what might lead to high usage, users can take proactive steps to diagnose and resolve performance issues. Whether it involves disabling features, updating software, or resolving conflicts, there are various ways to tackle the problem effectively. Implementing preventive strategies can help maintain optimal system performance and create a smoother computing experience in the long run. Maintaining awareness of the system’s health and regularly engaging in maintenance practices can prevent unnecessary slowdowns and keep your digital environment running seamlessly.
You are here: Home/ Windows/ Host Process For Setting Synchronization In Windows 10: 100% CPU Usage
Do you own a Surface Pro? Then you might have noticed your device is running with different Windows 10 OS versions. J
ust like other users, you may also face issues with the Host Process for Setting Synchronization. This process consumes 20% to 100% of your CPU resources in your Windows 10 PC. In this condition, your system runs with a snail’s pace.
What to do next? How to fix it? How to bring back the mint condition of your Surface Pro?

No need to worry! Check out our tutorial, direct from the expert’s desk. Go through to know it all. Your high CPU usage issue will be fixed as soon as you adjust the SettingSyncHost.exe– the associated file of the Synchronization host process.
Let’s start now!
The Host Process for the Setting Synchronization syncs all of your Computer’s settings with other devices efficiently. As in, if you personalize your wallpaper in one system, your other system’s wallpaper will also be changed automatically. Not only wallpaper but this process synchronizes the changes of your OneDrive, Internet Explorer, Xbox or other beneficial applications as well.

However, the associated file with this sync process is known as “SettingSyncHost.exe file”. You will find this file within the System32 folder. Many users assume it to be a virus, but this is not true at all. It’s somewhat an important and legitimate process in Windows 10. But the problem starts when it consumes too much of your system resources. We have surveyed through a number of community forums and found 100% CPU usage for the host process is a common error in Windows 10.
Now you have the basic knowledge regarding this process. It’s time to know how to disable it instantly?
How To Fix Setting Sync Host Error?
Many Windows 10 users have bypassed this error just by disabling this process in Windows 10. But it’s just a workaround, not a permanent fix. That’s why it keeps coming back with time. Anyway, our experts’ have found quite a hand full of potential fixes for you. Until Microsoft releases an update to fix the error, you can apply our troubleshooting methods to get rid of it.
Here you go!
Update Your Windows 10 OS
You might not aware of the recent Windows 10 update. Microsoft has released it as soon as they got to know about the high CPU usage error related to Setting Sync Host. So, if you haven’t updated your Operating System yet, follow the below process to do it and fix the error followed by other bugs.
- Firstly, press the Windows logo key + “S” button at a time
- Next, write “Windows Update” in the appearing search box and hit enter
- Now, the Windows Update window will be opened
- Here you will find a button named “Check for updates”
- Click on it and give it a few minutes to search for the latest OS version
- Once you see there is any pending update, install it as soon as possible
- Finally, restart your PC just after the 100% installation of the latest version
You are done! Check whether the issue is still there. If it is, perform our next troubleshooting steps to fix it.
Add Your Ownership For The Registry Key
Sometimes, the SettingSyncHost.exe try to write a distinct directory file but can’t because it is restricted to do so. Hence, it keeps trying to write the file again and again that leads you to high CPU usage error. You can take the ownership to see if it fixes the error.
Note: You have to have the administrative privileges to perform this step.
Let’s proceed now.
- Firstly, press the Windows logo key + “R” button at a time
- Next, type “regedit” in the appearing dialogue box and press the enter button
Now the registry editor will open, locate the path- “HKEY_CURRENT_USER\Software\Microsoft\InputPersonalization\TrainedDataStore\en-GB\2”
- After that, you have to right-click on the entry
- Then, select the “Permissions” option from the appearing list
- Next, hit the “Full Control” option for each user’s group turn by turn
- Finally, click on the “Apply” option to save changes
- At last, exit from there and restart your PC
Your issue must get sorted now. If it isn’t, check out the rest of our guidelines given below.
Run A PowerShell Script
You can write a PowerShell script if both of the above processes fail to heal your PC. To do so, you need to perform the below steps and have credentials for registering the job on your system.
- At first, right-click on the free space of your desktop
- Next, choose the “New” option from the appearing list
- Then, click on “Text Document” from the sub-menu of “New”
- It’s time to create the text document, name it as per your wish
- Now, double-click it to open your recently created text document to copy and paste the text-
“Get-ScheduledJob | ? Name -eq “Kill SettingSyncHost” | Unregister-ScheduledJob
Register-ScheduledJob -Name “Kill SettingSyncHost” -RunNow -RunEvery “00:05:00” -Credential (Get-Credential) -ScheduledJobOption (New-ScheduledJobOption -StartIfOnBattery -ContinueIfGoingOnBattery) -ScriptBlock {
Get-Process | ?{ $_.Name -eq “SettingSyncHost” -and $_.StartTime -lt ([System.DateTime]::Now).AddMinutes(-5) } | Stop-Process -Force
}“
- Once you are done, save this document by following- File> Save As> File Name
- Now, delete the file extension “.txt” in the file name portion and write “.ps1” (without quotes)
- Then, hit the “Save” button from the Save As window
- After that, go to the text document you have saved on your desktop and right-click it
- Now choose “Run with PowerShell” from the pop-up menu
- Next, put your credentials to log in to your administrator account
- Finally, check if the high CPU usage error still persists. The issue must get fixed after performing this solution. So you are good to go now!
Winding Up
We will advise you not to skip any step of our troubleshooting methods. Also, you have to perform each solution one by one. Still, if you got a query regarding Host Process for Setting Synchronization, get in touch with our professionals just by commenting in the below box. We will help you out instantly.
Fix Host Process For Setting Synchronization WIth High CPU. In this article, you will read what is Host Process For Setting Synchronization and how to fix the setting sync host error on Windows 10. This error usually occurs in the Windows version of Surface pro. Users face issues with the Host Process for Setting Synchronization. This error consumes a lot of CPU resources. The system will run at a languid pace and may also lag. This issue can be solved by setting the SettingSyncHost.exe–. This file is linked to the Synchronization host process.
What Is the Host Process For Setting Synchronization?
The Host Process for the Setting Synchronization syncs the computer’s settings with the other devices. If you make changes in one system, the changes will also take automatically in the other system. For example, the wallpaper changes in your OneDrive, Internet Explorer, Xbox or other beneficial applications as well.
The whole process is executed by the SettingSyncHost.exe file, which is present in the System 32 folder. Many users think that it is a virus, but they are wrong. It is an important procedure in Windows 10.
The problem arises when it uses 100% of CPU resources for the host processes. It is a common error in Windows 10.
How To Fix Host Process For Setting Synchronization WIth High CPU?
To fix the Setting Sync Host error in Windows 10, you can simply solve it by disabling the process. But, it is not a permanent fix. It will happen again and again. Here are some troubleshooting methods to fix the error.
Method 1 – Run A PowerShell Script:
You can write a Powershell script to solve this issue. Follow the steps:
1.Right-click on the free space of your desktop.
2.Choose the “New” option from the appearing list.
3.Click on “Text Document” from the sub-menu of “New”.
4.Create the text document, and name it as required.
5.Double-click it to open your recently created text document.
6.Then, copy and paste the text there.
“Get-ScheduledJob | ? Name -eq “Kill SettingSyncHost” | Unregister-ScheduledJob
Register-ScheduledJob -Name “Kill SettingSyncHost” -RunNow -RunEvery “00:05:00” -Credential (Get-Credential) -ScheduledJobOption (New-ScheduledJobOption -StartIfOnBattery -ContinueIfGoingOnBattery) -ScriptBlock {
Get-Process | ?{ $_.Name -eq “SettingSyncHost” -and $_.StartTime -lt ([System.DateTime]::Now).AddMinutes(-5) } | Stop-Process -Force
}“
7.Save this document by following: File> Save As> File Name.
8.Delete the file extension “.txt” in the file name portion and write “.ps1”
9.Press the “Save” button from the Save As window.
10.Go to the text document you have saved on your desktop.
11.Right-click it.
12.Now choose “Run with PowerShell” from the pop-up menu.
13.Put your credentials to log in to your administrator account.
14.Then, check if the high CPU usage error still persists.
Method 2 – Update Your Windows:
The simple way to get rid of the Setting Sync Host error is to update your Windows. Because the recent update released by Windows will solve the issue. They released the update as soon as Microsoft got to know about the high CPU usage error related to Setting Sync Host. To do so:
1.Press the Windows logo key + “S” button simultaneously to open search.
2.Write “Windows Update” in the appearing search box.
3.Press Enter.
4.The Windows Update window will be opened.
5.Search for a button named “Check for updates”.
6.Press it and the system will search for new updates and new OS versions.
7.If there is any update, install it.
8.Restart the PC after the installation of updates.
Method 3 – Add Your Ownership For The Registry Key:
As we know this error takes place by the SettingSyncHost.exe. It wants to try to write the special directory file but can’t do so, because of the restrictions. It tries to write the file, again and again, that cause this error. To fix this, you have to take ownership of the Registry Key. Follow the steps:
1.Press the Windows logo key + “R” button at a time.
2.Type “regedit” the dialogue box.
3.Press the enter button.
4.Now the registry editor will open, locate the path:
“HKEY_CURRENT_USER\Software\Microsoft\InputPersonalization\TrainedDataStore\en-GB\2”
5.Right-click on the entry.
6.Select the “Permissions” option from the appearing list.
7.Press the “Full Control” option for each user’s group turn by turn.
8.Click on the “Apply” option to save changes.
9.Exit and restart your PC.