
This guide provides step-by-step instructions to show you how to install Homebridge on Windows 10 / 11 as a service so it will automatically start on boot. Note: these instructions were originally written for Windows 10, but apply equally well to Windows 11.
- Prerequisites
-
Install Homebridge
- Step 1: Install Node.js
- Step 2: Install Homebridge
- Step 3: Setup Homebridge as a Service
-
Manage and Configure Homebridge
- With the Homebridge UI
- Using the command line
- How To Uninstall Homebridge
- Multiple Instances
- Additional Utilities
- Major Node.js Version Updates
- Configuration Reference
Prerequisites
⚠️ Some users report their iOS devices are not able to connect Homebridge running natively on Windows 10 / 11.
For this reason we recommend running Homebridge in a Linux virtual machine instead.
If you are using Windows 10 / 11 Pro / Edu / Enterprise, you can follow our guide for setting up Homebridge using Hyper-V, otherwise, see the required network settings for a VM running in Virtual Box or VMWare Workstation.
Before you get started, make sure you have the following ready:
- A computer running an update-to-date version of Windows 10 / 11 (this guide is based on 1903).
- An account with Administrator Privileges.
Install Homebridge
Step 1: Install Node.js
Homebridge requires Node.js installed on your system to run. Download the Active LTS version of Node.js (August 2024: v20) and run the installer with all the default options selected:
Node.js active LTS prebuilt installer
Open a new Node.js Command Prompt window as administrator, then check that Node.js and NPM have installed correctly by running the following commands:
# test node.js is working
node -v

# test npm is working
npm -v

Step 2: Install Homebridge
From the administrator Node.js command prompt, run the following command to install Homebridge and the Homebridge UI:
npm install -g --unsafe-perm homebridge homebridge-config-ui-x
Step 3: Setup Homebridge as a Service
To install Homebridge as a service we use the hb-service command provided by the Homebridge UI plugin:

If you see a Windows Firewall warning, make sure you grant Node.js permissions to access your private network.
Manage and Configure Homebridge
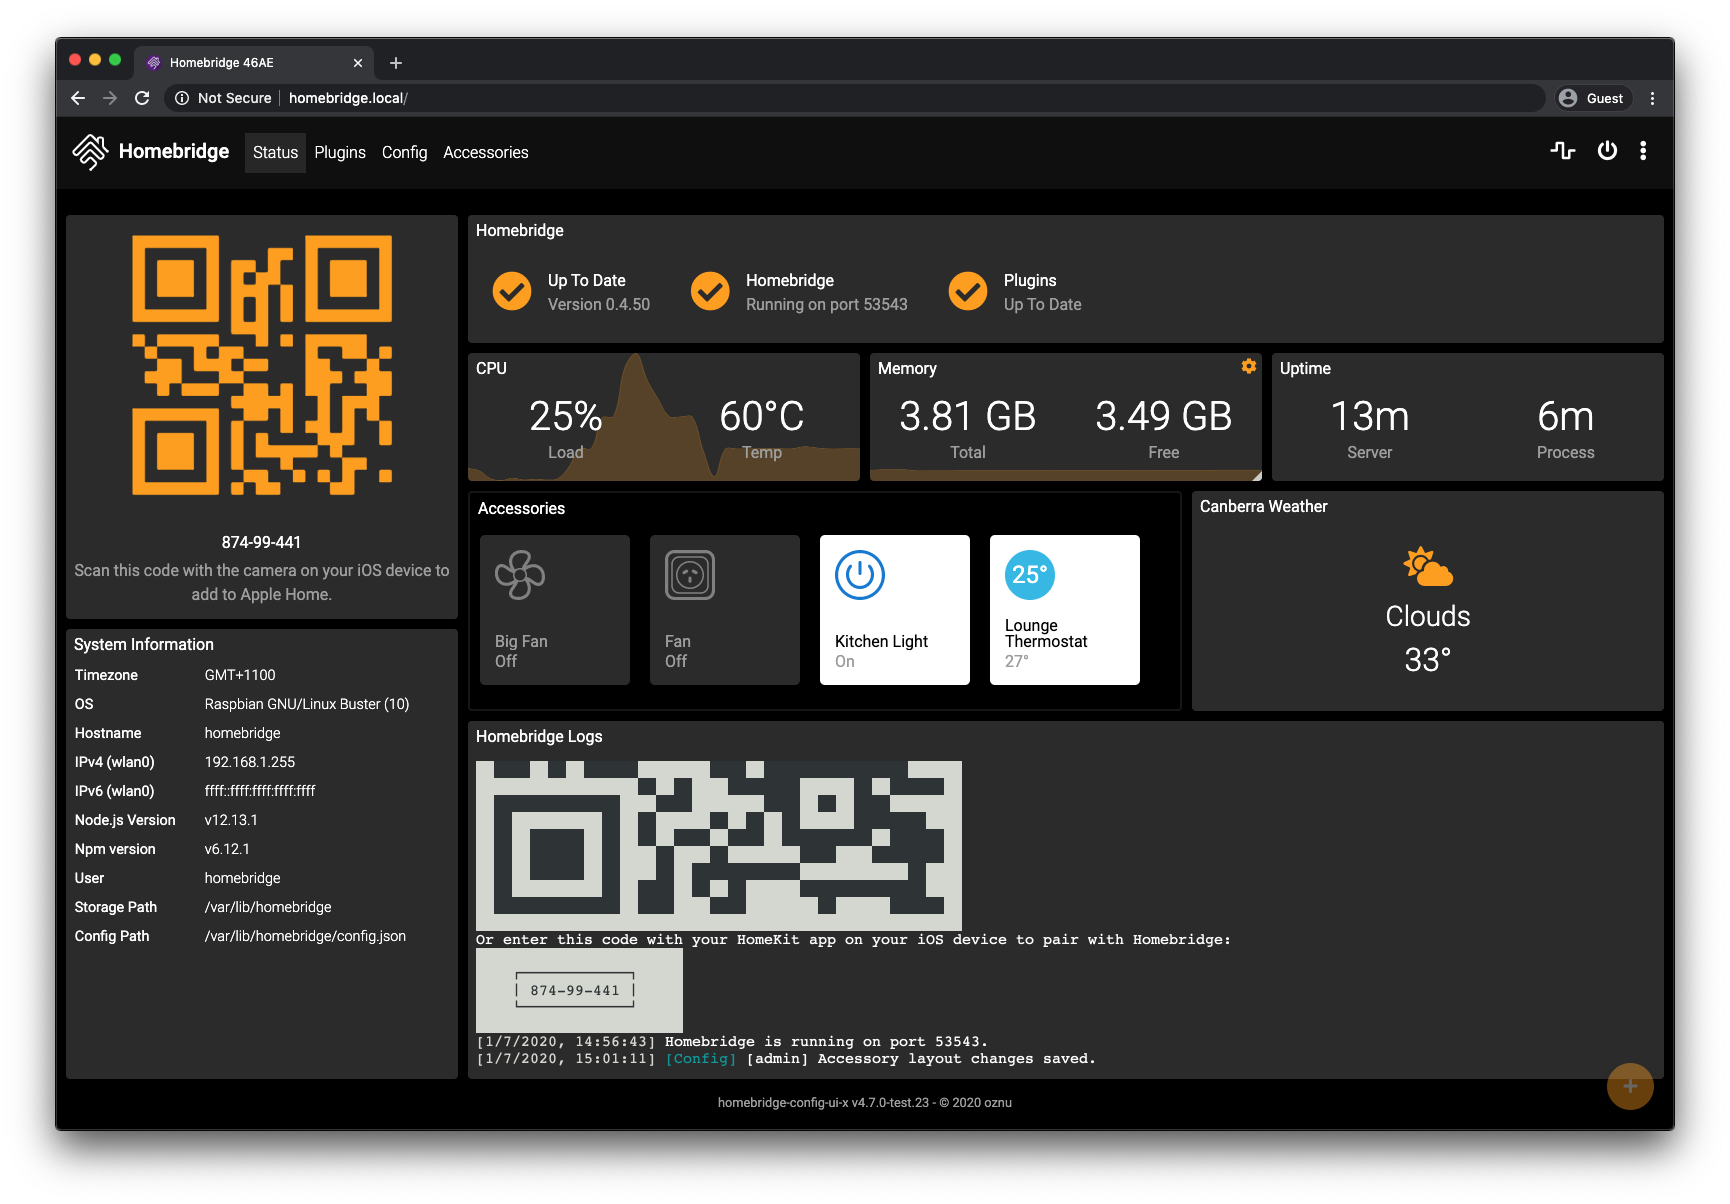
With the Homebridge UI
To access the Homebridge UI go to http://localhost:8581 in your browser.
The Homebridge UI will allow you to install, remove and update plugins, and modify the Homebridge config.json.
Review the Configuration Reference at the bottom of this guide.
Using the command line
To view your pairing QR code, you’ll need to view the logs which are stored in the $HOME\.homebridge\homebridge.log file. You can view the from a Node.js command prompt with this command:
To edit your config.json file you can open the $HOME\.homebridge\config.json file in a code editor of your choosing (VS Code is a good option with syntax checking).
Do not edit the config.json file using the a word processor that does text formatting as this will corrupt the file.
After making any changes to your config.json you need to restart Homebridge using by stopping and starting the service in Task Manager. You can also run this command from a Node.js command prompt:
hb-service stop
hb-service start
How To Uninstall Homebridge
Delete the service run the following command from a Node.js administrator command prompt:
Remove Homebridge and Homebridge Config UI X:
npm uninstall -g homebridge homebridge-config-ui-x
You can optionally delete all Homebridge data stored in $HOME\.homebridge and uninstall Node.js.
Multiple Instances
💡 Homebridge now supports Child Bridges which are an easier to manage alternative to running multiple instances.
Some users like to run multiple instances of Homebridge.
The hb-service command makes this easy to do via the --service-name flag.
See the hb-service documentation for instructions.
Additional Utilities
Some plugins may require you to have git installed, or the windows-build-tools to compile native modules.
git
While installing certain plugins you may encounter the spawn git ENOENT or ENOGIT error. To resolve this issue you need to install the git utility. You can download the installer from https://git-scm.com/downloads.
windows-build-tools
The windows-build-tools allow Homebridge plugins to compile native code for your platform. While increasingly rare, some plugins will require this. To install the windows-build-tools open a Node.js command prompt as an Administrator and run:
npm install --global windows-build-tools
Major Node.js Version Updates
It is recommended to run Homebridge on the current stable LTS version of Node.js. As at August 2024, the Active LTS version was v20. You can download new releases from the Node.js website.
Before updating Node.js, stop Homebridge:
Run the Node.js installer with the default options.
Once installed, run this command to rebuild the modules:
# This command can take a very long time to run. Be patient.
hb-service rebuild
Then start Homebridge again:
Configuration Reference
This table contains important information about your setup. You can use the information provided here as a reference when configuring or troubleshooting your environment after setting up Homebridge using the instructions below.
| File Location / Command | |
|---|---|
| Config File Path | %HOMEPATH%\.homebridge\config.json |
| Storage Path | %HOMEPATH%\.homebridge |
| Restart Command | hb-service restart |
| Stop Command | hb-service stop |
| Start Command | hb-service start |
| View Logs Command | hb-service logs |
Lately I’ve been going into a home automation spree, trying to automate my house as much as possible to avoid wasting time on repetitive stuff. While I am trying to not take it to the extreme, there’s actually a lot of nifty stuff you can either buy or quickly “hack” with a Raspberry Pi to make your life much easier.
While I started by getting a cheap Echo Dot and running everything with Alexa, I quickly felt the system to be quite limited and messy — just like many other Amazon apps, the Alexa app has a very weird UI that seems to not have the main focus on home automation. Also, the routines you can build in there are quite limited. So I decided to look for alternatives:
- Google’s solutions seem to be pretty good, but I don’t want to wire tap my entire house for them.
- Home Assistant and the rest of the “indie” solutions are very powerful, but a pain in the arse to set up and configure, and they also don’t give me the confidence that a solution backed by a big company does. You also need to pay a monthly subscription to have access to everything.
- Apple’s HomeKit is on a very weird spot because of their greediness with the MFi program. While being a very robust and technically compliant solution, and being the only AAA option that seems to respect your privacy, there very few accessories that work with it and the ones that do tend to be quite expensive. That is, until you find Homebridge.
Homebridge is a NodeJS solution that runs as a server and basically emulates a bridge (like the ones you get with stuff like Phillips Hue) through which you can add your own programmed accessories. You define your own scripts (that do things like interact with the REST API of a smart plug to control it), and Homebridge will expose them to HomeKit as HomeKit-defined accessories.
This means that anyone with enough skills can define Homekit accessories that not just control smart home stuff, but basically do anything. You can define a light switch in Homekit that instead of controlling a light, runs an SSH command. Or in the case of this blogpost, you can run a complex set of commands to turn on, monitor and turn off a Windows PC — like Alex Gustaffson did in homebridge-wol.
Since Microsoft woke up and started doing interesting stuff with Windows 10 now you can remotely control your PC via SSH, which means you can turn it on/off at will from something like a Raspberry Pi.
Let’s get started.
Getting the OpenSSH server in Windows 10
Microsoft prepared very good docs for it, but basically:
- Go to Windows 10 settings
- Go to apps
- Click in ‘Optional features’
- Click in ‘Add a feature’
- Select ‘OpenSSH server’. You can install the client too for fun.
- Reboot
Now there will be a new service for the SSH daemon, which you will have to configure to accept incoming connections. Since we are not idiots we’ll also configure it to reject password authentication and only accept SSH keys. The configuration process for this is a pain in the arse due to the differences between Linux users and Windows ones, and user n0rd made a very good guide for it in StackOverflow. Follow it to generate the keys and configure the service properly, then edit the C:\ProgramData\ssh\sshd_config file to set the #PasswordAuthentication yes to PasswordAuthentication no.
If you are wondering what your Windows username is (since Microsoft made a clusterfuck of it now that you login with your Microsoft account), you can retrieve it via the windows shell:
- In Windows, press the Windows key + R
- Type
cmd, hit enter - In the command shell, use the
whoamicommand to get your username. You’ll get something like:
DESKTOP\john
The username is the ‘john’ part, ‘DESKTOP’ is your computer’s network name which is not needed.
You will also have to configure wake-on-lan for your computer. There’s a lot of tutorials online for it (like this one) so I won’t go through it, but keep in mind this is something you’ll most likely also need to enable on the BIOS for it to work — and not all motherboards support it. Google your motherboard model plus ‘wake on lan’ for more info.
Now you can try to log into your computer and control it. Log into a second computer within the same LAN and ssh into your Windows computer:
ssh -i <your_private_key_file> <username>@<ip_address>
If it worked, you should see the Windows command shell. Run the following to initiate shutdown in 30 seconds:
shutdown /a /t 30
You should see a system notification in your Windows computer warning you of the remote-initiated shutdown, and the computer should automatically power off in 30 seconds. Now in order to wake it up, send a magic packet to the MAC address of your computer’s network interface. If you are running this from a Raspberry Pi you’ll probably have Raspbian which means you’ll have the wakeonlan command already available, but if not a quick Google search should show you a thousand billion tools to do it:
wakeonlan <your_mac_address>
Your computer should now boot up if wake-on-lan is properly configured.
Installing and configuring Homebridge
I would simply recommend Homebridge’s own tutorials on how to install the software and run it as a service, they are very good. Again, you should probably run this on Raspbian so the guide would be this one. Once it’s installed, install the homebridge-wol package through npm. Now there’s a small modification you’ll have to do to the process detailed in the Homebridge wiki: in order to run ssh commands, the homebridge service user you create in the guide will need a home directory to create the .ssh directory. You can do so by running:
mkhomedir_helper homebridge
Keep in mind you’ll also need to provide the private key to authenticate via SSH in a directory that is accesible by the homebridge user.
Now you’ll have to add your Windows laptop to Homebridge as an accessory. Here’s a configuration sample, similar to the ones found in the homebridge-wol package information:
"accessories": [
 {
   "accessory": "NetworkDevice",
   "name": "Windows PC",
   "mac": "<your_mac_address>",
   "ip": "<your_ip_address>",
   "pingInterval": 30,
   "wakeGraceTime": 30,
   "shutdownGraceTime": 30,
   "shutdownCommand": "ssh -i <your_ssh_key> <username>@<your_ip_address> shutdown /s /t 15"
 }
]
Restart the Homebridge service and your Windows computer should show up as a lights switch in your iOS Home app.
Enjoy!
Connecting Logitech HomeKit Secure Video to Windows 10
In the era of smart technology, the quest for seamless integration between various devices is more relevant than ever. With the rise of HomeKit Secure Video by Apple, users are looking for ways to bridge the gap between their security systems and their computers. Logitech has emerged as a key player in the smart security camera space, offering compatibility with HomeKit Secure Video. But what about Windows 10 users? Can they leverage the features of HomeKit Secure Video on their laptops and desktops? In this article, we will explore the process of connecting Logitech HomeKit Secure Video to Windows 10, the advantages this integration provides, and the potential for future developments.
Understanding HomeKit Secure Video
Before delving into the technicalities, it’s essential to comprehend what HomeKit Secure Video (HKSV) actually is. HomeKit Secure Video is Apple’s privacy-centric solution for managing live video feeds from connected secure cameras in your home. This feature offers several key benefits:
- End-to-End Encryption: Your video recordings are protected using encryption, ensuring that only you can view them.
- Storage on iCloud: HKSV allows you to store video recordings in iCloud, which grants users the ability to review footage for up to 30 days without needing a separate hardware solution.
- Smart Notifications: HomeKit Secure Video provides intelligent notifications when activity is detected. This minimizes false alerts by intelligently recognizing the difference between pets, people, and objects.
- Rich Integration with HomeKit: As part of the Apple ecosystem, HKSV operates seamlessly with other HomeKit-enabled devices, allowing users to create robust home automation scenarios.
What is Logitech’s Role?
Logitech, a leading brand in computer peripherals, has ventured into the smart security camera market with offerings that are HKSV compatible. Their line of cameras is designed to provide high-quality video feeds while adhering to the privacy standards set forth by Apple. Users of Logitech cameras that support HKSV can reap the benefits of this technology, allowing for remote monitoring and efficient home security management.
System Requirements for Windows 10 Users
To utilize Logitech cameras with HomeKit Secure Video on a Windows 10 platform, it’s crucial to understand that this integration generally requires Apple’s ecosystem. The following key components are necessary for optimal functionality:
- Windows 10 Device: An updated version of Windows 10 is required.
- Apple Device (iPhone or iPad): An iOS device is essential for the initial setup of the HomeKit configurations.
- Logitech Camera (Compatible Model): Ensure that your camera supports HomeKit Secure Video. Common models include the Logitech Circle 2 and Logitech Circle View.
- iCloud Account: A linked iCloud account is necessary to store video footage securely.
- Home App Access: Although you won’t be using the Home app directly on Windows 10, access to manage your camera settings will be needed on your iPhone or Apple device.
Setting Up Your Logitech Camera
- Unbox and Position the Camera: Place your Logitech security camera in a suitable location, ensuring it has a reliable Wi-Fi connection.
- Download the Logitech Circle App: Available on the App Store and Google Play, this app will assist with setting up the camera.
- Create an Account: If you do not already have a Logitech account, create one to register your camera.
- Add Your Camera: Follow the prompts in the Circle app to add your camera. This usually involves scanning a QR code that appears on the camera feed.
Linking Logitech to HomeKit Secure Video
-
Enable HomeKit on Your Camera:
- On the Logitech Circle app, navigate to the settings menu.
- Look for the option to enable HomeKit support. You will typically find this in the “Integrations” section.
- Here, a QR code will be generated, which you will scan using your Apple device.
-
Add to the Home App:
- Open the Home app on your iPhone or iPad.
- Tap the ‘+’ icon and select ‘Add Accessory.’
- Scan the QR code displayed on your Logitech camera.
- Follow the prompts to assign your camera to a room and customize settings.
Viewing the Camera Feed on Windows 10
Once your Logitech camera is integrated into the HomeKit framework, the challenge remains on how to view that feed on Windows 10. Here are a few methods that you can implement for this purpose:
Method 1: Using iCloud for Windows
Apple provides an iCloud app for Windows, which simplifies access to HomeKit and HomeKit Secure Video recordings.
-
Download iCloud for Windows:
- Visit the Apple website to download and install iCloud for Windows on your PC.
-
Sign in with Your iCloud Account:
- Open the iCloud app and sign in with the same Apple ID used for your HomeKit setup.
-
Enable Photos and Home:
- Ensure that the options for Photos and Home are checked.
- With Home enabled, you can select photos (including any snapshots from your cameras) from your camera roll.
-
Access Photos and Videos:
- Navigate to the iCloud Photos folder on your Windows 10 device. You will find any video or photos saved from the HomeKit Secure Video.
Keep in mind that at this point, you may not have direct live feed access due to the limitations of the iCloud app on Windows 10, but you can still access recordings.
Method 2: Third-Party Applications
Some third-party applications can bridge the gap between Windows and HomeKit, offering a more comprehensive experience:
-
HomeBridge:
- HomeBridge is a lightweight Node.js server that emulates the iOS HomeKit API.
- By running HomeBridge on your Windows device, you can use plugins to access your Logitech cameras along with many other HomeKit devices.
- Make sure to choose appropriate plugins capable of interacting with your security cameras, like “homebridge-camera-ffmpeg” for effective video streaming.
-
HomeKit for Windows:
- Certain applications claim to allow HomeKit access through Windows, though support and compatibility can vary. Ensure you rely on reputable software sources.
Remote Monitoring Options
While the standard access to HKSV on Windows is somewhat limited without an Apple device for configuration and management, remote monitoring from your iOS devices is straightforward. With the Home app:
- Receive Notifications: With HKSV, you can receive real-time notifications about motion detection events.
- Check Live Feeds: Use the Home app on your iPhone or iPad to check live feeds and recordings stored in iCloud.
Privacy Considerations
One of the chief advantages of HomeKit Secure Video is its focus on privacy. With that in mind, users should always be vigilant about their security settings.
- Manage Camera Access: On the Home app, ensure that you configure which family members or roommates have access to your camera feeds and notifications.
- Review Privacy Settings: Regularly review your privacy settings on the Logitech Circle app to ensure you are comfortable with how data and video feeds are being handled.
Troubleshooting Connectivity Issues
Even with a seamless setup, users may encounter connectivity issues. Below are several troubleshooting steps:
-
Check Wi-Fi Connectivity:
- Ensure that your Logitech camera is connected to a stable Wi-Fi network.
- Sometimes, moving your camera closer to the router can improve connectivity.
-
Update Firmware and Software:
- Ensure that both your Logitech camera and the Logitech Circle app are updated to the latest versions.
- Regular updates often fix bugs or issues related with connectivity.
-
Reboot Devices:
- Restart your Logitech camera, your router, and your Windows device to refresh connections.
-
Re-add Camera in Home App:
- In case the camera feed is disrupted, consider removing and adding the camera back to the Home app by utilizing the setup methods discussed previously.
Future of HomeKit and Windows Integration
As smart technology advances, the demand for compatibility between ecosystems will increase. Given the growth of smart home devices, we may see more robust solutions emerge for Windows 10 users looking to access HomeKit Secure Video. Apple has yet to release a dedicated application catering to Windows users, but the rise of cross-platform applications might pave the way for usability.
Conclusion
Connecting Logitech HomeKit Secure Video to Windows 10 is not a straightforward process due to the inherent design of Apple’s HomeKit ecosystem. However, with a combination of the right hardware, proper connections to iCloud, and potential third-party applications, Windows users can access and manage their security camera feeds to some degree.
As technology continues to evolve, the hope remains alive for a more integrated and user-friendly experience that bridges the gap between Windows and smart home solutions. Until those innovations occur, leveraging current tools can help enhance your home security and connectivity experience.
If you’re looking for the top products in home security and monitoring, we’ve got one that’s literally made for Homekit Secure Video, and this is what makes this security camera one-of-a-kind. I’m referring to Logitech’s newest security camera, the Logitech Circle View.
Contents
- 1 Designed for Homekit Secure Video
- 2 Logitech Circle View
- 3 Setting up Circle View with HomeKit Secure Video
- 3.1 Before You Start
- 3.2 Syncing Your Camera
- 4 Can It Connect to Other OS?
- 5 Conclusion
Designed for Homekit Secure Video
Homekit Secure Video is Apple’s camera streaming and recording feature. It syncs all video data into the Home app, which is included with all iOS systems. This means that you can turn your Apple devices into your very own security camera footage review platform. This footage is encrypted and stored in iCloud, so you can pull the footage anywhere you go.
Up until Logitech’s latest release, very few smart cameras were made to be compatible with Homekit Secure Video. The software to create products compatible with Homekit Secure was only introduced after their release. With Logitech Circle View, the camera integrates and works seamlessly with the Apple feature right out of the box.
Logitech Circle View
The Logitech Circle View, outside of its ability to work with Homekit Secure, comes with a series of advanced and useful features.
- Weatherproof casing
- 10-foot power cable
- Metal base allows for camera lens tilt
- 180º field view
- Infrared night vision can see up to 15’ away
- Video encryption
Currently going for $159.99, the Logitech Circle View is a worthy investment for discreet home security, both indoors and outdoors.
Setting up Circle View with HomeKit Secure Video
Whether you purchased the Circle View already or are investigating how quick it is to set up, let’s dive into how to connect to HomeKit Secure.
Before You Start
You will want to reserve time to do a complete set up with HomeKit. If you stop in the middle of syncing your camera with the application, you may have to reet your settings and start all over again before you can use it.
If you are using an iPod, iPad, or iPhone, you’ll want to be running iOS 13.2 or higher. Your WiFi should be 2.4 GHz.
Syncing Your Camera
You are now all set to go; start syncing your camera!
- First, plug in the camera with the cable provided and turn it on. The status light will turn green.
- Next, launch the Apple home app on your selected iOS device.
- Choose “Add Accessory.”
- You will be brought through a series of prompts until finally asked to scan the camera setup code. This code can be found in the camera’s Quick Start Guide on the first page or under the base of the camera.
Once your set up is complete, you can go into Settings to adjust the camera’s recording settings and information.
Can It Connect to Other OS?
Unfortunately, Logitech Circle View is only available to use with iOS devices that run HomeKit Secure. However, the predecessor of this camera, the Logitech Circle 2, can be used on Android devices and accessed online. If you’re a Windows 10 or Android user, this is a good way to partake in the benefits of owning a Logitech security camera.
You can even sync Alexa and Google Assistant to the Circle 2 camera.
To access Logitech Circle 2 online, navigate to the Logi Circle website. Enter your account information to access your video. The Circle Android app can be downloaded from the Google play store.
Conclusion
If you are an Apple family and want heightened security for your home, Logitech Circle View may be a smart option for you. Now, it just hit the market in May, so if the price is too steep, give it some time. Otherwise, relax in knowing that you made a great investment, and its easy set up with HomeKit Secure allows you to see exactly what is going on in and around your house.
Предисловие
Есть несколько моментов, которые надо учесть перед всеми необходимыми действиями:Необходимо использовать только командную строку Windows. Не пытайтесь использовать Windows PowerShell.
Вы должны выполнить следующие шаги, используя учетную запись, которую вы будете использовать для запуска HomeBridge. Это связано с тем, что по умолчанию некоторые установленные модули HomeBridge устанавливаются в учетной записи зарегистрированного пользователя по адресу: C:\Users\_your user name_\AppData\Roaming\npm\node_modulesи не будут доступны из других учетных записей Windows.
Вы можете создать пользователя HomeBridge. А затем выполнить установку при входе в систему под этим пользователем.Итак, приступим!
Установите Bonjour SDK для разработчиков
Загрузите и установите Bonjour for Developers 3.0.0.10 с сайта Apple, затем выберите «Bonjour SDK для Windows», а затем «Bonjour SDK для Windows v3.0» для загрузки. Вам нужно будет подписаться на бесплатную учетную запись Apple Developer.
Установите 64-разрядную версию Nodejs
Загрузите, а затем установите Nodejs v8.9.4 64BIT. Оставьте все значения по умолчанию как есть при установке.
Установите windows-build-tools
Откройте командную строку Windows в административном режиме. Для этого щелкните значок «Пуск в строке меню Windows» и начните вводить «cmd». Когда вы увидите, что приложение Командная строка появляется в результатах поиска, щелкните его правой кнопкой мыши и выберите Запуск от имени администратора. Выполните:
npm install -g windows-build-toolsЭто занимает некоторое время.
Установите OpenSSL 64-bit
Загрузить Open SSL 1.0.2o 64BIT. Вы должны использовать версию 1.0.x из OpenSSL и не использовать версии серии 1.1.x. Это связано с тем, что файл библиотеки был переименован в версии 1.1.x, что вызывает ошибки компиляции во время установки homebridge. Во время установки OpenSSL одно из отображаемых диалоговых окон спросит вас, куда вы хотите установить DLL OpenSSL. Выберите вариант для копирования в «Каталог двоичных файлов OpenSSL.
Вы должны открыть новую командную строку Windows в режиме администратора. Не использовать командную строку Windows, которую вы использовали на шаге выше. Теперь установите Homebridge из командной строки Windows:
npm install -g homebridgeЗапустите Homebridge
Откройте новую командную строку Windows не используйте повторно командную строку из шагов выше. Введите:
Теперь вам нужно создать файл config.json для homebridge. По умолчанию он должен быть помещен в папку:
%userprofile%\.homebridge