
In today’s digital age, the ability to share multimedia content seamlessly across devices in your home network has become a necessity. The Digital Living Network Alliance (DLNA) has provided a standard to make this process easier, enabling various devices — from smart TVs to gaming consoles and mobile devices — to connect and share content effortlessly. Setting up a DLNA server on Windows 10 can facilitate a smooth streaming experience within your home. This article will walk you through the configuration process of a DLNA server on Windows 10 step by step, ensuring that you can enjoy your media content without any hassle.
Understanding DLNA and Its Benefits
Before diving into the configuration process, let’s clarify what DLNA is and outline some of its benefits.
DLNA is a set of guidelines that allows different multimedia devices to communicate with one another over your home network. It enables devices to share and access digital media content like movies, music, and photos with ease. Here are some key benefits of using a DLNA server:
-
Device Compatibility: DLNA-compliant devices can communicate with each other, meaning you can easily stream content from one device to another regardless of the manufacturer.
-
Centralized Content Management: A DLNA server consolidates your media files in one location, making it easier to manage, navigate, and access your collection from any compatible device.
-
Convenience: Stream media content across various devices without the need for complicated setups or physical connections.
-
Streamlined Experience: Watching videos, listening to music, or viewing photos can be done without having to transfer files between devices manually.
Prerequisites
Before configuring your DLNA server, ensure you have the following prerequisites:
- A Windows 10 PC with sufficient multimedia files (videos, music, photos) you want to share.
- A stable home network (Wi-Fi or Ethernet) with all devices connected.
- DLNA-compatible devices (e.g., smart TVs, smartphones, tablets, game consoles).
Step-by-Step Guide to Configuring a DLNA Server on Windows 10
Step 1: Enable Media Streaming
The first step in configuring a DLNA server is to enable the media streaming feature on your Windows 10 PC.
-
Go to the Start Menu and select Settings.
-
In the Settings window, click on Network & Internet.
-
On the left sidebar, select Status, and under the network status, click on Network and Sharing Center.
-
In the Network and Sharing Center, find and select Media streaming options on the left.
-
Click on Turn on media streaming. This will enable your computer to stream media to other devices on the network.
Step 2: Configure Media Streaming Settings
After turning on media streaming, you’ll want to configure which files are shared.
-
In the Media streaming options window, you’ll see a list of devices that can access your media. At this point, you can manage the devices that have access by clicking on Block or Allow next to each device.
-
Click on the Options button next to the «Media streaming is on» section. This will open the media streaming settings.
-
Under “Show devices on”, you can set preferences for how your media is shared.
-
You can also edit the settings for shared libraries by allowing or blocking specific users or devices.
-
Once you have set the desired access for your devices, click Save to apply your changes.
Step 3: Organizing Your Media Files
To stream media efficiently, it’s essential to have your files organized properly. Windows Media Player is a great tool for this task:
-
Open Windows Media Player.
-
Select Library from the top menu, and then click on Organize.
-
Choose Manage Libraries and select the type of media you want to manage (Music, Videos, or Pictures).
-
For each type of media, click on Add to include folders where your media files are stored. This will make it easier for the DLNA server to locate and stream the content.
Step 4: Optimize Network Settings for Streaming
To ensure a smooth streaming experience, it’s crucial to optimize your network settings:
-
Make sure that your Windows Firewall isn’t blocking streaming. You can do this by going to Settings > Update & Security > Windows Security > Firewall & network protection.
-
Click on Allow an app through firewall, and in the new window, locate Windows Media Player Network Sharing Service. Ensure it is allowed through both private and public networks.
-
Another essential aspect is to ensure that your network is set to private. Go to Settings > Network & Internet > Status. Click on the network you are connected to, select Properties, and ensure the Network profile is set to Private.
Step 5: Accessing Your Media on DLNA-Compatible Devices
After setting up your DLNA server on Windows 10, you’ll want to access your media on compatible devices:
-
On your DLNA-compatible device (like a smart TV), navigate to the media or content sharing option.
-
Select your Windows 10 server from the list of available devices. Your server should display the media libraries you’ve shared.
-
You can now browse through your media files: videos, music, and pictures. Select a file to start streaming.
Advanced Configuration for DLNA Servers
If you want even more functionality, you might consider using third-party DLNA server software. Here are a few popular options:
-
Plex: Plex is a powerful media server that offers much more than basic streaming. It also provides features like transcoding media, creating personal playlists, and accessing your library remotely.
-
Serviio: This is another option that allows streaming of media files to various devices and is known for its ease of use and a clean interface. Serviio supports a wide range of formats and enables integration with online sources.
-
Universal Media Server (UMS): UMS is a free and open-source DLNA-compliant media server. It is easy to use and offers extensive settings for fine-tuning your streaming experience.
-
Choose a media server software based on your specific needs. Download and install the software.
-
Open the media server application and set it up by adding your media folders similar to the steps you took in Windows Media Player.
-
Finally, access the media from any DLNA-compatible device the same way you did with the Windows Media Player setup.
Troubleshooting Common Issues
Even after following all the steps to set up your DLNA server, you may occasionally encounter issues. Here are some common problems and solutions:
-
Device Not Recognized: Ensure your DLNA device and Windows 10 PC are connected to the same network. Restart both devices, and check your network settings.
-
Playback Problems: If certain media formats are not playing, ensure that your media files are compatible with the DLNA devices. Some may only support specific codecs.
-
Firewall Blockage: If you suspect that the firewall is interfering, revisit the firewall settings and make sure the media sharing services are allowed.
-
Slow Streaming: Check your network speed and bandwidth. Streaming over Wi-Fi can sometimes be slow; consider wired connections for better performance.
Conclusion
Setting up a DLNA server on Windows 10 can significantly enhance your multimedia experience at home. With a few simple steps, you can enable seamless access to your media library across various devices in your network. Whether you’re watching a movie on your smart TV or listening to music on your smartphone, a DLNA server makes it easier and more enjoyable. By following the guidelines in this article, you can ensure a successful DLNA setup, allowing you to enjoy the benefits of digital sharing in your home effortlessly. If you wish to incorporate additional features, exploring third-party media server options can take your streaming experience to the next level. Don’t hesitate to experiment with your setup to find the best configuration that suits your needs. Enjoy your media!
#1
kliminvi
- Posters
- 6 Сообщений:
Newbie
Отправлено 29 Апрель 2018 — 22:21
Как я уже только ни пытался настроить брандмауэр, упорно блокирует локальную сеть файлов «Домашний Медиасервер» (HMS). Изменял доступ к сети приложений ,менял режимы, бесполезно…Подскажите, кто знает.
- Наверх
#2
maxic
maxic
- Moderators
- 13 047 Сообщений:
Keep yourself alive
Отправлено 29 Апрель 2018 — 22:52
kliminvi, а вы уверены, что это брандмауэр? То есть при его отключении всё работает?
- Наверх
#3
kliminvi
kliminvi
- Posters
- 6 Сообщений:
Newbie
Отправлено 30 Апрель 2018 — 08:16
kliminvi, а вы уверены, что это брандмауэр? То есть при его отключении всё работает?
Да, полностью уверен
- Наверх
#4
maxic
maxic
- Moderators
- 13 047 Сообщений:
Keep yourself alive
Отправлено 30 Апрель 2018 — 11:40
kliminvi, на второй вопрос не ответили.
Allow all для пакетного фильтра поставьте.
- Наверх
#5
kliminvi
kliminvi
- Posters
- 6 Сообщений:
Newbie
Отправлено 30 Апрель 2018 — 14:42
kliminvi, на второй вопрос не ответили.
Allow all для пакетного фильтра поставьте.
Конкретизируйте точно где и для чего.
Ставил для 2 программ-файлов (они запущены и видны значки именно этой программы) , как «Доступ к сети для приложений». Причем галочка «Разрешать локальные соединения» стоит
на второй вопрос не ответили.
Ответил — «Да», т.е. все равно не работает.
- Наверх
#6
kliminvi
kliminvi
- Posters
- 6 Сообщений:
Newbie
Отправлено 30 Апрель 2018 — 14:43
Могу дать в личной переписке пароль от Teamviewer для помощи в настройках
- Наверх
#7
riaman
riaman
- Posters
- 206 Сообщений:
Member
Отправлено 30 Апрель 2018 — 22:05
У меня тоже не работает хом медиа сервер. Я думал, что что-то в сети, особо не разбирался. Завтра попробую пакетный фильтр настроить.
- Наверх
#8
maxic
maxic
- Moderators
- 13 047 Сообщений:
Keep yourself alive
Отправлено 30 Апрель 2018 — 22:57
kliminvi, давайте в личку ваш тим.
И. Если при отключении брандмауэра программы не работают, значит — дело не в брандмауэре. Гейт может резать соединение.
- Наверх
#9
Nenya Amo
Nenya Amo
- Posters
- 734 Сообщений:
Advanced Member
Отправлено 30 Апрель 2018 — 23:25
kliminvi, отчёт антивируса (Dr.Web > Инструменты > Поддержка > Отчёт для технической поддержки > Создать отчёт) не помешал бы.
мой девиз — служение злу, как у котика..
- Наверх
#10
kliminvi
kliminvi
- Posters
- 6 Сообщений:
Newbie
Отправлено 01 Май 2018 — 08:11
Nenya Amo,
Прилагаю
Сообщение было изменено kliminvi: 01 Май 2018 — 08:11
- Наверх
#11
kliminvi
kliminvi
- Posters
- 6 Сообщений:
Newbie
Отправлено 01 Май 2018 — 08:29
riaman,
После множества перезагрузок , внесения исключений в настройки брандмауэра (по приложениям с именем HMS ) , а также после изменения параметров доступа к потокам мультимедиа (общий доступ к файлам в настройках винды) и выдачи кучи разрешений для всяких туннельных адаптеров и т.п. и др, все что после этого всплывало ( DrWeb ), произошло чудо: телеки стали видны компу и наоборот.
Небольшой оффтоп:
Как смотреть трансляции Sopcast на телеках SMART:
0) Скачиваем и устанавливаем VLC-https://www.videolan.org/vlc/index.ru.html
1) В папке «Интернет-Телевидение» правой клавишей создаем ресурс-ссылку, возможно у Вас она уже есть. Она может как угодно называться, может и также: «Интернет-Телевидение»
2) Запускаете по sop-ссылке sopcast,
3) В sopcast есть значок внизу: 2 квадратика, жмете
4) Запустится проигрыватель windows media player,
5) Правой в windows media player-показать список,
6) Еще раз правой по названию списка-свойства списка, копируете инет-путь трансляции (например: http://127.0.0.1:8902/tv.ts)
7) Правой в HMS по созданному нами инет-ресурсу-редактирование инфо
 В поле «Ссылка» вводим скопированный путь (см. п.6)
9) Кликаем 2 раза по созданному нами ресурсу в этой папке.
10) Запустится VLC? НЕ ВЫКЛЮЧАЕМ ЕГО!!! Просто сворачиваем. Не запустился?-Запускаем и открываем вышеуказанный URL
11) Включаем телек, входим в папку «Интернет-Телевидение» и кликаем по созданному нами ресурсу.
P.S. Возможно конечно как-то и побыстрее получить инет-ссылку sopcast (не такую, например: sop://broker.sopcast.com:3912/138000, а такую: http://127.0.0.1:8902/tv.ts),кто подскажет-молодцы.
P.P.S.В профилях транскодирования (там же в строчке «Интернет-Телевидения» выбрать Без кодирования- Ремуксирование
Сообщение было изменено kliminvi: 01 Май 2018 — 08:31
- Наверх
#12
Konstantin Yudin
Konstantin Yudin
- Dr.Web Staff
- 19 568 Сообщений:
Смотрящий
Отправлено 03 Май 2018 — 10:52
Уже не первый год работает HMS совместно с нами, когда то спросил пару раз про правила и все. Как часы с тех пор.
With best regards, Konstantin Yudin
Doctor Web, Ltd.
- Наверх
#13
riaman
riaman
- Posters
- 206 Сообщений:
Member
Отправлено 30 Июнь 2018 — 17:44
Решил проблему. Проблема была в виндовом брандмауре и профиле сети. Надо было поставить тип сети: «Частная/домашняя сеть» и всё заработало.
- Наверх
Overview
When it comes to operating Windows Media Services, it is crucial to open the necessary firewall ports to ensure smooth communication and functionality. Understanding which ports need to be opened will help you optimize your media services and provide a seamless experience to your users.
Firewall ports act as doors that allow different types of network traffic to pass through. By opening specific ports, you are granting access to specific services or applications. In the case of Windows Media Services, there are several ports that you need to be aware of and open on your firewall to enable proper operation.
These ports enable various types of communication and data transfer required for streaming media content, managing server connections, and enabling remote administration. By opening the correct ports, you ensure that your Windows Media Services can function without any interruptions.
In this article, we will discuss the important firewall ports that need to be opened for Windows Media Services to operate smoothly. By understanding and configuring these ports, you will be able to provide a reliable and efficient media streaming service to your users.
TCP Port 80
TCP Port 80 is one of the most commonly used ports for web communication. It is the default port for HTTP (Hypertext Transfer Protocol) traffic, which is the protocol used for transmitting web pages and other web resources. Opening TCP Port 80 is essential for Windows Media Services because it allows users to access your media content through a web browser.
By opening TCP Port 80, you enable the transmission of HTTP traffic, which includes requests for media files and the streaming of those files to the user’s browser. This port is also used for administrative access to Windows Media Services, allowing you to manage and configure the server settings.
To open TCP Port 80, you need to configure your firewall to allow incoming and outgoing traffic on this port. It is important to note that opening this port makes your server vulnerable to potential security threats. Therefore, it is crucial to implement additional security measures such as access control and authentication mechanisms to protect your media content and server.
If TCP Port 80 is blocked by your firewall, users will not be able to access your media content or make requests for streaming. Opening this port ensures that your Windows Media Services can reach a wide audience through standard web browsers and allows for seamless media streaming and content delivery.
In summary, TCP Port 80 plays a vital role in enabling web communication and media streaming through Windows Media Services. By opening this port on your firewall, you allow users to access your media content, make requests for streaming, and provide administrative access to manage your media server effectively.
TCP Port 1755
TCP Port 1755 is specifically used for Windows Media Services. This port is crucial for the streaming and delivery of multimedia content, as it enables the transmission of streaming data and control messages through the RTSP (Real-Time Streaming Protocol).
RTSP is a network protocol that facilitates the controlled delivery of real-time multimedia data, such as audio or video streams. By opening TCP Port 1755, you allow RTSP traffic to flow between the Windows Media Services server and client applications, enabling the seamless streaming experience for your users.
Opening TCP Port 1755 is essential for Windows Media Services to function properly. Without this port being open on your firewall, users will not be able to establish RTSP connections to your media server, resulting in the inability to play or stream multimedia content from your server.
To open TCP Port 1755, you need to configure your firewall to allow inbound and outbound traffic on this port. By doing so, you ensure that the RTSP messages and streaming data can pass through the firewall and reach the client applications without any hindrance.
It is important to note that TCP Port 1755 is a specific port dedicated to Windows Media Services and should not be used or blocked by any other applications or services. By keeping this port open and dedicated to Windows Media Services, you maintain the integrity and reliability of your multimedia streaming infrastructure.
In summary, TCP Port 1755 is essential for the proper functioning of Windows Media Services. By opening this port on your firewall, you enable the seamless streaming of multimedia content through the RTSP protocol. It is crucial to ensure that this port is dedicated to Windows Media Services and not used by any other applications or services.
TCP Port 7007
TCP Port 7007 is another important port that needs to be opened for Windows Media Services. This port is used for the distribution of multimedia content over the network and plays a crucial role in ensuring efficient and reliable streaming.
By opening TCP Port 7007, you allow the transmission of multimedia data using the Windows Media Unicast protocol. This protocol is responsible for delivering media content to individual clients, allowing them to stream audio or video files from your server.
When a client connects to Windows Media Services and requests a specific media file, the server uses TCP Port 7007 to establish a unicast connection with the client and begins streaming the requested content. This port facilitates the streaming process by transmitting the multimedia data over the network in real-time.
Opening TCP Port 7007 on your firewall is crucial for providing a smooth and uninterrupted streaming experience to your users. If this port is blocked, clients will not be able to establish a connection with your server and stream the requested media content.
To open TCP Port 7007, you will need to configure your firewall settings to allow inbound and outbound traffic on this specific port. By doing so, you ensure that the Windows Media Unicast protocol can function properly, enabling clients to receive the multimedia content seamlessly.
It is important to note that TCP Port 7007 should only be used for Windows Media Services. Avoid using this port for any other applications or services to prevent conflicts and maintain the stability of your streaming infrastructure.
In summary, TCP Port 7007 is a vital port that needs to be opened for Windows Media Services. By enabling traffic on this port, you allow the efficient and reliable distribution of multimedia content to individual clients using the Windows Media Unicast protocol. Configuring your firewall to allow traffic on TCP Port 7007 ensures a seamless streaming experience for your users.
TCP Port 8080
TCP Port 8080 is commonly used as an alternative port for web communication and is often referred to as the HTTP alternative port. It provides an additional option for users to access web resources and is frequently used when the default port, TCP Port 80, is not available or already in use by another application or service.
For Windows Media Services, opening TCP Port 8080 allows users to access media content through web browsers when TCP Port 80 is not accessible. By configuring your web server to listen on TCP Port 8080 and opening this port on your firewall, you provide an alternative pathway for users to connect to your media server and access your multimedia content.
TCP Port 8080 is also commonly used for proxy servers, enabling users to access web content through a proxy server that sits between their web browser and the internet. By opening this port, you allow proxy servers to communicate with your Windows Media Services, enhancing accessibility for users who rely on proxy connections.
To open TCP Port 8080, you will need to configure your firewall to allow inbound and outbound traffic on this port. By doing so, you ensure that users can connect to your media server and access the content they desire through web browsers or proxy servers that utilize TCP Port 8080 for communication.
It is worth mentioning that opening ports on your firewall can potentially expose your server to security risks. Therefore, it is crucial to implement appropriate security measures, such as access control and authentication mechanisms, to protect your Windows Media Services from unauthorized access or malicious activities.
In summary, TCP Port 8080 serves as an alternative port for web communication and allows users to access Windows Media Services when TCP Port 80 is unavailable or already in use. By opening this port on your firewall and configuring your web server accordingly, you provide an alternative pathway for users to connect to your media server, enhancing accessibility and ensuring a seamless streaming experience.
UDP Ports 1024-5000
UDP (User Datagram Protocol) is another network protocol used for transmitting data over the internet. While TCP ensures reliable and ordered data transmission, UDP is preferred for applications that require faster transmission with reduced overhead. Windows Media Services utilizes UDP for streaming media content, and as a result, opening a range of UDP ports from 1024 to 5000 is crucial for uninterrupted streaming.
By opening UDP Ports 1024-5000, you allow Windows Media Services to transmit audio and video data using UDP. These ports facilitate the efficient delivery of streaming media to clients by enabling the real-time transmission of packets without the need for error checking and retransmission.
When a client requests a media stream, Windows Media Services uses UDP to send the media packets containing audio or video data directly to the client. Opening a range of UDP ports allows for multiple media streams to be transmitted simultaneously, enabling seamless playback for multiple users accessing your media server.
Configuring your firewall to allow inbound and outbound traffic on UDP Ports 1024-5000 is essential to ensure the proper functioning of Windows Media Services. If these ports are blocked, clients will experience disruptions in the media stream, resulting in buffering or stuttering playback.
It is worth noting that UDP is a connectionless protocol, which means that packets can be lost or arrive out of order. However, with proper network conditions and minimal packet loss, UDP provides a faster and more efficient transmission for streaming media content.
When utilizing UDP for streaming, it is important to monitor and manage packet loss and network congestion. Implementing buffering and adaptive streaming techniques can help mitigate the impact of packet loss and maintain a smooth playback experience for your users.
In summary, opening UDP Ports 1024-5000 is crucial for Windows Media Services to ensure seamless streaming of multimedia content. By enabling traffic on these UDP ports, you facilitate the efficient delivery of media packets to clients, allowing multiple streams to be transmitted simultaneously. Configuring your firewall to allow UDP traffic on this range of ports enhances the streaming experience and minimizes disruptions for your users.
TCP Port 554
TCP Port 554 is a significant port used by Windows Media Services for streaming multimedia content over the network. It plays a crucial role in facilitating the efficient delivery of audio and video streams to clients who request them.
Port 554 is associated with the Real Time Streaming Protocol (RTSP), which is used for controlling the delivery of streaming media. When a client requests a specific media file, Windows Media Services uses RTSP to establish a connection with the client and transmit the audio or video stream.
By opening TCP Port 554, you allow clients to establish RTSP connections with your media server, enabling them to play and stream the requested multimedia content. This port is responsible for the initiation and management of the streaming sessions, ensuring that the media streams are delivered in real-time and synchronized.
To open TCP Port 554, you need to configure your firewall to allow inbound and outbound traffic on this port. By doing so, you ensure that clients can establish RTSP connections to your media server without any hindrance.
It is important to note that TCP Port 554 should be dedicated to Windows Media Services and not used by any other applications or services. Using this port exclusively for Windows Media Services ensures the proper functionality of the streaming infrastructure and prevents conflicts with other services.
Additionally, it is crucial to implement security measures on your media server to protect against unauthorized access or malicious activities. Implementing authentication mechanisms and access controls helps safeguard your media content and ensures that only authorized users can access the streaming services.
In summary, TCP Port 554 is essential for Windows Media Services as it enables the streaming and delivery of multimedia content using the Real Time Streaming Protocol (RTSP). By opening this port on your firewall, you allow clients to establish RTSP connections and enjoy seamless playback and streaming of audio and video streams. Dedicated use of TCP Port 554 for Windows Media Services is recommended to ensure the smooth functioning of your streaming infrastructure.
TCP Port 1756
TCP Port 1756 is an important port that is used by Windows Media Services for managing and controlling server connections. This port facilitates the communication between the server and remote administration tools, allowing administrators to remotely control and configure the media server.
When you open TCP Port 1756, you enable remote administration of Windows Media Services. This allows administrators to access and manage the server settings, monitor the performance, and make any necessary adjustments without being physically present at the server location.
By configuring your firewall to allow inbound and outbound traffic on TCP Port 1756, you ensure that the remote administration tools can communicate with the media server securely. It provides a secure channel for transmitting administrative commands, configuration changes, and monitoring data between the administrator’s computer and the media server.
Opening TCP Port 1756 on your firewall enables remote administration applications, such as Windows Media Administrator or other management tools, to establish a connection with the media server. This connection allows administrators to perform tasks such as adding or removing media files, adjusting streaming settings, and monitoring the server’s performance in real-time.
It is important to note that remote administration should only be enabled for authorized administrators and proper security measures should be implemented. This includes using strong passwords, limiting access to trusted IP addresses, and protecting the server with additional layers of security such as firewalls and intrusion detection systems.
In summary, TCP Port 1756 is dedicated to remote administration and management of Windows Media Services. By opening this port on your firewall, you allow authorized administrators to remotely control and configure the media server, ensuring efficient administration and monitoring. Implementing proper security precautions is essential to protect the server and ensure that only authorized individuals can access and administer the media server remotely.
TCP Port 7000
TCP Port 7000 is a critical port that needs to be opened for Windows Media Services. This port is primarily used for establishing client-server communication and enabling the transmission of multimedia content over the network.
By opening TCP Port 7000, you allow clients to connect to Windows Media Services and access streaming media content. This port serves as the entry point for clients to initiate a connection with the media server and request the desired multimedia files.
When a client connects to Windows Media Services, the server uses TCP Port 7000 to establish a communication channel with the client. This port facilitates the transfer of streaming data, ensuring a smooth and uninterrupted streaming experience for the clients.
Opening TCP Port 7000 on your firewall is necessary to enable clients to establish a connection with your media server. It allows them to request and receive multimedia content, such as audio or video streams, and ensures that the streaming process can occur seamlessly.
To open TCP Port 7000, you need to configure your firewall to allow inbound and outbound traffic on this port. By doing so, you ensure that client requests can reach the media server and that the streaming data can be delivered without any interruptions or restrictions.
It is important to note that TCP Port 7000 is dedicated to Windows Media Services and should not be used or blocked by any other applications or services. By reserving this port exclusively for Windows Media Services, you prevent conflicts and ensure the reliable operation of your media streaming infrastructure.
In summary, TCP Port 7000 plays a vital role in enabling client-server communication for Windows Media Services. By opening this port on your firewall, you allow clients to connect to the media server and access streaming media content. Configuring your firewall to allow traffic on TCP Port 7000 ensures a seamless streaming experience for your users and allows your Windows Media Services to function effectively.
TCP Port 8887
TCP Port 8887 is a specific port utilized by Windows Media Services for the delivery of multimedia streams through the HTTP protocol. This port plays a critical role in enabling the transmission of audio and video content to clients over the network.
By opening TCP Port 8887, you allow clients to connect to Windows Media Services and access multimedia content through HTTP streaming. This port handles the delivery of media files requested by clients and ensures a seamless streaming experience.
TCP Port 8887 is specifically dedicated to the HTTP-based delivery of media streams. When a client requests a media file, Windows Media Services uses this port to establish a connection and transmit the requested content using the HTTP protocol.
Opening TCP Port 8887 on your firewall is essential for enabling clients to access and stream media content from your server. By configuring your firewall to allow inbound and outbound traffic on this port, you ensure that clients can connect to your media server and receive the requested multimedia files without any hindrance.
It is worth noting that TCP Port 8887 is solely dedicated to Windows Media Services and should not be allocated or blocked by any other applications or services. By reserving this port exclusively for Windows Media Services, you prevent conflicts and ensure the reliable operation of your media streaming infrastructure.
When opening TCP Port 8887, it is crucial to consider implementing additional security measures to protect your media content and server from unauthorized access. Utilizing encryption, authentication mechanisms, and access controls can help safeguard your media streaming infrastructure and ensure a secure streaming experience for your users.
In summary, TCP Port 8887 is utilized by Windows Media Services for delivering multimedia streams over the HTTP protocol. By opening this port on your firewall, you enable clients to connect to your media server and access audio and video content seamlessly. Reserving TCP Port 8887 exclusively for Windows Media Services and implementing appropriate security measures enhances the reliability and security of your media streaming infrastructure.
TCP/UDP Ports 7001-7007
TCP/UDP Ports 7001-7007 are a range of ports that are utilized by Windows Media Services for various purposes related to streaming media content. These ports play a crucial role in enabling the transmission of multimedia data and facilitate different types of communication between the media server and client applications.
Opening TCP/UDP Ports 7001-7007 on your firewall allows for the establishment of multiple simultaneous connections between the media server and clients. Each port in this range serves a specific function in facilitating the streaming and delivery of media content.
TCP Port 7001 is commonly used for managing and controlling the server-to-client communication. It supports the establishment of secure and reliable connections, ensuring efficient data transfer and synchronization between the media server and clients.
UDP Ports 7002-7004 are used for transmitting multimedia streams from the server to clients. These ports allow for the efficient delivery of audio and video data in real-time, ensuring a smooth streaming experience.
TCP Port 7005 is dedicated to remote administration, allowing administrators to remotely access and manage the media server. Opening this port enables authorized administrators to configure server settings, monitor performance, and perform other administrative tasks.
TCP Port 7006 is specifically used for delivering advertising content. It allows the media server to send targeted advertisements to clients, which can be dynamically inserted into the streaming media content.
TCP Port 7007 is used for the transmission of digital rights management (DRM) license information. Opening this port allows clients to receive and validate DRM licenses, ensuring the authorized access and playback of protected media content.
It is important to configure your firewall to allow inbound and outbound traffic on TCP/UDP Ports 7001-7007 to ensure the proper functioning of Windows Media Services. By doing so, you facilitate the necessary communication and data transfer between the media server and clients, enabling seamless streaming and content delivery.
In summary, TCP/UDP Ports 7001-7007 are essential for Windows Media Services as they enable various forms of communication and data transfer related to streaming media content. By opening these ports on your firewall, you ensure the efficient and reliable transmission of audio and video streams, enable remote administration, facilitate advertising delivery, and allow for DRM license validation.
We receive numerous posts in the Forums relating to Remote Access and Firewall Settings for Windows Home Server, often due to the UPnP features in Routers not being of a consistent standard. We’ve been encouraging users to post details of their experiences with different Routers. So if you haven’t updated this post and your Router is not listed, please do so!
If you are unfortunate enough to have a Router that UPnP support is questionable, then the best thing you can do is disable UPnP on the Router and configure it manually. This article won’t be able to cover each different Router configurations but I will show the ports required, and also the often forgotten area of the Windows Firewall when you are adding or changing ports.
The default ports required for Remote Access functionality are: —
| Service or Protocol | Port |
| HTTP | TCP 80 |
| HTTPS | TCP 443 |
| Remote Web Workplace | TCP 4125 |
Some optional ones (FireFly and FirePlay users) and anyone wanting to Remote Desktop onto the server are:-
| Service or Protocol | Port |
| RDP | TCP 3389 |
| FireFly/FirePlay | TCP 9999 |
If you are lucky enough to have a router that fully supports UPnP then we have an Add-In available called WHS Port Forward which will assist you in configuring additional ports for other applications.
Alex wrote the WHS Port Forward Add-In to make configuring your Router for other applications and ports a breeze. In Alex’s words:-
WHS Port Forward is an Add-In for the Microsoft Windows Home Server
operating system. It allows the user to utilize the UPnP feature of Windows
Home Server to open forwarded ports from your router to your Home Server. This
is useful if you have installed a 3rd party application that requires incoming
access from the Internet. This Add-In removes the need to assign a static IP
address to your server or manually forward ports on your router. Simply
configure the port you would like forwarded, and let Windows Home Server handle
it for you.
Another area to consider when adding/changing ports is the Windows Firewall on the server.
For example, if you don’t want to use the built in Remote Web Workplace feature of Windows Home Server and would rather connect via Remote Desktop simply adding TCP port 3389 to your router is not sufficient to access your server remotely via Remote Desktop. Although TCP Port 3389 is already configured in Windows Firewall, it is by default set to local subnet only (i.e. inside your LAN) so you need to change this to either a Custom List or Any Computer (including those on the internet).
The Windows Firewall applet can be found in the Control Panel on the server, for convenience I’ve captured some screen-shots of the relevant screens once you have launched Windows Firewall. Please click on an image below to expand if required.
Click Exceptions to add/remove/change an entry
Remote Desktop in the Windows Firewall
Now you have the exceptions listed, you need to scroll down the list until you find Remote Desktop and click on Edit.
Editing a Windows Firewall Entry
Changing the scope of a Windows Firewall entry
There are obvious security implications when you make Windows Firewall changes on your Windows Home Server and you need to weigh up the pros and cons of opening up ports to your home network. But, doing so opens up many other possibilities to your server. Whether or not you install Orb to stream Music and Video over the internet or just have the convenience of accessing your Windows Home Server in other ways, the firewall settings in Windows Home Server and your router will need to work together in harmony!
Tagged as:
Firewall Settings,
Firewall Settings for Windows Home Server,
RDP,
Remote Desktop,
UPnP,
WHS,
Windows Firewall,
Windows Home Server
- На главную
- Категории
- Операционные системы
- Установка и первоначальная настройка DLNA Home Media Server (HMS) на Windows
В данной статье мы рассмотрим, как установить свой DLNA сервер на Windows на примере программы Home Media Server (HMS)
2017-11-16 20:41:1566
В настоящее время все чаще требуется иметь в домашней сети DLNA сервер, так как большинство современных телевизоров не поддерживает такие протоколы передачи данных, как SMB или NFS, а работают только по DLNA.
Что такое DLNA?
DLNA (англ. Digital Living Network Alliance) — набор стандартов, позволяющих совместимым устройствам передавать и принимать по домашней сети различный медиа-контент (изображения, музыку, видео), а также отображать его в режиме реального времени. То есть — технология для соединения домашних компьютеров, мобильных телефонов, ноутбуков и бытовой электроники в единую цифровую сеть. Устройства, которые поддерживают спецификацию DLNA, по желанию пользователя могут настраиваться и объединяться в сеть в автоматическом режиме. (Источник — Википедия)
Установка DLNA Home Media Server (HMS)
Установка HMS очень простая, но мы все же подробно расскажем, как это происходит.
Для начала необходимо скачать установщик. На момент написания статьи официальный сайт не работал. И не работал месяц до этого, поэтому ниже приведу ссылку на скачивания с нашего сервера последний версии HMS:
Скачать Home Media Server (HMS) (47,2 МБ)
Давайте приступим к установке.
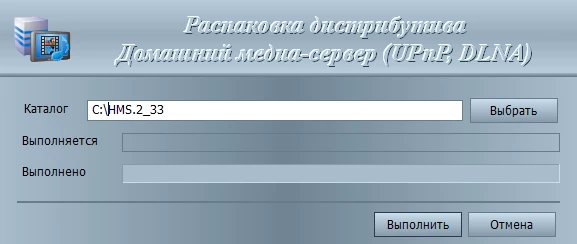
Запускаем установщик:

Тут нам предлагается выбрать в каталог, в который будут распакованы файлы установки. Выбираем каталог и нажимаем кнопку «Выполнить«. После распаковки установка запустится автоматически.
Внимание: Распакованные файлы автоматически не удаляются после установки программы, советую удалить их вручную после завершения установки
После распаковки у нас автоматически запускается установка программы:
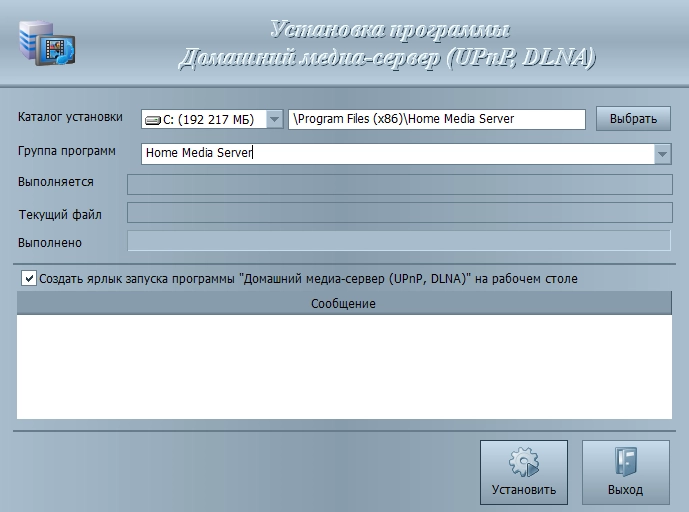
Тут настроек не очень много. В данном окне выбирается каталог, в который будет установлена программа Home Media Server (HMS) и «Группа программ» — название папки в меню «Пуск».
После выбора папки установки и названия папки в меню «Пуск» остается только поставить галочку «создать ярлык запуска программы на рабочем столе», если это необходимо и нажать кнопку «Установить«.
В конце установки, которая занимает менее минуты (зависит от вашего оборудования), нам предлагают сразу же запустить программу Home Media Server (HMS).
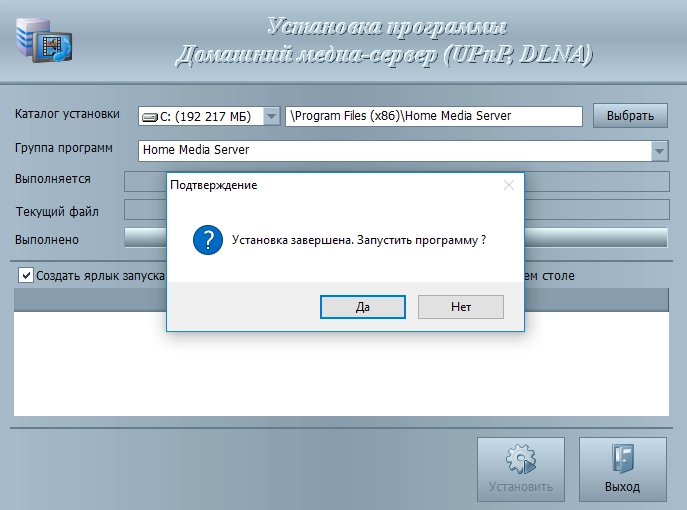
На этом установка программы завершена.
Первоначальная настройка DLNA Home Media Server (HMS)
Итак, у нас есть свежеустановленный сервер DLNA, давайте запустим его и посмотрим, что сначала он нам предложить настроить, а так же сделаем пару полезных настроек. Приступим.
После первого запуска программы мы видим окно первоначальных настроек.
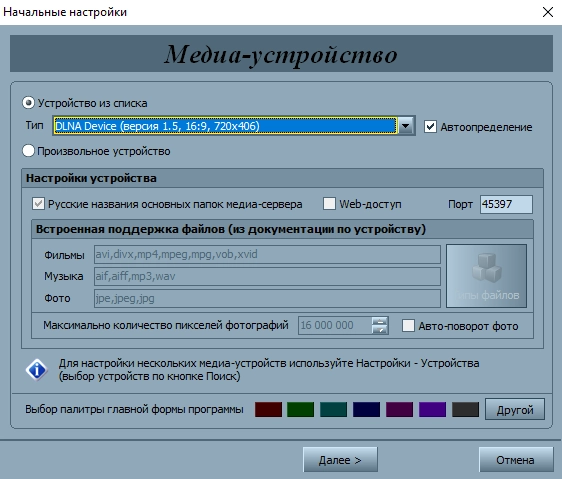
Данном окне нам предлагают выбрать устройство, на который будет транслироваться медиа-контент. В списке есть много шаблонов.
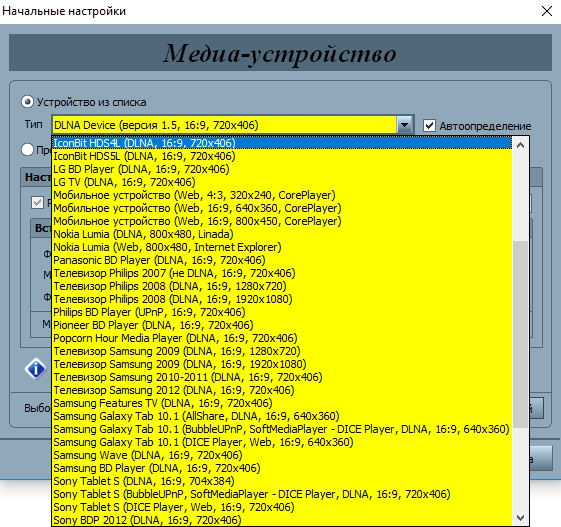
Если вы не нашли своего или похожего на ваше устройства, то можно оставить стандартный DLNA Device, как показала практика, на что то сильно это не влияет. После выбора переходим далее.
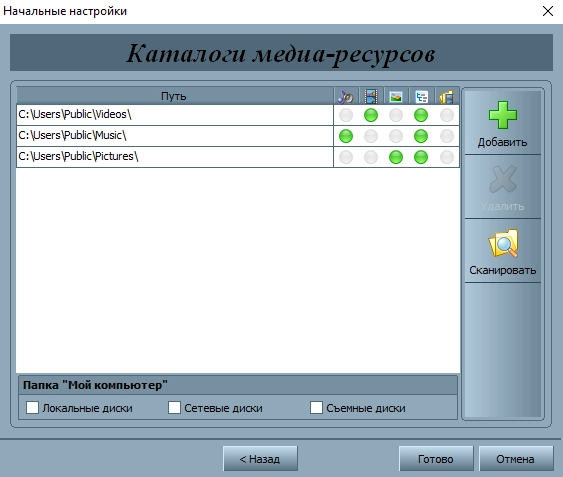
А далее перед глазами появляется выбор папок, из которых мы будем брать медиа-контент. Папки с Вашим медиа-контентом можно выбрать сейчас, а можно добавить их далее. Мы рассмотрим чуть ниже, как это сделать. После выбора папок нажимаем кнопку «Готово«.
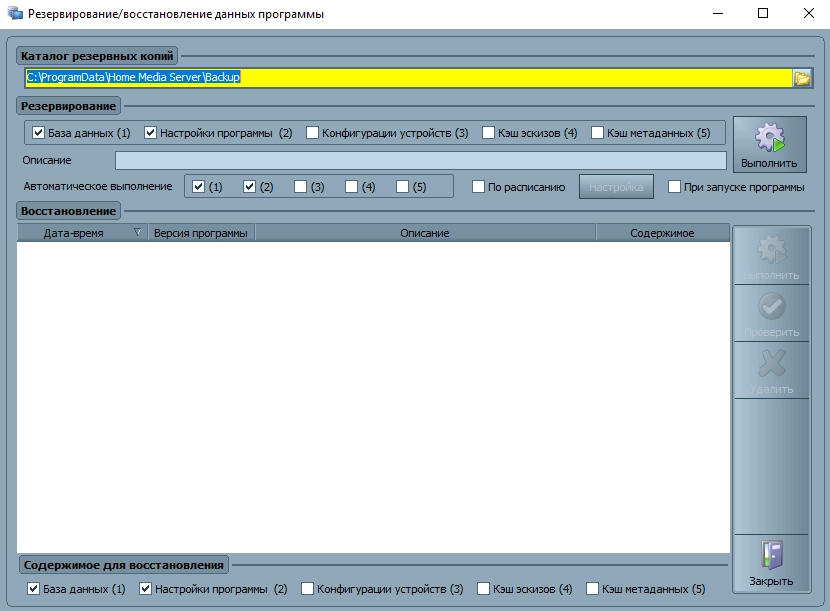
После первоначальных настроек нам предлагают сделать резервную копию настроек, кеша изображений, базы данных, настроить расписание автоматического бекапа. Не будем сейчас подробно на этом останавливаться и пойдем дальше. Для этого нажимаем кнопку «Закрыть«.
После этого перед нами появляется главное окно программы. Перейдем сразу к нескольким «важным» настройкам.
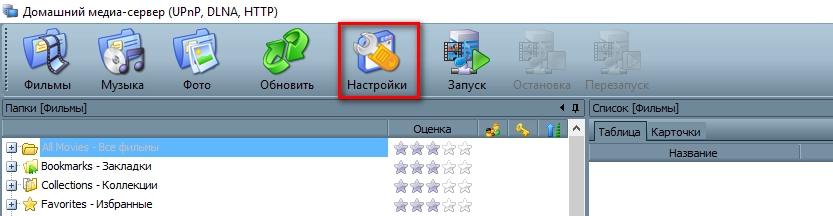
Слева представлены типы настроек, справа конкретные настройки.
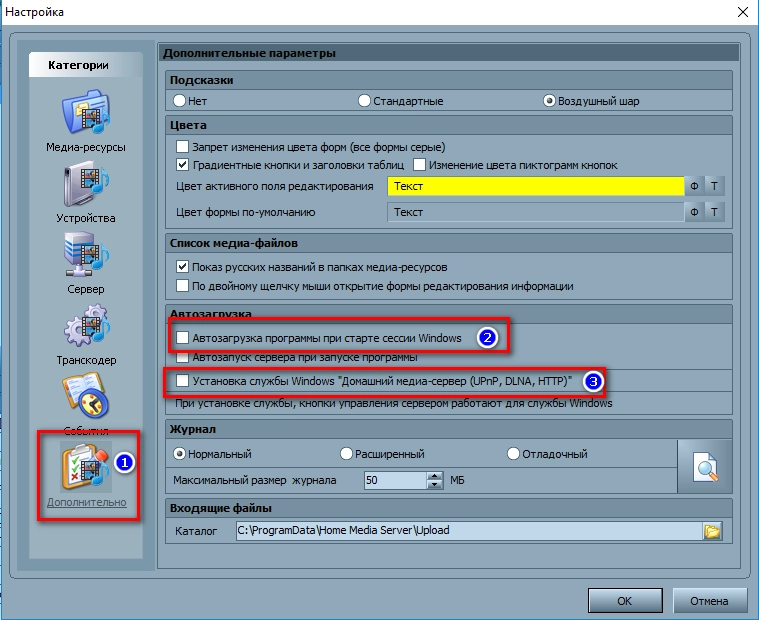
Давайте сразу перейдем в дополнительные настройки и настроим автозагрузку DLNA сервера с включением ПК.
Для того выбираем пункты 2 и 3.
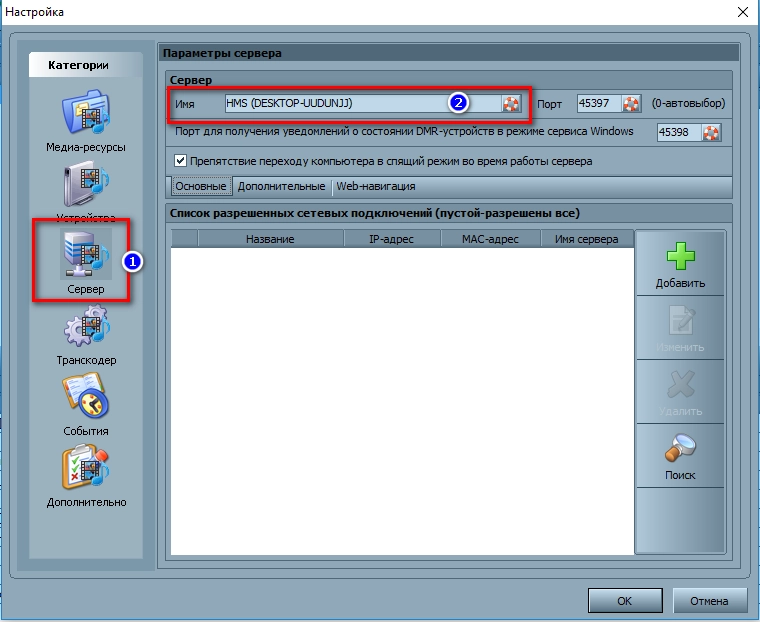
Теперь перейдем во вкладку «Сервер» и пропишем имя нашего DLNA сервера. Как мы будем видеть его в сети.
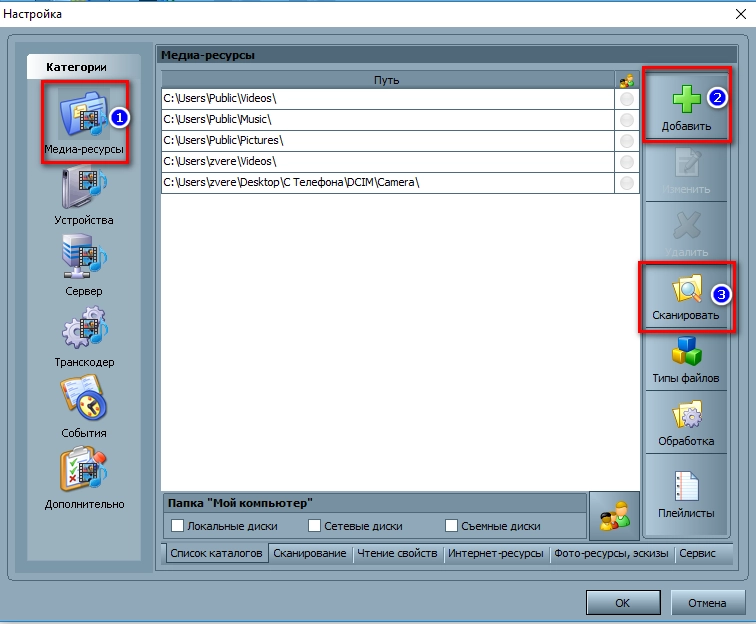
После изменения имени, необходимо добавить папки с медиа-контентом (если Вы не сделали этого в «первичной настройке или решили добавить еще папки. Тут все просто. Нажимаете кнопку «Добавить» (2) и выбираете папку, которую Вы хотите добавить. После этого ее необходимо «Сканировать» (3), чтобы файлы из папки/папок попали в сервер.
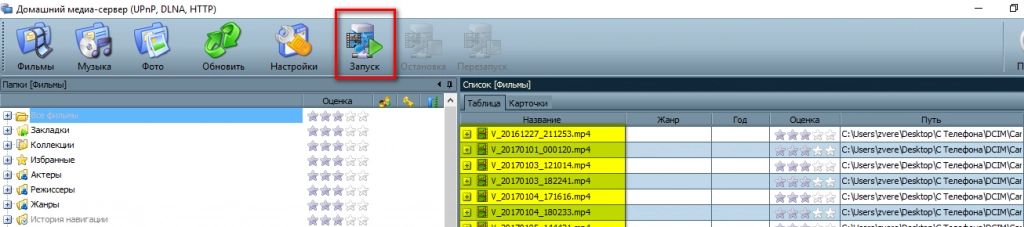
Если Вы все сделали верно, то у Вас должны появиться Ваши файлы в правой части (как на скриншоте выделено желтым цветом).
Если у Вас там есть Ваши файлы, то нам осталось уже совсем чуть чуть. Запустить и пользоваться. Тут все очень просто — нажимаем кнопку «Запустить«.
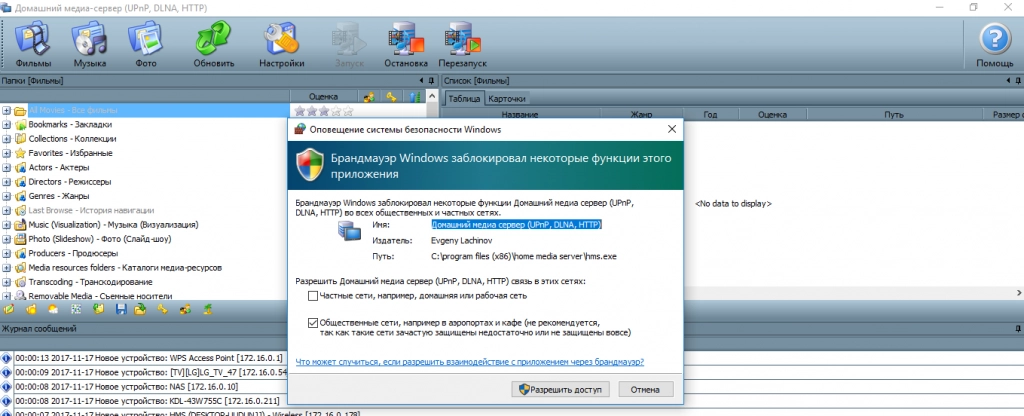
Если у Вас включен «Брандмауэр Windows», то у Вас спросит система, разрешить ли ей доступ в сеть. Выбираем в какие сети разрешить доступ и нажимаем «Разрешить доступ«.
Заключение
Мы с вами установили программу Home Media Server (HMS), а говоря проще — настроили DLNA сервер на операционной системе Windows.
Осталось только запустить устройство воспроизведения (ТВ, медиа-приставка, мобильный телефон и пр.) и проверить, есть ли в сети наше устройство и есть ли в нем файлы, нужные нам.
Мы надеемся, что данная статья вам помогла. Если у Вас что то не получается или есть вопросы — пишите комментарии, постараемся помочь.
Ваш покорный слуга — компьютерщик широкого профиля: системный администратор, вебмастер, интернет-маркетолог и много чего кто. Вместе с Вами, если Вы конечно не против, разовьем из обычного блога крутой технический комплекс.