
Hass.Agent on your Windows PC tied together with Home Assistant can do a LOT of things. Controlling aspects of your PC from Home Assistant and controlling entities in Home Assistant from your PC are just a few of those things.
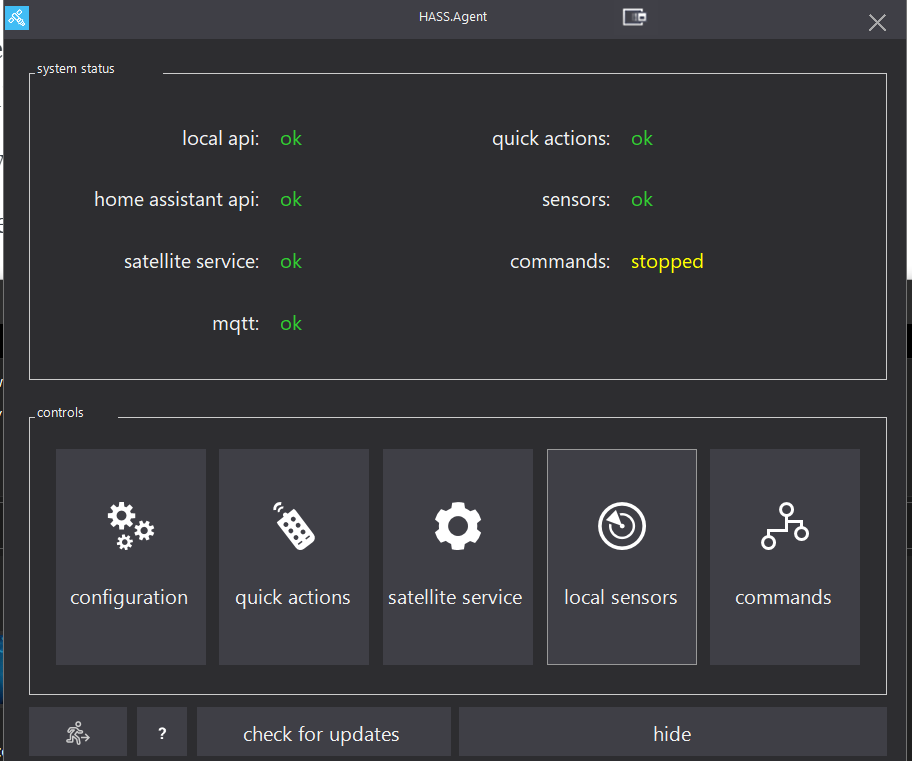
HASS.Agent is a Windows-based client (companion) application for Home Assistant, developed in .NET 6. Here are the core features of Hass.Agent.
Notifications: receive notifications, show them using Windows built-in toast popups, and optionally attach images.
- This requires the installation of the HASS.Agent Notifier integration.
Media Player: use HASS.Agent as a mediaplayer device: see and control what’s playing and send text-to-speech.
- This requires the installation of the HASS.Agent MediaPlayer integration.
- Quick Actions: use a keyboard shortcut to quickly pull up a command interface, through which you can control Home Assistant entities — or, assign a keyboard shortcut to individual Quick Actions for even faster triggering.
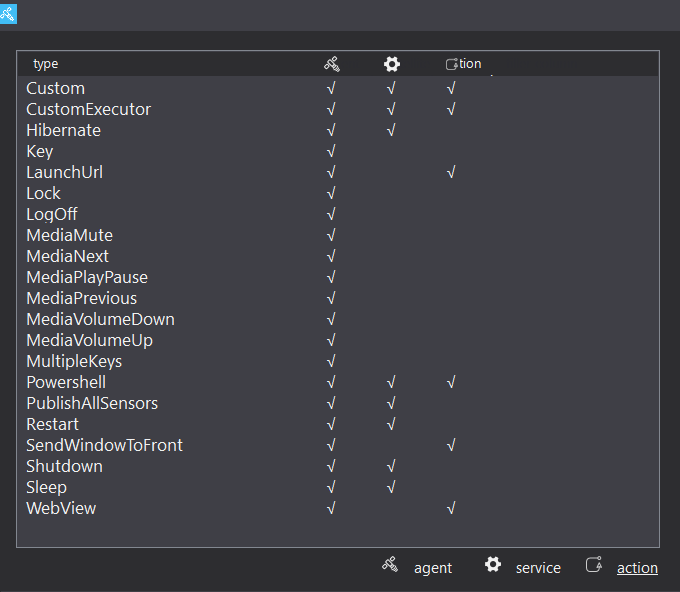
- Commands (currently 21): control your PC (or other Windows-based devices) through Home Assistant using custom- or built-in commands.
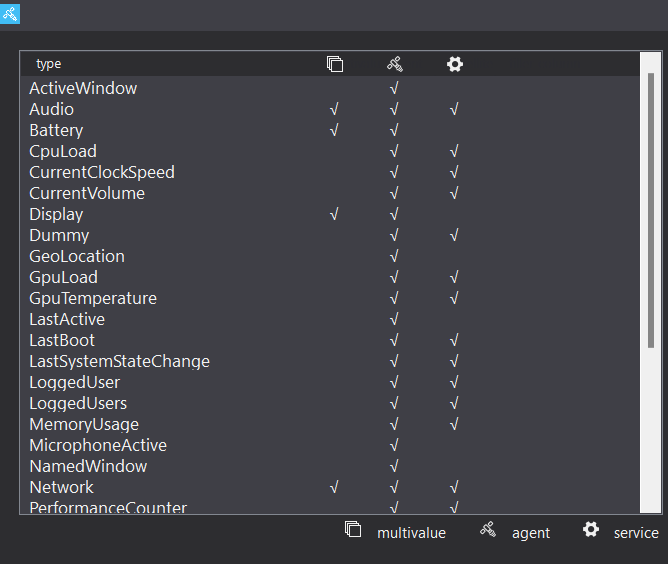
- Sensors (currently 29): send your PC’s sensors to Home Assistant to monitor every aspect of your device.
- WebView: quickly show any website, anywhere — no browser required, for instance, a HA dashboard.
- Satellite Service: use the service to collect sensor data and execute commands, even when you’re not logged in.
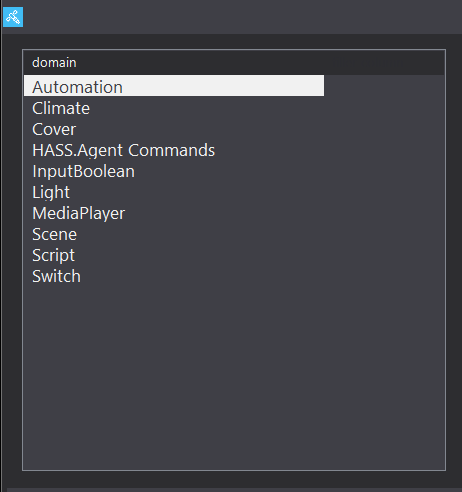
- All entities are dynamically acquired from your Home Assistant instance.
- Commands and sensors are automatically added to your Home Assistant instance.
Installation of Hass.Agent is super simple. Download the installer and go. If you are missing some requirements, such as .NET, the installer will prompt you to install those missing components. Installation of Hass.Agent Notifier and Hass.Agent MediaPlayer can be done through HACS. They can also be installed manually if you choose.
💡
Note: This is a Windows-only application. It is not available for Linux or Mac. Details about the reasons for this are on the Hass.Agent github page.
Hass.Agent has the ability to set hotkeys to send commands to Home Assistant as well as just opening the main screen.
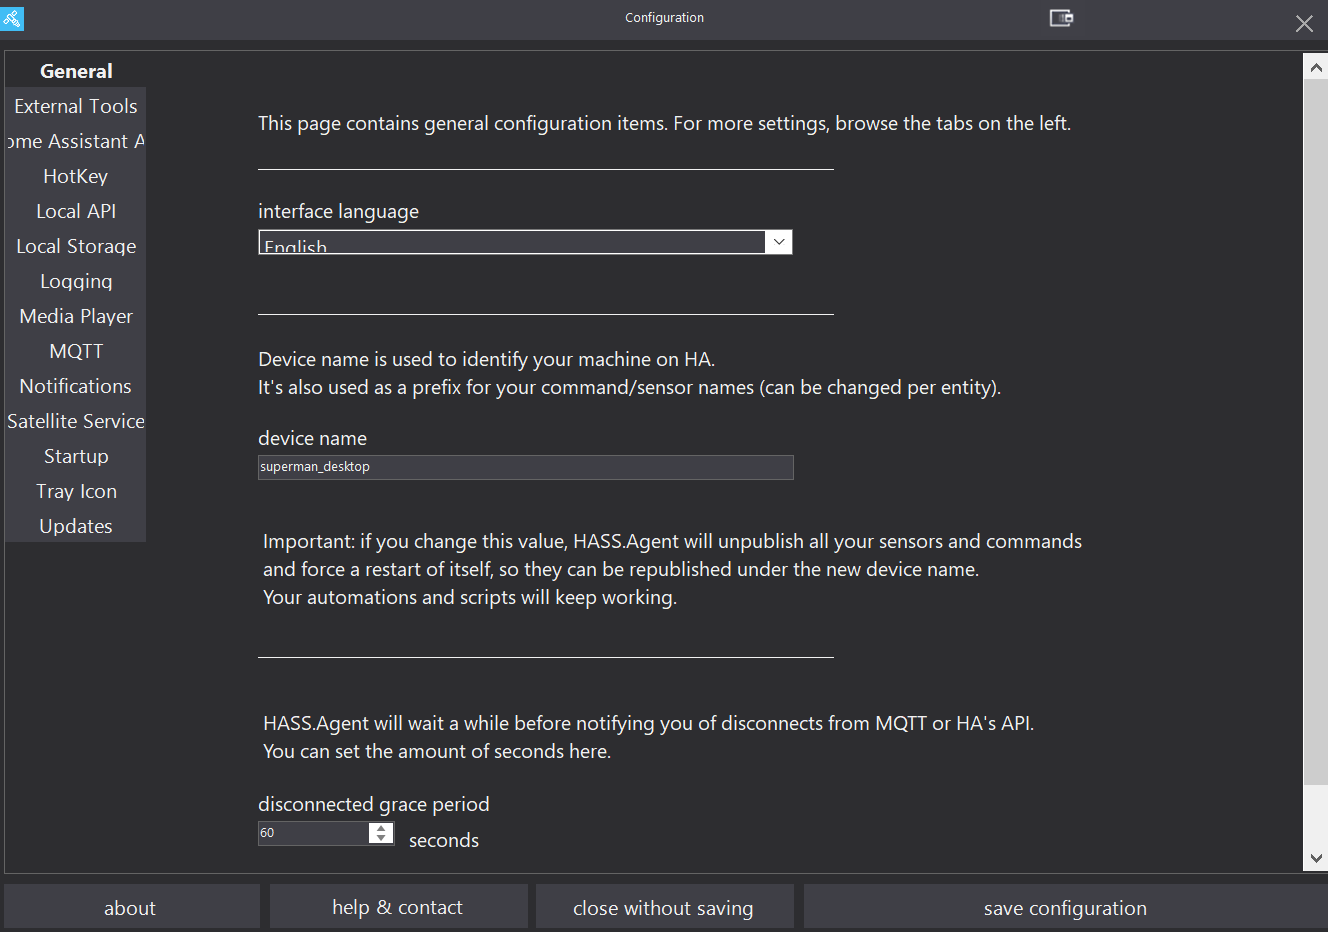
Initial configuration is done during «Onboarding» in the installation process. However, all of those same settings can be accessed via the configuration menus.
Most of the entities in Home Assistant are exposed to Hass.Agent which means that you can control all of them directly from Windows, and with hotkeys. How amazing is that?!
Along the same lines, there are tons of Windows sensors that are available to send over to Home Assistant. You can control your PC as well as log things such as CPU usage, battery percentage remaining, Webcam status, etc.
I cover more detail in my video. Please take a moment and give it a watch. If you’re not a subscriber to my YouTube channel, I would really appreciate if you would hit that subscribe button while you are over there. You can also join the channel if you like what I do and want to support growing the channel.
HASS Workstation Service is a new free and open-source application which allows you to control and monitor your, or any other that might be in your network, Windows PC from Home Assistant using the MQTT network protocol. As it is always running in the background, the application was developed with the goal of being a lightweight service using well-defined standards.
As you would have come to expect with everything that was developed for Home Assistant, HASS Worksation Service is a local service which doesn’t need any connection to the cloud. You can set it to only ever communicate through your MQTT broker, such as Mosquitto, using secure communication.
Contents
- Installing HASS Workstation Service on Windows
- Windows sensors provided by HASS Workstation Service
- Windows commands provided by HASS Workstation Service
- HASS Workstation Service vs. IOT Link
- Where HASS Workstation Service falls short
- No edit button for sensors and commands
- No media controls
- Some sensors should be binary sensors
- Append computer name
Installing HASS Workstation Service on Windows
Please note, that you will have to have an MQTT broker up and running before being able to use HASS Workstation Service. This guide will not cover how to install and set up a such a broker. The easiest way of doing so is by using the Mosquitto add-on for Home Assistant. Mosquitto can also be set up as a Docker container or as a native application on Windows, macOS, or Linux.
You can download an installer for the latest HASS Workstation Service version in this Reddit thread and install it as you would any other Windows application. However, if you get can’t install the application due to Windows not trusting it, I encountered this issue, you can enable a prompt to appear by editing the registry subkeys described in this article.
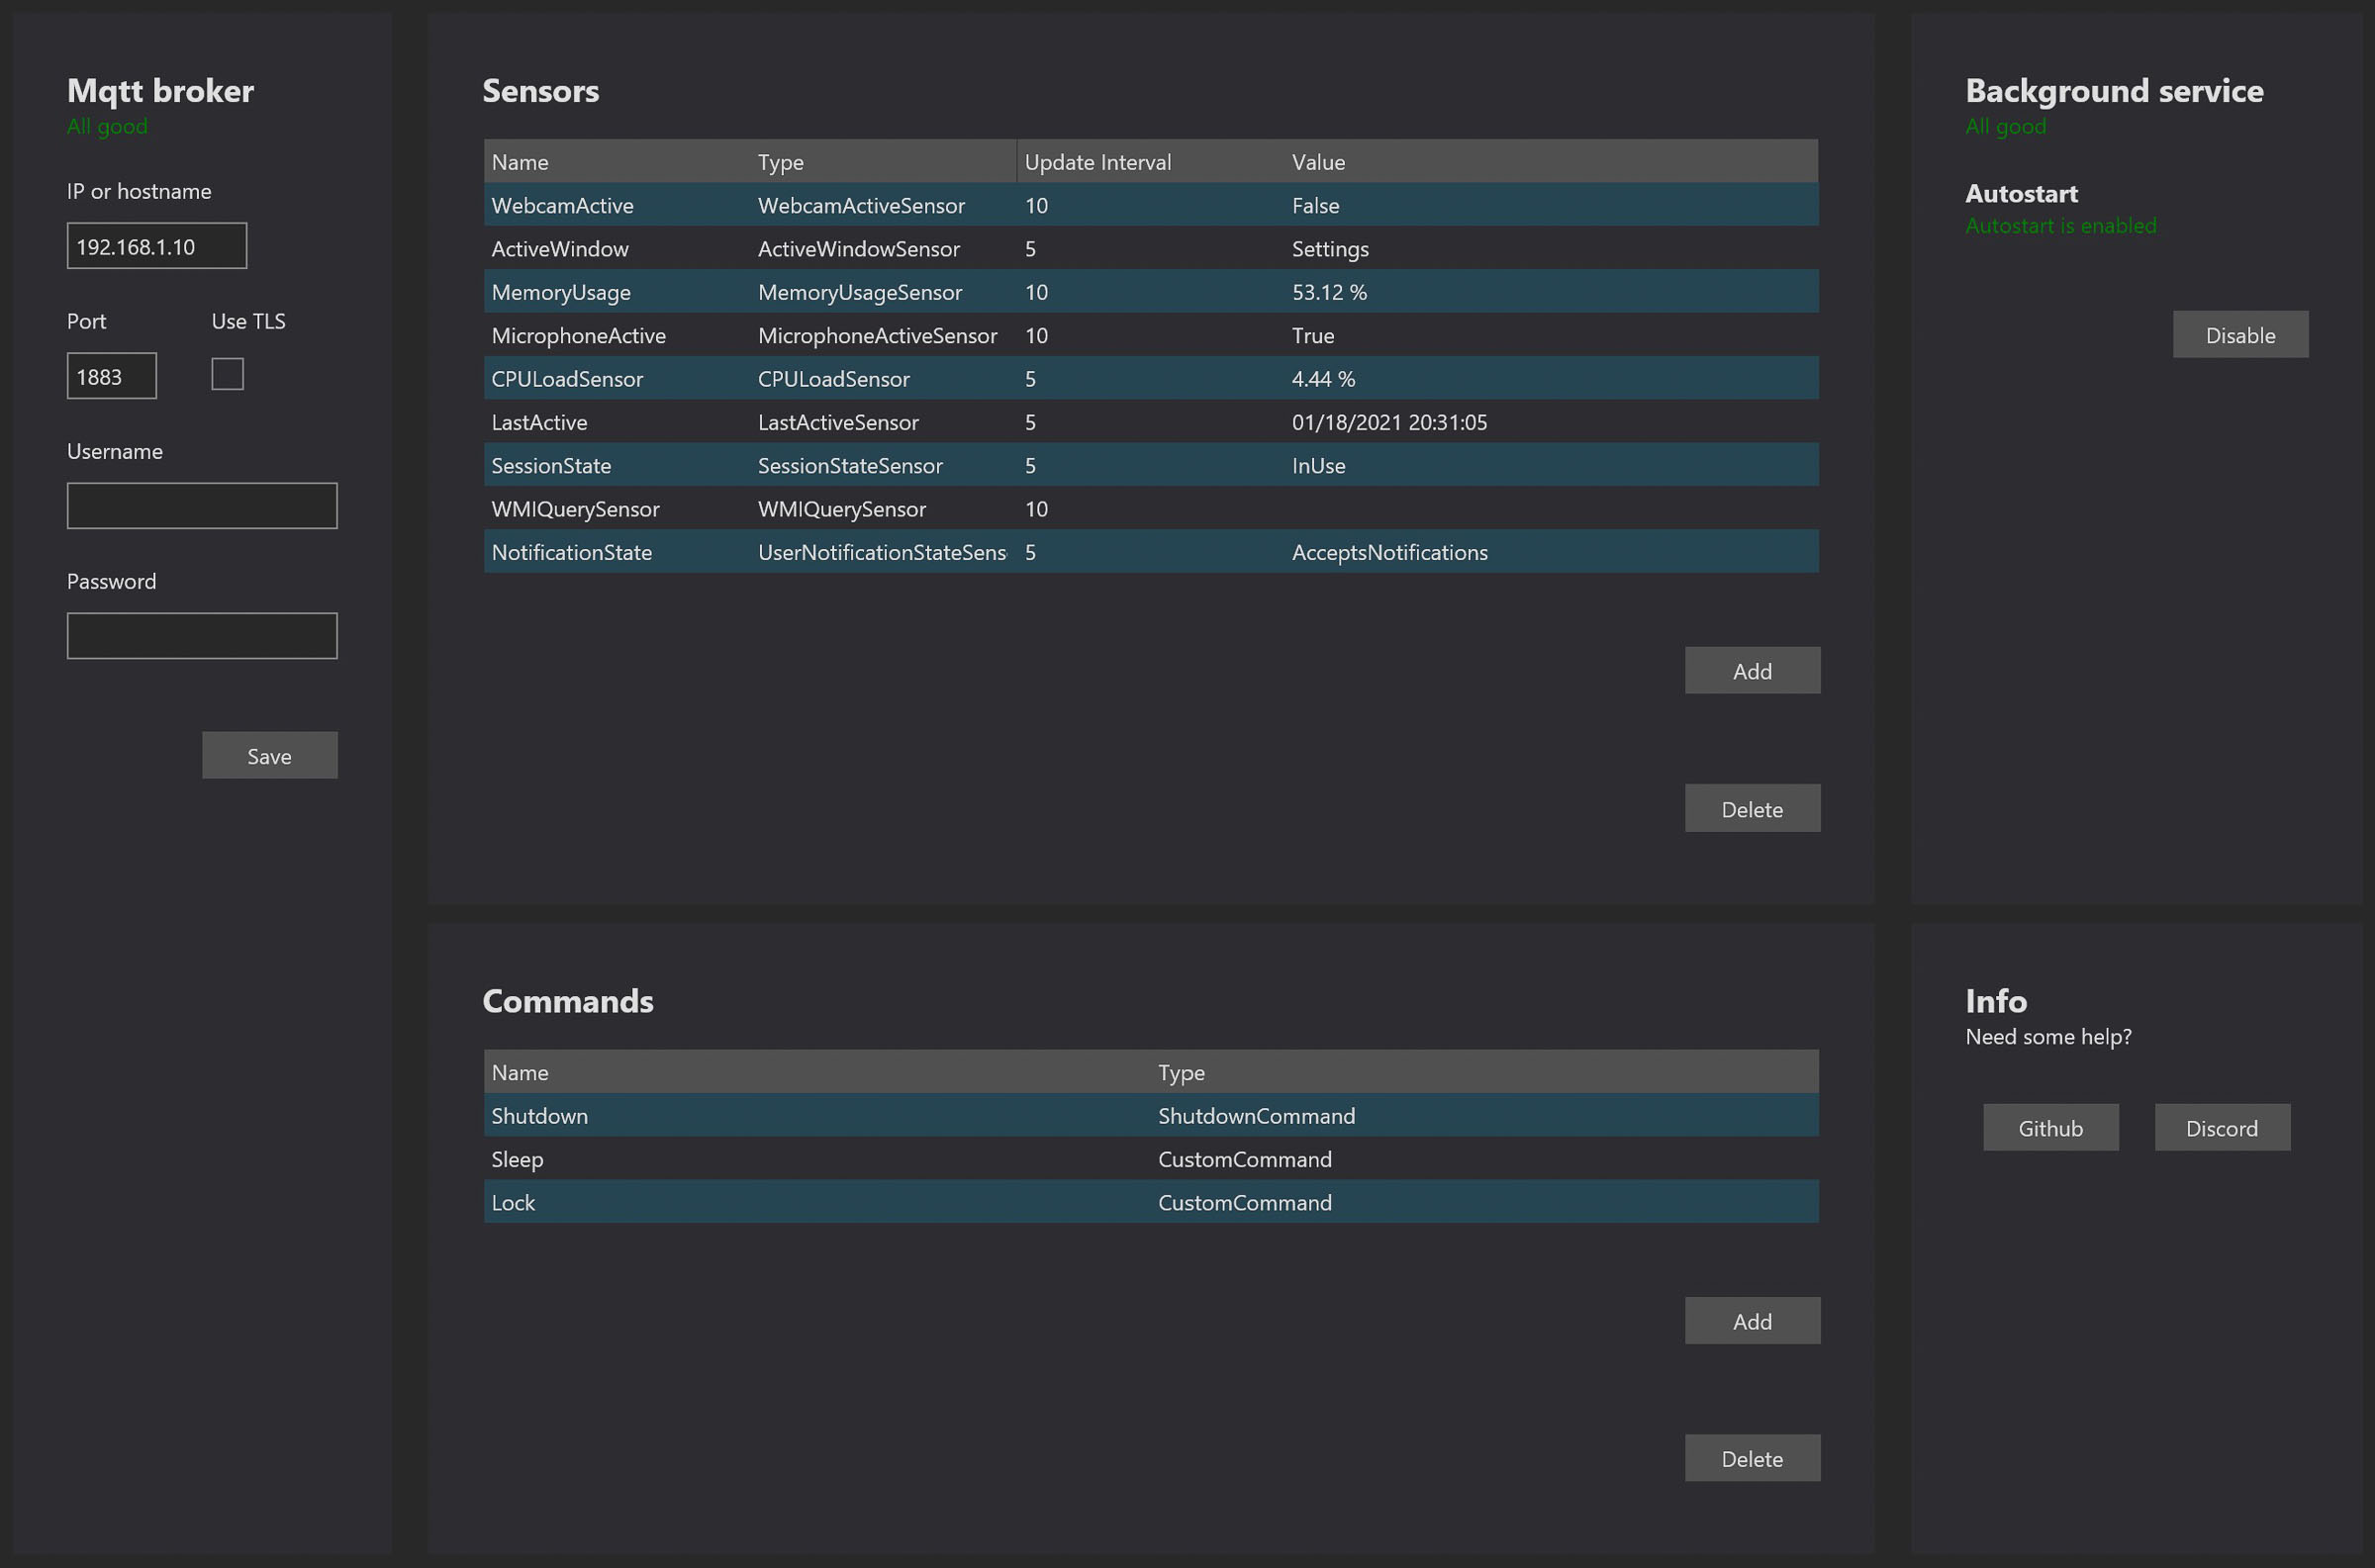
Once installed, all you have to do is add your MQTT broker’s credentials and click the save button. If you’ve already set up MQTT on Home Assistant and have enabled discovery, the sensors, and commands you add to HASS Workstation Service should automatically appear as entities.
Once fully configured, HASS Workstation Service it will stay active in the background and run as a Windows service. In my short time using the application I have not seen it creep above 0.5% CPU utilization, and, in my case, it occupies around 25 MB of memory.
Windows sensors provided by HASS Workstation Service
In its current version, you can configure up to twelve sensors using HASS Workstation. These include sensors which report whether your microphone or webcam is active, information on your CPU (load and clock speed) and memory usage, and also the title of the currently active window.
Using the provided sensors, you could, for example, have any noise producing machines in your office turn off whenever the microphone is active. Or you could turn on certain lights when HASS Workstation Service detects that the webcam is turned on.

Windows commands provided by HASS Workstation Service
There are three preconfigured commands which will add a switch to Home Assistant to log off the current user, restart the computer, and fully shut down the computer. There is also the option of adding custom commands, and the author has helpfully provided a few in the aforementioned Reddit thread. You can simply copy and paste the code below and add them as custom commands.
Put the computer to sleep (this will hibernate the computer if hibernation is enabled):
rundll32.exe powrprof.dll,SetSuspendState 0,1,0Lock the computer:
Rundll32.exe user32.dll,LockWorkStation
HASS Workstation Service vs. IOT Link
In a previous article, I presented the desktop application IOT Link, which has many parallels to HASS Workstation Service. IOT Link is currently the more mature of the two applications and provides many more sensors, including the ability to display a screenshot of what you are currently doing as a camera feed in Home Assistant.
HASS Workstation Service does go slightly easier on your system, though the difference is minimal, and provides a simpler interface. The setup is also easier but provides you with fewer options as all you have to do is enter your MQTT broker’s IP, whereas IOT Link requires you to edit a YAML file. IOT Link does also not have the ability to report the active window and webcam usage yet, which is one big advantage HASS Workstation Service has over it.
Where HASS Workstation Service falls short
Keep in mind that HASS Workstation Service is still very much beta software. I am in no way criticizing the developers or trying to say that they should do better. This application was developed in their spare time and is given away for free. As I can’t contribute to the project, I am in no position of telling them what to do. Still, there are a few shortcomings I believe you should be aware of before installing it.
No edit button for sensors and commands
In its current state, HASS Workstation Service does not allow you to edit any existing sensors or commands. If you want to change anything, for example how often the sensor is updated, you are forced to delete the sensor and add it again with the desired settings.
No media controls
Having media controls would be a nice feature and, luckily, is being worked on by the developers, but as isn’t integrated as yet. This would allow you to remotely skip tracks and adjust the volume when listening to Spotify or another music service through your computer speakers, even if the screen were turned off.
Some sensors should be binary sensors
Currently, every sensor you add to HASS Workstation Service is reported as a sensor to Home Assistant. However, the webcam and microphone status should definitely be reported as binary sensors, as they can only ever be one of two states. Namely, on or off.
Append computer name
One thing HASS Workstation Service should definitely do implement is prepending the computer’s name to any sensor and command. If you were to have the application set up on multiple computers in your network you would have to carefully adjust the sensors and commands on each installation to avoid any duplicates. If duplicates do occur, Home Assistant will simply append _2 to one of them, making them difficult to discern.

About Liam Alexander Colman
is an experienced Home Assistant user who has been utilizing the platform for a variety of projects over an extended period. His journey began with a Raspberry Pi, which quickly grew to three Raspberry Pis and eventually a full-fledged server. Liam’s current operating system of choice is Unraid, with Home Assistant comfortably running in a Docker container. With a deep understanding of the intricacies of Home Assistant, Liam has an impressive setup, consisting of various Zigbee devices, and seamless integrations with existing products such as his Android TV box. For those interested in learning more about Liam’s experience with Home Assistant, he shares his insights on how he first started using the platform and his subsequent journey.Понадобилось мне добавить в Home Assistant свой игровой PC. А именно возможность включения и выключения.
Возможность включение я разберу в другой статье, а в этой расскажу про выключение.
Быстрое гугление наводит на:
net rpc shutdown
Но я использую Home Assistant в Hass.io на малинке, а там не так просто доустановить отсутствующие утилиты. Нужен был способ исключительно на Python.
Я нашёл интересную библиотеку pypsexec и решил оформить её в виде компонента HA. Библиотека создаёт исполняемые exe-шники в папке Windows и запускает их через службы Windows, которые так же создаёт. Я решил немного поправить этот подход и обойтись только созданием служб Windows. Вот что получилось:
/config/custom_components/psexec/__init__.py
«»» Компонент добавляет службу `psexec.exec` удаленного выполнения команд на компьютерах Windows через протокол `SMB 2`. В момент выполнения на удалённом компьютере создаётся и запускается служба Windows, выполняющая указанную команду. По завершению выполнения служба удаляется. Удалённый пользователь должен быть администратором. Если на удалённом компьютере включен UAC — необходимо внести правки в реестр: «` Windows Registry Editor Version 5.00 [HKEY_LOCAL_MACHINE\SOFTWARE\Microsoft\Windows\CurrentVersion\Policies\System] «LocalAccountTokenFilterPolicy»=dword:00000001 «` Если удалённый Windows старый (например win7) — необходимо указывать параметр `encrypt=false`. Подробности тут: https://pypi.org/project/pypsexec/ Пример использования (создаст в корне диска C файл out.txt): «` script: smb_remote: sequence: — service: psexec.exec data: host: 192.168.1.123 username: user password: pass encrypt: false command: cmd.exe /c echo Hello World > c:\out.txt «` Для засыпания компьютера необходимо отправить команду: «` cmd.exe /c start /b shutdown.exe /h «` — `cmd.exe /c` — выполняет далее указанную команду (для start нет exe файла) — `start /b` — запускает следующую команду в фоне (нельзя дожидаться окончания выполнения shutdown — мы его не дождёмся) — `shutdown.exe /h` — отправляет компьютер в сон (или гибернацию в зависимости от настроек компьютера) Компонент протестирован в HA на Windows и в Hass.io на Raspberry Pi 3. «»» import logging _LOGGER = logging.getLogger(__name__) DOMAIN = «psexec» def setup(hass, config): def exec(call): import uuid from smbprotocol.connection import Connection from smbprotocol.session import Session from pypsexec.scmr import Service host = call.data.get(‘host’) username = call.data.get(‘username’) password = call.data.get(‘password’) encrypt = call.data.get(‘encrypt’, True) command = call.data.get(‘command’) try: connection = Connection(uuid.uuid4(), host) connection.connect() session = Session(connection, username, password, require_encryption=encrypt) session.connect() service = Service(‘HomeAssistant’, session) service.open() try: service.create(command) except: _LOGGER.exception(«Can’t create service») try: service.start() except: # Произвольный EXE-файл не может быть полноценной Службой, # поэтому даже при успешном выполнении мы будем получать ошибку pass try: service.delete() except: _LOGGER.exception(«Can’t delete service») service.close() connection.disconnect() except: _LOGGER.exception(f»Can’t connect to: «) hass.services.register(DOMAIN, ‘exec’, exec) return True
/config/custom_components/psexec/manifest.json
{ «domain»: «psexec», «name»: «PsExec», «documentation»: «https://www.home-assistant.io/», «dependencies»: [], «codeowners»: [ «AlexxIT» ], «requirements»: [ «pypsexec» ] }
Для появления соотвествующей службы в Home Assistant необходимо включить компонент в configuration.yaml
psexec:
Пример использования и краткое описание приведены в комментариях к коду.
Конечно компонент можно использовать не только для удалённого выключения компьютера, а для совершенно разнообразных целей.
Table of contents
- Examples
- Requirements
- Installation and manual to control your PC
- Initial configuration settings
- Configure settings with Home Assistant
- Set remote hibernation in Windows
- Wake on LAN in Home Assistant
The main element of the manual is an example of hibernation setting with HASS WS, I will also show you how to set the computer to turn on using Wake on LAN (WOL). It is an application that allows you to manage your COMPUTER using home assistant, such as locking your PC, restarting, hibernating your COMPUTER, remotely monitoring gpu load.
It also provides useful sensors in the Home Assistant, such as:
- CPU Load – CPULoad,
- Processor Clock – CurrentClockSpeed,
- Start-up time – LastBootTime,
- Microphone display – MicrophoneActive,
- The current sound intensity from the system,
- GPU load,
- The amount of RAM consumed.
Setting this up allows you to create amazing automations to manage your laptop, computer or workstation.
Examples
- Hibernate, turn off your computer remotely, or turn on your TV or console,
- Press your computer when you turn on your TV, console, or connect to your phone.
- Turn on the light for a video call (when the camera is active),
- Send notifications to the Home Assistant mobile app under heavy CPU, GPU or Ram load,
- Sound control.
Requirements
- Home Assistant Server
- Windows 10 on the PC we want to control
- MQTT broker installed, configured in Home Assistant (you need to know the password for it).
It works by installing a service in Windows (which runs in the background) and communicates with the MQTT broker you have configured in your Home Assistant.
Installation and manual to control your PC
You can download the program from here: https://hassworkstationstorage.z6.web.core.windows.net/publish/setup.exe
You’ll see a blue “Windows Protected your PC” screen. This is because the user .exe a certificate without a digital signature from a known certification center (i.e. its own).
Click More Information > Still Run. If you don’t have .NET 5.0.1 installed, you’ll be prompted to install it. You will then receive a “Publisher cannot be verified” warning.


When finished, the application will start automatically. Now it’s time to set up the program.
Initial configuration settings
Before you configure the settings, make sure that the hass-workstation-service.exe is running.You can check this in Task Manager > details.

Configure settings with Home Assistant
Add a Home Assistant IP address (mine is http://192.168.68.124:8123/) The broker’s default port is 1883.
Type the user name and password into the MQTT of a broker, disable the “Use TLS” option, turn on Startup to start the service with the old computer. Finally, save your settings with the Save button.


After you change the state from NormalDisconnection to connected, you can start adding sensors. This part is obvious, just click add and select a sensor or command from the drop-down list. Then they will be available in the Home Assistant as entities.
Set remote hibernation in Windows
Select CustomCommand by typing in the Command field “shutdown / h“, the name field is the name that will be available as an entity e.g. in the Lovelace interface. To prevent your computer from waking up for no reason, set“Only allow a magic packet to wake the computer”. The device manager disables mouse and keyboard wake-up (HIF devices).

When you press the the added button, your computer will be put to sleep.
Wake on LAN in Home Assistant
The “Enable” button is shown in the hibernation preview screenshot, this is an option to turn on the computer from the Home Assistant, it is useful for remote startup of the computer and e.g. a connection to the remote RDP desktop or chrome remote desktop.
In the configuration.yaml file,add a switch with the mac address of the network adapter, enable the option in the network adapter settings nt. WOL (Magic Packet), sometimes there is an option to resume the computer from sleep modes.
Want to monitor Windows computers in your Home-Assistant setup? Maybe even control them to some degree? Then IOT Link is probably the easiest and fastest way to do it. It is a background service that is communicating with Home-Assistant (or other) by MQTT.
I have tested this on Windows 10 and 11, and it works the same way on both, might even work on other versions of Windows.
In this post I will go trough the full setup, but I will not go trough all the more advanced features of the software. This is a little how-to/demonstration.
MQTT Broker
Before following this guide you will need a MQTT broker and MQTT configured with auto discovery in Home-Assistant. If this is in place you can ignore this step.
The easiest way to set this up is with the Mosquitto Add-On in Home-Assistant.
- Go to Supervisor -> Add-on Store
- Select Mosquitto broker under Official add-ons
- Click INSTALL
- You can set a username/password in the Configuration tab, this is optional.
- Click START
- Go to Configuration -> Integrations.
- MQTT will show as “Discovered” (If not add a new integration and search for “MQTT”).
- Select CONFIGURE
Done.
IOT Link: Download and installation
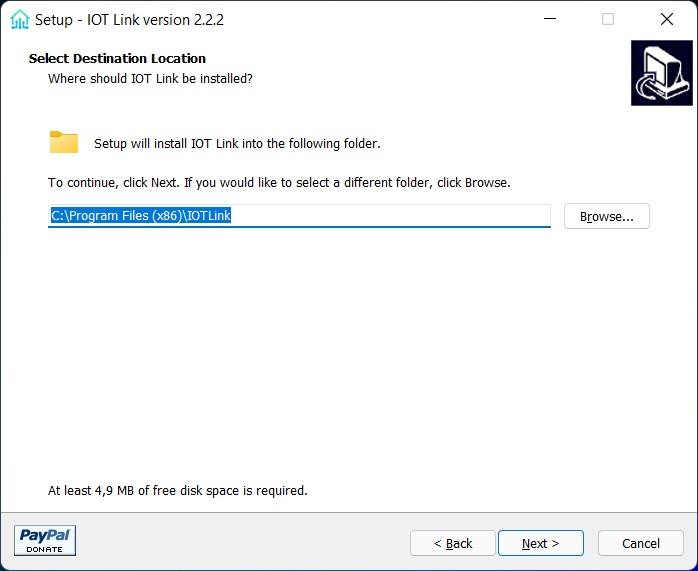
- Go to https://iotlink.gitlab.io/downloads.html and downlaod the last version of IOT link, At the time of writing this post the last version is IOT Link – v2.2.2 (released 2020-10-08)
- When the download is complete right-click the setup file and select “Run as administrator” (input Windows administrator credentials if prompted for)
- Microsoft Defender SmartScreen will pop up and block the installation, click “More info” and then “Run anyway”
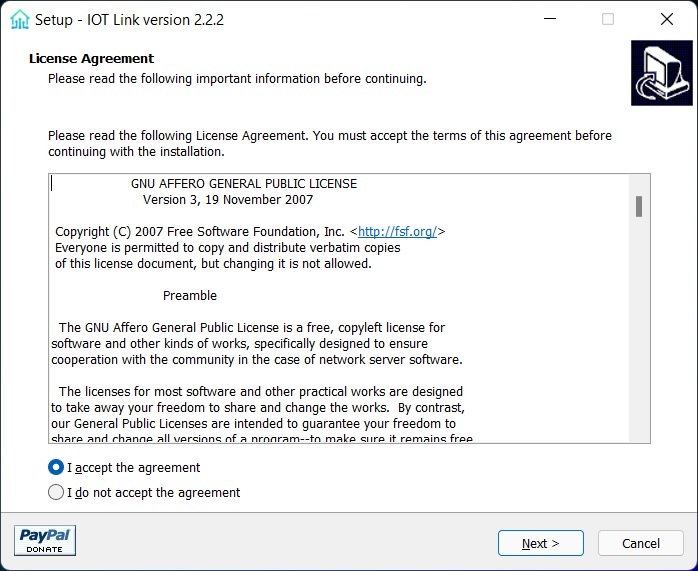
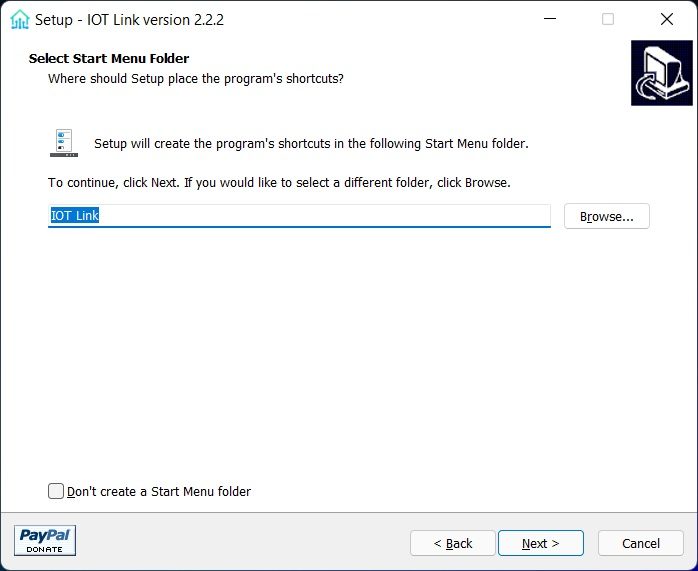
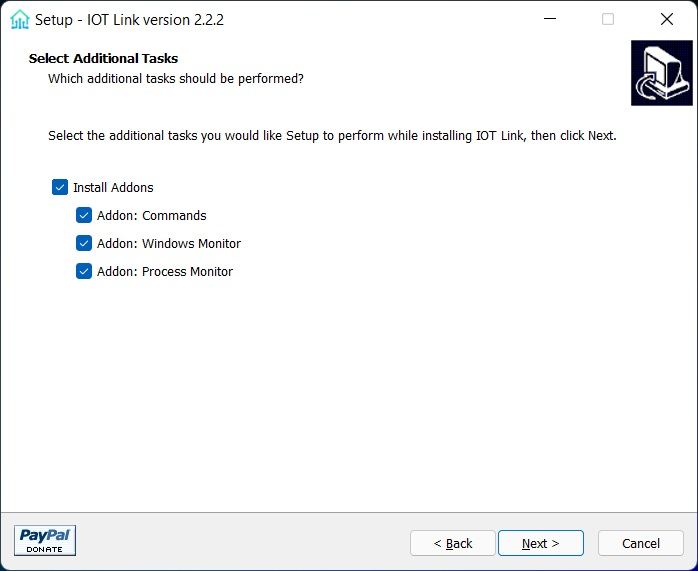
- During installation just keep alt default and complete the setup like in the pictures below.
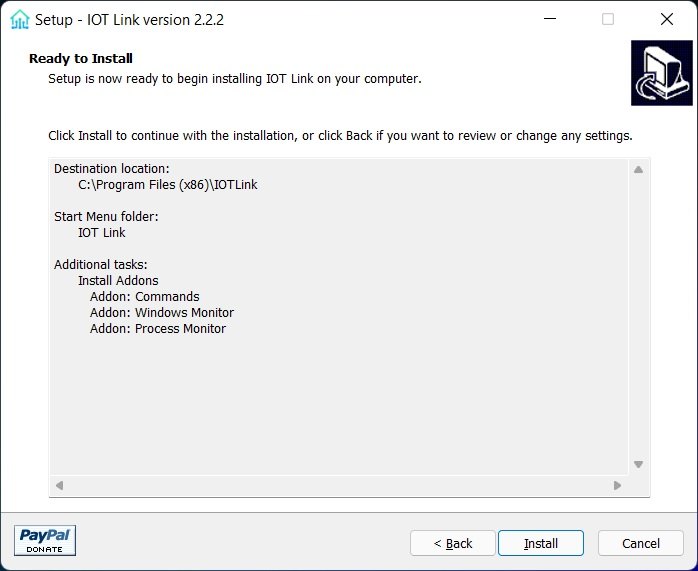
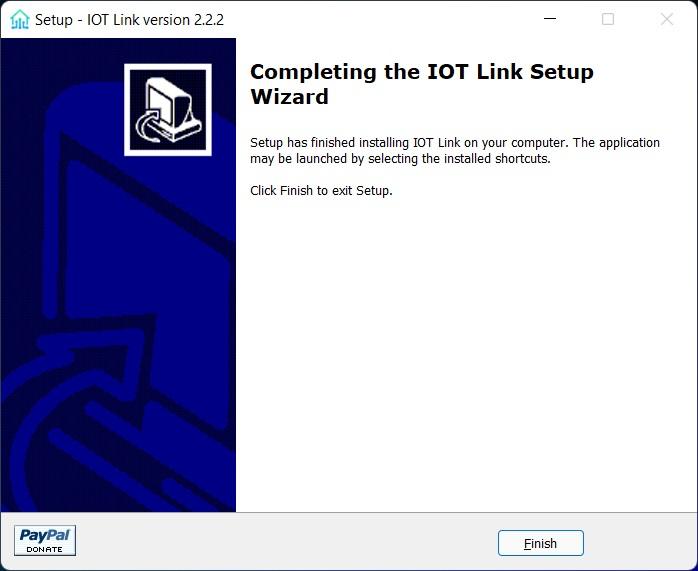
When the setup is done and the message “Service is installed successfully.” comes up click OK, the installation is complete.
A Windows service called IOT Link is now installed, this is now running, and it will automatic start with windows.
It can be found and managed by running services.msc in Windows. (Not needed if there is no issue)
IOT Link: Basic configuration
The installation is done, it is time to connect it to the MQTT, and in the same process to Home-Assistant (Here I assume M MQTT configured with auto discovery is up and working in Home-Assistant).
Open the mine configuration file, C:\ProgramData\IOTLink\Configs\configuration.yaml in a text-editor, (eg notepad).
Most of the settings can be default (or changed at your own preference), but the following options should be edited:
- Under
mqtt:->credentials:->username:andpassword:set MQTT broker user/password (if there is a user set up, else leave blank). - Under
mqtt:->tcp:setenabled:totrue,hostname:to the ip of your MQTT broker (Same as Home-Assistant if Add-On), andport:to the MQTT port,1883is default in Mosquitto. - Under
mqtt:->messages:setretain:totrue.
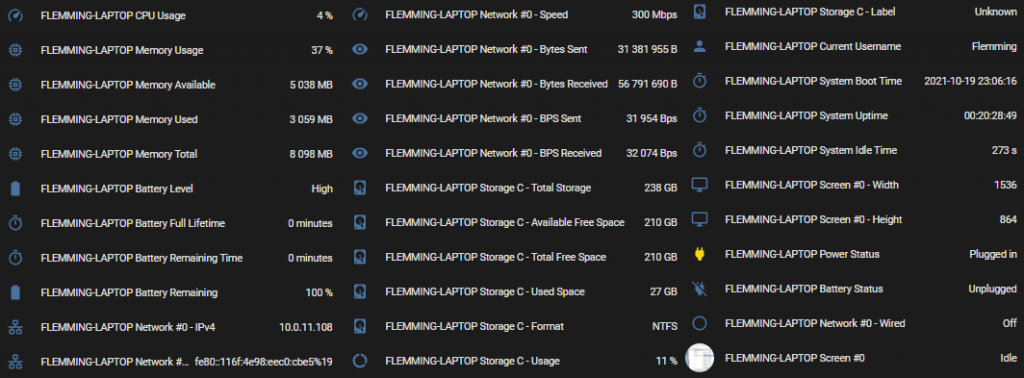
When done, save the file. IOT Link will Automatic ly import the new settings and start to publish to MQTT. If there is no issue Home-Assistant should be populated with new entities pretty fast.
Service Calls
One of the other nice features of IOT Link is the ability to control the remove Windows computer in different ways. This can be done by sending mqtt.publish service calls in Home-Assistant. There is a whole lot of things that can be accomplished but here I have a few examples. This is in Home-Assistant done under Developer Tools -> Services.
Change “workgroup” and “flemming-laptop” according to too actual values.
Reboot the remote computer:
service: mqtt.publish
data:
  topic: "iotlink/workgroup/flemming-laptop/commands/reboot"
  payload: ""
Run Windows Media Player on the remote computer:
service: mqtt.publish
data:
  topic: "iotlink/workgroup/flemming-laptop/commands/run"
  payload: '{ "command": "C:\\Program Files (x86)\\Windows Media Player\\wmplayer.exe", "path": "C:\\Program Files (x86)\\Windows Media Player\\", "user": "", "visible": true, "fallback": true }'
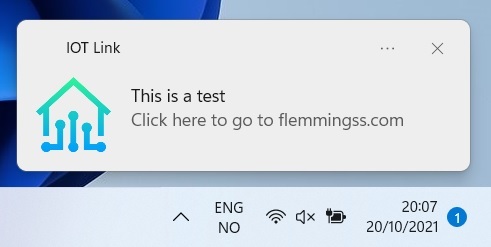
Send a notification, and a link to this website to the remote computer:
service: mqtt.publish
data:
  topic: "iotlink/workgroup/flemming-laptop/commands/notify"
  payload: '{ "title": "This is a test", "message": "Click here to go to flemmingss.com", "launchParams": "toast://open/http://flemmingss.com" }'
More can be found at this page: https://gitlab.com/iotlink/iotlink/-/wikis/Addons/Commands
That’s It. I hope the post was useful 🙂