
Home Assistant Container on Windows using Docker is possible! This article will be complication of super easy, step-by-step instructions on how to start Home Assistant on Windows machine using Docker. In other words, how to run Home Assistant Container, but there is more.
Table of Contents
What else is included in this Home Assistant Container on Windows article?
Here is what you can expect:
- I will show you how to update your Home Assistant when there is a new release and how to implement an automatic health check mechanism.
- If you don’t have Home Assistant yet this is a great way to finally get one and join in one of the fastest growing communities in the Smart Home world.
- On the other hand, if you already have Home Assistant, you can use this method to quickly spin a new test installation where you can start experimenting safely.
- I will also share which is the one and only drawback of this method in my humble opinion.
Just to mention that everything is free and it should work on any Windows version that is still in support and on any recent Intel or AMD Processor from the last 5 to even 10 years that support virtualization instructions.
Installing the Docker Application
First thing that is needed is a working Docker application. To achieve that:
- I will go to docker.com website where I can download the Docker application.
- I’m using a standard Docker installation and I’m accepting everything that is recommended (default installation).
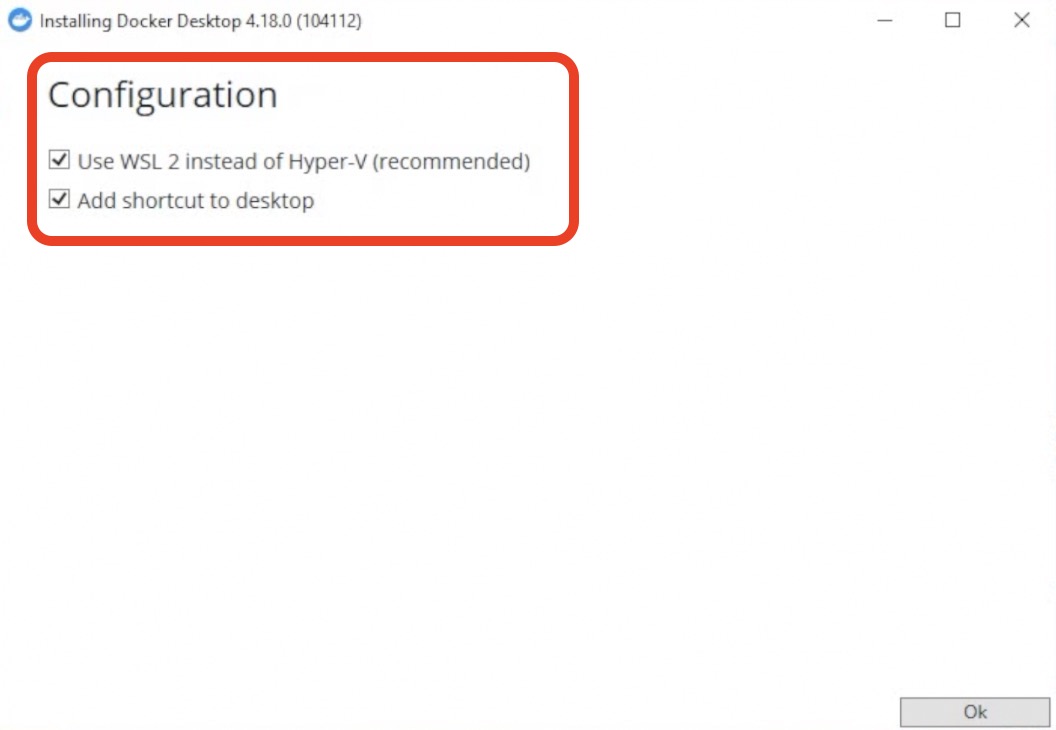
- Basically, I’m just clicking on the Next button until the installation is finished.
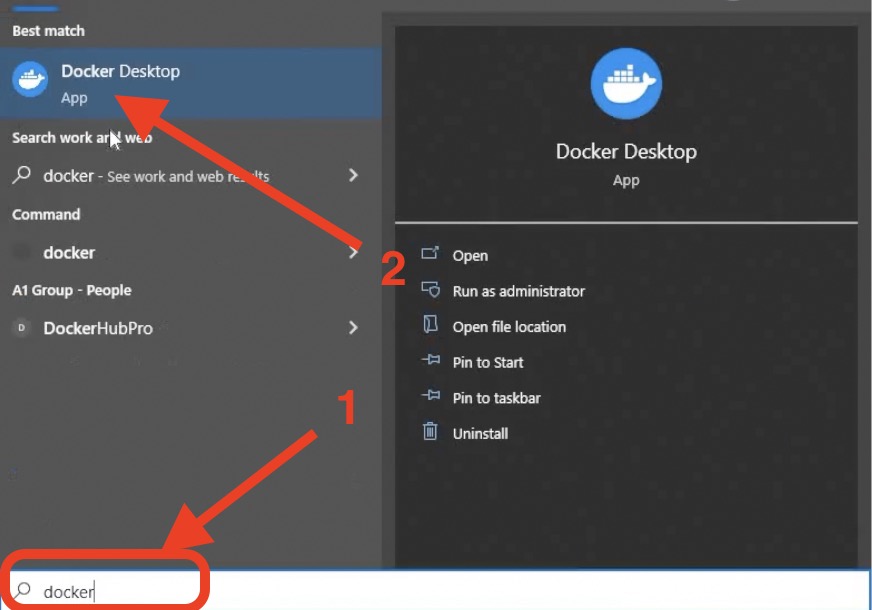
- After that, I will click on the Windows Start button I will search for Docker and I will click on it to start it.
- At the end I would like to see a Green Whale saying that Docker engine is running. This means that everything is fine with the Docker installation.
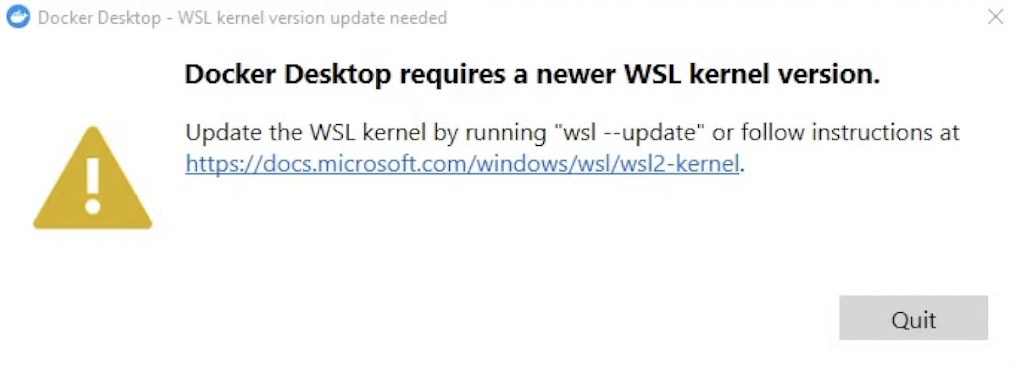
- By the way, If you get any warnings about WSL2 that is Windows Subsystem for Linux that Docker is using. Just follow the official Microsoft instructions to resolve the issue and you can find the link here – LINK
Start Home Assistant using docker-compose method
We finished with the Docker installation and it is time to move to the next steps.
Next, I will create a new empty folder named homeassistant in my C:\ drive on my Windows machine.
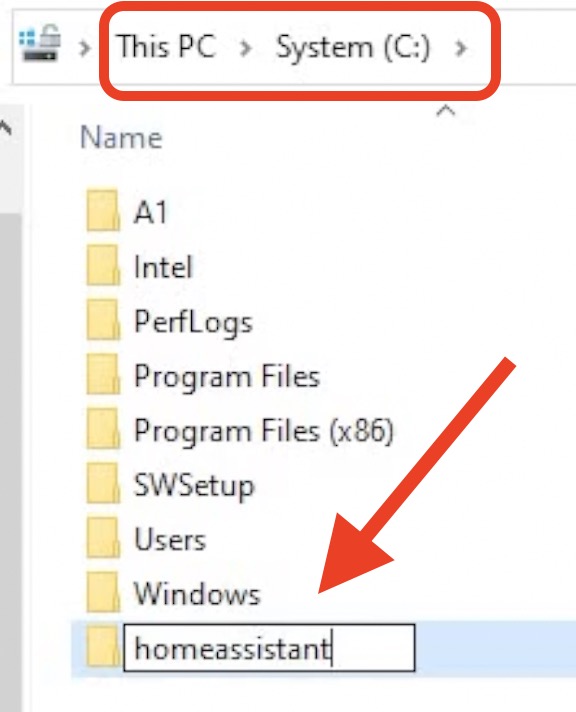
Quick Tip: I’m going to use this folder for the Home Assistant configuration. Be careful here if you want to replicate the steps that follows without any modification. Make the same folder inside your C drive and name it homeassistant exactly the same way all lowercase character without space or other special characters.
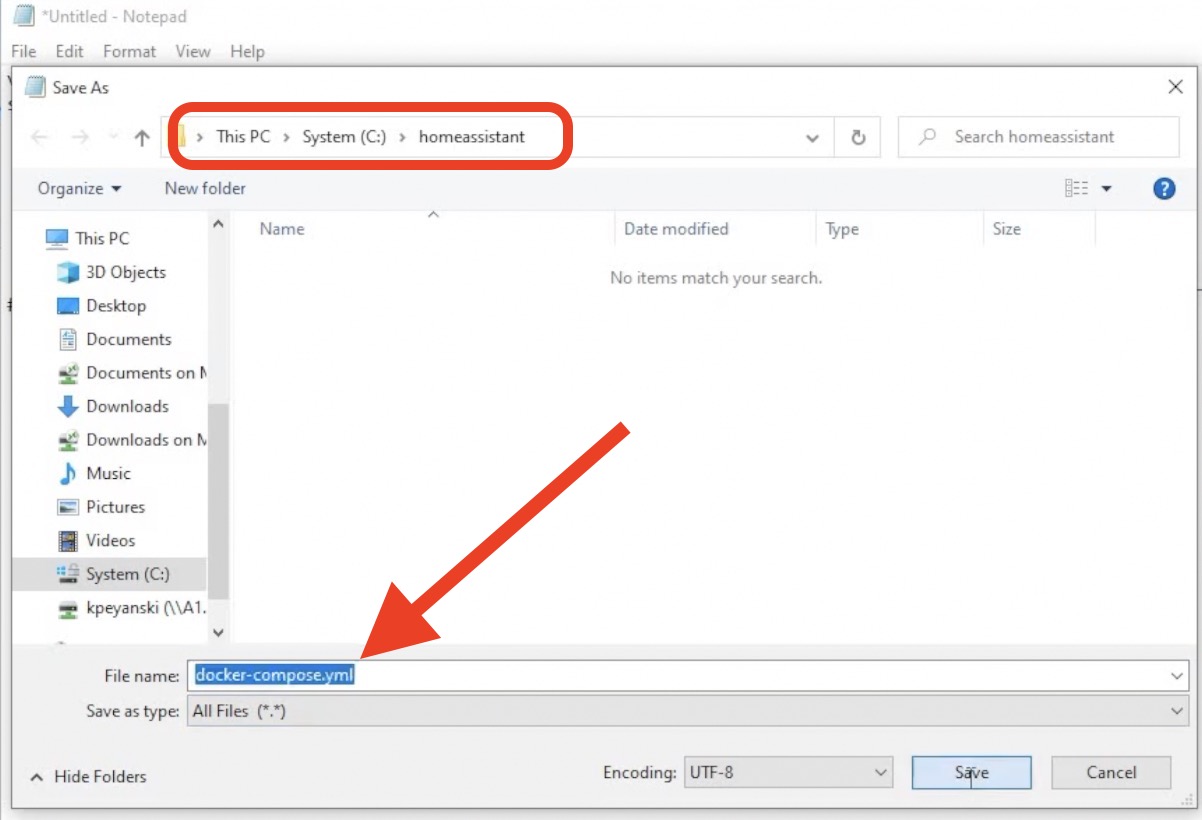
- After that, go to this GitHub link and either download the file as ZIP and unzip it or copy its contents and paste it in an empty Notepad.
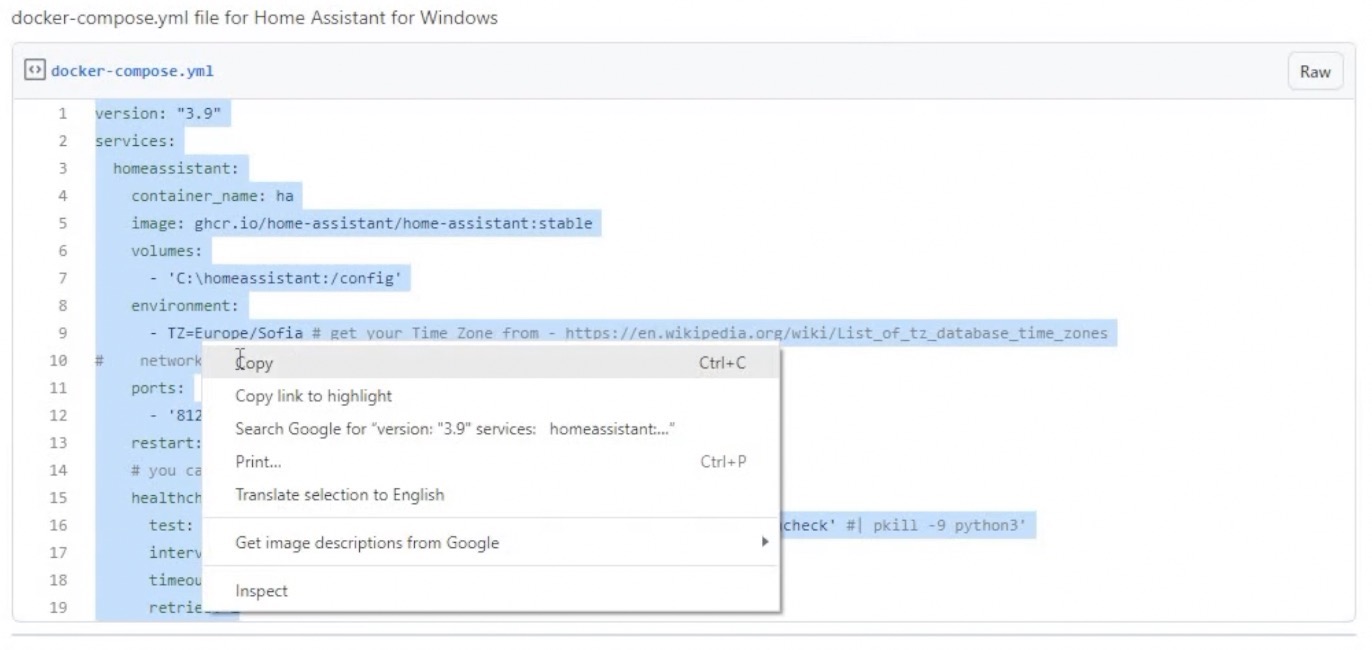
- Then name that file docker-compose.yml and save it in your homeassistant folder in drive C:\.
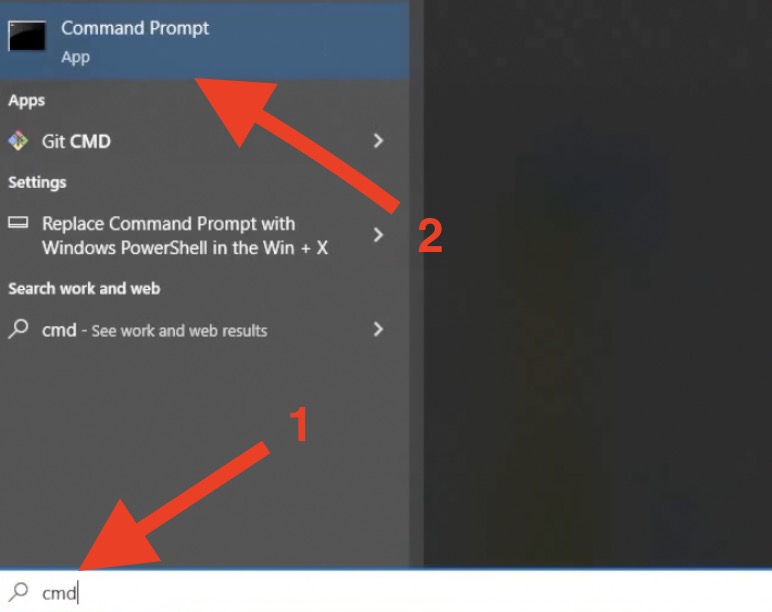
- Then click on the Windows Start button and type
cmdto run the Windows Command Prompt.
- Enter inside the homeassistant folder that we created earlier and in which we saved the docker-compose.yml file and type:
docker-compose up
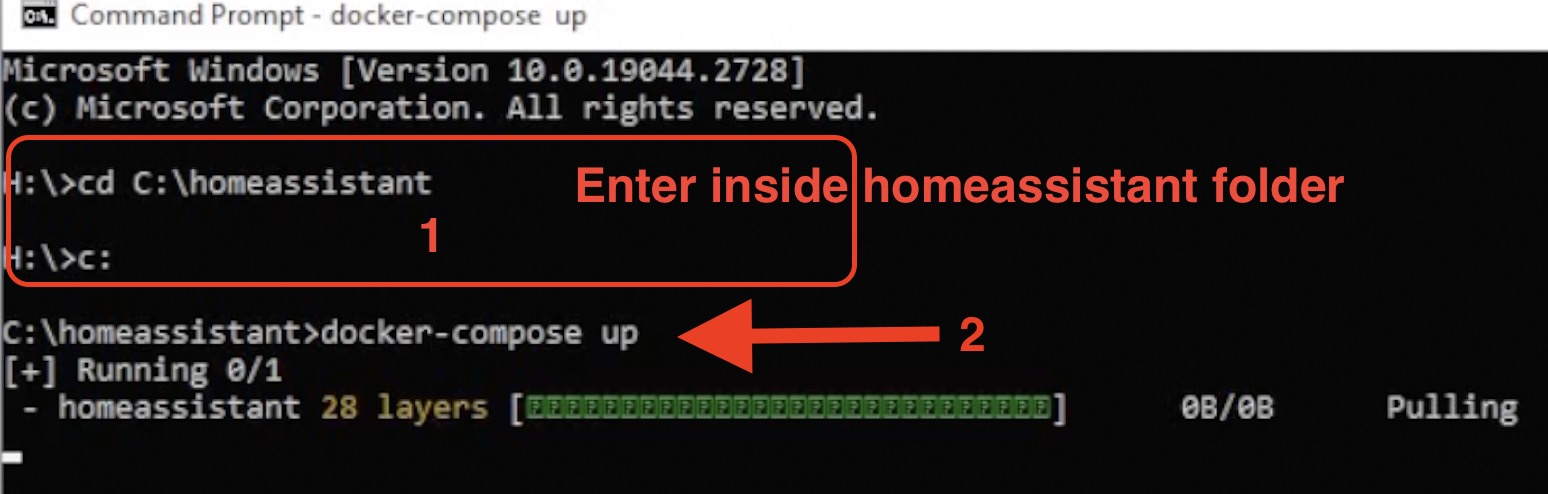
The above command will read the docker-compose.yml file and will execute the instructions inside:
- It will download Home Assistant Image,
- it will create a Docker container,
- it will map the Home Assistant config folder to the C:\homeassistant folder,
- it will set the time zone,
- it will expose the port 8123 where Home Assistant is running,
- and it will implement the health check mechanism.
At the end you will have a fully working Home Assistant.
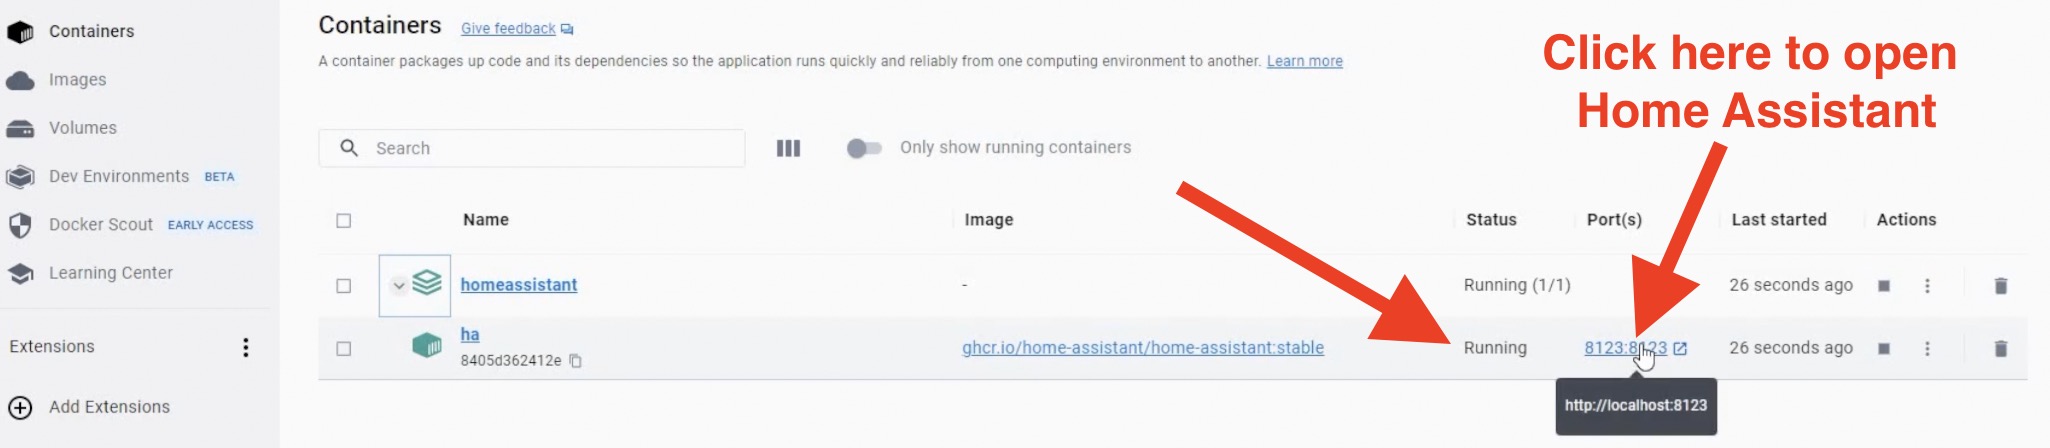
How to check if Home Assistant is working
To check that everything is working you can open the Docker app where you can see that ha container is running and you can open the Web interface.
How to see the health check?
After 90 seconds, because we set that time in our docker-compose.yml file you can open a new Command Prompt and you can type the following command.:
docker container lsYou will see that that our automatic health check is running and the Home Assistant container is healthy.
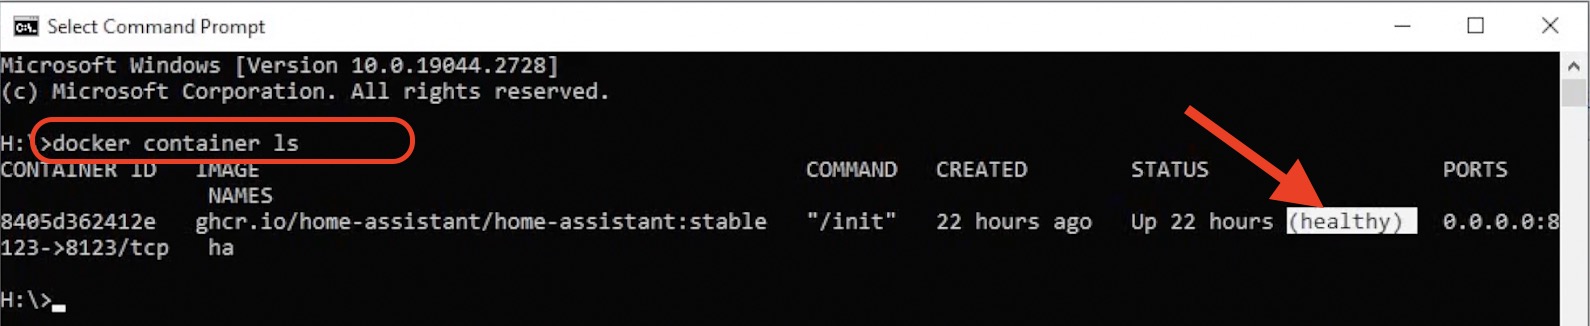
If for some reason localhost on port 8123 is not accessible this healthy status will not be shown.
Quick Tip: Don’t delete the docker-compose.yml file as we are going to use it for the future updates.
Start Home Assistant using docker run method
Instead of using docker-compose.yml method you can achieve the same result, but without the health check by using a docker run command.
To demonstrate you that I will stop & delete the ha container that docker-compose up created from the Docker app. Of course, this can be done from the Command Prompt, but using the Docker app is more visual friendly.

docker-compose up createdYou can get this command from the section below. You just have to paste it in the Command Prompt instead of docker-compose up command.
docker run -d --name="ha" -e "TZ=Europe/Sofia" -v "C:\homeassistant:/config" -p 8123:8123 ghcr.io/home-assistant/home-assistant:stable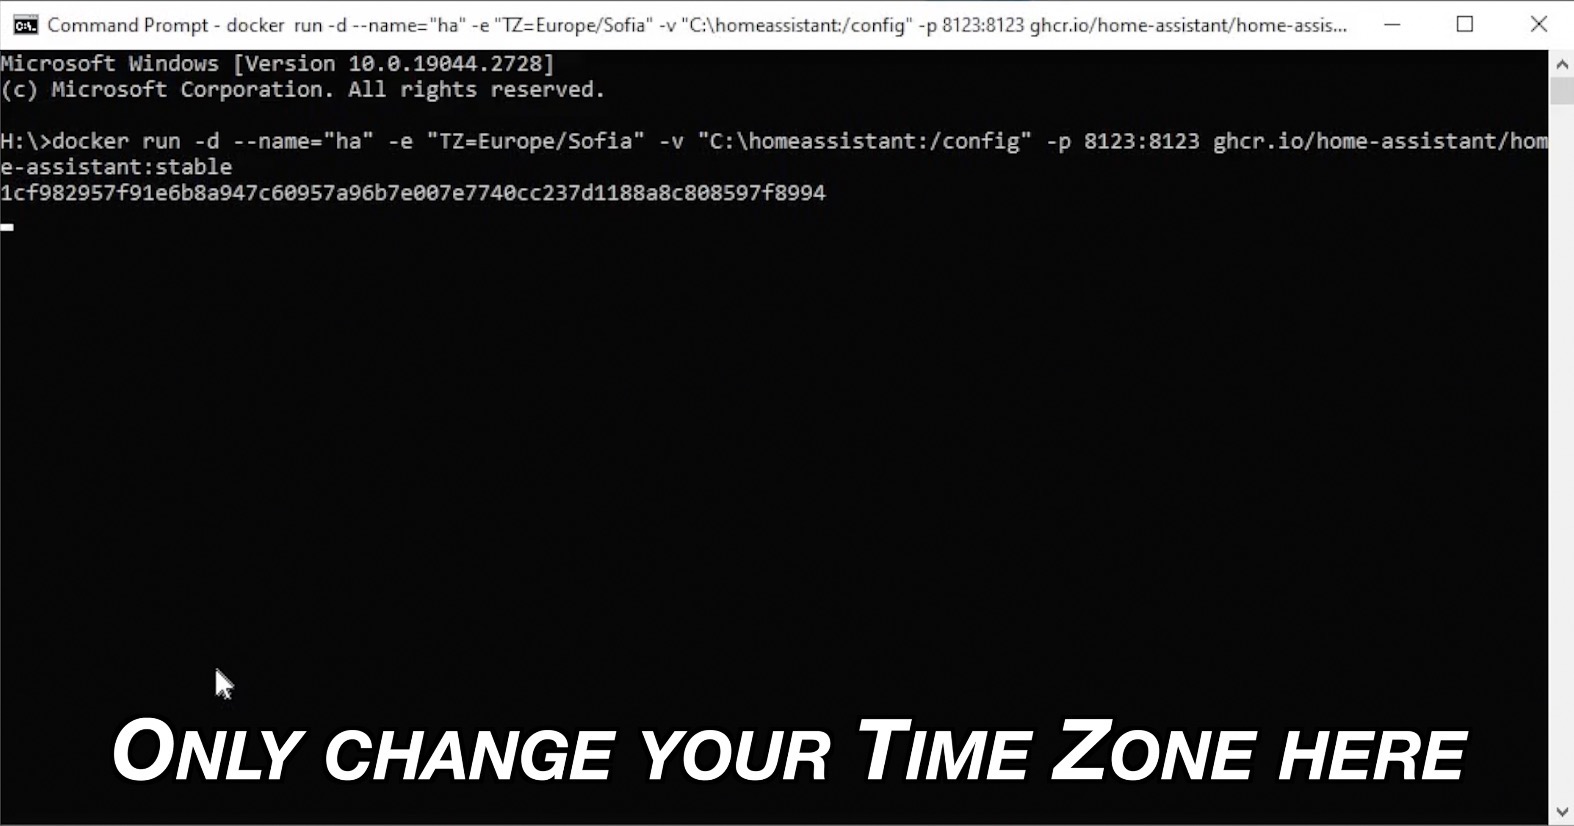
So, this is another method which may be even easier.
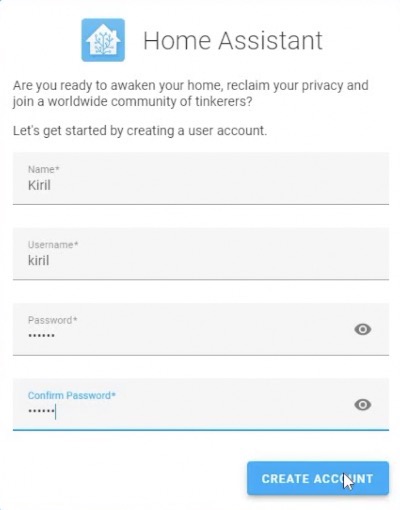
Home Assistant Onboarding
We now know two ways to start Home Assistant on Windows. And when Home Assistant is started it is time for onboarding which is super easy process:
- You just have to type a Username and Password,
- you can then name your Home Assistant installation,
- set a location, country, language, currency and stuff like that,
- then you can optionally opt-in for the anonymous Home Assistant statistics,
- the system will also try to auto-discover some devices and integrations nearby,
- and finally you are in.
You can start using Home Assistant.
What if you want to update Home Assistant? Every month there is one major new release and during that month usually more than 5 minor versions are released.
So, updating your Home Assistant is an important and regular task. With Home Assistant running on Docker or Home Assistant Container which is the official name of this kind of installation, the update process is easy.
# if this returns "Image is up to date" then you can stop here
docker pull ghcr.io/home-assistant/home-assistant:stable

# stop the running container
docker stop ha

# remove existing ha container
docker rm ha

# create a new ha container with docker-compose up
docker-compose up

# or you can create a new ha container with docker run
docker run -d --name="ha" -e "TZ=Europe/Sofia" -v "C:\homeassistant:/config" -p 8123:8123 ghcr.io/home-assistant/home-assistant:stable
Running Home Assistant container on other OSes?
The Home Assistant Container installation on Windows that we just did can be executed almost the same way on Mac and Linux Operating systems.
Just few minor modifications in the config folder mapping are needed.
docker run -d --name="ha" -e "TZ=Europe/Sofia" -v "/homeassistant:/config" -p 8123:8123 ghcr.io/home-assistant/home-assistant:stableFor whom Home Assistant Container installation type is?
This type of installation have almost everything and it is suitable for everyone from just testing type of installation to serious production environment where you can lose money if Home Assistant is down.
What is the Home Assistant Container biggest drawback?
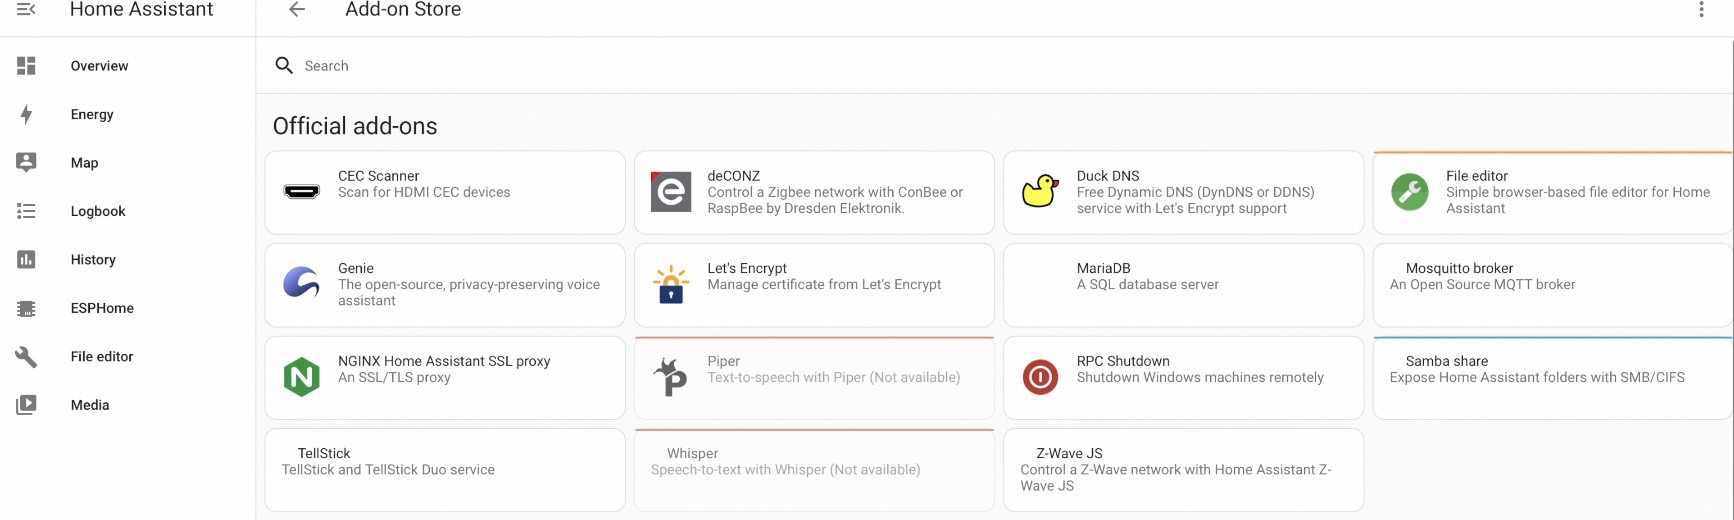
The only thing that is missing in the Home Assistant Container is the Home Assistant Add-on store from where you can install some useful add-ons with just 1 click. Most of these add-ons are coming preconfigured and ready to use, so they are great if you are looking for convenience and functionality.
On the other hand, you may never need these Apps in the Home Assistant Add-ons store or you can manually install them.
So, that can be considered as a plus or minus depending of the point of view.
Free Home Assistant Webinar?
To understand more about the different installation types of Home Assistant, you can register for my Webinar where I’m talking exactly about that. Which Home Assistant installation types have Add-ons store, and what are their other pros and cons. It will help you find a method to start Home Assistant that is best for you.
The webinar is completely free and you can register from the link – https://automatelike.pro/webinar
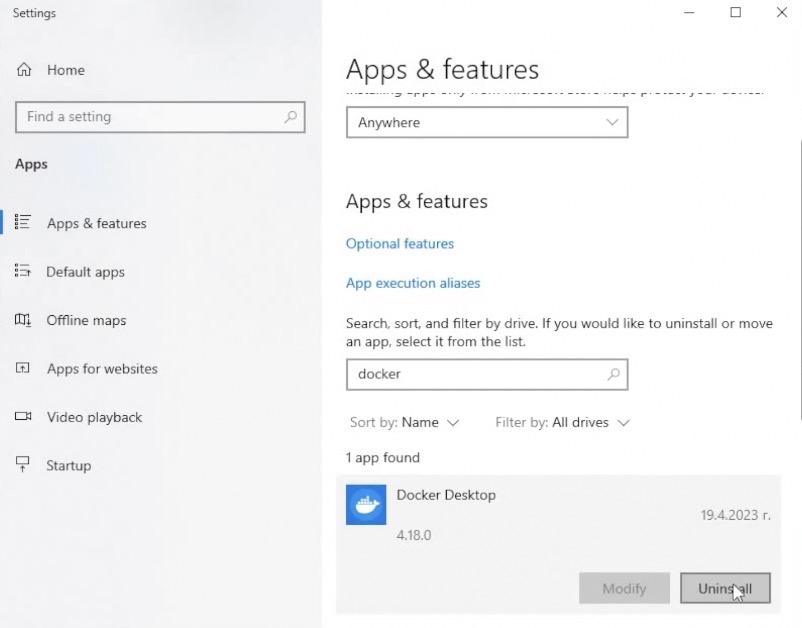
How to uninstall Home Assistant Container?
Back to the current installation type. If for some reason Home Assistant Container is not your thing and you want to remove and clean everything. That can be easily done:
- Just delete the Home Assistant container from the Docker Application.

- Then delete the Home Assistant Image from the Docker app.
- You can even remove Docker from the Windows Add/Remove Programs.
Smart Home Glossary
With Home Assistant Container or not you can download my Smart Home Glossary if some of the Smart Home terms and abbreviations are not so clear to you. It will help you, because it is full of simple but useful explanations of these terms.
The Glossary is completely free and it is in a form of a PDF document, so you can use it offline on any device you wish.
Link to the Glossary – https://automatelike.pro/glossary
If you want to see more Home Assistant articles from me check this link – https://peyanski.com/category/smart-home/home-assistant/
Thank you for reading, I’m Kiril see you next week. Bye!
В данной статье мы затронем установку Home Assistant с некоторыми аддонами как на поддерживаемые, так и на не поддерживаемые официально системы (32 бит).
В настоящее время умные дома становятся все более популярными среди потребителей. Это связано с быстро развивающейся технологией, которая позволяет создавать устройства и системы, способные управлять различными аспектами жизни в доме, такими как освещение, отопление, кондиционирование воздуха, безопасность и развлечения. Кроме того, умные дома позволяют сократить расходы на энергию и повысить уровень комфорта и удобства жизни.
В данной статье мы поговорим о том, как создать умный дом на платформе Home Assistant. Home Assistant — это бесплатная и открытая система управления домашними устройствами, которая позволяет интегрировать различные устройства и сервисы для автоматизации и управления жизнью в доме.
Преимущества Home Assistant перед системами умных домов других производителей (Xiaomi,Tuya, и др.) заключается в возможности использовать устройства разных производителей с разными типами подключения (WiFi, MQTT, Zigbee, Bluetooth) без привязки к экосистеме определенного производителя.

Нам потребуется компьютер или ноутбук с 512+ Мб ОЗУ
Если ваш компьютер или ноутбук имеет 64-битный процессор, установка Home Assistant значительно упрощается, так как подробная инструкция доступна на официальном сайте.
Однако, если у вас есть устройство с 32-битным процессором и архитектурой i386, то установка аддонов для работы с внешними датчиками может быть сложной из-за отсутствия официальной поддержки. Однако, не отчаивайтесь, поскольку в этой статье мы рассмотрим способы установки на такие устройства. (Важно отметить, что эти методы также могут быть применены на 64-битных системах, но они сложнее официальных в реализации).
1. Установка системы
Для сервера умного дома подойдет практически любой дистрибутив Linux, но рекомендуется Debian. В данной статье буду использовать сам Debian.
Начнем с установки. Этот процесс одинаков практически для любой системы.
-
Скачайте последнюю версию ISO.
Я выбрал образ «Small», так как он включает большинство файлов в образ, что требует меньше загрузки в процессе установки. -
Скачайте Balena Etcher, инструмент для записи ISO-образов на USB-накопитель. Если вы работаете в системе linux, вместо этого можно использовать dd.
-
Подключите загруженный USB-накопитель к системе и загрузитесь с USB.
-
Следуйте процессу установки.
Большая часть процесса — это следование настройкам по умолчанию и просто нажатие кнопки Continue.Не забудьте ввести учетные данные для пользователя root и пользователя, не являющегося администратором.
Если вы планируете использовать компьютер только для умного дома, убедитесь, что вы не устанавливаете графический интерфейс пользователя (GUI), и обязательно установите SSH-сервер.
-
После завершения установки войдите в систему по SSH, либо напрямую с пк, используя учетные данные обычного пользователя (не рут).
2. Установка Docker и Docker Compose
Несмотря на то, что Docker и Docker engine официально не поддерживают 32-битные системы, его можно установить, воспользовавшись данным репозиторием на GitLab:
wget https://gitlab.com/docker-32bit/debian/raw/i386/build-image.sh
sudo bash build-image.sh
Docker Compose можно установить командой:
sudo apt install docker-compose3. (опционально) Установка Portainer
Portainer может пригодиться для более удобного управления будущими Docker-контейнерами.
Для установки Portainer создадим конфигурационный файл docker-compose.yaml:
cd /opt
sudo nano docker-compose.yaml
Не забудьте обновить часовой пояс в конфигурации ниже.
Кроме того, я храню весь свой конфиг Docker и тома в этой папке. Это облегчает резервное копирование. Эти тома будут хранить данные из образа Docker локально, чтобы данные не терялись при пересборке контейнера (например, при обновлении) /opt
Здесь мы передаем файл, содержащий наши локальные настройки времени, чтобы Portainer знал, который сейчас час (для временных меток журнала), а также сокет, управляющий Docker, чтобы Portainer мог выполнять действия в Docker.
version: '3.0'

services:
  portainer:
    container_name: portainer
    image: bigbugcc/portainer-ce
    restart: unless-stopped
    ports:
      - "9000:9000/tcp"
      - "9443:9443/tcp"
    environment:
      - TZ=Asia/Novosibirsk
    volumes:
      - /etc/localtime:/etc/localtime:ro
      - /var/run/docker.sock:/var/run/docker.sock
      - /opt/portainer/data:/data
Разрешения
Мы также разрешим нашему пользователю, не являющемуся администратором, изменять этот файл. Опять же, чтобы немного облегчить нам жизнь.
sudo chown root:docker docker-compose.yaml
sudo chmod g+w docker-compose.yaml
Проверьте конфигурацию
Хотите убедиться, что вы не допустили ошибок в конфигурации? Выполните следующую команду, и Docker выведет вам то, что будет запущено, а также все ошибки в вашем конфиге и предупреждения.
docker-compose -f docker-compose.yaml configЗапуск
docker-compose up -dЗапускаем, и Docker загрузит последний образ Portainer и все настроит. После этого мы сможем открыть веб-интерфейс Portainer, перейдя по адресу (вы получите предупреждение о самоподписанном сертификате) или (нешифрованное соединение).
https://<ip компьютера>:9443
http://<ip компьютера>:9000

При первом посещении этого портала он попросит нас создать учетную запись пользователя.
4. Установка Home Assistant
Если вы пропустили предыдущий пункт, то потребуется первоначальная настройка Docker Compose для работы:
cd /opt
sudo nano docker-compose.yaml
Далее записываем конфигурацию контейнера в файл(не забываем указать свой часовой пояс для правильного показа времени в интерфейсе и логах):
version: '3.0'

services:
  [...]
  homeassistant:
    container_name: homeassistant
    image: "ghcr.io/home-assistant/home-assistant:stable"
    restart: unless-stopped
    environment:
      - TZ=Asia/Novosibirsk
    volumes:
      - /opt/homeassistant/config:/config
      - /etc/localtime:/etc/localtime:ro
    privileged: true
    network_mode: host
Создадим папку для конфигурационных файлов Homeassistant и запустим его:
cd /opt
sudo mkdir -p homeassistant/config
docker-compose up -d
Теперь Docker извлечет образ Home Assistant и все настроит.

Настройка Home Assistant
Теперь, когда контейнер запущен и работает, нам нужно настроить сам экземпляр Home Assistant.
Откройте браузер и перейдите по адресу http://<ip компьютера>:8123
Начальная настройка Home Assistant

Выберите имя пользователя и пароль для вашей учетной записи Home Assistant. Эта учетная запись также будет «администратором».
Далее пройдите через настройку вашей домашней зоны. В процессе настройки Home Assistant даже покажет вам устройства, которые он уже обнаружил и которые вы можете интегрировать с самого начала.
После завершения настройки вы окажетесь на информационной панели Home Assistant. Если вы настроили какие-либо устройства на предыдущем этапе, они будут отображаться на главном экране.

Управление Portainer из Home Assistant
Как только мы начнем добавлять дополнения, нам захочется довольно часто иметь возможность быстро просматривать их без необходимости открывать дополнительные окна браузера.
Для этого мы воспользуемся панелью iframe. Эта интеграция добавит Portainer в боковую панель Home Assistant.
cd /opt/homeassistant/config
sudo nano configuration.yaml
Чтобы добавить iframe для Portainer, добавьте следующий код в файл configuration.yaml:
panel_iframe:
  portainer:
    title: Portainer
    url: "https://192.168.10.106:9443"
    icon: mdi:docker
    require_admin: true
5. Установка брокера Mosquitto для работы MQTT и Zigbee устройств
В этой части мы добавим наше первое дополнение. Брокер Mosquitto MQTT позволит нам соединяться с широким спектром устройств, и я настоятельно рекомендую его к установке.
Обновим конфигурацию docker-compose.yaml:
services:
  [...]
  homeassistant:
    [...]
    depends_on:
      - mosquitto

  mosquitto:
    container_name: mosquitto
    image: eclipse-mosquitto
    restart: unless-stopped
    ports:
      - "1883:1883/tcp"
    environment:
      - TZ=Asia/Novosibirsk
    volumes:
      - /opt/mosquitto/config:/mosquitto/config
      - /opt/mosquitto/data:/mosquitto/data
      - /opt/mosquitto/log:/mosquitto/log
    stdin_open: true
    tty: true
Мы добавили строки stdin_open и tty, чтобы впоследствии мы могли подключиться к терминалу контейнера для выполнения некоторых команд.
Обратите внимание, что мы также добавили зависимость от контейнера mosquitto для нашего контейнера Home Assistant. Таким образом, наш брокер будет в сети до запуска Home Assistant, и мы можем быть уверены, что наше соединение не прервется.
Файл конфигурации mosquitto.conf
Когда мы запустим контейнер Mosquitto с помощью docker-compose up -d, в журналах появятся ошибки о невозможности открыть файл конфигурации /mosquitto/config/mosquitto.conf. Чтобы исправить это, мы можем загрузить файл конфигурации по умолчанию и сохранить его во вновь созданном каталоге config:
cd /opt/mosquitto/config/
sudo wget https://raw.githubusercontent.com/eclipse/mosquitto/master/mosquitto.conf
Однако мы сделаем несколько изменений. Вы можете добавить следующие строки в конец конфигурационного файла, так как по умолчанию все настройки закомментированы (настройки по умолчанию).
sudo nano mosquitto.conf
# Добавьте следующие строки в конец

# Listen on port 1883 on all IPv4 interfaces
listener 1883
socket_domain ipv4
# save the in-memory database to disk
persistence true
persistence_location /mosquitto/data/
# Log to stderr and logfile
log_dest stderr
log_dest file /mosquitto/log/mosquitto.log
# Require authentication
allow_anonymous false
password_file /mosquitto/config/mqttuser
Пользователи Mosquitto
Далее мы создадим пользователя в Home Assistant для соединения с брокером.
В идеале мы позже создадим нового пользователя для каждого устройства (семейства). Например, одна учетная запись для устройств Shelly, одна для Zigbee2MQTT и т.д.
Выполните следующую команду для создания пользователя с именем homeassistant. Обратите внимание, что параметр -c создаст новый файл паролей и перезапишет все существующие файлы. Поэтому отбросьте этот параметр, если вы хотите создать вторую учетную запись.
docker exec -it mosquitto mosquitto_passwd -c /mosquitto/config/mqttuser homeassistantЕсли теперь вы проверите содержимое только что созданного файла mqttuser, вы найдете свое имя пользователя и хэшированный пароль:
cat /opt/mosquitto/config/mqttuser
homeassistant:$7$101$q7VtJJ/E*******7$1I******************************************b/G**************************************A==
Теперь мы можем перезапустить контейнер Mosquitto, чтобы он загрузил наши изменения:
sudo docker-compose restart mosquittoЛоги должны показать, что контейнер Mosquitto запущен:
sudo cat /opt/mosquitto/log/mosquitto.log
1662413136: mosquitto version 2.0.15 starting
1662413136: Config loaded from /mosquitto/config/mosquitto.conf.
1662413136: Opening ipv4 listen socket on port 1883.
1662413136: mosquitto version 2.0.15 running
Настройка MQTT в Home Assistant
Теперь мы можем подключить Home Assistant к нашему брокеру MQTT, чтобы он мог начать подписываться на темы и отправлять сообщения. Поскольку пока нет других подключенных MQTT клиентов, Home Assistant пока не будет добавлять новые устройства.

Мы добавляем новую интеграцию MQTT в Home Assistant и вводим учетные данные, которые мы установили минуту назад для аутентификации.

Логи контейнера MQTT подтверждают успешное подключение Home Assistant:
sudo cat /opt/mosquitto/log/mosquitto.log
1662413136: mosquitto version 2.0.15 running
1662414198: New connection from 192.168.10.106:43153 on port 1883.
1662414198: New client connected from 192.168.10.106:43153 as 4atvQWWEyf2XpG3yy0kgOW (p1, c1, k60, u'homeassistant').
1662414198: Client 4atvQWWEyf2XpG3yy0kgOW disconnected.
1662414198: New connection from 192.168.10.106:39605 on port 1883.
1662414198: New client connected from 192.168.10.106:39605 as 5gNbahjfE5DulEufquYcaa (p2, c1, k60, u'homeassistant').
6. Установка Zigbee2MQTT для подключения датчиков и других устройств умного дома по протоколу Zigbee
Для этого потребуется приобрести отдельный Zigbee-координатор, который подключается к компьютеру по USB. Я использовал этот в своей системе.
Найти координатор Zigbee
В конфигурации Docker compose нам нужно будет назначить координатор Zigbee, который будет подключен через USB, к контейнеру Docker.
Подключите ваш координатор Zigbee (например, Conbee II, Sonof Zigbee 3.0 Plus, …) к вашей машине. Затем выполните следующую команду, чтобы получить уникальный путь к устройству.
ls -l /dev/serial/by-id/
usb-ITead_Sonoff_Zigbee_3.0_USB_Dongle_Plus_eexxxxxxxxxxxxxxxxxxxxxxxxxxxxxxx52-if00-port0 -> ../../ttyUSB0
Позже мы будем использовать этот уникальный путь by-id в нашей конфигурации вместо типичного /dev/ttyUSB0, потому что всегда есть риск, что устройство получит новый TTY после перезагрузки, особенно при подключении других устройств.
Docker-compose
Мы расширяем наш docker-compose.yaml конфигурацией для контейнера Zigbee2MQTT.
services:
  [...]

  zigbee2mqtt:
    container_name: zigbee2mqtt
    image: koenkk/zigbee2mqtt
    restart: unless-stopped
    ports:
      - "8099:8099/tcp"
    environment:
      - TZ=Asia/Novosibirsk
    volumes:
      - /opt/zigbee2mqtt/data:/app/data
      - /run/udev:/run/udev:ro
    devices:
      - /dev/serial/by-id/usb-ITead_Sonoff_Zigbee_3.0_USB_Dongle_Plus_eexxxxxxxxxxxxxxxxxxxxxxxxxxxx52-if00-port0:/dev/ttyACM0
Обратите внимание, что я изменил отображение портов для этого контейнера. Порт 8080 уже используется администратором, поэтому я изменил порт внешнего интерфейса Zigbee2MQTT на 8099 (см. ниже) и указал его в конфигурации Docker.
Мы не будем пока запускать наш контейнер, так как сначала нам нужно настроить нашу конфигурацию.
Создаем пользователя MQTT
Когда мы настраивали MQTT-брокер Mosquitto, я говорил, что предпочитаю создавать MQTT-пользователя для каждого сервиса. Поэтому давайте создадим пользователя для нашего контейнера Z2M.
docker exec -it mosquitto mosquitto_passwd /mosquitto/config/mqttuser z2m_mqtt
Password:          # Enter a password
Reenter password:  # Repeat the password

cat mosquitto/config/mqttuser
[...]
z2m_mqtt:$7$101$1xcB1yrF********$O$XR******************2/N************************************************************g==
Конфиг Zigbee2MQTT
Чтобы получить копию стандартного конфига, запустите sudo wget https://raw.githubusercontent.com/Koenkk/zigbee2mqtt/master/data/configuration.yaml в папке, где будет храниться конфиг (/opt/zigbee2mqtt/data). Затем откройте и отредактируйте его с помощью sudo nano /opt/zigbee2mqtt/data/configuration.yaml.
Мы укажем Z2M подключиться к нашему MQTT-брокеру, использовать синтаксис, который понимает Home Assistant для обнаружения устройств, настроить веб-сервер и позволить Z2M сгенерировать некоторые ключи, используемые для настройки сети Zigbee.
# Adapter settings
serial:
  port: /dev/ttyACM0

# MQTT
mqtt:
  base_topic: zigbee2mqtt
  server: '!secret server'
  user: '!secret user'
  password: '!secret password'
  client_id: zigbee

# Zigbee network
permit_join: false # Do not allow random devices to connect automatically

# Webserver
frontend:
  port: 8099 # Custom port
  url: 'http://<ip.of.our.box>:8099' # Update IP here

# Devices and groups
# Extract config to separate files
devices: devices.yaml
groups: groups.yaml

# Home Assistant integration
homeassistant: true
Если вы проверите журналы через Portainer или docker-compose logs zigbee2mqtt, вы увидите, что наш контейнер прекрасно запустился:
Using '/app/data' as data directory
Zigbee2MQTT:info  2022-10-04 12:09:47: Logging to console and directory: '/app/data/log/2022-10-04.12-09-47' filename: log.txt
Zigbee2MQTT:info  2022-10-04 12:09:47: Starting Zigbee2MQTT version 1.28.0 (commit #03ba647)
Zigbee2MQTT:info  2022-10-04 12:09:47: Starting zigbee-herdsman (0.14.62)
Zigbee2MQTT:info  2022-10-04 12:09:48: zigbee-herdsman started (resumed)
Zigbee2MQTT:info  2022-10-04 12:09:48: Coordinator firmware version: '{"meta":{"maintrel":1,"majorrel":2,"minorrel":7,"product":1,"revision":20220219,"transportrev":2},"type":"zStack3x0"}'
Zigbee2MQTT:info  2022-10-04 12:09:48: Currently 0 devices are joined:
Zigbee2MQTT:info  2022-10-04 12:09:48: Zigbee: disabling joining new devices.
Zigbee2MQTT:info  2022-10-04 12:09:48: Connecting to MQTT server at mqtt://<ip.of.our.box>:1883
Zigbee2MQTT:info  2022-10-04 12:09:48: Connected to MQTT server
Zigbee2MQTT:info  2022-10-04 12:09:48: MQTT publish: topic 'zigbee2mqtt/bridge/state', payload '{"state":"online"}'
Zigbee2MQTT:info  2022-10-04 12:09:48: Started frontend on port 0.0.0.0:8099
Zigbee2MQTT:info  2022-10-04 12:09:48: MQTT publish: topic 'zigbee2mqtt/bridge/state', payload '{"state":"online"}'
Добавим Z2M на боковую панель Home Assistant:
Процесс аналогичен с добавлением Portainer:
panel_iframe:
  portainer:
  [...]
  zigbee2mqtt:
    title: Zigbee2MQTT
    icon: mdi:zigbee
    url: http://192.168.10.106:8099
    require_admin: true
После перезапуска Home Assistant (docker-compose restart homeassistant) получим примерно следующее:


В данном видеоролике подробно и наглядно показано как пользоваться Zigbee2MQTT. Если вы в первый раз работаете с ним, рекомендую к просмотру.
Конец
Спасибо за внимание, есть еще немало дополнений, которые можно добавить, поэтому статья будет дополняться.
Если возникнут вопросы или предложения — пишите в комментарии, рад любой активности.
Installation with Docker is straightforward. Adjust the following command so that /path/to/your/config/ points at the folder where you want to store your config and run it:
Linux
$ docker run -d --name="home-assistant" -v /path/to/your/config:/config -v /etc/localtime:/etc/localtime:ro --net=host homeassistant/home-assistant
macOS
When using docker-ce (or boot2docker) on macOS, you are unable to map the local timezone to your Docker container (Docker issue). Instead of -v /etc/localtime:/etc/localtime:ro, just pass in the timezone environment variable when you launch the container, ex: -e "TZ=America/Los_Angeles". Replace “America/Los_Angeles” with your timezone.
If you wish to browse directly to http://localhost:8123 from your macOS host, meaning forward ports directly to the container, replace the --net=host switch with -p 8123:8123. More detail can be found in the docker forums.
$ docker run -d --name="home-assistant" -v /path/to/your/config:/config -e "TZ=America/Los_Angeles" -p 8123:8123 homeassistant/home-assistant
Alternatively, docker-compose works with any recent release of docker-ce on macOS. Note that (further down this page) we provide an example docker-compose.yml however it differs from the docker run example above. To make the .yml directives match, you would need to make two changes: first add the equivalent ports: directive, then remove the network_mode: host section. This is because Port mapping is incompatible with network_mode: host:. More details can be found at [Docker networking docs] (https://docs.docker.com/engine/userguide/networking/#default-networks). Note also the /dev/tty* device name used by your Arduino etc. devices will differ from the Linux example, so the compose mount: may require updates.
Windows
When running Home Assistant in Docker on Windows, you may have some difficulty getting ports to map for routing (since the --net=host switch actually applies to the hypervisor’s network interface). To get around this, you will need to add port proxy ipv4 rules to your local Windows machine, like so (Replacing ‘192.168.1.10’ with whatever your Windows IP is, and ‘10.0.50.2’ with whatever your Docker container’s IP is):
netsh interface portproxy add v4tov4 listenaddress=192.168.1.10 listenport=8123 connectaddress=10.0.50.2 connectport=8123
netsh interface portproxy add v4tov4 listenaddress=0.0.0.0 listenport=8123 connectaddress=10.0.50.2 connectport=8123
This will let you access your Home Assistant portal from http://localhost:8123, and if you forward port 8123 on your router to your machine IP, the traffic will be forwarded on through to the docker container.
Synology NAS
As Synology within DSM now supports Docker (with a neat UI), you can simply install Home Assistant using docker without the need for command-line. For details about the package (including compatibility-information, if your NAS is supported), see https://www.synology.com/en-us/dsm/app_packages/Docker
The steps would be:
- Install “Docker” package on your Synology NAS
- Launch Docker-app and move to “Registry”-section
- Find “homeassistant/home-assistant” with registry and click on “Download”
- Wait for some time until your NAS has pulled the image
- Move to the “Image”-section of the Docker-app
- Click on “Launch”
- Choose a container-name you want (e.g. “homeassistant”)
- Click on “Advanced Settings”
- Set “Enable auto-restart” if you like
- Within “Volume” click on “Add Folder” and choose either an existing folder or add a new folder. The “mount point” has to be “/config”, so that Home Assistant will use it for the configs and logs.
- Within “Network” select “Use same network as Docker Host”
- To ensure that Home Assistant displays the correct timezone go to the “Environment” tab and click the plus sign then add
variable=TZ&value=Europe/Londonchoosing your correct timezone - Confirm the “Advanced Settings”
- Click on “Next” and then “Apply”
- Your Home Assistant within Docker should now run and will serve the web interface from port 8123 on your Docker host (this will be your Synology NAS IP address — for example
http://192.168.1.10:8123)
Remark: to update your Home Assistant on your Docker within Synology NAS, you just have to do the following:
- Go to the Docker-app and move to “Image”-section
- Download the “homeassistant/home-assistant” image — don’t care, that it is already there
- wait until the system-message/-notification comes up, that the download is finished (there is no progress bar)
- Move to “Container”-section
- Stop your container if it’s running
- Right-click on it and select “Action”->”Clear”. You won’t lose any data, as all files are stored in your config-directory
- Start the container again — it will then boot up with the new Home Assistant image
Remark: to restart your Home Assistant within Synology NAS, you just have to do the following:
- Go to the Docker-app and move to “Container”-section
- Right-click on it and select “Action”->”Restart”.
If you want to use a USB Bluetooth adapter or Z-Wave USB Stick with Home Assistant on Synology Docker these instructions do not correctly configure the container to access the USB devices. To configure these devices on your Synology Docker Home Assistant you can follow the instructions provided here by Phil Hawthorne.
QNAP NAS
As QNAP within QTS now supports Docker (with a neat UI), you can simply install Home Assistant using docker without the need for command-line. For details about the package (including compatability-information, if your NAS is supported), see https://www.qnap.com/solution/container_station/en/index.php
The steps would be:
- Install “Container Station” package on your Qnap NAS
- Launch Container Station and move to “Create Container”-section
- Search image “homeassistant/home-assistant” with
docker hub and click on “Install” - Choose “latest” version and click next
- Choose a container-name you want (e.g.
“homeassistant”) - Click on “Advanced Settings”
- Within “Shared Folders” click on “Volume from host” > “Add” and
choose either an existing folder or add a new folder. The “mount
point” has to be “/config”, so that Home Assistant will use it for
the configs and logs. - Within “Network” and select Network Mode to “Host”
- To ensure that Home Assistant displays the correct
timezone go to the “Environment” tab and click the plus sign then add
variable=TZ&value=Europe/Londonchoosing your correct timezone - Click on “Create”
- Wait for some time until your NAS has created the container
- Your Home Assistant within Docker should now run and will serve the web interface from port 8123 on your Docker host (this will be your Qnap NAS IP address — for example
http://192.xxx.xxx.xxx:8123)
Remark: to update your Home Assistant on your Docker within Qnap NAS, you just remove container and image and do steps again (Don’t remove “config” folder)
If you want to use a USB Bluetooth adapter or Z-Wave USB Stick with Home Assistant on Qnap Docker, Fallow this step:
Z-wave:
- Connect to your NAS over SSH
- Load cdc-acm kernel module(when nas restart need to run this command)
insmod /usr/local/modules/cdc-acm.ko -
Find USB devices attached. Type command:
ls /dev/tty*
The above command should show you any USB devices plugged into your NAS. If you have more than one, you may get multiple items returned. Like :ttyACM0 -
Run Docker command:
docker run --name home-assistant --net=host --privileged -itd -v /share/CACHEDEV1_DATA/Public/homeassistant/config:/config -e variable=TZ -e value=Europe/London --device /dev/ttyACM0 homeassistant/home-assistant-vis your config path
-eis set timezone - Edit configuration.yaml
zwave:
  usb_path: /dev/ttyACM0
That will tell Home Assistant where to look for our Z-wave radio.
Bluetooth:
- Connect to your NAS over SSH
-
Run Docker command:
docker run --name home-assistant --net=host --privileged -itd -v /share/CACHEDEV1_DATA/Public/homeassistant/config:/config -e variable=TZ -e value=Europe/London -v /dev/bus/usb:/dev/bus/usb -v /var/run/dbus:/var/run/dbus homeassistant/home-assistantFirst
-vis your config path
-eis set timezone - Edit configuration.yaml
device_tracker:
  - platform: bluetooth_tracker
Restart
If you change the configuration you have to restart the server. To do that you have 2 options.
- You can go to the service developer tools, select the service
homeassistant/restartand click “Call Service”. - Or you can restart it from a terminal by running
docker restart home-assistant
Docker Compose
As the docker command becomes more complex, switching to docker-compose can be preferable and support automatically restarting on failure or system restart. Create a docker-compose.yml file:
  version: '3'
  services:
    homeassistant:
      container_name: home-assistant
      image: homeassistant/home-assistant
      volumes:
        - /path/to/your/config:/config
        - /etc/localtime:/etc/localtime:ro
      restart: always
      network_mode: host
Then start the container with:
Exposing Devices
In order to use z-wave, zigbee or other components that require access to devices, you need to map the appropriate device into the container. Ensure the user that is running the container has the correct privileges to access the /dev/tty* file, then add the device mapping to your docker command:
$ docker run -d --name="home-assistant" -v /path/to/your/config:/config -v /etc/localtime:/etc/localtime:ro --device /dev/ttyUSB0:/dev/ttyUSB0 --net=host homeassistant/home-assistant
or in a docker-compose.yml file:
  version: '3'
  services:
    homeassistant:
      container_name: home-assistant
      image: homeassistant/home-assistant
      volumes:
        - /path/to/your/config:/config
        - /etc/localtime:/etc/localtime:ro
      devices:
        - /dev/ttyUSB0:/dev/ttyUSB0
        - /dev/ttyUSB1:/dev/ttyUSB1
        - /dev/ttyACM0:/dev/ttyACM0
      restart: always
      network_mode: host
In this article, I will show you how to install Home Assistant Container on Windows, using Docker and Portainer, get it working with Agent DVR, and send an MQTT message from Agent DVR using CodeProject.AI Server to detect a person.
Introduction — The Many Ways of Installing Home Assistant
There are a lot of ways to install Home Assistant on Windows. You could install it using a Virtual Machine (via VirtualBox, VMware, Linux KVM, or Hyper-V), you could install it using Windows Subsystem for Linux (WSL), or you could install it in a Docker container.
When I started the process, I began installing it using VirtualBox, but I was unable to get an IP address for Home Assistant, or connect it to the internet. Some very kind, very patient people tried to help me for several days, but ultimately it became a question of, does my Network Interface Card support Promiscuous Mode? I emailed the manufacturer to find out — I’m still waiting for a response.
I tried installing Wireshark to force my NIC to use Promiscuous Mode, but that didn’t work. I tried using VMware to set up Home Assistant, but same problem; when I created the virtual machine, Home Assistant CLI did not generate an IP address. Unless you’re a network administrator, or have a lot of experience with networking, I wouldn’t recommend trying to install Home Assistant on Windows using a virtual machine.
This led me to installing Home Assistant Container, using Docker and Portainer. I wouldn’t say this is necessarily the ideal setup either. If you’re just starting with Home Assistant and you’re not a technical person, this won’t make sense to you, but Home Assistant Container does not come with Home Assistant Supervisor, which is an integration that allows you to easily install Add-ons. Without Supervisor, you may have to install separate containers and try to figure out how to access them / Home Assistant Container using an SSH command line. I’ll admit, I still haven’t figured that out yet.
Part of me wants to install successfully install Home Assistant every possible way to show you how to do it, but I don’t know if I hate myself that much. I suspect installing Home Assistant using WSL might be the ideal setup, so I might try that next.
But in this article, I will show you how to install Home Assistant Container on Windows, using Docker and Portainer, get it working with Agent DVR, and send an MQTT message from Agent DVR using CodeProject.AI Server to detect a person.
- Introduction — The Many Ways of Installing Home Assisstant
- The Tools We Use and How They Fit Together
- My Setup
- Setting Up Portainer
- Setting Up Home Assistant Container
- Setting Up an MQTT Broker — Eclipse Mosquitto
- Setting Up MQTT in Home Assistant Container
- Setting Up Agent DVR to Send an MQTT Notification to Home Assistant
- Setting Up Home Assistant Container to Receive MQTT Messages
My Setup
In this article, I am using:
- CodeProject.AI Server. If you need help setting up CodeProject.AI Server, please see my guide to Installing CodeProject.AI Server.
- A Wyze Cam v3. If you need help installing a Wyze Cam v3, please see my guide to Setting up your Wyze Cam.
- Agent DVR. If you need help setting up Agent DVR, please see my article How to Setup Agent DVR and CodeProject.AI Server on Windows Using a Wyze Cam
- Docker Desktop. If you need help setting up Docker, please see my article How to Run CodeProject.AI Server in Docker.
There’s a lot of tools used in this article. It may seem a little confusing, but here’s the basic layout of how all this works together.

- Docker houses everything we need for Home Assistant. It allows us to create a Portainer container, and through Portainer, create a Home Assistant Container, and creates an Eclipse Mosquitto container.
- Portainer helps manage and create container systems. Here, we use it to create the Home Assistant container.
- Home Assistant Container. This is the containerized version of Home Assistant. Everything else we have here in some way is set up to interact with Home Assistant, in some way.
- Mosquitto Eclipse. This is an MQTT Broker that we wrap in a container so that we can send MQTT messages from Agent DVR to Home Assistant.
- Agent DVR is the camera security software that gives us a shortcut to using a Wyze Cam with Home Assistant, as well as is what ties in with CodeProject.AI Server in order to do object detection. Agent DVR also allows us to create an action that sends an MQTT message to Home Assistant.
- CodeProject.AI Server handles the AI detection. Here, we use CodeProject.AI Server to detect a person, and send this detection through Agent DVR as an MQTT message to Home Assistant.
Setting Up Portainer
When I started messing around with installing Home Assistant Container, I incorrectly assumed that everything would have to be installed through Portainer, but this assumption was incorrect. Nevertheless, Portainer is a common tool that gets used to install Home Assistant. If you’re installing Home Assistant Container, I’m guessing one possible reason is because you don’t want to install everything from a command line. Portainer has a lot of functionality to avoid the command line, and is a great visual interface to look in and out of containers, check the formatting of YAML files, or if you were using Docker Compose, copy the contents into the Stack page. So let’s get started.
Go to the Start button on Windows and starting typing «PowerShell». Click on Windows PowerShell. Input the following:
docker volume create portainer_data
This creates a volume for Portainer which will be used to store its database. Next, run:
docker run -d -p 9443:9443 --name portainer
--restart=always -v /var/run/docker.sock:/var/run/docker.sock
-v portainer_data:/data portainer/portainer-ce:latest
This installs Portainer on Windows Subsystem for Linux (WSL).

Now, place https://localhost:9443/ in your browser. You can also (and may have to) use https://youripaddress:9443. If you do not know your IP address, go to the Start button in Windows and start to type «CMD» then select Command Prompt. Then, type ipconfig. The address you want is the IPv4 Address.

A scary warning. I’m going to say, «don’t worry about it.» If you really want to, you can install an SSL certificate later, but I don’t cover that here. Click Go Back, then Advanced…, then Accept the Risk and Continue.

Now it’s time to create a Username and password for Portainer. I’m leaving the Username as admin. Input a password that’s at least twelve characters long, and make sure you save it somewhere. Click Create user.

This actually made me start and stop the service again, and re-enter the password, but after that, I got to the Portainer.io home page.

Click Get Started.

Then click local to get into our Portainer container.
Setting Up Home Assistant Container
Now it’s time to use Portainer to install Home Assistant Container.
Click on the Volumes tab on the left. Then click + Add Volume.

This is similar to what we just did in Windows PowerShell. In the Name field, input something like «homeassistant_data» and hit Create the volume.

Next, click on the Containers tab on the left-hand panel, which takes you to the Containers page. Here the Portainer container is happily running. Click + Add Container.

Give the container a name in the Name field. I think «homeassistant» is a pretty good name. Then, in the Image field, put «homeassistant/home-assistant:latest». Next, click + publish a new network port and put in «8123» to both the host and container field.

There’s actually a pretty handy search button next to the Image field that allows you to search through Docker Hub for all available images, extensions, and plugins. When you find the image you’re looking for, the heading in bold is what you put into the Image field in Portainer.

Now it’s time to enter the Advanced container settings. First, click on the Volumes heading, then + map additional volume. In the container field, put /config, and in the volume dropdown, select the homeassistant_data volume we just created.

Then hit the Env tab and click + Add an environment variable. Put «TZ» into the name field, and then your Country/Timezone. I tried putting in Canada/Edmonton, but it was saved as «America/Edmonton» so I’ll just put that in the value field.

The next tab we need is the Restart policy tab. Simply click Always here.

Finally, click the Runtime and Resources tab and toggle Privileged mode into the on position. Now scroll up and hit Deploy the container.

If you input everything correctly, there is a little pop-up that says «Success Container successfully created» and Home Assistant Container now runs and is visible in the Container list.
You’ll probably notice how similar this is like a visual version of a docker command to pull Home Assistant. If you were to run the docker command to do this, it would look something like this:
docker run -d --name homeassistant --privileged
--restart=unless-stopped -e TZ=MY_TIME_ZONE
-v /PATH_TO_YOUR_CONFIG:/config -p 8123:8123 home-assistant/home-assistant:stable
Where MY_TIME_ZONE is your time zone (America/Edmonton for me) and PATH_TO_YOUR_CONFIG is the path to an empty folder you create on your computer. But you can see how each element in this line matches up with what we just did in Portainer: the name of the container, privileged mode, restart, host and container ports, and image. You could skip setting up Portainer and install it this way, it’s simply a different process.

All right, let’s log into Home Assistant. In the browser, put http://localhost:8123. This was the screen that eluded me for days when trying to install Home Assistant from a virtual machine, so when I saw this screen, I got a little excited.
Input your Name (which automatically starts entering that as your Username in lower case), then choose a password. Make sure you write this password down somewhere, you’re going to need it a lot. Hit Create Account.
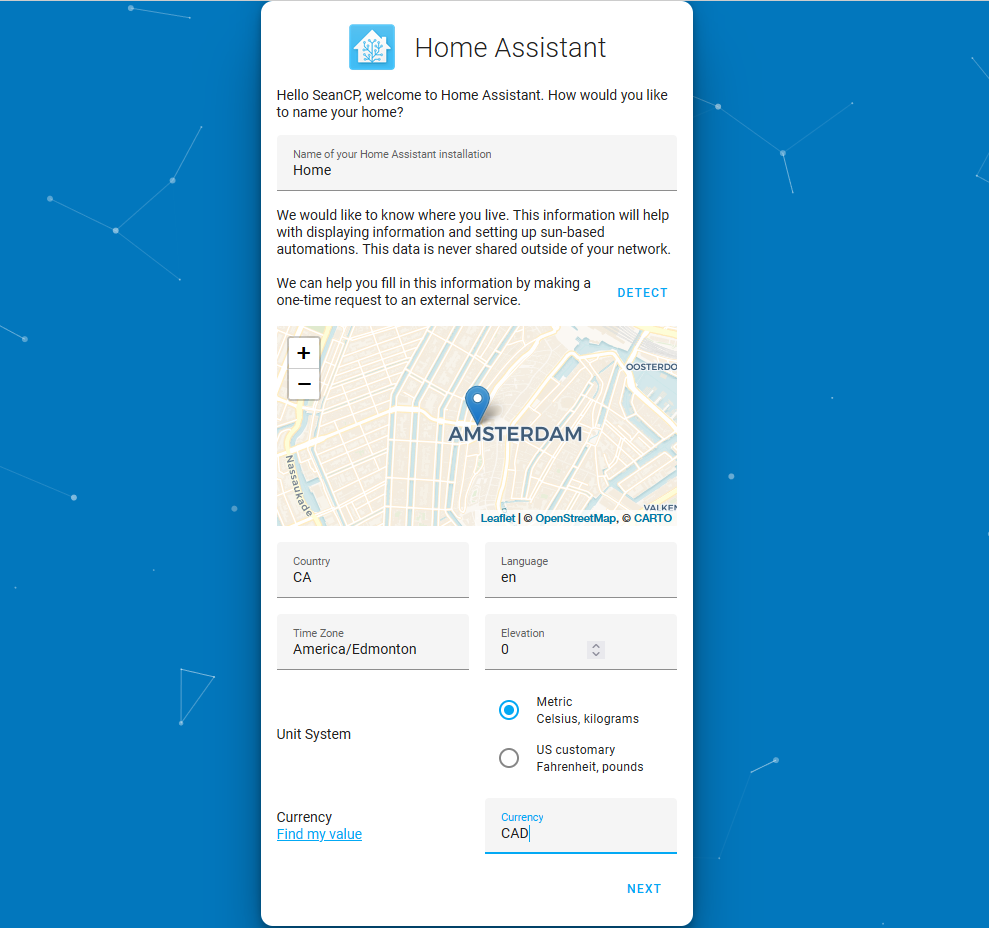
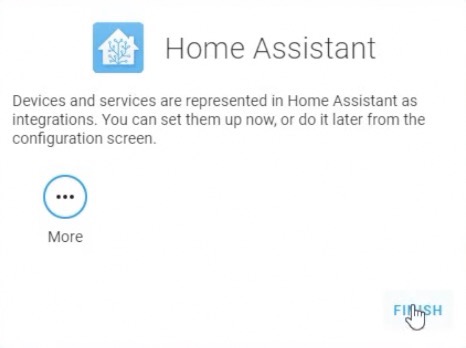
Next input more specific details for Home Assistant. You can give Home Assistant a name (I’m very creative and call mine «Home«), then select a Country, Language, Time Zone, and Currency. Hit Next.

Then is a screen about sharing data. I’m not interested in sharing so I click Next.

This next page is where all your IoT devices would show up if have them. Nothing shows up for me. Click Finish.

This is it. This is the Home Assistant Container Overview page. Isn’t it beautiful? Let’s add our Wyze cam and Agent DVR. First, launch Agent DVR. Go to your browser and put in http://localhost:8090/.

Back in Home Assistant, click the Settings tab on the left. Then click Devices & Services.

From here, hit + Add Integration.

Start typing «Agent» and then select Agent DVR.

Here, for the Host, you need to put in your IP address. If you don’t know it, go to the Start button in Windows and start to type «CMD» then select Command Prompt. Then, type ipconfig. The address you want is the IPv4 Address. Leave the Port as 8090 and hit Submit.

When you integrate Agent DVR to Home Assistant, it comes with two entities (depending on your camera setup). The first is an Alarm Panel. I presume you could use this to arm an alarm system if it were integrated with Agent DVR. For me, it’s just a camera in my office, so I click the dropdown and select Add new area, input «Office» and hit Add. I select Office for both the Alarm Panel and the camera (I call my camera Eye Spy), and hit Finish.

Now if you go back to Overview, boop! There I am.
Setting Up an MQTT Broker — Eclipse Mosquitto
Now let’s set up our MQTT Broker. I actually tried to set up Mosquitto using Portainer, but when I tried to do this, I couldn’t get Mosquitto set up in Home Assistant Container. I got an error: «Address not available».
There are a few ways to address this error. If you did install Mosquitto with Portainer, from Portainer you could command line into Mosquitto and alter the mosquitto.conf file to change the listener to 1883, persistance set to true, and allow_anonymous set to true. But I didn’t go that route. Instead, I installed Mosquitto using a Docker command that used the no authentication configuration.

Open Windows PowerShell, and type:
docker run -it --name mosquitto
-p 1883:1883 eclipse-mosquitto:2.0.15 mosquitto -c /mosquitto-no-auth.conf
It’s important to note that at the time of reading this article, Mosquitto is on version 2.0.15. That’s why the line reads eclipse-mosquitto:2.0.15, but simply replace 2.0.15 with whatever version of Mosquiotto you desire (eclipse-mosquitto:<version>).

Because we did not install Mosquitto through Portainer, the most important thing is to make sure that this mosquitto container is on the same network as Portainer and Home Assistant. To check, go back to Portainer and go to the Containers heading on the left. Then click on mosquitto in the Name field, then scroll down to Connected Networks. Underneath Network, you can see it says «bridge». If we go back to the Containers tab and click on homeassistant, then scroll down to the Connected Networks section, we can see that Home Assistant is also on the bridge network.
This process may be helpful in case you need to install other containers for your own use.
Setting Up MQTT in Home Assistant Container

Now it’s time to go back to Home Assistant. Go back to Settings -> Devices & Services and click + Add Integration. Then start typing MQTT, and click MQTT.

A dialog appears asking which MQTT integration you would like to add. Click just plain MQTT.

In the Broker field, input your IP Address. If you do not know your IP address, go to the Start button in Windows and start to type «CMD» then select Command Prompt. Then, type ipconfig. The address you want is the IPv4 Address. Leave the port as 1883, then for Username put your Home Assistant user name, which for me is «seancp», and then the password for Home Assistant. Then hit Submit. A little Success window pops up, then hit Finish.
Setting Up Agent DVR to Send an MQTT Notification to Home Assistant
Now let’s do a practical application of MQTT. Agent DVR has great integration with Home Assistant, so launch Agent DVR by putting http://localhost:8090/ in your browser.
In order to use Agent DVR for an MQTT message, you must have a business license. Head to the subscriptions page for Agent DVR and choose the desired license. For this, I only need the Basic plan. Click Choose this. This brings you to an Agent DVR tab. If you already have an account, click Login, if not click New Account.
Then navigate through the payment method (like PayPal) and there you go! You’re set up to send MQTT messages.
The first step is to set up MQTT in the Server Menu. Click the Server Menu button in the upper-left corner.

Then from the Configuration column, select Settings.

From the General dropdown, select MQTT. Here, we enter in all the settings for MQTT and make sure it is Enabled. Under Server, you want to put in your IP Address again. If you do not know your IP address, go to the Start button in Windows and start to type «CMD» then select Command Prompt. Then, type ipconfig. The address you want is the IPv4 Address. In the Port field, you want to put 1883. Then in the Username and Password fields, you again want to put in your Home Assistant username and password. Hit OK to accept the MQTT settings, then OK again to exit the Server Settings.
We’re going to be detecting a person, so let’s make sure Agent DVR is set up to detect a person.
Go to the Camera Settings.

Then from the General dropdown, select Alerts. And make sure Alerts are enabled.

Now go back to the Camera settings, and from the General dropdown, and select Detector. I want it to be really easy to detect a person, so change the Detector to Simple. The Simple detector means that the AI detection will be triggered on motion. Hit OK.

Now go back to the Camera settings, and from the General dropdown, and select Object Recognition. Make sure it is Enabled, that the AI Server is set to http://localhost:32168/. Then hit the … button to get to the Configure settings.

Make sure in the Find field it says «person» and set the Confidence to 50. Hit OK to accept the Configure settings, and OK again to accept the Object Recognition Settings.

Now go back to the Camera settings, and from the General dropdown, and select Actions. We actually want to create two actions, one action so we can confirm that within Agent DVR, a person is being detected, and the other to send the MQTT notification to Home Assistant. Hit Add.
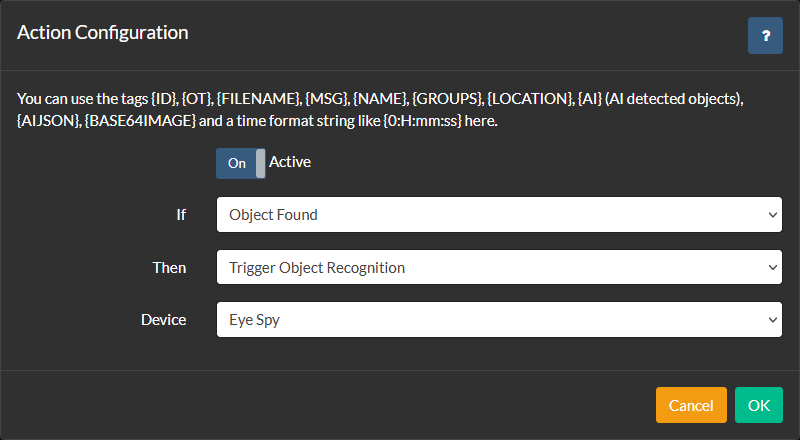
In the If dropdown, select Object Found. In the Then dropdown, select Trigger Object Recognition, which should automatically select your Device, which for my is my Wyze Cam v3 that I’ve named «Eye Spy». Hit OK to create the action.

Now for the action, we set this whole thing up to create. Hit Add to create another action. In the If dropdown, select Object Found. In the Then dropdown, select MQTT. This next bit is interesting and important. In the Topic field, you need to input a Topic and a Sub-topic. My Topic is «Agent» and my sub-topic is «alerts». You can name these whatever you want, but make sure to remember what these are. Input them as «Topic/Sub-topic». So in my case, «Agent/alerts». In the Post field, I want the MQTT message to contain what was detected, so I put «{AI}». Hit OK to create the action. Hit OK again to accept the action settings.
Setting Up Home Assistant Container to Receive MQTT Messages
Now let’s see if we can use CodeProject.AI Server through Agent DVR to detect a person, and send an MQTT message from Agent DVR to Home Assistant.
Go back to Home Assistant by putting http://localhost:8123 in your browser and enter your username and password. Then go the Settings panel from the left-hand side, then click Devices & Services.

From here, we can see our MQTT integration. Click Configure.

This is where we need the Topic and Sub-topic from Agent DVR. In the Topic field, put your Topic/Sub-topic. For me, this is «Agent/alerts». In the Payload setting, you can put in a message here to test to see if your MQTT Broker can share a packet. If you hit Publish, it will do a test and display «alert!» I’m deliberately leaving this as «alert!» to demonstrate that when the MQTT message comes in, it’s coming from Agent DVR. Now go down to Listen to a topic and put «Agent/alerts» in the Topic to subscribe to field.

Because we just configured this MQTT settings, we need to reload it in Home Assistant. Click on the Developer Tools, and in the YAML tab click Manually Configured MQTT Entities. A green button flashes, indicating that MQTT Entities have been reloaded.

Now launch CodeProject.AI Server by putting http://localhost:32168/ in your browser. I’ve previously installed a bunch of modules like Face Processing, and License Plate Reader, but for this, all we really need is Object Detection (YOLOv5 6.2), so I click the … next to all the other services, and select Stop.

Now let’s go to Agent DVR and see if we can get a notification of a person detected. Look at that! In the tag in the top right-hand corner, it says «person». That’s me!
Finally, it’s time to go to Home Assistant to see if our MQTT actions are firing. Go back to the MQTT settings page from within the Settings -> Devices & Services menu and click Configure on the MQTT integration. Hit Start Listening.

As you can see, MQTT is spitting out the AI Object detected, which is «person». There is a stream of messages that start coming through, because if you go to the CodeProject.AI Server Server logs

You can see that an object is being detected every 512 ms or less.
And that’s it! In this article, we’ve gone through how to set up Portainer, and use Portainer to install Home Assistant Container. Using Home Assistant Container, we were able to integrate Agent DVR and an MQTT Broker, and use CodeProject.AI to detect a person and send this as an MQTT message to Home Assistant. It’s not a very pretty result, but it is a proof of concept.
There are ways to use Home Assistant Container without the Home Assistant Supervisor and all its add-ons, it just requires more work. If for whatever reason you ‘had to’ install Home Assistant Container using Windows, this is how you would do it. The ideal is to install Home Assistant OS on a dedicated Linux device, or a Raspberry Pi. We’ll demonstrate that later.
Thanks for reading and if you have any questions, please feel free to ask them in the article forum below.
Universal Home Assistant docker containers one-click interactive installer
Also you can get the most popular Universal Home Assistant Supervised one-click installer for all platforms visit https://hassinstall.top
Contents
- Description
- One-click installation
- Manual installation
- Updating
- List of services
Description
Let me introduce a one-click install interactive script for home automation and some useful selfhosted services in isolated docker containers.
It fully functional on x86-64 and arm64 architectures (x86 and arm with exeptional, at this moment). Docker and docker-compose will be also installed if necessary.
The Home Assistant image comes with HACS repository installed, system monitoring sensors and panels for some services.
One-click installation
First of all you need to update system to make sure you have all the latest updates, security patches and required dependacy’s installed. To do this, log into the terminal of your machine as a root (su — or sudo su -), and:
apt update && apt upgrade -y && apt autoremove -y
Install curl if necessary:
Run this script at server:
curl -sL https://hassinstall.top/getdocker | bash
Follow instructions.
*Manual installation (Only for advaced users)
You can edit services and variables in docker-compose.yml or add .env file.
version: '3'
services:
    home-assistant:
        container_name: homeassistant
        volumes:
            - '$DATA_SHARE/data/homeassistant:/config'
            - '/etc/localtime:/etc/localtime:ro'
            - '/var/run/docker.sock:/var/run/docker.sock'
            - /run/dbus:/run/dbus:ro
        devices:
            - /dev/ttyUSB0:/dev/ttyUSB0
        network_mode: host
        restart: always
        privileged: true
        image: 'homeassistant/home-assistant:stable'
    file-editor:
        container_name: file-editor
        network_mode: host
        ports:
            - '3218:3218'
        restart: always
        volumes:
            - '$DATA_SHARE/data/homeassistant:/homeassistant'
            - '$DATA_SHARE/data/esphome:/esphome'
            - '$DATA_SHARE/data/file-editor:/config'
        image: $FED_IMAGE
    esphome:
        container_name: esphome
        volumes:
            - '$DATA_SHARE/data/esphome:/config'
            - '/etc/localtime:/etc/localtime:ro'
        ports:
            - '6052:6052'
        network_mode: host
        restart: always
        image: esphome/esphome
    mariadb:
        container_name: mariadb
        volumes:
            - '$DATA_SHARE/data/mysql:/var/lib/mysql'
        environment:
            - MYSQL_ROOT_PASSWORD=$SQL_RT_PWD
            - MYSQL_DATABASE=$SQL_DB
            - MYSQL_USER=$SQL_USR
            - MYSQL_PASSWORD=$SQL_PWD
        ports:
            - '3308:3306'
        restart: always
        image: $DB_IMAGE
    portainer:
        ports:
            - '9000:9000'
        container_name: portainer
        restart: always
        volumes:
            - '/var/run/docker.sock:/var/run/docker.sock'
            - '$DATA_SHARE/data/portainer/:/data'
        image: $PORT_IMAGE
    heimdall:
        container_name: heimdall
        volumes:
            - '$DATA_SHARE/data/heimdall:/config'
        environment:
            - PGID=1000
            - PUID=1000
            - TZ=$TIMEZONE
        ports:
            - '8080:80'
            - '8443:443'
        image: lscr.io/linuxserver/heimdall:latest
        restart: unless-stopped
    aapanel:
        ports:
            - '8886:7800'
            - '443:443'
            - '80:80'
            - '889:888'
        container_name: aapanel
        restart: always
        volumes:
            - '$DATA_SHARE/data/aapanel/website_data:/www/wwwroot'
            - '$DATA_SHARE/data/aapanel/mysql_data:/www/server/data'
            - '$DATA_SHARE/data/aapanel/vhost:/www/server/panel/vhost'
        image: 'aapanel/aapanel:lib'
    duplicati:
        image: lscr.io/linuxserver/duplicati:latest
        container_name: duplicati
        environment:
            - PUID=0
            - PGID=1000
            - TZ=$TIMEZONE
        volumes:
            - $DATA_SHARE/data/duplicati/config:/config
            - $DATA_SHARE/backups:/backups
            - $DATA_SHARE/data:/source
        ports:
          - 8200:8200
        restart: unless-stopped
    tailscaled:
        container_name: tailscaled
        volumes:
            - '/var/lib:/var/lib'
            - '/dev/net/tun:/dev/net/tun'
        network_mode: host
        privileged: false
        image: tailscale/tailscale
    cloudflared:
        image: erisamoe/cloudflared
        container_name: cloudflared
        restart: unless-stopped
        command: tunnel run
        environment:
            - TUNNEL_TOKEN=${CLOUDTOKEN}
    mosquitto:
        container_name: mqtt
        image: eclipse-mosquitto
        volumes:
            - ./mosquitto_data/:/mosquitto/data/
        ports:
            - "1883:1883"
            - '9001:9001'
        restart: always
    zigbee2mqtt:
        container_name: zigbee2mqtt
        image: $Z2M_IMAGE
        volumes:
            - $DATA_SHARE/data/mosquitto/zigbee2mqtt_data/:/app/data/
            - /run/udev:/run/udev:ro
        devices:
            - $Z2M_DEVICE:/dev/ttyACM0
        restart: always
        privileged: true
        environment:
            - TZ=$TIMEZONE
    nut-upsd:
        container_name: nut-upsd
        ports:
            - '3493:3493'
        devices:
            - /dev/bus/usb/$DS/$DV
        environment:
            - SHUTDOWN_CMD=my-shutdown-command-from-container
        image: botsudo/nut-upsd
    nextcloud:
        container_name: nextcloud
        ports:
            - '8088:80'
        image: nextcloud
        restart: unless-stopped
    adguard:
        container_name: adguard
        restart: unless-stopped
        volumes:
            - '$DATA_SHARE/data/adguard/workdir:/opt/adguardhome/work'
            - '$DATA_SHARE/data/adguard/confdir:/opt/adguardhome/conf'
        ports:
            - 53:53/tcp
            - 53:53/udp
            - 784:784/udp
            - 853:853/tcp
            - 3000:3000/tcp
            - 8081:80/tcp
            - 443:443/tcp
        image: adguard/adguardhome
    rclone:
        image: rclone/rclone
        container_name: rclone
        command: listremotes
        environment:
            - PUID=1000
            - PGID=1000
            - TZ=$TIMEZONE
        volumes:
            - $DATA_SHARE/data/rclone:/config/rclone
            - $DATA_SHARE/data:/data:shared
        restart: unless-stopped
Updating
To update and rebuild all containers change location to docker compose configuration file (/home as default)
Run this script as a root
docker-compose pull && docker-compose up -d && docker image prune
Services to be installed
List of services
-
Home Assistant
Open source home automation that puts local control and privacy first. Powered by a worldwide community of tinkerers and DIY enthusiasts.
Will avaiable at YOUR_SERVER_IP:8123
-
File Editor
Configuration UI for Home Assistant.
The HASS-Configurator is a small webapp (you access it via web browser) that provides a filesystem-browser and text-editor to modify files on the machine the configurator is running on. It has been created to allow easy configuration of Home Assistant. It is powered by Ace editor, which supports syntax highlighting for various code/markup languages. YAML files (the default language for Home Assistant configuration files) will be automatically checked for syntax errors while editing.
Will avaiable at YOUR_SERVER_IP:3218 or Home Assistant panel
-
ESPHome1
ESPHome is a system to control your ESP8266/ESP32 by simple yet powerful configuration files and control them remotely through Home Automation systems.
Will avaiable at YOUR_SERVER_IP:6052 or Home Assistant panel
-
MariaDB
MariaDB Server is one of the most popular open source relational databases. It’s made by the original developers of MySQL and guaranteed to stay open source. It is part of most cloud offerings and the default in most Linux distributions.
-
Portainer
Portainer’s multi-cluster, multi-cloud container management platform supports Kubernetes, Docker, Swarm, and Nomad running in any Data Center, Cloud, Network Edge or IIoT Device. …
Will avaiable at YOUR_SERVER_IP:9000 or Home Assistant panel
-
Heimdall Dashboard2
Heimdall Application Dashboard is a dashboard for all your web applications. It doesn’t need to be limited to applications though, you can add links to anything you like. There are no iframes here, no apps within apps, no abstraction of APIs. if you think something should work a certain way, it probably does.
Will avaiable at YOUR_SERVER_IP:8080
-
aaPanel3
aaPanel is a simple but powerful control panel for linux server.one-click install LNMP/LAMP/OpenLiteSpeed developing environment and software. … One-click installation of LEMP/LAMP website environment. Become a master of server management easily. aaPanel encapsulates common Linux commands into functional modules, such as creating a website, binding a domain name, reverse proxy, etc. It can be completed in a few clicks on the panel.
Will avaiable at YOUR_SERVER_IP:8886/aapanel
Initial credentials: aapanel/aapanel123
-
Duplicati4
Duplicati is free software and open source. You can use Duplicati for free even for commercial purposes. Source code is licensed under LGPL. Duplicati runs under Windows, Linux, MacOS. It requires .NET 4.5 or Mono. Strong encryption. Duplicati uses strong AES-256 encryption to protect your privacy. You can also use GPG to encrypt your backup. Built for online. Duplicati was designed for online backups from scratch. It is not only data efficient but also handles network issues nicely.
Will avaiable at YOUR_SERVER_IP:8200 or Home Assistant panel
-
Tailscale
Tailscale is a zero config VPN for building secure networks. Install on any device in minutes. Remote access from any network or physical location.
-
Cloudflare Tunnel
Cloudflare Tunnel provides you with a secure way to connect your resources to Cloudflare without a publicly routable IP address.
-
NextCloud 5
A safe home for all your data. Access & share your files, calendars, contacts, mail & more from any device, on your terms …
Will avaiable at YOUR_SERVER_IP:8088
-
AdGuard 5
AdGuard Home is a network-wide software for blocking ads and tracking. After you set it up, it’ll cover all your home devices, and you won’t need any client-side software for that.
Initial setup at YOUR_SERVER_IP:3000 later will avaiable at YOUR_SERVER_IP:8081 or Home Assistant panel
-
Eclipse Mosquitto 5
Eclipse Mosquitto is an open source (EPL/EDL licensed) message broker that implements the MQTT protocol versions 5.0, 3.1.1 and 3.1. Mosquitto is lightweight and is suitable for use on all devices from low power single board computers to full servers.
-
Zigbee2MQTT 5
Allows you to use your Zigbee devices without the vendor’s bridge or gateway. It bridges events and allows you to control your Zigbee devices via MQTT. In this way you can integrate your Zigbee devices with whatever smart home infrastructure you are using.
-
Network UPS Tools 5
The primary goal of the Network UPS Tools (NUT) project is to provide support for Power Devices, such as Uninterruptible Power Supplies, Power Distribution Units, Automatic Transfer Switches, Power Supply Units and Solar Controllers. NUT provides a common protocol and set of tools to monitor and manage such devices, and to consistently name equivalent features and data points, across a vast range of vendor-specific protocols and connection media types.
-
Rclone 5
Rclone is a command-line program to manage files on cloud storage. It is a feature-rich alternative to cloud vendors’ web storage interfaces. Over 40 cloud storage products support rclone including S3 object stores, business & consumer file storage services, as well as standard transfer protocols.
-
Installation in a virtual environment for 32 bit will be available a bit later ↩
-
x86-64, arm, arm64 only ↩
-
Non Docker installation for x86 and arm will be available a bit later ↩
-
On some installations the memory consumption of this container can increase up to 200Mb or more. To control this container from Home Assistant you may use Monitor Docker from HACS. ↩
-
Needs to be improved. I don’t use these services. Please let me know if you have working stable configuration of these services. ↩ ↩2 ↩3 ↩4 ↩5 ↩6