
На одном из хостов Windows Server 2019 после анализа свободного места, обнаружили что каталог ETLLogs с нескольким десятками Гб файлов расширением ETL (Event Trace Log).
Что интересно, обнаружить аномально разросшийся каталог ETLLogs с помощью утилит просмотра свободного места (типа WinDirStat или TreeSize) не удавалось, даже когда утилита была запущена с правами администратора. Найти проблемный каталог удалось, запустив утилиту от имени SYSTEM (для запуска программы от имени Local System используется команда:
psexec.exe -i -s WinDirStat.exe
).
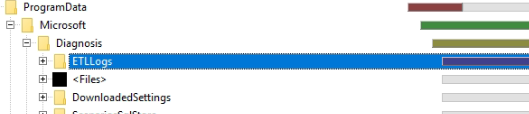
Полный путь к папке с ETL логами
C:\ProgramData\Microsoft\Diagnosis\ETLLogs
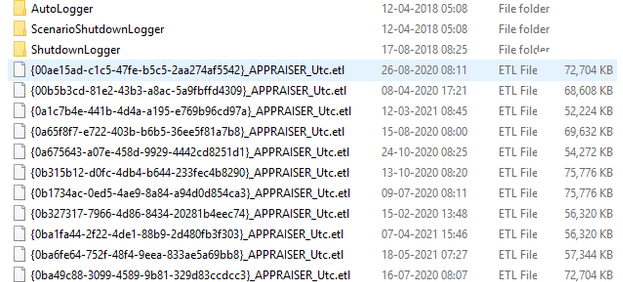
. На сервере в этом каталоге оказалось несколько сот файлов с именами формата {GUID}_APPRAISER_UTC.etl с размерами около 100 Мб. Судя по датам ETL файлов, они создавались процессом CompatTelRunner.exe каждый день в течении длительного времени, что привело к исчерпанию свободного места на диске.
Данные логи с диагностическим данными создаются службами телеметрии Windows. ETL файлы логов в этом каталоге можно удалить вручную, это безопасно. Также для быстрой очистки собранных диагностических данных, перейдите в раздел Settings -> Privacy -> Diagnostics & feedback -> нажмите кнопку Delete в разделе Delete diagnostic data. Здесь же в параметре Feedback frequency измените значение на Never.

Чтобы предотвратить дальнейший сбор ETL логов, нужно изменить параметры служб телеметрии.
Это позволит уменьшить размер сбора диагностических данных в ETLLogs.
Most users are not comfortable sharing their activity or data on the computers with anyone, Microsoft included. However, Microsoft gathers the user’s data through a feature called Telemetry, where your computer collects and sends your data to Microsoft, which is then presumably used to make your Windows experience better.
The Telemetry and Data Collection feature in Windows is enabled by default. This feature collects data of user’s activity and sends it to Microsoft as feedback. It is used to:
- Keep Windows up to date.
- Keep Windows secure and reliable.
- Improve Windows through analyzing.
The data which is recorded includes the type of hardware, applications being used, application and network usage, and much more.
Let us now discuss how to manage and disable Telemetry in Windows.
Table of Contents
How to Manage Telemetry in Windows
Sometimes other data is also shared with Microsoft, such as the user’s current location, searches performed online, wallpapers or screen savers being used, etc. Some users might be uncomfortable with this and want to disable the feature entirely.
Unfortunately, you cannot disable it using the conventional method. However, you can choose to send only the required data, or the required data plus the optional data to Microsoft.
Follow the steps below to manage your Telemetry preferences via Windows Settings.
In Windows 11
- Navigate to the following:
Settings app >> Privacy and Security >> Disgnostics and feedback - Expand Diagnostic Data.

- Now toggle the slider under “Send optional diagnostic data” into the Off position to disable sending optional data.


In Windows 10
- Navigate to the following:
Settings app >> Privacy >> Disgnostics and feedback - Here, select “Required diagnostics data” to disable the optional data from sending to Microsoft.


If you are using an older version of Windows 10, you may see the following 3 options on the Feedback and Diagnostics page:

- Basic: This will give basic data of your device to Microsoft.
- Enhanced: This includes the basic data plus data about how you use Windows, which apps you use frequently, etc.
- Full (Recommended): This includes Enhanced data plus the advanced diagnostics information.
As you may find, the actions performed above will only disable Windows from sending the optional data. However, the required data will still be available to Microsoft. Which is why, if you wish to disable Telemetry and Data Collection entirely, you must perform any of the given solutions below in this post.
How to Disable Telemetry and Data Collection in Windows
Using Group Policy
This method is only valid for Windows 11. If you are using Windows 10, continue to the next section of this post.
Perform the following steps to disable Telemetry entirely on your Windows 11 PC using the Group Policy Editor:
- Launch the Group Policy Editor by typing in gpedit.msc in Run.
- Navigate to the following using the left pane:
Computer Configuration >> Administrative Templates >> Windows Components >> Data collection and Preview Builds - Now double-click the following Group Policy “Allow Diagnostic Data” in the right pane.
- From the popup window, select Enabled, then select Diagnostic data off under Options, and then click Apply and Ok.

- Now run the following command in Command Prompt with administrative rights for the changes to take effect:
gpupdate /force


You will now find that Telemetry has been disabled for your PC. This can be confirmed when you see “Your organization prevents sending diagnostic data to Microsoft” written on the Diagnostics and Feedback Settings page.

From Windows Registry
Misconfiguration of critical values in the system’s registry could be fatal for your operating system. Therefore, we insist that you create a system restore point before proceeding forward with the process.
Perform the following steps to disable Telemetry on your PC using the Registry Editor:
- Open the Registry Editor by typing in regedit in Run.
- Now paste the following in the address bar at the top for quick navigation:
Computer\HKEY_LOCAL_MACHINE\SOFTWARE\Policies\Microsoft\Windows\DataCollection
- Right-click DataCollection key, expand New from the context menu, and then click DWORD (32-bit) Value.
- Name this DWORD “AllowTelemetry.”
- Double-click AllowTelemetry and set its Value Data to 0. Then click Ok.
- Now restart your computer for the changes to take effect.


You will now find that Telemetry has been disabled and the respective options in the Settings app have been greyed out.
By Disabling Services
You can also disable the Telemetry and Data Collection feature in Windows by disabling the respective service. Here is how:
- Open the Windows services page by typing in services.msc in Run.
- Here, double-click the service “Connected User Experience and Telemetry.” (If you are using an older version of Windows 10, the service’s name might be “Dignostics Tracking Service.”)

- From the popup properties window, select Startup Type as Disabled, then click Apply and Ok.
- Now restart the computer for the changes to take effect.


Once the computer restarts, the changes will be applied to your Registry settings and now your data won’t be accessible to Microsoft.
From Command Prompt
You can also disable Telemetry by performing the following task using Command Prompt. This is easier for the people who are familiar with the Command Line Interface (CLI) of Windows.
Launch the Command Prompt with administrative rights and then enter the following commands one after the other:
sc delete DiagTrack

sc delete dmwappushservice

echo “” > C:\\ProgramData\\Microsoft\\Diagnosis\\ETLLogs\\AutoLogger\\AutoLogger-Diagtrack-Listener.etl

reg add “HKLM\SOFTWARE\Policies\Microsoft\Windows\DataCollection” /v AllowTelemetry /t REG_DWORD /d 0 /f

Now restart your computer for the changes to take effect. When it does, you will find that the Diagnostics and Feedback Settings page has been greyed out as Telemetry has been disabled.

Disable Microsoft Compatibility Appraiser
Using Task Scheduler
As with every automated process in Windows, the Task Scheduler run a task that manages Telemetry on your Windows PC. Once this task is disabled, as will telemetry. Follow the steps below to disable the scheduled task:
- Open Task Scheduler by typing in taskschd.msc in Run.
- Now navigate to the following from the left pane:
Task Scheduler Library >> Microsoft >> Windows >> Application Experience - Here, in the middle pane, right-click “Microsoft Compatibility Appraiser” and then click Disable from the context menu.


Windows Telemetry will now be disabled. You can also perform the same task via Windows PowerShell.
Using PowerShell
To disable Microsoft Compatibility Appraiser using PowerShell, launch Windows PowerShell with administrative privileges and then run the following command:
Disable-ScheduledTask -TaskName "Microsoft Compatibility Appraiser" -TaskPath "\Microsoft\Windows\Application Experience"

Closing Words
These methods are necessary for users for whom privacy and security are more important than any update or improvement by the manufacturer. That’s why they can easily disable the Telemetry feature from their system.
@echo off
echo.
openfiles > NUL 2>&1
if %errorlevel% NEQ 0 (
echo You are not running as Administrator…
echo This batch cannot do it’s job without elevation!
echo.
echo Right-click and select ^‘Run as Administrator^‘ and try again…
echo.
pause
exit
)
echo.
echo Step 1: Disabling Data Logging Services…
echo — stop Diagtrack-service
sc stop DiagTrack > NUL 2>&1
sc config DiagTrack start= disabled > NUL 2>&1
rem sc delete DiagTrack > NUL 2>&1
echo — stop dmwappushservice-service
sc stop dmwappushservice > NUL 2>&1
sc config dmwappushservice start= disabled > NUL 2>&1
rem sc delete dmwappushservice > NUL 2>&1
echo — stop AutoLogger
set F=%TEMP%\al.reg
set F2=%TEMP%\al2.reg
regedit /e «%F%« «HKEY_LOCAL_MACHINE\SYSTEM\CurrentControlSet\Control\WMI\Autologger\AutoLogger-Diagtrack-Listener« > NUL 2>&1
powershell -Command «Select-String -Pattern «\«Enabled\««, «\[HKEY«, «Windows\sRegistry« -Path \«%F%\« | ForEach-Object {$_.Line} | Foreach-Object {$_ -replace ‘\«Enabled\«=dword:00000001′, ‘\«Enabled\«=dword:00000000′} | Out-File \«%F2%\«« > NUL 2>&1
regedit /s «%F2%« > NUL 2>&1
del «%F%« «%F2%« > NUL 2>&1
del «%ProgramData%\Microsoft\Diagnosis\ETLLogs\AutoLogger\*.etl« «%ProgramData%\Microsoft\Diagnosis\ETLLogs\ShutdownLogger\*.etl« > NUL 2>&1
rem echo «» > C:\ProgramData\Microsoft\Diagnosis\ETLLogs\AutoLogger\AutoLogger-Diagtrack-Listener.etl
reg add «HKLM\SYSTEM\CurrentControlSet\Control\WMI\AutoLogger\AutoLogger-Diagtrack-Listener« /v «Start« /t REG_DWORD /d 0 /f > NUL 2>&1
echo — stop Microsoft (R) Diagnostics Hub Standard Collector
sc config diagnosticshub.standardcollector.service start= disabled > NUL 2>&1
echo Step 2: Disabling Data Logging Tasks…
schtasks /change /TN «\Microsoft\Windows\Application Experience\Microsoft Compatibility Appraiser« /DISABLE > NUL 2>&1
schtasks /change /TN «\Microsoft\Windows\Application Experience\ProgramDataUpdater« /DISABLE > NUL 2>&1
schtasks /change /TN «\Microsoft\Windows\Customer Experience Improvement Program\Consolidator« /DISABLE > NUL 2>&1
schtasks /change /TN «\Microsoft\Windows\Customer Experience Improvement Program\KernelCeipTask« /DISABLE > NUL 2>&1
schtasks /change /TN «\Microsoft\Windows\Customer Experience Improvement Program\UsbCeip« /DISABLE > NUL 2>&1
echo Step 3: Removing the Microsoft Compatibility Appraiser…
takeown /F %windir%\System32\CompatTelRunner.exe > NUL 2>&1
icacls %windir%\System32\CompatTelRunner.exe /grant %username%:F > NUL 2>&1
del %windir%\System32\CompatTelRunner.exe /f > NUL 2>&1
echo Step 4: Modifying the Windows registry…
reg add «HKLM\SOFTWARE\Microsoft\Windows NT\CurrentVersion\AppCompatFlags\ClientTelemetry« /v «IsCensusDisabled« /t REG_DWORD /d 1 /f > NUL 2>&1
reg add «HKLM\SOFTWARE\Microsoft\Windows NT\CurrentVersion\AppCompatFlags\ClientTelemetry« /v «DontRetryOnError« /t REG_DWORD /d 1 /f > NUL 2>&1
reg add «HKLM\SOFTWARE\Microsoft\Windows NT\CurrentVersion\AppCompatFlags\ClientTelemetry« /v «TaskEnableRun« /t REG_DWORD /d 1 /f > NUL 2>&1
reg add «HKLM\SOFTWARE\Microsoft\DataCollection« /v «AllowTelemetry« /t REG_DWORD /d 0 /f > NUL 2>&1
reg add «HKLM\SOFTWARE\Policies\Microsoft\Windows\DataCollection« /v «AllowTelemetry« /t REG_DWORD /d 0 /f > NUL 2>&1
reg add «HKCU\SOFTWARE\Policies\Microsoft\Windows\DataCollection« /v «AllowTelemetry« /t REG_DWORD /d 0 /f > NUL 2>&1
reg add «HKLM\SOFTWARE\Microsoft\Windows\CurrentVersion\Policies\DataCollection« /v «AllowTelemetry« /t REG_DWORD /d 0 /f > NUL 2>&1
reg add «HKLM\SYSTEM\CurrentControlSet\Control\WMI\AutoLogger\SQMLogger« /v «Start« /t REG_DWORD /d 0 /f > NUL 2>&1
reg add «HKLM\SOFTWARE\Policies\Microsoft\Windows\AppCompat« /v «AITEnable« /t REG_DWORD /d 0 /f > NUL 2>&1
reg add «HKCU\SOFTWARE\Policies\Microsoft\Assistance\Client\1.0« /v «NoExplicitFeedback« /t REG_DWORD /d 1 /f > NUL 2>&1
echo Step 5: Additional actions
echo — stop Nvidia Telemetry
sc stop NvTelemetryContainer > NUL 2>&1
sc config NvTelemetryContainer start= disabled > NUL 2>&1
for /f «tokens=1 delims=,« %%t in (‘schtasks /Query /FO CSV ^| find /v «TaskName« ^| find «NvTmMon«‘) do schtasks /Change /TN «%%~t« /Disable >nul 2>&1
for /f «tokens=1 delims=,« %%t in (‘schtasks /Query /FO CSV ^| find /v «TaskName« ^| find «NvTmRep«‘) do schtasks /Change /TN «%%~t« /Disable >nul 2>&1
for /f «tokens=1 delims=,« %%t in (‘schtasks /Query /FO CSV ^| find /v «TaskName« ^| find «NvTmRepOnLogon«‘) do schtasks /Change /TN «%%~t« /Disable >nul 2>&1
for /f «tokens=1 delims=,« %%t in (‘schtasks /Query /FO CSV ^| find /v «TaskName« ^| find «NvProfileUpdaterDaily«‘) do schtasks /Change /TN «%%~t« /Disable >nul 2>&1
for /f «tokens=1 delims=,« %%t in (‘schtasks /Query /FO CSV ^| find /v «TaskName« ^| find «NvProfileUpdaterOnLogon«‘) do schtasks /Change /TN «%%~t« /Disable >nul 2>&1
reg add «HKCU\SOFTWARE\NVIDIA Corporation\NVControlPanel2\Client« /v «OptInOrOutPreference« /t REG_DWORD /d 0 /f > NUL 2>&1
echo — stop MS Office Telemetry
schtasks /change /TN «\Microsoft\Office\OfficeTelemetryAgentFallBack« /DISABLE > NUL 2>&1
schtasks /change /TN «\Microsoft\Office\OfficeTelemetryAgentLogOn« /DISABLE > NUL 2>&1
schtasks /change /TN «\Microsoft\Office\OfficeTelemetryAgentFallBack2016« /DISABLE > NUL 2>&1
schtasks /change /TN «\Microsoft\Office\OfficeTelemetryAgentLogOn2016« /DISABLE > NUL 2>&1
schtasks /change /TN «\Microsoft\Office\Office 15 Subscription Heartbeat« /DISABLE > NUL 2>&1
schtasks /change /TN «\Microsoft\Office\Office 16 Subscription Heartbeat« /DISABLE > NUL 2>&1
reg add «HKCU\SOFTWARE\Microsoft\Office\15.0\Outlook\Options\Mail« /v «EnableLogging« /t REG_DWORD /d 0 /f > NUL 2>&1
reg add «HKCU\SOFTWARE\Microsoft\Office\15.0\Word\Options« /v «EnableLogging« /t REG_DWORD /d 0 /f > NUL 2>&1
reg add «HKCU\SOFTWARE\Microsoft\Office\16.0\Outlook\Options\Mail« /v «EnableLogging« /t REG_DWORD /d 0 /f > NUL 2>&1
reg add «HKCU\SOFTWARE\Microsoft\Office\16.0\Word\Options« /v «EnableLogging« /t REG_DWORD /d 0 /f > NUL 2>&1
reg add «HKCU\SOFTWARE\Microsoft\Office\Common\ClientTelemetry« /v «DisableTelemetry« /t REG_DWORD /d 1 /f > NUL 2>&1
reg add «HKCU\SOFTWARE\Microsoft\Office\Common\ClientTelemetry« /v «VerboseLogging« /t REG_DWORD /d 0 /f > NUL 2>&1
reg add «HKCU\SOFTWARE\Microsoft\Office\16.0\Common\ClientTelemetry« /v «DisableTelemetry« /t REG_DWORD /d 1 /f > NUL 2>&1
reg add «HKCU\SOFTWARE\Microsoft\Office\16.0\Common\ClientTelemetry« /v «VerboseLogging« /t REG_DWORD /d 0 /f > NUL 2>&1
reg add «HKCU\SOFTWARE\Microsoft\Office\15.0\Common« /v «QMEnable« /t REG_DWORD /d 0 /f > NUL 2>&1
reg add «HKCU\SOFTWARE\Microsoft\Office\15.0\Common\Feedback« /v «Enabled« /t REG_DWORD /d 0 /f > NUL 2>&1
reg add «HKCU\SOFTWARE\Microsoft\Office\16.0\Common« /v «QMEnable« /t REG_DWORD /d 0 /f > NUL 2>&1
reg add «HKCU\SOFTWARE\Microsoft\Office\16.0\Common\Feedback« /v «Enabled« /t REG_DWORD /d 0 /f > NUL 2>&1
reg add «HKCU\SOFTWARE\Microsoft\Office\15.0\Outlook\Options\Calendar« /v «EnableCalendarLogging« /t REG_DWORD /d 0 /f > NUL 2>&1
reg add «HKCU\SOFTWARE\Microsoft\Office\16.0\Outlook\Options\Calendar« /v «EnableCalendarLogging« /t REG_DWORD /d 0 /f > NUL 2>&1
reg add «HKCU\SOFTWARE\Policies\Microsoft\Office\15.0\OSM« /v «EnableLogging« /t REG_DWORD /d 0 /f > NUL 2>&1
reg add «HKCU\SOFTWARE\Policies\Microsoft\Office\15.0\OSM« /v «EnableUpload« /t REG_DWORD /d 0 /f > NUL 2>&1
reg add «HKCU\SOFTWARE\Policies\Microsoft\Office\16.0\OSM« /v «EnableLogging« /t REG_DWORD /d 0 /f > NUL 2>&1
reg add «HKCU\SOFTWARE\Policies\Microsoft\Office\16.0\OSM« /v «EnableUpload« /t REG_DWORD /d 0 /f > NUL 2>&1
echo — disable Remote Assistance
reg add «HKLM\SYSTEM\CurrentControlSet\Control\Remote Assistance« /v «fAllowToGetHelp« /t REG_DWORD /d 0 /f > NUL 2>&1
reg add «HKLM\SYSTEM\CurrentControlSet\Control\Remote Assistance« /v «fAllowFullControl« /t REG_DWORD /d 0 /f > NUL 2>&1
echo — do not send Windows Media Player statistics
reg add «HKCU\SOFTWARE\Microsoft\MediaPlayer\Preferences« /v «UsageTracking« /t REG_DWORD /d 0 /f > NUL 2>&1
echo.
echo All done!
pause
На одном из серверов делали очистку — искали объекты для безопасного удаления, чтобы увеличить свободное место на системном разделе.
Наткнулись на каталог ETLLogs с десятками гигабайт etl-файлов. Оценивая даты изменений, видно, что эти логи создавались системой ежедневно и занимали в среднем по 80 Мб каждый. Так мы «теряем» условно по ~2,4 Гб за месяц. Оно нам надо? Нет, конечно.
Система: Windows Server 2019 Версия 1809 (сборка ОС 17763.2061).

Если растет папка ETLLogs в ProgramData
По существу вопроса
Эта папка заполнена файлами телеметрии совместимости Microsoft (CompatTelRunner.exe), которая запускается запланированной задачей.
Как исправить ситуацию и сократить объем собираемых файлов
�?сследуемая система: Windows Server 2019 Версия 1809 (сборка ОС 17763.2061).
1. Уменьшите уровень логирования собираемых диагностических данных
Параметры — Конфиденциальность — Диагностика и отзывы — Выберите «Основные»
При таком выборе собираются только сведения о вашем устройстве, его настройках, возможностях и исправности.
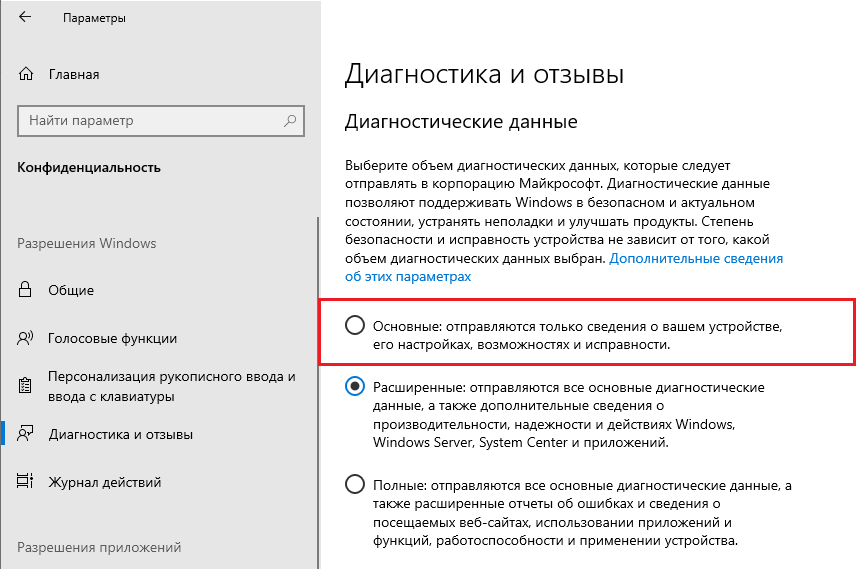
Выберите объем диагностических данных
2. Удалите диагностические данные
Удалите диагностические данные этого устройства, которые собрала корпорация Microsoft.
Параметры — Конфиденциальность — Диагностика и отзывы — Кнопка «Удалить»
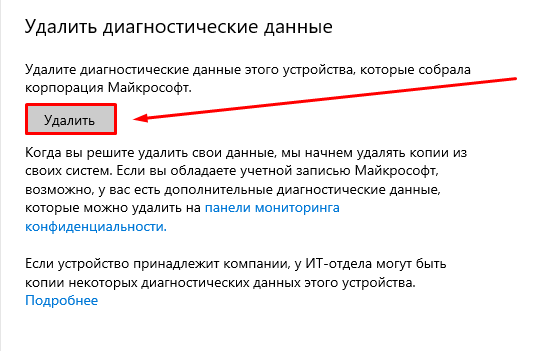
Удаление диагностических данных
Дополнительно отключите запросы на формирование отзывов.
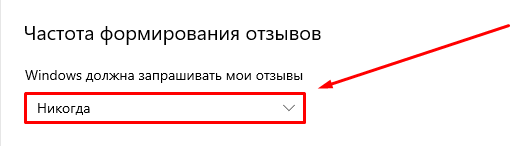
Частота формирования отзывов = Никогда
3. Отключите телеметрию через редактор групповой политики
Конфигурация компьютера — Административные шаблоны — Компоненты Windows — Сборки для сбора данных и предварительные сборки — Разрешить телеметрию = «0 — Безопасность [только для предприятий]»

Настройка телеметрии
�?з описания следует, что при этом значении политика:
- Отправляет в корпорацию Майкрософт только минимальный объем данных, необходимый для защиты Windows.
- Компоненты безопасности Windows, такие как средство удаления вредоносных программ (MSRT) и защитник Windows, могут отправлять данные в корпорацию Майкрософт на этом уровне, если это разрешено.
- Если этот параметр политики отключен или не задан, настройки телеметрии можно задать индивидуально в меню «Параметры».
Запрет телеметрии с помощью системного реестра
Либо запустите командную строку от имени администратора и установите запрет с помощью редактора реестра:
reg add «HKLM\\SOFTWARE\\Policies\\Microsoft\\Windows\\DataCollection» /v AllowTelemetry /t REG_DWORD /d 0 /f
4. Отключите участие в программе улучшения качества ПО Windows
Конфигурация компьютера — Административные шаблоны — Система — Управление связью через �?нтернет — Параметры связи через �?нтернет — Отключить программу по улучшению качества программного обеспечения Windows = «Включено»

Отключение программы по улучшению качества программного обеспечения Windows
5. Отключите служебную задачу Microsoft Compatibility Appraiser в Планировщике
Описание задачи: Сбор телеметрических данных программы при участии в программе улучшения качества ПО. Задача находится по адресу:
Планировщик заданий — Библиотека планировщика заданий — Microsoft — Windows — Application Experience
В нашем случае в папке Application Experience находилось 3 задачи, которые мы отключили: Microsoft Compatibility Appraiser, ProgramDataUpdater, StartupAppTask.
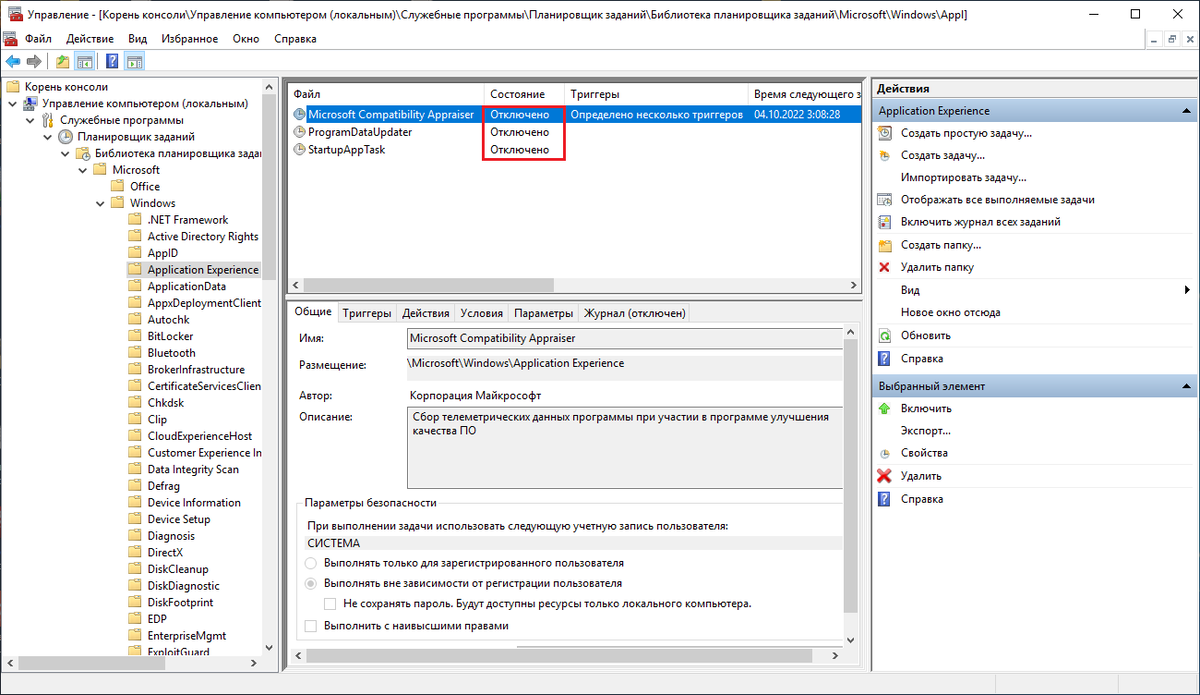
Отключение задачи Microsoft Compatibility Appraiser
6. Остановите работу Службы маршрутизации push-сообщений WAP
Управление компьютером — Службы и приложения — Службы — Служба маршрутизации push-сообщений на основе протокола WAP (Wireless Application Protocol) для управления устройствами — Тип запуска = «Отключена»
Эта служба, как и некоторые другие, имеет отношение к слежке за пользователем (телеметрия).
�?мя службы: dmwappushservice
Описание: Направляет push-сообщения на основе протокола WAP, которые получило устройство, и синхронизирует сеансы управления устройствами
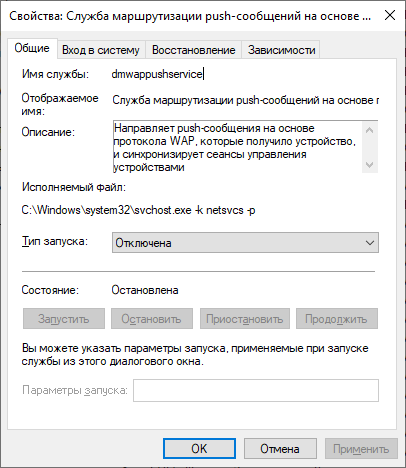
Отключение Службы маршрутизации push-сообщений WAP
Windows 10 now comes with the telemetry feature enabled by default which collects all sorts of user activity and sends it to Microsoft. Unfortunately, Microsoft has provided no way to disable it completely using the Settings app for Home and Pro editions of Windows 10. Only Enterprise users can turn it off. Here is a solution for editions other than Enterprise to disable Telemetry and Data Collection in Windows 10.
Before we start, I definitely should mention one fact. Beware Windows 7/Windows 8 users, your operating system might be spying on you as well! See the following article: Telemetry and Data Collection are coming to Windows 7 and Windows 8 too
Please find time to read the following article: Stop Windows 10 spying on you using just Windows Firewall. This might be interesting and useful for you. You can combine all mentioned tricks below with the Firewall tip.
As you use Windows 10, Microsoft will collect usage information. All its options are available in Settings -> Privacy — Feedback and Diagnostics.
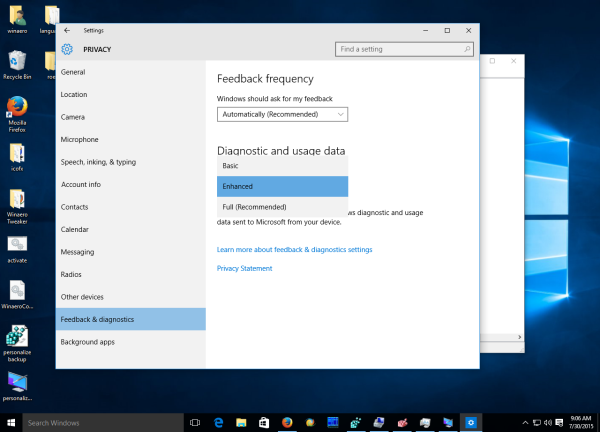
There you can set the options «Diagnostic and usage data» to one of the following options, as described by Microsoft:
- Basic
Basic information is data that is vital to the operation of Windows. This data helps keep Windows and apps running properly by letting Microsoft know the capabilities of your device, what is installed, and whether Windows is operating correctly. This option also turns on basic error reporting back to Microsoft. If you select this option, we’ll be able to provide updates to Windows (through Windows Update, including malicious software protection by the Malicious Software Removal Tool), but some apps and features may not work correctly or at all. - Enhanced
Enhanced data includes all Basic data plus data about how you use Windows, such as how frequently or how long you use certain features or apps and which apps you use most often. This option also lets us collect enhanced diagnostic information, such as the memory state of your device when a system or app crash occurs, as well as measure reliability of devices, the operating system, and apps. If you select this option, we’ll be able to provide you with an enhanced and personalized Windows experience. - Full
Full data includes all Basic and Enhanced data, and also turns on advanced diagnostic features that collect additional data from your device, such as system files or memory snapshots, which may unintentionally include parts of a document you were working on when a problem occurred. This information helps us further troubleshoot and fix problems. If an error report contains personal data, we won’t use that information to identify, contact, or target advertising to you. This is the recommended option for the best Windows experience and the most effective troubleshooting.
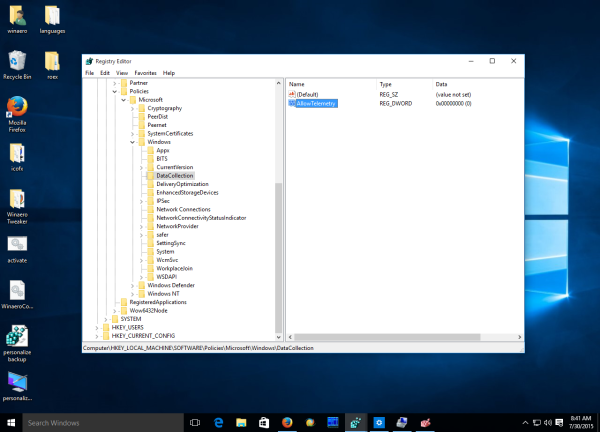
The usage data monitoring setting can be set to Full out of the box, which is not acceptable for many users. Those users might want to turn off the data collection in Windows 10. This can be done with a Registry tweak. To disable Telemetry and Data Collection in Windows 10 Home and Windows 10 Pro, you need to do the following:
- Open Registry Editor.
- Go to the following Registry key:
HKEY_LOCAL_MACHINE\SOFTWARE\Policies\Microsoft\Windows\DataCollection
Tip: You can access any desired Registry key with one click.
If you do not have such a Registry key, then just create it. - There you need to create a new a 32-bit DWORD value named AllowTelemetry and set it to 0.

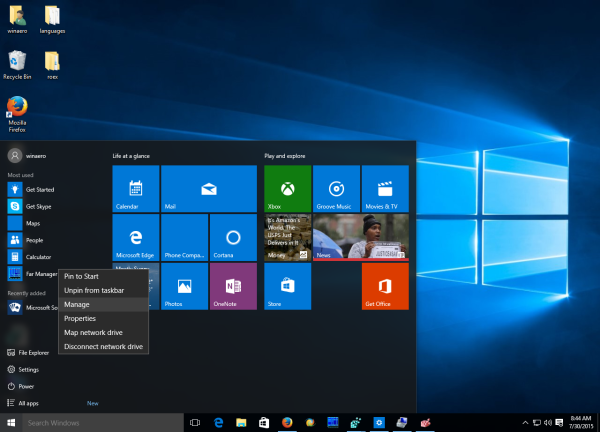
Now, you need to disable a couple of Windows services. Right click the File Explorer item in Windows 10 Start menu and pick Manage from its context menu:
Go to Services and Applications -> Services in the left pane. In the services list, disable the following services:
Diagnostics Tracking Service
dmwappushsvc
Update: Windows 10 version 1511 changed the Diagnostics Tracking Service to Connected User Experiences and Telemetry service. You will need to disable
Connected User Experiences and Telemetry
dmwappushsvc
Double click the mentioned services and pick «Disabled» for the startup type:
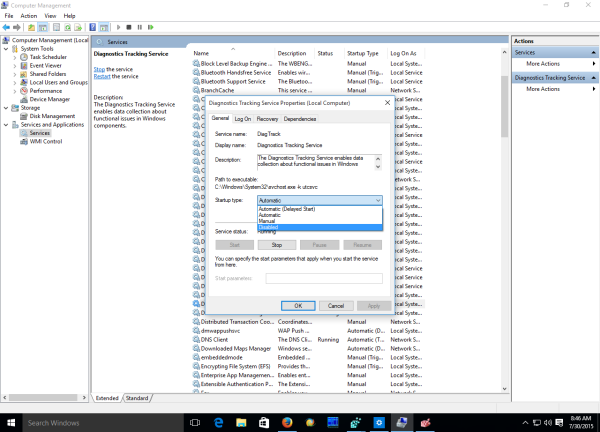
You need to restart Windows 10 for changes to take effect.
Tip: it is a good idea to check out rest of the options in the Settings app — >Privacy.
This should prevent Windows 10 from spying on you. If you have a more elegant solution for this or any questions, feel free to write a comment.
Support us
Winaero greatly relies on your support. You can help the site keep bringing you interesting and useful content and software by using these options:
If you like this article, please share it using the buttons below. It won’t take a lot from you, but it will help us grow. Thanks for your support!