
- LocalAccountTokenFilterPolicy is a DWORD value in the Windows registry that controls remote access to user accounts belonging to the local Administrators group.
- Remote UAC Restrictions refer to a security setting that allows or disallows local administrators to connect to the computer remotely.
- Disabling UAC remote restrictions increases the attack surface area and drastically increases the chances of your system being infiltrated.
The User Access Control (UAC) is a Windows feature that introduces an additional security prompt so that only authorized people and apps can make changes to the system and its configurations. In a previous post, we discussed several ways to disable UAC. However, it does not come without its implications.
In this article, we are going to talk about a similar item, which is a registry value in the Windows systems by the name “LocalAccountTokenFilterPolicy.” This DWORD is closely associated with the UAC feature of Windows and needs to be configured if you want to access a computer’s resources remotely using a local administrator account.
Let us dig into the details further to learn what LocalAccountTokenFilterPolicy is and how it should be configured to allow remote access.
Table of Contents
On This Page
What is LocalAccountTokenFilterPolicy
The LocalAccountTokenFilterPolicy is a DWORD value in the Windows registry. This value controls whether remote access is permitted to the user accounts connecting remotely, belonging to the local Administrators group.
The LocalAccountTokenFilterPolicy DWORD does not exist by default and needs to be created and configured manually. It needs to be present at the following path to allow remote connections and also to enable the Windows Remote Management (WinRM) service.
Computer\HKEY_LOCAL_MACHINE\SOFTWARE\Microsoft\Windows\CurrentVersion\Policies\System\LocalAccountTokenFilterPolicy
When the Value Data for LocalAccountTokenFilterPolicy is set to “1,” the WinRM service is enabled and thus the local administrator’s user account is permitted to connect remotely. This also disables the remote UAC restrictions for all users that are a member of the local Administrators group.
When to Disable UAC Remote Restrictions

If you see the “Access is denied” error prompt, or a similar error such as the one above, when attempting to connect remotely to a computer on the network, especially when using the net use “\\RemoteComputerName\Directory” command, or while using the PsExec utility from PsTools by SysInternals, that is when you should consider disabling the remote UAC restrictions on the target computer.

That being said, note that you only need to disable the UAC remote restrictions if you are using a local administrator account to access it.
As per Microsoft’s documentation, the local user accounts, when connecting remotely, has no elevation potential on the remote computer, and the user cannot perform administrative tasks. Therefore, to gain complete administrative privileges remotely, you must either connect to the computer using the Remote Desktop Connection utility, or you can use the LocalAccountTokenFilterPolicy DWORD to disable the UAC remote restrictions.
On the other hand, if you are connecting remotely using a domain administrator account, then you do not need to disable the UAC remote restriction. Microsoft says that “the domain user will run with a full administrator access token on the remote computer, and UAC won’t be in effect.” Therefore, if you are connecting remotely with a domain administrator, you do not need to configure the LocalAccountTokenFilterPolicy DWORD.
Is it Safe to Disable UAC Remote Restrictions?
As mentioned earlier, you can disable the UAC remote restrictions using the LocalAccountTokenFilterPolicy DWORD and settings its Value Data to “1”. However, the question is, whether you should do it or not.
When the UAC remote restriction is disabled, any local administrator user can remotely connect to the computer with full high-integrity tokens. This means that they will have full administrative rights, enabling them to make all sorts of changes to the system.
If the LocalAccountTokenFilterPolicy exists, and its value is “1”, then the computer will be vulnerable to remote connections, giving hackers a convenient way to gain unauthorized access to the computer.
Many Microsoft documentation even recommends that you set the LocalAccountTokenFilterPolicy to 1. However, as mentioned above, it is not the wisest choice.
That said, there are certain scenarios where you must absolutely disable the UAC remote restrictions and access the computer with complete administrative privileges. For those scenarios, you must disable UAC remote restrictions. However, it is recommended that you re-enable the remote restrictions once your work is done.
Disable UAC Remote Restrictions With LocalAccountTokenFilterPolicy
Now that you completely understand what the LocalAccountTokenFilterPolicy is and what it does, if you still wish to disable the UAC remote restrictions, here are a few methods to do so.
Note: All of the methods below make changes to the Windows Registry. Misconfiguration of critical values in the system’s registry could be fatal for your operating system. Therefore, we insist that you create a system restore point or a complete system image backup before proceeding forward with the process.
You can also use our top selection of disk imaging and backup software so you never lose your data or operating system again.
Disable UAC Remote Restrictions through Registry Editor
Here are the steps to create and configure the LocalAccountTokenFilterPolicy manually through the Registry editor:
-
Press the Windows Key + R shortcut keys to launch the Run Command box.
-
Type in “regedit” and press Enter.
Open the Registry Editor -
Navigate to the following path from the left pane:
Computer\HKEY_LOCAL_MACHINE\SOFTWARE\Microsoft\Windows\CurrentVersion\Policies\System

Navigate to the System key in Windows Registry -
Right-click “System,” expand New, then click “DWORD (32-bit) Value.”
Create a new DWORD -
Name the DWORD “LocalAccountTokenFilterPolicy“.
Create the LocalAccountTokenFilterPolicy DWORD -
Double-click “LocalAccountTokenFilterPolicy,” type in “1” in the Value Data field, and then click Ok.
Set Value Data for LocalAccountTokenFilterPolicy to 1 -
Restart the computer.


When the computer restarts, the UAC remote restrictions will now be disabled, and you should be able to access the remote computer using your local administrator account with full administrative privileges.

To re-enable the UAC remote restrictions, simply change the Value Data for the LocalAccountTokenFilterPolicy to “0” and restart the computer.
If you want to skip all of the complicated steps above, you can also disable the UAC remote restrictions using the command line, with a single command.
Disable UAC Remote Restrictions from Command Line
You can use the following command that will create and configure the LocallAccountTokenFilterPolicy DWORD to disable the UAC remote restrictions.
reg add "HKEY_LOCAL_MACHINE\SOFTWARE\Microsoft\Windows\CurrentVersion\Policies\System" /f /v LocalAccountTokenFilterPolicy /t Reg_DWORD /d 1This command can be executed inside the Run Command box, or an elevated Command Prompt or PowerShell instance. After running the command, restart the computer for the changes to take effect.

If you want to re-enable it later on, use this command instead:
reg add "HKEY_LOCAL_MACHINE\SOFTWARE\Microsoft\Windows\CurrentVersion\Policies\System" /f /v LocalAccountTokenFilterPolicy /t Reg_DWORD /d 0Disable UAC Remote Restrictions from Group Policy
You can also configure the UAC remote restrictions by managing your Group Policy. However, the Windows OS natively does not include any policies to manage the UAC remote restrictions. Therefore, you need to use the Windows version-specific Security Baseline to manage it.
This method is also helpful if you are experiencing the LocalAccountTokenFilterPolicy automatically changing its value each time you restart your computer. It is likely because the Group Policy is configured differently than what you are setting in the Registry Editor.
To begin, download the Windows version respective Security Baseline from this Microsoft Security Compliance Toolkit.
Once downloaded, proceed to perform the following steps to disable the UAC remote restrictions using the Group Policy Editor:
-
Extract the downloaded Security Baseline.

Extract the Security Baseline -
Navigate to the “Scripts” folder inside the extracted Security Baseline folder.
-
Right-click “Baseline-LocalInstall” and then click “Run with PowerShell.”
Run baseline script with PowerShell The PowerShell window will now appear briefly and close automatically, to run the script.
-
Now, jump back a folder and enter the “Templates” folder.
-
Copy the “SecGuide.admx” file and paste it at the following location:
C:\Windows\PolicyDefinitions
If asked for administrative privileges, provide them.
-
Now, back inside the extracted Security Baseline folder, go to “Templates\en-US“.
Note: The “en-US” folder can have a different name, depending on the language you have downloaded it in.
-
Copy the item “SecGuide.adml” and paste it at the following path:
C:\Windows\PolicyDefinitions\en-US
Note: The “en-US” folder can have a different name, depending on the language of your OS.
-
Restart the computer for the changes to take effect.
-
After the restart, press the Windows Key + R to open the Run Command box.
-
Type in “gpedit.msc” and press Enter.

Open the Group Policy Editor -
Navigate to the following from the left pane:
Local Computer Policy > Computer Configuration > Administrative Templates > MS Security Guide
Navigate to the MS Security Guide folder in the Group Policy Editor Note: If you do not see the “MS Security Guide” folder, then you either did not apply the Security Baseline correctly (Step 3) or did not copy the SecGuide.admx or the SecGuide.adml correctly (Steps 4 through 7). Go back and repeat these steps.
-
Double-click the policy “Apply UAC restrictions to local accounts on network logons.”
Apply UAC restrictions to local accounts on network logons group policy -
Select “Disabled,” and then click Apply and Ok.
Disable the UAC restrictions from Group Policy -
Now either restart the computer or run the following command in an elevated Command Prompt for the changes to take effect:
GPUpdate /Force


Once the computer restarts, UAC remote restriction will now be disabled. You should now be able to access the remote computer using a local administrator account with full administrative privileges.
In the case you want to re-enable remote restriction, simply select “Enabled” from the “Apply UAC restrictions to local accounts on network logons” Group Policy and restart the PC.
Note that when this policy is set to “Not Configured,” which is the default state when you install the Windows Security Baseline, the UAC remote restriction is enabled by default. Therefore, if you make any changes only to the LocalAccountTokenFilterPolicy in the Registry, the Group Policy will revert it when the computer restarts.
Takeaway
This article lists 3 methods to disable the UAC remote restrictions and allow the local administrator users to connect t the target computer with full administrative rights. This would allow them to make any changes to the system at their discretion.
Even Microsoft advises that you should set the LocalAccountTokenFilterPolicy to “1” from the Windows Registry, and disable the UAC remote restrictions. However, this is not always the wisest decision. Disabling UAC remote restrictions increase the attack surface area and drastically increases the chances of your system being infiltrated.
Therefore, we advise that you do not leave the UAC remote restrictions disabled for long, and re-enable it as soon you no longer require remote access.
Административные общие папки (шары, ресурсы) в Windows используются для удаленного доступа и управление компьютером. Windows по-умолчанию создает следующие административные шары:
-
Admin$
— Remote Admin (это каталог
%SystemRoot%
) – используется для удаленного администрирования компьютера; -
IPC$
— Remote IPC — используется для коммуникации программ named pipes) -
C$
— Default Share. Расшаренный системный диск. Если на компьютере есть другие диски с назначенными буквами, они также автоматически публикуются в виде административных общих ресурсов (
D$
,
E$
и т.д.); -
Print$
— публикуется, если вы открыли общий доступ к принтеру (используется, чтобы открыть доступ к каталогу с драйверами принтеров
C:\Windows\system32\spool\drivers
); -
FAX$
— используется для общего доступа к факс-серверу.
Содержание:
- Использование административных шар в Windows
- Как удалить общие административные шары в Windows?
- Включить административные общие папки в Windows
- Разрешить удаленный доступ к административным папкам Windows
Использование административных шар в Windows
Список административных папок на компьютере можно вывести в консоли управления компьютером
compmgmt.msc
( System Tools -> Shared Folders -> Shares, Общие папки -> Общие ресурсы), выполнив команду
net share
.
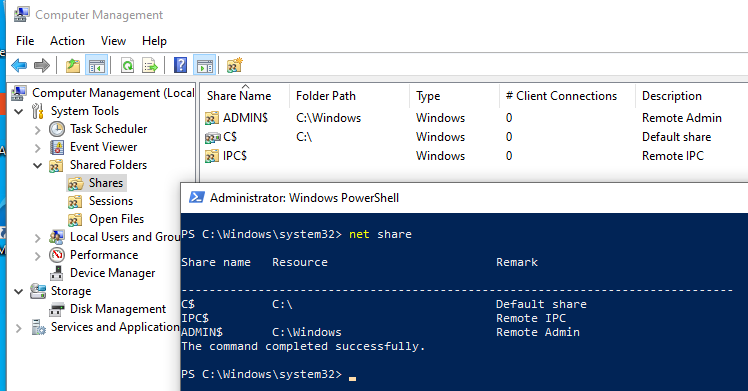
Имена общих административных шар заканчиваются знаком $. Служба LanmanServer скрывает общие папки с символом $ в сетевом окружении. Если в проводнике открыть список доступных сетевых папок на компьютере (
\\computername
), административные шары не будут показаны.
Можно получить список доступных административных шар на удаленном компьютере с помощью команды:
net view \\computername /all
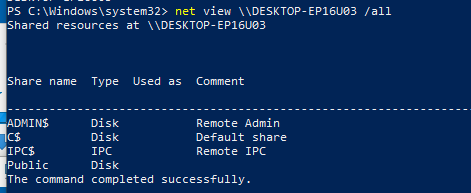
В большинстве сторонних файловых менеджеров для Windows доступна опция, позволяющая автоматически показывать доступные административные ресурсы на удаленных компьютерах.
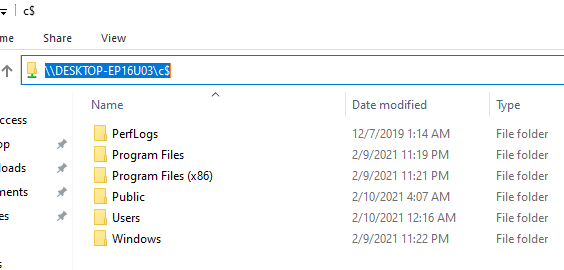
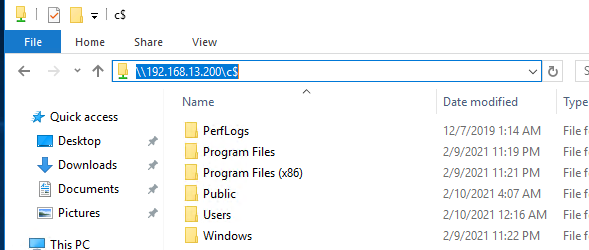
Чтобы открыть содержимое административной шары из File Explorer, нужно указать ее полное имя. Нажмите Win+R, и выполните команду
\\computername\c$
.
Данная команда откроет содержимое локального диска C и позволит вам получить полноценный доступ к файловой системе системного диска удаленного компьютера.
Получить доступ к административным шарам могут только члены локальной группы администраторов компьютера (и группы Backup Operators) при условии, что у вас включен SMB протокол, общий доступ (Turn on file and printer sharing) и доступ по 445 порту TCP не блокируется Windows Defender Firewall.
Как удалить общие административные шары в Windows?
Административные общие папки Windows удобны для удаленного администрирования компьютера, но несут дополнительные риски безопасности. Вы можете полностью запретить Windows создавать эти скрытые папки. Это не нарушит работу компьютера Windows, использующегося в качестве клиента, но ограничит его удаленное администрирование.
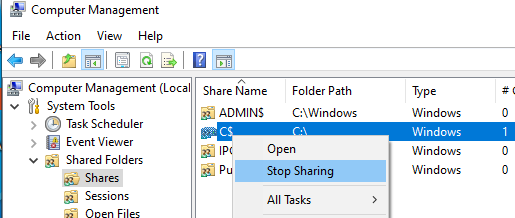
Чтобы отключить общую административную папку, выберите опцию Stop sharing в консоли Computer Management (или выполните команду
net share IPC$ /delete
). Это удалит общую административную папку, но по после перезагрузки компьютера Windows пересоздаст ее автоматически.
Чтобы запретить Windows публиковать административные шары, нужно открыть редактор реестра regedit.exe, перейти в ветку реестра HKLM\System\CurrentControlSet\Services\LanmanServer\Parameters и добавить Dword параметр с именем AutoShareWks (для десктопных версий Windows) или AutoShareServer (для Windows Server) и значением 0.
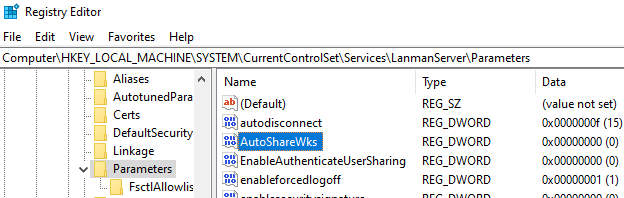
Можно создать это параметр реестра вручную, из командной строки reg add:
reg add HKLM\SYSTEM\CurrentControlSet\Services\lanmanserver\parameters /f /v AutoShareWks /t REG_DWORD /d 0
или через PowerShell:
New-ItemProperty -Name AutoShareWks -Path HKLM:\SYSTEM\CurrentControlSet\Services\LanmanServer\Parameters -Type DWORD -Value 0
Теперь после перезагрузки административные шары не будут создаваться. При этом перестанут работать утилиты удаленного управления компьютером, в том числе psexec.
В доменной сети вы можете запретить публиковать локальные диски компьютеров в качестве административных шар с помощью групповых политик:
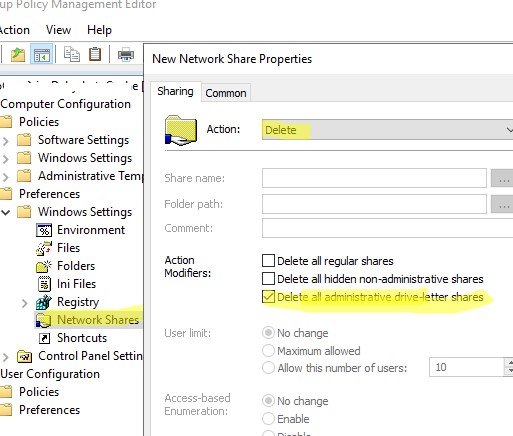
- Создайте новую GPO в консоли GPMC. Перейдите в раздел Computer Configuration -> Preferences -> Windows Settings -> Network Shares;
- Выберите Action: Delete и включите опцию Delete all administrative drive-letter shares.

Включить административные общие папки в Windows
Если вы хотите включить административные сетевые папки, нужно изменить значение параметра на 1 или удалить его.
Set-ItemProperty -Name AutoShareWks -Path HKLM:\SYSTEM\CurrentControlSet\Services\LanmanServer\Parameters -Value 1

Административные шары публикуются службой LanmanServer. Если эта служба остановлена, удаленные пользователи не смогут получить доступ к общим ресурсам на этом компьютере.
Get-Service LanmanServer
Чтобы Windows пересоздала административные шары, достаточно перезапустить службу Server командой:
Get-service LanmanServer | restart-service

Выполните команду PowerShell Get-SmbShare и проверьте, что административные шары стали доступны.
Разрешить удаленный доступ к административным папкам Windows
На компьютерах, добавленных в домен AD, удаленный доступ к административным шарам разрешен пользователям, состоящим в локальной группе администраторов.
Однако Windows по-умолчанию блокирует удаленный доступ к административным шарам на компьютерах в рабочей группе (Workgroup). При попытке открыть в проводнике список файлов на таком компьютере с помощью команды\
\win10_pc\C$
появляется запрос пароля. После ввода учетных данных локального пользователя из группы локальных администраторов появляется ошибка доступа (Access is denied). Удаленный доступ к административным шарам возможен только под встроенным администратором Windows.
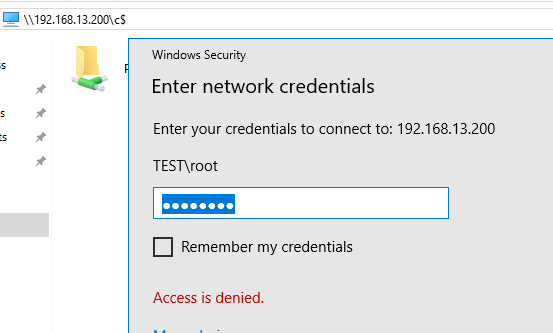
Удаленный доступ к административным шарам в этом случае блокируется компонентом Remote UAC (контроль учетных записей для удаленных подключений). Remote UAC фильтрует токены доступа локальных записей и аккаунтов Microsoft, блокируя удаленный административный доступ к папкам. При доступе под доменным аккаунтом такое ограничение не применяется.
Отключить Remote UAC можно путем создания в системном реестре параметра LocalAccountTokenFilterPolicy
Совет. Эта операция несколько снижает уровень безопасности Windows.
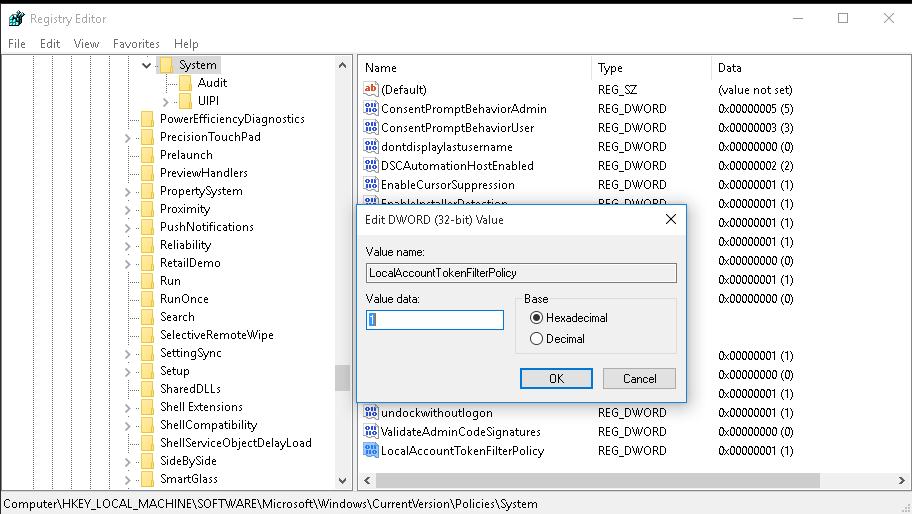
- Откройте редактор реестра (regedit.exe);
- Перейдите в ветку реестра HKEY_LOCAL_MACHINE\SOFTWARE\Microsoft\Windows\CurrentVersion\Policies\System ;
- Создайте новый параметр типа DWORD (32-bit) с именем LocalAccountTokenFilterPolicy;
- Установите значение параметра LocalAccountTokenFilterPolicy равным 1;

- Для применения изменений потребуется перезагрузить компьютер
Примечание. Создать параметр LocalAccountTokenFilterPolicy можно командой
reg add "HKLM\SOFTWARE\Microsoft\Windows\CurrentVersion\Policies\System" /v "LocalAccountTokenFilterPolicy" /t REG_DWORD /d 1 /f
После перезагрузки попробуйте удаленно открыть административный каталог C$ на компьютере Windows. Авторизуйтесь под учетною записью, входящей в группу локальных администраторов.
Должно открыться окно проводника с содержимым диска.
This post is addressing the ability to invoke remote commands using the context of a remote local administrator, and disabling the LocalAccountTokenFilterPolicy filter.
There are times when you have couple of servers or machines that are not member of you domain. They are stand alone machines, and they exist for couple of reasons. Nowadays, with all security concerns and attacks, many application architectures contain standalone not domain joined roles. Take Microsoft Lync for example, they have a separate Edge role to handle media from external clients and for security reasons, this role is meant to be a standalone deployment and never joined to the internal domain. There are many other examples.
If you are going to invoke a remote PowerShell session to one of those stand alone machines, you need to do so with a security context, and most of the time, with the privileges of the local administrator on the remote machine.
Say you want to connect to a stand alone machine, and get some WMI data using PowerShell. How a script running on my script server that is member of contoso domain, and running under contoso\user1 credentials, will be able to connect to that remote standalone server and get WMI data for example.

LocalAccountTokenFilterPolicy
LocalAccountTokenFilterPolicy is the secret that makes this possible, and I will show you how this can be done:
- Go to the stand alone computer, create a local user called User1 with the same password as Contoso\User1 (which is the account im using to run scripts on the domain joined script server). Add User1 to the local administrators group on that stand alone machine. You will end up with a domain user called contoso\User1 that will be used to run the PowerShell script from the joined machine, and a local user User1 on the stand alone machine, that is member of the local administrators group.
- Now, make sure the password for both users are the same.
- On the standalone server, I have to disablee something called (LocalAccountTokenFilterPolicy) to do the trick. This is saying that, if I receive a connection with a user name and password that matches a local user account on my local credential store, I will consider it valid transaction. To disable such LocalAccountTokenFilterPolicy, browse the following registry key, create it if not existing, and put the value = 1.
Key: HKEY_LOCAL_MACHINE\SOFTWARE\Microsoft\Windows\CurrentVersion\Policies\System
 Value: LocalAccountTokenFilterPolicy
 Data: 1 (to disable, 0 enables filtering)
 Type: REG_DWORD (32-bit)

Accessing Remote local administrator account in this way is somehow risky. If you are going to play with LocalAccountTokenFilterPolicy, then make sure you understand the consequences. The risk is that someone can connect remotely to the machine, and associate himself to the context of the remote local administrator on that standalone machine, and do nasty things.
Read more about this registry key here
Just a quick post on the LocalAccountTokenFilterPolicy setting. What it is why we have it. As a pentester and administering windows systems I’m bumping into this all the time. The classic scenario being your trying to access the C$ of machine with a local account, and being blocked. You check all the usuals; firewall, creds etc and are banging your head against a brick wall. Its more than likely to be the Remote User Account Control (UAC) LocalAccountTokenFilterPolicy setting in Windows that is stopping you. Depending on what type of account you are connecting with ie Domain or Local depends on whether the UAC access token filtering will take affect, it will not affect domain accounts in the local Administrators group, only Local accounts. Even if the Local account is in the Administrators group, UAC filtering means that the action being taken will run as a standard user until elevated. Think of when you launch CMD or PowerShell logged in as an Admin account, its run in the context of standard user until you elevate, or re launch as an Admin. So when we try to connect to the C$ with a Local account that is in the Administrator group we are blocked by UAC. Disabling LocalAccountTokenFilterPolicy will allow us to connect.
When the Remote User Account Control (UAC) LocalAccountTokenFilterPolicy value is set to 0, Remote UAC access token filtering is enabled. When it is set to 1, remote UAC is disabled. We can set this with the following one liner:
cmd /c reg add HKLM\SOFTWARE\Microsoft\Windows\CurrentVersion\Policies\system /v LocalAccountTokenFilterPolicy /t REG_DWORD /d 1 /f
The same scenario can be said for running a credentialed or authenticated Nessus scan with a local account that is part of the Administrators group. For Nessus to enumerate the system it will connect to the C$. It will fail unless the LocalAccountTokenFilterPolicy is set to 1. There are other pre-requisites, these are out of scope of this post however.
Well hope this helps!
In some cases there is a need to enable the Admin Shares of local hard disks, commonly for administrative purposes. The Admin shares are the default shares (aka Administrative shares) of all disk drives (C$, D$, etc.) on a Windows computer and by default are hidden and inaccessible from the network. Administrative shares on Windows 10 are disabled by default. When exetung a net use \\computername\C$ from a remote PC, it says it could not find the path, but of course, the PC is online and working fine, firewall is allowing traffic and you have full rights to it.
Run the following command to enable administrative shares:
reg add HKLM\SOFTWARE\Microsoft\Windows\CurrentVersion\Policies\system /v LocalAccountTokenFilterPolicy /t REG_DWORD /d 1 /f
Alternatively modify the registry manually.
– Run regedit
– Go to the following registry subkey:[HKEY_LOCAL_MACHINE\SOFTWARE\Microsoft\Windows\CurrentVersion\policies\system]
"LocalAccountTokenFilterPolicy"=dword:00000001
If LocalAccountTokenFilterPolicy DWORD entry does not exist, then do the following:
– Create a new DWORD value
– Call the DWORD value LocalAccountTokenFilterPolicy
– Enter 1 as value