
Summary
This article describes Attachment Manager in Windows. This article includes the methods to configure Attachment Manager and the workarounds for two issue with Attachment Manager.
Introduction
The Attachment Manager is included in Microsoft Windows to help protect your computer from unsafe attachments that you might receive with an e-mail message and from unsafe files that you might save from the Internet.
If the Attachment Manager identifies an attachment that might be unsafe, the Attachment Manager prevents you from opening the file, or it warns you before you open the file. For more information about Attachment Manager, go to the «More Information» section.
Workarounds when you cannot download a file or a program
Many people encounter issues when they try to download a file or a program from the Internet. This could be caused by a number of reasons. Here we provide two general solutions for you to try if you are getting an error that your download is blocked, or if you get «virus scan failed» or «virus detected» messages.
You cannot download any file if the «File download» option is disabled in the Internet security settings. Follow these steps to check the Internet security settings:
-
Start the Internet Properties window.
Windows 7-
Click Start, click All Programs, and then open the Accessories folder.
-
Click Run.
-
Type inetcpl.cpl, and then click OK.
Windows 8 or 10
-
From the Start screen, type inetcpl.cpl, and then press Enter.
-
-
In the Internet Properties window, click the Security tab, click the Ineternet zone (globe icon), and then click the Custom level button.
-
In the Security Settings window, scroll down to Downloads > File download.
-
Click to select Enable.
-
Scroll down the list further to Miscellaneous > Launching applications and unsafe files.
-
Click to select Prompt (recommended).
-
Click OK.
You may receive a «Virus scan failed» or «Virus detected» error message when you try to open or save a file or a program from Internet. In most cases, it is not caused by the Windows operating system, but by the antivirus software. If you are certain that the source you are trying to open is safe and trusted, try the following workaround to disable the virus scanning temporarily, and then enable the virus scanning immediately after you complete downloading the program or file. You have to be very cautious about using this workaround. Otherwise, you may be exposed to virus attacks.
-
Start Registry Editor.
Windows 7-
Click Start, click All Programs, and then open the Accessories folder.
-
Click Run.
-
Type regedit.exe, and then click OK.
Windows 8 or 10
-
From the Start screen, type regedit.exe, and then press Enter.
-
-
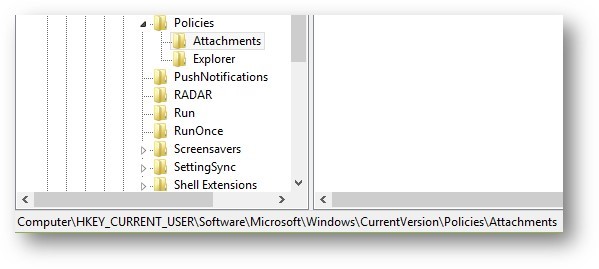
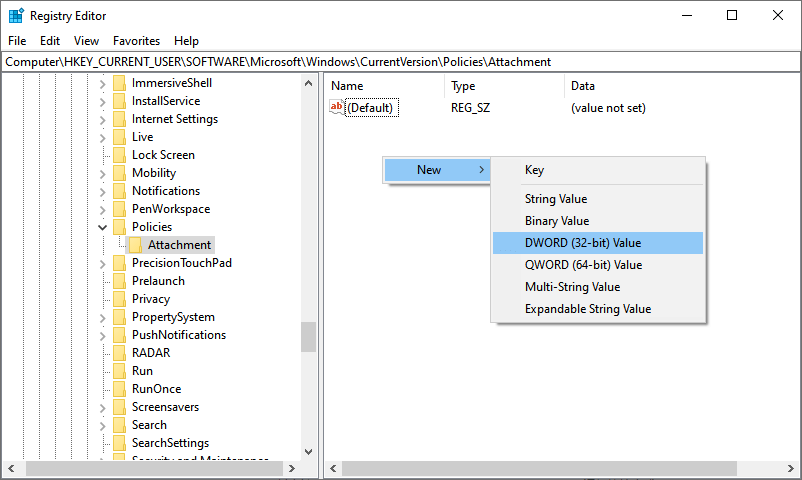
Locate the following registry subkeys: HKEY_CURRENT_USER\Software\Microsoft\Windows\CurrentVersion\Policies\Attachments
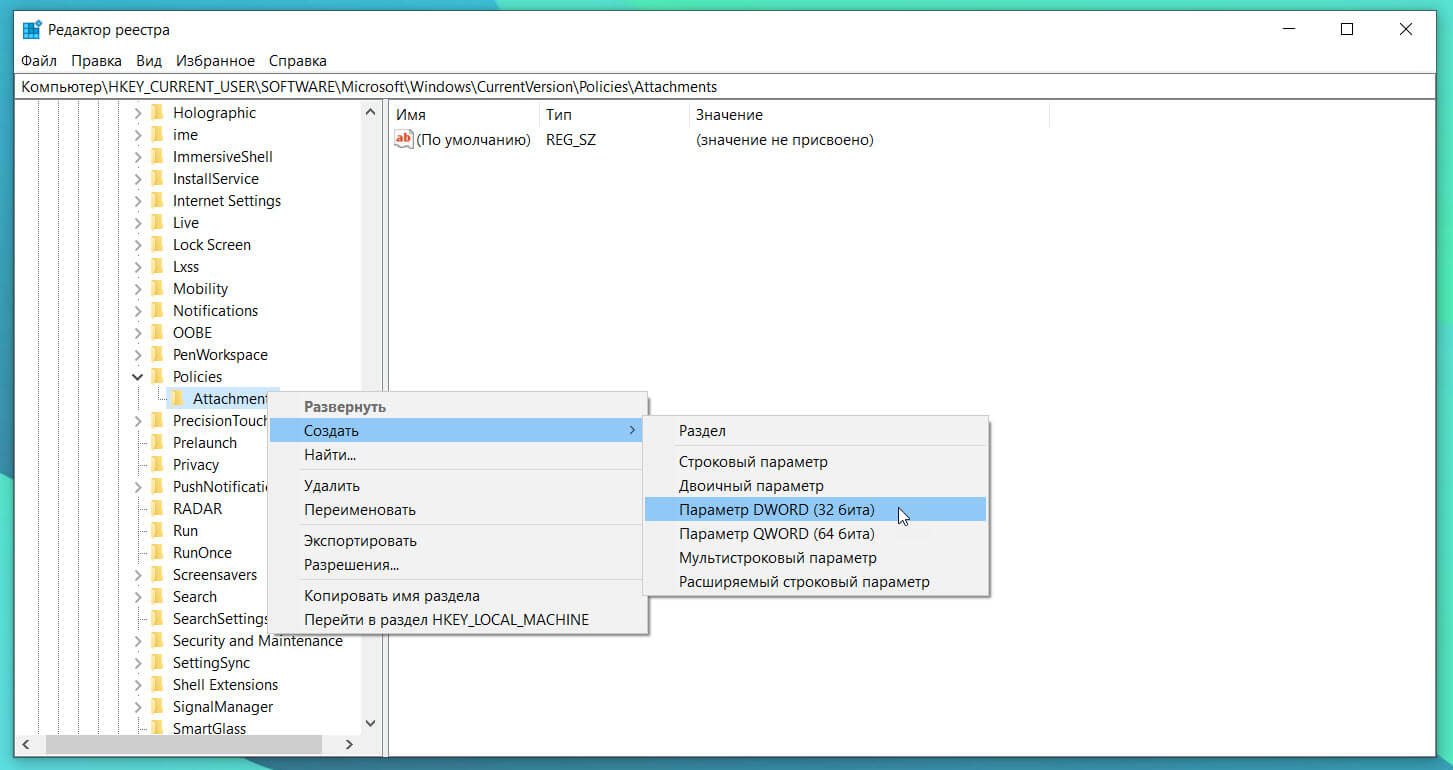
If you do not see the Attachments subkey, create it by right clicking Policies, select New, click Key, and then type Attachments as the key name.

-
Right click Attachments, select New, and then click DWORD (32-bit) Value.
-
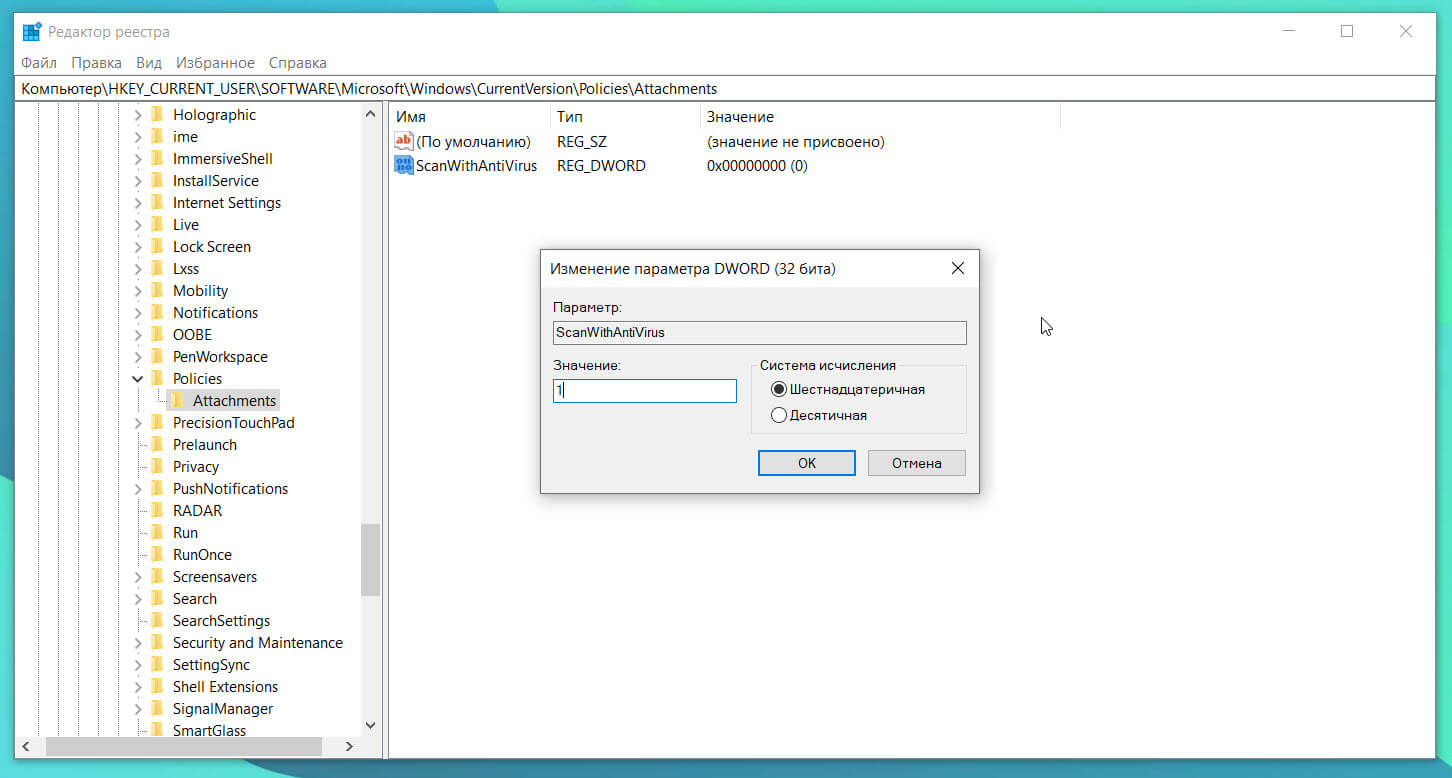
Type ScanWithAntiVirus as the value name, and then press Enter.
-
Right-click the new ScanWithAntiVirus DWORD value, and then click Modify.
-
In the Value data box, type 1, and then click OK.

-
Exit Registry Editor.
-
Log off and log in Windows to make the change take effect.
-
Open or save the program or file that you failed before.

Note We suggest you change the value of ScanWithAntiVirus subkey to 3 to enable the virus scan right after you completely open or save the program or file.
Configuring the Attachment Manager
There are several features of the Attachment Manager that can be configured by using Group Policy or the local registry.
This policy setting lets you manage the default risk level for file types. To fully customize the risk level for file attachments, you may also have to configure the trust logic for file attachments:
-
High Risk
If the attachment is in the list of high risk file types and is from the restricted zone, Windows blocks the user from accessing the file. If the file is from the Internet zone, Windows prompts the user before accessing the file. -
Moderate Risk
If the attachment is in the list of Moderate Risk file types, Windows will not prompt the user before accessing the file, regardless of the file’s zone information. -
Low Risk
If the attachment is in the list of low risk file types, Windows will not prompt the user before accessing the file, regardless of the file’s zone information.
If you enable this policy setting, you can specify the default risk level for file types. If you disable this policy setting, Windows sets the default risk level to moderate. If you do not configure this policy setting, Windows sets the default risk level to moderate.
|
Group Policy |
Registry Subkey |
Registry Entry |
Entry Value |
|---|---|---|---|
|
User Configuration\Administrative Templates\Windows Components\Attachment Manager |
HKEY_CURRENT_USER\ Software\Microsoft\Windows\CurrentVersion\Policies\Associations |
DefaultFileTypeRisk |
High (6150) Low (6152) |
Note The default value of the DefaultFileTypeRisk registry entry is Moderate (6151).
This policy setting lets you manage whether Windows marks file attachments that have information about their zone of origin. These zones or origin are Internet, intranet, and local. This policy setting requires the NTFS file system to function correctly and will fail without notice on systems that use FAT32. By not preserving the zone information, Windows cannot make appropriate risks assessments. If you enable this policy setting, Windows does not mark file attachments by using their zone information. If you disable this policy setting, Windows marks file attachments by using their zone information. If you do not configure this policy setting, Windows marks file attachments by using their zone information.
|
Group Policy |
Registry Subkey |
Registry Entry |
Entry Value |
|---|---|---|---|
|
User Configuration\Administrative Templates\Windows Components\Attachment Manager |
HKEY_CURRENT_USER\Software\Microsoft\Windows\CurrentVersion\Policies\Attachments |
SaveZoneInformation |
On (1) Off (2) |
Note The default value of the DefaultFileTypeRisk registry entry is Off (2).
Hide mechanisms to remove zone information
This policy setting lets you manage whether users can manually remove the zone information from saved file attachments by clickingUnblock on the file’s Properties tab or by clicking to select a check box in the Security Warning dialog box. Removing the zone information lets users open potentially dangerous file attachments that Windows has blocked users from opening. If you enable this policy setting, Windows hides the check box and the Unblock button. If you disable this policy setting, Windows shows the check box and the Unblock button. If you do not configure this policy setting, Windows shows the check box and the Unblock button.
|
Group Policy |
Registry Subkey |
Registry Entry |
Entry Value |
|---|---|---|---|
|
User Configuration\Administrative Templates\Windows Components\Attachment Manager |
HKEY_CURRENT_USER\Software\Microsoft\Windows\CurrentVersion\Policies\Attachments |
HideZoneInfoOnProperties |
Off (0) On (1) |
Note The default value of the DefaultFileTypeRisk registry entry is Off (0).
These policy settings let you configure the list of low, moderate, and high risk file types. The High list takes precedence over the Moderate and Low risk inclusion lists. Also, an extension is listed in more than one inclusion list. If you enable this policy setting you can create a custom list of low, moderate, and high risk file types. If you disable this policy setting, Windows uses its built in list of file types. If you do not configure this policy setting, Windows uses its built in list of file types.
|
Group Policy |
Registry Subkey |
Registry Entry |
Entry Value |
|---|---|---|---|
|
User Configuration\Administrative Templates\Windows Components\Attachment Manager |
HKEY_CURRENT_USER\Software\Microsoft\Windows\CurrentVersion\Policies\Associations |
HighRiskFileTypes ModRiskFileTypes LowRiskFileTypes |
This policy setting lets you configure the logic that Windows uses to determine the risk for file attachments. Preferring the file handler instructs Windows to use the file handler data over the file type data. For example, it instructs Windows to trust Notepad.exe, but do not trust .txt files. Preferring the file type instructs Windows to use the file type data over the file handler data. For example, trust .txt files, regardless of the file handler. Using both the file handler and type data is the most restrictive option. Windows chooses the more restrictive recommendation. This causes users to see more trust prompts than selecting the other options. If you enable this policy setting, you can select the order in which Windows processes risk assessment data. If you disable this policy, Windows uses its default trust logic which prefers the file handler over the file type.
|
Group Policy |
Registry Subkey |
Registry Entry |
Entry Value |
|---|---|---|---|
|
User Configuration\Administrative Templates\Windows Components\Attachment Manager |
HKEY_CURRENT_USER\ Software\Microsoft\Windows\CurrentVersion\Policies\Attachments |
UseTrustedHandlers |
File Type (1) |
Note The default value of the DefaultFileTypeRisk registry entry is Handler (2).
This policy setting lets you manage the behavior for notifying registered antivirus programs. If multiple programs are registered, they will all be notified. If the registered antivirus program already performs on-access checks or scans files as they arrive on the computer’s e-mail server, additional calls would be redundant. If you enable this policy, Windows tells the registered antivirus program to scan the file when a user opens a file attachment. If the antivirus program fails, the attachment is blocked from being opened. If you disable this policy, Windows does not call the registered antivirus programs when file attachments are opened. If you do not configure this policy, Windows does not call the registered antivirus programs when file attachments are opened.
|
Group Policy |
Registry Subkey |
Registry Entry |
Entry Value |
|---|---|---|---|
|
User Configuration\Administrative Templates\Windows Components\Attachment Manager |
HKEY_LOCAL_MACHINE\Software\Microsoft\Windows\CurrentVersion\Policies\Attachments HKEY_LOCAL_MACHINE\Software\Microsoft\Windows\CurrentVersion\Policies\Attachments |
ScanWithAntiVirus |
Off (1) On (3) |
Note The default value of the DefaultFileTypeRisk registry entry is Off (1). When the value is set to Optional (2), all scanners are called even after one reports a detection.
For more information, click the following article number to view the article in the Microsoft Knowledge Base:
182569 Internet Explorer security zones registry entries for advanced users
More Information
The following determine whether you are prevented from opening the file or whether you are warned before you open the file:
-
The type of program that you are using.
-
The file type that you are downloading or trying to open.
-
The security settings of the Web content zone that you are downloading the file from.
Note You can configure the Web content zones in Microsoft Internet Explorer on the Security tab. To view the Web content zones, click Tools, click Internet Options, and then click the Security tab. The following are the four Web content zones:
-
Internet
-
Local intranet
-
Trusted sites
-
Restricted sites
-
The Attachment Manager uses the IAttachmentExecute application programming interface (API) to find the file type, to find the file association, and to determine the most appropriate action.
Microsoft Outlook Express and Microsoft Internet Explorer use the Attachment Manager to handle e-mail attachments and Internet downloads.
The Attachment Manager classifies files that you receive or that you download based on the file type and the file name extension. Attachment Manager classifies files types as high risk, medium risk, and low risk. When you save files to your hard disk from a program that uses the Attachment Manager, the Web content zone information for the file is also saved with the file. For example, if you save a compressed file (.zip) that is attached to an e-mail message to your hard disk, the Web content zone information is also saved when you save the compressed file. When you try to extract the contents from the compressed file, or if you try to run a file, you cannot. The Web content zone information is saved together with the files only if the hard disk uses the NTFS file system.
You can open a blocked file from a known source if you want to. To open a blocked file, follow these steps:
-
Right-click the blocked file, and then clickProperties.
-
In the General tab, clickUnblock.
When you try to download or open a file from a Web site that is in the restricted Web content zone, you may receive a message that indicates that the file is blocked.
When you try to open high-risk file types from sites that belong to the Internet Web content zone, you may receive a warning message, but you may be able to open these types of files.
The file types that the Attachment Manager labels as high-risk include the following:
-
.ade
-
.adp
-
.app
-
.asp
-
.bas
-
.bat
-
.cer
-
.chm
-
.cmd
-
.com
-
.cpl
-
.crt
-
.csh
-
.exe
-
.fxp
-
.hlp
-
.hta
-
.inf
-
.ins
-
.isp
-
.its
-
.js
-
.jse
-
.ksh
-
.lnk
-
.mad
-
.maf
-
.mag
-
.mam
-
.maq
-
.mar
-
.mas
-
.mat
-
.mau
-
.mav
-
.maw
-
.mda
-
.mdb
-
.mde
-
.mdt
-
.mdw
-
.mdz
-
.msc
-
.msi
-
.msp
-
.mst
-
.ops
-
.pcd
-
.pif
-
.prf
-
.prg
-
.pst
-
.reg
-
.scf
-
.scr
-
.sct
-
.shb
-
.shs
-
.tmp
-
.url
-
.vb
-
.vbe
-
.vbs
-
.vsmacros
-
.vss
-
.vst
-
.vsw
-
.ws
-
.wsc
-
.wsf
-
.wsh
File types that the Attachment Manager does not label as high risk or low risk are automatically labeled as medium risk.
When you open a medium-risk file from the Internet Web content zone or from the restricted sites Web content zone, you will be able to open these types of files without warning message.
The Attachment Manager labels the following file types as low risk only when you open them by using Notepad. If you associate another program with this file type, the file type is no longer considered low risk.
-
.log
-
.text
-
.txt
The Attachment Manager labels the following file types as low risk only when you open the file by using the Microsoft Windows Picture and Fax Viewer:
-
.bmp
-
.dib
-
.emf
-
.gif
-
.ico
-
.jfif
-
.jpg
-
.jpe
-
.jpeg
-
.png
-
.tif
-
.tiff
-
.wmf
Note Associating a file type with Notepad or with the Windows Picture and Fax Viewer does not add that file type to the list of low-risk file types.
Рекомендуем: Неудачная загрузка, как исправить в Windows 10 «Этот файл содержал вирус и был удален».
Если вы не можете открыть загруженный файл или вложение электронной почты и получаете сообщение об ошибке при попытке его открыть, скорее всего, этот файл заблокирован Windows 10.
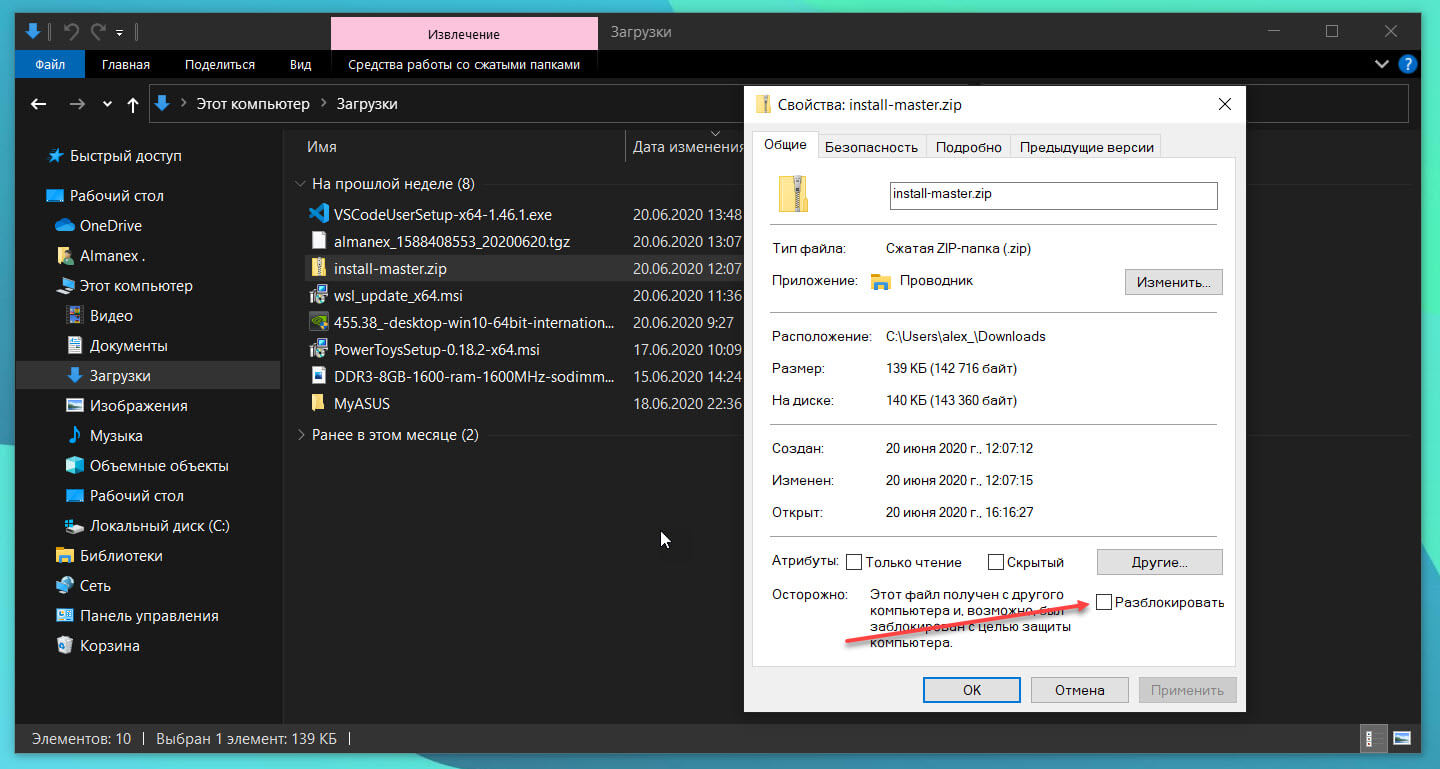
Если файл заблокирован, чтобы разблокировать выбранный файл вам нужно кликнуть правой кнопкой мыши по файлу, выбрать Свойства, на вкладке «Общие» установить флажок «Разблокировать».
Что такое диспетчер вложений в Windows 10?
Диспетчер вложений (Attachment Manager) в Windows 10 защищает компьютер от опасных вложений, получаемых по электронной почте или скачиваемых из Интернета, или перенесенные с другого компьютера, на ваш компьютер
Если диспетчер вложений заподозрит, что файл небезопасен, он не позволяет системе и установленным программам открывать его или отображает предупреждающее сообщение перед открытием файла.
В зависимости от типа программы, которую вы используете для загрузки файлов, типа (типа файла) загружаемого файла и настроек безопасности зоны веб-содержимого, Windows будет либо предупреждать вас, либо при попытке открыть файл блокировать его.
Если вы часто загружаете файлы из Интернета или получаете файлы в виде вложений электронной почты, вы можете отключить или запретить Windows 10 блокировать файл, загруженный из Интернета.
Поскольку в Windows 10 нет способа отключить Диспетчер вложений с помощью «Параметров» или панели управления, нам необходимо вручную отредактировать реестр, чтобы отключить эту функцию. Выполните приведенные ниже инструкции, чтобы включить или отключить функцию вложения в Windows 10.
Включить или выключить диспетчер вложений с помощью реестра
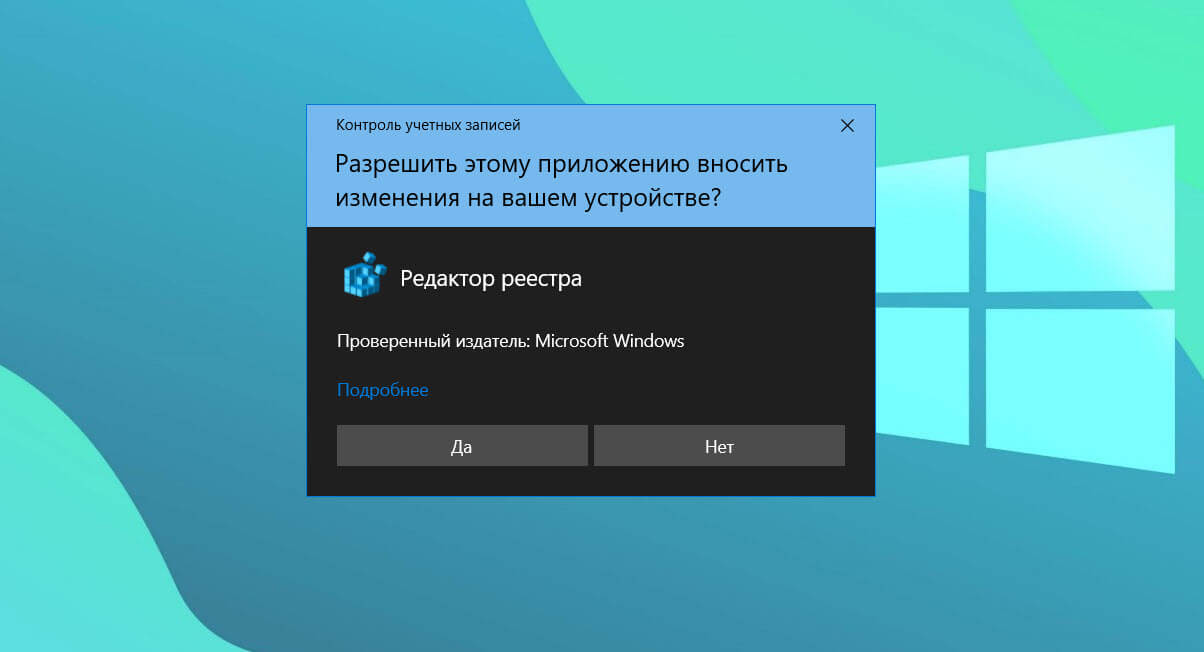
Шаг 1: Откройте редактор реестра, набрав Regedit в поле поиска и нажав клавишу Enter.
На запрос контроля учетных записей, ответьте Да.
Шаг 2: В редакторе реестра перейдите к следующему разделу:
HKEY_CURRENT_USER\Software\Microsoft\Windows\CurrentVersion\Policies
Шаг 3: Создайте или перейдите в раздел Attachments.
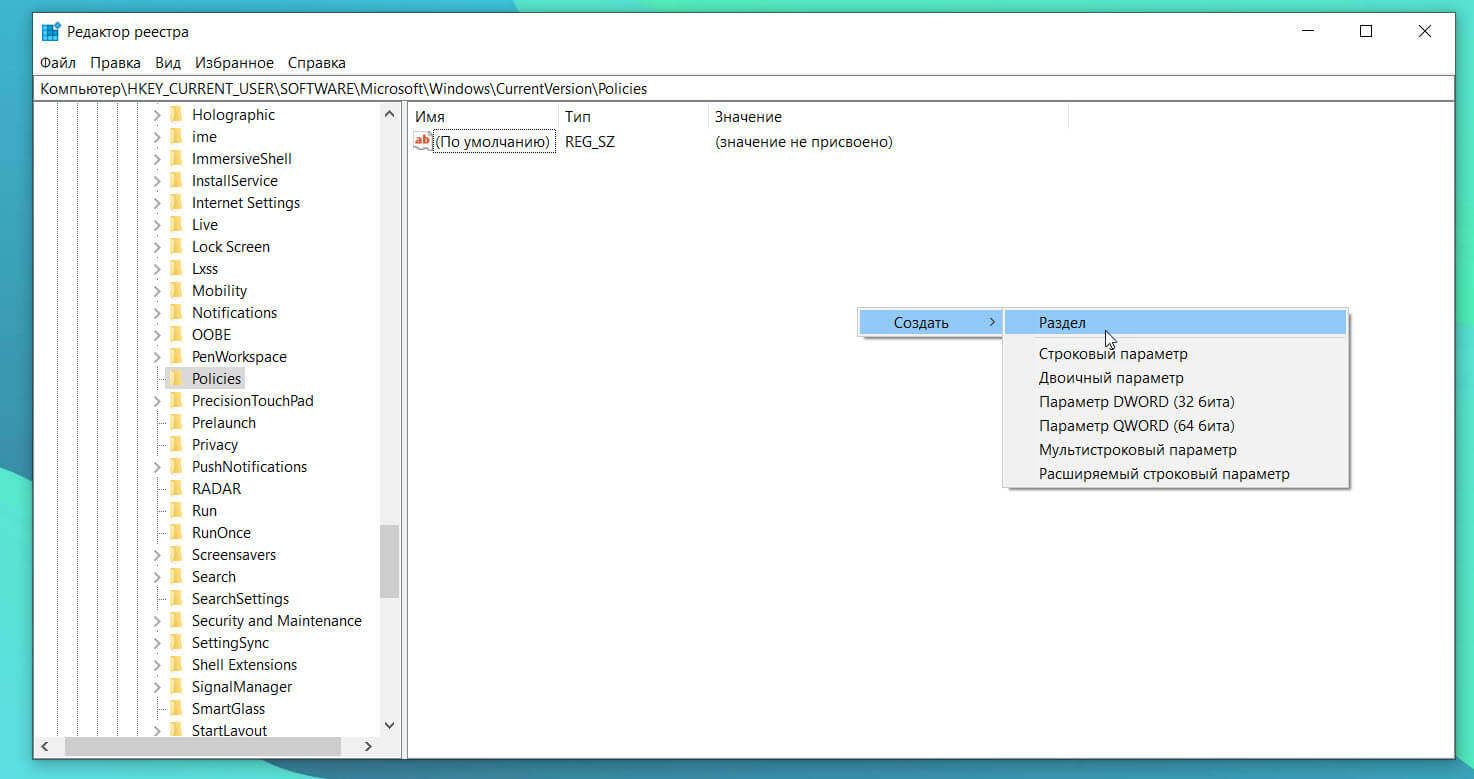
Шаг 4: Теперь выберите раздел Attachments в левой панели редактора. Кликните правой кнопкой мыши, выберите в контекстном меню «Создать», а затем Параметр «DWORD» (32-бита) и назовите его ScanWithAntiVirus.
Шаг 5: Наконец, дважды кликните только что созданный параметр ScanWithAntivirus и измените его значение на 1, чтобы отключить диспетчер вложений в Windows 10.
Шаг 6: Закройте редактор реестра. Выйдите и войдите или перезагрузите компьютер, чтобы применить изменения.
Включить Диспетчер вложений с помощью реестра
Шаг 1: Перейдите к следующему разделу в редакторе реестра:
HKEY_CURRENT_USER\Software\Microsoft\Windows\CurrentVersion\Policies\Attachments
Шаг 2: Справа дважды кликните параметр ScanWithAntivirus и измените его значение на 3.
Включить или выключить диспетчер вложений с помощью групповой политики
Обратите внимание, что редактор групповой политики не является частью домашней версии Windows, пользователи должны использовать способ с редактором реестра, упомянутый выше.
Шаг 1: Введите Gpedit.msc в поле поиска Пуск / панель задач и нажмите Enter, чтобы открыть редактор групповой политики.
Шаг 2: В редакторе политик перейдите к:
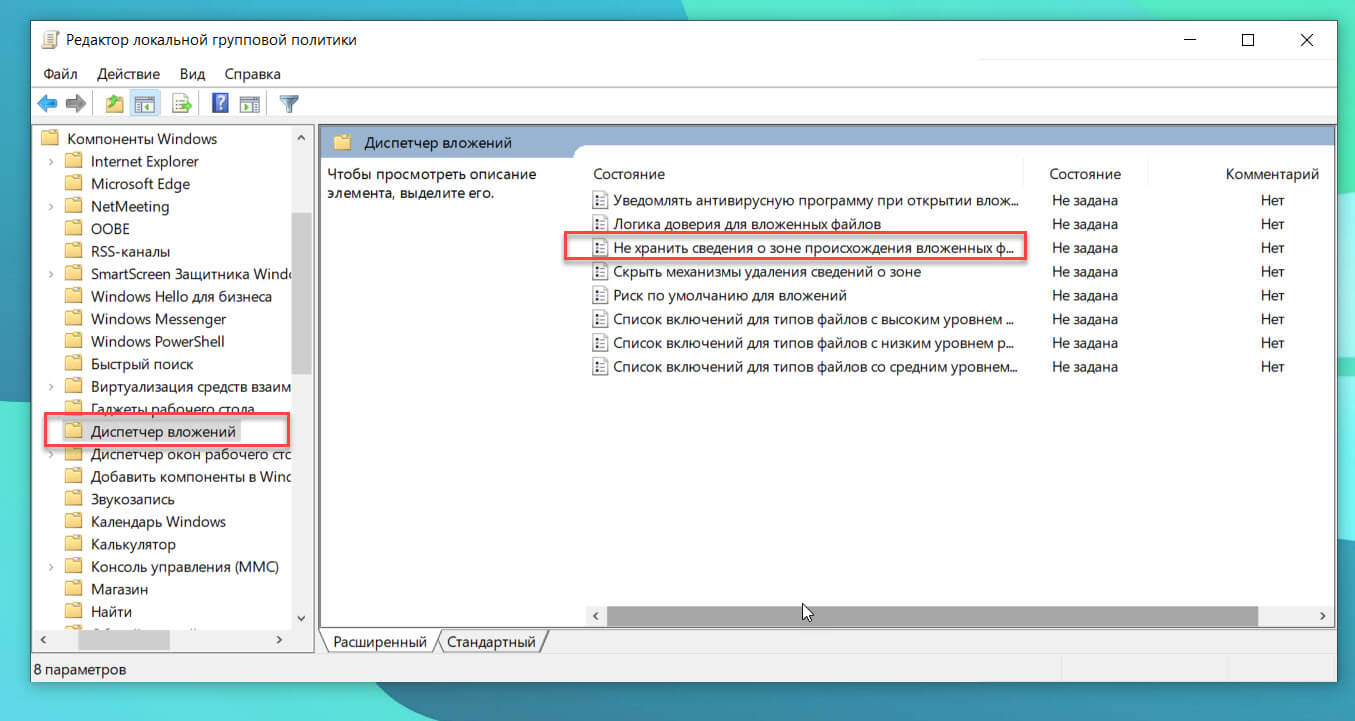
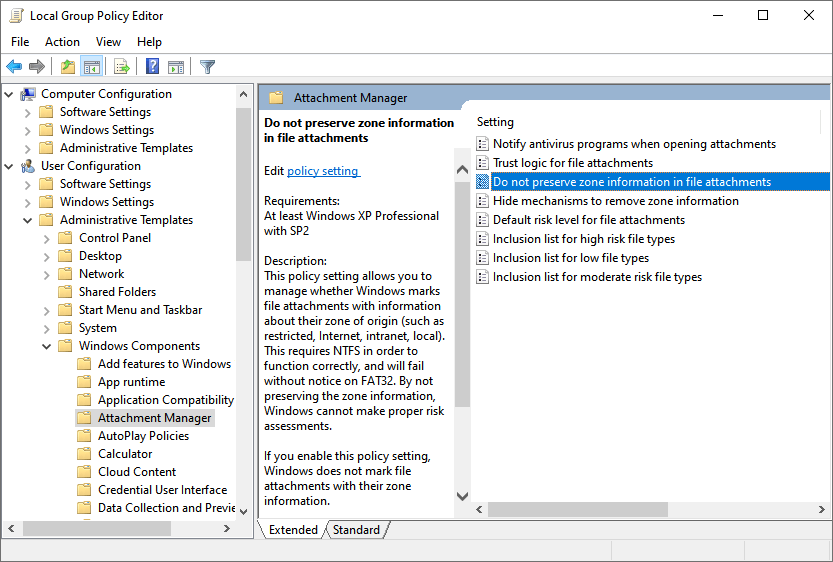
Конфигурация пользователя → Административные шаблоны → Компоненты Windows → Диспетчер вложений.
Шаг 3: С правой стороны кликните на «Не хранить сведения о зоне происхождения вложенных файлов», чтобы открыть ее свойства.
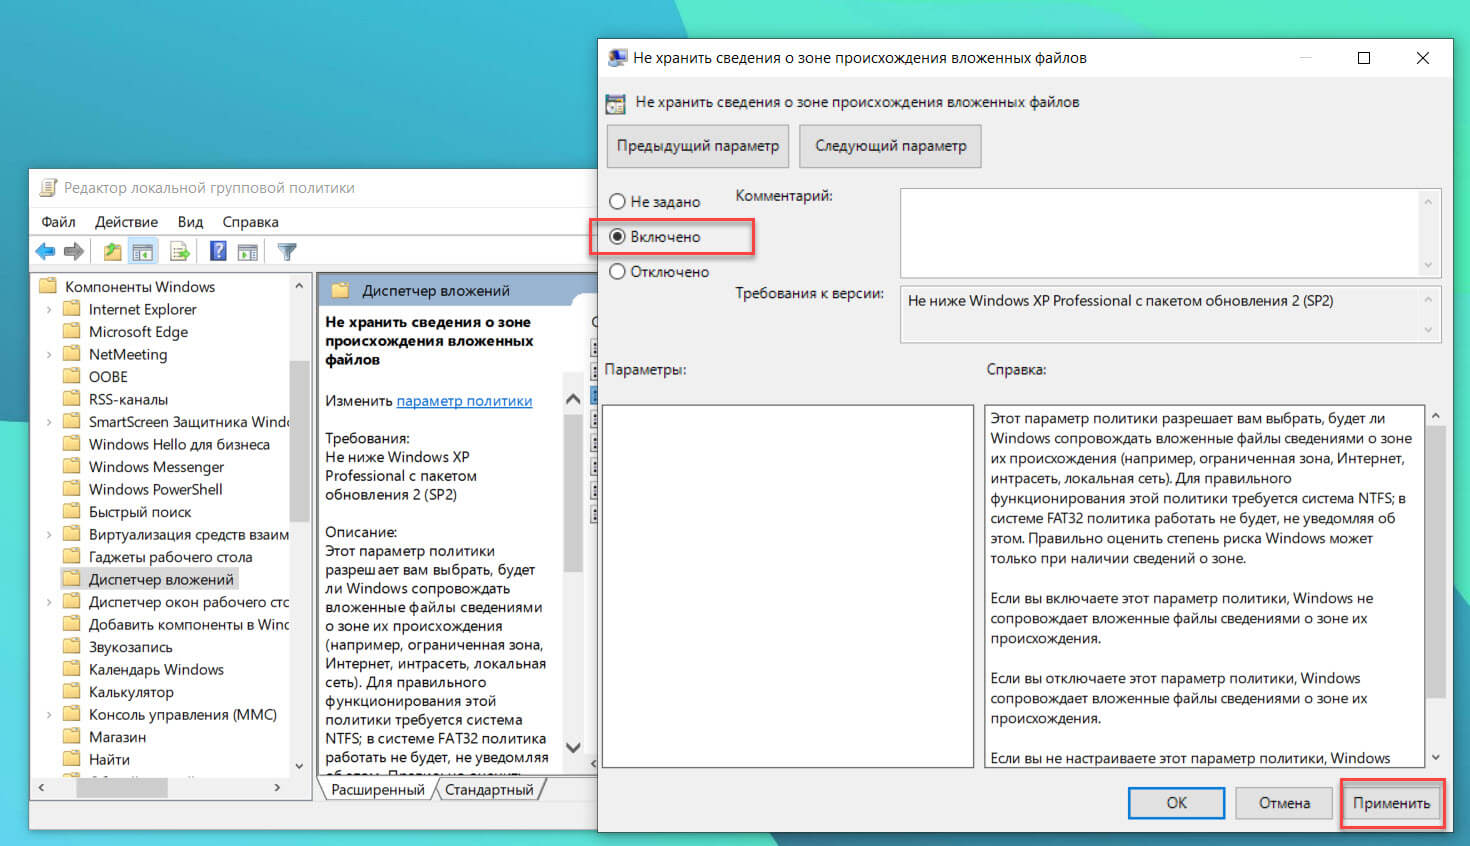
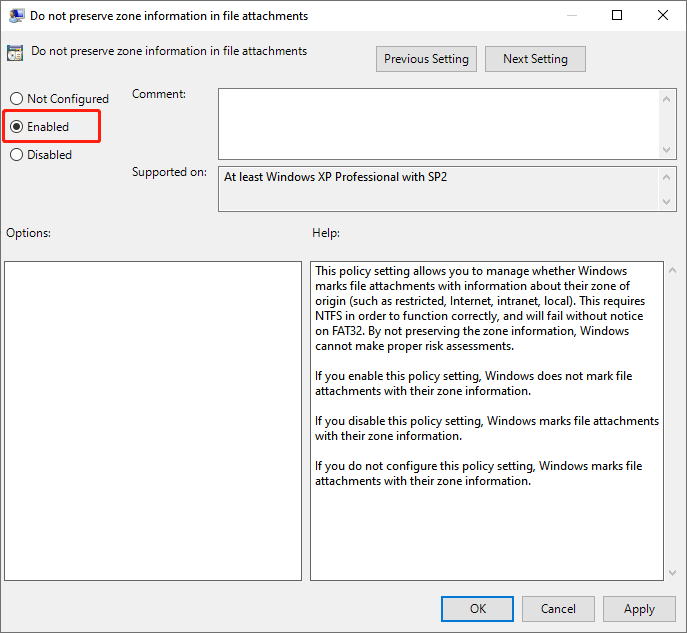
Шаг 4: Выберите опцию Включено. Нажмите кнопку Применить, чтобы сохранить изменения.
Все!
Download Windows Speedup Tool to fix errors and make PC run faster
The Attachment Manager in Windows 11/10 is a service that gets activated whenever you receive an e-mail message with an attachment and from unsafe files that you might save from the Internet. In this post, we will see how to configure High risk, Medium risk, Low-risk files. Microsoft Outlook Express, Microsoft Windows Messenger, and Microsoft Internet Explorer use the Attachment Manager to handle e-mail attachments and Internet downloads.
The Attachment Manager protects you against unsafe attachments and downloads by identifying the file type and the respective security settings. If it identifies an attachment that might be unsafe, it prevents you from opening the file, or it warns you before you open the file.
It uses the IAttachmentExecute application programming interface (API) to find the file type, to find the file association. When one of these applications saves a downloaded file on a disk formatted with NTFS, then it updates the metadata for the file with the zone it was downloaded from. The metadata is saved as an Alternate Data Stream (ADS). If you wish to unblock a downloaded file, you can do so by right-clicking it, selecting Properties and clicking on Unblock.
It checks for the following three things:
- The type of program that you are using.
- The file type that you are downloading or trying to open
- The security settings of the Web content zone that you are downloading the file from.
It classifies files types as high risk, medium risk, and low risk.
- High Risk – Will block the file from being opened, when the file is from the restricted-zone and give out a Windows Security Warning: Windows found that this file is potentially harmful. To help protect your computer, Windows has blocked access to this file.
- Moderate Risk – Will prompt with a warning: The Publisher could not be verified. Are you sure you want to run this software?
- Low Risk – Will open the file with no message.
The Attachment Manager labels the following file types as low risk only when you open them by using Notepad. If you associate another program with this file type, the file type is no longer considered low risk: .log, .text, .txt. The Attachment Manager also labels the following file types as low risk only when you open the file by using the Microsoft Windows Picture and Fax Viewer: .bmp, .dib, .emf, .gif, .ico, .jfif, .jpg, .jpe, .jpeg, .png, .tif, .tiff, .wmf.
When you try to download or open a file from a Web site that is in the restricted Web content zone, you may receive a message that indicates that the file is blocked. When you try to open high-risk file types from sites that belong to the Internet Web content zone, you may receive a warning message, but you may be able to open these select file types of files.
File types that the Attachment Manager does not label as high risk or low risk are automatically labeled as medium risk.
Disable Unblocking feature of Attachment Manager
YOU DON’T WANT TO DO IT, but if you wish to disable this feature of the Attachment Manager you can do so via Group Policy > User Configuration > Administrative Templates > Windows Components > Attachment Manager.

Automatically Unblock downloaded files
Double click on Do not preserve zone information in file attachments to open the settings box and Enable the setting here. If you enable this policy setting Windows does not mark file attachments with their zone information.
This policy setting allows you to manage whether Windows marks file attachments with information about their zone of origin (such as restricted, Internet, intranet, local). This requires NTFS in order to function correctly, and will fail without notice on FAT32. By not preserving the zone information, Windows cannot make proper risk assessments.
If you enable this policy setting, Windows does not mark file attachments with their zone information. If you disable this policy setting, Windows marks file attachments with their zone information. If you do not configure this policy setting, Windows marks file attachments with their zone information.
You could instead, also open Registry Editor and navigate to the following registry key;
HKEY_CURRENT_USER\Software\Microsoft\Windows\CurrentVersion\Policies\Attachments
Change the value of SaveZoneInformation from the default 2 to 1.
Several other policy settings for the Attachment Manager are also available here. To learn more about configuring the Attachment Manager, visit KB883260.
Anand Khanse is the Admin of TheWindowsClub.com, a 10-year Microsoft MVP (2006-16) & a Windows Insider MVP (2016-2022). Please read the entire post & the comments first, create a System Restore Point before making any changes to your system & be careful about any 3rd-party offers while installing freeware.
Summary: If you can’t open a file downloaded from the Internet, receive an error or receive a file as an e-mail attachment when you try to open the file, it might be because Windows 10 has blocked the file. So this page will guide you step-by-step to disable Windows 10 blocking downloaded files.
When Windows 10 blocks your downloaded file, you need to right-click the file and select the property. Then select the unblock option under the General to unblock the selected file.
Table of Contents
What is an Attachment Manager?
Attachment Manager is a security feature included in Windows that prevents unsafe files downloaded from the Internet. It is designed to protect users’ PC from unsecured attachments that e-mail messages may receive and unsafe files that may be saved from the Internet.
Why is My Computer Blocking Downloads?
If the Attachment Manager identifies a file or an attachment is unsafe, it prevents Windows from opening the file or displays a warning message before the user opens the file. Attachment Manager classes file types as high, medium, and low risk according to file name extensions and file types.
It uses the API to find file types and file associations. API stands for IAttachmentExecute Application Programming Interface. When one of the applications saves the downloaded file on an NTFS drive, it adds specific metadata to those downloaded files.
What determines whether to prevent you from opening the file or warn you before opening it:
- The type of file you’re downloading or trying to open.
- The type of program you’re running.
- Security settings for the web content zone from which the file was downloaded.
Methods to Turn On or Disable Windows 10 Blocking Downloaded Files
Enable or Disable Windows 10 Blocking Downloaded Files using gpedit
Step 1: Open the Group Policy Editor via typing Gpedit.msc in the Start search field and pressing Enter.
Step 2: In the Registry Editor, move to User Configuration, Administrative Templates, Windows Components, and Attachment Manager.
Step 3: On the right pane, double-click “Do not preserve zone information in file attachments” Policy to open its property.
Step 4: Then select the below option depending on your need, and click the Apply to save the change.
- Select Enabled if you need to disable the downloaded files being blocked.
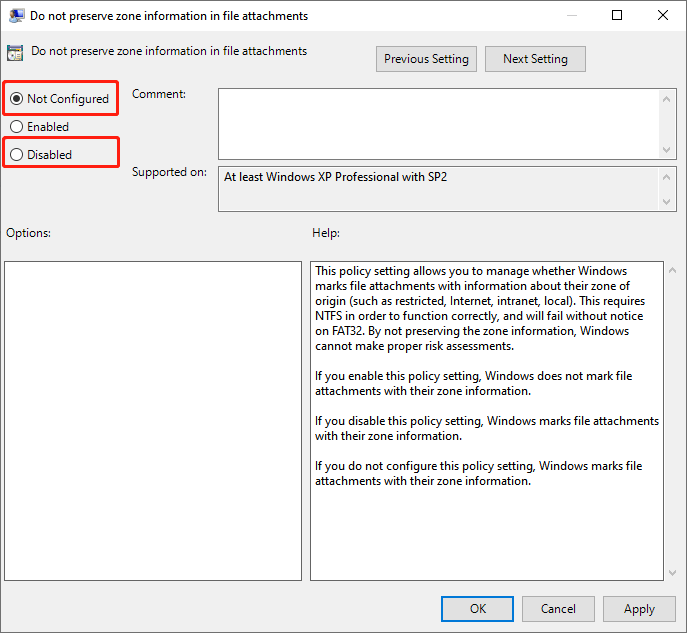
- Select the Not Configured or Disable if you want to enable the Windows blocking downloaded files.
Enable or Disable Attachment Manager by Registry
Step 1: Type Regedit in the search field and press Enter to open Registry Editor. Click on the Yes when getting the User Account Control prompt.
Step 2: In the Registry Editor, move to the following path:
HKEY_CURRENT_USER\Software\Microsoft\Windows\CurrentVersion\Policies\Attachments
If the Attachments key does not exist, right-click on the Policies, and then click New and select Key. Then name it as Attachments. If there is an Attachments key, you can skip to the next step.
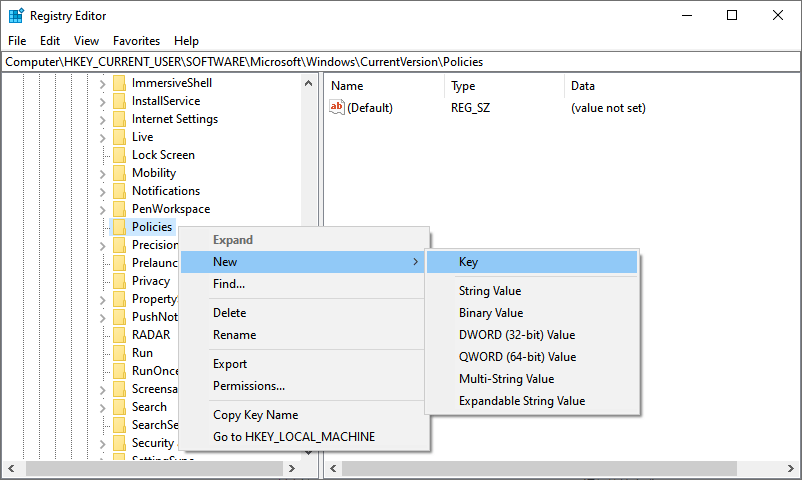
Step 3: Select Attachments on the left pane. Right-click on the right pane to select New and click DWORD (32-bit) Value, then name it as ScanWithAntiVirus.
Step 4: Then follow the below steps depending on your need.
- To Disable the Attachment Manager
- Double-click ScanWithAntivirus value you have newly created and change its value data to 1 and click OK.
- To Enable the Attachment Manager
- Double-click the ScanWithAntivirus value and change the value data to 3 and click OK.
Step 5: Close Registry Editor, and restart your PC to apply the change.
Final Words
The above method to disable Windows 10 blocking downloaded files is rather effective. File Explorer will not have an attachment to check because the zone information is not saved as a file attachment.
Отключаем предупреждение системы безопасности в Windows 10
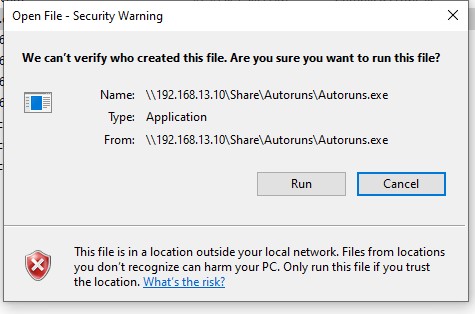
В Windows при попытке открыть или запустить исполняемый файл типа exe, vbs, msi, bat, cmd (и других типов файлов) с локального диска или сетевой папки может появиться предупреждение “Открыть файл – предупреждение системы безопасности” (Open file — Security Warning). Для продолжения выполнения программы пользователь должен вручную подтвердить запуск такого файла, нажав кнопку “Запустить” (Run). Такое предупреждение безопасности Windows обычно появляется при открытии файла, скачанного из интернета, или запуске исполняемого файла из общей сетевой папки или подключенного сетевого диска.
Предупреждение системы безопасности Windows при запуске файлов
Такая поведение Windows предназначено для защиты вашего компьютера от запуска потенциально опасных исполняемых файлов, которые вы скачали из Интернета или получили других недоверенных источников, и пытаетесь запустить. Предупреждение системы безопасности при запуске появляется во всех версиях Windows (включая Windows 10, 8.1 и 7).
Если вы устанавливаете или запускаете программы на компьютерах пользователя в фоновом режиме (через скрипты планировщика, групповые политики, задания SCCM и т.д.), это может вызвать проблемы. Дело в том, что в таки случаях предупреждающее окно системы безопасности Windows просто не отображается в сессии пользователя. Соответственно, установка или запуск таких приложений из скриптов становится невозможен.
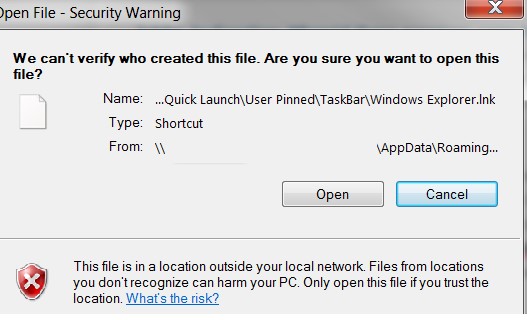
Например, при открытии файла из сетевого каталога окно предупреждения системы безопасности Windows выглядит так:
Открыть файл – предупреждение системы безопасности
Не удаётся проверить издателя. Вы действительно хотите запустить этот файл?
Этот файл не находится в вашей локальной сети. Файлы из неизвестных расположений могут причинить вред вашему компьютеру. Запускайте этот файл только в том случае, если вы доверяете его источнику.
Open File - Security Warning
The Publisher could not be verified. Are you sure you want to run this software?
This file is in location outside your local network. Files from locations you don’t recognize can harm your PC. Only run this file if you trust the location.
При запуске скачанного их Интернета файла с локального диска (или сетевого каталога, смонтированного через net use) текст предупреждения немного другой:
Open File - Security Warning

Do you want tio run this file?
Открыть файл – предупреждение системы безопасности
Запустить этот файл?
Файлы из Интернета могут быть полезны, но этот тип файла может повредить компьютер. Запускайте только программы, полученные от доверенного издателя.
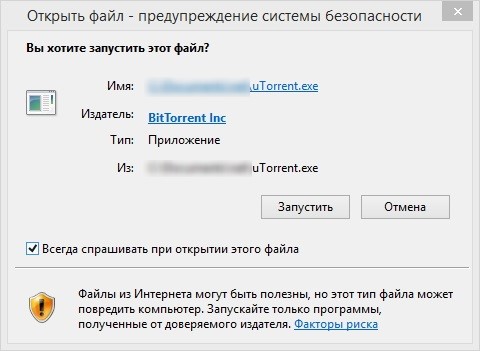
Если снять галку на опции “Всегда спрашивать при открытии этого файл”, то при следующем запуске этой программы окно безопасности Windows не появится. Но таким образом добавлять программы в исключения придется вручную.
Попробуем разобраться, как убрать предупреждение системы безопасности при запуске исполняемых или установочных файлов в Windows (инструкция применима для всех версий Windows, начиная с XP).
Важно. Отключение данного окна с предупреждением системы безопасности Windows в большинстве случаев не рекомендуется, так как уменьшает уровень защиты компьютера и повышает риск заражения системы пользователем.
Предлагается несколько вариантов отключения окна предупреждения системы безопасности. Выберите подходящий способ в зависимости от требуемого решения (в некоторых случаях предложенные решения приходится комбинировать).
Отключение окна предупреждения при запуске файла, скачанного из Интернета
Исполняемые файлы, скачанные из Интернета, автоматически помечаются как потенциально опасные (загруженные из небезопасного источника). Реализуется этот функционал через альтернативные NTFS потоки файлов. Для упрощения, будем считать что это специальная метка файла, которая автоматически назначается скачанному из сети файлу (Как Windows определяет, что файл скачан из Интернета). Чтобы удалить эту метку, нужно разблокировать это приложение. Для этого:
- Откройте свойства исполняемого файла;
- На вкладке Общие (General) нажмите кнопку или установите чекбокс Разблокировать (Unblock). У полученного из интернета файла рядом с кнопкой будет указано такое предупреждение:
Осторожно: Этот файл получен с другого компьютера и, возможно, был заблокирован с целью защиты компьютера. (This file came from another computer and might be blocked to help protect this computer)
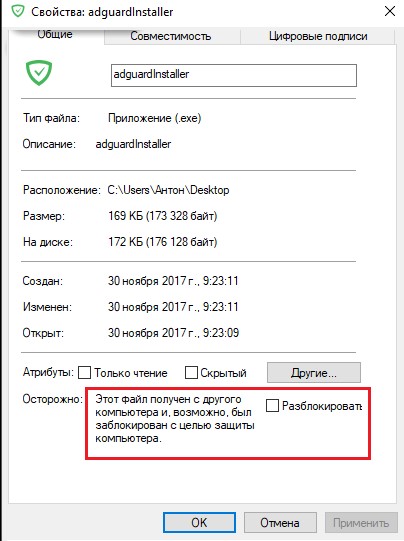
Сохраните изменения, нажав на кнопку Ok. Теперь файл разблокирован (NTFS метка снята) и будет запускаться без предупреждающего окна.
Трюк. Чтобы метка автоматически не назначалась файлам, которые вы загружаете из Интернета через браузер, можно сохранять скачанные файлы на диск отформатированный в файловой системе FAT32 или exFAT. На этих файловых системах альтернативные потоки NTFS не работают.
Метку альтернативного NTFS потока Zone.Identifier можно сбросить с помощью PowerShell:
Unblock-File someinstallfile.exe
Или утилиты
streams.exe
- Для Google Chrome и IE нужно создать такой ключ реестра
[HKEY_CURRENT_USER\Software\Microsoft\Windows\CurrentVersion\Policies\Attachments]
“SaveZoneInformation”=dword:00000001 - Для Mozilla Firefox на странице настроек about:config нужно изменить значение browser.download.saveZoneInformation на false.
В Windows можно полностью отключить сохранение информации о зонах в файлах, скачанных из интернета с помощью специально параметра групповых политик “Не хранить сведения о зоне происхождения вложений”/Do note preserve zone information in file attachments (User Configuration -> Administrative Templates -> Windows Components -> Attachment Manager).
Предупреждение безопасности при запуске приложений из сетевого каталога
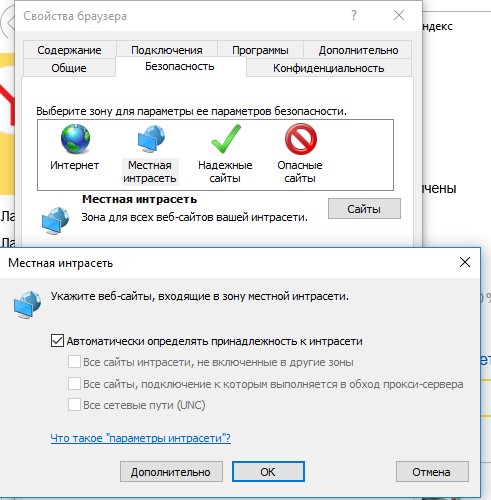
Этот вариант, как правило, возникает у корпоративных пользователей, которые работают в сети организации при доступе к ресурсам в другом домена AD или по IP адресу (по-умолчанию родной домен считается доверенным). Окно предупреждения может появится при запуске программы из общего сетевого каталога (сетевой шары) через UNC путь. В этом случае проще всего в настройках обозревателя Internet Explorer добавить имя и/или ip адрес сервера, на котором хранится исполняемый файл в зону Местная интрасеть. Тем самым вы укажете, что данный ресурс является доверенным. Для этого:
- Перейдите в Панель управления -> Свойства обозревателя (Internet Option) – команда inetcpl.cpl ;
- Вкладка Безопасность (Security);
- Открыть Местная интрасеть (Local Intranet) ->Узлы (Sites) ->Дополнительно (Advanced);

- В открывшемся окне добавьте имя и /или ip-адрес сервера. Например, file://10.0.0.6 , file://srvcontoso.com или file://127.0.0.1 для локального компьютера. Можно использовать знак подстановки, например добавить в зону местная интрасеть можно все адреса в определенной локальной подсети: file://192.168.1.*
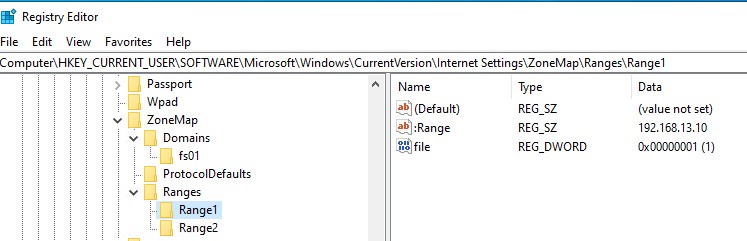
Совет. Эти настройки хранятся в реестре в ветке HKEY_CURRENT_USER\Software\Microsoft\Windows\CurrentVersion\Internet Settings\ZoneMap. Доверенные IP адреса указывается в ветке реестра Ranges ; доменные имена – в Domains .

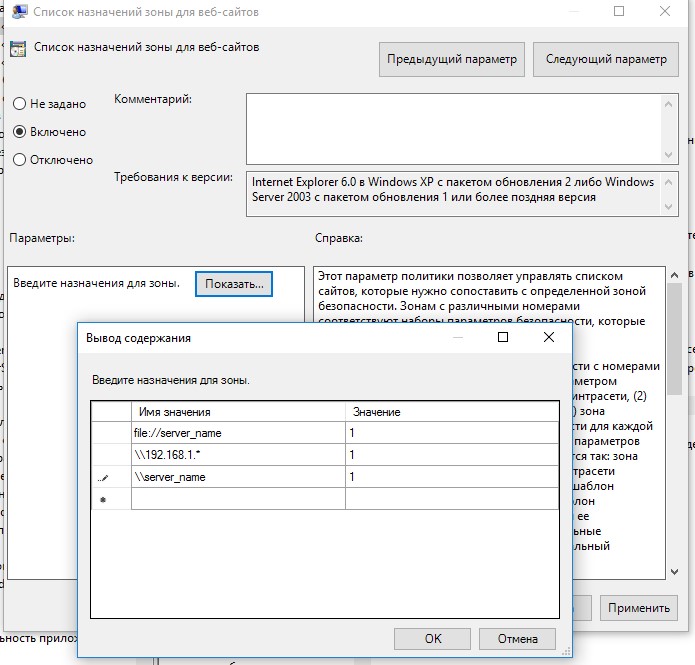
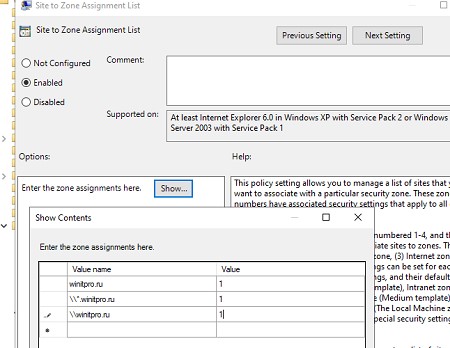
Вы можете добавить адреса и имена удаленных доверенных доменов, хостов и IP адресов в зону Местная интрасеть с помощью групповых политик (GPO). Откройте редактор локальной (gpedit.msc) либо доменной (gpmc.msc) политики. Перейдите в раздел Computer Configuration -> Administrative Templates -> Windows Components -> Internet Explorer -> Internet Control Panel -> Security Page (Конфигурация компьютера -> Административные шаблоны -> Компоненты Windows -> Internet Explorer -> Панель управления браузером -> Вкладка безопасность). Включите политику Site to Zone Assignment List (Список назначений зоны безопасности для веб-сайтов). В настройках политики нужно указать список доверенных серверов в формате:
- Имя сервера (в виде file://server_name , \\server_name , server_name или IP )
- Номер зоны (1 – Для местной интрасети)
Если у вас появляется окно предупреждения при запуске программ с подключенного сетевого диска, добавьте букву диска (например, U:\) или UNC путь в зону местной интрасети.
Сохраните изменения в политике и обновите GPO на клиенте (gpupdate /force). Теперь при запуске их сетевых каталогов на хостах, добавленных в местную интрасеть, не будет появляться предупреждение при открытии исполняемых файлов.
Кроме того, в групповых политиках можно включить следующие настройки в разделе User Configuration -> Administrative Templates -> Windows Components -> Internet Explorer -> Internet Control Panel -> Security Page (Конфигурация пользователя -> Административные шаблоны -> Компоненты Windows -> Internet Explorer -> Панель управления браузером -> Вкладка безопасность). Это оптимальный вариант для пользователей домена:
- Сайты Интрасети: все сайты, не перечисленные в других зонах Intranet Sites: Include all local (intranet) sites not listed in other zones
- Сайты Интрасети: все сетевые пути (UNC) Intranet Sites: Include all network paths (UNCs)
- Включить автоматическое определение интрасети
Перенаправление папки AppData и предупреждение при открытии файлов
Если вы используйте перенаправление папки AppData (в roaming сценариях), пользователи могут столкнуться с окном “Открыть файл – предупреждение системы безопасности” при запуске ярлыков приложений из профиля.
В этом случае нужно добавить ваш сервер (или целиком домен), где хранятся перемещаемые профили в доверенную зону.
Воспользуйтесь параметром GPO: User Configuration -> Policies -> Administrative Templates -> Windows Components -> Internet Explorer -> Internet Control Panel -> Security Page -> Site to Zone Assignment List. Добавьте имя сервера (домена) со значением 1.
Отключение предупреждение для определенных типов файлов через GPO
В некоторых случаях целесообразно отключить появление предупреждения для определенных типов (расширений) файлов через групповые политики. Хотя, конечно, это не очень безопасно, т.к. пользователь не глядя может запустить что-то вредоносное.
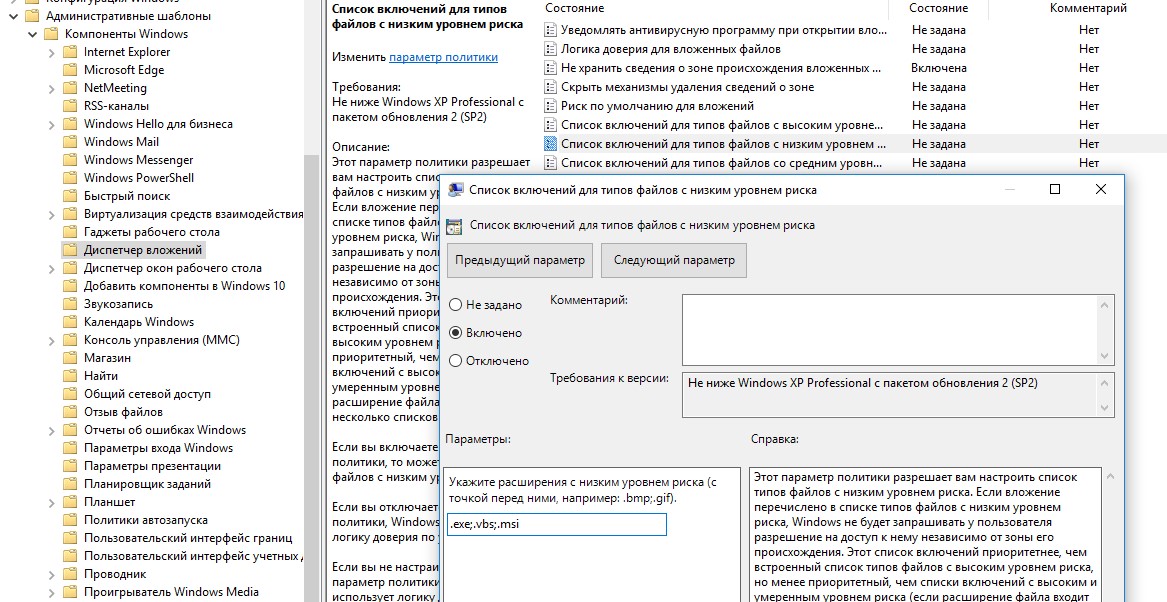
Для этого в редакторе GPO перейдите в раздел User Configuration-> Administrative Templates-> Windows Components-> Attachment Manager (Конфигурация пользователя -> Административные шаблоны -> Компоненты Windows -> Диспетчер вложений).
- Включите политику Не хранить сведения о зоне происхождения вложений (Do not preserve zone information in file attachments). Все скачанные из интернета исполняемые файлы будут запускаться без подтверждения на всех компьютерах.
- Включите политику Список включений для типов файлов с низким риском (Inclusion list for low file types), укажите в ее настройках список расширений файлов, для которых нужно отключить появления окна с предупреждением системы безопасности Windows, например: .exe;.vbs;.msi. Система будет игнорировать метки на файлах с этим расширением, и запускать их без подтверждения.
Примечание. При этом данные расширения файлов добавляются в параметр реестра LowRiskFileTypes: [HKEY_CURRENT_USER\Software\Microsoft\Windows\CurrentVersion\Policies\Associations]»LowRiskFileTypes»=».exe;.vbs;.msi;.bat;»
Сохраните политику и примените ее на клиентах, выполнив на них команду gpupdate /force.
Теперь при открытии исполняемых файлов с указанными расширениями не будет появляться окно безопасности (независимо от наличия NTFS атрибута Zone.Identifier).
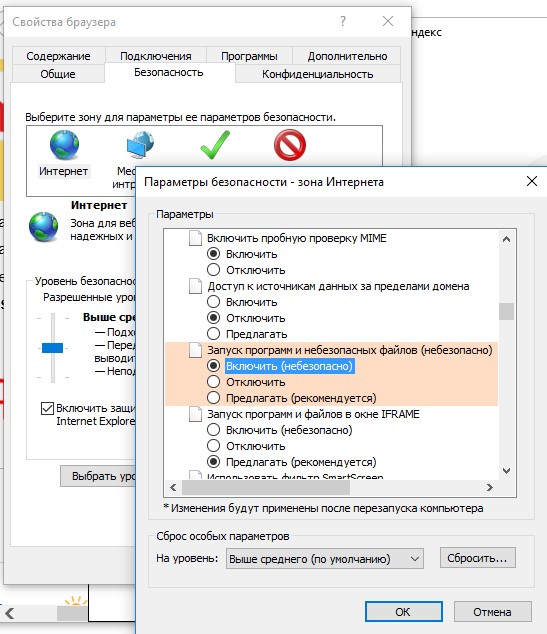
Можно также в параметрах обозревателя для зоны Интернета (Безопасность -> Интернет -> Другой -> Разное -> Запуск программ и небезопасный файлов) разрешить запуск любых файлов из интернета, но это крайне рискованно.
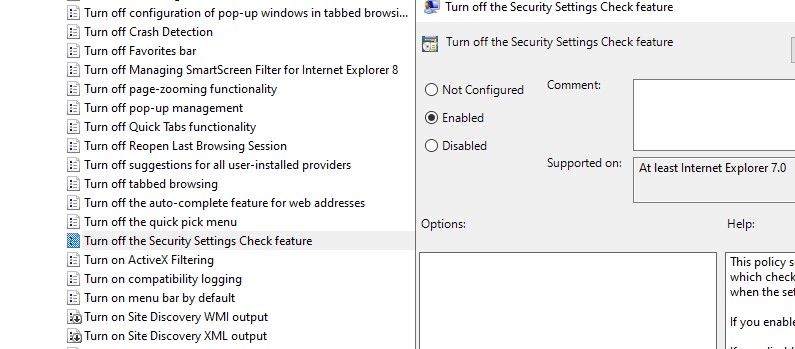
Вы можете полностью отключить вывод окна «Open File — Security Warning» с предупреждением об открытии небезопасных файлов с помощью параметра Turn off the Security Settings Check feature в разделе реестра Computer Configuration -> Administrative Templates -> Windows Components -> Internet Explorer.
Или с помощью следующих команд:
REG ADD «HKCU\Software\Microsoft\Windows\CurrentVersion\Internet Settings\Zones\3» /V «1806» /T «REG_DWORD» /D «00000000» /F
REG ADD «HKLM\Software\Microsoft\Windows\CurrentVersion\Internet Settings\Zones\3» /V «1806» /T «REG_DWORD» /D «00000000» /F
REG ADD «HKLM\SOFTWARE\Policies\Microsoft\Internet Explorer\Security» /V «DisableSecuritySettingsCheck» /T «REG_DWORD» /D «00000001» /F