
Оригинал статьи находится здесь.
The settings for desktop icon placement in Windows XP (or Vista) are located in the the
HKCU\Software\Microsoft\Windows\Shell\Bags\1\Desktop registry key.
This registry key contains a number of values, the most relevant if
which are the ItemPos<screenresolution> values, the Sort value and
the FFlags value.
The sort value controls the sort order of the icons (by name, by
type, by size etc.), the FFlags value controls the arrangement of the
icons (align to grid, auto align etc.)
Finally there may be any number of ItemPos values (appended with
different screen resolutions eg. ItemPos800x600), which control the user
defined positions of the icons for different screen resolutions.
For more details about the content of HKCU\Software\Microsoft\Windows\Shell values:
ShellBagsView v1.05

Regarding the Icon view used for any folder of one’s choosing, I believe the position of icons would be stored in:
HKEY_CURRENT_USER\Software\Classes\Local Settings\Software\Microsoft\Windows\Shell\Bags\[x]\Shell\{yyyyyyy-yy...}\ItemPoswith ‘x’ representing one of your many folder specific settings.
Добавлю, также, что в Microsoft Windows NT Resource Kit tools есть расширение shell для сохранения и восстановления иконок десктопа, см. здесь.
You can take a backup of all the changes you have made to the Folder View settings and restore using it if the settings get reverted back or on some other computer. In this post, we will see how you can back up and restore Folder View settings in Windows 11/10.

The Windows File Explorer is easy to navigate and comes with so many interesting accessibility features, one of which is the folder view settings. You can customize folders to represent the type of files they store.
For instance, if you have a folder where you saved only videos, you can set the folder to show thumbnails of the videos instead of a list or file details. You can also customize each folder to display medium, large, or extra-large icons.
After making these changes, you may want to back them up to restore the folder view settings if they are reset. This guide shows you how to do so using a batch file.
Follow the steps below to back up and restore your Folder View settings in Windows 11/10.
- Create the backup-and-restore batch file.
- Unblock the .bat file if blocked by Windows.
- Run the .bat file to backup and restore your folder view settings.
Without further ado, we’ll now jump right into the detailed steps involved in carrying out the above operations.
1] Create the backup-and-restore batch file

Click on the Start button and search for Notepad. Select the Notepad app from the search results to launch it.
Enter the following text in the new Notepad file:
@ECHO OFF

title Backup and Restore Folder View Settings Tool
:choice
cls
echo.
echo OPTIONS:
echo.
echo 1. Back up your folder view settings.
echo 2. Restore folder view settings from backup.
echo 3. Cancel
echo.
echo.
set /P c=Type the option number you would like to do, and press Enter?
if /I "%c%" EQU "1" goto :verify1
if /I "%c%" EQU "2" goto :verify2
if /I "%c%" EQU "3" exit
goto :choice

:verify1
IF EXIST "%userprofile%\Desktop\Folder View Settings Backup" goto :response1
goto :backup

:response1
echo.
echo.
echo You already have a "Folder View Settings Backup" folder on your desktop.
echo Please move it to another location, and try again.
echo.
pause
goto :choice

:backup
mkdir "%userprofile%\Desktop\Folder View Settings Backup"
REG EXPORT HKCU\Software\Microsoft\Windows\CurrentVersion\Explorer\Streams\Defaults "%userprofile%\Desktop\Folder View Settings Backup\HKCU_Software_Microsoft_Windows_CurrentVersion_Explorer_Streams_Defaults.reg" /y
REG EXPORT HKCU\Software\Microsoft\Windows\Shell\BagMRU "%userprofile%\Desktop\Folder View Settings Backup\HKCU_Software_Microsoft_Windows_Shell_BagMRU.reg" /y
REG EXPORT HKCU\Software\Microsoft\Windows\Shell\Bags "%userprofile%\Desktop\Folder View Settings Backup\HKCU_Software_Microsoft_Windows_Shell_Bags.reg" /y
REG EXPORT HKCU\Software\Microsoft\Windows\ShellNoRoam\Bags "%userprofile%\Desktop\Folder View Settings Backup\HKCU_Software_Microsoft_Windows_ShellNoRoam_Bags.reg" /y
REG EXPORT HKCU\Software\Microsoft\Windows\ShellNoRoam\BagMRU "%userprofile%\Desktop\Folder View Settings Backup\HKCU_Software_Microsoft_Windows_ShellNoRoam_BagMRU.reg" /y
REG EXPORT "HKCU\Software\Classes\Local Settings\Software\Microsoft\Windows\Shell\BagMRU" "%userprofile%\Desktop\Folder View Settings Backup\HKCU_Software_Classes_LocalSettings_Software_Microsoft_Windows_Shell_BagMRU.reg" /y
REG EXPORT "HKCU\Software\Classes\Local Settings\Software\Microsoft\Windows\Shell\Bags" "%userprofile%\Desktop\Folder View Settings Backup\HKCU_Software_Classes_LocalSettings_Software_Microsoft_Windows_Shell_Bags.reg" /y
cls
echo.
echo Backup of folder view settings successfully completed.
echo.
pause
exit

:verify2
IF NOT EXIST "%userprofile%\Desktop\Folder View Settings Backup" goto :response
goto :restore

:response
echo.
echo.
echo You do not have a "Folder View Settings Backup" folder on your desktop.
echo Please place the backup folder on your desktop, and try again.
echo.
pause
goto :choice

:restore
REG Delete "HKCU\Software\Microsoft\Windows\CurrentVersion\Explorer\Streams\Defaults" /F
Reg Delete "HKCU\Software\Microsoft\Windows\Shell\BagMRU" /F
Reg Delete "HKCU\Software\Microsoft\Windows\Shell\Bags" /F
Reg Delete "HKCU\Software\Microsoft\Windows\ShellNoRoam\Bags" /F
Reg Delete "HKCU\Software\Microsoft\Windows\ShellNoRoam\BagMRU" /F
Reg Delete "HKCU\Software\Classes\Local Settings\Software\Microsoft\Windows\Shell\BagMRU" /F
Reg Delete "HKCU\Software\Classes\Local Settings\Software\Microsoft\Windows\Shell\Bags" /F

REG IMPORT "%userprofile%\Desktop\Folder View Settings Backup\HKCU_Software_Microsoft_Windows_CurrentVersion_Explorer_Streams_Defaults.reg"
REG IMPORT "%userprofile%\Desktop\Folder View Settings Backup\HKCU_Software_Microsoft_Windows_Shell_BagMRU.reg"
REG IMPORT "%userprofile%\Desktop\Folder View Settings Backup\HKCU_Software_Microsoft_Windows_Shell_Bags.reg"
REG IMPORT "%userprofile%\Desktop\Folder View Settings Backup\HKCU_Software_Microsoft_Windows_ShellNoRoam_Bags.reg"
REG IMPORT "%userprofile%\Desktop\Folder View Settings Backup\HKCU_Software_Microsoft_Windows_ShellNoRoam_BagMRU.reg"
REG IMPORT "%userprofile%\Desktop\Folder View Settings Backup\HKCU_Software_Classes_LocalSettings_Software_Microsoft_Windows_Shell_BagMRU.reg"
REG IMPORT "%userprofile%\Desktop\Folder View Settings Backup\HKCU_Software_Classes_LocalSettings_Software_Microsoft_Windows_Shell_Bags.reg"
cls
echo.
echo Backup of folder view settings successfully restored.
echo.
echo Waiting to restart explorer to apply.
echo Your screen will flash as explorer is restarted.
echo.
echo.
pause
taskkill /f /im explorer.exe
start explorer.exe
exit
You can copy and paste the above text into the note. Next, press CTRL + S and save the file on your desktop with the .bat extension. Do this by adding .bat at the end of the filename before hitting the Save button.

Files saved in the .bat extension are batch files and when done correctly, they’ll let you run commands on your Windows system. Learn more about batch files and explore these cool tricks.
2] Unblock the .bat file
After successfully saving the newly created file as a .bat file, Windows may block it. To run this file, you’ll need to unblock it first. To do this, right-click on the file and select Properties from the context menu.
Switch to the General tab of the Properties window and find the Unblock checkbox towards the bottom of the window. Check this box and hit the OK button to unblock the batch file.
NOTE: If the Unblock checkbox is missing in your setup, it means that Windows didn’t block the file and you can move to the next step.
3] Run the .bat file
After unblocking the .bat file, you’re good to go. You can run the .bat file by double-clicking on it. Running the batch file opens a Command Prompt window that shows you the following options:
- Back up your folder view settings.
- Restore folder view settings from backup.
- Cancel.
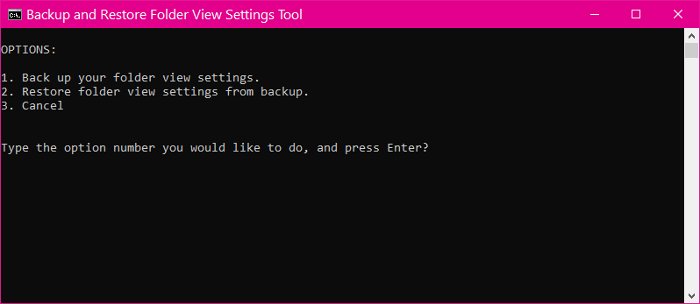
To back up your folder view settings, press 1 and hit the ENTER key. If you wish to restore your folder view settings, press 2 and press ENTER.
Alternatively, press 3 to cancel the operation.
I hope this helps.
Read: How to reset Folder View in Windows 11?
How do I go back to default settings in Windows 11?
To reset your settings to default, you can reset your PC without removing the files. To do so, open Settings, go to System > Recovery, and click on Reset PC placed right next to Reset this PC option. Now, click on Keep my files and proceed.
Also Read: Reset this PC stuck in Windows 11.
Reset Folder View Settings to Default in Windows 10: One of the best features of Windows 10 is the appearance and personalization settings but sometimes this much of customization can lead up to some annoying changes. One such case is where your Folder View Settings are automatically changed even when you don’t have anything to do with it. We usually set the Folder View settings according to our own preferences but if it changes automatically then we have to adjust it manually.
If after every restart you need to adjust your Folder View settings then it can become quite an annoying issue and therefore we need to fix this problem in a more permanent way. Windows 10 generally forgets your Folder View settings and therefore you need to reset the folder view settings in order to fix this issue. So without wasting any time let’s see How to Reset Folder View Settings to Default in Windows 10 with the help of the below-listed tutorial.
Table of Contents
Make sure to create a restore point just in case something goes wrong.
Method 1: Reset Folder View Settings to Default in File Explorer Options
1.Open Folder Options or File Explorer Options from any one of the methods listed here.
2.Now switch to the View tab and click on “Reset Folders” button.
3.Click Yes to confirm your action and continue.

4.Click Apply followed by OK to save changes.
Method 2: Reset Folder View Settings to Default in Windows 10 using Registry
1.Press Windows Key + R then type regedit and hit Enter to open Registry Editor.
2.Navigate to the following registry key:
HKEY_CURRENT_USER\Software\Classes\Local Settings\Software\Microsoft\Windows\Shell
3.Right-click on Bags and BagMRU keys then select Delete.

4.Once done, close Registry and reboot your PC.
Method 3: Reset Folder View Settings of All Folders in Windows 10
1.Open Notepad then copy & paste the following:
@echo off

:: To reset folder view settings of all folders
Reg Delete "HKCU\SOFTWARE\Microsoft\Windows\Shell\BagMRU" /F
Reg Delete "HKCU\SOFTWARE\Microsoft\Windows\Shell\Bags" /F

Reg Delete "HKCU\SOFTWARE\Microsoft\Windows\ShellNoRoam\Bags" /F
Reg Delete "HKCU\SOFTWARE\Microsoft\Windows\ShellNoRoam\BagMRU" /F

Reg Delete "HKCU\SOFTWARE\Classes\Local Settings\Software\Microsoft\Windows\Shell\BagMRU" /F
Reg Delete "HKCU\SOFTWARE\Classes\Local Settings\Software\Microsoft\Windows\Shell\Bags" /F

Reg Delete "HKCU\SOFTWARE\Classes\Wow6432Node\Local Settings\Software\Microsoft\Windows\Shell\Bags" /F
Reg Delete "HKCU\SOFTWARE\Classes\Wow6432Node\Local Settings\Software\Microsoft\Windows\Shell\BagMRU" /F

:: To reset "Apply to Folders" views to default
REG Delete "HKCU\Software\Microsoft\Windows\CurrentVersion\Explorer\Streams\Defaults" /F

:: To reset size of details, navigation, preview panes to default
Reg Delete "HKCU\SOFTWARE\Microsoft\Windows\CurrentVersion\Explorer\Modules\GlobalSettings\Sizer" /F

:: To kill and restart explorer
taskkill /f /im explorer.exe
start explorer.exe
2.Now from Notepad menu click on File then click Save as.

3.From Save as type drop-down select “All Files” then under File name type Reset_Folders.bat (.bat extension is very important).

4.Make sure to navigate to desktop then click on Save.
5.Double-click on Reset_Folders.bat to run it and once done File Explorer would be restarted automatically to save the changes.
Recommended:
- How to Install Exodus Kodi 2018
- Fix PC Stuck on Getting Windows Ready, Don’t Turn off Your Computer
- How to Disable Fullscreen Optimizations in Windows 10
- Fix Option to Turn Bluetooth on or off is Missing from Windows 10
That’s it, you successfully learned How to Reset Folder View Settings to Default in Windows 10 but if you still have any questions regarding this tutorial then feel free to ask them in the comment’s section.
Locations starting from Windows 7:
Windows Explorer activity:
File:
<SYSTEMDRIVE>:\Users\<USERNAME>\AppData\Local\Microsoft\Windows\UsrClass.dat
Registry keys:
HKCU\Software\Classes\Local Settings\Software\Microsoft\Windows\Shell\BagMRU
HKCU\Software\Classes\Local Settings\Software\Microsoft\Windows\Shell\Bags
Desktop and Network locations activity:
File:
<SYSTEMDRIVE>:\Users\<USERNAME>\NTUSER.dat
Registry keys:
HKCU\Software\Microsoft\Windows\Shell\BagMRU
HKCU\Software\Microsoft\Windows\Shell\Bags.
Overview
The Shellbags are Windows Registry keys designed as a user experience
enhancing feature to keep track of Windows explorer graphical display settings
on a folder-by-folder basis. For instance, a Shellbag entry is used to store
the View mode of a folder (details, list, small/medium/large icons) as
well as the column displayed (entry names, dates, sizes, etc.) and their order.
Shellbags contain folders and network shares to which a given user has
navigated (using the Windows Explorer), but not the content of a directory.
Files will thus not be referenced and subdirectories will only be referenced if
they were navigated into. An exception is for ZIP files, and
other archive formats (such as tar, 7z, tgz, …) in Windows 11 (2023-09 update),
that are opened directly as folders through the Windows Explorer. Under such
activity, archive files are stored as if they were folders (with their content
thus partially referenced depending on the related activity). Shellbags
entries are also generated by access to the Control Panel settings, on an
interface-by-interface basis. The Shellbags entries related to the
Control Panel can notably be useful to detect possible Windows Firewall
(Control Panel\All Control Panel Items\Windows Defender Firewall\Customize Settings)
or Credential Manager (Control Panel\User Accounts\Credential Manager)
operations.
Various kinds of user activity may generate or update Shellbag entries (with
different level of data depending on the activity):
-
First access or renaming of folders, removable devices, or network
shares through theWindows Explorersystematically generate a
Shellbagentry. -
Graphical opening of compressed archives or
ISOs. -
Access to the
Control Panelinterface. -
Modification of the folder view preferences.
-
Etc.
Information of interest
Shellbag entries are stored in registry as a tree-like data structure, with
the root target having the topmost BagMRU key. This allows the reconstitution
of the browsed directories arborescence. Each sub-target (subdirectory for
example) of the parent target is then represented with both:
-
A registry sub-key, named with a numerical value (starting from
0). -
A registry value (in the parent target’s registry key), named with the
same numerical value and associated with binary data that notably contains
the target’s name.
Each Shellbag BagMRU registry key also contains:
-
A
MRUListExvalue, that maintains the entries visited order, i.e. the
order in which the sub-targets of a target were accessed (the last
sub-target accessed having aMRU positionof 0).For example,
My Computerwill be associated with the topmostBagMRU
key,C:toBagMRU\0if it was accessed first (0),C:\Usersto
BagMRU\0\1ifUserswas the second folder accessed underC:\
(1),C:\Users\USERNAMEtoBagMRU\0\1\0ifUSERNAMEwas the first
folder accessed underC:\Users, and so on and so forth. A
hierarchical view of theShellbagentries can thus be established. -
A
NodeSlotvalue, containing a numerical value that references the item
Bagssub-key. Each target is indeed associated with a sub-key under the
HKCU\Software\Classes\Local Settings\Software\Microsoft\Windows\Shell\Bags
key. This sub-key, named with a numerical value value corresponding to the
NodeSlotof its associated target, contains theExplorerview settings
for the target.
As the Shellbags entries are stored in user’s specific registry hives,
targets (folders, Control Panel interfaces, etc.) access can be tied
to a given user through its Shellbags. Shellbags entries are populated
only upon interaction (i.e. are not pre-populated), the mere presence of a
Shellbag entry for a target is thus evidence that the user interacted with
the given target. Shellbags entries are not automatically deleted upon
deletion of the related folders and can thus be a source of historical
information.
Each Shellbags entry for a given target yields the following information of
forensic interest:
-
The target name and absolute path.
-
The target
Modified, Access, and Created (MAC)timestamps (UTC),
retrieved from the$MFTat theShellbagentry creation (and not further
updated). -
Each entry in
ShellBagsBagMRUmaintain aMRUListExlist, which
records the order in which the sub-targets of a target were accessed
(the last sub-target accessed having aMRU positionof 0).
The first and last interacted timestamps can be indirectly deducted
for some targets:
-
The
First Interactedtimestamp can be deduced for some targets thanks to
the tree like data structure ofShellBagsentry. Indeed, for entries that
do not have sub-keys (i.e. directory for which no subdirectory were
accessed) theFirst Interactedtimestamp is equal to the key’s
LastWriteTimetimestamp. This is due to the fact that the key is created
when a target is first accessed, and further activity for that target will
not update the targetBagMRUkey’s values or its sub-keys. Indeed
activities, such asExplorerdisplay settings modifications, will update
the targetBagskey only (and not itsBagMRUkey directly). In such
circumstances, theLastWriteTimetimestamp reflect the timestamp of the
key initial creation.When a sub-key is created for the target (i.e. when a subdirectory is
accessed for that particular directory), the timestamp becomes unreliable
as it reflect the creation of the sub-key. -
The
Last Interactedtimestamp can be deducted for the sub-target that was
last interacted with. Indeed, as eachShellbagentry corresponds to
a registry key, the key’sLastWriteTimetimestamp indicates when the
Shellbagentry was last updated. As the key is only updated when (a newly
interacted with) sub-target is added (both as a sub-key and a numerical
value), theLastWriteTimetimestamp of a key (with sub-keys) correspond
to the timestamp of creation of the last added sub-key. This last added
sub-key being known, by itsMRU positionof 0, the interaction timestamp
of the last interacted with child-bag/sub-target can thus be deduced (the
parent keyLastWriteTimetimestamp).
Note however that major updates of the Windows operating system may result in
modification of ShellBags entries, resulting in updated last write
timestamp.
Tool(s)
ShellBagsExplorer
and SBECmd tools (KAPE associated
module SBECmd) can be used to parse ShellBags entries.
ShellBagsExplorer displays the ShellBags entries in a graphical user
interface that allow browsing of the referenced targets, in a similar manner to
Windows Explorer.
# Recursively enumerates the users' registry hives in the specified directory and parses their ShellBags entries.
SBECmd.exe --csv <CSV_DIRECTORY_OUTPUT> -d <C:\Users\<USERNAME> | C:\Users\ | DIRECTORY>

# Parses the ShellBags entries in the live registry.
SBECmd.exe --csv <CSV_DIRECTORY_OUTPUT> -l
References
-
4n6k — Shellbags Forensics: Addressing a Misconception (interpretation, step-by-step testing, new findings, and more)
-
SANS — Vincent Lo — Windows ShellBag Forensics in Depth
-
SANS — Chad Tilbury — Computer Forensic Artifacts: Windows 7 Shellbags
-
LIFARS — Windows Shellbags Forensics
-
An Important Change to ShellBags — Windows 11 2023 Update!
View on GitHub
Правильная настройка вида папок в Windows Vista (2010-5-17)
Правильная настройка вида папок в Windows Vista
В проводнике Windows Vista произошло множество улучшений по сравнению с Windows XP. Однако некоторые болячки предыдущей операционной системы перекочевали в Vista. В частности одной из наиболее раздражающих проблем является неспособность ОС отображать вид папок таким, каким хотят его видеть пользователи. В первую очередь речь о “забывчивости” Vista, теряющей пользовательские настройки вида. К этому примешивается и не всегда верное определение шаблона папки в зависимости от находящихся в ней файлов, что является нововведением в Vista. О том, как настроить вид папок и избежать неудобств при работе с ними, пойдет речь ниже.
Сброс вида папок Windows Vista
Если вы уже столкнулись с тем, что Vista не запоминает устанавливаемый вами вид папок, то придется сбросить его и начать все сначала. Проблема тут в том, что ОС может запомнить настройки лишь ограниченного количества папок, которое, впрочем, можно увеличить. Сбросить настройки вида папок можно двумя способами.
Способ 1 – В панели управления откройте Свойства папки, перейдите на вкладку Вид и нажмите кнопку Сброс вида папок.
Способ 2 – Этот способ сводится к удалению параметров реестра, в которых хранятся настройки вида папок. В частности, требуется удалить параметры Bags и BagMRU из разделов:
HKCU\Software\Microsoft\Windows\ShellNoRoam HKCU\Software\Microsoft\Windows\Shell HKCU\Software\Classes\Local Settings\Software\Microsoft\Windows\Shell\
Отключение автоматического присвоения шаблонов для папок Windows Vista (2010-5-17)
Отключение автоматического присвоения шаблонов для папок Windows Vista
Речь о шаблонах, которые вы можете задать для папки в ее свойствах на вкладке Настройка. Windows Vista автоматически присваивает папкам шаблон на основании их содержимого. Иногда ОС определяет шаблон правильно, иногда ошибается. Когда ошибается – это раздражает. Поэтому автоопределение можно отключить через реестр. Для этого в разделе HKCU\Software\Classes\Local Settings\Software\Microsoft\Windows\Shell\Bags необходимо создать подраздел AllFolders, а в нем подраздел Shell, в котором нужно создать строковой параметр FolderType и присвоить ему значение NotSpecified.
Вместо параметра NotSpecified можно указать некоторые другие, и тогда ОС будет автоматически присваивать указанный шаблон.
| Параметр | Описание |
| NotSpecified | Все элементы |
| Contacts | Контакты |
| Music | Подробности о записи |
| MusicIcons | Значки музыки |
| Documents | Документы |
| Pictures | Изображения и видео |
Увеличение кэша памяти для вида папок Windows Vista (2010-5-15)
Увеличение кэша памяти для вида папок Windows Vista
Можно увеличить количество папок, для которых Vista будет запоминать настройки вида. В разделе HKCU\Software\Classes\Local Settings \Software\Microsoft\Windows\Shell\Bags\AllFolders\Shell необходимо создать параметр DWORD BagMRU Size и присвоить ему десятичное значение, скажем, 20000.
Скрытие часов в области уведомлений (2010-5-14)
Скрытие часов в области уведомлений
Если в разделе HKCU\Software\Microsoft\Windows\CurrentVersion\Policies\Explorer создать параметр HideClock со значением, равным 1, то после перезагрузки компьютера на панели задач в области уведомлений часы не будут отображаться.
Запоминание параметров отображения каждой папки Windows Vista (2010-5-12)
Запоминание параметров отображения каждой папки Windows Vista
По умолчанию Vista запоминает параметры отображения каждой папки. Впрочем, убедитесь, что у вас в Панель управления – Свойства папки – Вид установлен флажок Помнить параметры отображения каждой папки.
В реестре за это отвечает параметр DWORD NoSaveSettings в разделе HKCU\Software\Microsoft\Windows\CurrentVersion\Policies\Explorer, для которого нужно установить значение 0.
Автор: Вадим Стеркин
Источник: vadikan. spaces. live. com
Свойства папки (2010-5-12)
Свойства папки
Удаление апплета Свойства папки
Если вы хотите удалить пункт Свойства папки из меню Проводника, а также апплет из Панели управления, то откройте раздел
HKCU\Software\Microsoft\Windows\CurrentVersion\Policies\Explоrer и создайте параметр NoFolderOptions типа DWORD со значением 1.
Типы файлов
Чтобы заблокировать кнопки Создать, Удалить, Изменить на вкладке Типы файлов, тем самым лишить пользователя возможности менять типы файлов, нужно создать параметр NoFileAssociate типа DWORD со значением 1 в разделе
HKEY_CURRENT_USER\Software\Microsoft\Windows\CurrentVersion\Policies\Explorer
Данная блокировка не мешает менять типы файлов непосредственно в реестре или другими программами
Дата и время (2010-5-12)
Дата и время
Украшение часиков
Украшаем часы. Идем в раздел HKCU\Control Panel\International и создаем строковый параметр sTimeFormat. Присвойте этому параметру слово, не превышающее 8 символом (например, свою фамилию), и оно отобразится вместо часов. Если вы не готовы к такому радикальному изменению, то предлагаю более мягкий вариант. В указанный параметр пишите “HH: mm Рыжик”. В этом случае будет показываться и время и имя вашего любимого кота. Кстати, вместо стандартного разделителся – двоеточия (:) можете использовать и другие символы, например звездочку(*) или вообще обойтись без разделителя. Заодно можете поменять и формат – сначала минуты, потом часы – mm*HH
Можно применить и другой интересный эффект. В этом же разделе создаем еще два строковых параметра – s1159 и s2359 и присваиваем им слова, напр. Еще не вечер и Утро вечера мудреней. А в уже знакомом параметре sTimeFormat пишем HH: mm: ss tt (по-прежнему можно использовать другой разделитель). Теперь в утренние часы рядом с часиками будет надпись Еще не вечер, а с 12 до 24 часов соответственно Утро вечера мудреней
Примечание: Данные изменения могут проявиться и в других местах. Например, в Outlook Express при получении и отправке писем
Часовой пояс
В компоненте Панели управления Дата и время вы видите, что у вас часовой пояс Москвы, Санкт-Петербурга и Волгограда (или что-то в этом роде). Хотите, чтобы Windows знала о существовании вашей деревни Гадюкино? В разделе реестра HKLM\SOFTWARE\Microsoft\Windows NT\CurrentVersion\Time Zones\Russian Standard Time меняем строковый параметр Display, введя название своей деревни. Щелкните на часиках в правом углу экрана и вы увидите в часовом поясе свою малую родину. Своей подружке скажите, что Билл Гейтс специально по вашей просьбе внес на карту название вашей деревни!
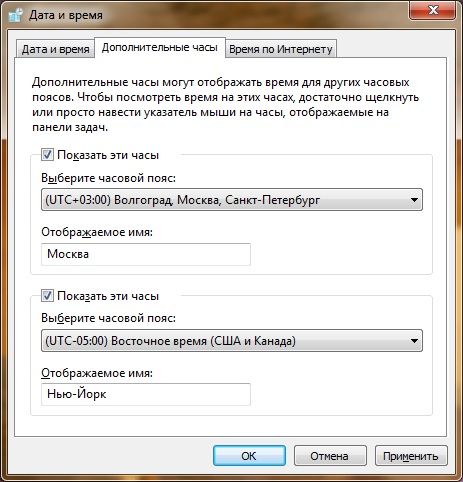
Дополнительные часы (2010-5-10)
Дополнительные часы
Вкладка «Дополнительные часы» компонента панели управления «Дата и время» предназначена для отображения времени других часовых поясов наряду с вашим. В операционной системе Windows 7 для установки дополнительных часов других часовых поясов, установите флажок «Показать эти часы», в раскрывающемся списке выберите нужный для вас часовой пояс и в текстовом поле «Отображаемое имя» введите название нового часового пояса. Для примера на следующем скриншоте видно, что добавлены двое дополнительных часовых пояса для Москвы и Нью-Йорка.
Добавлять дополнительные часы также можно при помощи реестра. В следующем примере, добавим дополнительные часы для часового пояса UTC +03:00 с названием «Москва»:
[HKEY_CURRENT_USER\Control Panel\TimeDate\AdditionalClocks\1] "Enable"=dword:00000001 "DisplayName"="Москва" "TzRegKeyName"="Russian Standard Time"
Параметр Enable указывает на то, что дополнительные часы будут отображаться.
Параметр DisplayName определяет строку, отображаемую напротив данных часов.
Параметр TzRegKeyName определяет часовой пояс, на основе которого работают данные дополнительные часы.
Скрытие значка регулятора громкости (2010-5-10)
Скрытие значка регулятора громкости
Очень часто в области уведомлений можно увидеть значок регулятора громкости. Можно скрыть данный значок при помощи параметра типа DWORD HideSCAVolume со значением 1 в разделе HKCU\Software\Microsoft\Windows\CurrentVersion\Policies\Explorer. После применения изменений в реестре данный значок исчезнет из окна настроек Значки области уведомлений.
Быстрое завершение работы Windows (2010-5-9)
Быстрое завершение работы Windows
Windows NT версии 3.1и 3.5 позволяла закрыть все процессы за 20 секунд. В Windows XP существует возможность определять величину интервала, в течение которого система должна завершить свою работу. Для этого необходимо исправить ключ системного реестра – строковый параметр WaitToKillServiceTimeout, где установлена временная задержка закрытия всех запущенных сервисов в миллисекундах.
Этот ключ расположен в разделе HKLM/SYSTEM/CurrentControlSet/Control
По умолчанию значение параметра равно 20000, что эквивалентно 20 секундам.
Для уменьшения времени завершения, нужно уменьшить это значение, например до 1000, что эквивалентно 1 секунде. Однако, помните, что слишком значительное уменьшение значения этого ключа не позволит системе корректно завершить запущенные сервисы, что может сказаться на стабильности загрузки. Во время завершения работы, система уведомляет все сервисы и дает каждому сервису время на корректное закрытие. По истечении этого времени система уничтожает сервис. При этом некоторые параметры настройки сервиса могут быть не сохранены. Поэтому, если при уменьшении значения система становится нестабильной, рекомендуется попробовать увеличить это значение до тех пор, пока система не будет полностью стабильной.