
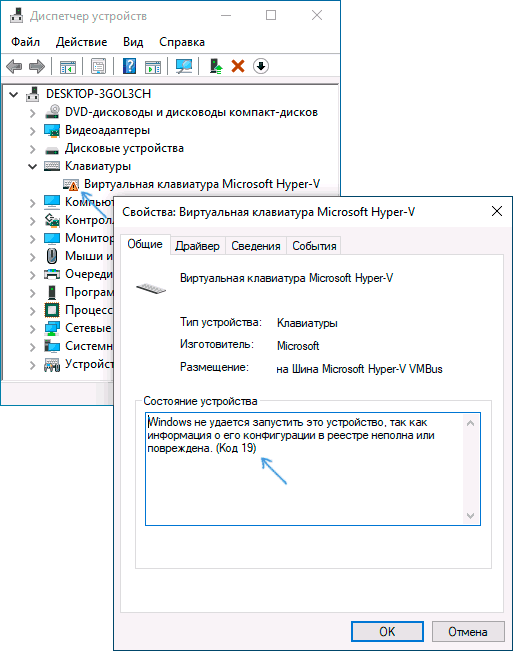
Пользователи Windows 10, 8.1 и Windows 7 могут столкнуться с ошибкой устройства в диспетчере устройств: Код 19, Windows не удается запустить это устройство, так как информация о его конфигурации в реестре неполна или повреждена. Часто такая проблема возникает с клавиатурой, мышью или веб-камерой, но вполне может появиться и для другого типа устройств.
В этой инструкции подробно о том, как исправить ошибку с кодом 19 «Windows не удается запустить это устройство» несколькими способами.
- Простые способы решения проблемы
- Как исправить ошибку Код 19 в редакторе реестра
- Видео инструкция
Простые методы исправления ошибки в Windows 10, 8.1 и Windows 7
Сначала несколько простых способов решения проблемы Код 19, «Windows не удается запустить это устройство, так как информация о его конфигурации в реестре неполна или повреждена», возможно, один из них сработает и вам не потребуется выполнять каких-то дополнительных манипуляций:
- Попробуйте выполнить простую перезагрузку вашего компьютера или ноутбука. Важно: в случае Windows 10 или 8.1 нужно использовать именно пункт «Перезагрузка», а не «Завершение работы» с повторным включением, эти два действия отличаются по результату.
- Зайдите в Панель управления. Для этого можно нажать клавиши Win+R на клавиатуре и ввести control, а затем нажать Ok или Enter. А если клавиатура не работает, запустить диалоговое меню «Выполнить» через правый клик по кнопке «Пуск» (в Windows 10) или из меню Пуск, а затем ввести control с помощью экранной клавиатуры, которую вы найдете в папке «Специальные возможности» в стандартных программах.
- Перейдите в пункт «Восстановление» и выберите пункт «Запуск восстановления системы».
- Проверьте, есть ли точки восстановления системы на дату, когда проблема с кодом 19 в диспетчере устройств не наблюдалась. При ее наличии, выберите такую точку восстановления и примените её.

- Если проблема возникла не с каким-то стандартным устройством, попробуйте скачать драйверы для него с официального сайта производителя и установить их. При этом если у вас Windows 10, а драйверы для предыдущих версий системы, все равно попробуйте их установить.
- Можно попробовать следующий метод: в диспетчере устройств нажмите правой кнопкой мыши по устройству с ошибкой и выберите пункт «Удалить». Подтвердите удаление устройства, а затем в главном меню диспетчера устройств выберите «Действие» — «Обновить конфигурацию оборудования» и проверьте, решило ли это проблему.

Еще один метод, впрочем не очень часто срабатывающий — использование встроенных средств устранения неполадок, которые в Windows 10 можно найти в Параметры — Обновление и безопасность — Устранение неполадок — Дополнительные средства устранения неполадок, а в предыдущих системах в соответствующем пункте панели управления (подробнее: Устранение неполадок Windows 10).
В списке доступных инструментов устранения неполадок выберите тот, которые соответствует устройству с ошибкой (при наличии) и запустите средство восстановления неполадок.
Исправление ошибки Windows не удается запустить это устройство Код 19 в редакторе реестра
В случае, если предыдущие попытки не привели к результату, можно попробовать исправить ошибку с помощью редактора реестра. Перед этим рекомендую создать точку восстановления системы для быстрого отката сделанных изменений при необходимости. Шаги будут следующими:
- Запустите редактор реестра, для этого можно нажать клавиши Win+R и ввести regedit, а если клавиатура не работает, то использовать экранную клавиатуру, как это было описано в шаге 2 в предыдущем разделе инструкции.
- Перейдите к разделу реестра (папки слева)
HKEY_LOCAL_MACHINE\SYSTEM\CurrentControlSet\Control\Class\
- В зависимости от того, с каким устройством у вас возникла проблема, перейдите к одному из следующий подразделов:
-
- {4d36e972-e325-11ce-bfc1-08002be10318} — сетевые адаптеры
- {4d36e968-e325-11ce-bfc1-08002be10318} — видеокарты
- {4d36e96c-e325-11ce-bfc1-08002be10318} — аудио и видео устройства
- {4d36e96f-e325-11ce-bfc1-08002be10318} — мыши
- {4d36e96b-e325-11ce-bfc1-08002be10318} — клавиатуры
- {6bdd1fc6-810f-11d0-bec7-08002be2092f} — камеры и сканеры
- {4d36e967-e325-11ce-bfc1-08002be10318} — жесткие диски
- {4d36e96a-e325-11ce-bfc1-08002be10318} — контроллеры жестких дисков
- {4d36e96d-e325-11ce-bfc1-08002be10318} — модемы
- {4d36e978-e325-11ce-bfc1-08002be10318} — последовательные и параллельные порты
- {4d36e97b-e325-11ce-bfc1-08002be10318} — контроллеры SCSI и RAID
- {4d36e97d-e325-11ce-bfc1-08002be10318} — системные шины и мосты
- {36fc9e60-c465-11cf-8056-444553540000} — USB устройства, такие как флешки и внешние диски
- {745a17a0-74d3-11d0-b6fe-00a0c90f57da} — некоторые USB-устройства ввода
- {EEC5AD98-8080-425F-922A-DABF3DE3F69A} — MTP-устройства (смартфоны, плееры, некоторые камеры)
- Проверьте, есть ли в этом разделе параметры UpperFilters и LowerFilters (в правой панели редактора реестра). Для клавиатуры в UpperFilters должно быть указано kbdclass, для мыши — mouclass. Если это не так, дважды нажмите по значению и измените его (ввод можно выполнять с помощью экранной клавиатуры, если клавиатура не работает). LowerFilters удалите (при наличии). Для других устройств попробуйте удалить параметры UpperFilters и LowerFilters.

- Закройте редактор реестра и перезагрузите компьютер.

После перезагрузки проверьте, была ли исправлена ошибка «Код 19» в диспетчере устройств и работает ли устройство теперь.
Видео инструкция
И, завершая статью, помните, что в крайнем случае вы можете использовать встроенную возможность сброса системы Windows 10.
Jun. 23, 2022 / Updated by
Daphne to
Windows 10
Imagine how frustrating it would be if there is no sound when you are about to play games, watch movies or listen to music on your computer. It is really irritating. These days, many users are plagued by audio issues, especially the “No Audio Output Device is installed” issue after Windows 10 updates. Microsoft has released a patch KB4468550 to address the “No Audio Output Device is installed” issue. But there are still a number of users who come to us for help with audio issues. One of these common audio issues is the High Definition Audio Device cannot start (Code 10) or High Definition Audio Controller cannot start (Code 10) issue.
When the High Definition Audio Device cannot start issue occurs, you can see a yellow circle with an exclamation mark under your audio device in the Device Manager. And when you double click the device, you can also see the error message “The device cannot start. (Code 10)” in the Device status section.

If you encounter this issue, don’t fret. Here are several effective methods you can try to get rid of the High Definition Audio Device cannot start issue. Read on to try them one by one.
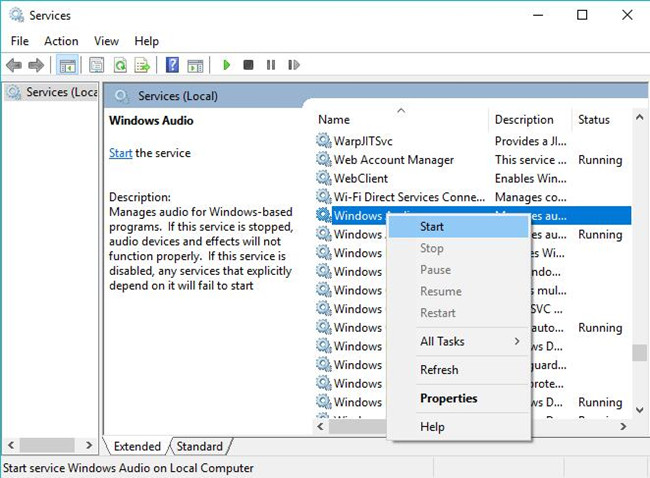
Method 1. Make Sure the Windows Audio Service Is Started
The High Definition Audio Device cannot start (Code 10) issue may occur if the Windows Audio service is not started. Therefore, if you come across this issue, the first method you can try is to check whether the Windows Audio service is started or not. Do like this:
Step 1. Press Windows + R to launch Run.
Step 2. Type “services.msc” into the Run dialog box and hit Enter.
Step 3. Scroll down to find Windows Audio and check if its Status is “Running”. If no, right click it and select Start from the pop-up menu to start it.

Step 4. Double click Windows Audio and check if the Startup type in the General tab is set as Automatic. If no, set it as Automatic.
Step 5. Restart your computer for the changes to take effect.
Method 2. Uninstall the Audio Device on Your Computer
According to some users who went through the High Definition Audio Device cannot start (Code 10) issue, uninstalling the audio device like High Definition Audio Device plays an important role in resolving the issue. To uninstall the audio device on your computer, you can take the steps below.
Step 1. Launch the Device Manager.
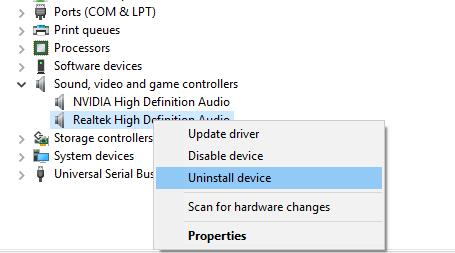
Step 2. Scroll down to find Sound, video and game controllers and double click it to expand it.
Step 3. Right click on the audio device under it (for example, the Realtek High Definition Audio) and select Uninstalldevice from the pop-up menu to uninstall the device.

Step 4. After uninstalling the audio device successfully, restart your computer.
When you reboot your computer, Windows will reinstall the audio device automatically.
Method 3. Update the Audio Driver to Get Rid of Code 10
Outdated audio driver may also lead to the High Definition Audio Device cannot start (Code 10) issue. In this case, you can get rid of the issue by updating the audio driver. These posts are for your reference:
-
How to Download and Update Audio Driver for Windows 10
-
Conexant Audio Drivers Download and Update for Windows 10, 8.1, 8, 7
-
HP Audio Drivers Download and Update on Windows 10, 8.1, 8, 7, XP, Vista
-
Download and Update Lenovo Audio Drivers for Windows 10, 8.1, 8, 7, Vista, XP
-
Asus Realtek Audio Drivers Download and Update for Windows 10/8.1/8/7/Vista/XP
-
Top 2 Ways to Download Intel High Definition Audio Drivers on Windows 10, 8.1, 8, 7, Vista, XP
-
One-Click Realtek High Definition Audio Driver Download & Install for Windows 10, 8.1, 8, 7, XP, Vista
Regarding to the easiest and fastest way to update drivers, the professional driver download utility – Driver Talent can do you a favor. It will help you download, install, update and repair all your drivers quickly and safely. Click on the Download Now button below to get it directly. And follow the guide below to update your audio driver right now.
Download Now
Step 1. Launch Driver Talent and click the Scan button to perform a full scan on your computer. Then all the iffy drivers on your computer will be listed, including your outdated audio driver.

Step 2. If your audio driver is detected as outdated, click the Update button in the right of it to update it.

Step 3. Restart your computer after updating the driver successfully.
If there is still no sound, try the Audio Repair tool. You can access this tool from Driver Talent > Windows Assistant > Audio Repair.

Method 4. Modify the Registry to Troubleshoot the Issue
Sometimes, this method can work to resolve the High Definition Audio Device cannot start (Code 10) issue. Follow the steps below carefully. And you’d better back up the registry before you make any changes. Then if something goes wrong after the modification, you can restore them to the previous status quickly.
Step 1. Press Windows + R to launch Run.
Step 2. Type “regedit” into the Run dialog box and hit Enter to launch the Registry Editor.
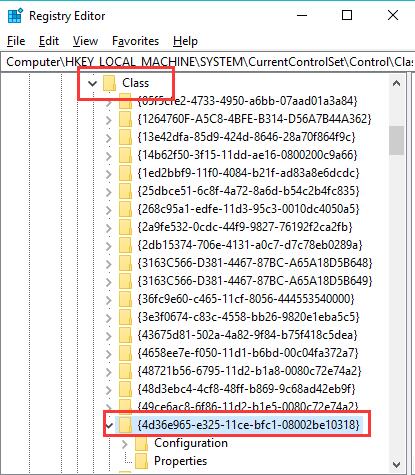
Step 3. Navigate to: Computer\HKEY_LOCAL_MACHINE\SYSTEM\CurrentControlSet\Control\Class.
Step 4. Find {4D36E96C-E325-11CE-BFC1-08002BE10318} under the Class and click it to expand it.

Step 5. Find the registry values titled UpperFilters and LowerFilters in the right pane, and then right click them and select Delete from the pop-up menu to delete them. Select Yes when you are prompted to confirm the deletion. (Note: If you don’t see the UpperFilters registry value or the LowerFilters registry value, this method is not for you. And if there is just one of them on your registry, delete that one and move on.)
Step 6. Close the Registry Editor and restart your computer for the changes to take effect.
Method 5: Disable and re-enable the USB controller
Fortunately, the steps to disable and re-enable the USB controller are simple and will not damage your PC. Let’s go through the steps here:
Step 1: Click «Start» and then go to the «Control Panel» tab. Select «System» and then «Hardware Tab«.
Step 2: After opening the «Device Manager» page, click «Universal Serial Bus Controller» to expand it.

Step 3: Right-click on each and select «Uninstall«.
Step 4: After the uninstallation is complete, restart the PC. The machine will reinstall all USB controllers.
Step 5: Insert the USB device, it should install without any problems.
Tip: Please check whether the USB device is running on other PCs. If it is, the USB controller is not working properly.
Method 6: Perform Windows Update
Performing a Windows update can avoid this Windows error because it will update the operating system with the latest security patches. Microsoft often brings users updates to make the most of its operating system by fixing bugs and improving performance. Also, if your system has been updated but has not been implemented, the result of the older version may be error code 10. This is how you can check and update.
Step 1: Click «Start» and then go to the settings icon.
Step 2: In «Settings«, click the «Update and Security» option.
Step 3: Now, go to «Windows Update» from the left panel, and click «Check for Updates» in the Windows Update pop-up window.

Step 4: A new window will pop up to notify that the update has started and the installation progress bar will be displayed.
Step 5: Once you see a message on the screen instructing to restart the computer to complete the installation process, restart the PC.
The error should now disappear.
The High Definition Audio Device cannot start issue should be gone after you try the methods above. If you know other methods to get rid of this issue, welcome to share them with us in the comment section below. To learn more solutions to other audio issues, you can get to the Sound Issue section on this site.
Company
Driver Talent is a professional Windows driver download and update utility from drivethelife.com, a professional team of OSToto Co., Ltd. Since the establishment in 2009, the team has been working hard to develop computer and Internet software so as to improve the work and lives of people. Our products are well received by people from all over the word.
Our Spirit
“User-centric Design, Technology Fundamental, Principles Open”
Our Products
Driver Talent, Driver Talent for Network Card, ExplorerMax
Recommended Download
|
ExplorerMax |
Driver Talent for Network Card | |||
| Smart and advanced file explorer tool for Windows platforms | Download & Install Network Drivers without Internet Connection | |||
|
30-day Free Trial |
Free Download |
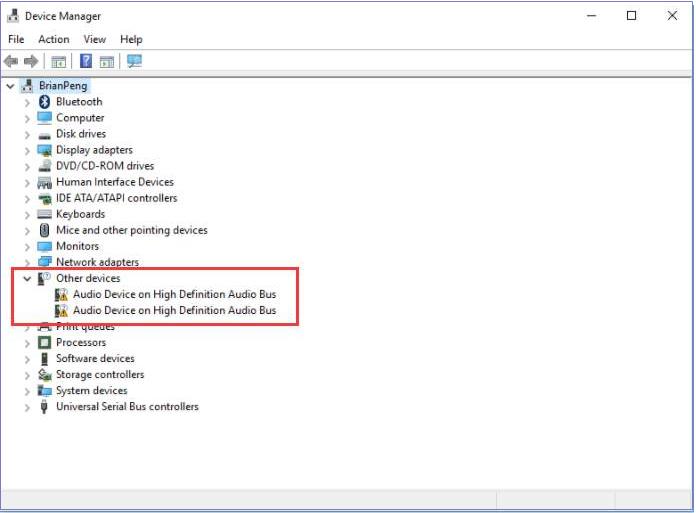
Audio Device on High Definition Audio Bus driver error commonly occurs on Windows. As you can see, in Device Manager, a yellow exclamation mark is next to the device. It means that Windows has identified a problem with the device. To fix the problem, just use the solutions here.
There are three solutions to fix the problem. Try them one by one until you find the one that works for you.
- Uninstall then reinstall the driver
- Update the driver manually
- Update the driver automatically
Method1: Uninstall then reinstall the driver
Uninstalling the driver and then allowing Windows to reinstall the driver may fix the problem.
Follow the steps below:
1) Open Device Manager.
2) Double-click the problem device to open the Properties dialog box.
3) Go to the Driver tab. Click Uninstall Device then click OK.
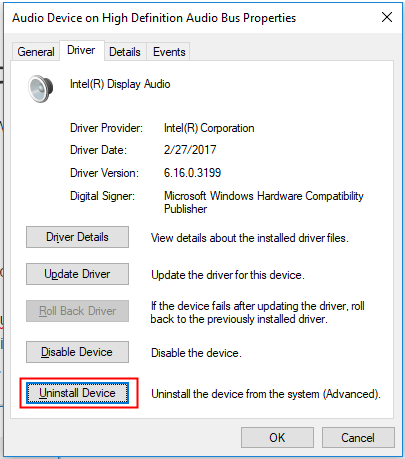
4) Windows will prompt to confirm the uninstallation, check the box next to “Delete the driver software for this device.” and click Uninstall. (If you don’t see the box, just click “Uninstall” to finish the uninstallation.)
5) Restart your PC and check to see if the problem is resolved.
Method 2: Update the driver
You may have tried to uninstall and then reinstall the driver. But it doesn’t work. In this case, you can update the driver manually or automatically.
Follow the steps below to update the driver manually:
1) Open Device Manager.
2) Double-click the problem device to open the Properties dialog box.
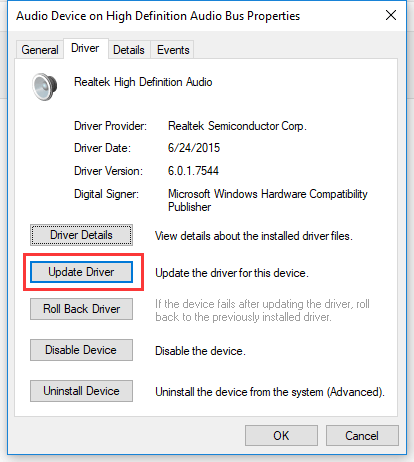
3) Go to the Driver tab. Click the Update Driver then click OK.
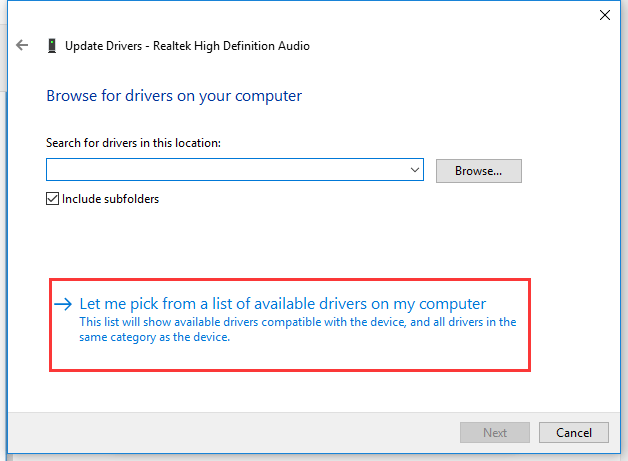
4) Select Browse my computer for driver software.

5) Select Let me pick from a list of available drivers on my computer.
6) Ensure “Show compatible hardware” is checked. Under Model, select High Definition Audio Device and click Next.
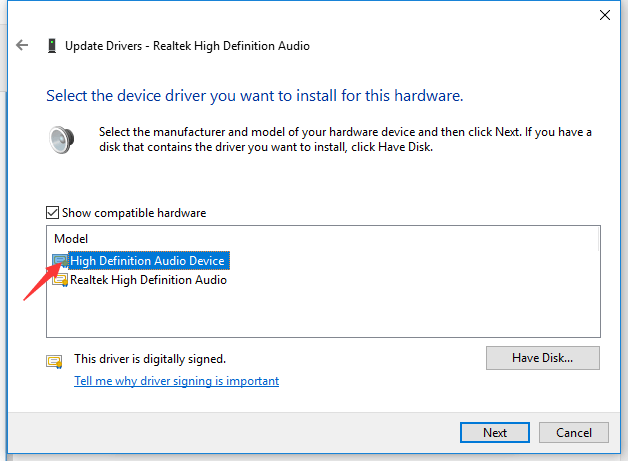
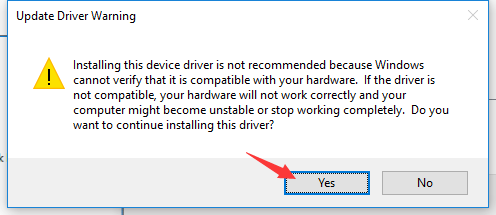
7) Click the Yes button to continue. Then Windows will update the driver.
 Check to see if the problem is resolved.
Method 3: Update the driver automatically
The steps above may help resolve the problem. But if they don’t, you can use Driver Easy to help update the driver automatically.
Driver Easy will automatically recognize your system and find the correct drivers for it. You don’t need to know exactly what system your computer is running, you don’t need to risk downloading and installing the wrong driver, and you don’t need to worry about making a mistake when installing.
You can update your drivers automatically with either the FREE or the Pro version of Driver Easy. But with the Pro version it takes just 2 clicks (and you get full support and a 30-day money back guarantee):
1) Download and install Driver Easy.
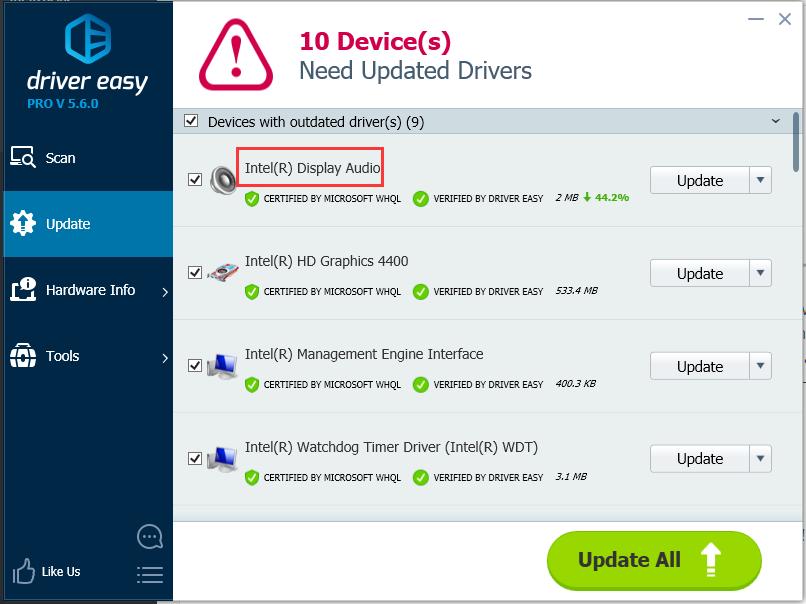
2) Run Driver Easy and click Scan Now. Driver Easy will then scan your computer and detect any problem drivers.

3) Click the Update button next to a flagged display audio driver to automatically download and install the correct version of this driver (you can do this with the FREE version). Or click Update All to automatically download and install the correct version of all the drivers that are missing or out of date on your system (this requires the Pro version – you’ll be prompted to upgrade when you click Update All).
4) After updating the driver, check to see if the problem is resolved.
Hope the solution here will help you fix the issue. If you have any questions, please leave your comments below. Thanks!
Though code 10 error: this device cannot start, can happen to any hardware device, but most of the cases occur to audio devices and USB devices. That is why this tutorial focuses on High Definition Audio.
Cannot hear sound from the speaker or headphone? Or when you go to the Realtek High Definition audio in device manager, it shows you that this device cannot start in Windows 10?
This code 10 error results from the driver issue or problem, such as driver missing or corrupted. In other words, fix the High Definition audio driver cannot start issue can depend on solving the driver compatibility problem.
Therefore, if no audio with this device cannot start error comes to Windows 10, it is a good choice for you to refer to this passage.
Solutions:
- 1: Open Windows Audio Services
- 2: Uninstall High Definition Audio Driver
- 3: Update HD Audio Drivers
- 4: Modify Registry Entry
- 5: Disable PCI Lock
Solution 1: Open Windows Audio Services
Code 10 error is created by the failed communication between device manager and the hardware device or because of the outdated or corrupted device drivers. Furthermore, if you have disabled Windows audio services, it will cause the Realtek High Definition Audio not start.
As Windows audio is a Windows-based program and if it is disabled, the audio device will function improperly. So when it is shown to us that the High Definition audio cannot start, you would better try to open the Windows audio services and Windows Audio Endpoint Builder. Therefore, you need to make sure your audio service is turned on and won’t cause HD audio error 10 with no sound.
1. Press Windows + R to open the run box and then enter services.msc in the box. Click OK to move on.
2. In Services window, locate Windows Audio and then right click it to Start it if it has not yet opened.
Here if you have started Windows Audio service, it is also necessary to change its startup type for Windows 10.
3. Right click Windows Audio to open its Properties.
4. In Window Audio Properties, under the General tab, find out Startup type and then change it to Automatic.
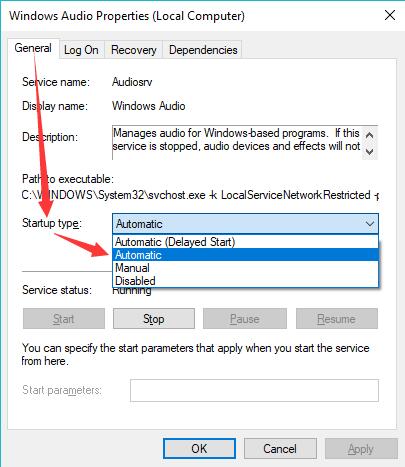
5. Then hit Apply and OK to save changes. After that, check whether there is sound from your audio device.
But if the error still persists, you can go ahead to find the final solution.
Solution 2: Uninstall High Definition Audio Driver
Now that it presents that this Realtek High Definition audio cannot start on Windows 10, so it is your instinct to uninstall this Realtek High Definition audio driver and then reinstall it on your PC.
1: Enter Device Manager.
2: Expand Sound, video, and game Controller.
3: Locate Realtek High Definition Audio driver and right click it to Uninstall it.
4: Reboot your computer to let it take effect.
Finally, Windows 10 will help you reinstall the Realtek HD audio drivers without the operation of yourself.
But maybe sometimes, this way of downloading the audio driver by Windows 10 cannot make the HD audio driver start to work, so you would better update this Realtek HD audio driver in a comprehensive way.
Solution 3: Update HD Audio Drivers
There is the quickest way to update the Realtek HD audio driver to the latest version in order to fix the code 10 error. To be more specific, you are able to use Driver Booster to update the audio driver for you.
As a professional and safe driver downloading and updating tool, you can find drivers of all sorts, Realtek HD audio driver is just a piece of cake. So you may as well download Driver Booster to your PC.
It is worth noting that Driver Booster is able to fix Device Manager code errors, with no exception for error code 10 with Realtek High Definition audio device.
1. Download, install and run Driver Booster on Windows 10.[
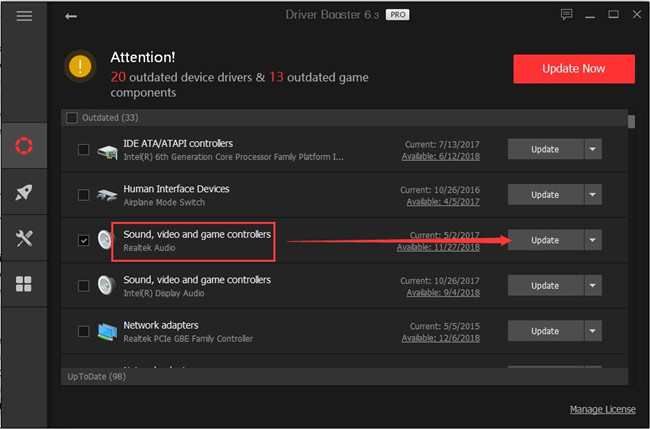
2. After installing and running it, hit Scan on it to start searching for outdated, missing, and corrupted drivers.

You can see your Realtek HD audio driver is listed in to-be-updated list in Driver Booster.
3. Then find out Sound, video and game controllers to Update the HD audio driver for Windows 10.
With the updated High definition audio driver, such as Realtek audio driver and sound device, if you noticed in Device Manager the error code 10 remains next to your HD audio device, move on to fix this device cannot start error on Windows 10.
4. In the left side of Driver Booster, find out Tools and then choose to Fix device error.
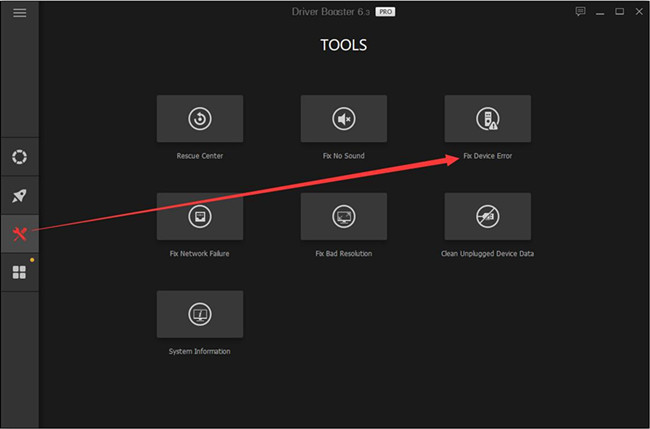
5. Then as you can see, Driver Booster is detecting and trying to fix the error code 10.
The moment Driver Booster updated HD audio driver and managed to fix this device cannot start code 10, you can use your microphone or speaker again to see if there is sound from the audio devices.
Solution 4: Modify Registry Entry
In terms of this error code 10 with High definition audio device, you can also make an attempt to change the registry entries. But before that, you may as well back up your data on Windows 10.
1. Press Windows + R to activate the Run box and then type in regedit in the box. Lastly, hit OK to move on.
2. In Registry Editor, navigate to here.
HKEY_LOCAL_MACHINE\SYSTEM\CurrentControlSet\Control\Class\{4D36E965-E325-11CE-BFC1-08002BE10318}
3. Then under this key, on the right pane, find and right click its subkey UpperFilters to Delete it.

4. Locate LowerFilters and right click it to Delete it as well.
5. Confirm to remove these two subkeys by hitting Yes.
6. Reboot Windows 10 to take effect.
If possible, the time you boot up again, there won’t be high definition audio device code 10 this device cannot start on Windows 10.
Solution 5: Disable PCI Lock
Though PCI Lock on your PC can prevent you from reallocating input and output, it does sometimes cause errors including Realtek code 10 on Windows 10. On that occasion, you would better try to turn off it to see if it works for this device cannot start error.
1. Search msconfig in the search box and then press Enter to get into System configuration.
2. In System Configuration, under the boot tab, hit Advanced options.
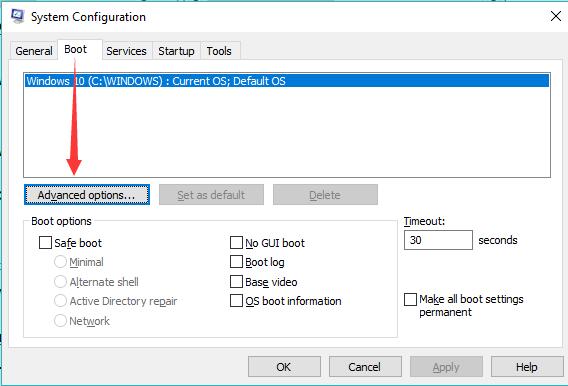
3. Then find out PCI Lock and then uncheck it to disable it.
After that, check in Device Manager if error code 10 with High definition persists and whether you are able to hear sound from microphone or speaker.
In a word, this post will help you get rid of high definition audio device error code 10. This device cannot start code 10 can be fixed if you can find a way suitable.
More Articles:
3 Ways to Update Realtek Audio Drivers for Windows 10/11
Fix Realtek HD Audio Manager Won’t Open or Missed on Windows 10/11
5.1 Channel Surround Sound Not Working on Windows 10/11
Как перейти от Waterfall к Agile
EggHead 06.05.2025
Каскадная модель разработки Waterfall — классический пример того, как благие намерения превращаются в организационный кошмар. Изначально созданная для упорядочивания хаоса и внесения предсказуемости. . .
Оптимизация SQL запросов — Продвинутые техники
Codd 06.05.2025
Интересно наблюдать эволюцию подходов к оптимизации. Двадцать лет назад всё сводилось к нескольким простым правилам: «Избегайте SELECT *», «Используйте индексы», «Не джойните слишком много таблиц». . . .
Создание микросервисов с gRPC и Protobuf в C++
bytestream 06.05.2025
Монолитные приложения, которые ещё недавно считались стандартом индустрии, уступают место микросервисной архитектуре — подходу, при котором система разбивается на небольшие автономные сервисы, каждый. . .
Многопоточность и параллелизм в Python: потоки, процессы и гринлеты
py-thonny 06.05.2025
Параллелизм и конкурентность — две стороны многопоточной медали, которые постоянно путают даже бывалые разработчики.
Конкурентность (concurrency) — это когда ваша программа умеет жонглировать. . .
Распределенное обучение с TensorFlow и Python
AI_Generated 05.05.2025
В машинном обучении размер имеет значение. С ростом сложности моделей и объема данных одиночный процессор или даже мощная видеокарта уже не справляются с задачей обучения за разумное время. Когда. . .
CRUD API на C# и GraphQL
stackOverflow 05.05.2025
В бэкенд-разработке постоянно возникают новые технологии, призванные решить актуальные проблемы и упростить жизнь программистам. Одной из таких технологий стал GraphQL — язык запросов для API,. . .
Распознавание голоса и речи на C#
UnmanagedCoder 05.05.2025
Интеграция голосового управления в приложения на C# стала намного доступнее благодаря развитию специализированных библиотек и API. При этом многие разработчики до сих пор считают голосовое управление. . .
Реализация своих итераторов в C++
NullReferenced 05.05.2025
Итераторы в C++ — это абстракция, которая связывает весь экосистему Стандартной Библиотеки Шаблонов (STL) в единое целое, позволяя алгоритмам работать с разнородными структурами данных без знания их. . .
Разработка собственного фреймворка для тестирования в C#
UnmanagedCoder 04.05.2025
C# довольно богат готовыми решениями – NUnit, xUnit, MSTest уже давно стали своеобразными динозаврами индустрии. Однако, как и любой динозавр, они не всегда могут протиснуться в узкие коридоры. . .
Распределенная трассировка в Java с помощью OpenTelemetry
Javaican 04.05.2025
Микросервисная архитектура стала краеугольным камнем современной разработки, но вместе с ней пришла и головная боль, знакомая многим — отслеживание прохождения запросов через лабиринт взаимосвязанных. . .