
How to Hide the Start Menu in Windows 11: A Comprehensive Guide
Windows 11 has brought a slew of features and a refined aesthetic to Microsoft’s operating system, emphasizing productivity and user experience. One of the significant visual changes is the revamped Start Menu, now centered on the taskbar instead of being anchored on the left side. While many users appreciate the new design, some might prefer a minimalistic workspace unencumbered by a visible Start Menu. This article will delve into various methods to hide the Start Menu in Windows 11—explaining the rationale behind doing so, the step-by-step processes, and potential benefits.
Understanding the Start Menu in Windows 11
Before diving into hiding the Start Menu, it’s essential to understand its purpose. The Start Menu is a central hub for accessing applications, files, and settings on your computer. It allows users to launch programs, search for files, adjust settings, and access power options. While this functionality enhances accessibility and organization, for some users—like gamers or those in creative fields—keeping the Start Menu out of view can lead to fewer distractions and more focus on the task at hand.
Why Hide the Start Menu?
Several reasons could drive you to hide the Start Menu in Windows 11:
-
Minimized Distractions: For users engaged in gaming or other immersive activities, the Start Menu may provide unnecessary distractions.
-
More Screen Space: Hiding the Start Menu can free up screen real estate, especially on smaller monitors or when multitasking with multiple windows.
-
Aesthetic Preferences: Some users might simply prefer a cleaner visual appearance with less clutter on their desktop.
-
Enhanced Privacy: Hiding the Start Menu can provide an added layer of privacy, especially if you share your computer or device with others.
-
Customization: Advanced users often enjoy customizing their work environment; hiding the Start Menu can be part of this personalization process.
Methods to Hide the Start Menu
There are several strategies to hide or minimize the Start Menu in Windows 11. Below, we’ll explore various techniques, including system settings, taskbar adjustments, and third-party applications.
Method 1: Auto-hide the Taskbar
The easiest way to hide the Start Menu is to enable auto-hide for the taskbar. This method makes the taskbar disappear when not in use, eliminating access to the Start Menu unless you hover over the taskbar area.
Steps to Enable Auto-hide:
-
Right-click on the Taskbar: Start by right-clicking anywhere on the taskbar (the bar at the bottom of your screen).
-
Select Taskbar Settings: From the pop-up menu, click on “Taskbar settings.”
-
Find Taskbar Behaviors: In the Taskbar settings menu, scroll down until you find the «Taskbar behaviors» option.
-
Enable Auto-hide: Check the box next to “Automatically hide the taskbar.”
-
Test the Auto-hide: Move your mouse cursor to the taskbar area to verify that it reappears. If you want it hidden, simply move your mouse away.
Method 2: Use Full-Screen Applications
Certain applications, especially games or content creation software, can be used in full-screen mode to automatically hide the Start Menu. When in full-screen mode, the operating system typically does not display the taskbar, thereby keeping the Start Menu hidden.
How to Run Applications in Full-Screen Mode:
-
Launch Your Application: Open the desired application (game, video player, etc.).
-
Enter Full-Screen Mode: Most applications allow you to enter full-screen mode by pressing
F11. Alternatively, look for a «Full Screen» option in the menu of the application. -
Exit Full-Screen: To exit full-screen mode, press
F11again or use the appropriate option in the menu.
Method 3: Utilize Virtual Desktops
Windows 11 allows you to create virtual desktops, which can help in reducing clutter. By dedicating one virtual desktop to tasks that require the Start Menu and setting another for activities needing it hidden, users can switch seamlessly while keeping the Start Menu out of sight on the relevant desktop.
Steps to Create a Virtual Desktop:
-
Open Task View: Click on the Task View icon on the taskbar (or press
Win + Tab). -
Create a New Desktop: In the Task View screen, click on «New Desktop» at the top left corner.
-
Switch Desktops: To switch between desktops, return to Task View and select the desired desktop.
-
Open Applications: Open the applications you want to use on separate desktops. This way, the Start Menu can remain hidden on the desktop you’re not using.
Method 4: Third-Party Tools
Several third-party applications exist that can help hide or customize your Start Menu experience. While these tools can offer additional functionalities, it’s critical to download software from reputable sources to avoid potential security risks.
Recommended Third-Party Software:
-
Classic Shell/Open-Shell: These applications allow you to customize the Start Menu and hide it. You can use this software to replace the Start Menu with a minimal interface according to your preferences.
-
TaskbarX: This tool lets you customize the position and visibility of your taskbar icons. Although designed for different functionalities, it can aid in creating a cleaner look by positioning icons easily.
-
Visplore: An application that rearranges the desktop environment and allows for full customization. While geared towards enhancing desktop aesthetics, hiding taskbar elements can also be achieved using this app.
Method 5: Keyboard Shortcuts
For quick actions without having to click through menus, utilizing keyboard shortcuts can sometimes help you effectively avoid relying on the Start Menu. While this does not physically hide the Start Menu, it enables a more uninterrupted workflow.
Key Shortcuts to Consider:
-
Windows + D: Minimizes all windows and shows the desktop. You can then quickly bring up the applications you need without the Start Menu.
-
Windows + X: Opens the Quick Link menu, which provides easy access to system tools without needing the Start Menu.
-
Alt + Tab: This shortcut lets you switch between open applications without accessing the Start Menu.
Method 6: Adjusting the Taskbar Alignment
If your intent in hiding the Start Menu relates to aesthetics, consider redesigning the taskbar’s look. Windows 11 allows users to adjust the alignment of icons on the taskbar, which can enhance the appearance and help minimize the importance of the Start Menu.
Steps to Change Taskbar Icon Alignment:
-
Right-click on the Taskbar: Again, right-click the taskbar and select “Taskbar settings.”
-
Adjust Taskbar Alignment: Find the «Taskbar behaviors» section and choose «Center» or «Left» under the “Taskbar alignment” option.
-
Explore Taskbar Customization: Consider adjusting which icons appear on the taskbar. Removing unnecessary icons can declutter the visual appearance.
Potential Caveats to Hiding the Start Menu
While several methods exist to hide the Start Menu, it’s worth noting a few potential downsides:
-
Access Inconvenience: Hiding the Start Menu can make accessing frequently used programs and settings cumbersome. It may require alternative methods, which could be inconvenient for some users.
-
Learning Curve: For users accustomed to the traditional Start Menu, shifting away from its use may introduce a learning curve as they adapt to new workflows or tools.
-
Lost Functionality: Some features tied directly to the Start Menu could become less accessible when hidden, which may hinder productivity for specific tasks or users.
Conclusion
Diminishing the visibility of the Start Menu in Windows 11 can cater to personal preferences, enhance productivity, and create a cleaner workspace. From utilizing built-in features like auto-hiding the taskbar to embracing third-party software for a tailored experience, users have various options for modifying their operating environment.
Remember, the goal is to find a balance between productivity and comfort. It’s essential to weigh the benefits against any potential downsides based on your specific workflow requirements. Explore the different methods discussed in this article to find the best approach for your unique situation, and enjoy a workspace that aligns with your personal preferences.
Whether you’re gaming, freelancing, or simply prefer a decluttered setup, there’s a solution waiting for you in the versatile realm of Windows 11. Keep experimenting, and tailor your experience to fit your needs!
Summary: Windows 10 changed the Start Menu layout so that users can access the installed apps listed on the Start Menu. However, some people who used to launch apps by keyboard shortcuts may want to disable the Start Menu. So today, this how-to post will offer practical ways to hide or remove the Start Menu.
Table of Contents
What Is The Windows 10 Start Menu?
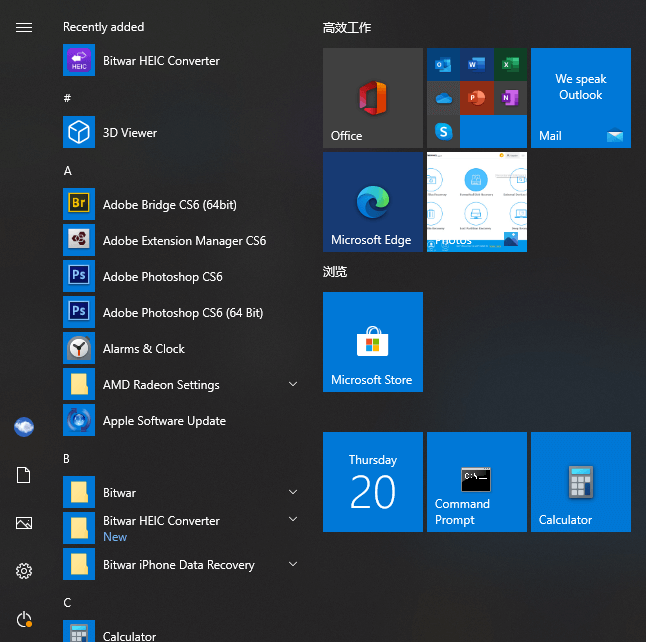
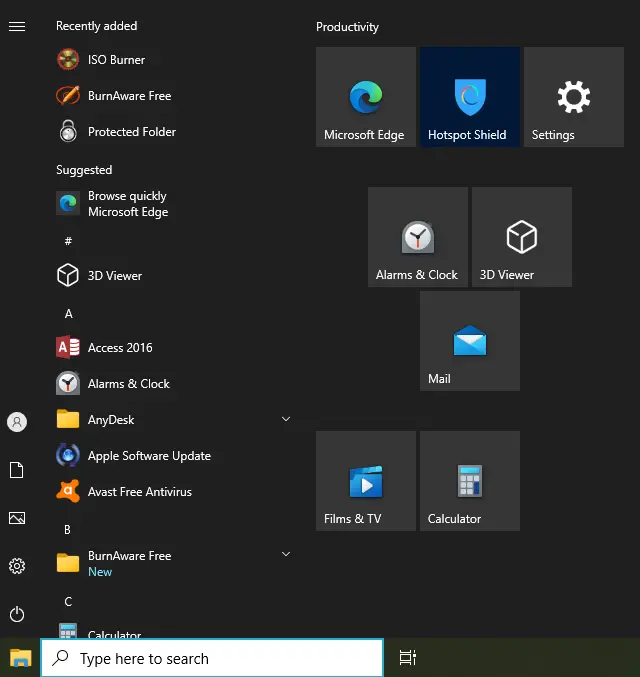
The Win10 Start menu is a directory of all the programs, folders, and contacts that you frequently use. It is the primary point to access the applications on your PC. Users can click the Start button or press the Win logo key to access the Start Menu.
There are two panes and a Search box in the Windows 10 Start Menu. Users can find all apps on the left pane and the corresponding live titles of the apps on the right pane. Any app in the “All Apps” list on the left pane can be copied as a tile on the right.
How to Hide Windows 10 Start Menu?
Hide the Start Menu Using StartIsGone
StartIsGone is a portable program that helps users to hide the Start Menu on the taskbar. It is fully native to Win 8.1 and Win 10.
- You should first download and run StartIsGone. Then its icon will appear in the system tray.
- Right-click its tray icon to access the load at startup and hide system tray icon options. It requires a paltry 1.7 MB of memory.
- If you want to show or bring back the Start Menu, close the SatrtIsGone program.
Hide the Start Menu With Start Killer
Start Killer is a free program to hide or disable the Start menu. It’s easy to hide the Start button with the Start Killer.
- First, you should download and install the Start Killer.
- Run it from Start Menu and right-click its icon to open or exit the “Setting”.
- If you’d like to run the Start Killer automatically, you can turn on the “Load on system start” option.
- Just like StartIsGone, you can close Start Killer to bring back the Start Menu.
Hide the Start Menu With Registry Editor
- Open a Run command dialog box by pressing Win + R keys on your keyboard, then type regedit and press the Enter key to open Registry Editor.
- Choose the Yes button for UAC (User Account Control) prompt.
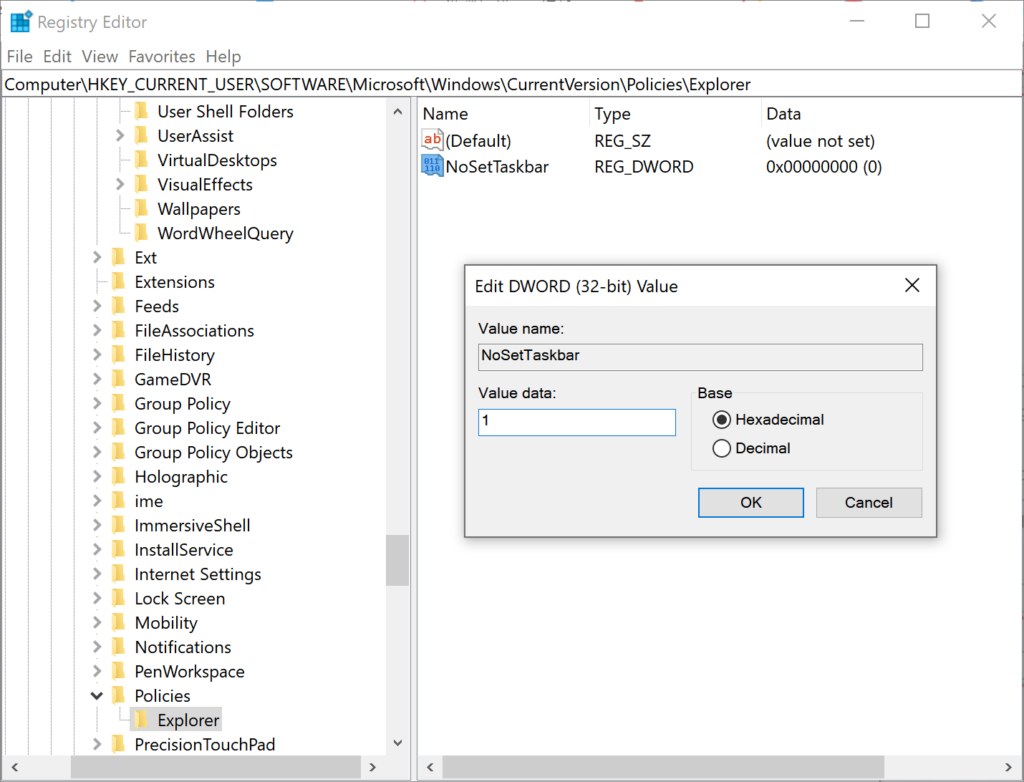
- In the Current User hive, navigate to the following key: HKEY_CURRENT_USER\Software\Microsoft\Windows\CurrentVersion\Policies\Explorer
- In the Explorer key, right-click on the right pane and choose the New > DWORD (32-bit) Value option. Name this newly created value as NoSetTaskbar.
- Double-click on the NoSetTaskbar value to open it and then change Value data to 1.

- Lastly, you need to restart your system to apply the changes to the system.
- If you want to enable it back, you need to open the NoSetTaskbar value again and change Value data to 0.
NOTE: We always recommend users create a backup before making any changes in their Registry Editor.
Conclusion
The Start Menu provides a way to start apps or programs, adjust Windows settings, ask for help for sticky situations, turn off Windows, and leave your PC for a while. Users can hide or remove it easily if they don’t need it. They can also bring it back with ease.
Wondering how to disable the Start menu on Windows 10?
The Windows Start menu is a big deal. It is probably the first thing that you think of when it comes to launching applications, searching for important files, or simply shutting down your PC. This iconic Start menu is so intertwined with the identity of Windows, that it is hard to imagine using Windows without it, but it might not be as convenient for some as it is for others.
Luckily, Windows allows its users to disable the Start menu and if you are one of those people who do not find it handy, you are in the right place.
In this guide, we will walk you through the steps of disabling the Start menu on Windows 10 in detail.
Let’s get started!
1. Use Windows Registry.
If you have always wanted to get better control over your operating system, then Windows Registry is something you should know about.
Windows Registry is a database of low-level information about Windows programs and processes. The information in the Registry Editor is stored in the form of Registry keys, and advanced users modify the relevant keys to customize their operating systems.
Here is how you can disable the Start menu on Windows 10 using Windows Registry:
- Press Windows + R keys on your keyboard simultaneously to open a Run dialogue box.
- Inside the text field of the dialogue box, type ‘regedit’ and hit Enter. This will open Registry Editor on Windows.

- Inside the Registry Editor window, navigate to the location mentioned below.
HKEY_CURRENT_USER\Software\Microsoft\Windows\CurrentVersion\Policies\Explorer
- In the right pane, right-click anywhere and select the New > DWORD (32-bit) Value option and name this value as NoSetTaskbar.
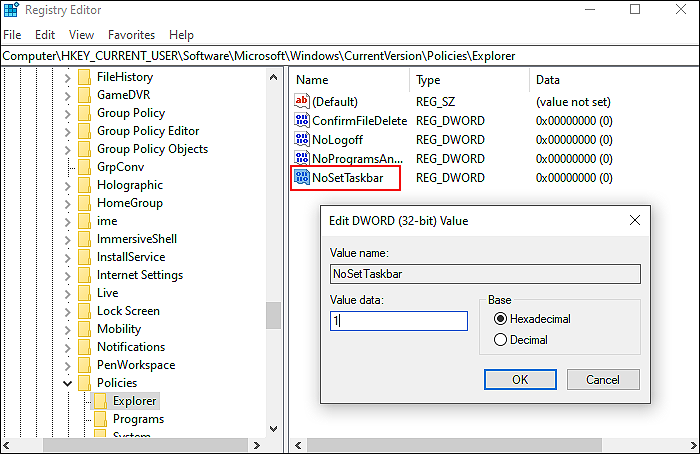
- Double-click on this value and under Value data, type 1.
This should disable the Start menu on Windows 10 without any issues.
2. Try Using CleanMyPC.
In the event that none of the suggested solutions work for you, there is a possibility that your system is infected with bugs or corrupt files that are hindering these operations. In this case, the best course of action would be to remove the junk files before attempting to troubleshoot.
Cleaning your computer from clutter is best done with a professional PC cleaner. If you want a recommendation, we like CleanMyPC.

Apart from removing junk files, CleanMyPC also offers an array of system maintenance tools that are designed to address other PC problems. When you install the tool and run an initial scan, it will automatically identify and fix problems without the need for extensive user input.
It is also quite easy to use, so even if you have never used a PC cleaner before, you will have no problem using CleanMyPC!
Try CleanMyPC Now!
3. Use Group Policy Editor.
Another easy way of disabling the Start menu is via Group Policy Editor.
Group Policy Editor is also an administrative-level tool that allows you to customize the operations of Windows, as the Windows Registry. Information here is stored in the form of policies, and we will be modifying the relevant policies to make our desired changes.
Here is what you need to do:
- Press Windows + R keys on your keyboard simultaneously to open a Run dialogue box.
- Inside the text field of the dialogue box, type ‘gpedit.msc’ and hit Enter. This will launch Group Policy Editor.
- In the newly launched window, navigate to the location mentioned below.
User Configuration\Administrative Templates\Start Menu and Taskbar\
- In the right pane, locate Prevent changes to Taskbar and Start Menu Settings and double-click on it.
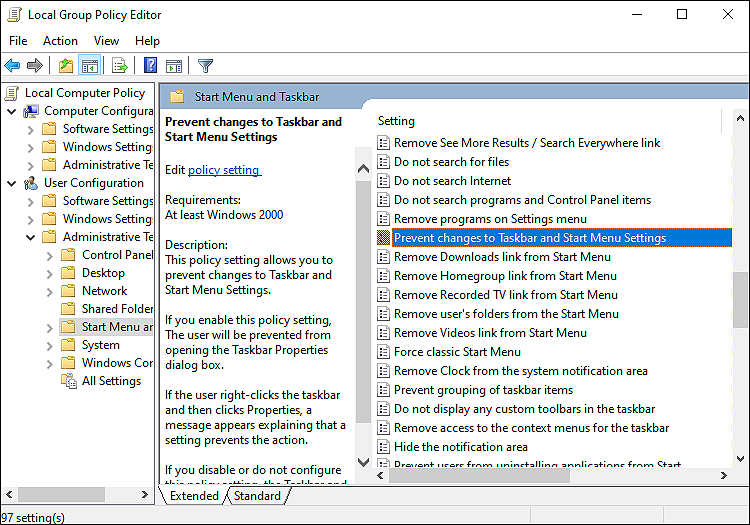
- Click on Enabled and hit Apply to save the changes.
That’s it.
Hopefully, doing so will make desired changes in no time.
This brings us to the end of our guide on disabling the Start menu on Windows 10. We tried walking you through all the steps in detail and hope that one of the methods mentioned above did the trick for you. In case you still have any confusion about the methods, please let us know in the comment section below!
If this guide helped you, please share it. 🙂
-
Zainab Falak is a staff writer for Saint and an expert in Microsoft Windows, having authored more than 200 posts. She has a Bachelors in Actuarial Sciences and her passion for computers extends to exploring various aspects, from UI customization to the Windows registry and exploring error codes. Twitter
LinkedIn
View all posts
You are here:
Home » Windows 10 » 2 Ways To Hide Or Remove Start Button In Windows 10
Windows 10 finally brought back the Start menu. The Start menu or Start screen (turned off by default for desktops and laptops) can either be accessed by clicking on the Start button or pressing down the Windows logo key on the keyboard.
Most users open the Start menu by clicking on the Start button on the taskbar. However, many keyboard shortcut lovers use the Windows logo key to open the Start menu.

If you always use the keyboard to open the Start menu or configured Windows 10 to center taskbar icons, you might want to hide the Start button. Hiding the Start button frees up an icon’s space on the taskbar!

In this guide, we will take about the two ways out there to hide the Start button in Windows 10.
Note that hiding the Start button will not hide or disable the Start menu. You can access the Start menu by pressing the Windows logo key on the keyboard. Likewise, you can also access the Win + X menu using the Windows logo key and X keyboard shortcut. So, you will not miss out on any features when you hide the Start button.
Tip: Change the default Windows 10 Start button as well.
Hide the Windows 10 Start menu with Start Killer
Start Killer is a free program designed to disable or hide the Start menu. With Start menu Killer, hiding the Start button is easy. Just download the program, install the same, and run it. Alternatively, there is a portable version of the program also on offer. We prefer the portable version.
If you want to use the portable version, just download and run it to hide the Start button.

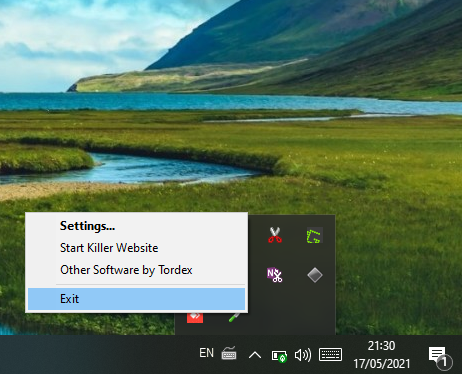
To see the Start button again, close the Start Killer program by right-clicking on the Start Killer icon in the system tray and then clicking the Exit option.
Download Start Killer
Remove the Start button using StartIsGone
StartIsGone is a portable program out there to help you hide the Start button on the taskbar. Downloading and running StartIsGone will hide the Start button immediately.
When running, its icon will show up in the system tray. Right-click on its tray icon to access load at startup and hide the system tray icon options. It takes a negligible 1.7 MB of memory.

Just like the Start Killer, closing the program (right-click on its tray icon and then exit) or via Task Manager will bring back the Start button.
Download StartIsGone
The Start button is a part of the Microsoft operating system for a long time. You can find the Start button in Windows XP, Vista, and 7. However, Microsoft has removed the Start button in Windows 8 and finally added them back in Windows 8.1. The latest Windows 10 also comes with a beautiful Start menu.
Windows 10 allows you to access the Start menu or Start screen by clicking on the Start button or pressing the Windows logo key on the keyboard. Most of us prefer to open the Start menu by clicking on the Start button on the Windows taskbar. However, if you prefer to use a keyboard shortcut (Windows logo key) to open the Start menu on Windows 10 or want to remove the Start button for any reason, it is possible to use a third-party tool.
If you always use a keyboard shortcut to open the Start menu, the Start button may be useless for you, and want to get rid of this; you can take the help of third-party freeware. There is no built-in function on Windows 10 to remove the Start button from the PC; hence we will take the help of free tools: StartIsGone and Start Killer. Both these freeware applications serve the purpose; hence you can download and use any of them.
Before proceeding with further steps, ensure that hiding or removing the Start button using a third-party tool will not obliterate the Start menu from your PC. Once you deactivate the application, the Start button will appear again. Even you can access the Start menu by pressing the Windows logo key from the keyboard. Similarly, to access the power menu, you can use the Windows logo + X keyboard shortcut. That means disabling or removing the Start menu from software will not remove the built-in features of Windows 10. You can still enjoy all the features of the Start button even by hiding them.
Hide Windows 10 Start menu with Start Killer
Start Killer is a free program specially designed to disable or hide the Start button on Windows PC. With Start menu Killer, you can easily hide the Start button. Just download the installer or portable program and run it on your PC. If you download a portable version of this program, there is no need to install it on your PC. Just run them and start hiding the Start menu.
There is no GUI of this application to change the settings; however, you can access the Settings of this program by right-clicking on its icon on the System Tray. If you want to see the Start menu, To see the Start button again, exit the Start Killer program by right-clicking on the Start Killer icon in the system tray.
Start Killer comes with two executable files, one for 32-bit and another for the 64-bit operating system. Before running the app, make sure you have double-clicked on the right application. Furthermore, this free utility is compatible with Windows Vista, Windows 7, Windows 8.1, and Windows 10.
You can download this tiny Start Killer from its official website.
Hide Windows 10 Start menu using StartIsGone
StartIsGone is another free application that serves the purpose, and it also removes the Start button from Windows PC. It is also a portable program to hide the Start button on the taskbar. Just download and run this freeware tool to start hiding the Start button immediately.
When running, its icon will remain visible on the system tray. To see or unhide the Start button, right-click on its tray icon and select the “Exit” option. If you want to load it with Windows Startup, right-click on its icon on the System tray and select the option, “Run at startup.” There is also an option available to hide its icon on the system tray; it is useful when you don’t want to unhide the Start button.
This application is compatible with Windows 10 and Windows 8.1. There are two separate executable files for 32-bit and 64-bit OS; hence before running, make sure you have selected the right application. You can download this tiny freeware from here.
Note: During our test, we noticed that both the applications hide the Start button and Taskbar icons which were added manually. If you only want to hide or remove the Start button, but want to see the custom Taskbar icons, then it might not be your choice.