
Today’s computers offer a range of energy-saving options. These features are especially useful for laptops, which often run on battery power instead of being plugged in. One of the most well-known features for saving power and battery is Hibernate mode (also called Suspend to disk), which powers off your computer. Before the operating system shuts down, it stores your current user session to the hard disk so that you can continue exactly where you left off when your computer wakes up from hibernation.
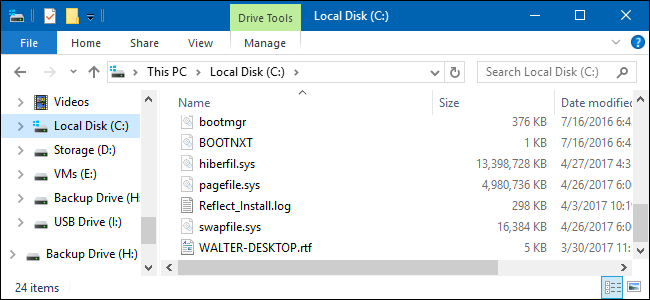
Microsoft systems such as Windows 7, 8, or 10 store this memory content to the hiberfil.sys file, which can use several GBs of space depending on the software, system version and type of device you’re using. Windows creates this system memory file even if you never use Hibernate mode or Sleep mode, which also uses the hibernation method. We’ll explain how to delete the hiberfil.sys file and prevent the automatic creation of a new hiberfil.sys file if you don’t use the hibernation feature in Windows.
What is hiberfil.sys?
hiberfil.sys is a system file in Windows operating systems that contains the current memory contents of the machine state and is used by the “Sleep” and “Hibernate” power-saving options. The file is created and managed by the Windows operating system itself and can be several gigabytes in size (in Windows 10, it usually ranges from three to five gigabytes). The hiberfil.sys file is used to restore the user session when the system boots up after hibernation or sleep mode.
Hybrid sleep is a combination of Sleep and Hibernate mode where only certain system components such as hard drives are shut down.
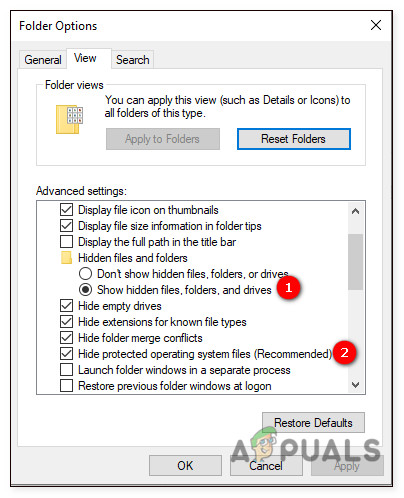
Windows places the hibernation file in the source directory of the system partition itself, typically in the root directory of C:\. However, hiberfil.sys is a hidden and protected operating system file, so you won’t see it by default. If you want to change this setting, for example to view the size of the file, do the following:
- Go to the View tab and select the Hidden items checkbox.
- Click Options, and then click Change folder and search options.
- In the dialog box that appears, go to the View tab and uncheck Hide protected operating system files (Recommended).

How to delete and disable the hiberfil.sys file
Although hiberfil.sys is a hidden and protected system file, you can safely delete it if you don’t want to use the power-saving options in Windows. That’s because the hibernation file has no effect on the general functions of the operating system. However, you can’t use the standard delete method (right-click and “Delete”) because Windows actively uses this file. When you try to do this, you’ll get a message saying that the hiberfil.sys file is open in another program.
The solution is to disable Hibernate mode. Windows will then automatically delete hiberfil.sys as a result. We’ll now explain exactly how to do this in Windows 7, 8 and 10.
you need administrator privileges to disable hiberfil.sys.
How to the disable hiberfil.sys in Windows 10
There are two ways to disable the hibernation file that stores your session to the hard disk: Either disable the service using Command Prompt or change the registry entry for hiberfil.sys. In both cases, you have to have the necessary access privileges because the hibernation file is a system file, as mentioned above.
Deleting hiberfil.sys via PowerShell in Windows 10:
To turn off caching in the system file via PowerShell, all you need to do is a run a command. But first you need to run PowerShell as an administrator by choosing the keyboard shortcut [Windows] + [X] or right-clicking the Windows icon and choosing Windows PowerShell (Admin) Windows PowerShell:

Once you’ve launched PowerShell (you may need to enter a password), type in the following CMD command to disable the hiberfil.sys file:

Press Enter to confirm your entry. Hibernate mode will be disabled and the hiberfil.sys file will be automatically deleted.
You can also use the powercfg command if you want to re-enable Hibernate mode later. All you have to do is change the “off” parameter to “on”
Deleting hiberfil.sys via the registry in Windows 10:
You shouldn’t disable the hiberfil.sys file via the registry unless you have experience using the registry database. Incorrect entries or changes to the entries can easily cause Windows 10 to stop working properly.
The Windows Registry Editor is the best way to modify the registry. Open it by pressing Windows + R and typing regedit in the Run dialog box. To learn more about the Windows Registry Editor, see our article on regedit.
The service is relatively easy to turn off using this method. First, open the “HibernateEnabled”registry entry, which is located at:
\HKEY_LOCAL_MACHINE\SYSTEM\CurrentControlSet\Control\PowerDouble-click the above entry and set the value in the Value data field to 0 to disable Hibernate mode and delete the hiberfil.sys file:

Deleting hiberfil.sys in Windows 7 and 8: Step-by-step guide
You can also remove the hibernation file from your system if you’re using Windows 7 and 8. Just like in Windows 10, you can choose between Command Prompt and the registry database. The procedure is almost the same as in Windows 10.
Deleting hiberfil.sys using Command Prompt in Windows 7 and 8:
Although the command to disable hiberfil.sys is the same in all versions of Windows, the steps for opening Command Prompt are different depending on the version you’re using. Unlike Windows 10, Windows 7 and Windows 8 don’t have a Quick Access Menu, so this option for launching Command Prompt isn’t available. Instead, open the Windows Start menu and use the built-in search feature. Simply type the following in the search bar:
Windows will show Command Prompt as a best match. Right-click to select it and choose Run as administrator. Enter the CMD command above and choose Enter to disable caching for Hibernate mode and to delete hiberfil.sys:
Deleting hiberfil.sys via the registry in Windows 7 and 8:
Just like in Windows 10, you start from the Start menu if you want to disable hiberfil.sys via the registry. But instead of using the search bar, use the Run function. If it’s not visible in your Start menu, you can unhide it as follows:
- Right-click the task bar.
- Select Properties.
- Go to the Start Menu tab and click Customize.
- Select Run command and click OK. Chose Apply to save the change.
Open the “Run” dialog and enter the command for launching the Registry Editor:

Now open the directory for the registry entry of Windows Hibernate mode:
\HKEY_LOCAL_MACHINE\SYSTEM\CurrentControlSet\Control\PowerThen click HibernateEnabled and set the value of this key to 0 to remove the hiberfil.sys file. If the key doesn’t exist, create it manually: Right-click in the window on the right and select “New” and then DWORD value. Enter “HibernateEnabled” as the key name:

Was this article helpful?
Что делать, если внушительную часть места на диске (C:\) занимает файл hiberfil.sys? Можно ли и главное каким образом от него избавиться? В этом вопросе обязательно разберёмся ниже, но прежде пару слов о теоретической части вопроса — что это за системный компонент, и для чего он нужен.
Hiberfil.sys – это рабочий файл режима гибернации. Прежде погружения компьютера в данный режим в этот файл записывается текущее состояние Windows, – все активные сеансы работающих программ. Находится hiberfil.sys в корне диска (C:\). Но чтобы его увидеть в штатном проводнике, необходимо провести кое-какие настройки. В среде Windows 7 в окне проводника жмём Alt, затем в меню «Сервис» выбираем «Параметры папок». В системах Windows 8.1 и 10 доступ к изменению параметров папок реализован во вкладке меню «Вид».

Непосредственно в окошке параметров папок переключаемся на вкладку «Вид» и делаем следующее:
• Снимаем галочку сокрытия защищённых системных файлов;
• Включаем отображение скрытых элементов;
• Жмём внизу «Применить».

Теперь внутри проводника в корне диска (C:\) можем лицезреть тот самый файл «hiberfil» с расширением «.sys», а также узнать, сколько места он занимает.

Современные версии Windows 7, 8.1 и 10 предусматривают два механизма электропитания, которые могут быть задействованы в режиме сна:
- Спящий режим, когда компьютер продолжает работать в условиях низкого потребления электроэнергии;
- Режим гибернации, когда компьютер не потребляет электроэнергию вовсе.
При погружении системы в спящий режим отключается работа большей части аппаратных устройств компьютера. А отвечающая за сохранность сессии пользователя оперативная память продолжает работать. Она же, собственно, и обеспечивает оперативность процесса выхода из спящего режима.
Режим гибернации – это, по сути, полное выключение компьютера, но с возможностью восстановления текущей сессии работы Windows. После выхода из гибернации работа Windows продолжается благодаря извлечению данных сессии из того самого файла hiberfil.sys. Гибернация предназначена по большей части для применения на ноутбуках. Она экономит заряд аккумулятора, при этом оперативнее приводит Windows в рабочее состояние, нежели процесс включения ноутбука.
У гибернации 2 основных недостатка:
- фрагментация оперативной памяти при длительном использовании этого режима вместо цикла выключений и включений компьютерного устройства;
- место, занимаемое на диске (C:\).
При активном использовании этого режима его файл hiberfil.sys будет занимать на системном диске примерно столько места, сколько на компьютере имеется оперативной памяти.
Для ноутбуков гибернация, конечно, имеет свои плюсы. И если вы, друзья, из числа владельцев таковых, пожалуй, порекомендую вам присмотреть другие способы высвобождения места на диске (C:\). А вот для десктопов, подключённых к электросети, гибернация бесполезна. На десктопах гибернацию можно отключить и, соответственно, удалить hiberfil.sys. Ну и таким образом высвободить место на диске (C:\).
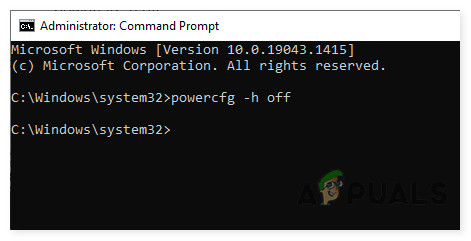
Что для этого нужно? Запускаем командную строку (запускаем её, естественно, от администратора) и прописываем команду:
powercfg -h off

Вручную избавляться от файла hiberfil.sys не нужно, он сам исчезнет после применения настроек его отключения. Если же в будущем гибернация понадобится, включить её можно с помощью той же командной строки. На этот раз команда будет такой:
powercfg /h on
После этого система снова создаст файл hiberfil.sys в корне диска (C:\).
Друзья, возможно, у некоторых из вас возникнет вопрос — а можно ли перенести hiberfil.sys на другой раздел диска? Ну, например, как это допускается с файлом подкачки pagefile.sys. Увы, нет. Нахождение рабочего файла режима гибернации на диске системы принципиально важно. Он должен находиться только там, где находится, и быть доступным загрузчику операционной системы.
You might have come across a file named ‘hiberfil.sys’ while scanning your computer for large files and thought it was some kind of virus. You don’t need to worry, as this file simply manages the hibernation of your computer. However, if you don’t use that feature, the hiberfil.sys file may be unnecessarily occupying a large amount of space. In such cases, safely removing the file could be advisable.
In this guide, we will explain what hiberfil.sys is and how to safely delete it from your Windows.
What is hiberfil.sys?
During hibernation, the Windows creates a file called hiberfil.sys. This file stores the state of your computer as it was before it entered hibernation, ensuring that when the computer wakes from hibernation, it can return to its previous state. It is perfectly possible to put your system into hibernation for days or even weeks without any impact on its restoration.
In simple terms, hibernation mode allows users to completely shut down their computers while saving their work/session so they can quickly resume where they left off after restarting.
Currently, hiberfil.sys is a hidden file, and it is visible in the Windows file manager only after you select the ‘Show hidden files and folders’ option in the folder options.
Is It Safe to Delete hiberfil.sys?
One consideration regarding hibernation is the storage space it requires. The hiberfil.sys file generally amounts to approximately 75% of your total RAM capacity. For example, if your computer has 16 GB of RAM, the hiberfil.sys file might occupy about 12 GB of space. This size remains constant and will not increase over time unless you upgrade your computer’s RAM.
For computers with large RAM, the space taken up by the hibernation file might not be noticeable. However, this can be problematic for laptops with limited storage.
Before deleting hiberfil.sys, consider whether you frequently use the Hibernate function. If you regularly use Hibernate during breaks, deleting hiberfil.sys may not be beneficial, as Windows will recreate the file during the next hibernation cycle.
Thus, you can delete the hiberfil.sys file safely, but we recommend doing so only if you wish to disable the hibernation feature of Windows.
How to Delete hiberfil.sys in Windows
To delete the hiberfil.sys file, you must first disable Hibernation. Once you disable the feature, the file can be safely deleted.
Note: Disabling hibernation also turns off Fast Startup on Windows, which could lead to longer boot times. Keep this in mind if you prioritize quick startups.
Disable Hibernation Using Command Prompt
- Type cmd in the search bar and click on Run as administrator to launch the Command Prompt with administrative privileges.
- Type powercfg -h off and press Enter to disable Hibernation.

Turn Hibernation off using Command Prompt
To enable Hibernation in the future, simply execute powercfg -h on.
Disable Hibernation Using System Settings
Alternatively, if you prefer not to use Command Prompt, you can disable hibernation through System settings.
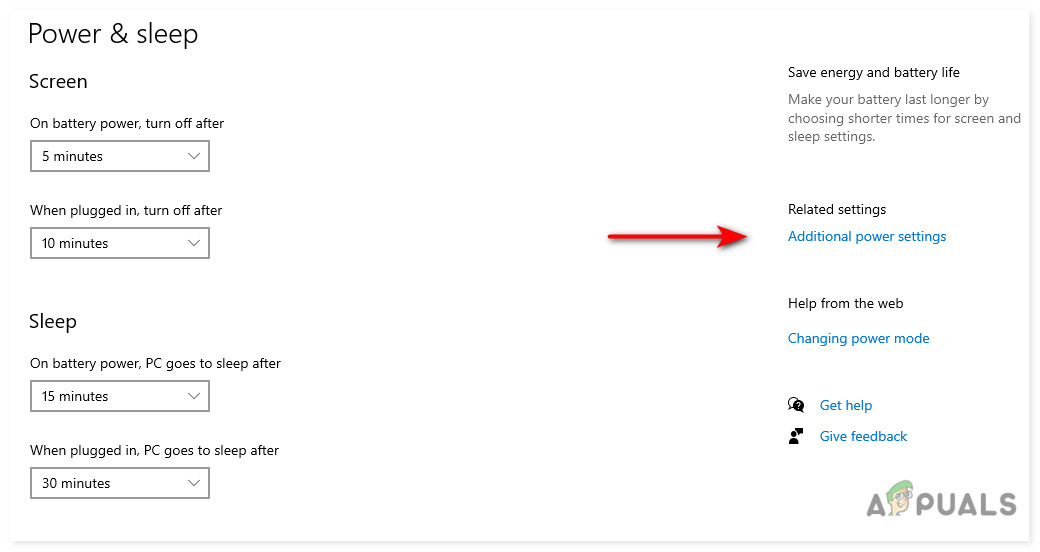
- Enter ‘power’ in the search area of your taskbar and select Power & sleep settings.
- In the next window, select Additional power settings from the right pane.

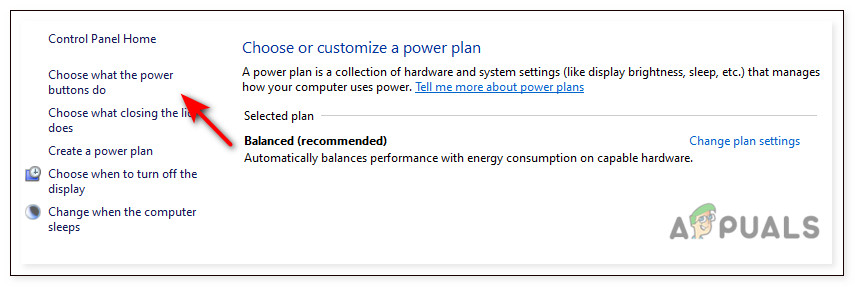
Access additional power settings via Windows Settings - Click on Choose what the power buttons do in the left pane and then choose Change settings that are currently unavailable.

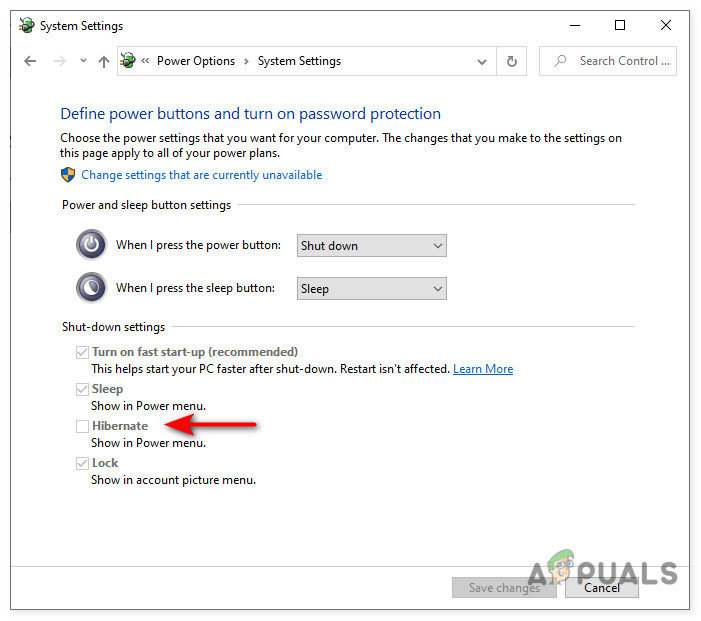
Change what the power buttons do - Uncheck the box next to Hibernation and click Save changes.

Deactivate the hibernate option in System Settings
Users of Windows 7 can refer to our guide on how to enable or disable Hibernation in Windows 7.
Delete hiberfil.sys in Windows
Disabling Hibernation should automatically remove the hiberfil.sys file. To confirm its deletion, follow these steps:
- Open File Explorer and go to the View tab.
- Click on Options and navigate to the View tab.

View hidden files in File Explorer - Select Show hidden files, folders, and drives.
- Uncheck Hide protected operating system files (Recommended).
- Click Apply.

Adjusting folder options in Windows

Now, navigate to your C drive to verify whether the hiberfil.sys file remains. If it’s not there, then it has been successfully deleted!
Zainab Falak
Zainab Falak is a highly educated professional with a background in actuarial science and a strong passion for technology. Her expertise lies in the field of data analytics and she is a proficient programmer in languages such as Python and R. At Appuals, Zainab shares her extensive knowledge of Windows 8, 10, and 11, covering a broad range of topics related to these operating systems. Zainab’s ability to effectively communicate technical concepts in a clear and concise manner has earned her recognition and respect in the tech community. She is committed to staying up-to-date with the latest developments in the field and providing readers with insightful and informative content.
Sign in to your How-To Geek account
Quick Links
-
What Is the hiberfil.sys File?
-
Disable Hibernate Mode in Windows 10, 8, 7, or Vista
-
Disable Hibernate Mode in Windows XP
Summary
Windows stores information about your PC’s current state in hiberfil.sys when you put your PC into hibernation mode. You can delete Hiberfil.sys by disabling hibernation mode. Run Command Prompt as an Administrator and enter «powercfg -h off» into the window to disable hibernation mode and delete hiberfil.sys.
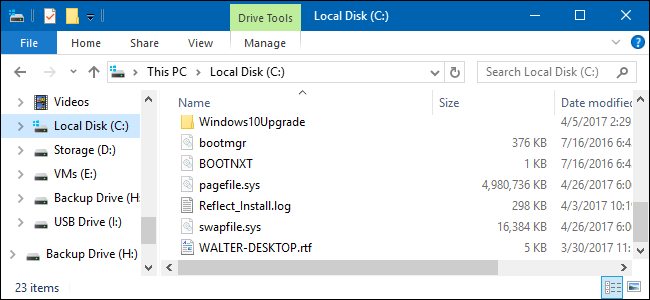
You’re likely reading this because you noticed a gigantic hiberfil.sys file sitting on your system drive and you’re wondering if you can get rid of it to free up some space. Here’s what that file is and how you can delete it if you want to.
What Is the hiberfil.sys File?
Depending on the version of Windows you’re using, you have several options for conserving power when you’re not using your PC. Obviously, you can just shut it down. But, you can also send it into a sleep or hibernate mode, where it uses dramatically less power but is still available quickly when you need it. Sleep uses just enough power to maintain the information in your PC’s memory. Hibernate conserves even more power by writing the information in memory out to the hard drive and essentially shutting down—the benefit being that bringing your PC back up is much quicker than bringing it up from a fully off state. That’s where the hiberfil.sys file comes in—Windows writes the information in memory to that file.
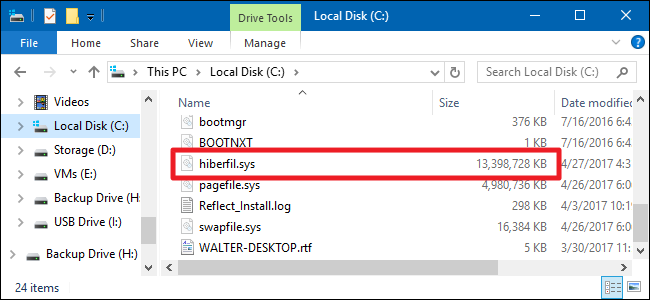
While we recommend using sleep or hibernation instead of shutting down your PC in most cases, we understand that many people simply prefer shutting down. In that case, disabling hibernate mode on your PC will allow you to delete that file and reclaim valuable disk space. And the file can use up quite a bit of space. How much depends on the amount of memory installed in your PC. In our example, the hiberfil.sys file is using a whopping 13 GB of disk space.
Disable Hibernate Mode in Windows 10, 8, 7, or Vista
The technique for disabling hibernate mode is pretty much the same in Windows 10, 8, 7, and Vista. You’ll need to use the Command Prompt in administrative mode to get it done, but it’s just one simple command. Disabling hibernate mode automatically deletes the hiberfil.sys file.
Open Command Prompt by first hitting Start and typing «command prompt.» When you see the Command Prompt app pop up, right-click it, and then choose «Run as administrator.»
At the prompt, type the following command and then press Enter:
powercfg -h off
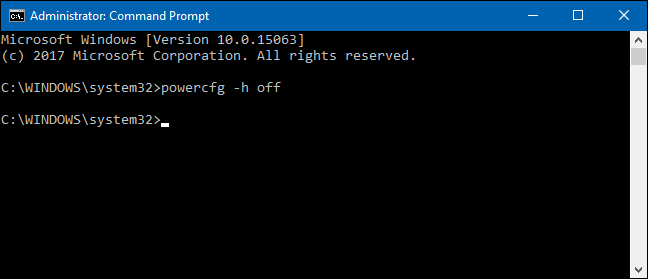
This command immediately disables hibernate mode, so you’ll notice it’s no longer an option from your shut down menu. And, if you visit File Explorer again, you’ll see that the hiberfil.sys file has been deleted and all that disk space is yours once again.
If you change your mind and would like to enable hibernate mode again, just revisit the Command Prompt and use this command:
powercfg -h on
The Hibernate command should be available to you once again and Windows will recreate the hiberfil.sys file.
Disable Hibernate Mode in Windows XP
Disabling hibernate mode in Windows XP is a little different than in later versions of Windows. First, head to Control Panel > Power Options. In the Power Options properties window, switch to the «Hibernate» tab and disable the «Enable hibernation» option.
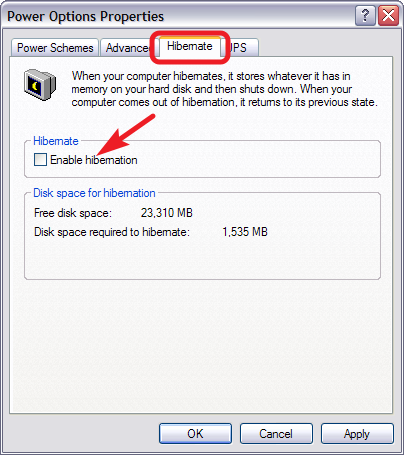
After you disable hibernate mode, restart your PC, and then you’ll need to manually delete the hiberfil.sys file.
Table of Contents
Reduce the Size of hiberfil.sys in Windows
The hiberfil.sys file in Windows is used to store the system’s hibernation state. It’s directly related to the amount of RAM in your system, and its size is usually around 75% of your installed RAM by default.
Reducing the size of hiberfil.sys can be done by adjusting the hibernation settings. You can use the powercfg command to reduce the size of hiberfil.sys.
1. Right-click on the Windows Start icon then open PowerShell (Terminal) as administrator.
To reduce the size of the hibernation file, use the following command:
powercfg /h /type reducedAfter executing the command, restart your computer for the changes to take effect.
Disable Hibernation Completely (Optional)
If you don’t use hibernation at all, you can disable it entirely, which will delete the hiberfil.sys file:
1. Open PowerShell as Administrator (same as above).
2. Use the following command to disable hibernation completely:
3. Restart your computer: This will remove the hiberfil.sys file and free up the disk space it was using.
Not a reader? Watch this related video tutorial:
Related Titles:
- How to Shrink hiberfil.sys File in Windows
- Free Up Disk Space by Reducing hiberfil.sys Size
- Windows Hibernation File Too Large? Here’s How to Reduce It
- Complete Guide to Managing hiberfil.sys File Size
- Optimize Windows Performance by Resizing hiberfil.sys
- Step-by-Step Guide to Reducing hiberfil.sys Size
- How to Delete hiberfil.sys and Free Up Space
- Resize hiberfil.sys for More Disk Space in Windows
- Easy Method to Reduce Hibernation File Size in Windows
- How to Customize the Size of hiberfil.sys in Windows
- Windows hiberfil.sys File Management: Resize or Delete
- Free Disk Space: How to Reduce hiberfil.sys Size
- How to Manage hiberfil.sys Size in Windows 10/11
- Disable or Reduce hiberfil.sys File on Windows PC
- How to Resize hiberfil.sys Using Command Prompt
Keywords:
hiberfil.sys, reduce hiberfil.sys size, delete hiberfil.sys, free up disk space, Windows hibernation file, Windows performance optimization, resize hiberfil.sys, Command Prompt hiberfil.sys, manage hiberfil.sys, Windows 10, Windows 11, hiberfil.sys too large, hiberfil.sys size reduction, disable hibernation, tech guide, Windows tutorial
Hashtags:
#hiberfilsys #WindowsTutorial #PCOptimization #TechGuide #FreeUpSpace #WindowsTips #HibernationFile #Windows10 #Windows11 #TechHowTo #OptimizeWindows #ComputerTips #TechHelp #bonguides