
HDR в Windows часто выглядит размытым и неприятным, будь то в игре или на рабочем столе. В результате большинство людей, вероятно, включают HDR один раз, отводят глаза в ужасе, а затем больше никогда не обращаются к этой функции. Но так не должно быть! Есть некоторые вещи, которые вы можете сделать, чтобы получить достойное HDR-изображение.
Как включить HDR в Windows
Раньше включение и выключение HDR было довольно трудоемкой задачей в Windows. Однако если ваша версия Windows обновлена, теперь для переключения HDR можно использовать простую комбинацию клавиш.
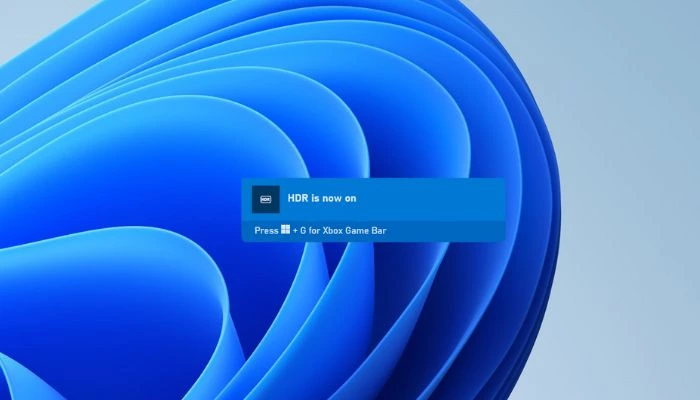
Нажмите Win + Alt + B в любое время, и HDR обязательно включится или выключится. В большинстве случаев экран будет мигать при смене режимов, а экранный дисплей (OSD) сообщит вам, что HDR включен или выключен.
Интересно: 3 способа создания загрузочного USB-накопителя Windows 11
Это сочетание клавиш решает большинство жалоб на использование HDR на компьютере под управлением Windows, поскольку основной проблемой является плохое отображение SDR-контента. Именно поэтому никто не хочет оставлять HDR включенным во время работы на рабочем столе или копаться в куче меню и настроек при каждом запуске игры.
Просто имейте в виду, что для большинства игр, использующих HDR, вам нужно включить его до запуска программы. Это может быть справедливо и для других типов приложений, использующих HDR. Некоторые игры автоматически включают HDR при запуске, но такие игры встречаются относительно редко.
Регулировка SDR-контента в режиме HDR
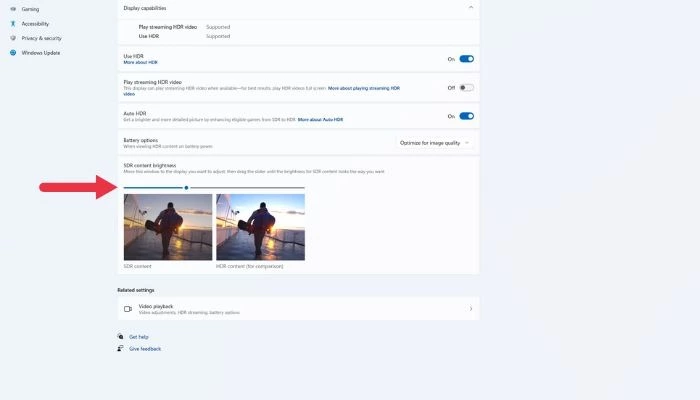
Если SDR-контент выглядит размытым или слишком темным при включенном HDR, вы можете отрегулировать относительную яркость этого контента, не затрагивая HDR-контент.
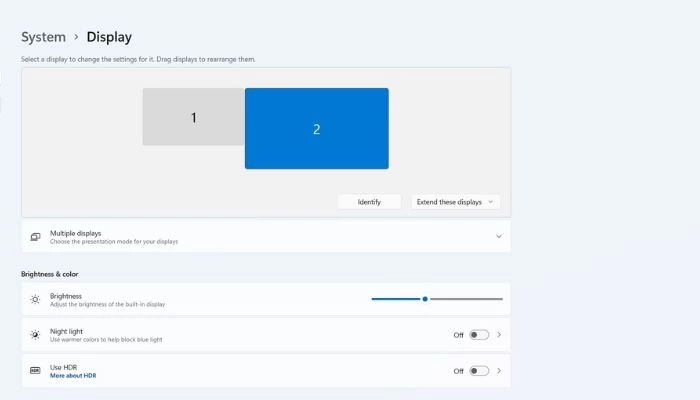
- На вашем ПК перейдите в «Пуск -> Настройки -> Система -> Дисплей.»

- Выберите монитор, который вы хотите настроить. Если у вас подключен только один монитор, этот шаг можно пропустить.
- Если HDR еще не включен, установите переключатель рядом с «Использовать HDR»; в противном случае нажмите на слово «HDR», чтобы продолжить.
- В разделе «Яркость SDR-контента» перетащите ползунок, как показано в окне примера, пока вас не устроит внешний вид SDR— и HDR-контента.
- Если вам удается добиться удовлетворительного вида SDR-контента в режиме HDR, вы можете оставить HDR включенным постоянно.

Проверьте настройки монитора
Если регулировка внешнего вида SDR-контента при активированном HDR не позволяет добиться нужного качества изображения, возможно, вам потребуется изменить настройки монитора в дополнение к настройкам, доступным в Windows.
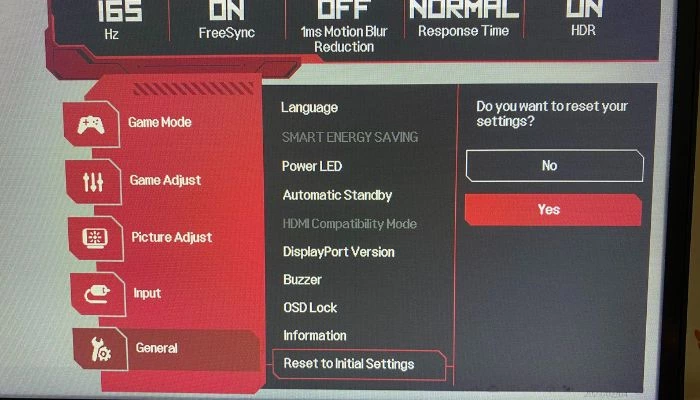
Для начала стоит сбросить настройки изображения на стандартные. Если это не очевидно из экранного меню монитора, обратитесь к его руководству за инструкциями.
Вернитесь к ползунку SDR/HDR в настройках Windows и отрегулируйте его как можно ближе к желаемому уровню.
После этого отрегулируйте настройки яркости, контрастности и цвета монитора, чтобы пройти оставшийся путь.
Проверьте настройки HDR в приложении
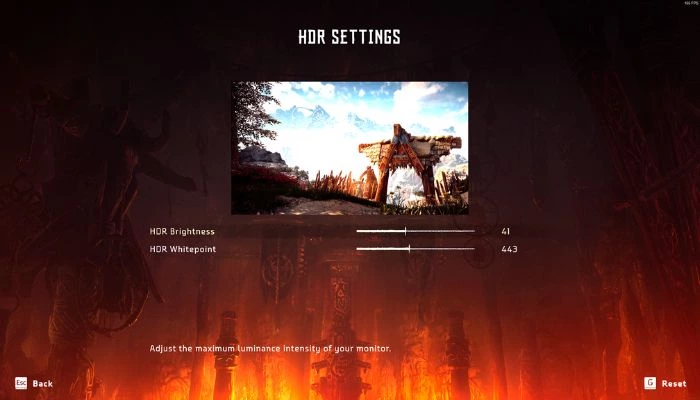
Многие игры и некоторые приложения для мультимедиа имеют свои собственные инструменты калибровки HDR. Обычно там есть образец изображения и элементы управления, позволяющие настроить пиковую яркость, уровни серого и т.д.
.
Если игра с поддержкой HDR выглядит неправильно, откройте ее графические настройки и проверьте параметры HDR, а затем следуйте инструкциям в этом меню, чтобы получить изображение, задуманное создателем.
Используйте приложения Auto HDR
Если вы используете Windows 11, у вас есть доступ к функции, известной как «Auto HDR». Это та же функция, что и в последних консолях Xbox. По сути, Windows вводит данные изображения HDR в конвейер рендеринга игры, предлагая очень HDR-подобное изображение, которое могло бы быть таким, как выглядит игра, если бы она была разработана для HDR изначально.
По умолчанию Auto HDR активируется, когда вы включаете HDR. Однако вы можете вручную отключить его в том же меню HDR, где вы настраивали ползунок SDR-изображения.
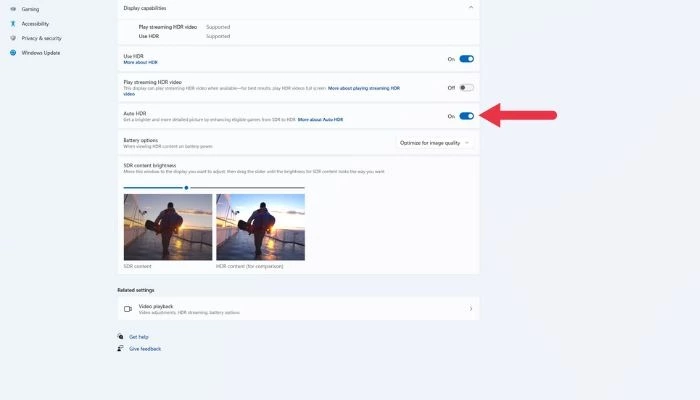
Чтобы воспользоваться преимуществами Auto HDR, не нужно делать ничего особенного. Если функция HDR включена, Windows 11 автоматически применит Auto HDR к играм, которые ее поддерживают. Что касается того, какие игры поддерживают эту функцию, то это меняется со временем. PC Gaming Wiki поддерживает список Auto HDR Games, но вы также можете просто запустить игру без HDR с включенным HDR, и Windows сообщит вам, включен ли Auto HDR, во всплывающем окне.
Не думайте, что раз некоторые SDR-игры выглядят плохо с включенным HDR, то все они будут выглядеть плохо. В большинстве случаев Auto HDR выглядит просто великолепно!
Плохая производительность HDR
Если вы использовали все вышеупомянутые настройки, а HDR по-прежнему выглядит ужасно по сравнению с выключенным HDR, скорее всего, HDR-возможности вашего монитора просто не очень хороши.
Это может быть тяжелой пилюлей, особенно если вы потратили значительную сумму на отличный игровой монитор или монитор для создания контента. К сожалению, основные стандарты HDR настолько нечеткие, что многие мониторы технически могут заявлять о поддержке HDR, хотя на самом деле они не могут достичь контрастности и яркости, необходимых для того, чтобы считаться настоящим HDR.

При поиске монитора, который будет отлично смотреться с HDR, вам нужно что-то с высокой пиковой яркостью (желательно 1000 нит или лучше) и технологией панели, которая может обеспечить достаточную контрастность. Это означает технологию подсветки с множеством отдельных зон затемнения или OLED, которая позволяет достичь истинно черного цвета, как технология эмиссионных дисплеев.
Мониторы, сертифицированные для более продвинутых стандартов HDR, таких как Dolby Vision или HDR10, заслуживают внимания, поскольку эти дисплеи должны пройти проверку, чтобы получить эти блестящие наклейки.
Часто задаваемые вопросы
Как HDR может быть полезен для настольных компьютеров, а не для просмотра фильмов или игр?
HDR – это технология, которая позволяет отображать более широкий диапазон цветов и более высокий коэффициент контрастности, что приводит к созданию более реалистичных изображений. Она может быть особенно полезна для настольных компьютеров при работе с изображениями высокого разрешения или редактировании видео, особенно при создании HDR-контента.
Может ли окружающее освещение улучшить HDR на моем компьютере?
Окружающее освещение, или освещение в комнате, где вы используете компьютер, может повлиять на восприятие HDR-контента на экране. В целом, лучше всего использовать компьютер в хорошо освещенной комнате с равномерным освещением, так как это поможет уменьшить блики и отражения на экране и облегчит восприятие всего спектра цветов и коэффициентов контрастности, которые может предложить HDR-контент.
Однако если окружающее освещение в комнате слишком яркое или неравномерное, оно может размыть цвета на вашем дисплее и затруднить восприятие всех преимуществ HDR. В таких случаях может быть полезно отрегулировать освещение в комнате или использовать защитный экран или бленду, чтобы уменьшить видимые блики.
Работает ли HDR с Gsync и другими подобными технологиями?
Да, контент с высоким динамическим диапазоном (HDR) можно отображать с помощью дисплеев G-Sync или аналогичных технологий. G-Sync – это технология, разработанная NVIDIA, которая помогает синхронизировать частоту обновления дисплея с частотой кадров отображаемого контента, уменьшая разрывы экрана и улучшая общее визуальное восприятие.
Чтобы использовать HDR с G-Sync или аналогичными технологиями, дисплей и видеокарта должны поддерживать HDR, а дисплей должен быть настроен на прием HDR-входа. Обычно это включает включение HDR в настройках дисплея и, в некоторых случаях, подключение HDR-совместимого кабеля.
(Image credit: Windows Central)
On Windows 10, you can play high dynamic range (HDR) content on an HDR10 compatible built-in display or external monitor (or TV) connected to your computer.
HDR is a technology that has been designed to improve the contrast and color of the content you see on the screen. Unlike standard dynamic range (SDR), high dynamic range offers brighter, more vibrant, and a wide range of color details for better image quality on supported videos, games, and apps.
Although on capable smart TVs, the HDR technology just works, on desktop computers and laptops running Windows 10, it’s not that simple. You have to make sure that your device meets the minimum requirements. You have to turn on HDR on display and the OS manually, and you may come across several problems.
In this Windows 10 guide, we’ll walk you through the steps to resolve common problems using HDR displays for games and apps.
- How to fix HDR display not working on Windows 10
- How to fix HDR option not available on Windows 10
- How to fix HDR color not showing correctly on Windows 10
- How to fix HDR color problems with night light on Windows 10
- How to fix HDR brightness problems on Windows 10
- How to fix SDR brightness problems on HDR display on Windows 10
How to fix HDR display not working on Windows 10
Before you can start using your display for HDR content, you have to make sure the display is HDR-compatible, and you have to enable the feature on the external display (if applicable) and on Windows 10.
Confirm HDR compatibility
To check if the display is capable of HDR content on Windows 10, use these steps:
- Open Start.
- Search for dxdiag and click the top result to open the app.
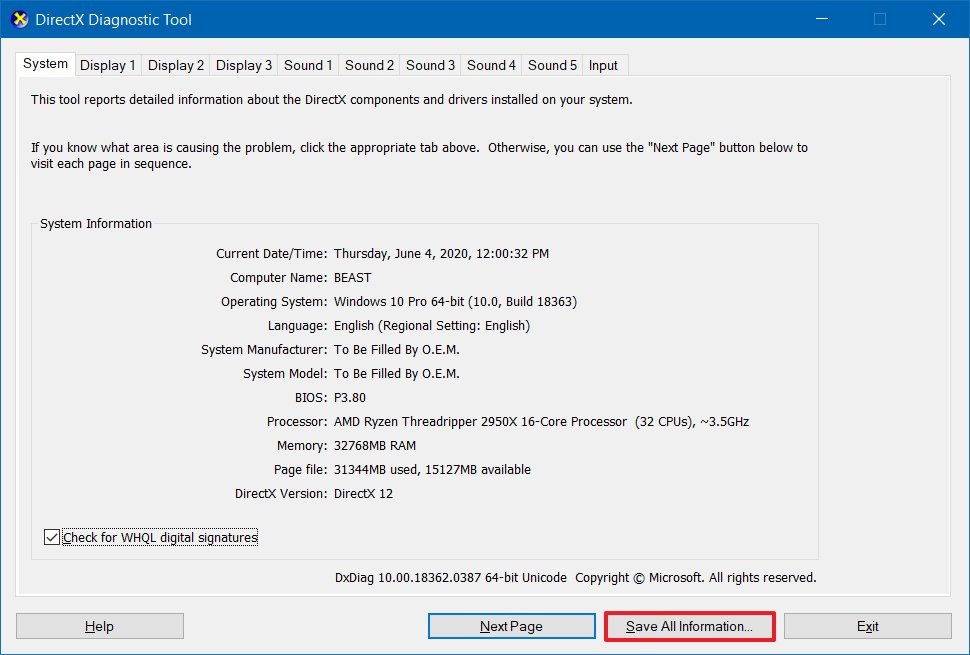
- Click the System tab.
- Click the Save All Information button.
- Select a location to save the output file.
- Click the Save button.
- Open the file with Notepad.
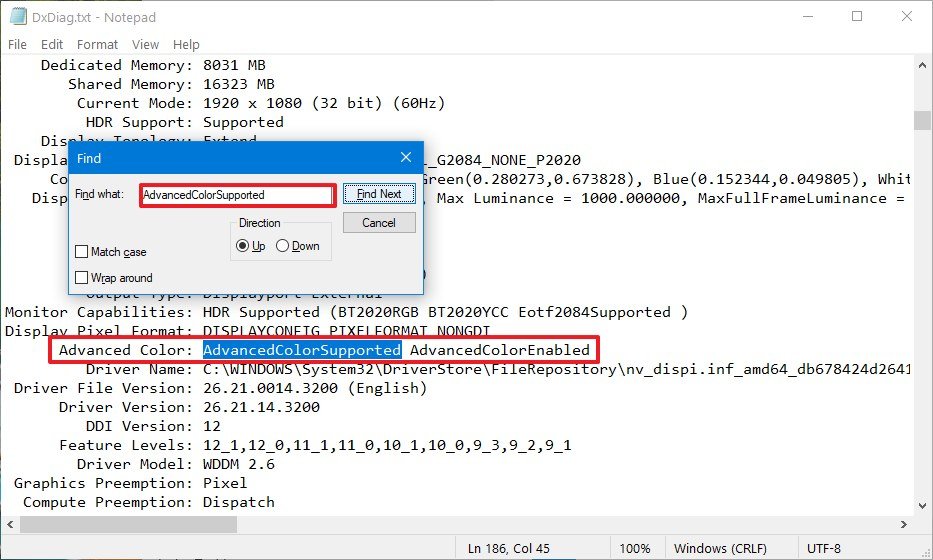
- Search for Advanced Color and determine if HDR is supported:
- AdvancedColorSupported – indicates display driver with support for HDR10 is installed.
- AdvancedColorEnabled – indicates that HDR is enabled.
Quick tip: To search on Notepad, use the Ctrl + F keyboard shortcut, type the search query in the «Find what» box, and click the Find Next button. You can also use the «Direction» option to look up or down from where you’re in the file.
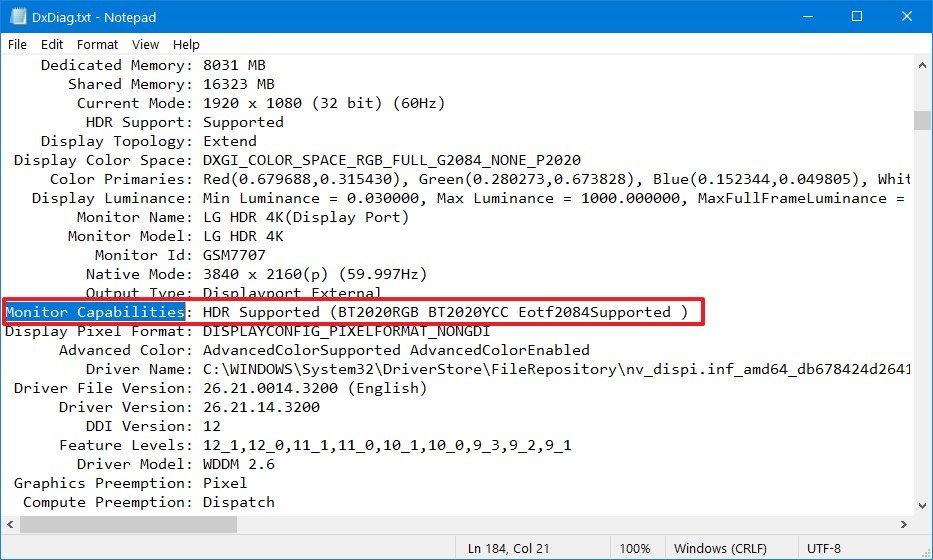
- Search for Monitor Capabilities and confirm it reads HDR Supported to determine that HDR10 is supported. If one or more requirements are missing, then you’ll see the HDR Not Supported message.Quick note: If you also see «BT2020RGB» or «BT2020YCC», then the panel is capable of HDR10, and the «Eotf2084Supported» indicates that the display is capable of HDR.
Once you complete the steps, you can check and enable high dynamic range on the screen and Windows 10.
All the latest news, reviews, and guides for Windows and Xbox diehards.
If the display isn’t ready for HDR, Microsoft recommends choosing from VESA Certified DisplayHDR displays.
Minimum requirements for HDR
The minimum requirements to stream HDR video on Windows 10 are:
On a laptop:
- The built-in display needs to have a minimum resolution of 1080p and a max brightness of 300 nits (more is better).
- The integrated graphics card has to have PlayReady support and codecs for 10-bit video decoding.
On a PC:
- The monitor has to support HDR10, and HDMI 2.0 or DisplayPort 1.4 or higher.
- The graphics card has to have PlayReady 3.0 support. For example, AMD Radeon RX 400 series or higher, NVIDIA GeForce 1000 series or higher, or Intel UHD Graphics 600 series or higher support the HDR requirements.
- Windows 10 must-have codecs for 10-bit video decoding and latest graphics drivers (WDDM) installed.
Enable HDR on display
If the panel isn’t showing HDR, then make sure to enable the feature on the peripheral.
The steps to enable HDR on a monitor is different per manufacturer and even per model. As a result, you’ll need to check your manufacturer support website for more specific details.
Enable HDR on Windows 10
In the case of Windows 10, you can enable HDR using these steps:
- Open Settings.
- Click on System.
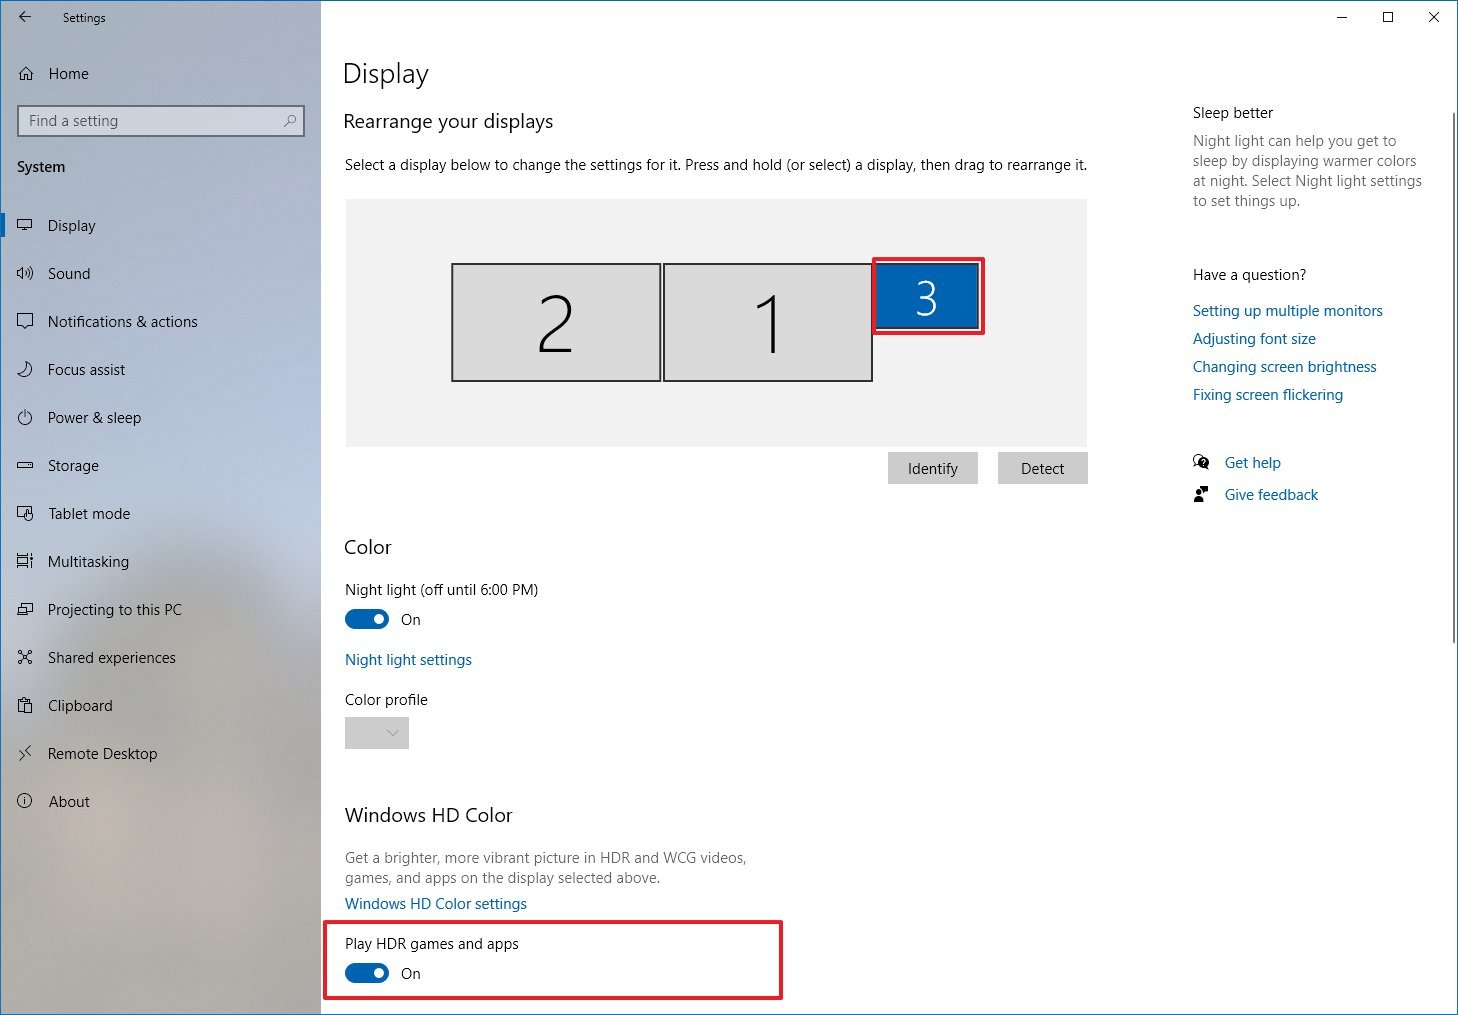
- Click on Display.
- Under the «Rearrange your displays» section, select the external monitor.
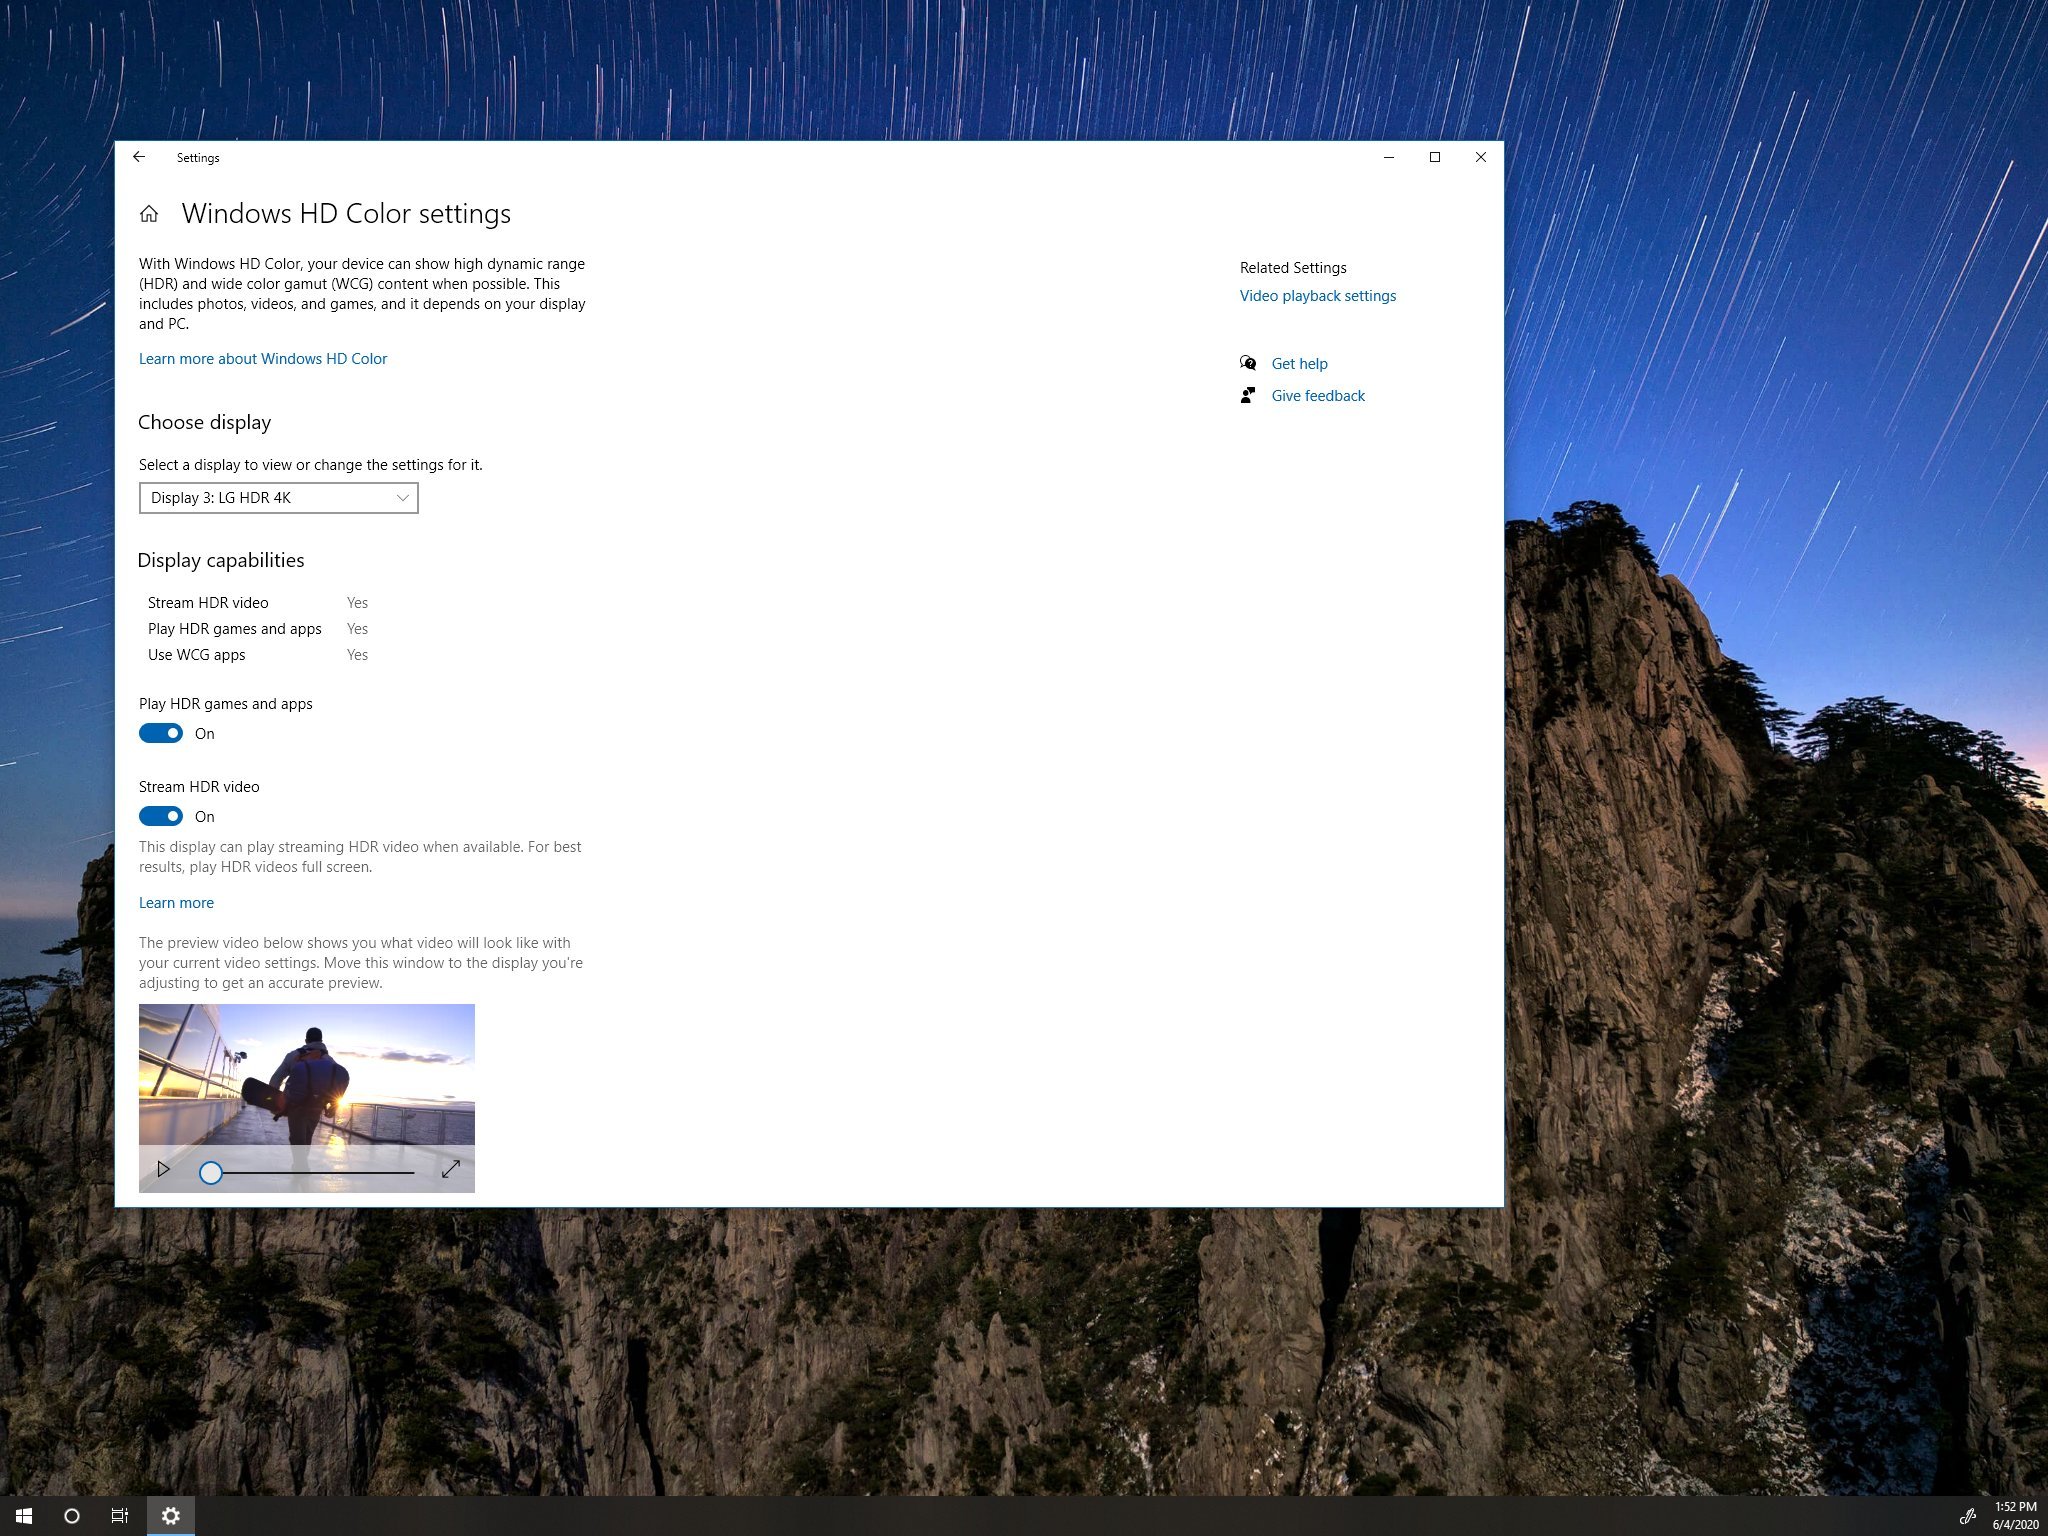
- Under the «Windows HD Color» section, turn on the Play HDR games and apps toggle switch.
After you complete the steps, HDR will enable allowing you to play compatible games and apps.
How to fix HDR option not available on Windows 10
When trying to turn on high dynamic range from the Windows HD Color settings, you might see the option. However, it’ll appear grayed out. Or the option won’t be available after connecting an external HDR-capable monitor.
Multi-monitor setup HDR not available
If you connected an external HDR display, and you don’t see the option to enable HDR in the Windows HD Color settings, then it is likely because Windows 10 is duplicating the desktop on both screens, which is not a supported configuration.
To play HDR content on the external monitor, use these steps:
- Open Settings.
- Click on System.
- Click on Display.
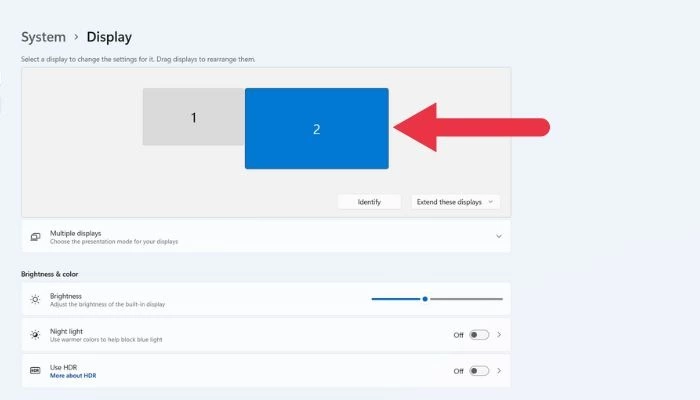
- Under the «Rearrange your displays» section, select the external monitor.
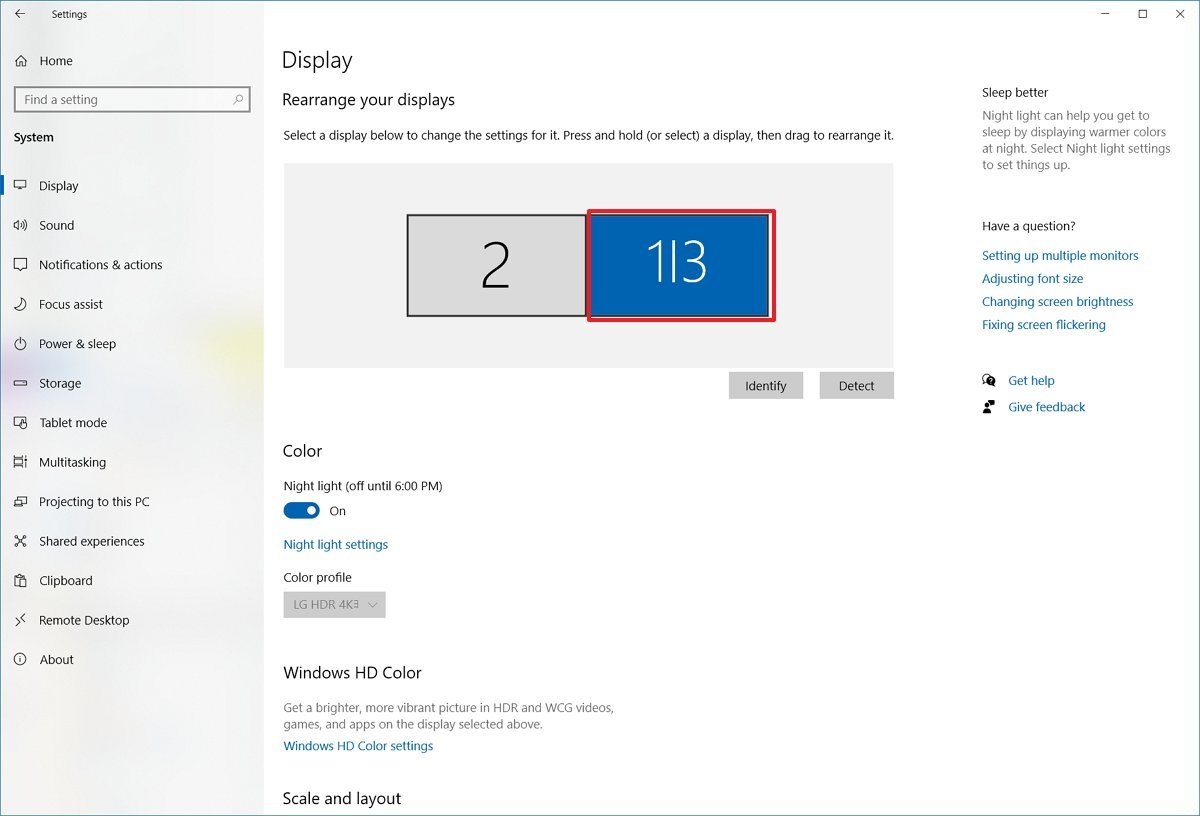
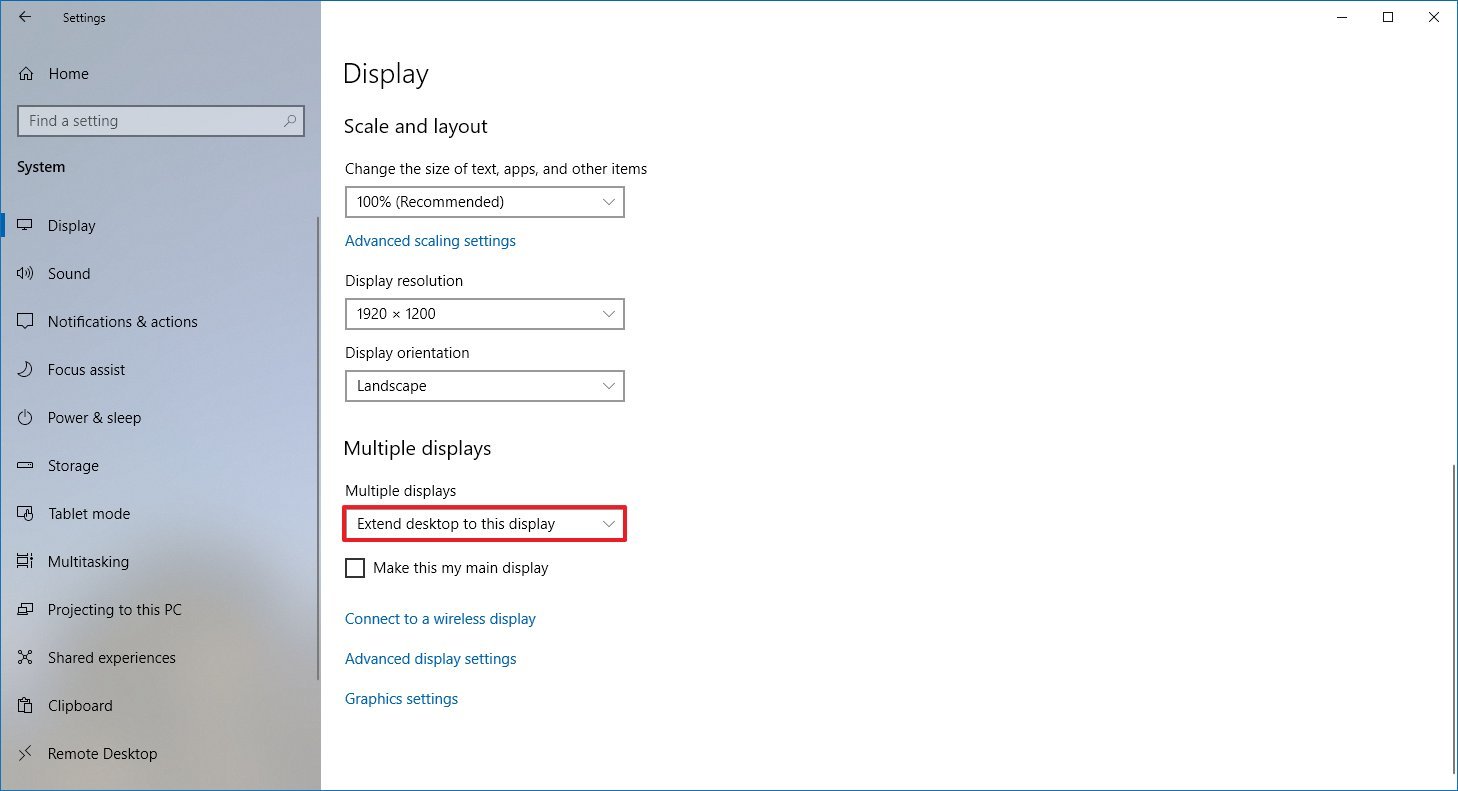
- Under the «Multiple displays» section, select the Extend these displays option.
- Click the Windows HD Color settings option.
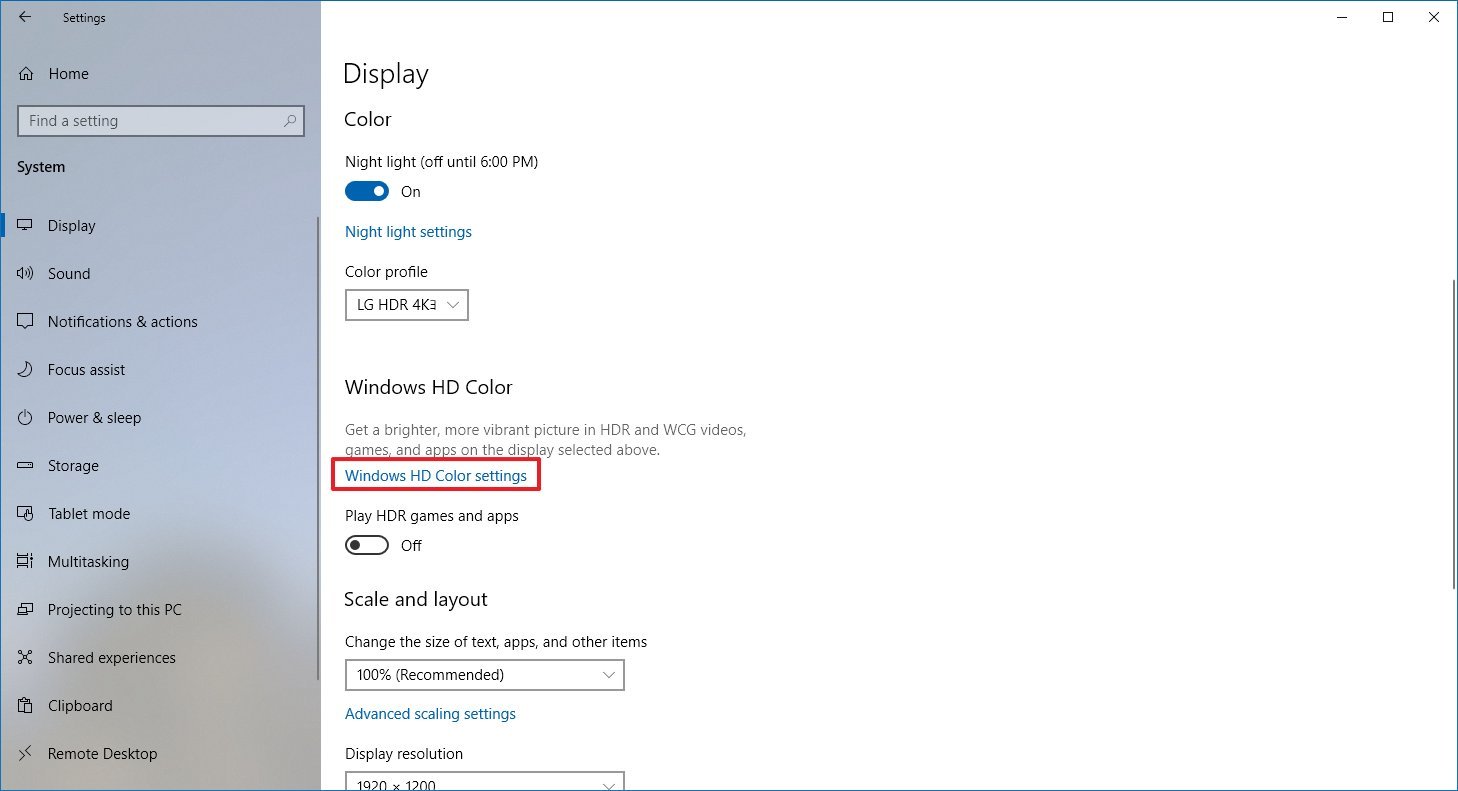
- Turn on the Play HDR games and apps toggle switch.
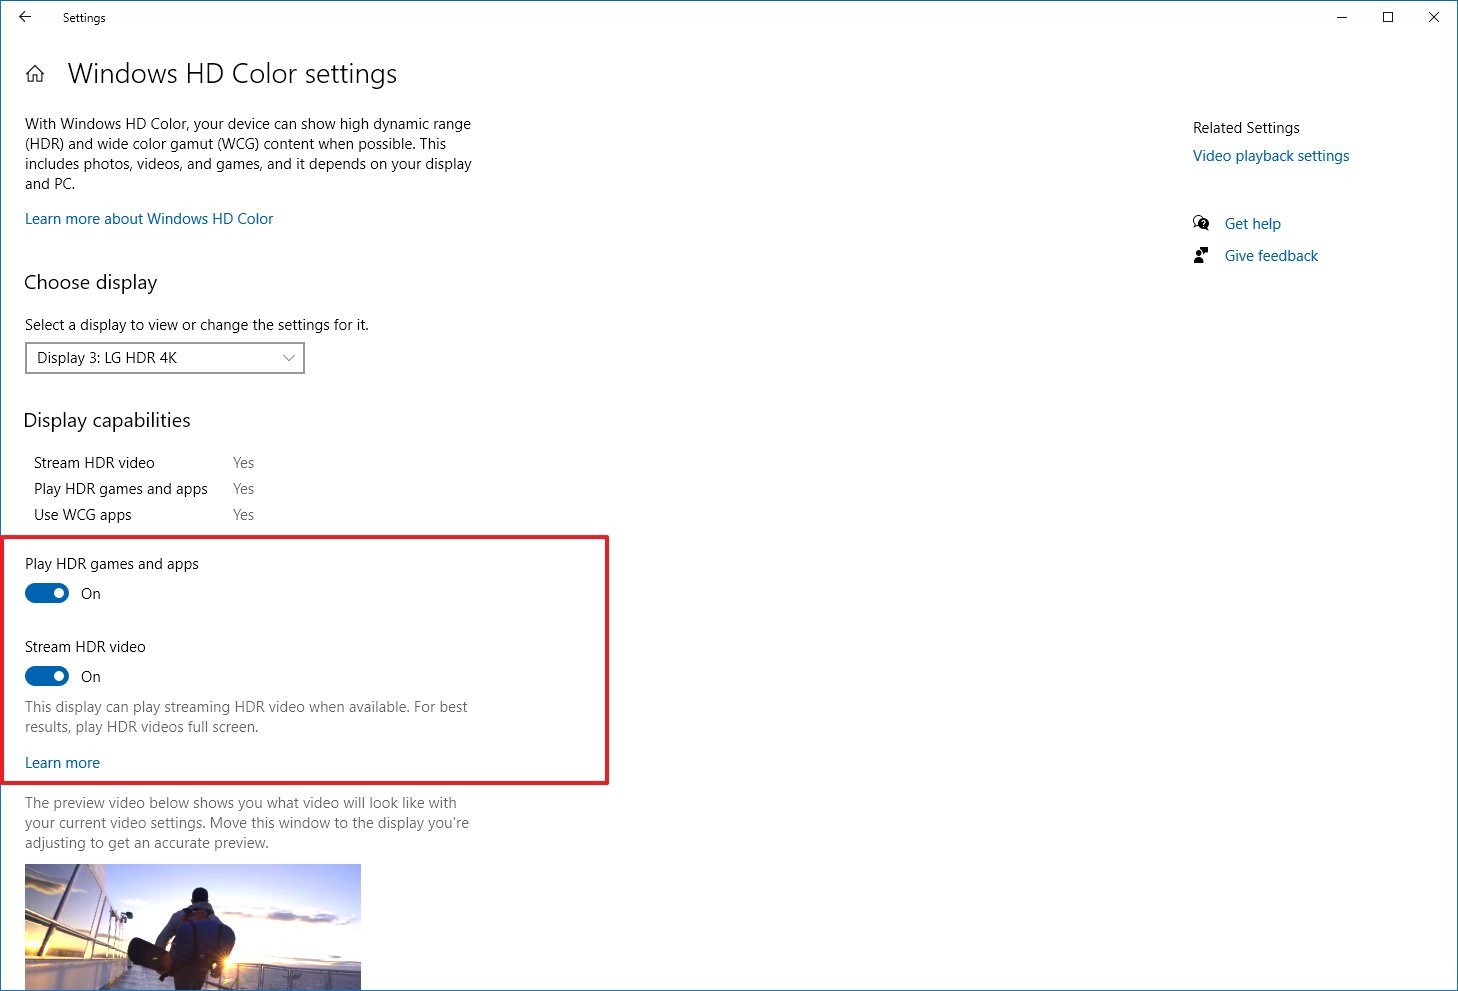
- Turn on the Stream HDR video toggle switch (if applicable).
Once you complete the steps, you should now be able to turn on the monitor’s HDR feature.
Grayed-out HDR option
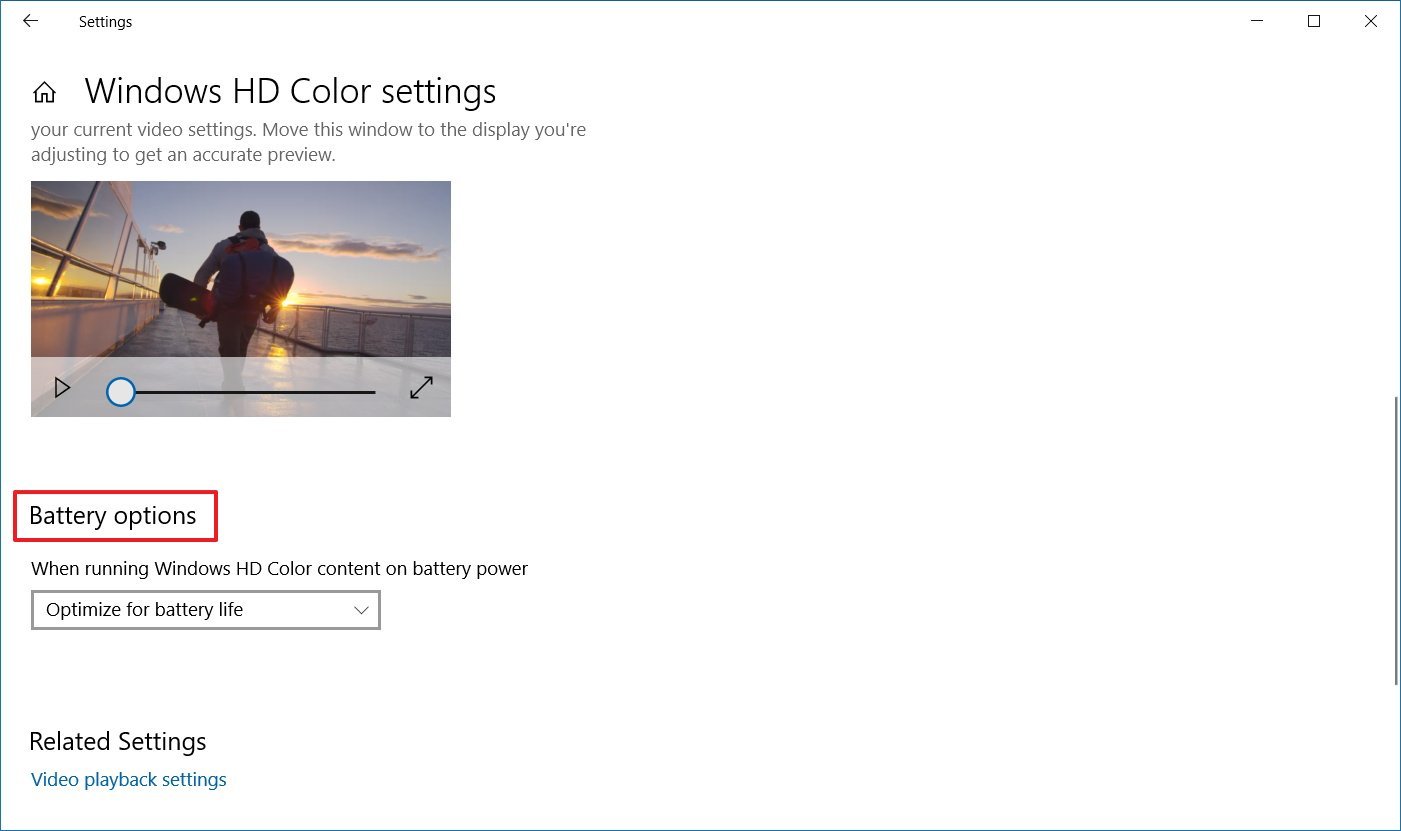
If the Windows HD Color settings page shows that the built-in display of a laptop with support for HDR, but the option to enable the feature isn’t accessible, then it’s because the power default settings are disabling HDR when running on battery.
To resolve this issue, connect the laptop to a power source, or change the settings to allow HDR content to play while on battery.
To turn on HDR while a laptop is running on battery, use these steps:
- Open Settings.
- Click on System.
- Click on Display.
- Click the Windows HD Color settings option.
- Under the «Battery options» section, clear the Don’t allow HDR games and apps on battery option.Quick note: If you don’t see the option, the feature isn’t available on the device.
After you complete the steps, you should be able to turn on HDR on the laptop.
How to fix HDR color not showing correctly on Windows 10
When using an HDR display on a desktop computer, you may see problems displaying colors. For example, black text not rendering correctly on a white background.
If you’re experiencing color problems with an external monitor, you should check your computer to determine if the latest graphics driver is installed. If you need assistance updating the video driver, you can use these steps.
It’s always recommended to use a DisplayPort connection to connect an HDR monitor instead of an HDMI connection.
If you’re stuck with an HDMI connection, you can reduce the frame rate to 30Hz with these steps:
- Open Settings.
- Click on System.
- Click on Display.
- Click the Advanced display settings option.
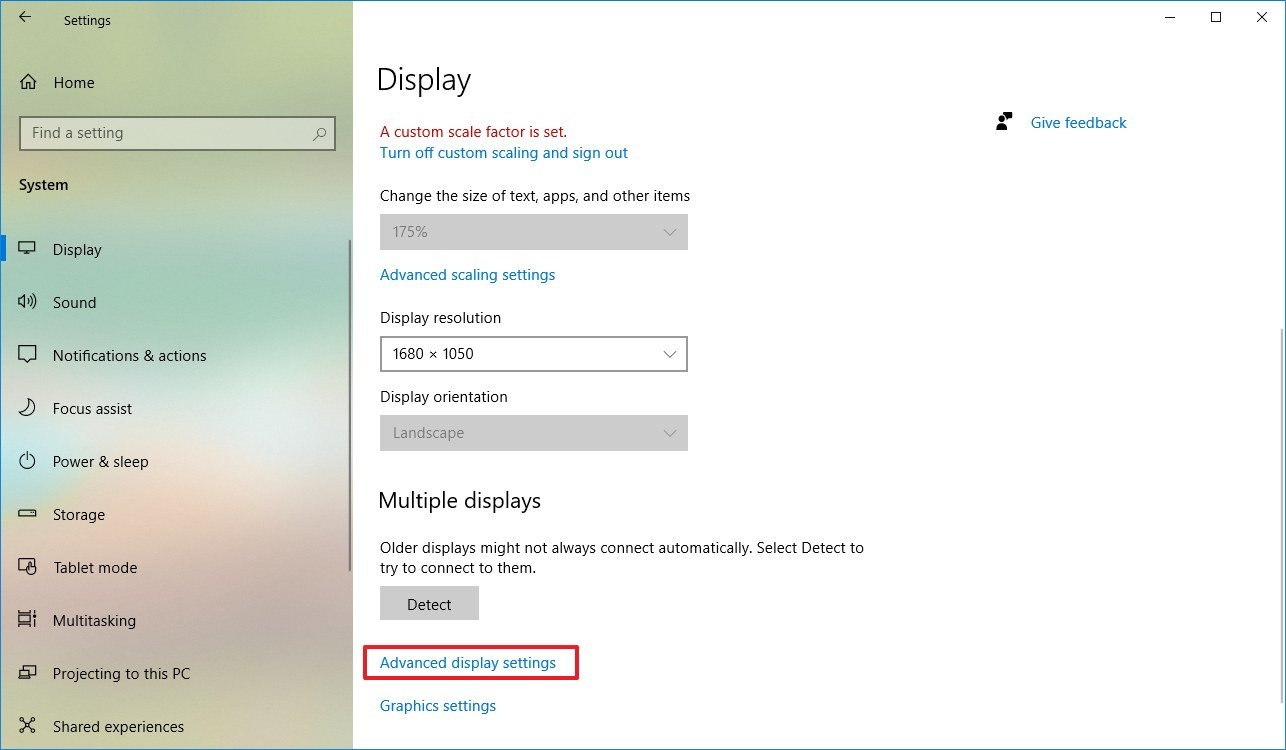
- Click the Display adapter properties option.
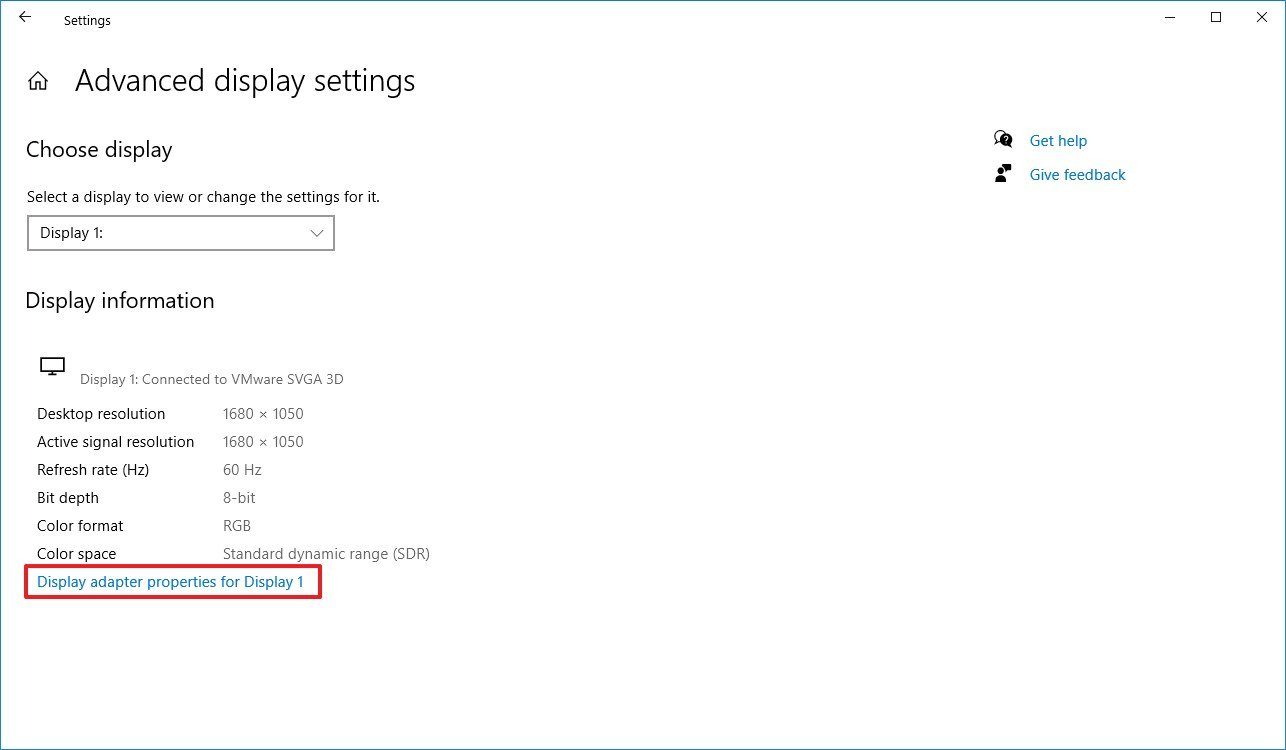
- Click the Monitor tab.
- Use the «Screen refresh rate» drop-down menu and select the 30 Hertz option (if available).
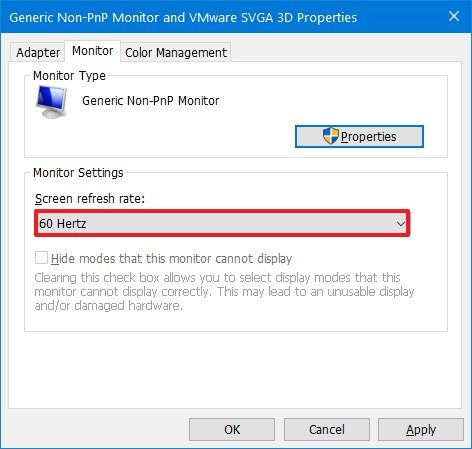
- Click the Apply button.
- Click the OK button.
Once you complete the steps, the HDR display will start rendering colors more accurately.
How to fix HDR color problems with night light on Windows 10
On Windows 10, if the night light feature is enabled, colors on the screen may look red tint making content unreadable.
The solution is to adjust the night light strength or disable the feature when using HDR content with these steps:
- Open Settings.
- Click on System.
- Click on Display.
- Click the Night light settings option.
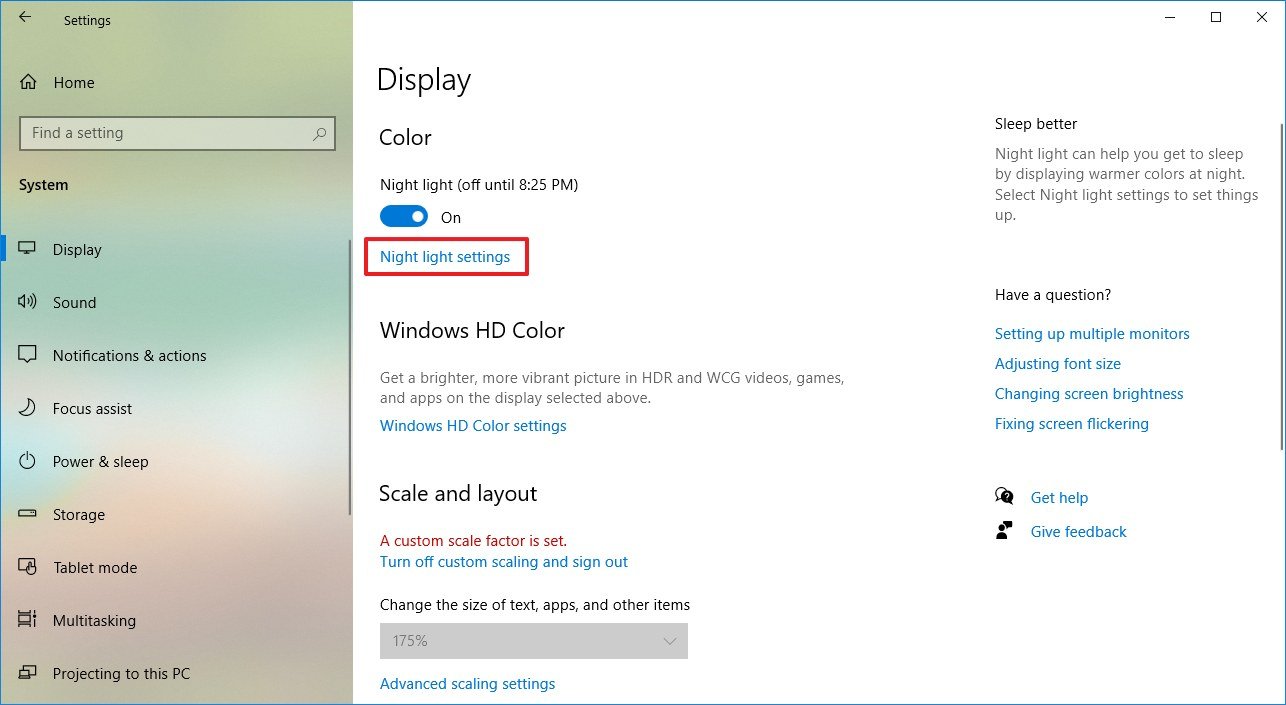
- Use the slider to minimize the strength of night light to improve HDR on Windows 10.
- (Optional) Click the Turn off now button.
After you complete the steps, content in the HDR display will not be readable, and without red tint, depending on the resolution you applied.
How to fix HDR brightness problems on Windows 10
When you use a laptop with an HDR screen, you may run into several brightness issues depending on how the system is configured and whether it’s plugged into a power source or running on battery.
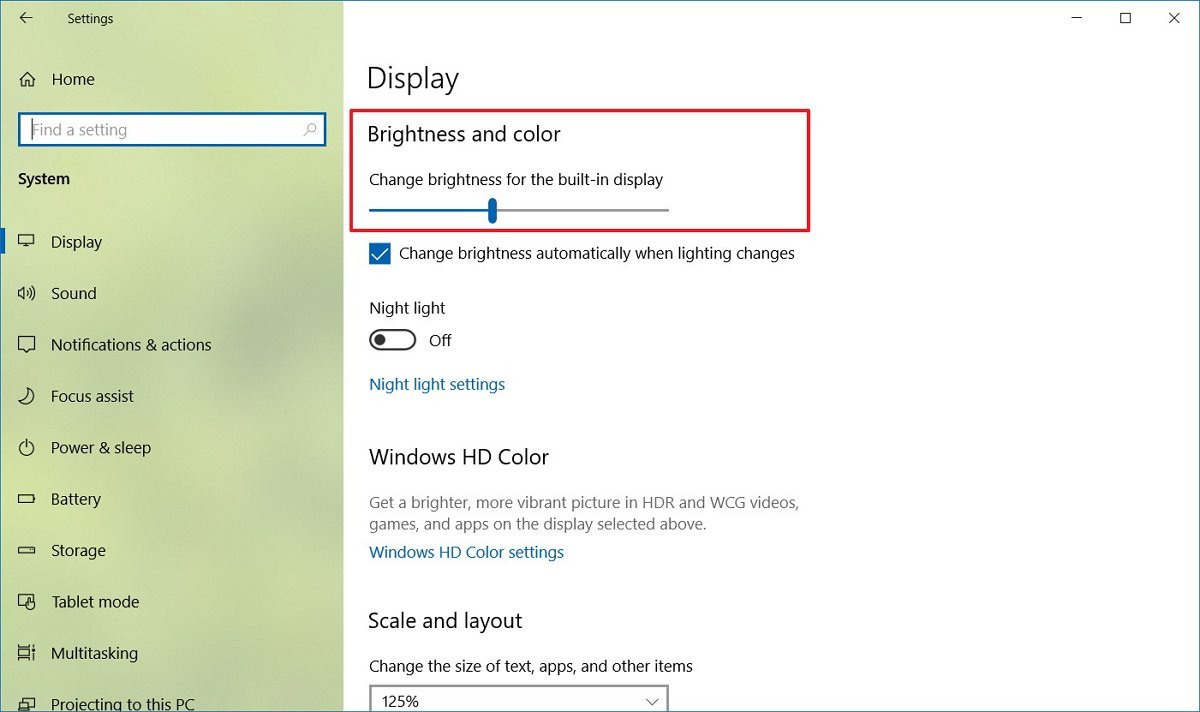
Laptop with battery saver on
In the case that the battery saver feature is enabled and brightness changes unexpectedly on a laptop, for example, a screen turns brighter or brightness level changes on wake when running on battery, then you’ll need to adjust the brightness settings manually.
To mitigate these issues, use these steps:
- Open Settings.
- Click on System.
- Click on Display.
- Use the «Brightness and color» slider to lower the brightness on the HDR screen.
Or if you see a sudden change of brightness level, you can disable battery saver feature on Windows 10 using these steps:
- Open Settings.
- Click on System.
- Click on Battery.
- Clear the Turn battery saver on automatically if my battery falls below option.
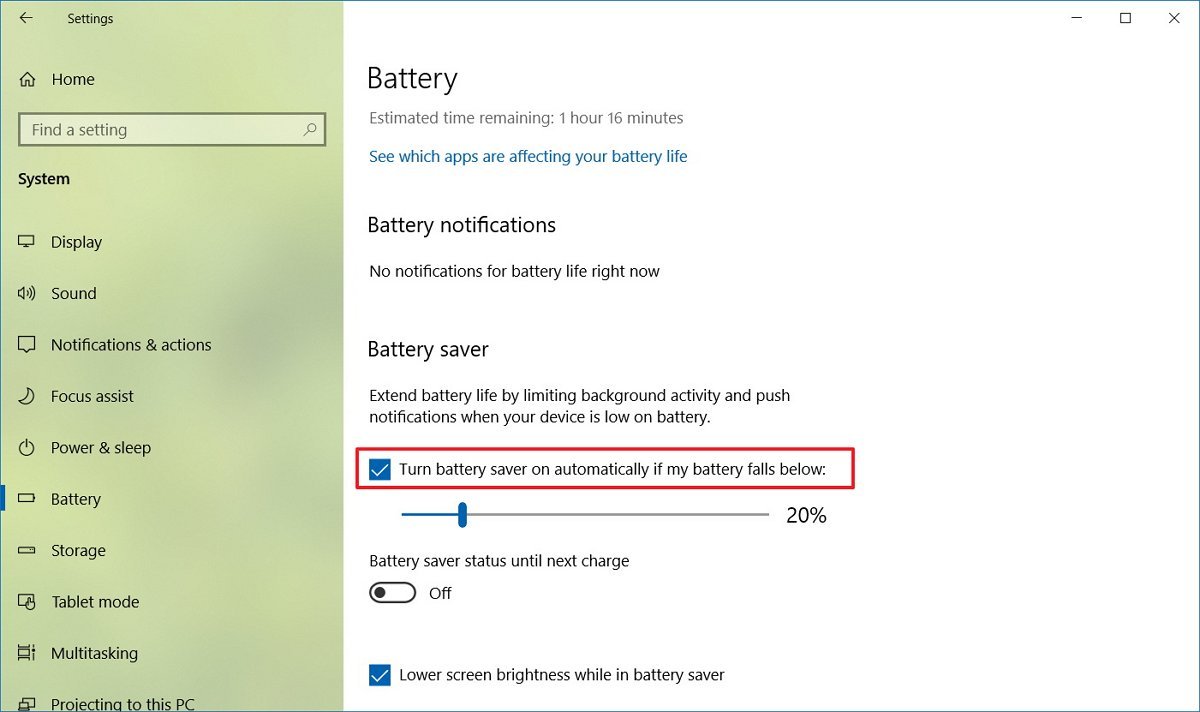
Once you complete the steps, the brightness problem due to the battery saver option should now be resolved.
Laptop with do nothing when closing lid
If you have the option to close the lid on a laptop to «Do nothing,» then you may experience lower brightness on the built-in HDR screen while the brightness setting still showing the level unchanged.
To resolve this issue set a different option for closing the lid with these steps:
- Open Settings.
- Click on System.
- Click on Power & sleep.
- Under the «Related settings» section, click the Additional power settings option.
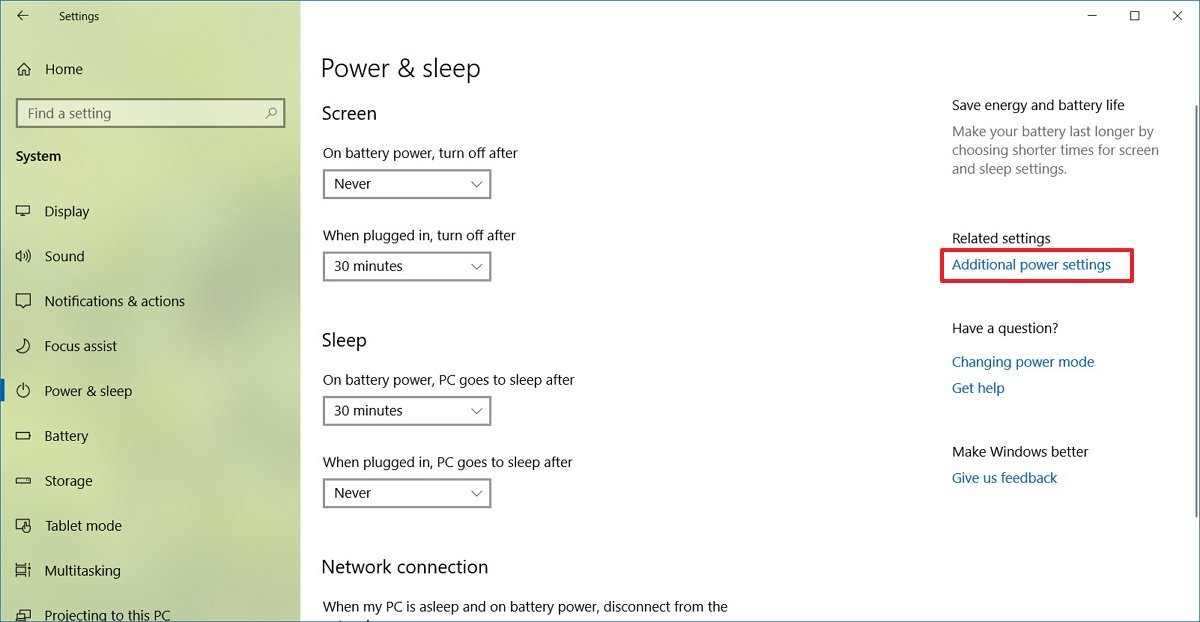
- Click the Choose what closing the lid does option from the left pane.

- Use the When I close the lid drop-down menus and select another option other than «Do nothing.»
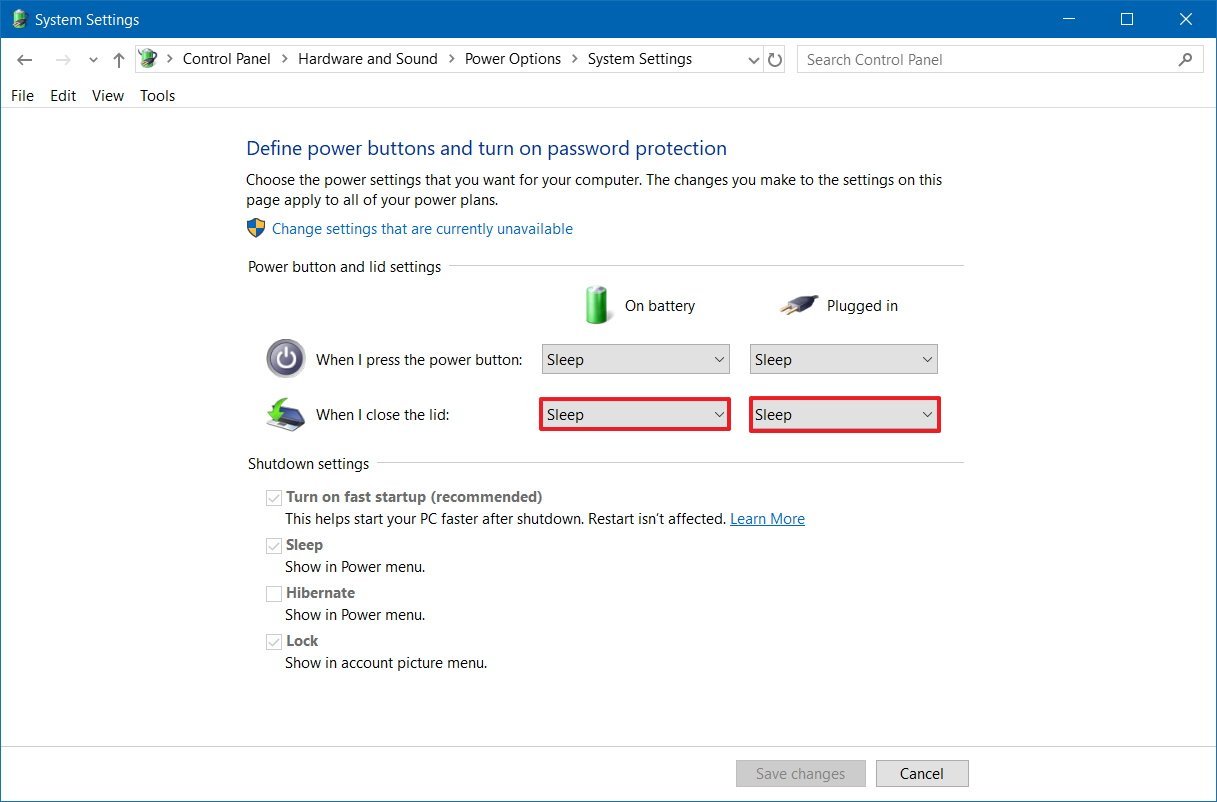
- Click the Save changes button.
Also, to correct the screen brightness, use these steps:
- Open Settings.
- Click on System.
- Click on Display.
- Use the «Brightness and color» slider to adjust the brightness to the desired level.
After you complete the steps, the brightness should no longer change when closing the laptop lid.
Laptop with switch from DC to AC power
On an HDR display, the brightness can suddenly change when switching from battery power to outlet power.
To resolve this issue simply adjust the brightness manually:
- Open Settings.
- Click on System.
- Click on Display.
- Use the «Brightness and color» slider to adjust the brightness on the HDR screen to the desired level.
Once you complete the steps, you may need to repeat the steps in the future, if you run into the same situation.
How to fix SDR brightness problems on HDR display on Windows 10
When you use an HDR display, standard dynamic range (SDR) content may appear with very low or very high brightness. This happens because displays identify SDR and HDR signals differently, which can cause brightness problems.
All SDR content and apps
To resolve this problem, you need to adjust the relative brightness with these steps:
- Open Settings.
- Click on System.
- Click on Display.
- Click the Windows HD Color settings option.
- Under the «Windows HD Color» section, use the SDR content appearance slider to adjust the brightness until you find the right balance.
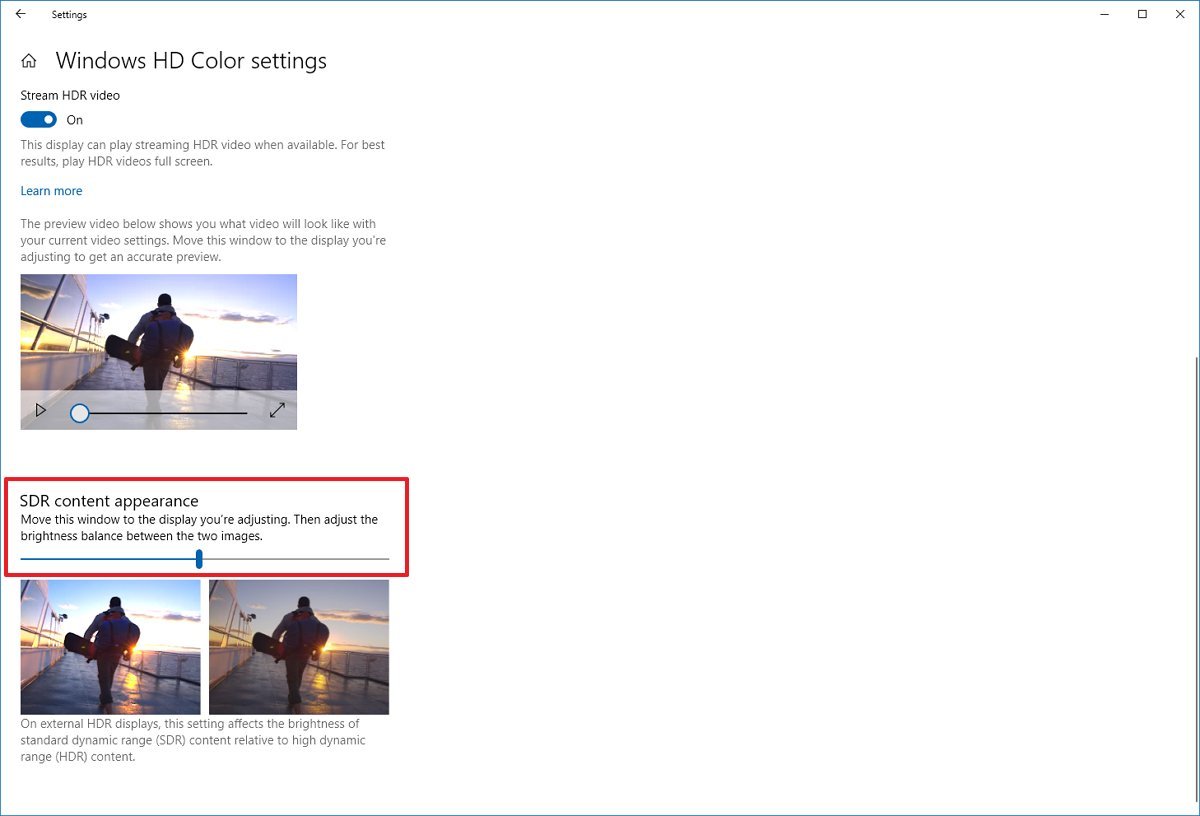
Once you complete the steps, SDR content should appear with an improved brightness level.
Some SDR apps appear darker
Sometimes, apps that haven’t been designed to work with the HDR brightness settings will cause them to appear darker on HDR displays.
One solution to this problem is to run the SDR apps on an SDR display. If you have a multi-monitor setup, you can disable HDR on one of the displays to make apps brighter.
If you have an HDR-compatible display, you can try lowering the SDR content appearance brightness level using these steps:
- Open Settings.
- Click on System.
- Click on Display.
- Click the Windows HD Color settings option.
- Under the «Windows HD Color» section, use the SDR content appearance slider to lower the brightness until the SDR content looks brighter.
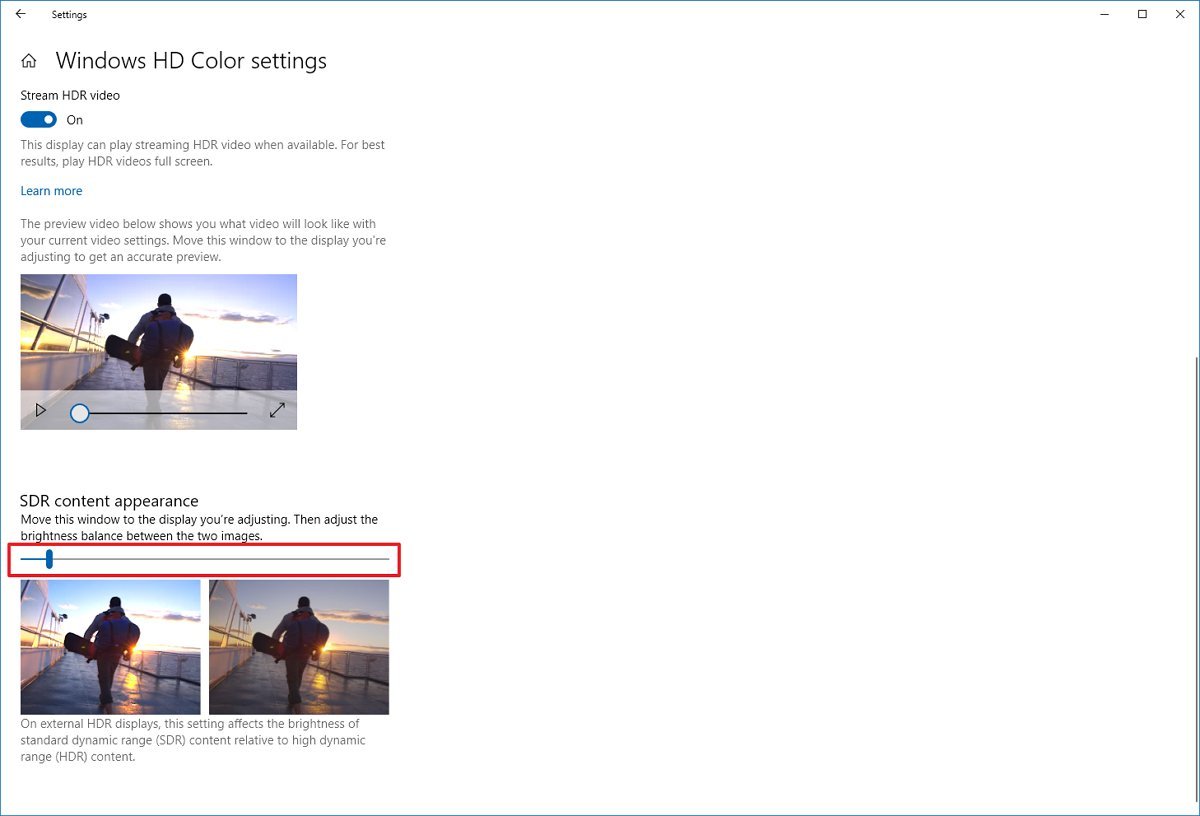
- (Optional) Use the monitor’s on-screen settings to increase the brightness to the preferred level.
After you complete the steps, apps should no longer look dimmed.
Mauro Huculak has been a Windows How-To Expert contributor for WindowsCentral.com for nearly a decade and has over 15 years of experience writing comprehensive guides. He also has an IT background and has achieved different professional certifications from Microsoft, Cisco, VMware, and CompTIA. He has been recognized as a Microsoft MVP for many years.
With HDR in Windows 11, you get the most of out your high dynamic range (HDR) TV or PC display. When you connect your HDR10-capable TV or display to a Windows PC that supports HDR and wide color gamut (WCG), you’ll get a brighter, more vibrant, and more detailed picture compared to a standard dynamic range (SDR) display.
The Microsoft Store contains a growing number of HDR apps and games. To find HDR games, visit the Microsoft Store online. To watch HDR movies and videos from online providers, you might need to change a few settings to get set up. To play HDR games and use HDR apps, your PC and display must meet certain hardware requirements. For detailed info, see Display requirements for HDR video.
If your PC and display support HDR, turn it on to get started.
-
Select the Start button, then enter settings. Select Settings > System > Display .
-
If you have multiple displays connected to your PC, choose the HDR-capable display at the top.
-
Turn on the option to Use HDR.
Power options for HDR-capable displays
Playing HDR content while running your laptop on battery can reduce battery life. Therefore, your PC manufacturer might have turned HDR off by default for when you’re running on battery.
If HDR is turned on when your laptop is plugged in, HDR will be turned off to help save battery power when you unplug it. If you plug in your laptop again, HDR will be turned on again automatically.
Note: The display may appear black temporarily when HDR turns on or off after you plug in or unplug your laptop.
-
Select the Start button, then enter settings. Select Settings > System > Display .
-
Select an HDR-capable display at the top of the screen.
-
Select HDR.
-
Select the Use HDR section to expand it, then deselect the Turn off HDR with my PC is running on battery check box or the Turn off HDR video streaming when my PC is running on battery check box.
If HDR was already turned on when your laptop is plugged in, HDR will now stay on if you unplug it and run on battery power.
Fixing common problems
Many HDR displays today are designed primarily for watching movies and videos in HDR mode. As a result, you might need to do some things to get the best results when using your HDR display in Windows. If you’re buying a new HDR display, we recommend looking for displays that are certified for HDR. These displays are designed and tested for a wide range of things you might do with HDR on a PC—including playing HDR games and using HDR apps.
If you’re having problems displaying HDR content from your PC, here are things you can try to fix them. Select any item, and it’ll open to display more information:
-
Make sure your display or TV has HDR turned on. The way you get to the on-screen menu on your HDR TV, or display varies by make and model. Check out the documentation for your display or TV by visiting the manufacturer’s website.
-
Go to Settings > System > Display and make sure Use HDR is turned on.
-
Make sure your Windows PC has the required hardware to display HDR and find out if your display supports HDR10. Here’s how to do that:
-
Press the Windows logo key + R, type dxdiag, and then select OK.
-
Select Yes at the prompt.
-
In the DirectX Diagnostic Tool, on the System tab, look in the System Information area.
-
To save the information to a file, select Save All Information, and then name and save the text file.
-
Open the text file and look at the value for Advanced Color. This provides info about your display’s HDR configuration and the status of it. Look for these values:
-
AdvancedColorSupported. This indicates that your installed display driver and display support HDR10.
-
AdvancedColorEnabled. This indicates that HDR is currently turned on for your display.
-
-
Look at the value for Monitor Capabilities. This provides more detailed info about the display’s capabilities.
-
If the value is HDR Supported, that indicates that your display supports HDR10. You might see additional values in parentheses.
-
BT2020RGB or BT2020YCC. One of these color spaces must appear for the display to be considered as an HDR10-capable display.
-
Eotf2084Supported. This value must appear for the display to be considered as an HDR-capable display.
-
-
If the value is HDR Not Supported, that indicates that the display is missing one or more requirements for HDR10.
-
-
On HDR-capable laptops, the default power settings will turn off HDR when running on battery power. To have HDR turn on, do one of the following:
-
Plug in your laptop (recommended).
-
Allow HDR video streaming when your PC is running on battery.
Note that allowing HDR when running on battery power will reduce battery life.
When you first connect an external display to a laptop, Windows will duplicate your desktop on both displays by default. However, HDR isn’t supported in this configuration. To view HDR content on the external HDR monitor or TV, extend your desktop across both displays:
-
Select the Start button, then enter settings. Select Settings > System > Display.
-
Near the top of the screen, select Extend these displays.
You might need to adjust the relative brightness of SDR and HDR content for your HDR-capable display. This is because a display interprets an HDR and SDR signal differently, and the results will vary by make and model.
-
Select the Start button, then enter settings. Select Settings > System > Display.
-
If you have multiple displays connected to your PC, select the HDR-capable display near the top of the screen, and then move the Settings app window to the HDR display that you’re adjusting
-
On the Display settings screen, select Use HDR.
-
Under SDR content brightness or HDR content brightness, drag the slider to get the right balance for brightness between HDR and SDR content.
Notes:
-
When you change the SDR content brightness setting for an external HDR display or HDR content brightness setting for a built-in HDR display, the effect it has on SDR content depends on whether it’s an external or built-in HDR-capable display:
-
On an external HDR display, this setting will change the brightness of SDR content relative to HDR content.
-
On a built-in HDR display, the brightness of SDR content is controlled by a separate brightness setting, or it might be controlled automatically. (For more info, see Change screen brightness in Windows.) Since the brightness of SDR content is already set, the HDR content brightness setting will change the brightness of HDR content relative to the brightness of SDR content.
-
-
For built-in HDR displays, such as on HDR-capable laptops, both the brightness setting and HDR content brightness setting will affect the appearance of HDR content.
-
Brightness setting. When viewing HDR content in a bright area, you might need to increase the brightness setting to see the display. However, this will reduce both the effective dynamic range for HDR content in apps and the overall contrast because the darker pixels will appear brighter. To improve the appearance of HDR content, view HDR content in a darker area and use a fairly low brightness setting. If the brightness is set to a very low level, that will increase the overall contrast between the brightest and darkest parts of the content. However, there will be less details in the darker parts of the content. For example, if you have a scene in a movie that shows a dimly lit room at night, you might see less details in that scene.
-
SDR content brightness or HDR content brightness setting. For most times, using the default SDR or HDR content brightness setting or one close to it should work well. You could set the SDR or HDR content brightness setting higher to help improve the overall contrast between the brightest and darkest parts of the content. However, this would reduce the details in the darker parts of the content, such as a scene in a dark room at night.
-
Some SDR apps appear darker on an HDR display compared to other SDR apps shown on the same display. This can happen with apps that don’t work with the SDR content brightness or HDR content brightness setting. Here are some things to try to fix this:
-
If you have multiple displays set up with both SDR and HDR displays, move the app to the SDR display.
-
If you’re using an external HDR display, move the SDR content brightness slider to a lower setting. This will make the brighter SDR content appear darker, so all the SDR content appears at a similar brightness level. Afterwards, use the on-screen menu on your HDR TV or display to increase the brightness to the level you want.
Note: If you adjust the SDR or HDR content brightness setting but the brightness of SDR content in some apps doesn’t change, try restarting the app.
-
If you’re using a laptop with an HDR-capable built-in display, move the HDR content brightness slider to a lower setting. This will make the app that appears too dark brighter, so all SDR apps have a similar brightness level.
Note: If you change the SDR content brightness or HDR content brightness setting but the brightness of some apps doesn’t change, or if the SDR content appears too bright and desaturated, try restarting the app.
-
Make sure you have the latest graphics drivers (WDDM) installed. To get the latest drivers, go to Windows Update in Settings, or check your PC manufacturer’s website.
-
If you’re using an HDMI connection and your display supports HDR over a DisplayPort connection, use DisplayPort instead to connect your PC and display.
-
If HDMI is your only option, use that, and then do one of the following:
Reduce the refresh rate
-
In Settings, select System > Display > Advanced display.
-
In Advanced display settings, for Choose a refresh rate, select 30 Hz (if it’s available).
— OR —
Reduce the resolution
-
In Settings, Select System > Display > Advanced display, and then select Display adapter properties.
-
On the Adapter tab, select List All Modes.
-
In List All Modes, select the setting that includes 1920 by 1080, 60 Hertz, then select OK.
On HDR-capable laptops, the default power settings will turn off HDR when running on battery power. This can cause under-saturated colors after restarting your PC. To avoid this, plug in your laptop before restarting it, or change the power settings to keep HDR on when running on battery.
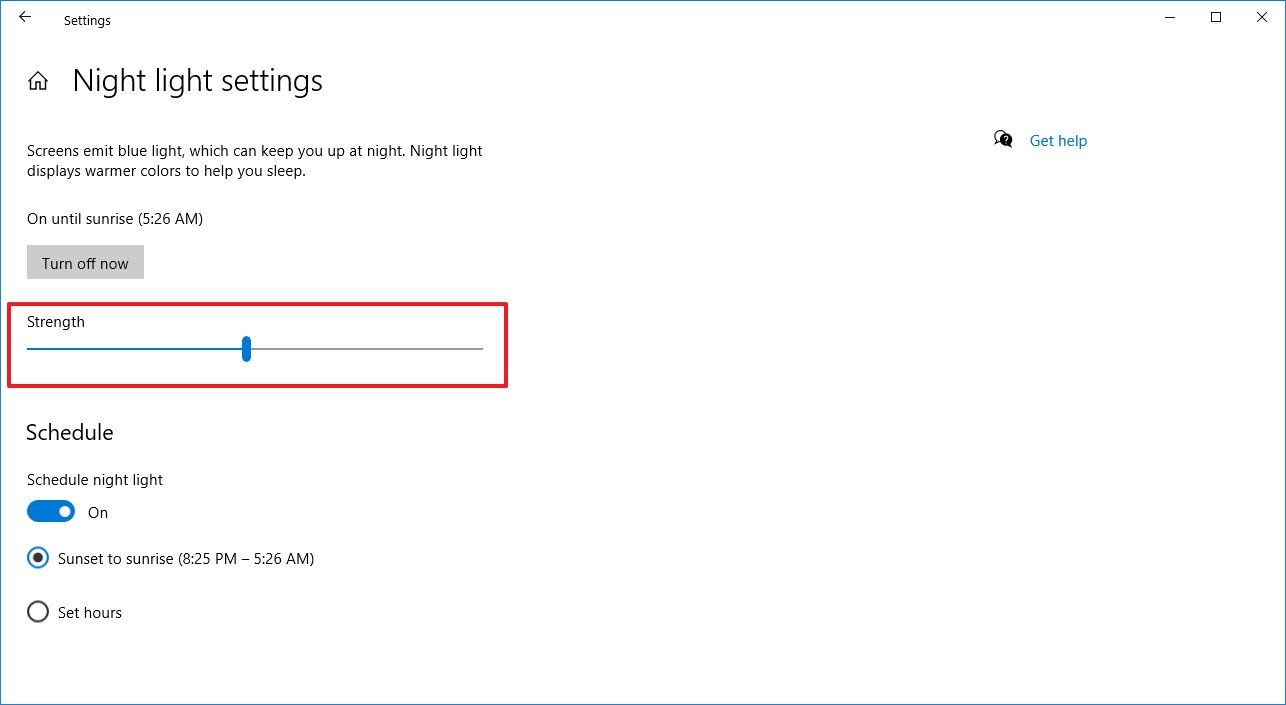
When night light is turned on, the coloring on your display might have a red tint and content might not be readable on it. This depends on the strength that’s set for night light. Here is how you can work around this problem.
Workaround:
-
Go to Settings > System > Display > Night light.
-
In Night light settings, do one of the following:
-
If night light is on, drag the Strength slider to the left to reduce the red-tinted coloring on your display.
-
Select Turn off now to turn off night light.
-
For more info about night light, see Set your display for night time in Windows.
Many HDR-capable displays support a wider color gamut than sRGB. When HDR is turned on, the HDR display should correctly reproduce the sRGB colors used in desktop apps. However, some HDR-capable displays don’t do this correctly. When shopping for an HDR-capable display, look for displays that are certified for HDR and read reviews that discuss color accuracy.
We are closely monitoring HDR-related customer feedback and are aware of the reports of new monitors that support both VESA DisplayHDR and DolbyVision but are apparently delivering differing color reproduction experiences, which is not expected. DolbyVision can be considered to provide a superset of the certification guarantees provided by DisplayHDR, and that is the primary reason why Windows will automatically choose DolbyVision when it is available.
HDR10 content on Windows should be displayed accurately independent of whether the PC monitor is configured in a certified DisplayHDR or DolbyVision mode. In both monitor modes, tone mapping occurs on the GPU, using color information retrieved from the monitor, prior to compositing the final desktop image which may combine the content of multiple application windows rendered in different color spaces. Windows uses the GPU to apply this tone mapping using the associated content specific metadata. This tone mapping is always done on the source content prior to composition and no additional content-based tone mapping is expected from the monitor in either DisplayHDR or DolbyVision mode. This is true whether the content is displayed in a maximized window or not. Note that on non-Windows platforms, tone mapping may be implemented differently and may rely on the monitor to perform content-based tone mapping.
We are aware of monitors that may limit max brightness to around 450 nits in both DolbyVision and DisplayHDR modes, but on some cases, there may exist a configuration option available via the monitor’s on-screen display (OSD) menu to enable a non-certified HDR10 mode that unlocks max brightness levels up to 1000 nits.
Readers help support Windows Report. We may get a commission if you buy through our links.
Read our disclosure page to find out how can you help Windows Report sustain the editorial team. Read more
On Windows 10, you can play HDR content when supported by your external or laptop display. However, several users have reported the Windows 10 HDR won’t turn on in the Microsoft forum.
If you are trying to figure out why HDR is not turning on, this issue can occur if you recently upgraded to the latest version of Windows 10. When trying to enable HDR stream settings, the HDR option fails to turn on.
In this article, we explore a few quick steps to help you resolve the Windows 10 HDR won’t turn on problem.
What can I do if Windows 10 HDR won’t turn on?
Here’s what you should first do:
- If you connect multiple HDR-enabled displays to your PC, ensure the multi-monitor setup is not causing the issue. If you are using a monitor plus TV setup, turn on HDR Stream with only your TV connected to the PC.
- In other instances, an incompatible HDMI cable can also cause HDR issues in Windows 10. HDR requires HDMI 2.0b cable to transmit the signal. If you are using an HDMI 1.4v cable, replace it with an HDMI 2.0b cable.
1. Enable the HDR option from Registry Editor
- Press the Windows + R to open Run, type regedit in the text field, and hit Enter.

- Click Yes when the UAC prompt appears.
- Paste the following path in the address bar and hit Enter:
Computer\HKEY_CURRENT_USER\SOFTWARE\Microsoft\Windows\CurrentVersion\VideoSettings
- Double-click the EnableHDRForPlayback entry. If you can’t find it, right-click on the blank portion, hover the cursor over New, select DWORD (32-bit Value), name it EnableHDRForPlayback, and then open it.
- Enter 1 in the Value data field, and click OK to save the changes.

- Once done, restart the computer for the changes to come into effect.


If HDR won’t stay on Windows 10, the registry fix usually works best for users. You should now be able to enable HDR from Settings.
2. Restore the device to the previous version
- Press the Windows + I to open Settings, and select Update & Security.

- Open the Recovery tab from the left pane.
- Scroll down to Go back to the previous version of the Windows 10 section.
- Click on Get started.
- Follow the on-screen instructions to restore your PC to the earlier version of Windows 10.
- Once restored, check if you can enable the Stream HDR option in settings.

If the issue occurred after upgrading to the latest version of Windows 10, you could restore the PC to the previous version of Windows OS to fix the issue.
Note that the Go back to the previous version of the Windows 10 option will not be available after 10 days of updating the system.
Going back to the previous version will also restore all the driver updates. So, you may have to install the update again to get the latest supported drivers for the PC hardware.
- Microsoft blocks the Windows 24H2 updates for millions after a newly discovered Auto HDR bug
- Disable Hibernation on Windows 10: How to Get Rid of it
With all said, if the HDR Stream option is missing from your display, it is most likely due to your monitor or TV not supporting HDR technology. The Windows 10 HDR won’t turn on problem usually occurs due to a glitchy update or incompatible HDMI connection.
Follow the steps to troubleshoot and fix the HDR disabled issue on your Windows 10 computer.
Also, find out what to do if Windows 10 HDR is washed out. Do let us know which method helped you resolve the issue in the comments.
Tashreef Shareef
Tashreef Shareef is a software developer turned tech writer. He discovered his interest in technology after reading a tech magazine accidentally. Now he writes about everything tech from Windows to iOS and streaming services to IoT at WindowsReport.
Some Windows 10 users like you disable Stream HDR feature before upgrading the device to its next immediate versions. But unfortunately, they find that the setting won’t turn on after updating to version 1903 or 1909. Sum is, you encounter Switching off this High Dynamic Range fails to get activated upon upgradation.
Microsoft experts suggest two solutions to make the streaming of HDR videos working again. One is to restore the device to the previous version, toggle On Stream HDR video setting, and then install the next version. Secondly, to modify a registry entry through Command Prompt which will automatically enable HDR functionality. Explore the below section of this article to see both the methods in detail. Let’s begin –
HDR won’t turn on in Windows 10
Here is How to Fix HDR won’t turn on in Windows 10 –
1] Enable HDR video switch through Registry
- Open taskbar search by using Win+S shortcut.
- Type cmd and when Command Prompt and select Run as administrator from the right flyout.
- Click Yes button on the prompt of User Account Control (UAC) dialog.
- On the command prompt, copy-paste the following text on a single line and hit Enter.
reg add “HKCU\Software\Microsoft\Windows\CurrentVersion\VideoSettings” /v EnableHDRForPlayback /t REG_DWORD /d 1
- Once you successfully execute the above command, exit Command Prompt and Restart Windows 10 PC.
2] Restore device to the previous version
Remember that restoring to the earlier version is needed because you have to enable Stream HDR video setting. Once you have enabled, update Windows 10 to the subsequent edition v1903 or v1909 to fix the problem.
To roll back to the previous version, go through these series of steps –
- Press Win Logo+I.
- Click Update & Security.
- Choose Recovery subsection from the left pane.
- Switch to the adjacent side and click Get started button underneath Go back to the previous version of Windows 10.
You can also follow – How to Restore Earlier Build in Windows 10.
Note – This option will be available only for a limited time, so you need to roll back within 10 days of upgradation. Choosing this method will upkeep the personal files; whereas the apps and drivers that you installed after the upgrade will be removed. Moreover, rolling back to the previous version will also remove the settings you made earlier.
After successfully enabling the “Stream HDR” video switch in Win 10, v1809, do check for updates and grab the next version 1903 or 1909.
Methods:
1] Enable HDR video switch through Registry
2] Restore device to the previous version
That’s all!!