
Для начала работы с Haskell рекомендуется установить Haskell Platform, которая включает в себя компилятор GHC (Glasgow Haskell Compiler) и набор основных инструментов для разработки. Эта платформа позволяет быстро приступить к разработке на Haskell с минимальными настройками.
1. Что такое Haskell Platform и GHC
Haskell Platform — это комплект инструментов и библиотек, который включает:
- Компилятор GHC — основной компилятор для Haskell, обеспечивающий поддержку всех современных возможностей языка.
- Библиотеки Cabal и Stack для управления проектами и зависимостями.
- Набор стандартных библиотек и инструментов, необходимых для разработки.
GHC (Glasgow Haskell Compiler) — это компилятор с открытым исходным кодом для Haskell. Он является самым популярным и продвинутым компилятором, поддерживающим различные расширения и оптимизации.
2. Установка Haskell Platform
Установка на Windows
- Перейдите на официальный сайт Haskell Platform и выберите версию для Windows.
- Скачайте установочный файл и запустите его.
- Следуйте инструкциям установщика. В процессе установки будет предложено выбрать компоненты, но для начала работы рекомендуется установить все предлагаемые пакеты.
- После установки проверьте успешность, выполнив в командной строке:
ghc --version
cabal --version
stack --version
Установка на macOS
- Используйте менеджер пакетов Homebrew:
brew install ghc cabal-install stack - Убедитесь, что Haskell и его инструменты установлены:
ghc --version
cabal --version
stack --version
Установка на Linux
Для большинства дистрибутивов Linux GHC и сопутствующие инструменты можно установить через менеджеры пакетов:
Ubuntu/Debian:
sudo apt update
sudo apt install haskell-platform
Fedora:
sudo dnf install ghc cabal-install
После установки выполните проверку:
ghc --version
cabal --version
stack --version
3. Установка только GHC с использованием GHCup
GHCup — это инструмент для управления установками GHC, Cabal и других инструментов Haskell. Он удобен для пользователей, которые хотят контролировать версии и не использовать полную Haskell Platform.
- Загрузите и установите GHCup, выполнив команду:
curl --proto '=https' --tlsv1.2 -sSf https://get-ghcup.haskell.org | sh - Следуйте инструкциям скрипта установки. После завершения добавьте путь GHCup в системные переменные окружения, если это не произошло автоматически.
- Установите GHC и другие инструменты с помощью GHCup:
ghcup install ghc ghcup install cabal ghcup install stack - Убедитесь в успешной установке:
ghc --version
cabal --version
stack --version
4. Менеджмент зависимостей с Cabal и Stack
Cabal и Stack — два популярных инструмента для управления зависимостями и сборкой проектов на Haskell.
- Cabal: инструмент для создания проектов, управления зависимостями и сборки. Используется с файлом
cabal.projectили*.cabal. - Stack: инструмент, облегчающий работу с изолированными проектами и управлением версиями GHC.
Создание нового проекта с Cabal:
cabal init
Создание нового проекта с Stack:
stack new my-project simple
cd my-project
stack setup
stack build
5. Запуск первой программы на Haskell
После установки вы можете написать и запустить свою первую программу на Haskell:
- Создайте файл
Hello.hsс содержимым:main :: IO () main = putStrLn "Hello, Haskell!" - Компиляция и запуск с использованием GHC:
ghc -o Hello Hello.hs ./Hello - Использование
runghcдля интерпретации файла без компиляции:runghc Hello.hs
Установка Haskell Platform или GHC — это первый шаг к изучению функционального программирования и созданию надежных программ. Платформа предоставляет все необходимое для быстрого начала работы, а инструменты управления зависимостями, такие как Cabal и Stack, позволяют легко поддерживать и развивать проекты.
Haskell install instructions — ZuriHac 2020
Table of contents
- Introduction
- Prerequisites
- Linux / MacOS
- Minimal setup
- Fancy features
- Windows
- Minimal setup
- Fancy features
Introduction
This guide aims to be a simple way to get a modern Haskell toolchain up and running on your computer.
We describe only «one way to do it», in order to simplify the process for beginners. The goal is to get started quickly and make it pleasant to start writing the language we all love.
At the end we will have the following:
- Visual Studio Code with plugins that gives you features like:
- type signatures and documentation on hover, autocomplete.
- jump to definition, rename variable and function names.
- error messages right in your editor.
- ghc — the Glasgow Haskell Compiler.
- ghci — a REPL to interactively type in code and explore.
- ghcid for recompiling your code on changes, giving you fast feedback and error messages.
- ghcide for the IDE features in VS Code mentioned above.
- cabal to manage dependencies and build your project.
- On Linux and Mac: ghcup to manage GHC versions, and help install Cabal.
- On Windows: The Haskell Platform, which bundles GHC, Cabal and some tools.
If you just want to get started, then please read the prerequisites, then just jump straight to the install instructions for your operating system:
- Linux
- MacOS
- Windows
Prerequisites
Most programming still requires some basic familiarity with the command line. Haskell is no exception, so you should know how to use the terminal on your computer.
This installation guide describes a bunch of commands that you should be able to type in and execute. You don’t need to be a command line ninja, but you’ll be a lot more effective if you can change directories, copy/move files, list directory contents and a couple of other basic things.
If you’re absolutely new to this, we recommend you take some time to familiarise yourself with the following:
- on MacOS: install and use iTerm2.
- on Windows: use Powershell.
- on Linux: use whatever terminal your distro comes with.
Linux and MacOS
Minimal setup
Tested on Ubuntu 18.04 and MacOS Mojave
For the command below you need to have curl installed. Consider using Homebrew (brew install curl) on Mac, or sudo apt install curl on Ubuntu/Debian. If you’re using another distro then I’m sure you know what to do.
On Ubuntu you also need to install some additional libraries with sudo apt install libgmp-dev libtinfo-dev.
Install ghcup as per the official instructions:
curl --proto '=https' --tlsv1.2 -sSf https://get-ghcup.haskell.org | sh
It will take a while to download GHC and Cabal, and you need to press Enter to confirm a couple of times. When it asks you to modify your .bashrc, enter YES and continue. If for some reason you missed that step, you can also just add the line source ~/.ghcup/env at the end of your .bashrc in your home directory. There is more information in the Readme if you need it.
For the changes to take effect, either restart all your terminal windows, or type source ~/.bashrc in every one of them.
If you’re on zsh or fish instead of bash then you’re on your own, but you’ll probably know what to do.
That’s it! You now have Cabal 3 and a recent version of GHC on your machine. You can see which one by typing ghcup list.
Play around in an interactive REPL with cabal repl.
Run a Hello World program by saving the following to a file called Hi.hs:
module Hi where

main = putStrLn "hey"
Run it with runghc Hi.hs. You’re all set!
Fancy features
1
You can already create proper Haskell projects by doing the following in your command line:
mkdir first-projectcd first-projectcabal init
You’ll see a couple of new files and folders. Edit Main.hs and run your code by typing cabal run or cabal exec first-project. The file first-project.cabal is where you will add your dependencies.
One small thing: It’s probably a good idea to generate a cabal config file with cabal user-config init. It will tell you the location, and I warmly recommend you add the following line to it:
write-ghc-environment-files: never
Ok, let’s get some slick editor integration running.
2
- Install Visual Studio Code from https://code.visualstudio.com/.
- Launch VS Code, and install the Haskell Syntax Highlighting plugin. Open
Hi.hsfrom before and enjoy the pretty colours.
3
Install ghcide with
This will compile from source, so it takes a while. Go for a tea or help the next person out that’s trying to get this far.
Note: it only makes sense to install tools with
cabal-install, not libraries. Later you’ll learn how to add library dependencies locally to your projects.
When this is done, you can install the ghcide extension in VS Code.
Done. Open a Haskell project folder in VS Code and try hovering over stuff, use autocomplete, and maybe even add a dependency or two.
4
Windows
Minimal setup
Tested on Windows 10.
- Install the Haskell Platform from https://www.haskell.org/platform/#windows
- See if your installation worked by launching GHCi. That’s your interactive prompt.
- To run single Haskell Source (.hs) files you can use
runghcfrom the command line.
Try it out with the following hello world program:
module Hello where

main = putStrLn "sup"
Save it as Hello.hs somewhere, and execute runghc Hello.hs in the command line.
We recommend you use Powershell when you need to execute stuff in the command line. If that’s not included in your version of Windows, then you can use the normal Command Prompt (
cmd.exe) as well.
Fancy features
This allows you to set up projects with multiple source code files, external library dependencies, editor integration, etc.
1
- Install Visual Studio Code from https://code.visualstudio.com/.
- Launch VS Code, and install the Haskell Syntax Highlighting plugin. Open
Hello.hsfrom before and admire the shiny colours.
2
Next we install the latest version of Cabal. Right now the Haskell Platform uses 2.4.1.0. That’s fine, but Cabal 3 has some major improvements, so let’s upgrade:
- Download the binary for your type of machine (32 or 64 bit) https://www.haskell.org/cabal/download.html
- Copy the cabal executable inside the .zip to
C:\Program Files\Haskell Platform\8.6.5\lib\extralibs\bin. - Verify that you have the right version with
cabal --version. Only continue if this shows version 3. - Execute
cabal updateto refresh its package index. - Execute
cabal user-config updateto upgrade the version of Cabal’s config file.
The last command also tells you where the config is. For exampe mine is at C:\Users\taylorswift\AppData\Roaming\cabal\config. I strongly suggest you open it and add the following line:
write-ghc-environment-files: never
Later, for compiling some packages like network, this config file also needs to be fixed, in particular the lines extra-lib-dirs, extra-prog-path, etc. See the remarks below.
You can now create new projects with cabal init 🎉
3
Final step: editor integration. The best way to do this in 2020 is to install ghcide:
cabal install ghcide --install-method=copy --overwrite-policy=always
This will compile for quite a while, so go get a coffee or make a new friend.
At the end you will have a new executable/command called ghcid.
For your information, the executables are installed in C:\Users\your-username-here\AppData\Roaming\cabal\bin, which Haskell Platform made sure to put in your Windows %PATH%.
Create a new project by doing the following in your command line:
mkdir first-projectcd first-projectcabal init
Open this folder in VS Code, and install the ghcide extension from the VS Code Marketplace. You’re done.
How can you know this all worked? You will be able to see definitions when hovering with your mouse, you can introduce an error and see it highlighted red in the code, and you will get autocompletion.
You add dependencies in first-project.cabal, and you can run the code by just typing cabal run. The thing that will be executed is always your main :: IO () function.
The rest you will learn in the beginner’s course. Have fun!
Some remarks about Cabal on Windows
Skip this if you just want to set up your Haskell tooling. This is more of an explanation why we did the setup the way described above.
The reason we are downloading a pre-compiled cabal 3 instead of doing the more canonical cabal v2-install Cabal cabal-install is because
- it works
- compiling from source takes a while
- the Cabal configuration on Windows currently needs some fixing.
- Cabal 2.4 doesn’t have the flag
--install-method=copy, so it can only try to symlink, which is not something Windows supports.
By default cabal currently produces the following config:
extra-include-dirs: C:\Program,
                    Files\Haskell,
                    Platform\8.6.5\mingw\include
extra-lib-dirs: C:\Program,Files\Haskell,Platform\8.6.5\mingw\lib
extra-prog-path: C:\Program Files\Haskell Platform\8.6.5\msys\usr\bin,
                 C:\Users\justinbieber\AppData\Roaming\cabal\bin
The line breaks and commas make no sense, and they prevent Cabal from seeing MinGW and MSYS, leading to an error when trying to compile packages with a ./configure step like network.
It can be assumed that this will be fixed in the future, and moreover Haskell Platform will probably ship directly with Cabal 3 at some point.
Other Editors
If you’re eager to use something other than Visual Studio Code (vim, emacs, Sublime Text, Atom, etc), then the keyword to search for is «Language Server Protocol» (LSP). The ghcide Readme has instructions for a bunch of these. For emacs you might even consider intero.
A Comprehensive Guide to Installing Haskell on Windows, macOS, and Linux
Hello, Haskell enthusiasts! In this blog post, we will explore Install Haskell on Wi
ndows macOS Linux – one of the first and most important steps in your Haskell programming journey: installing Haskell on your system. Whether you are using Windows, macOS, or Linux, setting up Haskell is a simple process that will unlock the world of functional programming for you. Haskell’s powerful features, such as strong typing and lazy evaluation, make it a favorite among developers. In this guide, I’ll walk you through the installation process step by step, introduce essential tools like GHC and Stack, and help you get your environment ready for coding. By the end of this post, you’ll be all set to dive into Haskell programming. Let’s get started!
Table of contents
- A Comprehensive Guide to Installing Haskell on Windows, macOS, and Linux
- Introduction to Installing Haskell on Different Platforms
- What is the process for Installing Haskell on Windows, macOS, and Linux?
- Installing Haskell on Windows
- The Step 1: Download GHCup Installer
- Step 2: Install GHCup
- Step 3: Verify Installation
- Installing Haskell on macOS
- Step 1: Install Homebrew
- Step 2: Install GHCup
- Step 3: Install Haskell Tools
- Step 4: Verify Installation
- Installing Haskell on Linux
- Step 1: Install GHCup
- Step 2: Add GHCup to Path
- Step 3: Install Haskell Tools
- Step 4: Verify Installation
- Post-Installation: Writing Your First Haskell Program
- What is the Importance of Installing Haskell on Different Platforms?
- Example of Installing Haskell on Windows, macOS, and Linux
- 1. Installing Haskell on Windows
- 2. Installing Haskell on macOS
- 3. Installing Haskell on Linux
- Post-Installation: Verifying and Testing
- Advantages of Installing Haskell on Different Platforms
- Disadvantages of Installing Haskell on Different Platforms
- Future Development and Enhancement of Installing Haskell on Different Platforms
- Introduction to Installing Haskell on Different Platforms
Introduction to Installing Haskell on Different Platforms
Hello, aspiring Haskell developers! Setting up your environment is the first exciting step in your journey to mastering functional programming. Haskell, known for its strong typing and elegant syntax, requires a simple installation process tailored to your platform whether it’s Windows, macOS, or Linux. In this blog, I’ll guide you through installing Haskell seamlessly on each platform and introduce you to essential tools like GHC (Glasgow Haskell Compiler) and Stack. With your development environment ready, you’ll be equipped to write your first Haskell programs and explore its powerful features. Let’s get started on this transformative programming journey!
What is the process for Installing Haskell on Windows, macOS, and Linux?
Installing Haskell is straightforward on all major platforms, and this guide will help you get started by providing a detailed step-by-step process for each operating system. We’ll use GHCup, the recommended tool for installing and managing Haskell versions.
Below are the steps of Installing Haskell on Windows:
The Step 1: Download GHCup Installer
- Open your web browser and visit the official GHCup website: https://www.haskell.org/ghcup/.
- Download the GHCup Windows Installer by clicking the appropriate link.
Step 2: Install GHCup
- Run the downloaded installer file.
- Follow the on-screen instructions, ensuring you select the following tools during installation:
- GHC (Glasgow Haskell Compiler)
- Cabal (Haskell’s build tool)
- HLS (Haskell Language Server) for IDE support.
- Allow the installer to make changes to your system if prompted.
Step 3: Verify Installation
- Open a new Command Prompt or PowerShell window.
- Run the following commands to verify:
ghc --version
cabal --version
haskell-language-server --version
If all tools show their versions, your installation is successful.
Installing Haskell on macOS
Below are the steps of Installing Haskell on macOS:
Step 1: Install Homebrew
- Open the Terminal app.
- If you don’t have Homebrew, install it by running:
/bin/bash -c "$(curl -fsSL https://raw.githubusercontent.com/Homebrew/install/HEAD/install.sh)"Step 2: Install GHCup
Use Homebrew to install GHCup by running:
brew install ghcupInitialize GHCup with the following command:
ghcup installStep 3: Install Haskell Tools
Run the GHCup command-line interface to install the required tools:
ghcup install ghc
ghcup install cabal
ghcup install hls
Step 4: Verify Installation
Run the following commands in Terminal:
ghc --version
cabal --version
haskell-language-server --version
If the versions are displayed, your Haskell environment is ready to use.
Installing Haskell on Linux
Below are the steps of Installing Haskell on Linux:
Step 1: Install GHCup
- Open your Terminal.
- Download and run the GHCup installation script:
curl --proto '=https' --tlsv1.2 -sSf https://get-ghcup.haskell.org | sh- Follow the on-screen prompts to complete the installation.
Step 2: Add GHCup to Path
If prompted, add GHCup to your shell’s PATH by sourcing the profile file:
source ~/.ghcup/envStep 3: Install Haskell Tools
Install the necessary tools using GHCup:
ghcup install ghc
ghcup install cabal
ghcup install hls
Step 4: Verify Installation
Check the installed tools by running:
ghc --version
cabal --version
haskell-language-server --version
If all tools show their versions, the installation is successful.
Post-Installation: Writing Your First Haskell Program
- Open a terminal or command prompt.
- Create a new Haskell file:
nano hello.hs- Add the following code:
main = putStrLn "Hello, Haskell!"- Save the file and run it using GHC:
ghc hello.hs
./hello
You should see the output:
Hello, Haskell!What is the Importance of Installing Haskell on Different Platforms?
Haskell’s versatility and functionality make it an ideal language for developers working on various operating systems, including Windows, macOS, and Linux. Installing Haskell on different platforms is crucial for several reasons:
1. Universal Access for Developers
Developers around the world work on different operating systems like Windows, macOS, or Linux. Ensuring Haskell can be installed on all these platforms allows developers from various backgrounds to explore and use it. This universal access removes barriers and makes Haskell a more inclusive programming language.
2. Promotes Cross-Platform Development
Haskell is often used for creating applications that need to run seamlessly across multiple platforms. Installing Haskell on different operating systems ensures developers can test their applications in various environments. This support is crucial for building reliable and portable software.
3. Enhances Learning and Collaboration
In academic or professional settings, teams and learners often use different platforms. Having Haskell available on all operating systems ensures everyone can work together without compatibility issues. This accessibility promotes knowledge sharing and collaborative learning among developers.
4. Optimized Performance for Platform-Specific Tasks
Each operating system has unique strengths, such as file handling on Linux or UI capabilities on macOS. Installing Haskell on the preferred platform allows developers to take advantage of these features. This optimization enhances the overall performance of Haskell-based projects.
5. Facilitates Consistency in Development Environments
Organizations often have teams working with diverse operating systems. Installing Haskell on all platforms ensures a consistent development experience for the entire team. This consistency minimizes compatibility problems and boosts overall productivity.
6. Supports Diverse Toolchains and Libraries
Some Haskell libraries and tools are designed specifically for certain platforms. Installing Haskell on multiple platforms ensures developers can access these tools, regardless of the operating system. This flexibility allows developers to fully utilize Haskell’s ecosystem.
7. Boosts Haskell’s Reach and Adoption
Making Haskell installation easy on all major platforms encourages more developers to use the language. This accessibility fosters a larger and more diverse community of Haskell users. A growing community contributes to the language’s long-term success and innovation.
Example of Installing Haskell on Windows, macOS, and Linux
Below are detailed examples of installing Haskell on each platform using GHCup, stack, and binary installers, covering a range of tools and methods for different preferences.
1. Installing Haskell on Windows
The Example 1: Using GHCup (Recommended)
- Download GHCup:
- Visit https://www.haskell.org/ghcup/ and download the GHCup Windows installer.
- Run the Installer:
- Launch the installer and follow the instructions.
- Ensure you install GHC, Cabal, and Haskell Language Server (HLS) during the setup.
- Test Installation:
- Open Command Prompt or PowerShell and run:
ghc --version
cabal --version
haskell-language-server --version
Example 2: Using Stack
- Download Stack:
- Visit https://docs.haskellstack.org/ and download the Windows installer.
- Install Stack:
- Run the installer and follow the on-screen instructions.
- Setup Haskell Environment:
- Open Command Prompt and run:
stack setup- Verify Installation:
- Check the version using:
stack ghc -- --version2. Installing Haskell on macOS
The Example 1: Using GHCup
- Install GHCup via Terminal:
- Open Terminal and execute:
curl --proto '=https' --tlsv1.2 -sSf https://get-ghcup.haskell.org | sh- Install Haskell Tools:
- Use GHCup to install GHC, Cabal, and HLS:
ghcup install ghc
ghcup install cabal
ghcup install hls- Verify Installation:
- Check versions:
ghc --version
cabal --version
haskell-language-server --version
Example 2: Using Homebrew
- Install Homebrew:
- If not already installed, run:
/bin/bash -c "$(curl -fsSL https://raw.githubusercontent.com/Homebrew/install/HEAD/install.sh)"- Install GHC:
- Run:
brew install ghc
brew install cabal-install- Verify Installation:
- Check versions of the installed tools:
ghc --version
cabal --version
3. Installing Haskell on Linux
The Example 1: Using GHCup
- Install GHCup:
- Open the terminal and execute:
curl --proto '=https' --tlsv1.2 -sSf https://get-ghcup.haskell.org | sh- Install Required Tools:
- Use GHCup to install GHC, Cabal, and HLS:
ghcup install ghc
ghcup install cabal
ghcup install hls- Test Installation:
- Run the following commands to check:
ghc --version
cabal --version
haskell-language-server --version
Example 2: Using Stack
- Install Stack:
- Download the Stack installer script and run it:
curl -sSL https://get.haskellstack.org/ | sh- Setup Environment:
- Run:
stack setup- Verify Installation:
- Check the GHC version with:
stack ghc -- --versionExample 3: Using System Package Manager
- On Debian-based systems (e.g., Ubuntu):
sudo apt-get install haskell-platform- On Red Hat-based systems (e.g., Fedora):
sudo dnf install haskell-platform- Verify installation:
ghc --versionPost-Installation: Verifying and Testing
After installing Haskell, write and run a simple Haskell program to ensure everything works:
- Create a Haskell File:
nano hello.hsAdd the following code:
main = putStrLn "Hello, Haskell!"- Compile and Run:
ghc hello.hs
./hello- Expected Output:
Hello, Haskell!These examples demonstrate how to set up Haskell on different platforms using various tools, catering to diverse preferences and workflows.
Advantages of Installing Haskell on Different Platforms
Installing Haskell on various platforms ensures flexibility, cross-platform compatibility, and a seamless development experience. Below are the detailed advantages, explained for Windows, macOS, and Linux users.
- Cross-Platform Development Capability: Installing Haskell on multiple platforms enables developers to create and test applications that work across different operating systems. This ensures that the Haskell code behaves consistently on Windows, macOS, and Linux, making it ideal for projects targeting a diverse user base. Developers can work on different systems without worrying about platform-specific issues.
- Platform-Specific Optimization: Haskell installations take advantage of the unique features of each platform for better performance. Windows supports integration with development environments like Visual Studio Code, macOS benefits from UNIX-based tools that streamline development, and Linux offers powerful server-side capabilities. Each platform optimizes the developer’s workflow for different needs.
- Community and Ecosystem Support: Each platform has its own Haskell community and ecosystem that provides specialized resources and guidance. Linux users benefit from package management tools like
aptordnf, macOS users can rely on Homebrew, and Windows developers get support from PowerShell and other Windows-specific tools. This platform-specific support helps developers troubleshoot and improve their workflows. - Flexibility in Development Environment: Installing Haskell on multiple platforms gives developers the flexibility to work in their preferred environments. They can seamlessly switch between platforms without worrying about compatibility issues. For instance, a developer might code on a macOS laptop and deploy the application on a Linux server, making it easy to work across systems.
- Enhanced Learning Opportunities: Using Haskell on different platforms provides developers with the opportunity to explore the unique tools and workflows offered by each operating system. Learning to use different installation managers like GHCup on Linux and Stack on Windows deepens understanding of Haskell’s ecosystem and enhances problem-solving skills.
- Improved Portability and Collaboration: Installing Haskell on different platforms makes it easier for teams with diverse operating systems to collaborate on the same projects. Team members using Windows, macOS, or Linux can all contribute to the same codebase, ensuring that the software works across various environments. This cross-platform compatibility is essential for global teams.
- Access to Platform-Specific Tools: Each platform offers specific tools that enhance the Haskell development experience. For example, Windows users can use PowerShell and Chocolatey for package management, macOS users can take advantage of Xcode and other UNIX tools, while Linux users benefit from bash scripting and other automation tools. These tools help streamline development tasks.
- Seamless Deployment Options: Linux, in particular, offers seamless deployment of Haskell applications on servers, making it an excellent choice for backend development. Haskell applications can be easily deployed on Linux-based cloud servers like AWS EC2, ensuring smooth operation in production environments. Developers can test and deploy applications on Linux without compatibility issues.
- Testing in Diverse Environments: Installing Haskell on multiple platforms allows developers to test their applications across different environments, ensuring the code is reliable and stable. Testing Haskell code on Windows, macOS, and Linux ensures that the software works smoothly regardless of the operating system. This reduces the risk of platform-specific bugs and issues.
- Access to Comprehensive Tools and Libraries: Installing Haskell on various platforms gives developers access to a wide range of platform-specific tools and libraries. For instance, Linux provides robust server-side libraries, macOS users can leverage Xcode for development, and Windows users have access to a rich ecosystem of development tools. This broadens the developer’s toolkit and improves productivity.
Disadvantages of Installing Haskell on Different Platforms
Following are the Disadvantages of Installing Haskell on Different Platforms:
- Platform-Specific Compatibility Issues: Despite the advantages, installing Haskell on different platforms can sometimes lead to compatibility issues. Some tools or libraries might work well on one platform but not on others, requiring developers to spend extra time troubleshooting. This can be especially problematic if the code relies on platform-specific features.
- Increased Maintenance Overhead: Managing Haskell installations across multiple platforms can increase the maintenance workload. Developers need to ensure that their Haskell setup, including dependencies and configurations, is kept up to date on each platform. This adds to the complexity and effort required to maintain consistency across systems.
- Complexity in Deployment: While Linux is ideal for deploying Haskell applications, the deployment process can be more complex on Windows and macOS. These platforms might require additional configuration or tools to ensure compatibility, leading to a longer setup time and potential issues when deploying applications in production environments.
- Diverse Tooling Requirements: Each platform comes with its own set of development tools, and learning how to use these tools effectively can be time-consuming. For example, a developer using Haskell on macOS may need to become familiar with Homebrew and Xcode, while a Windows developer might need to work with PowerShell and Chocolatey. This variety can overwhelm developers who are unfamiliar with specific tools.
- Inconsistent Performance: Haskell performance can vary across different platforms. While Linux offers robust performance for server-side applications, Haskell might not perform as efficiently on Windows or macOS for certain use cases. This could impact the efficiency of development, especially for high-performance applications.
- Limited Documentation for Certain Platforms: While Haskell is widely used on Linux, its support on platforms like Windows and macOS can be less comprehensive. Developers may struggle to find detailed documentation or community support for troubleshooting platform-specific issues. This can make setting up and working with Haskell on these platforms more challenging.
- Resource Consumption: Haskell installations, particularly on Windows and macOS, may require more system resources, such as memory and CPU, compared to Linux. This can slow down the development process, especially on machines with lower specifications. Additionally, the need for platform-specific tools might require installing additional software, further consuming resources.
- Difficulty in Synchronizing Projects Across Platforms: When working across multiple platforms, syncing Haskell projects can be challenging. Differences in file paths, environment variables, or dependency management between platforms may lead to conflicts and difficulties in keeping projects synchronized. This can result in wasted time resolving conflicts.
- Dependency Management Challenges: Each platform handles dependency management differently. On Linux, you might use package managers like
aptordnf, while on macOS, you would rely on Homebrew, and on Windows, tools like Chocolatey or manual setups. This fragmentation can lead to inconsistencies in the development environment and make dependency management more complicated. - Learning Curve for Cross-Platform Development: Developing Haskell applications across multiple platforms requires knowledge of how Haskell behaves on each platform. Developers need to understand the nuances of working with Haskell on different operating systems, which adds to the learning curve. This could be overwhelming for beginners who are not yet comfortable with Haskell.
Future Development and Enhancement of Installing Haskell on Different Platforms
Below are the Future Development and Enhancement of Installing Haskell on Different Platforms:
- Improved Cross-Platform Compatibility: As Haskell continues to evolve, there will likely be improvements in cross-platform compatibility. This includes better integration with operating system-specific tools and libraries, ensuring a smoother experience for developers. Enhanced support for popular package managers like Homebrew, Chocolatey, and APT will simplify the installation process across platforms, making Haskell more accessible.
- Streamlined Installation Process: The installation process for Haskell across different platforms will likely become more streamlined and user-friendly. Tools like GHCup and Stack will continue to improve, offering automatic configuration and dependency management. Future enhancements may include easier installation with fewer manual steps, reducing the complexity and potential errors during setup.
- Better Documentation and Resources: As the Haskell community grows, we can expect more comprehensive documentation and tutorials focused on platform-specific setups. This will provide developers with better guidance for installing and configuring Haskell on Windows, macOS, and Linux. Additionally, platform-specific issues will be addressed more effectively, reducing confusion and improving the overall learning experience.
- Optimized Performance Across Platforms: Future development may focus on optimizing Haskell’s performance on all platforms, ensuring that applications run efficiently regardless of the operating system. With advancements in the Glasgow Haskell Compiler (GHC) and platform-specific optimizations, Haskell’s performance will become more consistent, especially on Windows and macOS, where it currently lags behind Linux.
- Enhanced Tooling and Ecosystem Support: Over time, there will likely be enhanced tooling and ecosystem support for Haskell development across platforms. For example, improved IDE integrations for Visual Studio Code, better support for macOS’s Xcode, and new Linux-based tools will make the development experience more seamless. This could also include the creation of new tools that facilitate building, testing, and deploying Haskell applications in cross-platform environments.
- Automated Cross-Platform Deployment Solutions: As the Haskell ecosystem matures, solutions for automating deployment across multiple platforms will emerge. This could include cloud-based tools or continuous integration services specifically designed to handle Haskell applications. Such tools will ensure that developers can seamlessly deploy their code to servers or production environments, regardless of the underlying platform.
- Better Dependency Management: With ongoing advancements in Haskell package management, we can expect more efficient dependency resolution and cross-platform compatibility. Future enhancements might allow developers to easily manage and sync dependencies across platforms, making it easier to ensure that the right versions of libraries are used, regardless of the operating system.
- Cross-Platform Development Frameworks: Future developments in Haskell may introduce new frameworks or tools that make cross-platform development easier. These frameworks could allow developers to write Haskell code once and deploy it on multiple platforms with minimal adjustments, making it more convenient to build and maintain applications across operating systems.
- Support for New Platforms: The growth of Haskell may lead to support for additional platforms in the future. This could include specialized versions for mobile devices, IoT, or new operating systems. As Haskell becomes more widely adopted, developers will likely see support for a broader range of platforms, expanding the versatility of Haskell for modern software development.
- Stronger Community Collaboration and Support: As more developers work with Haskell on different platforms, the community will likely grow, fostering better collaboration and innovation. Increased platform-specific contributions from the community will result in more tools, bug fixes, and enhancements, further improving the Haskell installation experience and development process across operating systems.
Discover more from PiEmbSysTech
Subscribe to get the latest posts sent to your email.
By MacBobby Chibuzor
What is Haskell? What is it used for? Why are there relatively few Haskell programmers? How can I get started with Haskell?
If you’re asking yourself these questions, then this article is for you. In it, I’ll answer your questions about the Haskell programming language and demystify it for you.
You will learn about the Haskell ecosystem and how to set it up for development. You will also learn the beauty of Haskell and where the language can be applied for real world problem solving.
Given the complexity of Haskell, you should know the basics of programming prior to diving into Haskell. It’ll also help if you’re very comfortable with another functional programming language to best understand Haskell syntax.
What We’ll Cover
- Haskell — A Proper Introduction
- Functional Programming
- Strongly Statically Typed Programming
- The Haskell Ecosystem
- How to Set Up Haskell Development Environment
- The Code Editor
- Hacking into the Beauty of Haskell
- The
ghciCompiler - Python vs Haskell – the Easiest vs the Hardest
- Major Use Cases for Haskell
- Web development: Backend with Spock, Frontend with Elm
- Cardano Blockchain Development with Plutus
Haskell — A Proper Introduction
Haskell is a fully functional programming language that supports lazy evaluation and type classes.
Haskell forces the developer to write very correct code, which is the quintessential nature of the language.
Functional Programming
The world of computer programming allows different programming styles: functional, imperative, object-oriented.
The functional programming style treats functions as the first-class citizens – the most important parts of a program.
In functional programming languages, functions can be passed as values or data types. Functions can be passed as arguments to other functions, returned as results from functions, and assigned to variables. This promotes code reuse in a single codebase.
Haskell is a functional programming language and it supports these properties. Modern Java, C++, Go, and C# are all tethered to the functional style of programming.
Strongly Statically Typed Language
Programming languages can either have a dynamic or static type system. In dynamic typing, values are tagged to data types during execution. This is common among languages like Python and JavaScript which allow implicit conversion between data types.
In static typing, tagging is done during compilation and is common among low-level languages. In statically typed languages, programs are evaluated by the compiler before they are compiled into machine or bytecode and run.
Haskell is statically typed as its programs must be type checked before compilation and execution. Unlike Java and C#, the Haskell compiler only does type checking once, which boosts performance.
Also, Haskell’s type system is called strong because of the error safety at compile time. As such, a common phrase among Haskell developers is, “Once it compiles, it works.”
The Haskell Ecosystem
The most challenging aspect of starting out with a new language is configuring the development environment perfectly.
To install and set up Haskell, you need to grab the entire Haskell ecosystem. The Haskell ecosystem contains:
- The compiler called Glasgow Haskell Compiler (GHC)
- The Interpreter called Glasgow Haskell Interpreter, (GHCi)
- The Stack tool for managing Haskell projects
- Other Haskell packages
You can get the one-for-all software package from www.haskell.org/downloads#platform. Haskell, like every other programming language widely adopted, has a database for its libraries, called Hackage.
How to Set Up the Haskell Development Environment
Linux Environment
If you use a Linux machine, it’s easier to run a shell command. The command below will install the Haskell platform on your machine.
$ sudo apt-get install haskell-platform
Next, type ghc on the Linux command line and hit Enter. This should prompt whether you install the GHCi interpreter or not. Type Y and hit Enter. You should also install the Cabal build tool by running this chain of commands:
$ sudo apt-get install software-properties-common
$ sudo add-apt-repository ppa:hvr/ghc
$ sudo apt install cabal-install
After installation, you should see the following output when you re-run ghci on the shell:
$ ghci
GHCi, version 8.8.4: <https://www.haskell.org/ghc/>  :? for help
Prelude>
Run a simple arithmetic to confirm that ghci works properly.
Windows and Mac OS
The Haskell platform can be gotten from the official download page for both Windows and macOS.
You can install the Cabal libraries tool on Windows from here. You can install it for macOS here.
The Code Editor
Haskell does not have a specially suitable code editor for writing its programs. You can write Haskell code in any of these Code Editors:
- IntelliJ IDEA with the Haskell Plugin installed
- Visual Studio Code with Haskell plugins installed
- Emacs in Haskell Mode
- Neovim
Alternatively, you can also write Haskell code on a “dumb” code editor like Notepad++ and Sublime Text and then compile with the GHC.
What Haskell does is condition you to write codes in bits or modules, reiterating over it to make sure each module is correct and perfect for production. Thus, a smart or dumb code editor has minimal impact whatsoever on the finished code.
Feel free to check for extensions in the code editor marketplaces that will make writing Haskell source files a lot easier, like Haskero or Haskell Runner for VSCode.
Hacking into the Beauty of Haskell
The beauty of Haskell lies in:
- The logic
- The ease of reading Haskell code like mathematical expressions
- You can specify the probable output for a program and the language does the rest
- Its self-documenting nature
- The magnificent GHCi compiler
- The concept of purity
The ghci Compiler
Unlike other programming languages, the ghci compiler allows you to interactively use the compiler.
Also, multi-line coding which isn’t allowed in other compilers is allowed in ghci. For example, if you want to write a full script in Python IDLE, you would have to write it step by step, with each line being complete. But Haskell’s compiler makes it possible to do multi-line coding like this:
$ ghci
GHCi, version 8.8.4: <https://www.haskell.org/ghc/>  :? for help
Prelude> :{
Prelude| 60 +
Prelude| 30
Prelude| :}
90
Prelude>
Python vs Haskel – the Easiest vs the Hardest
Haskell is considered a very hard language to learn and master. On the other hand, Python is considered the easiest and most useful programming language to use.
Given that a lot of programmers are comfortable with Python programming, it is logical to explain Haskell in terms of Python:
- Haskell is a functional language, as mentioned before, while Python is a mixture of procedural, object-oriented, and functional programming styles. Haskell has procedural programming support, but the side-effects in the language do not make it easy.
- Python and Haskell have a strong type system, which means explicit conversions have to be done. However, while Python is dynamically typed, Haskell is statically typed.
- Python is a lot slower than Haskell.
- As mentioned earlier, Python is easier than Haskell to learn. The learning curve for Haskell is steep, especially for those with no prior functional programming experience.
- In terms of library support, Python has more libraries and use-cases than Haskell.
Major Use Cases for Haskell
The major uses of the Haskell language today include Web Development and Cardano Blockchain Development.
Haskell for Web Development
You can use Haskell for web development. Just as Python has Flask and Django, Go has Gin, Echo, and Bevel, Haskell has Scotty, Servant, and Yesod all built on top of Wai.
Wai is the Haskell package for managing HTTP requests/responses. Among the three popular Haskell frameworks, Yesod is more of a complete web framework than the others.
Haskell also has the blaze-html package used to build HTML files, similar to gohtml.
Haskell for Cardano Blockchain Development
Cardano is a new blockchain platform that adopts the Proof-of-Stake consensus algorithm. It is the first to allow peer-review research and it was created to address the downsides of Bitcoin and Ethereum.
The Cardano cryptocurrency, ADA, is a popular coin in Japan, and they have ADA ATMs installed in Tokyo.
The Cardano blockchain system is written in Plutus, a Haskell-based, Turing-complete programming language.
Plutus makes use of several tools to build smart contracts on the Cardano blockchain. It has the Plutus Application Backend which provides the environment and tools used to interact with smart contracts. Plutus also provides a fee estimator for in-house cost calculations.
You can preview and run Plutus code on the Plutus Playground.
Since Haskell is a high assurance language built for users in the financial industry, it tackles the problem of transaction exchanged failures due to bad code, and multi-sig failures that enable hackers to steal digital money.
Final Words
Thank you for reading this introduction to Haskell and its ecosystem and main uses. I hope you are inspired to start learning more about it.
In my future articles, you will be able to learn the basics of Haskell programming, as well as more about its main use cases.
Learn to code for free. freeCodeCamp’s open source curriculum has helped more than 40,000 people get jobs as developers. Get started
Haskell is a functional programming and non-strict language. It was published in 1990 and was named after an American mathematician Haskell Brooks Curry. Big tech companies like Meta, Apple, and Microsoft use Haskell for huge-computational operations.
The Haskell Programming environment can run on any OS. This tutorial focuses on installation on Windows, and it can run on Windows 7 through to 10. The entire installation process is user-friendly, and anyone can install it.
Install Haskell on Windows
We have listed three different ways to download Haskell into your system.
- By using Chocolatey
- By using Visual Studio Code or VS Code
- By downloading from the official website
Let’s dive into the installation process:
I. Installing Haskell using Chocolatey
Chocolatey is a command line application installer for Windows based on a developer-centric package manager called NuGet. It is different from other manual installations. It can add, update and uninstall programs in the background with very little user interaction. It makes users’ jobs easy.
Ensure you have Chocolatey on your Windows before you proceed. You can download it from here.
Enter the following command in the Powershell Command Line:
choco install haskell-devIt should look something like this:
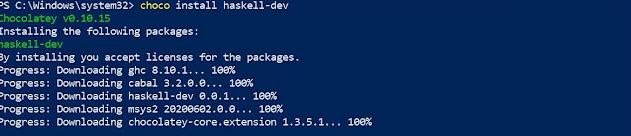
Ensure you type Y as it will install ghc, cabal, msys2, and more Haskell components.
If it runs error-free, it will be successfully downloaded, and a success message will be prompted at the end of the process.
II. Installing Haskell using Visual Studio Code (VS Code)
For this, ensure Visual Studio Code is already downloaded to your system.
It is very easy because all you need are two things:
- Haskell Extension
- Code Runner Extension
- Go to the marketplace using Ctrl+Shift+X or manually locate it on VS Code and download the Haskell extension. Read the documentation.

2. You will also find the Code Runner Extension in the marketplace. This is needed to run and compile your Haskell codes.
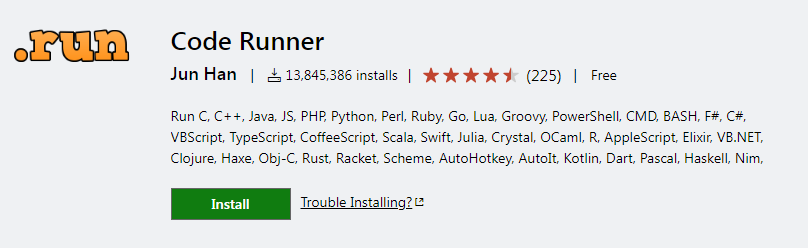
When both are downloaded, you will be able to code in Haskell.
III. Installing Haskell Packages from the Website
Another way to download Haskell to your system is by downloading the packages from the official website. You must download the Glasgow Haskell Compiler (GHC), Cabal, and Stack. It is optional to download the Haskell language server.
It is nicely laid out on the website. You have to download them individually and run them on your system.
Downloading instructions are provided on the official website, along with documentation.
Conclusion
There are various ways to download Haskell’s environment into your system. We have talked about how you can download it to your system. Choose the one that you find hassle-free.
Happy coding!