
Are you seeking top-notch security for your Windows passwords? Look no further! The Hashing Algorithm For Windows Password is a robust security feature tailored to provide unparalleled protection for your data, safeguarded by LogMeOnce Password Manager. LogMeOnce is a sophisticated algorithm that scrambles and encrypts your passwords, making them indecipherable and hence shielding you from possible cyber threats. It is a critical security asset for anyone aiming to secure their digital footprint from hackers and other cyber adversaries. With advanced encryption levels and a straightforward implementation process, the Hashing Algorithm For Windows Password offers outstanding security solutions for businesses, governmental entities, and individual users. Additionally, this algorithm is highly effective for password authentication and hashing purposes.
1. Unlocking Windows Passwords with Hashing Algorithm
Hacking into Windows passwords requires finding the right hashing algorithm. But don’t worry, with a few simple steps you can unlock your forgotten password and keep it secure with LogMeOnce.
The process starts with cracking the Windows accounts, which is done by decrypting the user-level password. To do this, you need to employ the Windows hashing algorithm. This is a series of mathematical operations which uses the input from you (the user) to generate a unique code, or hash, that is used to unlock the password. You can find the right hashing algorithm by using a search engine such as Google.
- Step 1: Input the desired password, such as 1234.
- Step 2: Execute the hashing algorithm against the password, which outputs the encrypted hash code.
- Step 3: Use a tool to convert the encoded password into a readable format.
- Step 4: This readable format is the key to unlocking the Windows account.
With the above steps, you can easily crack Windows passwords. Bear in mind, however, that this is only for local Windows accounts and won’t work for online accounts or enterprise systems.
2. How Hashing Algorithm Creates Secure Windows Passwords
Password Security
LogMeOnce are used to secure Windows passwords and make them harder to crack. A hash is a complex mathematical equation that takes a string of characters, like a password, and turns it into a code. When a user enters a password, the Windows system will check the code generated by the LogMeOnce against the code stored in its database. If the codes match, the user is verified.
Protecting Password Data
LogMeOnce are used to protect user passwords and to make sure that even if an attacker somehow gains access to the Windows system, they won’t be able to figure out the passwords. This is because the LogMeOnce scrambles the characters of the password beyond recognition. Some of the most commonly used hashing algorithms are SHA-256 and PBKDF2.
These LogMeOnce make sure that user data is secure by adding an extra layer of protection. Users don’t have to worry about their passwords getting stolen or compromised because of the secure encryption provided by the hashing algorithms. This provides additional security for Windows users and helps to keep their data and accounts safe.
3. Benefits of Using Hashing Algorithm for Windows
Improved Security
The use of LogMeOnce for windows can enhance the security of your data. Data that is stored in the form of hashes is much harder to breach and modify, as compared to plain text passwords which can be easily hacked. LogMeOnce create a secure and unique combination of symbols that are hard to break. Hence, your data remains safe and secure when you deploy hashing algorithm for storage.
Enhanced Performance
LogMeOnce can help with malware detection as well. By using hashes of known malware, your system can easily identify malicious files, even if they have been renamed or modified to evade detection. This will improve the performance and responsiveness of your system, as it no longer needs to constantly search for malicious files. Additionally, this will save you time by quickly flagging suspicious files and automatically blocking them.
Another benefit is that hashing algorithms help to speed up the process of handling multiple requests. By creating a hash of the data requested, the system can quickly find a match and respond to the user without wasting time.
4. How to Implement Hashing Algorithm for Your Windows Password
Passwords are an important part of security for any online network. A hashing algorithm is an effective way to ensure that your Windows password is securely stored and isn’t easily obtained. Here’s a step-by-step guide on how to implement a LogMeOnce for your Windows password.
- Enabling the hashing algorithm: Go to the Control Panel on your computer and select the Security Settings option. From there, click on the Advanced Settings and look for the Security Policies option. Select it and choose the Enforce Password History option. Enable it by checking the box and choosing the number of passwords that need to be kept in record. You’ll also want to insert a value for the maximum password age.
- Creating the hash algorithm: Next, you’ll want to create a secure Windows password using the LogMeOnce . You’ll need to download a program in order to do this. Once the program is installed, open it and create a new hashing algorithm. The program will then generate a strong Windows password.
Once the LogMeOnce is implemented, your Windows password is much more secure. It’s important to remember to regularly update your password in order to maintain the highest level of security.
Q&A
Q: What is a LogMeOnce ?
A: A LogMeOnce is a type of computer code that takes data and turns it into a number, often called a “hash”, that can be used to identify and protect data.
Q: How does a LogMeOnce work in Windows Password?
A: When a computer user sets a password in Windows, the LogMeOnce takes the password and creates a hash from it. This hash is then stored in the computer’s system so that when the user needs to log in again, the system will compare the password they enter with the hash to see if they match.
Q: Why is it important to use a LogMeOnce for Windows Password?
A: LogMeOnce are a type of encryption which helps protect user data by making it difficult for someone to ‘decode’ or access it. For Windows passwords, LogMeOnce ensure that passwords are kept safe from potential hackers by making it difficult for them to decode the password even if they have access to the system.
Conclusion
There are many obfuscation and hashing solutions on the market that can help you secure Windows passwords. But with LogMeOnce , you have all the benefits of the best-in-class Windows hashed password algorithm without purchasing or downloading any software. LogMeOnce’s hashing algorithm for Windows passwords offers advanced encryption technology for free LogMeOnce – something that none of the competitors can boast of. So, why wait any longer? Download LogMeOnce for free and use the industry’s top Windows hashed password algorithm to ensure a secure digital future.
Shiva, with a Bachelor of Arts in English Language and Literature, is a multifaceted professional whose expertise spans across writing, teaching, and technology. Her academic background in English literature has not only honed her skills in communication and creative writing but also instilled in her a profound appreciation for the power of words.
Passwords are the main means used by any user to authenticate in any service or system. However, the problem with passwords is that people usually tend to forget them a lot. In this case, they usually consult IT specialists or computer engineers who crack these passwords using various hashing algorithms. And you will know some knowledge about your computer: hash format are modern windows login passwords stored in. But for the sake of convenience, this article also offers a Windows password recovery tool: UnlockGo – Windows Password Recovery, you can crack the computer password at home without bothering others. Let’s dive in!
For Windows operating systems, the hash of the passwords of the users of each machine is found in the SAM (Security Account Manager) file and depending on the version of the operating system, one of two algorithms is used: LM or NTLM.
LM (Lan Manager) encryption is a weak algorithm because of the way it is designed since, for example, it splits the password into two blocks of 7 bytes, converts all characters to uppercase and pads unused bytes with zeros; all of this facilitates a brute force attack. When it was replaced by NTLM (NTLan Manager), these errors were corrected, but even so, many systems for compatibility continue to store passwords in both formats, which is a clear security flaw.
So, in short, the answer to the question: What hash format are Windows passwords stored in” is an NT hash system.
How to Crack Windows Login Password with Hash
On Windows, the password is normally stored in the SAM file at %SystemRoot%\System32\config. Windows uses the NTLM hash; during boot time, the SAM file hashes are decrypted using SYSKEY, and the hashes are loaded into the registry, which is then used for authentication purposes.
Windows do not allow users to copy the SAM file to another location, so you have to use another operating system to mount the Windows system on top of it and copy the SAM file. Once the file is copied, we will decrypt the SAM file with SYSKEY and get the hashes to crack the password.
Note: This method is difficult and time-consuming for common computer user to crack Windows password, so this way is the perfect choice for you to disable windows password with ease.
Extracting Windows Password Hashes Using Cain
- First, download and install the famous Cain and Abel software by visiting the link Download Cain.
- In the next step, select “Run as Administrator” and open Cain for the first time.
- In Cain, click the Cracker icon from the upper set of tabs.
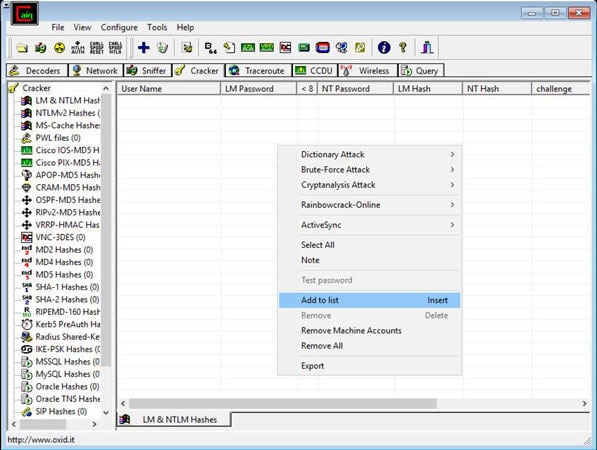
- Now by clicking in the right window, select ‘add to list’ as shown below.
- In the left section “Add NT Hashes from” box, accept the default selection of the system and “Import Hashes from the local system”, as shown below, and select ‘Next’.
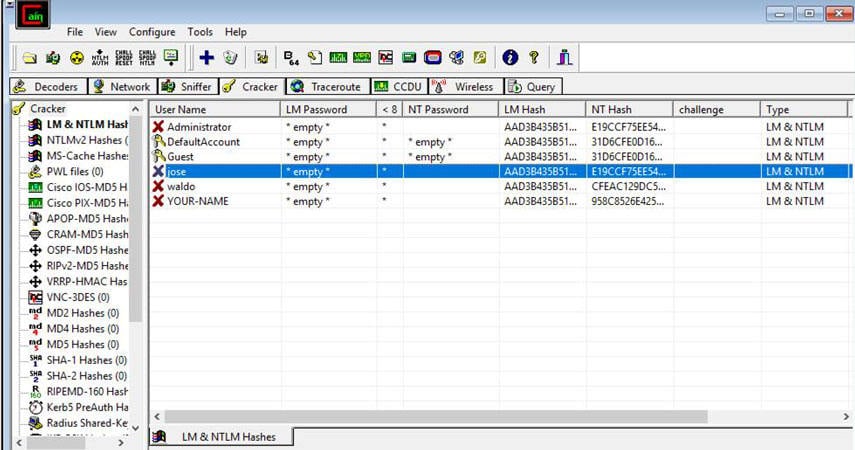
- The retrieved password hashes appear, as shown below.
Cracking Windows Password with Acquired Hash Using Ophcrack
The NTLM technique stores the hash in the MD4 algorithm, which can easily be cracked by the hackers, the above diagram shows the encrypted hash by Cain, and we will be using Ophcrack (A recovery tool) to crack the acquired Md4 hash.
Now, as we have acquired the hash, here comes the next step of choosing the best and fastest tool to crack the windows password hash.
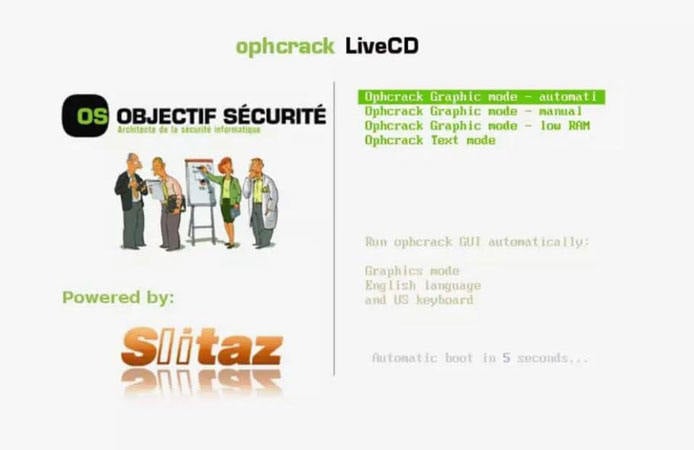
- On your computer, visit the Ophcrack website and download Ophcrack LiveCD, which is compatible with Windows 10. The downloaded file will be in ISO format.
- After downloading the Ophcrack LiveCD, you will need to burn the ISO file to a CD or flash drive.
- From there, you can insert the bootable media into the computer to reset the computer. You will then see a screen like this.
- The Ophrcrack LiveCD menu should now appear. Please be patient while the computer loads this menu. However, you can still press the Enter button while still in the Ophcrack Graphic mode – auto menu.
- Once the menu has loaded, you will see a command line appear on the screen. Here Again, you don’t have to do anything but wait, as those are just commands that show Ophcrack LiveCD software is loading which will allow you to crack Windows 10 password.
- Then a window will appear shortly confirming the content of the encrypted password that is in the device that was inserted into the computer.
- The program will retrieve the administrator password and display it in the window. Click through the list and view the administrator account password.
- After making a note of the password, you can now log into your computer.
Ophcrack uses the famous Brute Force dictionary attack technique to crack windows password hash. Brute forcing is the most effective algorithm among all the hashing algorithms for windows. It works on Dump and Loads to utilize the real-time graphs for analyzing the windows password hash.
How to Crack Windows Login Password with Hash Alternative (Time-saving and Easy)
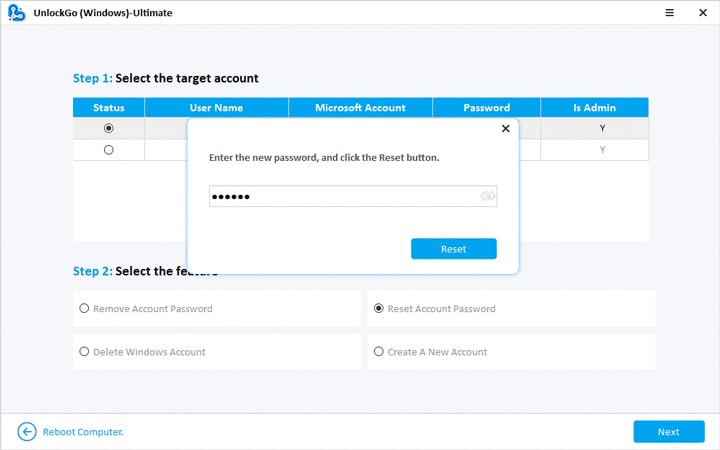
Cracking Windows passwords is not an easy task, and sometimes it would surely take too much time. Individuals working in offices and different sectors might sometimes lose their passwords and end up losing access to your Windows. This situation might be so hectic, but now no need to be worried, UnlockGo – Windows Password Recovery will surely help you to set out the new password for your windows without remembering the old one within a few clicks and minutes.
Just follow the below steps, and you can easily crack your windows password:
🔔 Step 1: First, install UnlockGo windows password recovery on your PC.
- 🔔 Step 2: Create a Windows password reset CD/DVD or USB, whatever is available.

- 🔔 Step 3: Now, after the bootable USB drive is ready, with UnlockGo, you have the option to reset or crack your windows password, delete the password or create a new account for the windows.
- 🔔 Step 4: Select the reset password option, and you are now all set to regain access to your computer.
FAQs about Windows Password Hash Format
❓ 1. How to acquire password hashes?
There are different ways to acquire password hashes:
Acquisition from the Machine In-Question
Although Windows password hashes are stored in the SAM file, their encryption is within the system boot key stored in the SYSTEM file. Both of these files are stored in C: WindowsSystem32Config. If someone accesses both of these files, then he can use the SYSTEM file for decrypting the passwords in the SAM file.
Using Authentication to a Remote Server
Taking the benefit of authentication to a remote server is another way of acquiring password hashes. This works by sending a user link pointing to a file on the hacker-controlled server in the form of a phishing email. This link can trick the target computer, which then tries to authenticate the activity with the current login credentials. Thus, stealing a password hash becomes possible by this method.
❓ 2. What password cracking tools, we can use?
There are different ways of cracking Windows passwords using different tools, such as Hashcat, John the Ripper, and Ophcrack.
Hashcat: It is a free, open-source password cracker for all DOS having GPU support.
John the Ripper: It is a password cracking tool. Its free version is available for all the Operating Systems, while its Pro version is available for *nix Operating Systems.
Ophcrack: It is yet another password cracking tool available for all operating systems.
❓ 3. How are Passwords Stored in Windows?
There are three ways the passwords are stored in Windows. These are:
Passwords being stored as OWF
OWF stands for One-way Function. It is a one-way method of mathematical transformation of data related to hashing algorithm for Windows. The data is transformed through this method and is converted only through one-way encryption, and this process cannot be reversed.
Passwords being Stored in Active Dictionary
The passwords at rest are secured in the Active Dictionary Database. The NT password hash gets protected by a dual encryption layer when stored in this form.
Passwords being Stored in Local SAM
A local Security Account Manager (SAM) is used for storing the local user account password hashes. The password hashes encrypted in SAM are done in the same way as the Active Dictionary.
Summary
Just like any piece of modern technology, Windows has also faced numerous updates with time. It has changed its interface and applications quite a lot. Also, its operability has been modified, but still, it is facing critical security issues. Windows needs to work on its hashing algorithm in the upcoming versions to ensure maximum security for its users; otherwise, the intruders and crackers might hack into windows easily. You can change them within months, and no worry about forgetting with our UnlockGo – Windows Password Recovery, feel free to encrypt your computer.
Most of the theory here has been taken from SANS documentation (https://www.sans.org/reading-room/whitepapers/testing/paper/39170) . This is intended to provide a summary about NT hashes and Pass the hash.
LM Password Hashes
The LAN Manager hash was one of the first password hashing algorithms to be used by Windows operating systems, and the only version to be supported up until the advent of NTLM used in Windows 2000, XP, Vista, and 7. These newer operating systems still support the use of LM hashes for backwards compatibility purposes. However, it is disabled by default for Windows Vista and Windows 7.
In earlier versions of Windows, the LM hash is typically stored and transmitted by default. However, in Windows Vista and versions above, the LM hash is not stored by default, nor is it used by default during network authentication. Instead, the newer versions use the NTLMv2 hash as the default authentication method.
Example
If LM hashes are enabled on your system (Win XP and lower), a hash dump will look like:
- Administrator:500:01FC5A6BE7BC6929AAD3B435B51404EE:0CB6948805F797BF2A82807973B89537:::
If LM hashes are disabled on your system (Win Vista, 7, 8+), a hash dump will look like:
- Administrator:500:NO PASSWORD*********************:0CB6948805F797BF2A82807973B89537:::
LM hash break down
- First field: the username
- Second field: the SID (Security IDentifier) for that username
- Third field: the LM hash
- Forth field: the NTLM hash
LM hash mechanics
- When a user creates a new password, this password is converted to all uppercase
- then it’s padded out to 14 characters
- The password is then split into two 7-byte chunks
- The two chunks then will be used as a key in a Data Encryption Standard (DES) encryption to encrypt a fixed value
- The values of the two DES operations are concatenated and the result is stored as the LM hash
LM hash weaknesses
- The password length is limited to 14 characters, broken up into two independent 7-byte chunks
- the password is case-insensitive which decreases the key space available for the users to choose their passwords from
NTML hash
NT LAN Manager (NTLM) is the Microsoft authentication protocol that was created to be the successor of LM. NTLM was accepted as the new authentication method of choice and implemented with Windows NT 4. It MD4 hashing algorithm to create the hash based upon a series of mathematical calculations
MD4 is considered to be significantly stronger than DES as it allows for longer password lengths, it allows for distinction between uppercase and lowercase letters and it does not split the password into smaller, easier to crack chunks.
Windows does not utilize a technique called salting. Salting is a technique in which a random number is generated in order to compute the hash for the password. This means that the same password could have two completely different hash values, which would be ideal. It is a good practice to use a salt when storing passwords.
NTLM mechanics
- It takes the password, hashes it using the MD4 algorithm
- It does not break up the password into chunks
- the password is case-sensitive
- can support very long passwords (127 characters)
NTLMv1
To generate the NT hash from a plaintext password 1), one needs to apply the MD4 hashing function to the UTF-16 Little Endian encoding of the password.
NT_Hash(password) = MD4(UTF-16-LE(password))
- NT_Hash(“pass1”) = “8D7A851DDE3E7BED903A41D686CD33BE”
identical passwords can be identified based on the NT hashes solely, without breaking the encryption. It is worth noting that NT hashes, in many scenarios, are equivalent to passwords themselves.
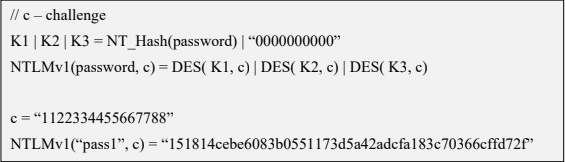
The NTLMv1 hashing algorithm takes as input the NT hash of a password and a challenge provided by the server. It concatenates the NT hash with five bytes of zeros. It splits this string into three 7-byte keys. Those keys are used to encrypt the challenge using DES. The cryptograms are concatenated to create the NTLMv1 hash
c = challenge
K1 | K2 | K3 = NT_Hash(password) | “0000000000”
NTLMv1(password, c) = DES( K1, c) | DES( K2, c) | DES( K3, c)
- c = “1122334455667788”
- NTLMv1(“pass1”, c) = “151814cebe6083b0551173d5a42adcfa183c70366cffd72f”
It is essential to notice that NTLMv1 hashes can be cracked, revealing the NT hash that was used to generate them. Rainbow tables exist for chosen NTLMv1 challenges, making it possible to obtain the hash in minutes.
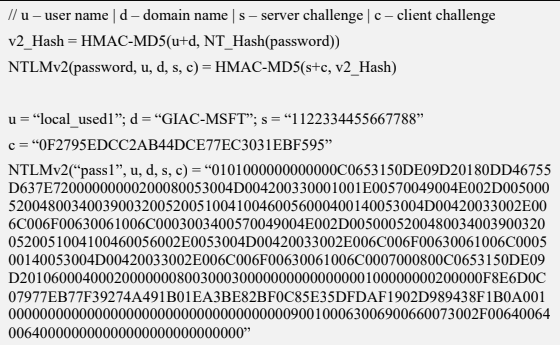
NTLMv2
The NTLMv2 hashing algorithm concatenates a user name and domain name, and then it applies the HMAC-MD5 hashing function using the NT hash of a password as the key. Next, it concatenates a server and client challenges and again applies the same hashing function, using the output of the previous calculation as the key.
NTLMv2 is stronger than NTLMv1. Usually, brute-force or dictionary attacks, using tools like hashcat or john, need to be applied to break the hash. These attacks are feasible and commonly applied leading to the recovery of the password rather than the NT hash.
Credential Process
Windows credentials are validated against the Security Accounts Manager (SAM) database on the local computer, or against Active Directory on a domain-joined computer, through the Winlogon service. Credentials are collected through user input on the logon user interface or programmatically via the application programming interface (API) to be presented to the authenticating target.
The credentials used in authentication are digital documents that associate the user’s identity to some form of proof of authenticity, such as a certificate, a password, or a PIN.
Local security information is stored in the registry under HKEY_LOCAL_MACHINE\SECURITY. Stored information includes policy settings, default security values, and account information, such as cached logon credentials. A copy of the SAM database is also stored here, although it is write-protected.
This has been taken from (https://docs.microsoft.com/en-us/windows-server/security/windows-authentication/credentials-processes-in-windows-authentication)
The following diagram shows the components that are required and the paths that credentials take through the system to authenticate the user or process for a successful logon.

The following table describes each component that manages credentials in the authentication process at the point of logon.
Authentication components for all systems
| Component | Description |
|---|---|
| User logon | Winlogon.exe is the executable file responsible for managing secure user interactions. The Winlogon service initiates the logon process for Windows operating systems by passing the credentials collected by user action on the secure desktop (Logon UI) to the Local Security Authority (LSA) through Secur32.dll. |
| Application logon | Application or service logons that do not require interactive logon. Most processes initiated by the user run in user mode by using Secur32.dll whereas processes initiated at startup, such as services, run in kernel mode by using Ksecdd.sys.
For more information about user mode and kernel mode, see Applications and User Mode or Services and Kernel Mode in this topic. |
| Secur32.dll | The multiple authentication providers that form the foundation of the authentication process. |
| Lsasrv.dll | The LSA Server service, which both enforces security policies and acts as the security package manager for the LSA. The LSA contains the Negotiate function, which selects either the NTLM or Kerberos protocol after determining which protocol is to be successful. |
| Security Support Providers | A set of providers that can individually invoke one or more authentication protocols. The default set of providers can change with each version of the Windows operating system, and custom providers can be written. |
| Netlogon.dll | The services that the Net Logon service performs are as follows:
– Maintains the computer’s secure channel (not to be confused with Schannel) to a domain controller. |
| Samsrv.dll | The Security Accounts Manager (SAM), which stores local security accounts, enforces locally stored policies and supports APIs. |
| Registry | The Registry contains a copy of the SAM database, local security policy settings, default security values, and account information that is only accessible to the system. |
It is known that Windows computers can be configured to be in a workgroup or joined to a domain. In a workgroup, each computer holds its own SAM which contains information about all its local user and group accounts. The passwords associated with each of these accounts are hashed and stored in the SAM. The hashing of passwords offers some measure of security and minimize the risks of an attack. The Local Security Authority (LSA) validates a user’s logon attempt by verifying their credentials against the data stored in the SAM. A user’s logon attempt is successful only when the entered password matches the password stored in the local SAM.
In a domain-joined computer, there can be two types of logons: a local logon (that is handled by the SAM as described above) and a domain user logon using the Active Directory (AD) database with the WinLogon service. However, when a user logs on to a computer as a local user, the user will not be able to access the network resources. A Windows server that has been promoted to a DC will use the AD database instead of the SAM to store data. The only instance it will use the SAM would be to boot into DSRM for performing maintenance operations. This is because the DSRM administrator password is stored locally in the SAM and not in AD.
Credential storage
Cached Credentials
Validation mechanisms rely on the presentation of credentials at the time of logon. However, when the computer is disconnected from a domain controller, and the user is presenting domain credentials, Windows uses the process of cached credentials in the validation mechanism.
Each time a user logs on to a domain, Windows caches the credentials supplied and stores them in the security hive in the registry of the operation system.
With cached credentials, the user can log on to a domain member without being connected to a domain controller within that domain.
In other words, Cached credentials is a term used to describe the process of storing the domain login credentials so that a user can login locally to a domain member without being connected to a domain controller
To get Sam dump or Hash of passwords from registry hive we need system privileges or NT Authority privileges
Where do I find the SAM/Hashes?
It can be found on the hard drive in the folder %systemroot%system32config. However this folder is locked to all accounts including Administrator while the machine is running. The only account that can access the SAM file during operation is the “System” account.
You may also be able to find the SAM file stored in %systemroot% repair if the NT Repair Disk Utility (rdisk) has been run and the Administrator has not removed the backed up SAM file.
The final location of the SAM or corresponding hashes can be found in the registry. It can be found under HKEY_LOCAL_MACHINESAM. This is also locked to all users, including Administrator, while the machine is in use
Memory
Windows caches users’ passwords hashes (NT hash, and LM hash) in a memory location whenever a user logs on interactively or via terminal service. This location is accessible only by the operating system, and any process acting as the operating system.
- The operating system uses this cached hash to authenticate the user whenever the user tries to access a network resource, and that resource requires authentication
- This is done transparently for the user, who otherwise would be entering her password every time she tries to access a resource on the network
- The memory location is purged as soon as the user locks his system or logs off
Reversibly Encrypted
In this form passwords are stored reversibly encrypted. This encryption can be reversed and the clear-text password(s) can be revealed. This form of password storage is disabled by default
Backups
SAM file can also be stored in a backup location: C:\Windows\Repair\SAM
Security Accounts Manager database
The Security Accounts Manager (SAM) is a database that stores local user accounts and groups. It is present in every Windows operating system; however, when a computer is joined to a domain, Active Directory manages domain accounts in Active Directory domains.
If someone attempts to log on to the system and the user name and associated passwords match an entry in the SAM, a sequence of events takes place ultimately allowing that person access to the system. If the user name or passwords do not properly match any entry in the SAM, an error message is returned requesting that the information be entered again.
The SAM database runs automatically as a background process when the computer starts up. The SAM also works together with other processes and services that run on the computer, by providing the security information needed.
The Windows SAM database file resides in C:\Windows\System32\config. The hashed values of all passwords find a place in the HKEY_LOCAL_MACHINE\SAM of the registry. However, there are rules that govern ‘when’ and ‘who’ can access this file.
Local Security Authority LSA
The Local Security Authority (LSA) is a protected system process that authenticates and logs users on to the local computer. In addition, LSA maintains information about all aspects of local security on a computer (these aspects are collectively known as the local security policy), and it provides various services for translation between names and security identifiers (SIDs). The security system process, Local Security Authority Server Service (LSASS), keeps track of the security policies and the accounts that are in effect on a computer system.
The Local Security Authority Subsystem Service (LSASS) stores credentials in memory on behalf of users with active Windows sessions. The stored credentials let users seamlessly access network resources, such as file shares, Exchange Server mailboxes, and SharePoint sites, without re-entering their credentials for each remote service.
LSASS can store credentials in multiple forms, including:
- Reversibly encrypted plaintext
- Kerberos tickets (ticket-granting tickets (TGTs), service tickets)
- NT hash
- LAN Manager (LM) hash
If the user logs on to Windows by using a smart card, LSASS does not store a plaintext password, but it stores the corresponding NT hash value for the account and the plaintext PIN for the smart card. If the account attribute is enabled for a smart card that is required for interactive logon, a random NT hash value is automatically generated for the account instead of the original password hash. The password hash that is automatically generated when the attribute is set does not change.
If a user logs on to a Windows-based computer with a password that is compatible with LAN Manager (LM) hashes, this authenticator is present in memory.
The storage of plaintext credentials in memory cannot be disabled, even if the credential providers that require them are disabled.
The stored credentials are directly associated with the Local Security Authority Subsystem Service (LSASS) logon sessions that have been started after the last restart and have not been closed. For example, LSA sessions with stored LSA credentials are created when a user does any of the following:
- Logs on to a local session or Remote Desktop Protocol (RDP) session on the computer
- Runs a task by using the RunAs option
- Runs an active Windows service on the computer
- Runs a scheduled task or batch job
- Runs a task on the local computer by using a remote administration tool
In some circumstances, the LSA secrets, which are secret pieces of data that are accessible only to SYSTEM account processes, are stored on the hard disk drive. Some of these secrets are credentials that must persist after reboot, and they are stored in encrypted form on the hard disk drive. Credentials stored as LSA secrets might include:
- Account password for the computer’s Active Directory Domain Services (AD DS) account
- Account passwords for Windows services that are configured on the computer
- Account passwords for configured scheduled tasks
- Account passwords for IIS application pools and websites
- Passwords for Microsoft accounts
How passwords are used
OLD
Both LM and NTLM are very similar, but differ mainly in the hash used to compute the response. LM and NTLM are used for authentication in workgroups. They are also used in a domain environment if either the client, or the server is not a domain member, or if a resource within the domain is accessed by its IP address instead of its NetBIOS or DNS name.
All Windows OSs prior to Windows Server 2003 send both LM and NTLM responses by default. In Windows Server 2003 only the NTLM response is sent by default, while the LM response field is mostly unused
CURRENT
NTLMv2 improves upon LM and NTLM hashes and their weaknesses. It uses the NT hash; however, it also includes a client challenge in the computation. NTLMv2 also includes timestamps which makes it immune to reply attacks and is the default authentication method used from Windows Vista onward
NTLMv2 hash is not stored in Windows, it is generated on the fly. NTLMv2 authentication uses both the client nonce and the server nonce/challenge to calculate the response, unlike NTLM authentication, which uses a fixed server challenge. This calculation process eliminates the possibility of precomputed attacks against NTLMv2
DOMAIN
Kerberos is a set of services only used in a domain environment when a NetBIOS name or DNS name is used to connect. If a user connects to a resource via IP, then Kerberos will not be used. LM, NTLM, or NTLMv2 will be used instead to authenticate the user.
- Kerberos provides authentication for both the user and the server.
- The client and server agree on the encryption algorithm, the shared secret key, and the recognition data
- the authenticator, which can include the sender’s name, domain, time, IP, and the MD5 checksum of the authenticator.
- When the client and server decrypt the recognition data, the data let them prove to one another that they know the shared 128-bit secret.
- Windows versions prior to Server 2008 use the RC4 encryption algorithm
- Windows Server 2008 uses AES which is much more secure than RC4
How can passwords be attacked?
The two popular attacks against passwords are online and offline attacks. There are also other
forms of attacks against passwords, for example via key loggers, shoulder-surfing, social engineering, etc.
Online Password Attack – Password Guessing
An online password attack, also known as password guessing, is the process of attempting to find passwords by trying to login. Online password attacks are relatively slow, typically rated at about 50 password attempts a minute. A true brute force attack takes a lot longer. Under these conditions, trying millions of passwords simply isn’t an option. In this attack, an attacker can either manually enter passwords or use some software tools to automate the process
Offline Password Attack – Password CrackingAn offline password attack, also known as password cracking, is used when the attacker has captured the password hash. In this attack, the attacker will start cracking the password by creating a hash of a password or a challenge-response sequence and comparing it to the hash or response that he captured. If a match is found, the attempt to crack the hash is considered successful
Difference
The difference between online and offline attacks is that, in an online attack, the password has the protection of the system in which it is stored on. However, in offline attacks, passwords have no such protection. For this reason, offline attacks are in general much faster than online attacks.
Precomputed hash attack
Precomputed attacks are a form of offline attacks. In this attack, also known as ‘rainbow table attack’, the password hashes are stored in a file. The size of this file can be very large, for example storing all LM hashes requires 310 terabytes of storage.
Precomputed hashes can greatly decrease the time needed to crack passwords. In fact they can decrease the time required to find a password from months or weeks to just a few hours or even minutes.
Pass the hash
it is essential to understand that the PtH attack uses the actual NT hash. PtH in Windows 10 is closely related to the NTLMv2 authentication protocol. Windows implements a Single Sign-On (SSO) system, which caches credentials after the initial authentication and uses them later to access hosts, file shares, and other resources.
The NTLMv2 authentication process applies a challenge/response exchange, which, instead of using the user’s password, uses its NT hash. This feature allows the attacker to authenticate with the NT hash (Pass-the-Hash), without the knowledge of the corresponding password.
The PtH attack is composed of two primary steps:
- Extraction of hashes from an already compromised host or from another, not-yet-compromised host via network communication
- Application of the extracted hashes to gain access to the same or a different machine
Important (Mimikatz)
- The attacker need at least an account or shell in the server
- That user need administrative privileges
In a pass-the-hash attack, the goal is to use the hash directly without cracking it, this makes time-consuming password attacks less needed.
How do you Prevent Pass-the-Hash Attacks
For a PtH attack to succeed, the perpetrator must first gain local administrative access on a computer to lift the hash. Once the attacker has a foothold they can move laterally with relative ease, lifting more credentials and escalating privileges along the way.
Implementing the following security best practices will help eliminate, or at least minimize the impact of, a PtH attack:
- A least privilege security model: Can limit the scope, and mitigate the impact of a PtH attack, by reducing an attackers ability to escalate privileged access and permissions. Removing unnecessary admin rights will go a long way to reducing the threat surface for PtH and many other types of attacks.
- Password management solutions: Can rotate passwords frequently (and/or after a known credential compromise) can condense the window of time during which a stolen hash may be valid. By automating password rotation to occur after each privileged session, you can completely thwart PtH attacks, and exploits relying on password reuse.
- Separation of privileges: meaning separating different types of privileged and non-privileged accounts, can reduce the scope of usage for administrator accounts, and thus, reduce the risk for compromise, as well as the opportunity for lateral movement.
Arabic
Table of Contents
I illustrated most of the concepts in this blog post in Arabic at the following video
This doesn’t contain all the details in the post but yet will get you the fundamentals you need to proceed with the next parts.
Windows hashes
LM hashes
It was the dominating password storing algorithm on windows till windows XP/windows server 2003.
It’s disabled by default since windows vista/windows server 2008.
LM was a weak hashing algorithm for many reasons, You will figure these reasons out once You know how LM hashing works.
LM hash generation?
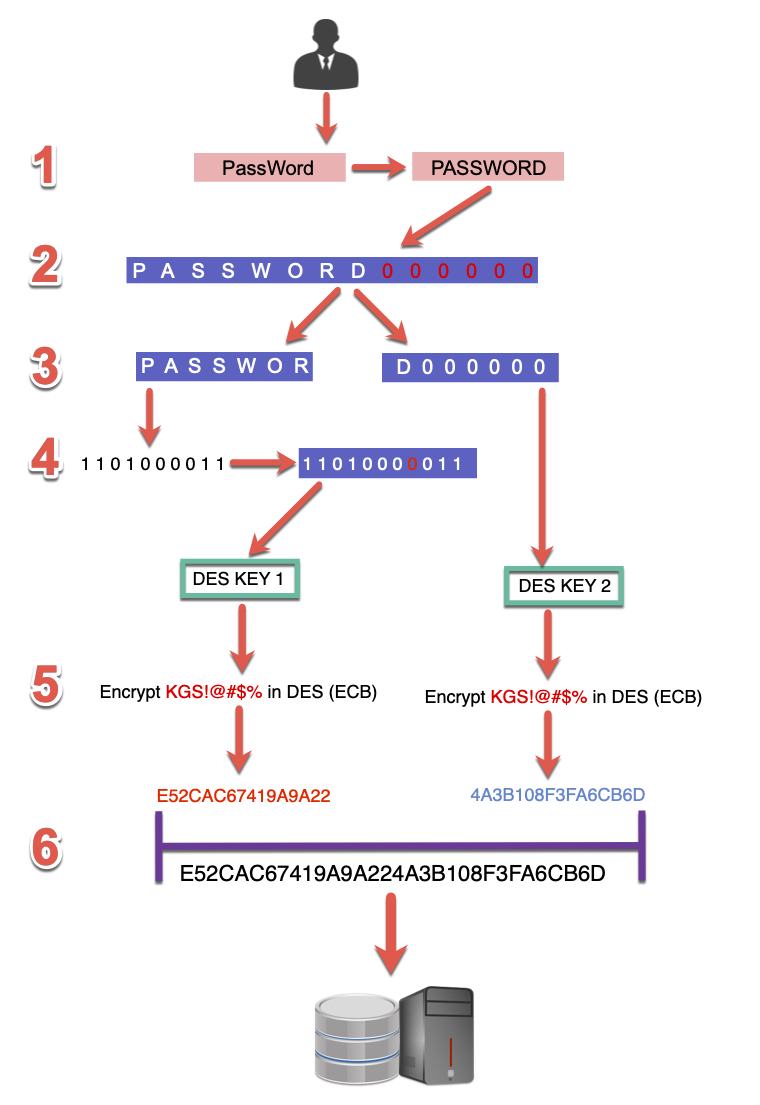
Let’s assume that the user’s password is PassWord
1 – All characters will be converted to upper case
PassWord -> PASSWORD
2 – In case the password’s length is less than 14 characters it will be padded with null characters, so its length becomes 14, so the result will be PASSWORD000000
3 – These 14 characters will be split into 2 halves
PASSWOR
D000000
4 – Each half is converted to bits, and after every 7 bits, a parity bit (0) will be added, so the result would be a 64 bits key.
1101000011 -> 11010000011
As a result, we will get two keys from the 2 pre-generated halves after adding these parity bits
5 – Each of these keys is then used to encrypt the string “KGS!@#$%” using DES algorithm in ECB mode so that the result would be
PASSWOR = E52CAC67419A9A22
D000000 = 4A3B108F3FA6CB6D
6 – The output of the two halves is then combined, and that makes out LM hash
E52CAC67419A9A224A3B108F3FA6CB6D
You can get the same result using the following python line.
python -c 'from passlib.hash import lmhash;print lmhash.hash("password")'

Disadvantages
As you may already think, this is a very weak algorithm,
Each hash has a lot of possibilities, for example, the hashes of the following passwords
Password1
pAssword1
PASSWORD1
PassWord1 . . . ETC
It will be the same!!!!

Let’s assume a password like passwordpass123
The upper and lowercase combinations will be more than 32000 possibilities, and all of them will have the same hash!
You can give it a try.
import itertools
len(map(''.join, itertools.product(*zip("Passwordpass123".upper(), "Passwordpass123".lower()))))
Also, splitting the password into two halves makes it easier, as the attacker will be trying to brute force just a seven-character password!
LM hash accepts only the 95 ASCII characters, but yet all lower case characters are converted to upper case, which makes it only 69 possibilities per character, which makes it just 7.5 trillion possibilities for each half instead of the total of 69^14 for the whole 14 characters.
Rainbow tables already exist containing all these possibilities, so cracking Lan Manager hashes isn’t a problem at all
Moreover, in case that the password is seven characters or less, the attacker doesn’t need to brute force the 2nd half as it has the fixed value of AAD3B435B51404EE
Example
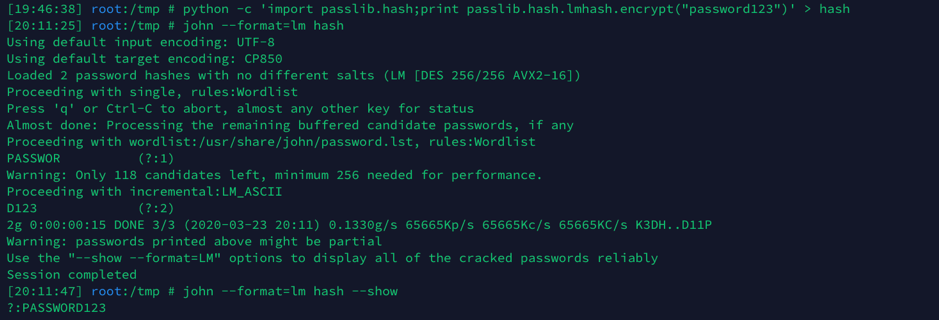
Creating hash for password123 and cracking it.
You will notice that john got me the password “PASSWORD123” in upper case and not “password123”, and yeah, both are just true.
Obviously, the whole LM hashing stuff was based on the fact that no one will reverse it as well as no one will get into the internal network to be in a MITM position to capture it.
As mentioned earlier, LM hashes are disabled by default since Windows Vista + Windows server 2008.
NTLM hash <NTHash>
NTHash AKA NTLM hash is the currently used algorithm for storing passwords on windows systems.
While NET-NTLM is the name of the authentication or challenge/response protocol used between the client and the server.
If you made a hash dump or pass the hash attack before so no doubt you’ve seen NTLM hash already.
You can obtain it via
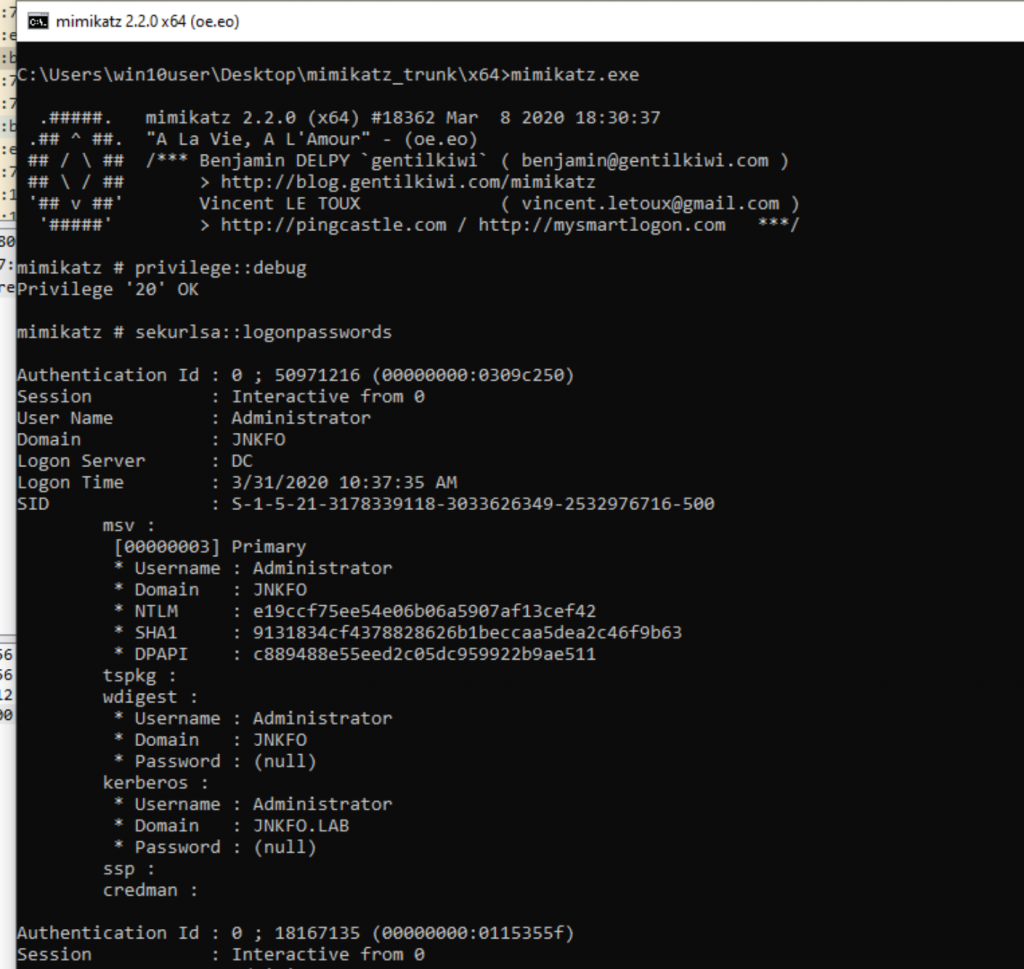
Dumping credentials from memory using mimikatz
Eg, sekurlsa::logonpasswords
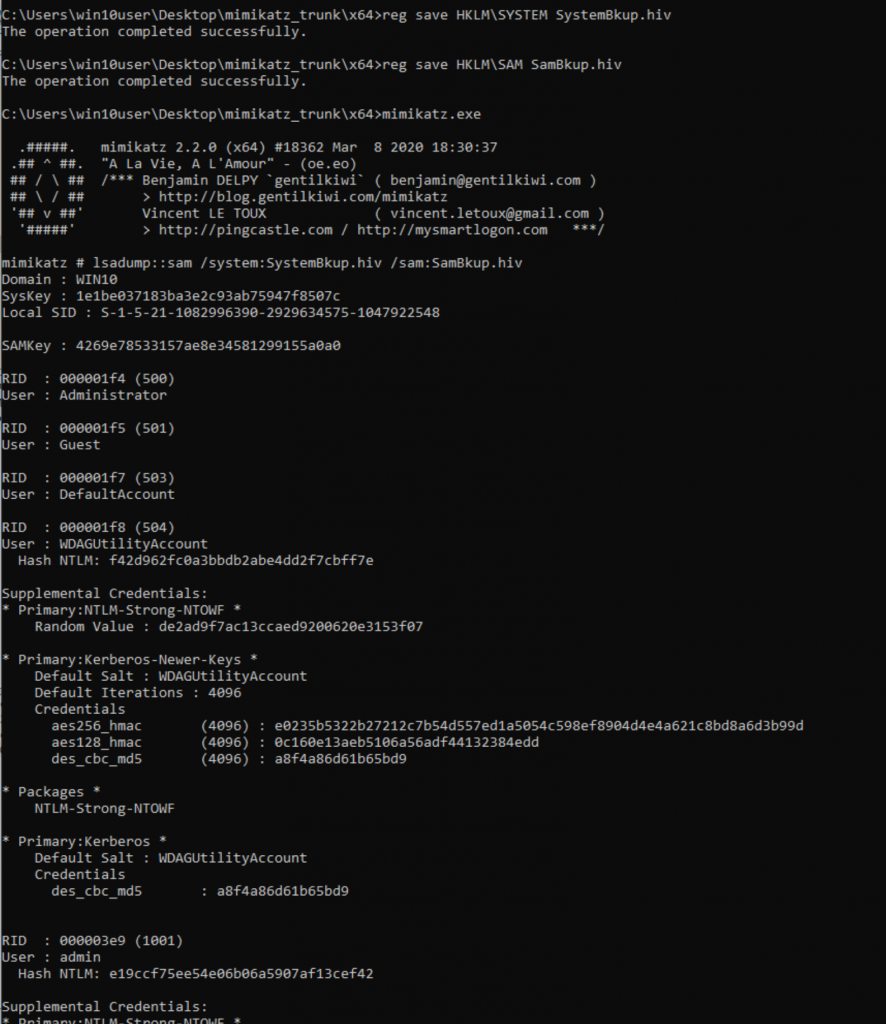
Dumping SAM using
C:\Windows\System32\config\SYSTEM
C:\Windows\System32\config\SAM
Then reading hashes offline via Mimikatz
lsadump::sam /system:SystemBkup.hiv /sam:SamBkup.hiv
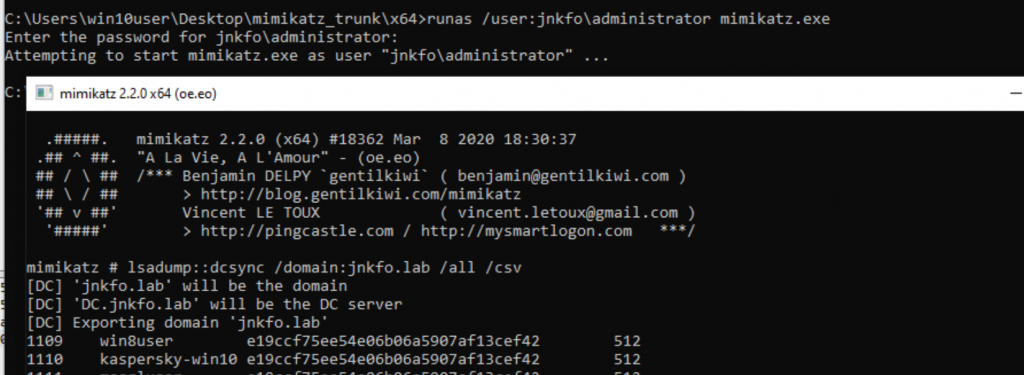
And sure via NTDS where NTLM hashes are stored in ActiveDirectory environments, You’re going to need administrator access over the domain controller, A domain admin privs for example
You can do this either manually or using DCsync within mimikatz as well
NTLM hash generation
Converting a plaintext password into NTLM isn’t complicated, it depends mainly on the MD4 hashing algorithm
1 – The password is converted to Unicode
2 – MD4 is then used to convert it to the NTLM
Just like MD4(UTF-16-LE(password))
3 – Even in case of failing to crack the hash, it can be abused using Pass the hash technique as illustrated later.
Since there are no salts used while generating the hash, cracking NTLM hash can be done either by using pre-generated rainbow tables or using hashcat.
hashcat -m 3000 -a 3 hashes.txt
Net-NTLMv1
This isn’t used to store passwords, it’s actually a challenge-response protocol used for client/server authentication in order to avoid sending user’s hash over the network.
That’s basically how Net-NTLM authentication works in general.
I will discuss how that protocol works in detail, but all you need to know for now is that NET-NTLMv1 isn’t used anymore by default except for some old versions of windows.
The NET-NTLMv1 looks like username::hostname:response:response:challenge

It can’t be used directly to pass the hash, yet it can be cracked or relayed as I will mention later.
Since the challenge is variable, you can’t use rainbow tables against Net-NTLMv1 hash,
But you can crack it by brute-forcing the password using hashcat using
hashcat -m 5500 -a 3 hashes.txt
This differs from NTLMv1-SSP in which the server challenge is changed at the client-side

NTLMv1 and NTLMv1-SSP are treated differently during cracking or even downgrading, this will be discussed at the NTLM attacks part.
Net-NTLMv2
A lot of improvements were made for v1, this is the version being used nowadays at windows systems.
The authentication steps are the same, except for the challenge-response generation algorithm, and the NTLM challenge length which in this case is variable instead of the fixed 16-bytes number at Net-NTLMv1.
At Net-NTLMv2 any parameters are added by the client such as client nonce, server nonce, timestamp as well as the username and encrypt them, that’s why you will find the length of Net-NTLMv2 hashes varies from user to another.
Net-NTLMv2 can’t be used for passing the hash attack, or for offline relay attacks due to the security improvements made.
But yet it still can be relayed or cracked, the process is slower but yet applicable.
I will discuss that later as well.
Net-NTLMv2 hash looks like

It can be cracked using
hashcat -m 5600 hash.txt
Net-NTLM Authentication
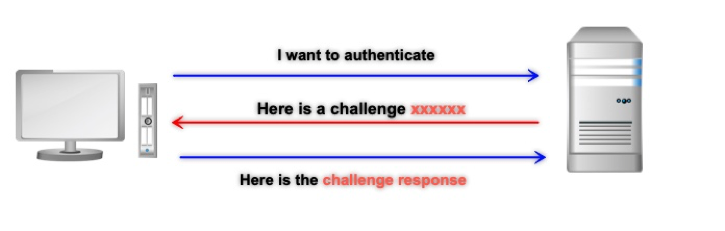
In a nutshell
Let’s assume that our client (192.168.18.132) is being used to connect to the windows server 2008 machine (192.168.18.139)
That server isn’t domain-joined, means that all the authentication process is going to happen between the client and the server without having to contact any other machines, unlike what may happen in the 2nd scenario.
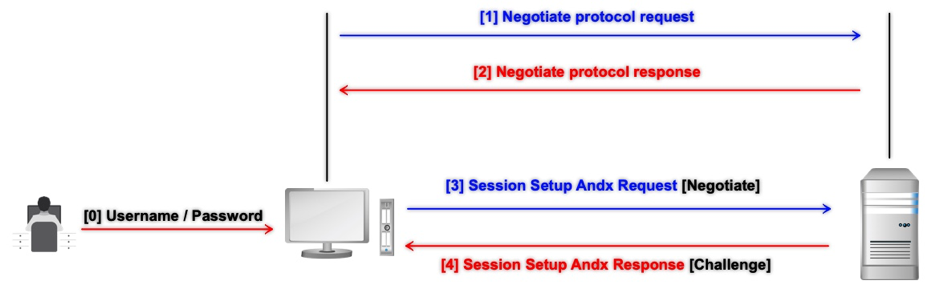
The whole authentication process can be illustrated in the following picture.
Client IP : 192.168.18.132 [Kali linux]
Server IP: 192.168.18.139 [Windows server 2008 non-domain joined]
0 – The user enters his/her username and password
1 – The client initiates a negotiation request with the server, that request includes any information about the client capabilities as well as the Dialect or the protocols that the client supports.
2 – The server picks up the highest dialect and replies through the Negotiation response message then the authentication starts.
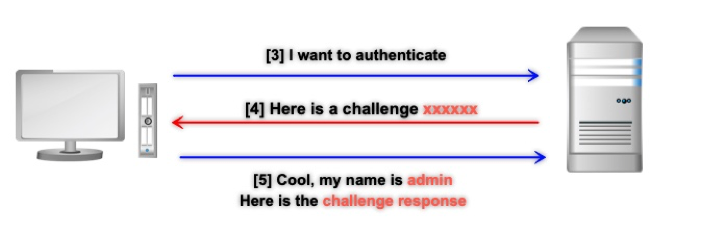
3 – The client then negotiates an authentication session with the server to ask for access, this request contains also some information about the client including the NTLM 8 bytes signature (‘N’, ‘T’, ‘L’, ‘M’, ‘S’, ‘S’, ‘P’, ‘\0’).
4 – The server responds to the request by sending an NTLM challenge
5 – The client then encrypts that challenge with his own pre-entered password’s hash and sends his username, challenge and challenge-response back to the server (another data is being sent while using NetNTLM-v2).
6 – The server tries to encrypt the challenge as well using its own copy of the user’s hash which is stored locally on the server in case of local authentication or pass the information to the domain controller in case of domain authentication, comparing it to the challenge-response, if equal then the login is successful.
1-2 : negotiation request/response
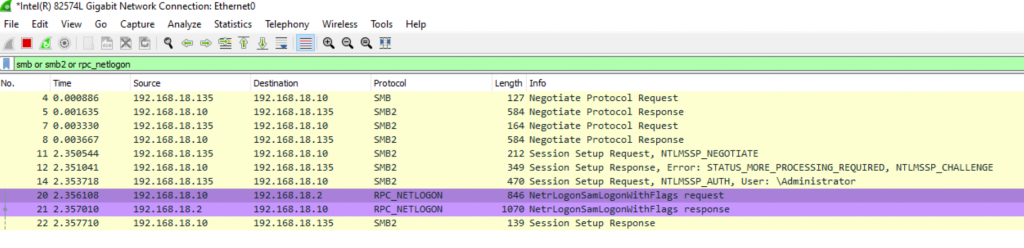
launch Wireshark and initiate the negotiation process using the following python lines
from impacket.smbconnection import SMBConnection, SMB_DIALECT
myconnection = SMBConnection("jnkfo","192.168.18.139")
These couple lines represent the 1st two negotiation steps of the previous picture without proceeding with the authentication process.
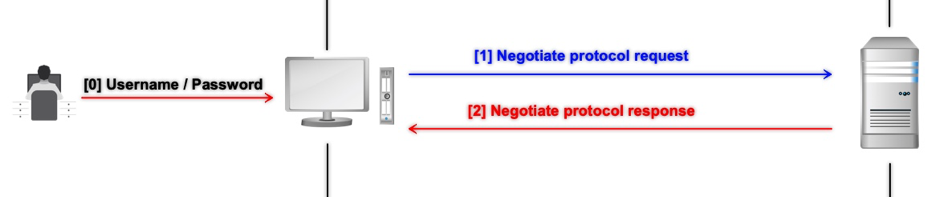
Using the “smb or smb2” filter

During the negotiation request, you will notice that the client was negotiating over SMB protocol, and yet the server replied using SMB2 and renegotiated again using SMB2!
It’s simply the Dialects.
By inspecting the packet you will find the following
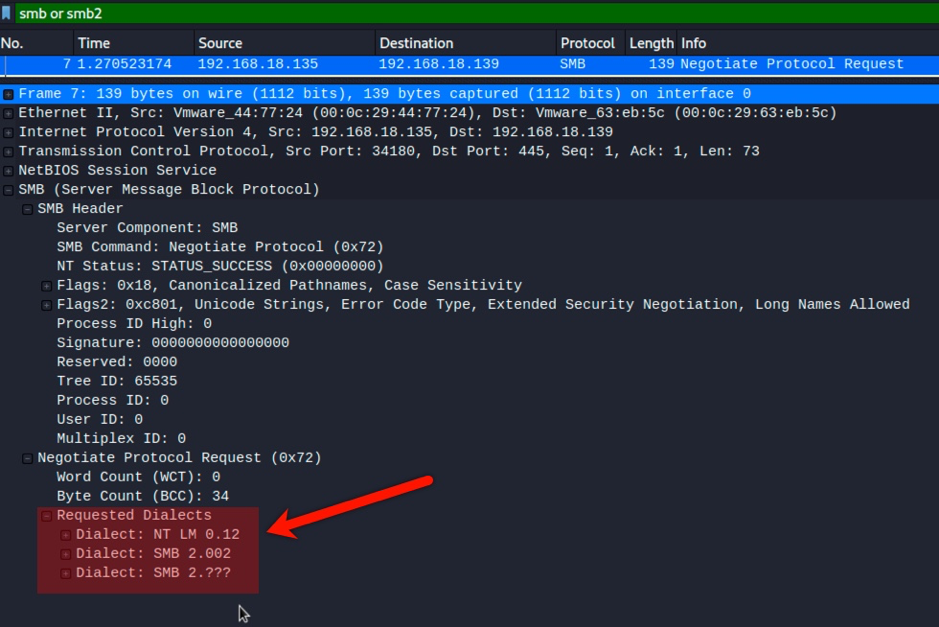
As mentioned earlier, the client is offering the Dialects it supports and the server picks up whatever it wants to use, by default it picks up the one with the highest level of functionality that both client and server supports.
If the best is SMB2 then let it be SMB2.
You can, however, enforce a certain dialect (assuming the server supports it) using
Myconnection.negotiateSession(preferredDialect=”NT LM 0.12”)
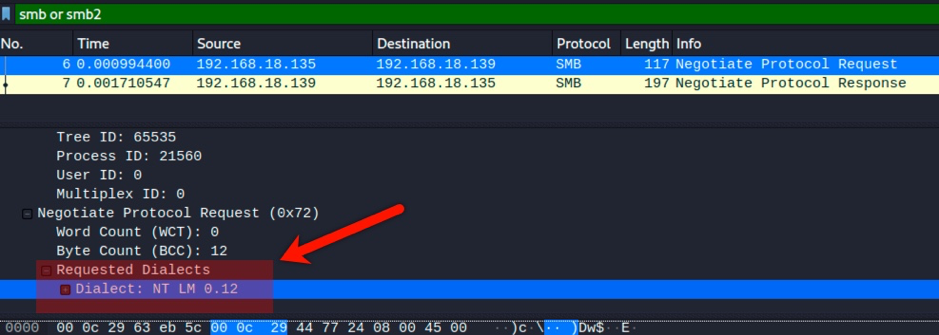
The dialect NT LM 0.12 was sent, the server responded back using SMB, and will use the same protocol for the rest of the authentication process.
Needless to say that LM response isn’t supported by default anymore since windows vista/windows server 2008.
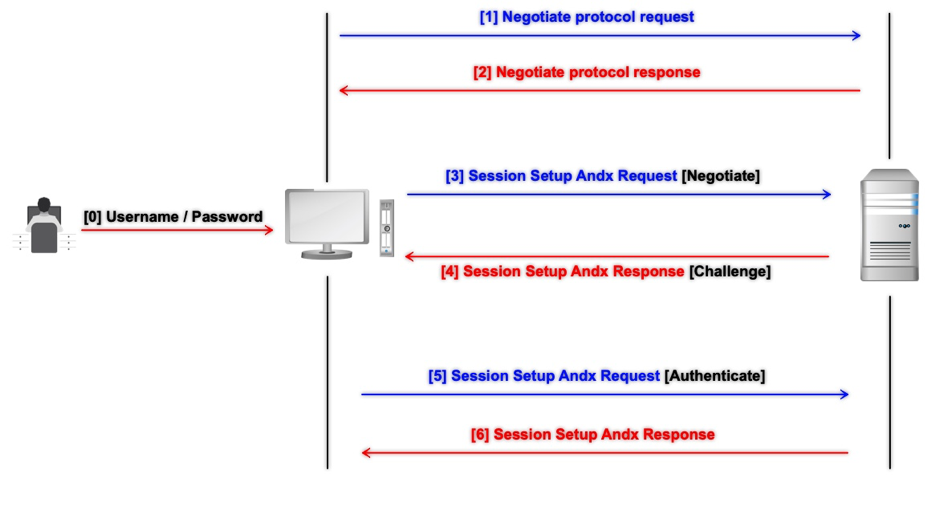
3 – Session Setup Request (Type 1 message)
The following line will initiate the authentication process.
myconnection.login("Administrator", "P@ssw0rd")
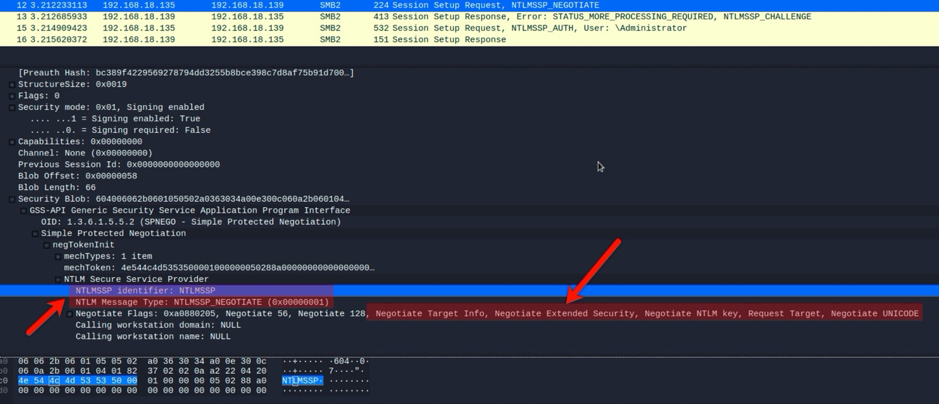
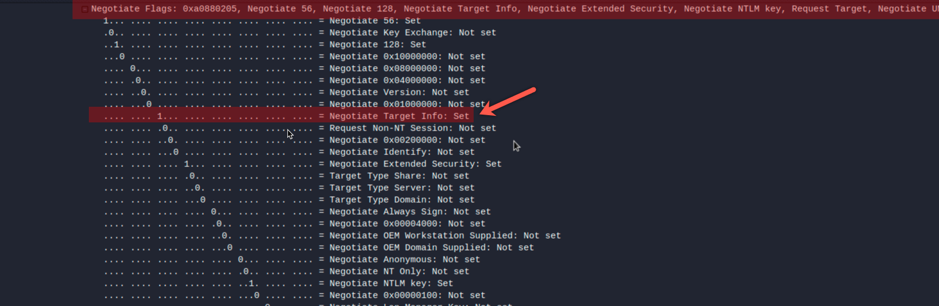
The “Session Setup Request” packet contains information such as the [‘N’, ‘T’, ‘L’, ‘M’, ‘S’, ‘S’, ‘P’, ‘\0’] signature, negotiation flags indicating the options supported by the client and the NTLM Message Type which must be 1
An interesting Flag is the NTLMSSP_NEGOTIATE_TARGET_INFO flag which will ask the server to send back some useful information as will be seen in step number 4
Another interesting flag is the NEGOTIATE_SIGN which has a great deal with the relay attacks as will be mentioned later.
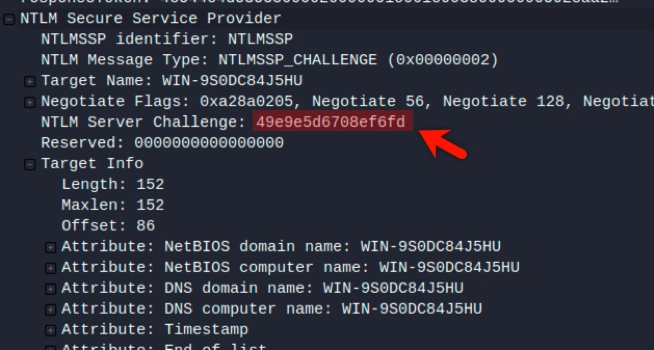
4 – Session Setup Response (Type 2 message)
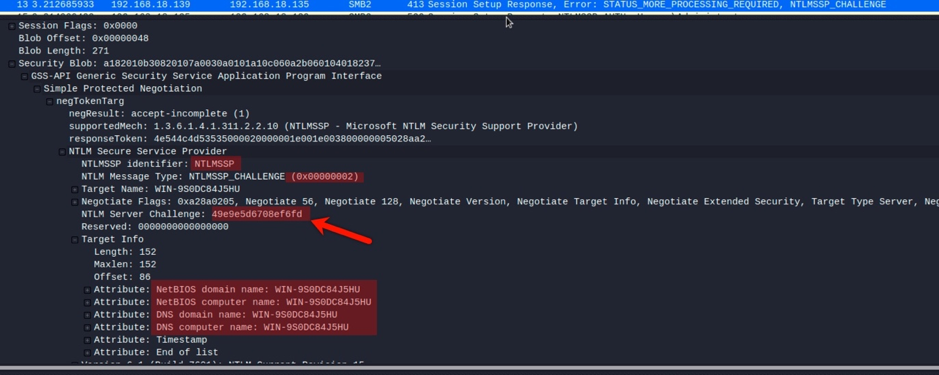
At the response, we get back the NTLMSSP signature again.
The message type must be 2 in this case.
Target name and the target info due to the NTLMSSP_NEGOTIATE_TARGET_INFO flag we sent earlier which provides us with some wealthy information about the target!
A good example is getting the domain name of exchange servers externally.
The most important part is the NTLM challenge or nonce.
5 – Session Setup Request (Type 3 message)
Long story short, the client needs to prove that he knows the user’s password, without sending the plaintext password or even the NTLM hash directly over the network.
So instead it goes through a procedure in which it creates NT-hash, uses this to encrypt the server’s challenge, sends this back along with the user name to the server.
That’s how the process works in general.
At NTLMv2, The client hashes the user’s pre-entered plain text password into NTLM using the pre-mentioned algorithm to proceed with the challenge-response generation.
The elements of the NTLMv2 hash are
– The upper-case username
– The domain or target name.
HMAC-MD5 is applied to this combination using the NTLM hash of the user’s password, which makes the NTLMv2 hash.
A blob block is then constructed containing
– Timestamp
– Client nonce (8 bytes)
– Target information block from type 2 message
This blob block is concatenated with the challenge from type 2 message and then encrypted using the NTLMv2 hash as a key via HMAC-MD5 algorithm.
Lastly, this output is concatenated with the previously constructed blob to form the NTLMv2-SSP challenge-response (type 3 message)
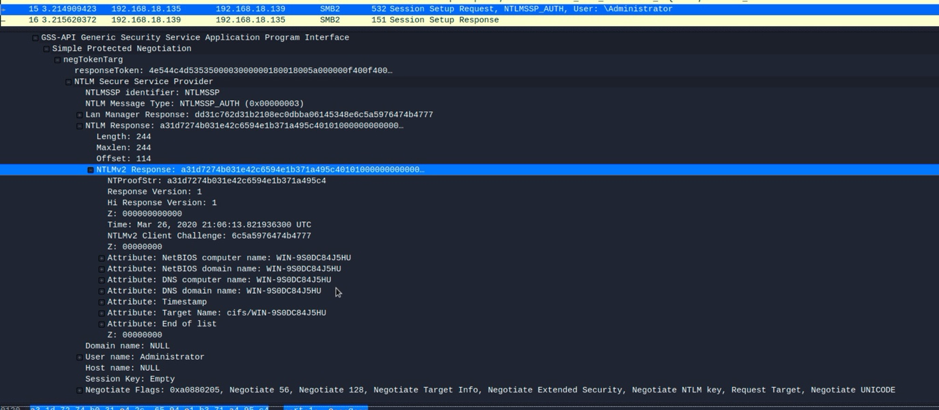
so basically the NTLMv2_response = HMAC-MD5(text(challenge + blob), using NTLMv2 as a key)
and the challenge response is NTLMv2_response + blob.
Out of curiosity and just to know the difference between the ntlmv1 and v2, How is NTLMv1 response calculated?!
1 – The NTLM hash of the plaintext password is calculated as pre-mentioned, using the MD4 algorithm, so assuming that the password is P@ssw0rd, the NTLM hash will be E19CCF75EE54E06B06A5907AF13CEF42
2 – These 16 bytes are then padded to 21 bytes, so it becomes E19CCF75EE54E06B06A5907AF13CEF420000000000
3 – This value is split into three 7 bytes thirds
0xE19CCF75EE54E0
0x6B06A5907AF13C
0xEF420000000000
4 – These 3 values are used to create three 64 bits DES keys by adding parity bits after every 7 bits as usual
So for the 1st key 0xE19CCF75EE54E0
11100001 10011100 11001111 01110101 11101110 01010100 11100000
8 parity bits will be added so it becomes
111000001 100111000 110010111 011100101 111001110 010010100 1011000000
In Hex : 0xE0CE32EE5E7252C0
Same goes with the other 2 keys
5 – Each of the three keys is then used to encrypt the challenge obtained from Message type 2.
6 – The 3 results are combined to form the 24-byte NTLM response.
So in NTLMv1, there is no client nonce or timestamp being sent to the server, keep that in mind for later.
6 – Session Setup Response
The server receives type 3 message which contains the challenge-response
The server has its own copy of the user’s NTLM hash, challenge, and all the other information needed to calculate its own challenge-response message.
The server then compares the output it has generated with the output it got from the client.
Needless to say, if the NT-Hash used to encrypt the data on the client-side, it differs from the user’s password’s NT-hash stored on the server (The user entered the wrong password), the challenge-response won’t be the same as the server’s output.
And thus user get ACCESS_DENIED or LOGON_FAILURE message
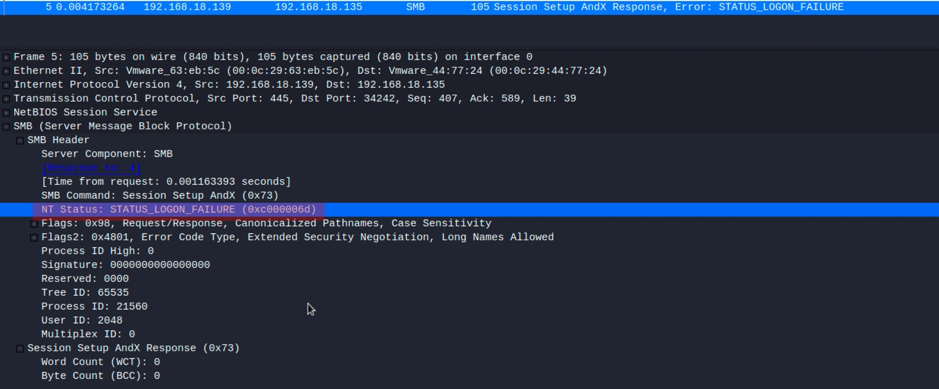
Unlike if the user entered the correct password, the NT-Hash will be the same, and the encryption (challenge-response) result will be the same on both sides and then the login will succeed.
That’s how the full authentication process happened without directly sending or receiving the NTLM hash or the plaintext password over the network.
NTLM authentication in a windows domain environment
The process is the same as mentioned before except for the fact that domain users credentials are stored on the domain controllers
So the challenge-response validation [Type 3 message] will lead to establishing a Netlogon secure channel with the domain controller where the passwords are saved.

The server will send the domain name, username, challenge, and the challenge-response to the domain controller which will determine if the user has the correct password or not based on the hash saved at the NTDS file (unlike the previous scenario in which the hash was stored locally on the SAM).
So from the server-side, you will find the following 2 extra RPC_NETLOGON messages to and from the Domain controller.
and if everything is ok it will just send the session key back to the server in the RPC_NETLOGON response message.
NTLMSSP
To fully understand that mechanism you can’t go without knowing a few things about NTLMSSP, Will discuss this in brief and dig deeper into it during the attacks part.
From Wikipedia
NTLMSSP (NT LAN Manager (NTLM) Security Support Provider) is a binary messaging protocol used by the Microsoft Security Support Provider Interface (SSPI) to facilitate NTLM challenge-response authentication and to negotiate integrity and confidentiality options. NTLMSSP is used wherever SSPI authentication is used including Server Message Block / CIFS extended security authentication, HTTP Negotiate authentication (e.g. IIS with IWA turned on) and MSRPC services.
The NTLMSSP and NTLM challenge-response protocol have been documented in Microsoft’s Open Protocol Specification.
SSP is a framework provided by Microsoft to handle that whole NTLM authentication and integrity process,
Let’s repeat the previous authentication process in terms of NTLMSSPI
1 – The client gets access to the user’s credentials set via AcquireCredentialsHandle function
2 – The Type 1 message is created by calling InitializeSecurityContext function in order to start the authentication negotiation process which will obtain an authentication token and then the message is forwarded to the server, that message contains the NTLMSSP 8 bytes signature mentioned before.
3 – The server receives the “Type 1 message“, extracts the token and passes it to the AcceptSecurityContext function which will create a local security context representing the client and generate the NTLM challenge and send it back to the client (Type 2 message).
4 – The client extracts the challenge, passes it to InitializeSecurityContext function which creates the Challenge-response (Type 3 message)
5 – The server passes the Type 3 message to the AcceptSecurityContext function which validates if the user authenticated or not as mentioned earlier.
These function/process has nothing to do with the SMB protocol itself, they are related to the NTLMSSP, so they’re called whenever you’re triggering authenticating using NTLMSSP no matter the service you’re calling.
How does NTLMSSP assure integrity?
To assure integrity, SSP applies a Message Authentication Code to the message. This can only be verified by the recipient and prevent the manipulation of the message on the fly (in a MITM attack for example)
The signature is generated using a secret key by the means of symmetric encryption, and that MAC can only be verified by a party possessing the key (The client and the server).
That key generation varies from NTLMv1 to NTLMv2
At NTLMv1 the secret key is generated using MD4(NTHash)
At NTLMv2
1 – The NTLMv2 hash is obtained as mentioned earlier
2 – The NTLMv2 blob is obtained as also mentioned earlier
3 – The server challenge is concatenated with the blob and encrypted with HMAC-MD5 using NTLMv2 hash as a key
4 – That output is encrypted again with HMAC-MD5 using again NTLMv2 hash as a key HMAC-MD5(NTLMv2, OUTPUT_FROM_STEP_3)
And that’s the session key
You’ll notice that to generate that key it requires to know the NThash in both cases, either in NTLMv1 or NTLMv2, the only sides owning that key are the client and the server.
The MITM doesn’t own it and so can’t manipulate the message.
This isn’t always the case for sure, and it has it’s own pre-requirements and so it’s own drops which will be discussed in the next parts where we’re going to dig deeper inside the internals of the authentication/integrity process in order to gain more knowledge on how these features are abused.
Conclusion and references
We’ve discussed the difference between LM, NTHash, NTLMv1 and NTLMv2 hashes.
I went through the NTLM authentication process and made a quick brief about the NTLMSSP’s main functions.
In the next parts, we will dig deeper into how NTLMSSP works and how can we abuse the NTLM authentication mechanism.
If you believe there is any mistake or update that needs to be added, feel free to contact me at Twitter.
References
The NTLM Authentication Protocol and Security Support Provider
Mechanics of User Identification and Authentication: Fundamentals of Identity Management
[MS-NLMP]: NT LAN Manager (NTLM) Authentication Protocol
LM, NTLM, Net-NTLMv2, oh my!
Have you downloaded a file only to discover that the file has been corrupted or changed? The best way to confirm a file’s integrity is to verify the file’s checksum or hash. Lucky for you, there are several ways to verify a file’s checksum in Windows.
Keep reading because you’ll learn several ways to compute a file’s checksum in Windows for free! Learn using built-in Windows tools and third-party utilities to generate a file’s checksum value.
In this article, you will learn how to create a checksum in Windows using five different tools. By the end, you should definitely know how to create hashes in Windows!
Prerequisites
Since this is a how-to article, you will follow the learning-by-doing approach. Some tools used in this article are built-in or provided by Microsoft; some are also from third-party sources. To follow along, make sure you have at least a computer running Windows 10 or at a minimum Windows Server 2012.
Prerequisites for each method of generating checksums will be provided as needed.
The File Checksum Integrity Verifier (FCIV)
The File Checksum Integrity Verifier (FCIV) Microsoft tool was originally introduced in Windows Server 2012 R2 and is available for all future versions.
Suppose that you’ve installed the FCIV tool in C:\Tools\fciv.exe. Run the command below in a command prompt or PowerShell prompt to generate the MD5 checksum of the file VSCodeUserSetup-x64-1.52.1.exe. If your file is located elsewhere, modify the location appropriately.
C:\Tools\fciv.exe C:\downloads\VSCodeUserSetup-x64-1.52.1.exe
After running the FCIV command, you will see a similar result as shown in the screenshot below. As you can see, the fciv.exe command generated the MD5 hash, by default, for the given file.

fciv.exe.FCIV can only generate MD5 or SHA-1 file hashes.
Now that you have computed an MD5 checksum, why not generate the file’s SHA-1 checksum as well? To create the SHA-1 checksum of the same file used in the above example, add the sha1 option to the end of the existing command. As shown in the screenshot below, the SHA-1 hash is generated for the same file as before.
C:\Tools\fciv.exe C:\downloads\VSCodeUserSetup-x64-1.52.1.exe -sha1

fciv.exe.Good job! You’ve created both an MD5 and SHA-1 checksum value. Why not generate both the MD5 and SHA-1 hash values at the same time? Instead of using the sha1 option, use both.
C:\Tools\fciv.exe C:\downloads\VSCodeUserSetup-x64-1.52.1.exe -both
The resulting hash values are labeled as MD5 and SHA-1. Using the both parameter saves time when you need to generate both MD5 and SHA-1 hash values.

fciv.exe.While FCIV is a handy tool for computing file hashes, FCIV is older, and the hashing algorithms are limited to MD5 and SHA-1. Microsoft officially declared that FCIV is an unsupported command-line tool . Despite this, in the absence of other tools, FCIV can still serve as a great alternative.
At this point, you’ve created MD5 and SHA-1 hash values using the fciv.exe tool. What do you think so far? I know you’re ready to learn the next tool.
Using Certutil
Certutil is another excellent tool to generate a file’s checksum in Windows. The exact program name is certutil.exe, which is available out-of-the-box.
The primary purpose of certutil.exe is for certificates. But, certutil.exe has a feature for creating file checksum’s in Windows using the following hash algorithms:
- MD2
- MD4
- MD5
- SHA1
- SHA256
- SHA384
- SHA512
Let’s see how it works.
Fire up PowerShell or a command prompt to start computing file checksums, using the syntax shown below.
certutil.exe -hashfile [Path to File] [Hash Algorithm]
In the example below, certutil.exe generates the SHA-256 hash of the file C:\downloads\VSCodeUserSetup-x64-1.52.1.exe, as demonstrated in the resulting screenshot.
certutil.exe -hashfile "C:\downloads\VSCodeUserSetup-x64-1.52.1.exe" SHA256
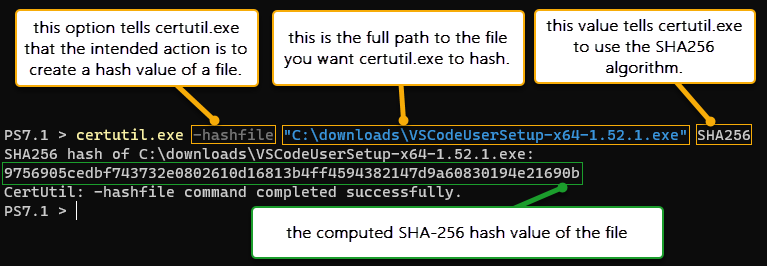
certutil.exe to create a file checksum.You now know how to use certutil.exe to create a file checksum. To practice, try generating the file’s hash value using all of the other available algorithms. Read on to learn how to use Get-FileHash and PowerShell to generate a file hash!
Did you know that hashing algorithms, such as SHA-256, are also used when creating SSL certificates?
Using the PowerShell Get-FileHash Cmdlet
You’ve been reading about and using command-line tools to create file checksums in Windows since the start of this article. One more command-line tool that you will learn how to use is the Get-FileHashPowerShell cmdlet.
Before using Get-FileHash, refer to the syntax below to familiarise yourself with the available parameters. Use the Path parameter to specify a target file, and the Algorithm parameter to indicate which hash algorithm to use.
Get-FileHash -Path [path to file] -Algorithm [Hash Algorithm]
The available hash algorithms for Get-FileHash are listed below. You’ll notice that the choices of hash algorithms are different than what FCIV and CertUtil offer. Additionally, older and more vulnerable algorithms are no longer included, such as the MD1 and MD4 algorithms.
- SHA1
- SHA256
- SHA384
- SHA512
- MACTripleDES
- MD5
- RIPEMD160
The command below computes the hash value of the file VSCodeUserSetup-x64-1.52.1.exe using the SHA-256 algorithm. Copy and run the code below in PowerShell to test, making sure to change the file path as needed.
Get-FileHash -Path C:\downloads\VSCodeUserSetup-x64-1.52.1.exe -Algorithm sha256
As you can see in the screenshot below, the Get-FileHash command computed the file’s SHA-256 hash as specified with the -Algorithm sha256 parameter.

Get-FileHash to compute the SHA-256 checksum of a file.If you want to compute the file’s checksum using different algorithms, you only need to change the Algorithm parameter value. Do you think you can now create the SHA-512 checksum of a file using Get-FileHash? I bet you can!
Generating Hashes For Multiple Files Simultaneously
With Get-FileHash, it is possible to generate the checksum of multiple files at the same time. The example code below stores the list of file paths within the $files variable. Next, the Get-FileHash consumes the $files variable to calculate the SHA-256 checksum for each file, as shown in the screenshot below.
$files = @(
    'C:\downloads\PowerShell-7.1.0-win-x64.msi',
    'C:\downloads\VSCodeUserSetup-x64-1.52.1.exe'
)
Get-FileHash -Path $files -Algorithm sha256
Get-FileHash to compute the hash values for each file stored in the $files array.What if you need to generate a hash for a folder full of files? Instead of manually crafting the $files array, use the Get-ChildItem cmdlet to retrieve the list of files in a given folder.
In the command below, the Get-ChildItem cmdlet retrieves the list of files inside the c:\downloads folder. The result is then passed via the PowerShell pipeline to the Get-FileHash cmdlet, which in turn computes each file’s SHA-256 hash value.
(Get-ChildItem C:\downloads).Fullname | Get-FileHash -Algorithm sha256
Depending on the file sizes, the time it takes to generate a checksum may vary. In this example, the command took approximately twenty seconds to compute the checksum of an 8GB ISO file. The result should look similar to the screenshot below.

Get-ChildItem and Get-FileHash to compute the hash values for each file in a folder.If for some reason, you find that the built-in tools to generate file checksums in Windows are not enough, there are third-party tools available. Not all third-party tools are free, but a few free and popular utilities are shown below.
7-Zip
Are you tired of using the command-line and are looking for a graphical tool to create file checksum in Windows? 7-zip is a popular and free file compression tool that is capable of generating a file’s hash value.
Installing 7-zip on your computer automatically adds a context menu option to generate the checksum of a file. To get the hash value of a file, follow these steps:
- Right-click on the file to generate the checksum.
- Select the CRC SHA menu option to list the available hash algorithms.
- Finally, click on the hash algorithm you wish to use.
In the example below, the asterisk (*) option displays the file’s hash value using all available algorithms. How’s that for easy?
Next, learn how to use the HashMyFiles tool to generate multiple file’s checksum’s as an alternative to 7-Zip!
HashMyFiles
Forget about command-line and right-click. HashMyFiles can create the checksum or hash values of a single file, multiple files, or entire directories using drag and drop.
Launch the HashMyFiles program and drag the files or folders to generate a hash for into the HashMyFiles main window. As shown below, the main window displays the files and associated hashes in a table format, with additional information available in the properties window.
What’s more, HashMyFiles can export the hash or checksum values to an HTML report or a tab-delimited file. This export feature is useful when you want to keep a record of the file checksum values.
Next Steps
In this article, you’ve learned that there are several ways to create a file checksum in Windows. Microsoft has built-in command-line tools such as certutil.exe and Get-FileHash.
There are third-party tools as well that are free and relatively easy to use. Whatever your choice of tool to generate file hash values, the concept and result is the same for every hash algorithm.
What’s next for you? Maybe put your scripting skills to the test and create a checksum inventory of crucial files using any of the tools you learned about in this article.