
Install Vault
Package manager
brew tap hashicorp/tap
brew install hashicorp/tap/vault
Binary download
Binary download
Package manager
wget -O - https://apt.releases.hashicorp.com/gpg | sudo gpg --dearmor -o /usr/share/keyrings/hashicorp-archive-keyring.gpg
echo "deb [arch=$(dpkg --print-architecture) signed-by=/usr/share/keyrings/hashicorp-archive-keyring.gpg] https://apt.releases.hashicorp.com $(lsb_release -cs) main" | sudo tee /etc/apt/sources.list.d/hashicorp.list
sudo apt update && sudo apt install vault
Binary download
Note
Complete this tutorial to learn how to install and verify HashiCorp tools on any Linux distribution, and create a custom Linux container with verified HashiCorp tools.
Binary download
Binary download
Binary download
Binary download
-
13min
Why use Vault
Begin your Vault journey by learning why you should use Vault and the challenges that it can help you solve.
-
12min
Learn to use the Vault UI
Learn to use the Vault UI to interact with a dev server.
-
8min
Harden server deployments
Harden your production deployments with baseline and extended recommendations.
-
15min
Vault with integrated storage reference architecture
Understand architectural best practices for implementing Vault using the Integrated Storage (Raft) storage backend.
-
12min
Vault with integrated storage deployment guide
Review the required steps to install and configure a single HashiCorp Vault cluster according to the Vault with Integrated Storage Reference Architecture
Linux
- Download the appropriate package for your system.
- Extract the package using
tar -xzf [filename] - Move the binary to a directory in your PATH:
sudo mv vault /usr/local/bin/ - Verify installation:
vault --version
macOS
- Download the appropriate package for your system.
- Extract the package:
unzip [filename] - Move the binary to a directory in your PATH:
sudo mv vault /usr/local/bin/ - Verify installation:
vault --version
Alternatively, you can use Homebrew:
brew install hashicorp/tap/vaultWindows
- Download the appropriate package for your system.
- Extract the ZIP file to a directory of your choice.
- Add that directory to your system PATH.
- Open a new command prompt and verify installation:
vault.exe --version
Alternatively, you can use Chocolatey:
choco install vaultIn this blog we are going to talk about Hashicorp Vault. Hashicorp Vault is an open-source secrets management platform that provides full lifecycle management of static and dynamic secrets in your environment. In this blog I’ll tell you about installing, config and managing secrets in Hashicorp Vault on Windows. The Hashicorp Vault is a way to store and manage the lifecycle of secrets within your organization. Vault is working through an API. Every command is going to go through that API and then interact with Vault. To get access to the Vault there are different types of authentication methods. You can use tokens, username/password, Active Directory credentials etc. Through groups and policies you are able to control the access of the secrets. All actions are logged in the Vault and can be exported.
The vault is sealed by using the Shamir encryption method. Instead of 1 master key you need multiple keys to unseal the Vault. Through this way you can give multiple persons 1 key. When the Vault must be unsealed these persons need each other to unseal the Vault.
There are of course other products. Think about Azure Key Vault and AWS Key Management Services but these are cloud products. If you want to manage your credentials locally Hashicorp Vault is a great choice.
Installing Vault on Windows.
Vault is a single executable binary that’s compiled from Go, so it’s not a particularly complicated setup.
- If you already have Chocolatey (Windows Package Manager) installed on Windows, you can simply run “choco install vault”. Chocolatey will download Vault, install it and put it in an executable path for you.
Install Chocolatey and Vault:
- You can download it yourself from the Hashicorp website ( https://releases.hashicorp.com/vault/ ), unzip and save the Vault in an executable path.
- You can use the Install-Vault cmdlet from the PSVault module.

In this blog we will use the PSVault module. This module contains multiple cmdlets. The Install-Vault cmdlet from this module will do the work for you. I will explain everything step by step.
Before we are able to start using Install-Vault, you will have to download the module PSVault. The PSvault module can be downloaded from my github page: https://github.com/D2CIT/Hashicorp-Vault
You can download it as a zip-file or you could clone it via GIT.
git clone https://github.com/D2CIT/Hashicorp-Vault.git
Unzip or copy the PSVault folder to “C:\Program Files\WindowsPowerShell\Modules”
Run the Import-Module cmdlet to import the module. See Below.
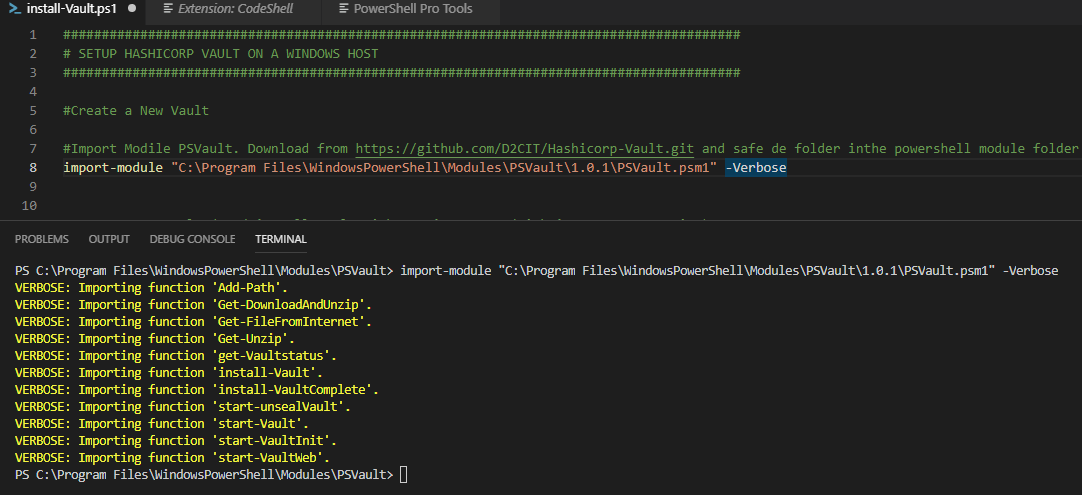
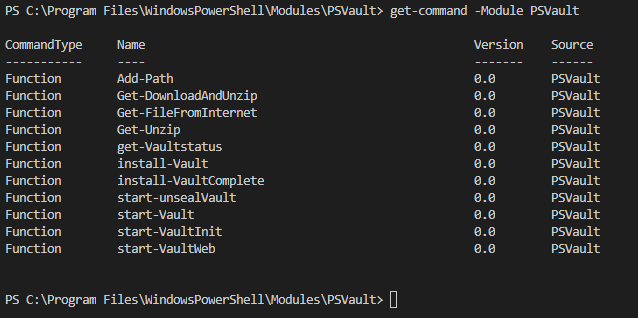
The module is downloaded, imported and ready for use. With the command “get-command” you can see which cmdlets are available in this module.
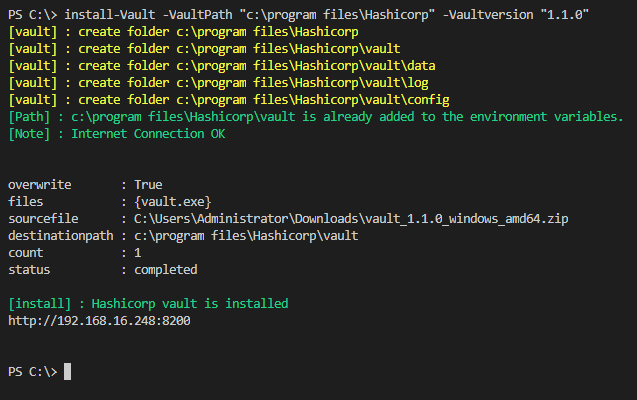
Install-vault will do the following actions
- Check internet Access
- download Vault from the Hashicorp website if internet connection is successful
- use the “-vaultzip” parameter with the fullpath to the download zip. You can use this option if you don’t have an internet connection.
- Create a directory structure for Vault
- Add the path of the vault.exe to the environment path
- Create the config.hcl with the default settings for Vault
- Create a scheduled task for running the Vault. Vault will start through this task when the system starts. The task will run under the system account
- Start the scheduled task to start Vault.
Let’s run the command Install-Vault as shown below. We will install Vault version 1.1.0 (March 2019) in the “c:\program files” folder.
If we check the folder “c:\program files”, you will see that the folder Hashicorp is created with the subfolder Vault.
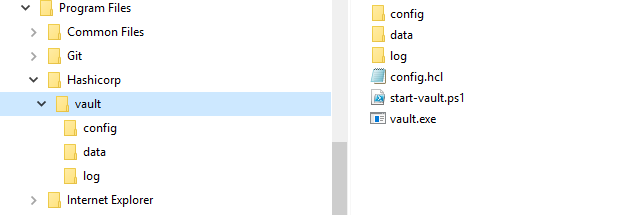
The subfolder Vault contains the file config.hcl with the vault settings, the start-vault.ps1 for starting Vault manually and the Vault binary Vault.exe .
The config.hcl contains config setting for Vault .
- The path to the storage folder,
- The listener port ,
- The API-address,
- UI is on true, for using the user interface via the browser
- Disable_mlock for protecting against dumping the memory
The subfolders of .\Vault are :
- config folder : created for config files. Like policy etc.
- data folder : the Vault data files
- log folder : created for the audit logs
The data folder contains the data of Vault. All files are encrypted. Do not change anything in this folder .
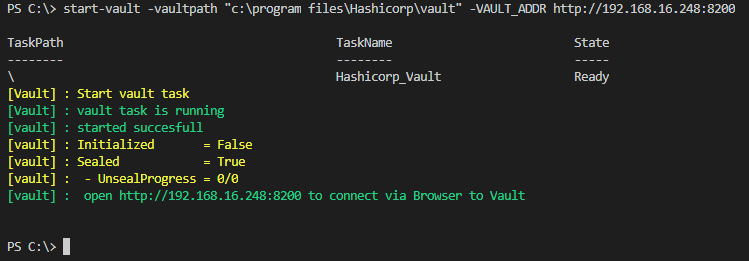
Start Vault
Let’s start Vault for the first time. We will run the command start-Vault. This cmdlet will create (if not exists) a scheduled task with the following settings :
- Name : Hashicorp Vault
- Trigger : at startup
- User : system
- Arguments : server -config=”c:\program files\Hashicorp\vault\config.hcl”
- Execute : c:\program files\Hashicorp\vault\vault.exe
When the task is created, the script will check and start the task. When the task is running Vault is started.
At the end, the script will check the status of the Vault. In the output below we see that the value sealed is true and the value initialized is false. This means that the Vault is not initialized and sealed.
Vault Initialize
Even though Vault is started, we cannot use it yet. It’s a new vault and before we can use it we have to initialize it first. We can initialize the Vault by running the cmdlet Start-VaultInit.
Start-VaultInit will run the Vault command.
vault operator init -address=http://192.168.16.248:8200 .
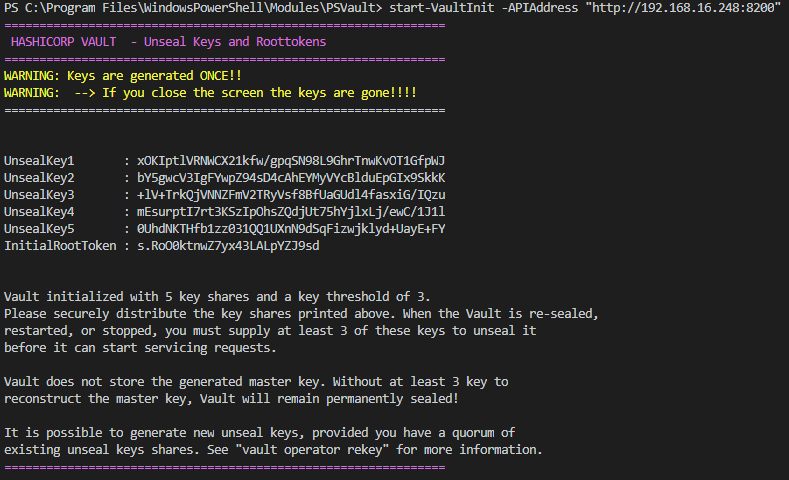
The unseal and root tokens are showed once. When you close the screen there is no way to retrieve them again.
Default the cmdlet will create two files in the .\Vault\Config folder. The unsealkeys.xml and the AESKey.txt created. The Unsealkey.txt stores the unsealkeys but the keys are encrypted with the AESKey stored in the AESKey.txt.
Note : If you use the switch parameter “-secure $false” the keys wil not saved encrypted in the xml file will we created.
—————————————————————————————————————————————
Warning : The keys are safed encrypted in the xml file. The AESkey is default saved in the same folder. This key is needed to decrypt the UnsealKeys. So save the AESkeys in a secure place and not together with the encrypted keys in the UnsealKeys.xml.
—————————————————————————————————————————————

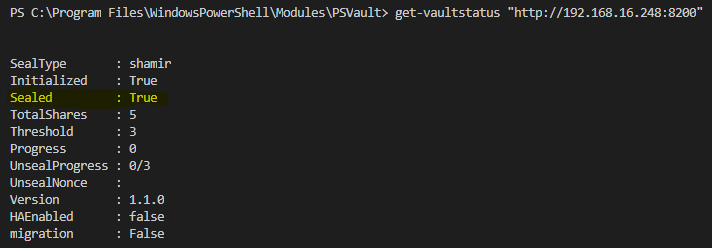
When we run the cmdlet Get-VaultStatus (See below) we can check the current status of the vault.
The Vault is initialized know but is still sealed.
Vault Unseal
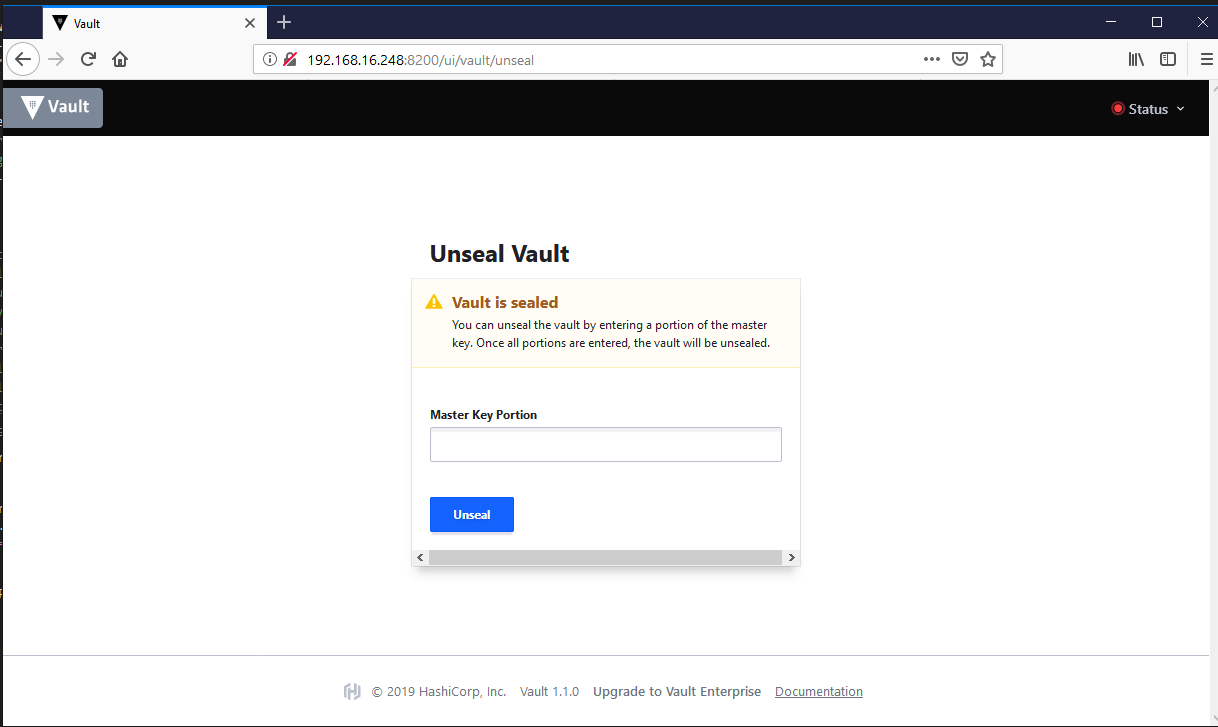
We will have to unseal the Vault before we can use it. We can unseal the Vault via the commandline or through the Vault website (http://192.168.16.248:8200)
When we connect to the Vault UI, we will see that the Vault is sealed as well . When a Vault server is started, it starts in a sealed state. So if you reboot the server, stop the scheduled task or kill the vault.exe in the taskmanager , you will have to unseal it when you start Vault again. There are default 5 unseal keys and you need default 3 keys to unseal.
We will unseal the Vault via the commandline by using the cmdlet start-UnsealVault. This cmdlet will use the vault command vault operator unseal -address=”http://192.168.16.248:8200” “xOKIptlVRNWCX21kfw/gpqSN98L9GhrTnwKvOT1GfpWJ” and will validate the process.

You will have to run this command with 3 different unseal keys. You will see that unseal progress is changed to 1/3 after running the unseal command for the first time.
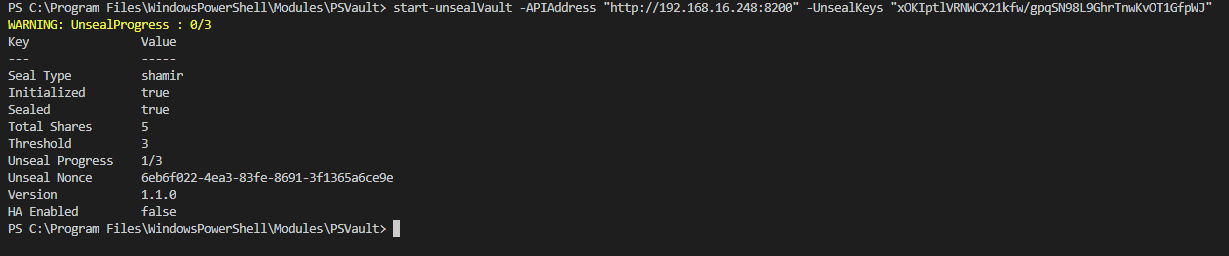
To unseal we will have to run the same command with 2 other keys.
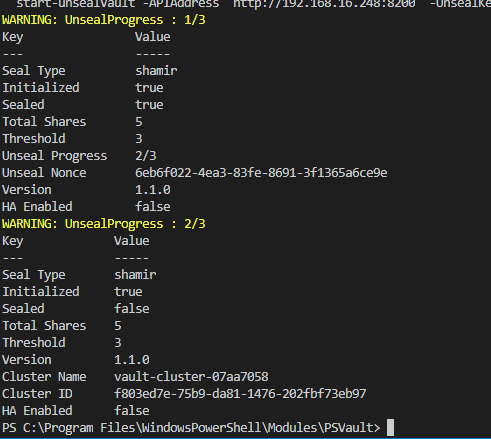
After running the command with the different keys you will notice that the sealed value has changed to false. The vault is now accessible.
Note : We can also use the UnsealKeys.xml to unseal. See example below

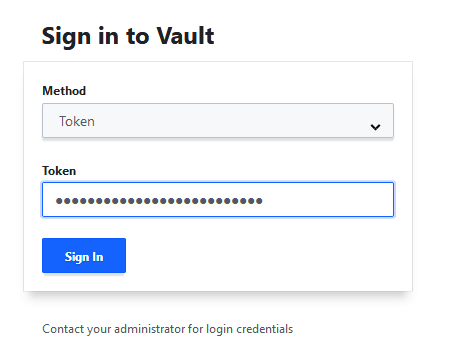
Vault Login
Let’s first check the Vault UI (http://192.168.16.248:8200). We see that the UI is having a login screen.

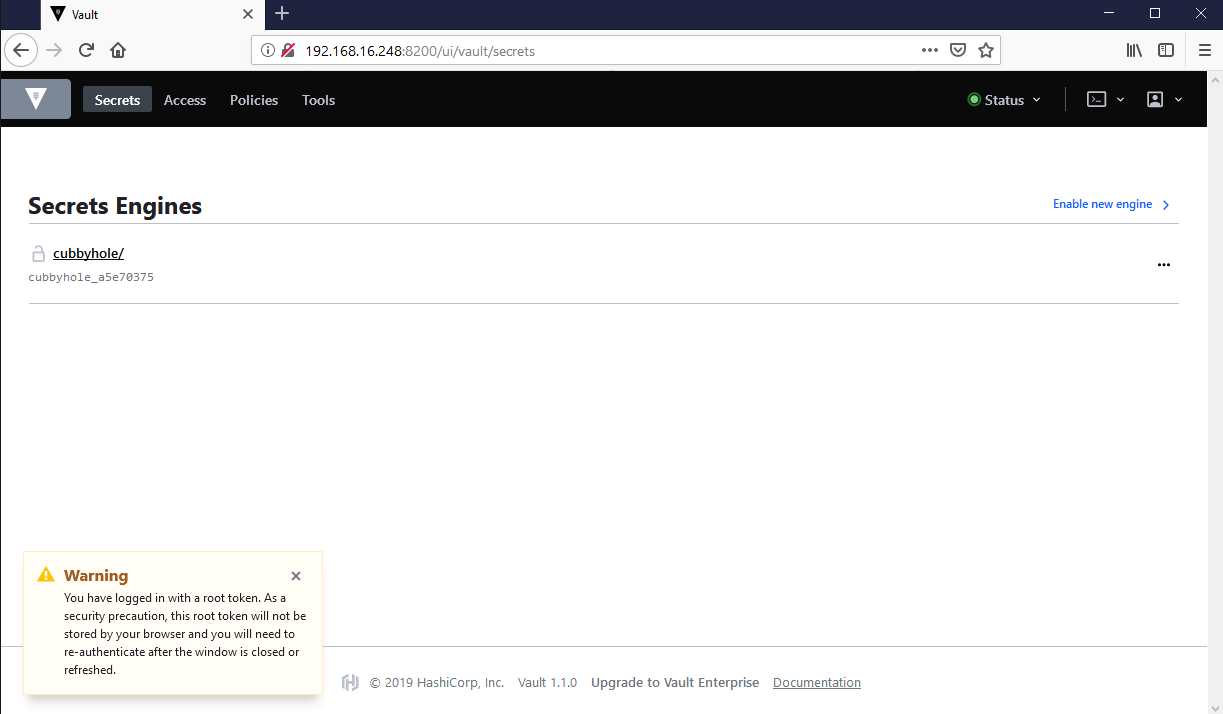
Because this is the first time that we are going to login to the Vault, we have to login with the root token that we received during the vault init process.
Login via the PowerShell commandline
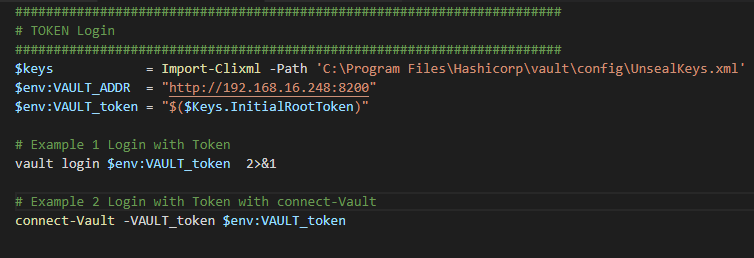
The first example shows the vault command. In PowerShell and the Powershell_ISE you will receive some errors. The connect-Vault will convert the output to a readable and usable output.
Setup Auth login via username and password
I mentioned before that we can also use the username password authentication method.
Setup Auth login via LDAP (Active Directory)
Enable Auditing
With the command below we can enable auditing.
vault audit enable file file_path=”c:\program files\Hashicorp\vault/log/vault_audit.log”
The Vault is now configured and ready for use.
Links :
- Introduction to HashiCorp Vault with Armon Dadgar
- What is the value of adopting Vault Enterprise?
- Vault Documentation
- How do client applications authenticate themselves against Vault?
-
Painless Password Rotation with HashiCorp Vault
- How to use passwords in PowerShell?
Upgrade & Secure Your Future with DevOps, SRE, DevSecOps, MLOps!
We spend hours on Instagram and YouTube and waste money on coffee and fast food, but won’t spend 30 minutes a day learning skills to boost our careers.
Master in DevOps, SRE, DevSecOps & MLOps!
Learn from Guru Rajesh Kumar and double your salary in just one year.
Get Started Now!
Reference – https://developer.hashicorp.com/vault/downloads
Install Vault in Ubuntu
$ wget -O- https://apt.releases.hashicorp.com/gpg | sudo gpg --dearmor -o /usr/share/keyrings/hashicorp-archive-keyring.gpg

$ echo "deb [signed-by=/usr/share/keyrings/hashicorp-archive-keyring.gpg] https://apt.releases.hashicorp.com $(lsb_release -cs) main" | sudo tee /etc/apt/sources.list.d/hashicorp.list

$ sudo apt update && sudo apt install vault
sudo apt remove vault
sudo apt autoclean && sudo apt autoremoveInstall Vault in RHEL/Centos
sudo yum install -y yum-utils
sudo yum-config-manager --add-repo https://rpm.releases.hashicorp.com/RHEL/hashicorp.repo
sudo yum -y install vault
Install Vault in Windows
# First we will install the Vault binary using Chocolatey.
# You'll need to run this from an elevated PowerShell prompt
# Download URL - https://developer.hashicorp.com/vault/downloads

choco install vault -y

# Now let's verify it installed successfully and is in the PATH
# environment variable
vault version
Certification Courses
DevOpsSchool has introduced a series of professional certification courses designed to enhance your skills and expertise in cutting-edge technologies and methodologies. Whether you are aiming to excel in development, security, or operations, these certifications provide a comprehensive learning experience. Explore the following programs:
- DevOps Certification — Learn the fundamentals and advanced concepts of DevOps practices and tools.
- DevSecOps Certification — Master the integration of security within the DevOps workflow.
- SRE Certification — Gain expertise in Site Reliability Engineering and ensure reliability at scale.
- MLOps Certification — Dive into Machine Learning Operations and streamline ML workflows.
- AiOps Certification — Discover AI-driven operations management for next-gen IT environments.

Explore our DevOps Certification, SRE Certification, and DevSecOps Certification programs at DevOpsSchool. Gain the expertise needed to excel in your career with hands-on training and globally recognized certifications.
Время на прочтение9 мин
Количество просмотров72K
HashiCorp Vault — это инструмент с открытым исходным кодом, который обеспечивает безопасный и надежный способ хранения и распространения секретов, таких как ключи API, токены доступа и пароли. Программное обеспечение, такое как Vault, может быть критически важным при развертывании приложений, требующих использования секретов или конфиденциальных данных.
Согласно недавнему исследованию ученых из Университета штата Северная Каролина, более 100 000 общедоступных репозиториев GitHub содержат открытые секреты приложений непосредственно в исходном коде. Это исследование — от частных токенов API до криптографических ключей — просканировало только около 13% общедоступных репозиториев GitHub — показывает, что надлежащая защита секретов приложений является одним из наиболее часто игнорируемых методов защиты информации в программном обеспечении.
Хотя масштабы воздействия удивительны, важно отметить, что эта проблема затрагивает не только проекты с открытым исходным кодом. Даже частные репозитории исходного кода могут раскрывать секреты, если они не защищены должным образом. Возьмем, к примеру, нарушение безопасности в Buffer Inc. в 2013 году. То, что начиналось как незаконный доступ к собственному исходному коду Buffer, привело к утечке учетных данных Twitter API компании, что в конечном итоге привело к рассылке спама в учетных записях Twitter бесчисленных клиентов.
Я не собираюсь угнетать Buffer прямо сейчас. Компании взламывают каждый день, и Buffer дал первоклассный ответ. Их нефильтрованная прозрачность и информирование об инцидентах послужили интересным примером важности управления секретами как основного принципа информационной безопасности. Но это также поднимает вопрос о том, как лучше всего управлять секретами в растущей, масштабируемой организации.
Введение в HashiCorp Vault
Я большой поклонник HashiCorp. Их подход к инструментам DevOps, не зависящий от поставщика, предоставляет отличные портативные решения, которые абстрагируются от отдельных поставщиков облачных услуг и фокусируются на решении реальных проблем. Их инструмент управления секретами, Vault, не исключение.
В то время как каждый отдельный поставщик облачных услуг имеет собственное решение для управления секретами, Vault является независимым от поставщика решением, которое позволяет централизованно управлять и обеспечивать доступ к секретам приложений без учета базового механизма секретов или методов аутентификации.
Установка Vault
Скачать Vault — Vault от HashiCorp
Прежде чем мы сможем начать работу с Vault, нам сначала нужно его установить. Как и все продукты HashiCorp, Vault кроссплатформенный, с поддержкой macOS, Windows, Linux, Solaris и даже BSD. Вы даже можете запустить его на Raspberry Pi.
Запуск сервера
После установки Vault нам нужно запустить наш сервер. В этой статье я буду работать только с сервером разработки Vault. Однако важно отметить, что сервер разработки невероятно небезопасен и хранит все данные в памяти, а это означает, что при его перезапуске все будет потеряно. По словам самих HashiCorp:
Сервер разработки следует использовать для экспериментов с функциями Vault, такими как: различные методы аутентификации, механизмы секретов, устройства аудита и т. д.
Чтобы запустить сервер разработки, просто запустите команду vault server -dev (-dev указывает, что мы должны запускать сервер разработки, а не рабочий сервер):
$ vault server -dev
==> Vault server configuration:

        Api Address: http://127.0.0.1:8200
                Cgo: disabled
    Cluster Address: https://127.0.0.1:8201
        Listener 1: tcp (addr: "127.0.0.1:8200", cluster address: "127.0.0.1:8201", max_request_duration: "1m30s", max_request_size: "33554432", tls: "disabled")
        Log Level: info
            Mlock: supported: false, enabled: false
            Storage: inmem
            Version: Vault v1.2.1

WARNING! dev mode is enabled! In this mode, Vault runs entirely in-memory
and starts unsealed with a single unseal key. The root token is already
authenticated to the CLI, so you can immediately begin using Vault.

You may need to set the following environment variable:

    $ export VAULT_ADDR='http://127.0.0.1:8200'

The unseal key and root token are displayed below in case you want to seal/unseal the Vault or re-authenticate.

Unseal Key: p8MumXfy57bh2T1FxdvZSmHhxqr7aQAByPpfE4PLujk=
Root Token: s.aSQmpEYEi5MKelf5TDLPC6r9

Development mode should NOT be used in production installations!

==> Vault server started! Log data will stream in below:
Как видите, на экран выводится много данных, с которыми вы можете поиграть. Прежде всего следует отметить, что сервер разработки по умолчанию не запускается как демон (и в целях тестирования, никогда не должен запускаться как демон). Следовательно, если вы хотите взаимодействовать с сервером, вы должны сначала открыть второе окно терминала и экспортировать предоставленную переменную среды VAULT_ADDR, чтобы команда Vault хранилища знала, с каким сервером она должна взаимодействовать.
Также важно отметить значения Unseal Key и Root Token. Хотя мы коснемся того, что делать с Root Token в следующем разделе, понимание запечатывания / распечатывания Vault имеет решающее значение для правильного развертывания Vault в производственной среде.
Расшифровка и аутентификация
В производственной среде сервер Vault запускается в закрытом состоянии. Это означает, что Vault знает, где находятся данные, но не знает, как их расшифровать. На сервере разработки Vault по умолчанию не запечатан (unsealed). Однако, если вы решите запечатать его, вы получите ключ распечатки (Unseal Key), чтобы распечатать (unseal) его. Незапечатанный Vault остается в этом состоянии до тех пор, пока оно не будет повторно запечатано или сам сервер не будет перезапущен.
При первом запуске производственного сервера Vault важно его инициализировать. Этот процесс сгенерирует ключи шифрования и начальный корневой токен, и его можно будет запустить только с новыми хранилищами без каких-либо данных:
$ vault operator init

Unseal Key 1: 4jYbl2CBIv6SpkKj6Hos9iD32k5RfGkLzlosrrq/JgOm
Unseal Key 2: B05G1DRtfYckFV5BbdBvXq0wkK5HFqB9g2jcDmNfTQiS
Unseal Key 3: Arig0N9rN9ezkTRo7qTB7gsIZDaonOcc53EHo83F5chA
Unseal Key 4: 0cZE0C/gEk3YHaKjIWxhyyfs8REhqkRW/CSXTnmTilv+
Unseal Key 5: fYhZOseRgzxmJCmIqUdxEm9C3jB5Q27AowER9w4FC2Ck

Initial Root Token: s.KkNJYWF5g0pomcCLEmDdOVCW

Vault initialized with 5 key shares and a key threshold of 3. Please securely distribute the key shares printed above. When the Vault is re-sealed, restarted, or stopped, you must supply at least 3 of these keys to unseal it before it can start servicing requests.

Vault does not store the generated master key. Without at least 3 keys to reconstruct the master key, Vault will remain permanently sealed!

It is possible to generate new unseal keys, provided you have a quorum of existing unseal keys shares. See "vault operator rekey" for more information.
Вход в систему
Когда сервер запущен, следующее, что нам нужно сделать, это войти в него. Это можно сделать с помощью команды vault login, которая запросит токен аутентификации. При первоначальной настройке вы можете пройти аутентификацию с помощью Root Token (см. Выше). Однако в производственной среде базовые методы аутентификации можно изменить, чтобы обеспечить более точный контроль над тем, кто имеет доступ и почему:
$ vault login
Token (will be hidden):
Success! You are now authenticated. The token information displayed below is already stored in the token helper. You do NOT need to run "vault login" again. Future Vault requests will automatically use this token.

Key                 Value
---                 -----
token               s.aSQmpEYEi5MKelf5TDLPC6r9
token_accessor      MaJhao2R54EdV9fDq7sL11d4
token_duration      ∞
token_renewable     false
token_policies      ["root"]
identity_policies   []
policies            ["root"]
Хранение секретов
В то время как Vault HashiCorp можно использовать для безопасного хранения практически любых данных, наиболее распространенным вариантом использования Vault является хранилище ключей и значений для секретов приложений. После проверки подлинности хранение секретов становится невероятно простым благодаря команде vault kv put:
$ vault kv put secret/foo bar=baz
Key             Value
---             -----
created_time    2019-08-09T16:43:10.604124Z
deletion_time   n/a
destroyed       false
version         1
Чтобы немного разобрать приведенную выше команду и ответ, мы создали новый секрет с именем foo в пространстве имен secret со значением bar=baz, ответ дает нам некоторые базовые метаданные о нашем новом секрете. Хотя ключи created_time, deletion_time и destroyed не требуют пояснений, вам следует обратить особое внимание на ключ version, потому что это подразумевает, что секреты могут быть версированы.
Например, давайте посмотрим, что произойдет, если мы введем новое значение для того же секрета:
$ vault kv put secret/foo bat=ball
Key             Value
---             -----
created_time    2019-08-09T16:43:32.638788Z
deletion_time   n/a
destroyed       false
version         2
Видите, как был увеличен ключ метаданных версии? Это означает, что наше исходное значение должно поддерживаться в дополнение к новым значениям, что обеспечивает отличный журнал аудита того, какие секреты были изменены и когда.
Извлечение секретов
$ vault kv list secret
Keys
----
foo
Хранение секретов — это только половина дела. Другая половина — извлекать эти секреты. В нашем примере выше давайте сначала посмотрим, как получить весь список секретов:
Как видите, хотя технически мы помещаем два секрета, отслеживается только один ключ, потому что эти два секрета на самом деле являются всего лишь двумя версиями одного секрета. Чтобы получить его, выполните команду vault kv get с секретным пространством имен и ключом:
$ vault kv get secret/foo
====== Metadata ======
Key             Value
---             -----
created_time    2019-08-09T16:43:32.638788Z
deletion_time   n/a
destroyed       false
version         2

=== Data ===
Key Value
--- -----
bat ball
По умолчанию Vault будет извлекать самую последнюю версию секрета, но если мы хотим получить предыдущую версию, можно использовать директиву -version:
$ vault kv get -version=1 secret/foo
====== Metadata ======
Key             Value
---             -----
created_time    2019-08-09T16:43:10.604124Z
deletion_time   n/a
destroyed       false
version         1

=== Data ===
Key Value
--- -----
bar baz
Ценность секретов с управлением версиями невероятна, поскольку они позволяют внутренним службам привязаться к различным секретным версиям, что дает возможность постепенно развиваться, выпускать (release) и откатывать изменения приложений, не опасаясь потери важных данных.
Удаление секретов
Несмотря на преимущества контроля секретами, нам может понадобится фактическое удаление секрета (или его версии). Это можно сделать двумя способами, в зависимости от того, насколько «удаленным» вы хотите, чтобы секрет был: удалить delete и уничтожить destroy. Чтобы проиллюстрировать это, давайте сначала рассмотрим удаление версии нашего секрета foo:
$ vault kv delete -versions=1 secret/foo
Success! Data deleted (if it existed) at: secret/foo
Это помечает данные как удаленные (deleted) и предотвращает их извлечение в обычных запросах GET, но фактически не удаляет данные:
$ vault kv get -version=1 secret/foo
====== Metadata ======
Key             Value
---             -----
created_time    2019-08-09T16:43:10.604124Z
deletion_time   2019-08-09T16:45:39.664577Z
destroyed       false
version         1
Чтобы данные действительно были удалены без возможности восстановления, необходимо использовать команду destroy:
$ vault kv destroy -versions=1 secret/foo
Success! Data written to: secret/destroy/foo
Вместо того, чтобы просто пометить данные как удаленные и ограничить доступ к ним, команда destroy удалит их полностью, что сделает невозможным последующее извлечение:
$ vault kv get -version=1 secret/foo
====== Metadata ======
Key             Value
---             -----
created_time    2019-08-09T16:43:10.604124Z
deletion_time   2019-08-09T16:45:39.664577Z
destroyed       true
version         1
Копаем глубже в HashiCorp Vault
Vault — сложный инструмент, и управление такими секретами — это лишь малая часть того, что можно с его помощью сделать. Хотя тонкости Vault выходят далеко за рамки этой статьи, давайте коснемся лишь нескольких других концепций, которые делают Vault таким мощным.
Secrets engines
$ vault secrets enable database
Success! Enabled the database secrets engine at: database/
Хранилище ключей и значений по умолчанию в Vault является примером механизма секретов (в частности, механизма под названием kv). По своей сути алгоритм секретов — это абстрактный механизм хранения секретных данных. Это означает, что вместо механизма хранения на основе ключа-значения можно использовать более целевые механизмы хранения. Например, механизм секретов базы данных может использоваться для динамического генерирования учетных данных базы данных (database) на основе настроенных ролей для MySQL и MariaDB, что позволяет производить автоматическую ротацию учетных данных root или даже временные учетные данные для доступа по запросу.
Методы аутентификации
$ vault auth enable github
Success! Enabled github auth method at: github/
В дополнение к стандартному методу аутентификации на основе токенов Vault поддерживает ряд дополнительных методов аутентификации для лучшей поддержки ваших вариантов использования. Отличным примером этого является метод проверки подлинности GitHub, который можно использовать для автоматического предоставления доступа к Vault разработчикам, принадлежащим к определенной организации GitHub — и даже к определенной группе внутри организации GitHub — с использованием только токена личного доступа. Для более крупных организаций решения единого входа на уровне предприятия, такие как LDAP или Okta, могут использоваться для аутентификации пользователей в Vault.
Авторизация
$ vault write auth/userpass/users/test policies="dev-readonly,logs"Авторизация всегда идет рука об руку с аутентификацией. Хотя предоставить глобальный доступ с помощью GitHub или аутентификации на основе токенов несложно, это почти никогда не бывает полным решением. Благодаря политике Vault может быть реализован метод авторизации в стиле RBAC, предоставляющий разным пользователям и группам CRUD-подобный доступ к различным аспектам самого хранилища. В сочетании с одним из более продвинутых методов аутентификации это может стать невероятно мощным инструментом для детального контроля доступа в большой организации.
За пределами Vault
Каким бы мощным ни было Vault, настроить его правильно довольно сложно. Хотя размер и объем различных методов проверки подлинности и механизмов секретов ясно показывают, сколько вы можете сделать с Vault, может быть сложным осмыслить основы управления секретами в контексте информационной безопасности исходного кода. Благодаря впечатляюще большому количеству как официальных, так и общественных библиотек API, получение секретов безопасным способом невероятно просто, и если вы стремитесь стать опытным пользователем Vault, собственная учебная программа Vault HashiCorp – отличный способ для начала изучения.
Помимо безопасности приложений и инфраструктуры, вам нужен план быстрого реагирования на инциденты. Ознакомьтесь с нашим бесплатным руководством «От реактивного к упреждающему: 6 способов трансформации вашего мониторинга и реагирования на инциденты» для создания прозрачных рабочих процессов управления инцидентами с высокой степенью совместной работы.
Если эта публикация вас вдохновила и вы хотите поддержать автора — не стесняйтесь нажать на кнопку