
Все способы:
- Возвращаем недоступную системе память
- Способ 1: Отключение ограничения памяти
- Способ 2: Обновление BIOS (UEFI)
- Способ 3: Освобождение памяти в BIOS (UEFI)
- Способ 4: Проверка комплектующих
- Вопросы и ответы: 30
Когда Виндовс 10 теряет доступ к части оперативной памяти (ОЗУ), это напрямую сказывается на работе компьютера. Его производительность падает или не увеличивается при установке дополнительных модулей. Недостающие мегабайты и даже гигабайты иногда резервируются аппаратно, но система может не видеть их по другим причинам.
Возвращаем недоступную системе память
Информацию об общем объеме ОЗУ, установленной на компьютере, и объеме доступном Windows 10 можно узнать в окне параметров системы.
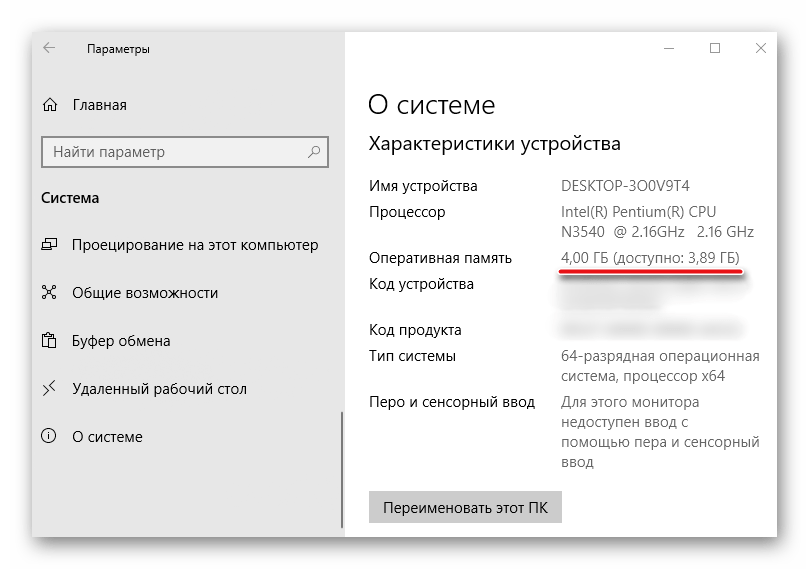
Подробнее: Как узнать характеристики компьютера на Windows 10
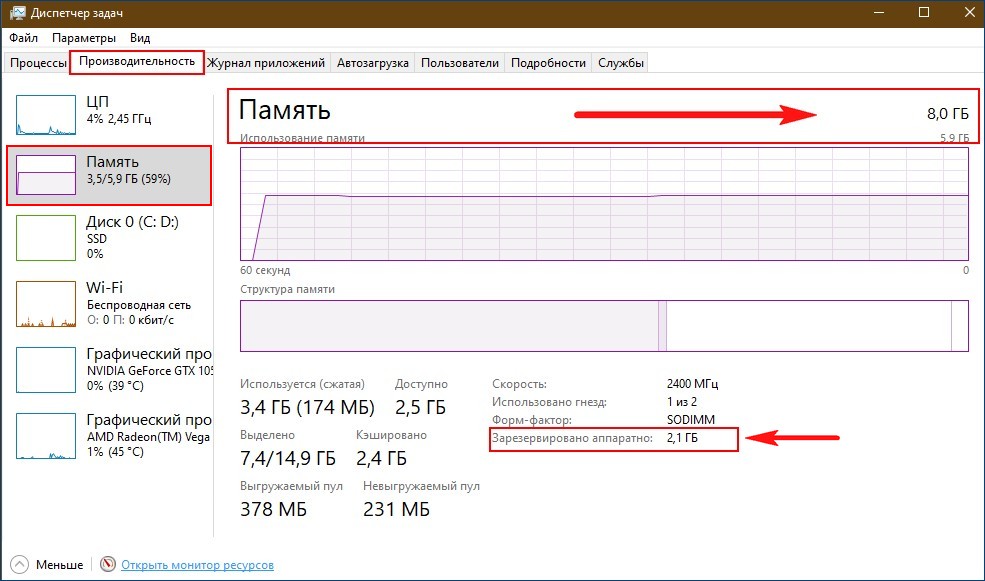
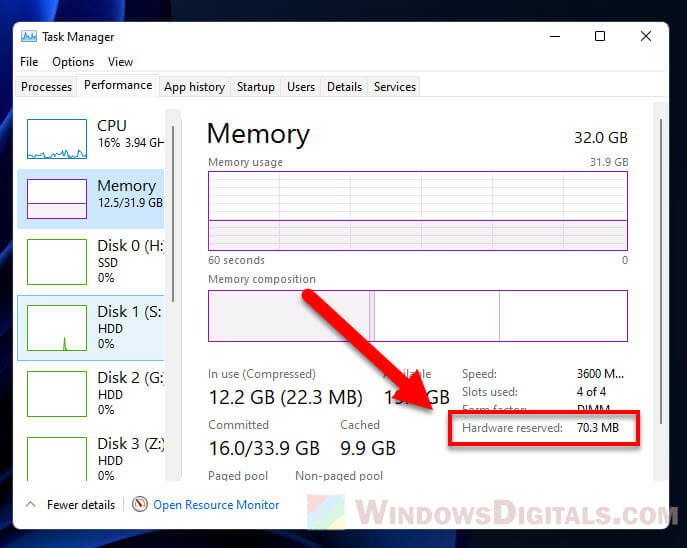
Данные о том, сколько памяти зарезервировано аппаратно, можно найти в «Диспетчере задач», во вкладке «Производительность».
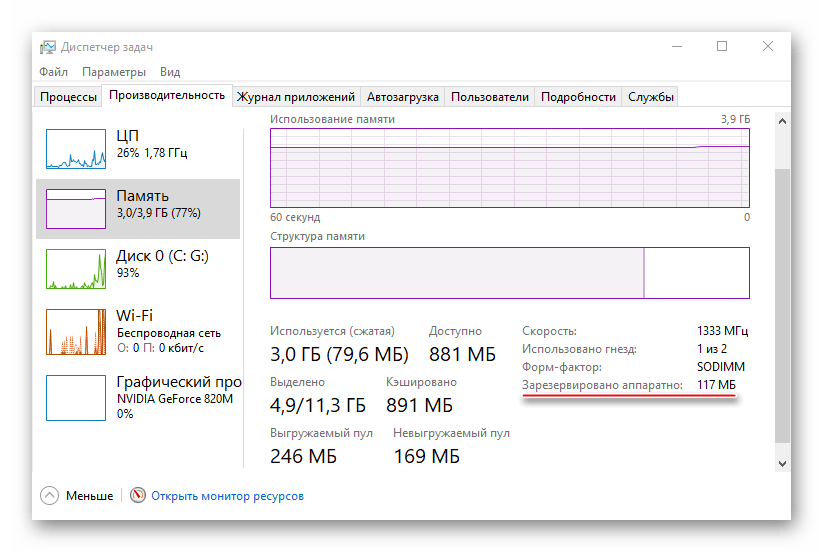
Подробнее: Методы запуска «Диспетчера задач» в Windows 10
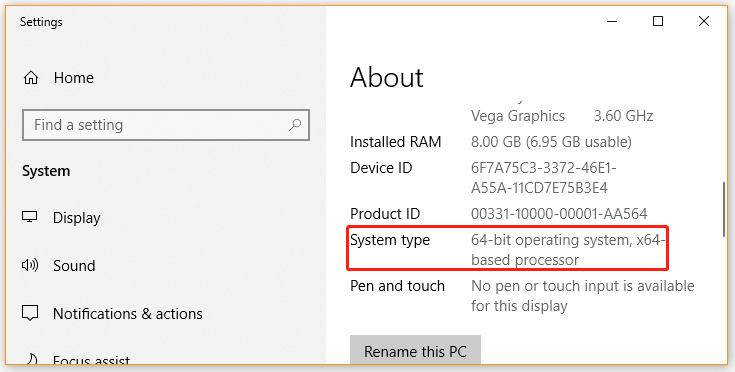
Прежде всего изучите руководство к материнской плате. Она должна поддерживать установленный в нее объем ОЗУ. Убедитесь, что на компьютере стоит 64-х разрядная система, так как в отличие от 32-битной, она способна определить более 4 Гб системной памяти. Если эти условия выполнены, переходим к способам решения проблемы.
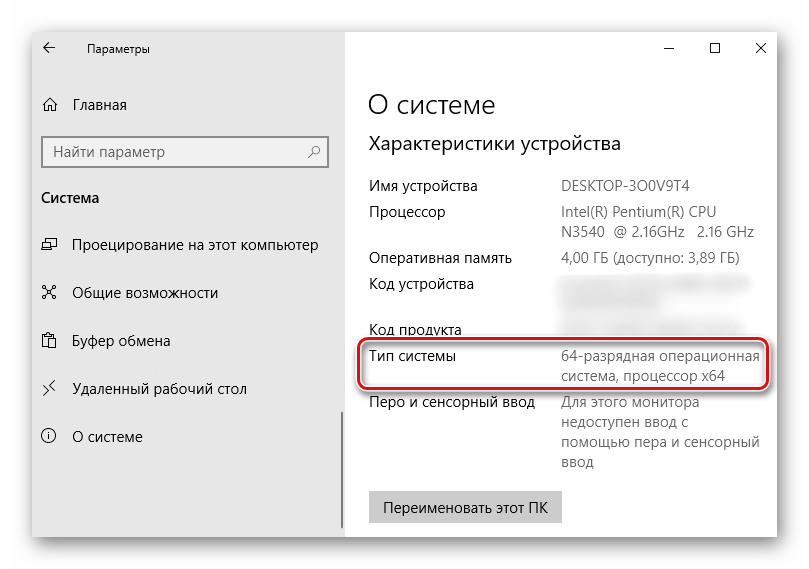
Подробнее: Как определить разрядность Windows 10
Способ 1: Отключение ограничения памяти
В Виндовс 10 есть настройка, благодаря которой можно самостоятельно установить доступный системе максимальный объем ОЗУ. Чтобы снять ограничение:
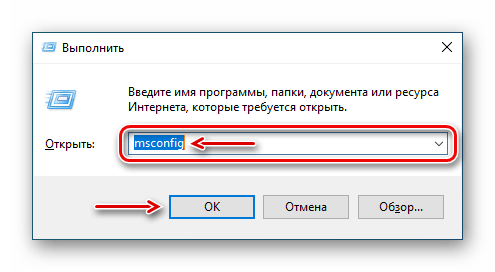
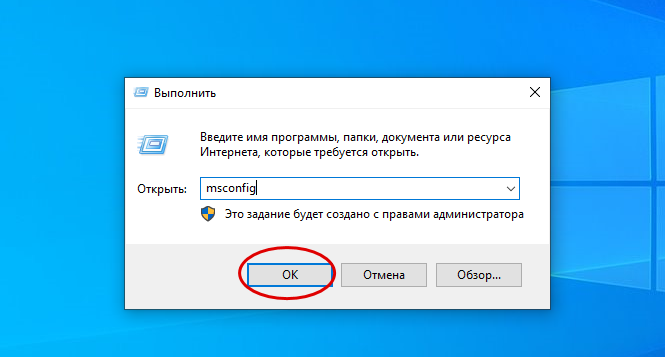
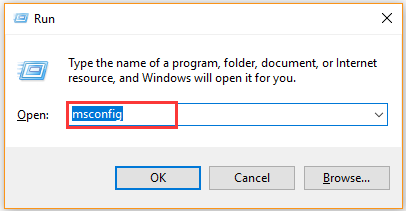
- Вызываем диалоговое окно «Выполнить» комбинацией клавиш Win+R, вводим команду
msconfigи нажимаем «OK».
Читайте также: Вызов оснастки «Выполнить» в ОС Windows 10
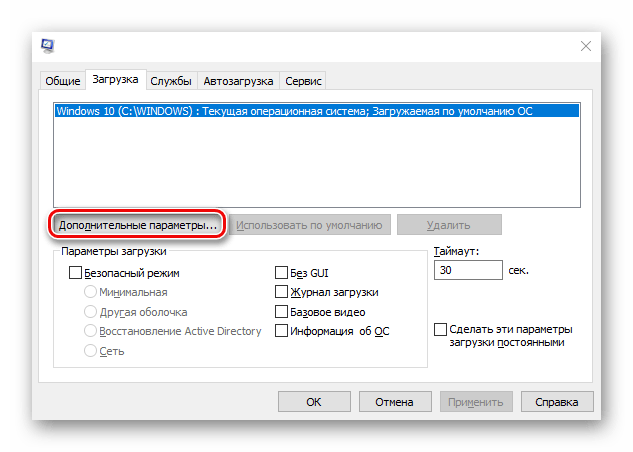
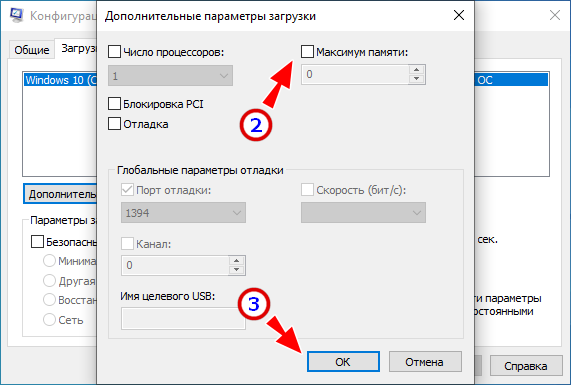
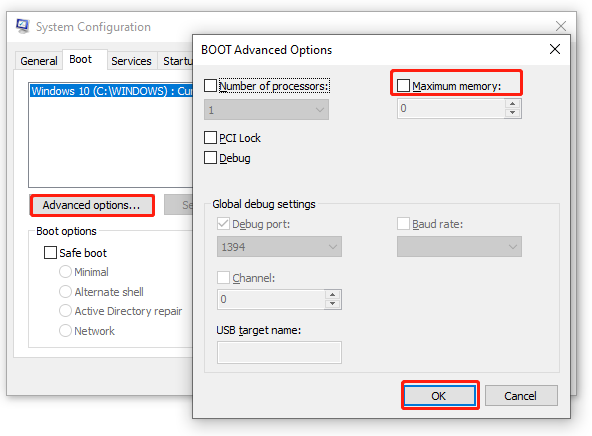
- Во вкладке «Загрузка» жмем «Дополнительные параметры».
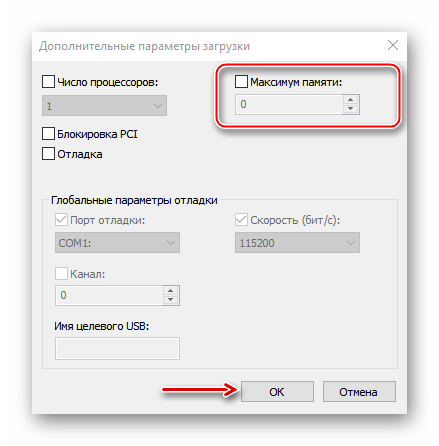
- В блоке «Максимум памяти» снимаем галочку.

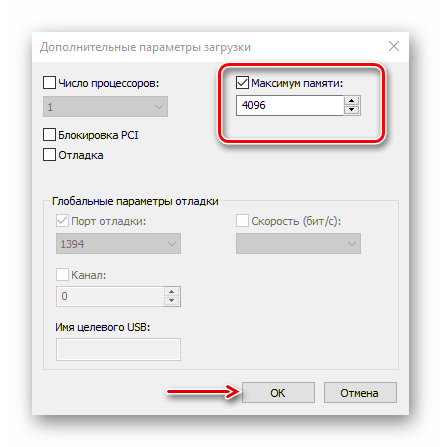
Либо оставляем галочку, но в поле ниже прописываем реальный объем ОЗУ и нажимаем «OK».
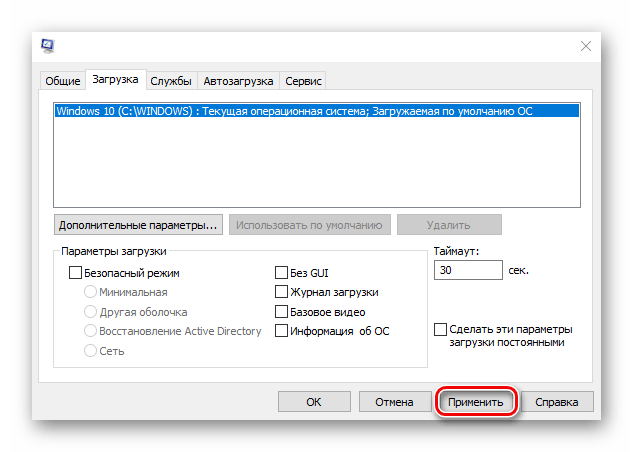
- Жмем «Применить», закрываем все окна и перезагружаем компьютер.
Способ 2: Обновление BIOS (UEFI)
Если на материнской плате устаревшая версия микропрограммы БИОС или более современного интерфейса UEFI, система может не получать доступ ко всей установленной «оперативке». Чтобы проверить наличие свежего программного обеспечения, посетите сайт разработчика главной платы. Обновить микропрограмму можно несколькими способами, о которых мы уже подробно писали.

Подробнее:
Как обновить BIOS на компьютере
Как обновить BIOS с флешки
Способ 3: Освобождение памяти в BIOS (UEFI)
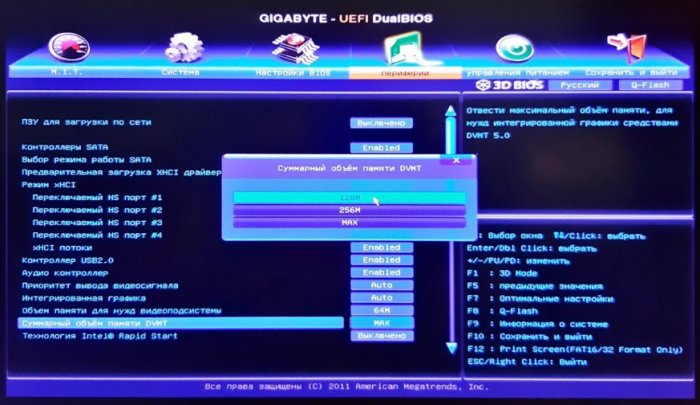
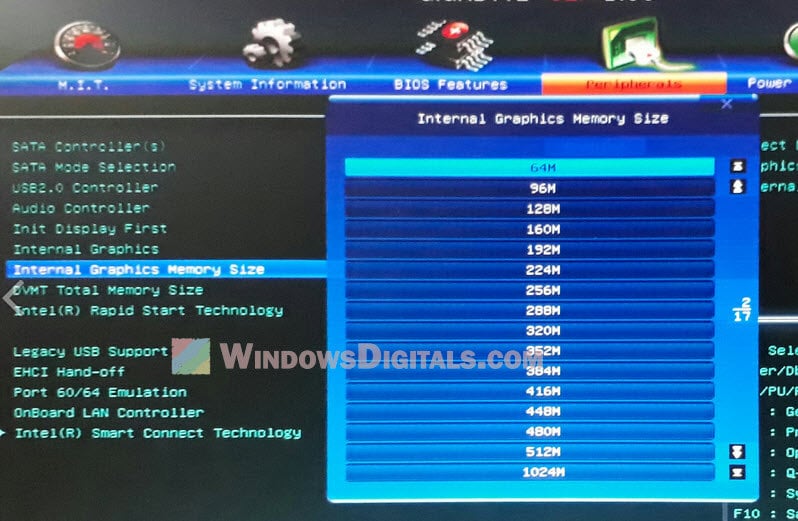
Многие материнские платы разработаны на основе чипсета с интегрированным видеоядром. В БИОС таких плат иногда встраивают опции, которые позволяют выделить определенный объем ОЗУ, например, на запуск требовательных игр. Встроенные графические ядра, использующие технологию Unified Memory Architecture (UMA) или Dynamic Video Memory Technology (DVMT), могут самостоятельно резервировать себе память. В этом случае она сразу становится недоступна системе. Поэтому если такая опция в BIOS (UEFI) есть, следует найти ее и поставить минимальное значение или по возможности отключить (Disabled или None).
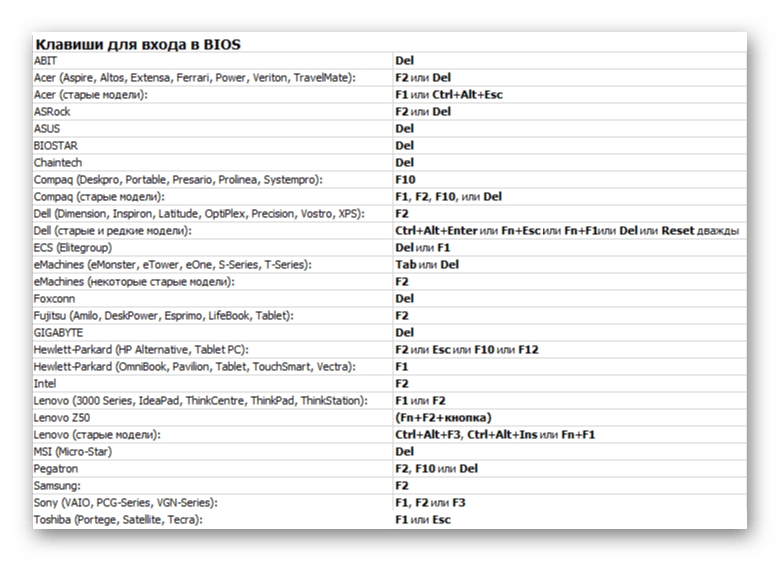
- Перезагружаем компьютер и заходим в БИОС. В самом начале перезагрузки обычно нужно нажать одну или несколько кнопок. Самые распространенные – Delete или функциональные клавиши F.

Читайте также: Как попасть в BIOS на компьютере
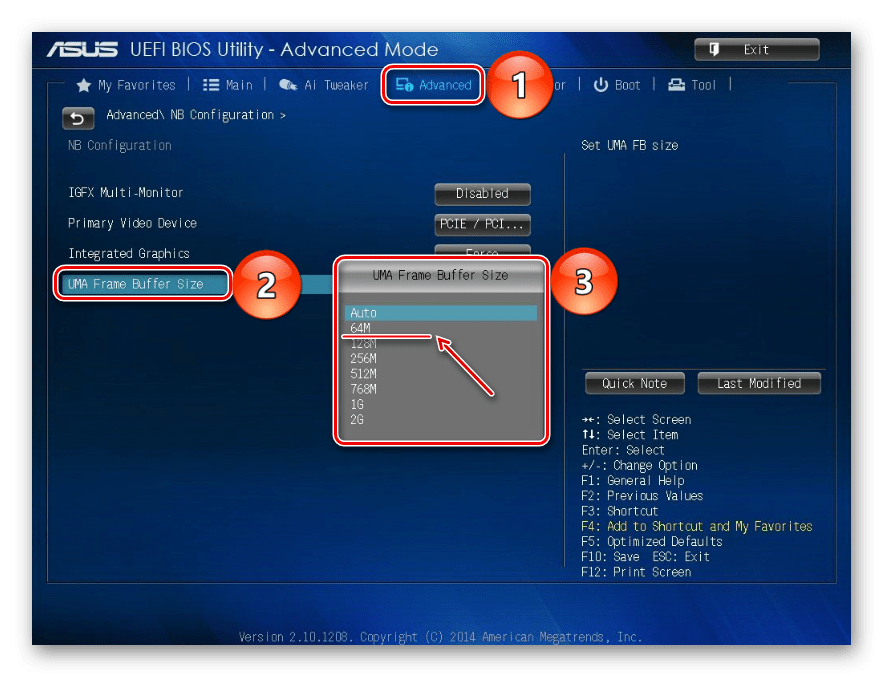
- Находим опцию UMA Frame Buffer Size (или схожую по названию) во вкладке «Advanced», нажимаем на нее и ставим минимальное значение.
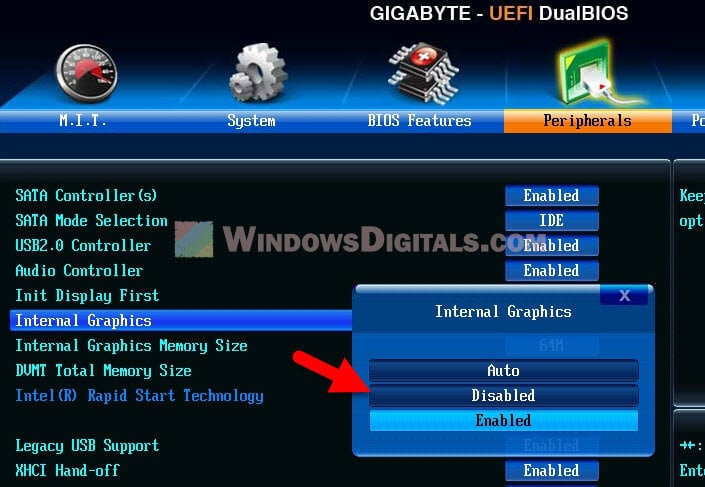
На компьютере с дискретной графической картой можно полностью отключить интегрированный видеоадаптер. Эту тему мы подробно рассмотрели в другой статье.
Подробнее: Как отключить встроенную видеокарту на компьютере
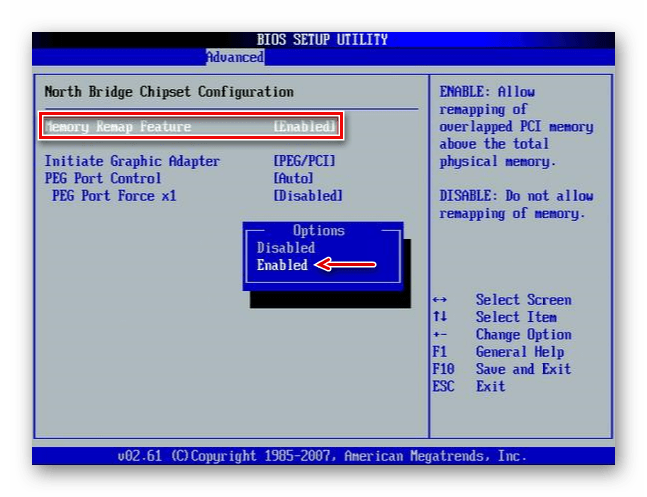
Иногда в BIOS встраивают дополнительные настройки, благодаря которым система может максимально использовать ОЗУ. Если на компьютере установлено 4 Гб или больше «оперативки», активация соответствующей опции позволит распределить блоки адресов, которые используют карты расширения, в адресное пространство за пределы 4-х Гб. Таким образом увеличивается доступный системе объем памяти. Чтобы включить функцию, снова заходим в БИОС, переходим во вкладку «Advanced», ищем настройку Memory Remap Feature (или схожую по названию) и включаем ее (Enabled).
В BIOS материнских плат разных производителей описанные выше опции, если они есть, могут называться по-разному. Информацию об их наличии, расположении и наименовании следует искать в инструкции к оборудованию.
Способ 4: Проверка комплектующих
Отсутствие части памяти необязательно связано с аппаратным резервированием, проблема может заключаться в самом «железе». Для начала проверьте его. Может, модуль памяти вышел из строя или перестали работать слоты на материнской плате. Диагностику можно провести инструментами Windows 10, но более эффективно это сделает специальное программное обеспечение.
Подробнее:
Как проверить оперативную память на Windows 10
Как проверить материнскую плату на работоспособность
Диагностика материнской платы компьютера
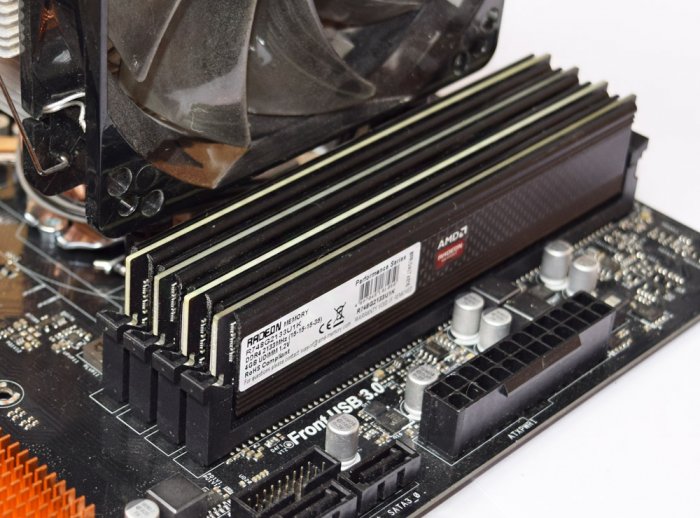
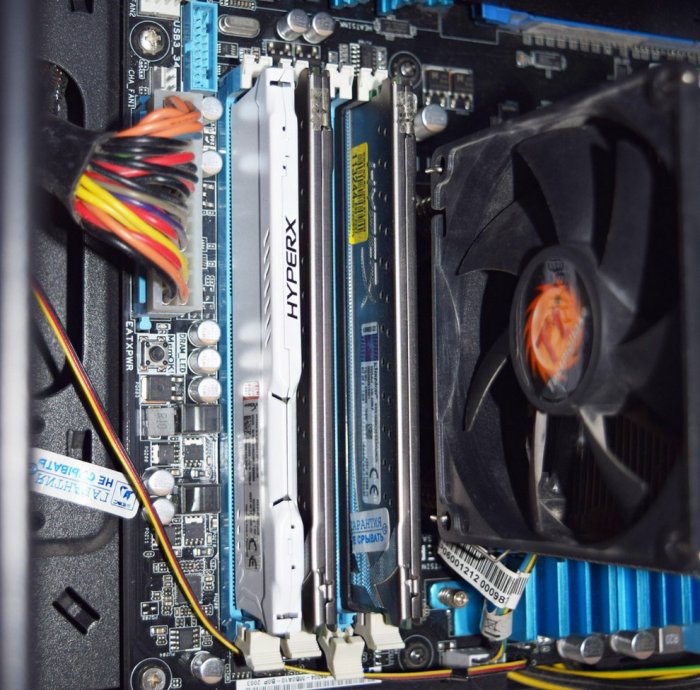
Поменяйте местами планки оперативной памяти, предварительно отключив компьютер от сети. Для системы и BIOS эти действия тождественны смене оборудования, а значит, они могут по-новому определить состояние ОЗУ. Посмотрите в инструкции правильный порядок установки планок в гнезда. Возможно, если их всего две, а гнезд на главной плате четыре, следует задействовать какие-то определенные из них. Дополнительно протрите контакты модулей спиртом или аккуратно зачистите ластиком, а затем вставьте обратно.
Использование нелицензированной операционной системы часто приводит к подобной проблеме, так как неоригинальные версии Windows 10 (сборки) изначально могут быть повреждены.
Мы предложили самые распространенные способы освобождения ОЗУ, недоступной системе, но даже в случае отрицательного результата не спешите переустанавливать Виндовс 10, тем более что это не всегда помогает. Если вы пользуетесь лицензией, то попробуйте обратится в службу поддержки Microsoft или написать производителю материнской платы. Возможно, они знают иные методы решения проблемы.
Наша группа в TelegramПолезные советы и помощь
Современные десктопные компьютеры могут иметь 64 и даже больше гигабайт оперативной памяти на борту, однако это не всегда означает, что вся она будет доступна. Так, 32-битные системы Windows не могут использовать более 4 Гб ОЗУ, хотя теоретически это возможно. Но сегодня речь пойдёт о проблеме иного рода, когда часть оперативной памяти оказывается зарезервированной. Обычно проблема обнаруживается случайно, когда столкнувшийся с падением производительности пользователь открывает Диспетчер задач и на вкладке «Производительность» видит, что определённый объем памяти у него зарезервирован аппаратно.
Данное уведомление имеет место, когда часть оперативной памяти резервируется для какого-либо устройства, чаще всего для интегрированной видеокарты, но ограничение может быть связано и с настройками операционной системы. Реже подобное сообщение указывает на лимит поддержки объёма ОЗУ системной платой, отсутствие поддержки ею же одного из модулей памяти, ошибки BIOS, а иногда и на неисправность самой оперативной памяти. Рассмотрим распространённые причины этого явления чуть более подробно.
Первым делом проверьте, нет ли ограничений на использование памяти самой системой. Откройте командой msconfig,
переключитесь на вкладку «Загрузка», нажмите «Дополнительные параметры»

и убедитесь, что галочка в чекбоксе «Максимум памяти» снята. В противном случае снимаем её и перезагружаем компьютер.
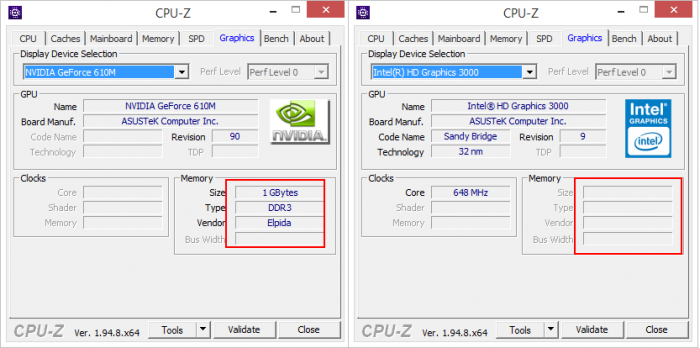
Поскольку встроенные видеочипы не располагают собственными ресурсами, они используют системную память. Как правило, потребляемый ими объем ОЗУ невелик, но могут быть и исключения. Проверить, сколько памяти забирает под свои нужды встроенная видеокарта, а сколько имеет своей памяти дискретная, можно с помощью утилиты CPU-Z. На вкладке «Graphics» выбираем в выпадающем списке «Display Device Selection» сначала одну, а затем вторую карту (если доступна) и смотрим значение «Size» в блоке «Memory». Видеочипы от Intel обычно всегда интегрированные, а от NVIDIA и AMD — дискретные. Из скриншота видно, что наша интегрированная видеокарта Intel не использует ресурсов, но могло быть и иначе. А дискретная видеокарта 610M имеет своей встроенной памяти 1 Гб.
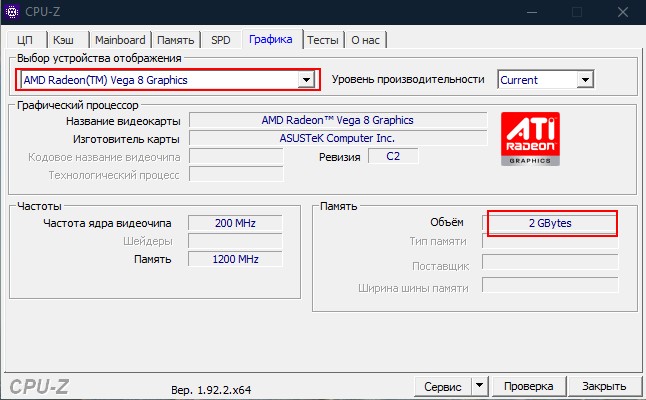
А в этом случае, встроенная в процессор видеокарта Vega 8 зарезервировала для себя целых 2 Гб оперативки.
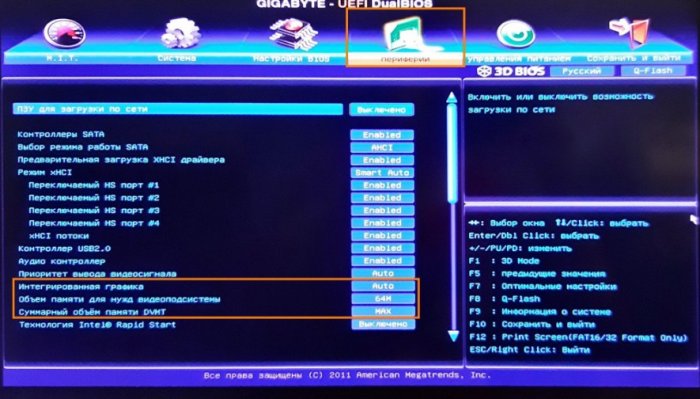
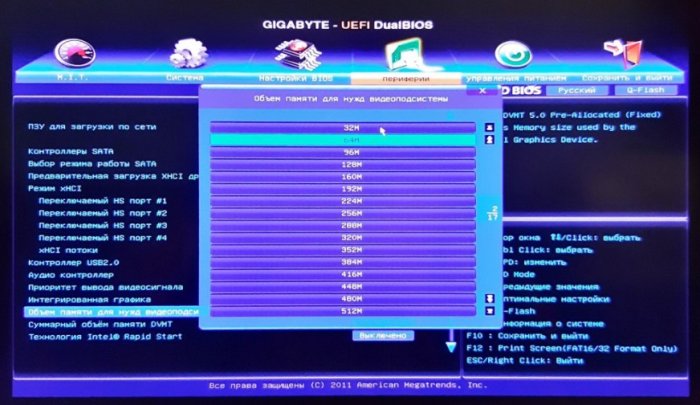
Если вы видите, что встроенный видеоадаптер потребляет не в меру много памяти, необходимо изменить его настройки в BIOS. Здесь всё индивидуально, поскольку в разных моделях BIOS отвечающая за выделение памяти встроенному видеочипу опция может иметь разные названия. В классическом BIOS она может называться Internal Graphic Mode Select или Share Memory Size и располагаться в разделе «Advanced», в UEFI — UMA Frame Buffer Size. А вот так, например, выглядят настройки интегрированной карты в UEFI GIGABYTE. Для указанных на скриншотах настроек устанавливаются минимальные значения.
{banner_google1}
Выше уже было сказано, что для 32-битных Windows установлено ограничение на доступный объем памяти в 4 Гб. Но и в 64-битных системах тоже есть свои ограничения. Например, Windows 7 Домашняя Базовая «увидит» только 8 Гб ОЗУ, а Домашняя Windows 8.1 — максимум 128 Гб. Более детально о поддержке оперативной памяти разными версиями и выпусками Windows рассказывается в статье сайта «Сколько оперативной памяти поддерживает Windows».
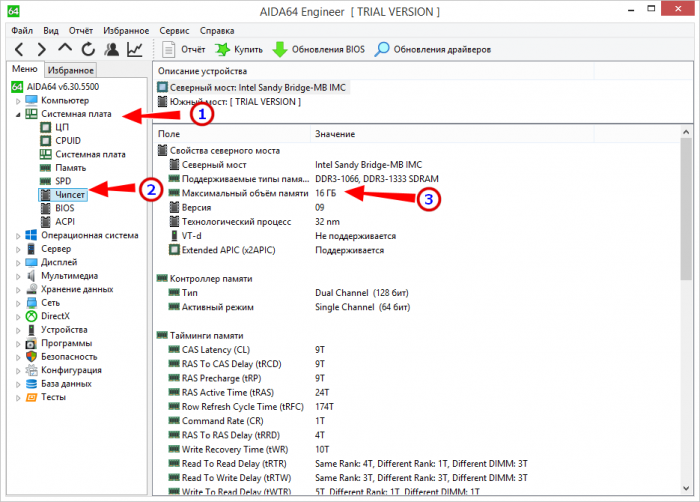
Ограничение на использования оперативной памяти может обуславливаться и на аппаратном уровне. Определить, максимально доступный объем ОЗУ для вашего ПК можно с помощью небезызвестной программы AIDA64, выбрав в меню Системная плата → Чипсет. В правой большей колонке у вас как раз и будет указан максимальный объем RAM, который поддерживает материнская плата вашего компьютера. Кстати, подобные ограничения действуют и для ЦП, но их нужно смотреть в спецификациях процессора на официальном сайте производителя.
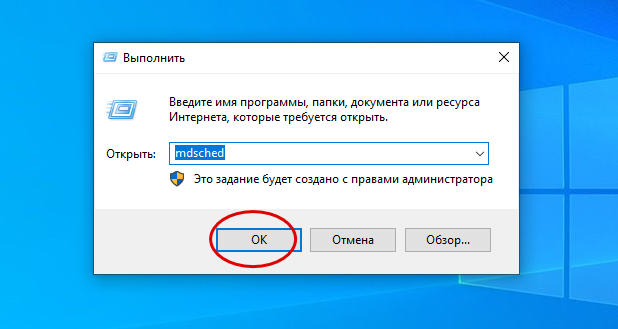
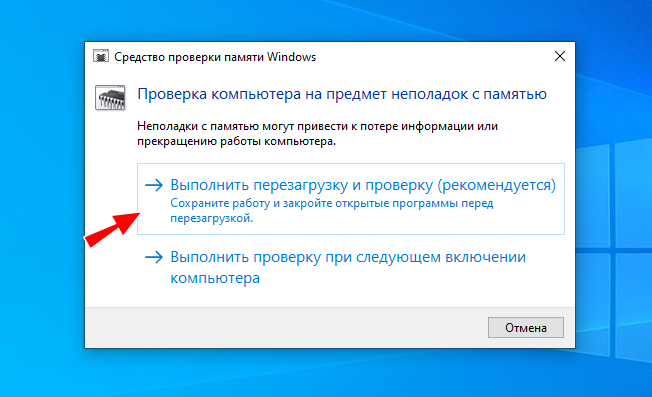
Стоит проверить на предмет ошибок и саму память. Для этого в окошке быстрого запуска выполняем команду mdsched (можно проверять по одной планке за раз, вытащив из слота остальные). Далее соглашаемся на перезагрузку и ждём результатов проверки.
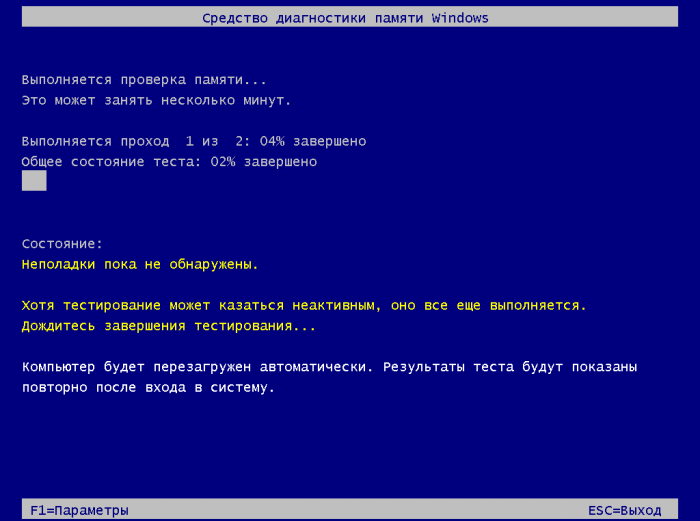
Если сканирование не выявит проблем, проверьте контакты планок ОЗУ, попробуйте поменять их местами. Наличие выявленных в ходе тестирования ошибок нередко свидетельствует об аппаратных проблемах памяти. В этом случае, возможно, повреждённую планку придётся заменить.
• Попробуйте отключить виртуализацию в разделе БИОСа «Advanced». В интеловских ЦП эта опция называется Intel Virtualization Technology, в AMD — SVM Mode.
• Обновите или переустановите драйвер чипсета материнской платы.
• Уточните в характеристиках планок памяти их тайминги. Желательно, чтобы все планки имели одинаковый тайминг. Если он отличается, контроллер памяти автоматически выставляет нужные параметры, но если он не справится со своей задачей, один из модулей RAM может начать работать некорректно. В этом случае рекомендуется выставить в BIOS тайминги, соответствующие самому медленному модулю ОЗУ.
• Проверьте, имеется ли у вас в BIOS функция перераспределение памяти (Memory Remap Feature) и включена ли она. Включите, если отключена.
Это что касается основных причин, по которым память может быть зарезервирована аппаратно. Другой вопрос, когда нужно считать это проблемой и начинать поиск адекватного решения. Если объем зарезервированной памяти в процентном соотношении невелик, допустим 3-5%, и не сказывается на производительности системы, то особо волноваться по этому поводу не нужно. Другое дело, если «потерянными» окажутся сотни мегабайт, то стоит разобраться, на что тратится память или что не позволяет системе использовать её в полном, доступном для неё объёме.
When we talk about how fast your computer works or how smoothly it can run, the Memory, or more often known as RAM (Random Access Memory), is one of the most important factors. The more RAM your computer has, the better it can handle doing lots of things at once; however, it doesn’t always mean the more the better.
But sometimes, you might see some of your computer’s RAM is locked away for “Hardware Reserved Memory.” This happens with both Windows 11 and Windows 10. In this guide, we’re going to explain what Hardware Reserved Memory is, why some computers have a lot of it, and how to reduce it.
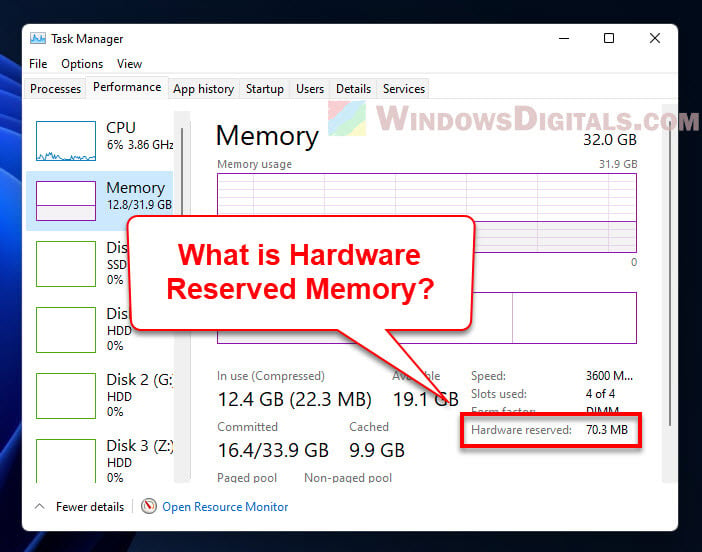
What is hardware reserved memory?
Hardware Reserved Memory is part of your computer’s RAM that’s saved for stuff like your GPU (Graphics Processing Unit), sound card, network adapter, and other pieces inside your computer. This memory is kept aside so these parts can work well.
How to check the hardware reserved memory in Windows 11?
Want to see how much Hardware Reserved Memory your Windows 11 computer has? Just do this:
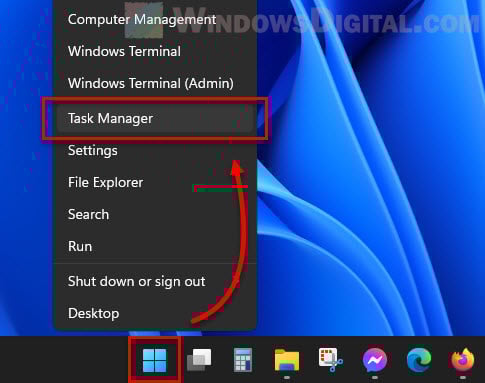
- Right-click on the taskbar and pick “Task Manager” from the list. Or, you can press “Ctrl + Shift + Esc” to open the Task Manager straight away.

- Click on the “Performance” tab in the Task Manager window.
- Choose “Memory” on the left side. You’ll see the total memory your system has, how much is being used, and how much is free.
- Scroll down to the “Hardware Reserved” part to check out how much memory is set aside for hardware stuff.

And there you have it! Now you know how much Hardware Reserved Memory your computer has.
Why do I have 2.1GB, 4GB, or 8GB of RAM hardware reserved?
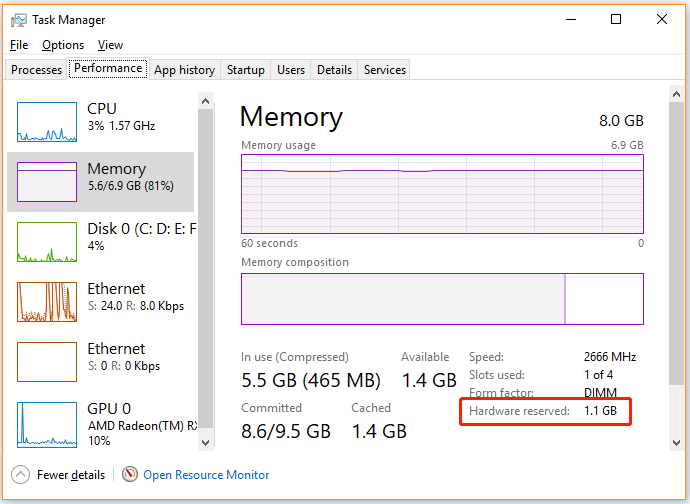
The amount of Hardware Reserved Memory depends on what hardware you have in your computer. If you’ve got fancy GPU, sound card, and other stuff, they need more memory to work right. So, if your computer has 16GB of RAM, you might find that only 8GB is usable because the rest is Hardware Reserved.
Related issue: 16GB RAM Installed Only 8GB Usable in Windows 11
Why is hardware reserved memory so high?
Hardware Reserved Memory can be high because of the hardware in your computer needing more memory. Also, some software and drivers can make it higher too.
Suggested read: Why is My Memory Usage So High When Nothing is Running?
What impact does hardware reserved memory have on system performance?
If a lot of your RAM is Hardware Reserved, it means there’s less memory for running apps and multitasking. This can make your computer slow or take longer to load things. In the worst case, your computer might run out of memory and crash or freeze.
How to reduce hardware reserved memory in Windows 11/10?
Here are some things you can try to lower the amount of Hardware Reserved Memory:
See also: How to Clear RAM Cache in Windows 11
Adjust the amount of RAM allocated to your integrated graphics card
If your computer’s CPU uses some of your RAM for video, you can change how much RAM it gets in the BIOS settings.
- Restart your computer and hit the right key (like F2, F10, or Del) to go into the BIOS setup when it starts up.
- Find the “Advanced” or “Chipset” menu.
- Look for an option that says “Integrated Graphics Share Memory“, “Internal Graphics Memory Size“, or something similar.
- Change how much memory it can use and save your changes.

Be careful though, lowering the memory for your graphics can affect how well games or other graphic stuff works. Test your computer after making changes.
Warning: Be really careful with BIOS settings. Wrong settings can mess up your computer. If you’re not sure, ask someone who knows or check with your computer’s maker. If things go wrong, you might need to clear the CMOS to reset the BIOS settings.
Disable the integrated GPU if it’s not in use
If you have another graphics card, you might turn off the built-in GPU to save some memory.
- Restart your computer and get into the BIOS setup by hitting the usual key (like F2, F10, or Del) as it starts.
- Go to “Advanced” or “Chipset” in the menu.
- Find the “Integrated Graphics“, “Onboard Graphics” or a similar option.
- Choose to “Disable” the built-in graphics.

- Save and exit the BIOS setup.
Also see: How to Force App or Game to Use Dedicated GPU or Integrated Graphics
Just make sure your other graphics card can handle everything you need. Check everything works well before turning off the built-in GPU.
Adjust the maximum memory setting in the system configuration
In Windows 11/10, you can set a max limit for system memory use. Here’s how:
This won’t change how much memory is Hardware Reserved though.
Disable unnecessary hardware devices
Some devices you don’t really use might still take up memory. Turning them off can free up some space. Here’s how:
But, be careful not to turn off anything important. You don’t want to accidentally cause problems.
Update your device drivers
Sometimes old or broken drivers can mess with memory. Updating your device drivers, especially for graphics card, might help.
- Right-click the Start menu and pick “Device Manager.”
- In Device Manager, find the device you want to update, right-click it, and choose “Update driver.”

- Follow the steps on the screen to update the driver.

One last thing
Hardware Reserved Memory can really affect how well your computer works by limiting how much memory is available for your apps and multitasking. It’s very important to find a good balance when trying to reduce the Hardware Reserved Memory. You want to make sure your computer’s parts have enough memory to do their job as well.
Many Windows 10 users have discovered that Windows 10 is using only some of their RAM and that a lot of memory is being reserved. An integrated graphics card is frequently associated with the hardware-reserved memory, and the BIOS can also set aside some memory.
Hardware reserved memory, typically a portion of shared graphics memory is generally a memory block isolated from the RAM. Many people are troubled by the Windows 10 hardware reserved memory issue.

Why Does My RAM Say 8GB Hardware Reserved on Windows 10
There are several causes for an increase in hardware reserve memory. It generally happens when a graphic card is out of date or is built to use some RAM for processing. Additionally, hardware-reserved memory might expand as a result of BIOS errors.
If optimization determines that hardware reserved memory has increased to the value of the entire RAM module, RAM is most likely destroyed.
There are often a few hundred megabytes of hardware-reserved memory. The most that can be used on 32-bit systems is 3.5 GB. Out of the 16 GB of RAM available for 64-bit computers, 1 GB is typically allocated. Between 1GB and 4GB RAM (Hardware Reserved) is defective and needs to be fixed.

How Do I Fix the Hardware Reserved RAM Error?
For the critical operations of the computer, there is a special section of memory called hardware-reserved memory. These procedures make sure that the CPU and external peripherals like the keyboard, printer, and graphics work together in harmony. For routine daily tasks, it is not usable.
Additionally, hardware reserved memory is used to hold the drivers for computer peripherals such as monitors, keyboards, mice, and trackpads, which are given dedicated storage to ensure uninterrupted operation.
The RAM needs to be changed if the reserved ram issue is being caused by a faulty ram. It’s possible that it simply has to be reseated, or that the timings or voltage in the BIOS are incorrect, or some other issue.
Before handling any RAM in this situation, the user must make sure to expel static electricity or use a grounded anti-static wrist strap. For the hardware reserved issue, there are some other alternative fast fixes.
Solution 1: Installation of 64-Bit Windows
To fix hardware reserved RAM, the first thing should do is to check Windows 10 system is 32-bit or 64-bit. This is so that a 32-bit Windows OS, regardless of how much RAM is installed on the computer, can only access 3.5GB of RAM. In this instance, a 64-bit version of Windows 10 must be installed to access all RAM.

Solution 2: Modification of the Maximum Memory
In Windows 10, the maximum memory option is used to reserve RAM during the boot process. If this is set to the maximum memory, Windows 10 may discover a significant amount of hardware reserved RAM. Here, a few simple steps can be taken to modify the settings.
Step 1: Open the Run dialog box by pressing Win + R, then enter “msconfig” into the box after pressing Enter.

Step 2: Select the operating system from the list under the Boot heading in the System Configuration window, and then click on Advanced Options.
Step 3: Uncheck the option next to Maximum memory, then click OK to save changes.
Step 4: In the System Configuration window, click Apply and OK.

The computer can be restarted to see if the hardware-reserved memory Windows 10 issue still exists.
Solution 3: Optimization of Windows 10 Virtual Memory
Some people claimed that changing the Virtual Memory could resolve the problem with Windows 10 not utilizing all of the RAM. It is located by default in the C:\ disk and is used by Windows to control memory usage. The following procedures can be used to optimize virtual memory.
Step 1: To access the File Explorer, press Win + E. Next, select Properties from the context menu by right-clicking the This PC entry.
Step 2: On the left side of the window, select Advanced system settings.
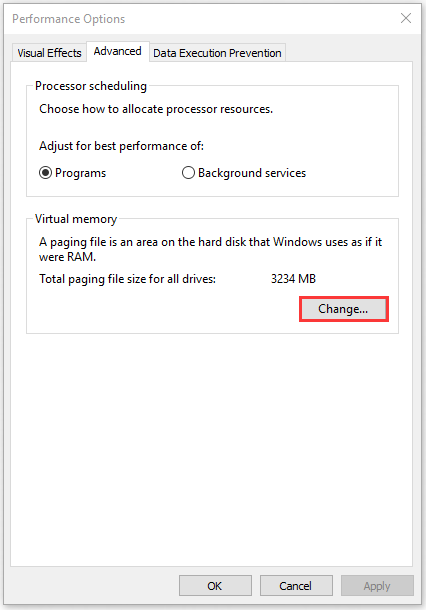
Step 3: Select the Advanced tab and, in the Performance section, select the Settings button.

Step 4: Click the Change button in the Virtual memory box under the Advanced tab.

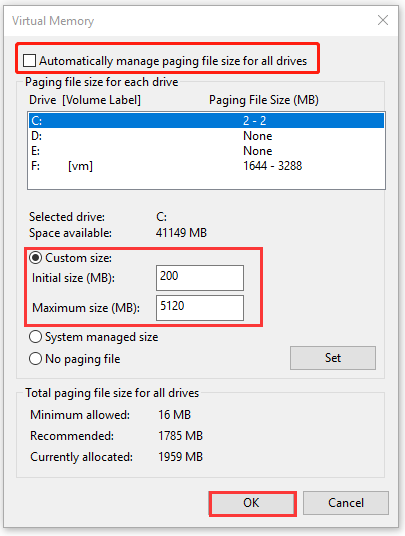
Step 5: Uncheck the box next to Manage paging file size for all disks automatically.
Step 6: Choose the C drive from the list of drives, choose Custom size, increase the size, and then click OK to make the change. Here, it can be set based on real circumstances.

Solution 4: Update BIOS
Windows 10 hardware reserved memory can occasionally be caused by an outdated BIOS. Users can attempt to update the BIOS to try to fix this problem.
Solution 5: Reset the BIOS to Default
The hardware-reserved RAM Windows 10 issue could be brought on by incorrect BIOS. The user could try setting the BIOS back to its default settings to repair it.
Step 1: When the Windows startup screen opens, press F2 or Delete to access the BIOS.
Step 2: Select Restore Settings (or Load Defaults) at the bottom of the right pane and click to approve this modification to restore BIOS.
Step 3: Restart the computer and exit the BIOS.
Solution 6: Update Windows
The hardware-reserved memory Windows 10 issue can be caused by some Windows bugs. To fix these issues, Microsoft frequently releases patches and upgrades. So, users can attempt updating Windows 10 to the most recent build.
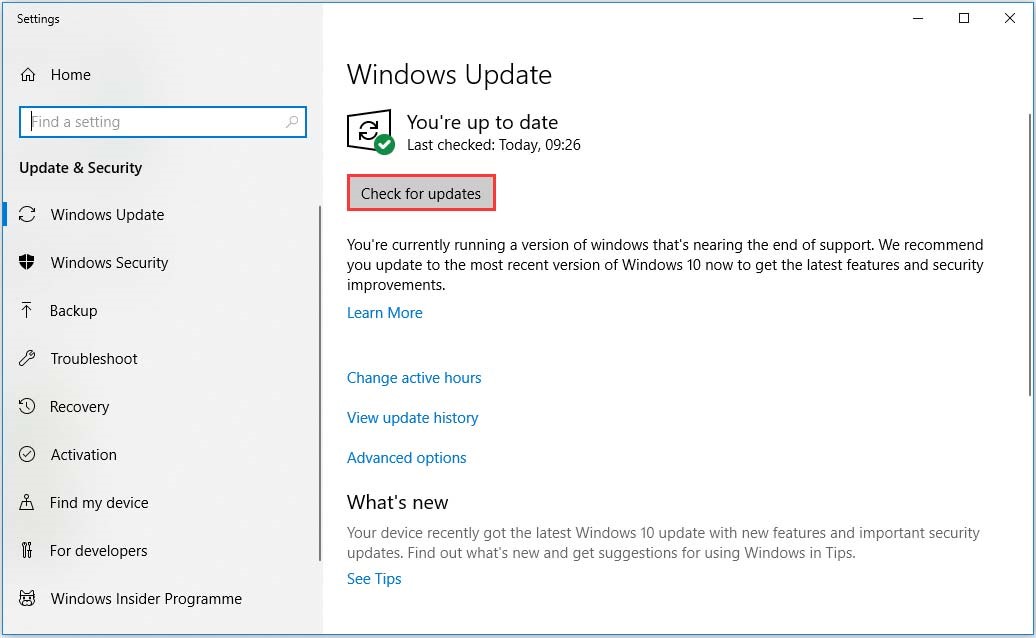
Step 1: After opening Settings select the Update & Security option.
Step 2: To begin updating Windows 10, click the Check for Updates icon. Install any Windows 10 updates that are available to see if the hardware-reserved RAM issue is fixed.

FAQs (Frequently Asked Questions)
Can Windows 10 run smoothly on 8GB RAM?
8 GB of RAM is the very least that should be taken into consideration to avoid dissatisfaction if the computer is intended for photo or HD video editing and rendering, or if users simply want a speedy system.
Is It Safe To Reduce Hardware Reserved Memory?
It is generally safe to reduce the amount of hardware-reserved memory. Most of the time, the PC is unaffected by this. However, under some circumstances, it might obstruct the boot process.
Conclusion
When hardware-reserved memory consumes a significant amount of RAM and causes the computer to run slowly, it becomes undesirable. Although hardware-reserved RAM is becoming an issue among Windows 10 users, it can be resolved by adhering to a few basic tips.
A tech wordsmith with an unquenchable thirst for knowledge. Has a knack for breaking down complex topics into digestible insights ensures that our readers are always in the know.
-
Home
-
Clone Disk
- How to Fix Hardware Reserved Memory Windows 10 [6 Ways]
By Ariel | Follow |
Last Updated
Have you come across hardware reserved memory windows 10? This issue troubles a lot of users. If you are still trying to resolve it, then you come to the right place. This post of MiniTool summarizes 6 fixes for hardware reserved memory.
When opening Task Manager, many users noticed that there is a large amount of hardware reserved memory Windows 10. Why Windows 10 not using all RAM? According to a survey, the hardware reserved memory is often related to an integrated graphics card. In addition, your BIOS can reserve some amount of memory.
Fix 1. Check Your System Information
To fix hardware reserved RAM, the first thing you should do is to check your Windows 10 system is 32 bit or 64 bit. This is because a 32 bit Windows OS can only access 3.5GB RAM no matter how much RAM is physically installed on your PC. In this case, you need to install a 64 bit Windows 10 OS to access full RAM.
If you don’t know how to check Windows 10 operating system type, read this post: “What Is the Difference Between 32 Bit and 64 Bit (x86 vs x64)”.
Fix 2. Change the Maximum Memory Used on Boot
There is a maximum memory option in the boot procedure that’s used to reserve RAM in Windows 10. If you set the maximum memory too high, you may find a large amount of hardware reserved RAM Windows 10. Here you can follow the steps below to change the settings.
Step 1. Press Win + R keys to open the Run dialog box, and then type msconfig in it and hit Enter.
Step 2. In the System Configuration window, navigate to the Boot tab, and then select the Operating System from the list and click on Advanced Options.
Step 3. Untick the checkbox next to Maximum memory and click on OK to save the change.
Step 4. Click on Apply and OK in the System Configuration window.
Now, you can restart the computer and check if the hardware reserved memory Windows 10 issue still persists.
Fix 3. Optimize the Virtual Memory on Windows 10
Some users reported that the Windows 10 not using all RAM issue can be fixed by modifying the Virtual Memory. It is used by Windows to manage memory usage and located in the C: drive by default. Here you can try optimizing the virtual memory.
Step 1. Press Win + E keys to open the File Explorer, and then right-click This PC entry and select Properties.
Step 2. Click on the Advanced system settings on the left side of the window.
Step 3. Go to the Advanced tab and click on the Settings button under the Performance section.
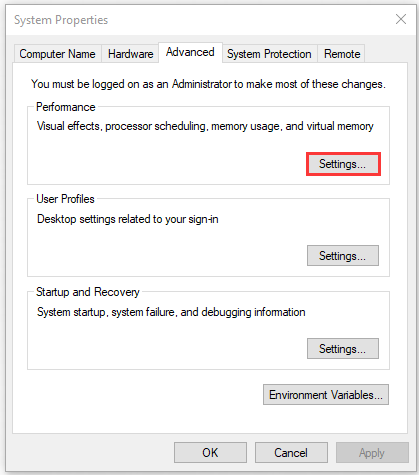
Step 4. Go to the Advanced tab and click on the Change button in the Virtual memory box.
Step 5. Uncheck the box next to Automatically manage paging file size for all drives.
Step 6. Select the C drive from the listed drives, and then select Custom size to larger and click on OK to apply the change. Here you can set it based on your actual situation.
Once done, reboot your computer and check if hardware reserved RAM Windows 10 is resolved.
Fix 4. Update BIOS
Sometimes an outdated BIOS is also responsible for hardware reserved memory Windows 10. To get rid of this error, you can try updating BIOS. If you are unclear about the operation steps, don’t worry. This post “How to Update BIOS Windows 10 | How to Check BIOS Version” walks you through a full guide.
Fix 5. Check for Windows Updates
The hardware reserved memory Windows 10 issue can be caused by some Windows bugs. As you know, Microsoft will release patches and updates on a regular basis to resolve these bugs. So, you can try updating your Windows 10 to the latest build.
Step 1. Press Win + I keys to open the Settings app and navigate to the Update & Security section.
Step 2. Click on Check for updates button to start updating Windows 10. If there are any available Windows 10 updates, you can install them and see if the hardware reserved RAM problem can be resolved.
Fix 6. Restore BIOS to the Default Settings
If all the above methods fail to work, then the hardware reserved RAM Windows 10 problem may be caused by improper BIOS configurations. To fix it, you can try restoring BIOS to the factory defaults. Here’s how to do that:
Step 1. Enter BIOS by pressing the F2 or Delete key when the Windows startup screen appears.
Step 2. Click on Restore Settings (or Load Defaults) at the bottom of the right pane and confirm this change to restore BIOS.
Step 3. Exit the BIOS and restart your computer.
Tips:
Experience peak PC performance with MiniTool System Booster — Free up RAM for a smoother computing journey.
MiniTool System Booster TrialClick to Download100%Clean & Safe
About The Author
Position: Columnist
Ariel has been working as a highly professional computer-relevant technology editor at MiniTool for many years. She has a strong passion for researching all knowledge related to the computer’s disk, partition, and Windows OS. Up till now, she has finished thousands of articles covering a broad range of topics and helped lots of users fix various problems. She focuses on the fields of disk management, OS backup, and PDF editing and provides her readers with insightful and informative content.