
Все способы:
- Исправляем проблему с туннелем в Hamachi
- Способ 1: Проверка настроек Hamachi
- Способ 2: Настройка параметров виртуального адаптера
- Способ 3: Добавление Hamachi в исключения брандмауэра и антивируса
- Способ 4: Переустановка программы
- Вопросы и ответы: 3
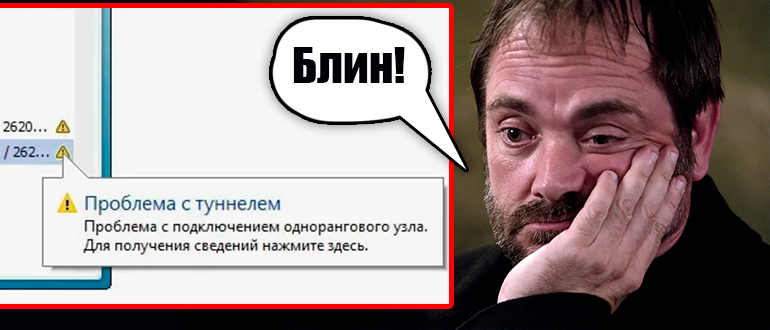
Иногда пользователи сталкиваются с необходимостью создания собственной защищенной виртуальной сети, в которую бы входило несколько компьютеров. Организовать подобное подключение можно только с помощью специального программного обеспечения. Одна из самых частых проблем, возникающих при попытке наладить соединение через Hamachi, сопровождается уведомлением «Проблема с туннелем».
Исправляем проблему с туннелем в Hamachi
Существует несколько факторов, вызывающих подобную неполадку. В большинстве случаев они заключаются в неправильных настройках виртуального подключения Ethernet или конфигурации самой Hamachi. В таком случае пользователю потребуется вручную проверить все параметры, изменить их значения и убедиться в том, что неисправность успешно устранилась.
Способ 1: Проверка настроек Hamachi
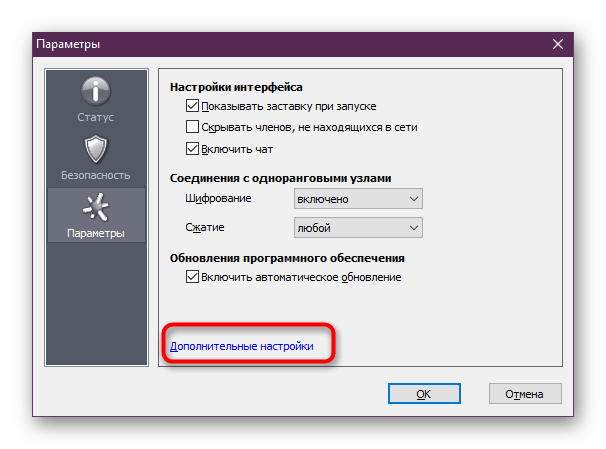
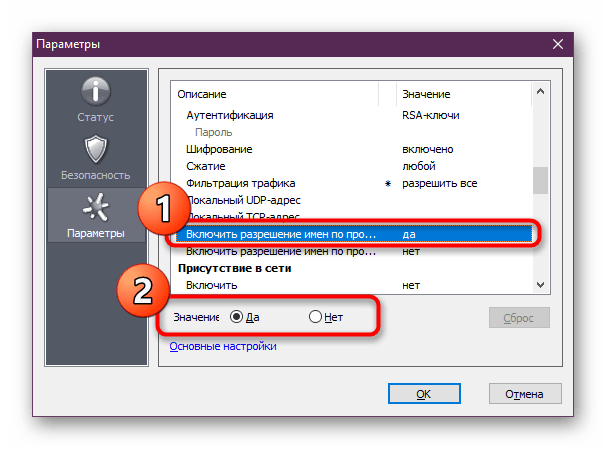
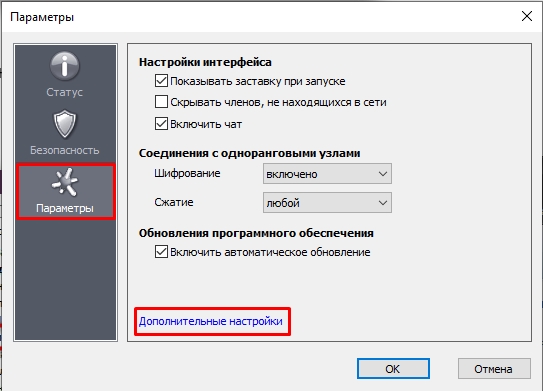
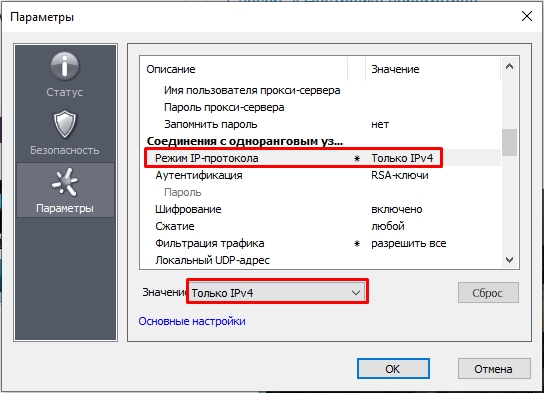
Сперва потребуется обратиться к меню «Параметры» в используемой программе, поскольку по умолчанию некоторые настройки не соответствуют требованиям для успешного соединения, что на определенных компьютерах и приводит к проблемам с туннелем. Вам понадобится поочередно выполнить такие действия:
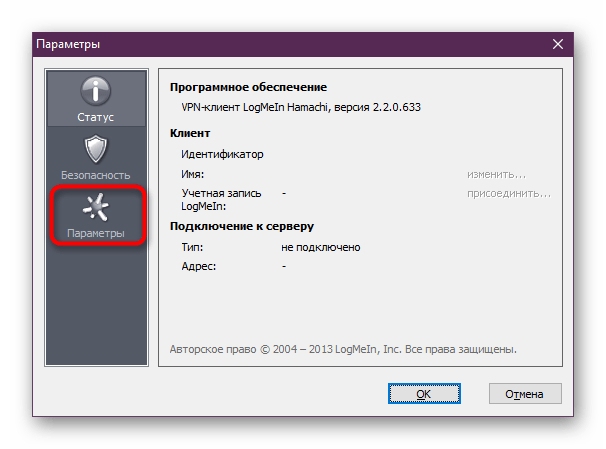
- Запустите Хамачи и через вкладку «Система» перейдите в раздел «Hamachi».
- Здесь на панели слева разверните категорию «Параметры».
- Нажмите на ссылку «Дополнительные настройки».
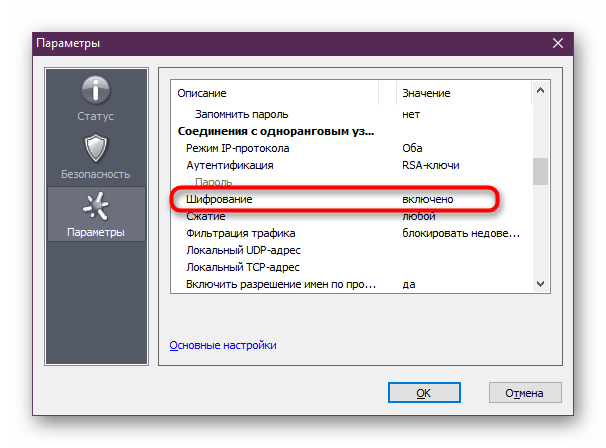
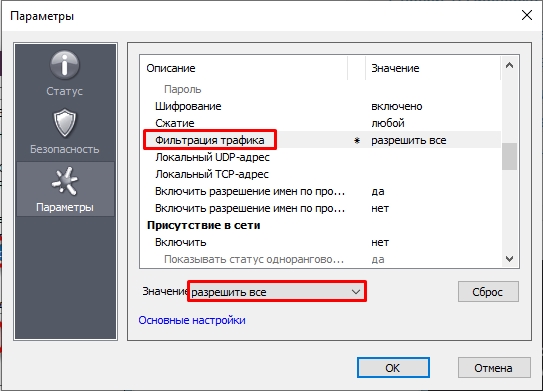
- Начните просматривать список описаний и значений. Отыщите там «Шифрование» и установите его в состояние «Отключено».
- В пункте «Фильтрация трафика» выставьте значение «Разрешить все».
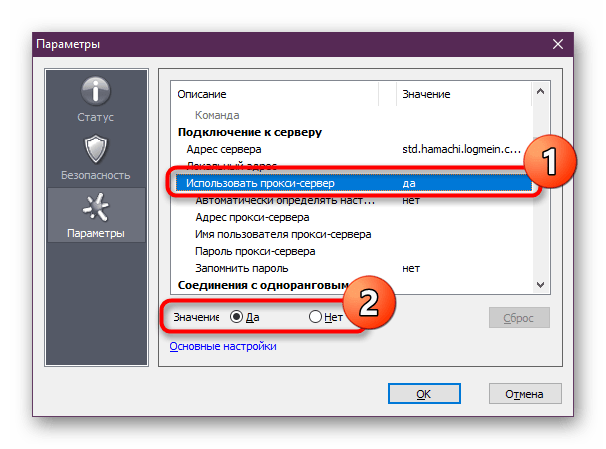
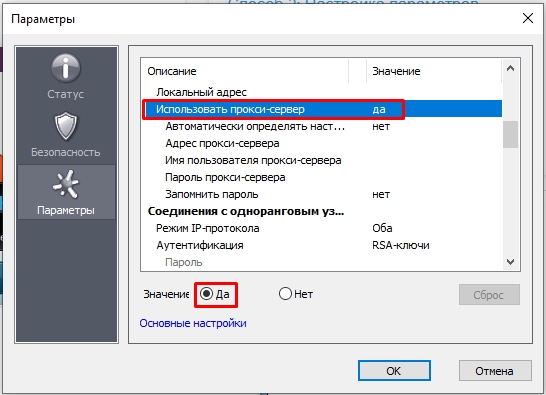
- Отключите использование прокси-сервера, отметив соответствующий пункт маркером.
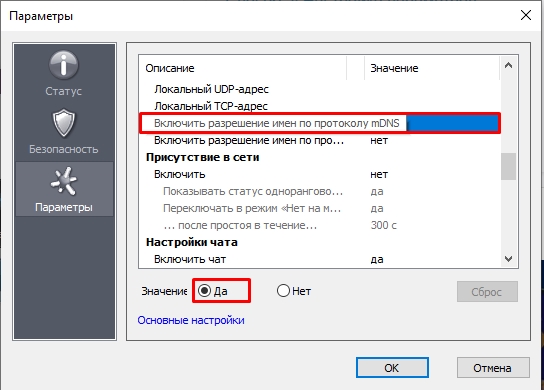
- Включите разрешение имен по протоколу mDNS.
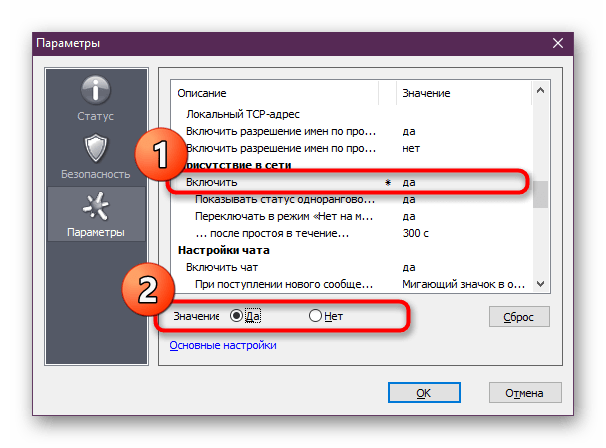
- Опуститесь в категорию «Присутствие в сети» и включите его, так же поставив точку возле слова «Да».
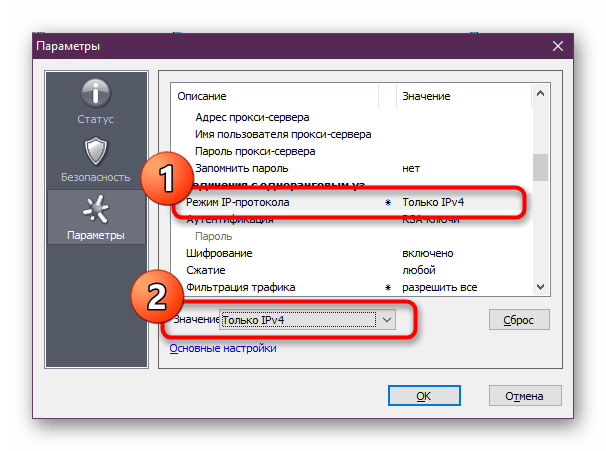
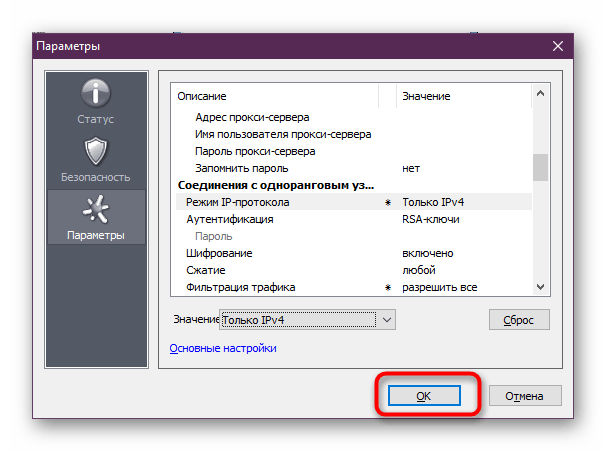
- Приведенных выше параметров достаточно для того, чтобы исправить возможные проблемы с туннелем, однако если это не помогло, дополнительно поставьте значение «Режим IP-протокола» в состояние «Только IPv4».
- Примените все изменения, а затем перезапустите программу, чтобы они вступили в силу.

Данный метод будет максимально эффективен в той ситуации, когда в самой операционной системе выставлены правильные настройки подключения виртуальной сети. Если вдруг окажется, что это не так, потребуется дополнительно использовать следующий метод.
Способ 2: Настройка параметров виртуального адаптера
Как известно, во время установки Хамачи добавляет в ОС отдельный драйвер, который идентифицируется как подключение Ethernet. Оно и используется для наладки дальнейших соединений. Когда какие-то настройки сбиваются или изначально установились неправильно, может возникнуть рассматриваемая неполадка.
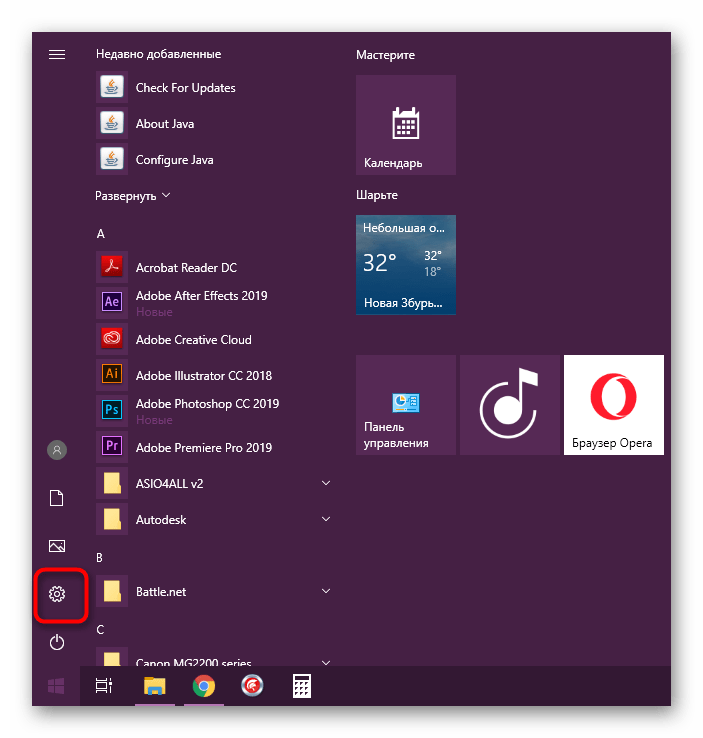
- Откройте «Пуск» и перейдите в «Параметры», нажав на соответствующую иконку в виде шестеренки.
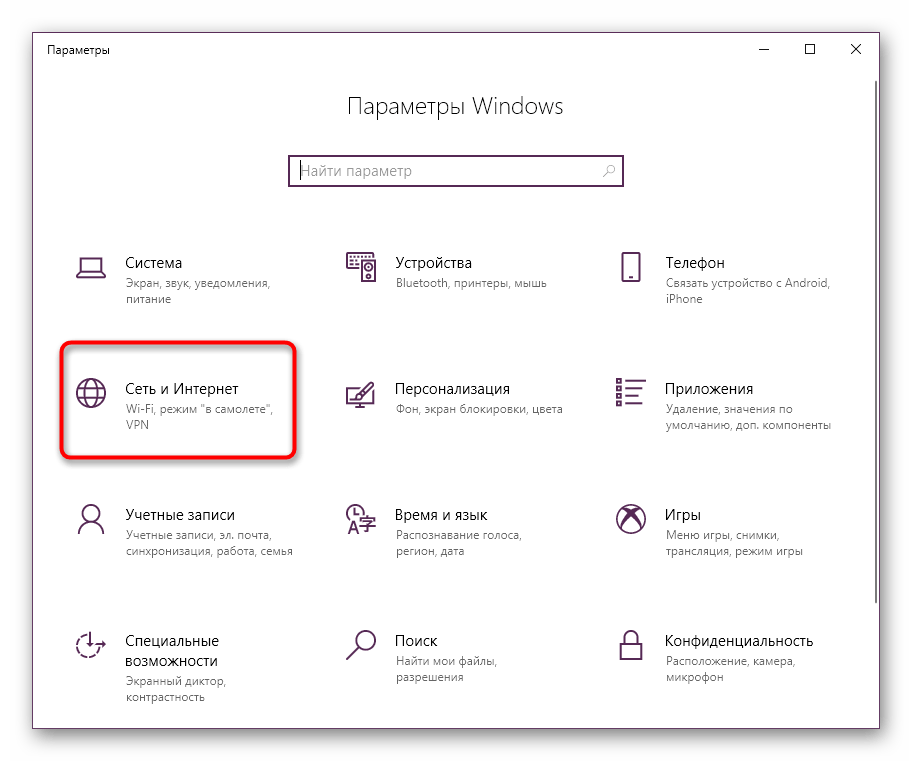
- Переместитесь в раздел «Сеть и Интернет», дважды щелкнув по нему левой кнопкой мыши.
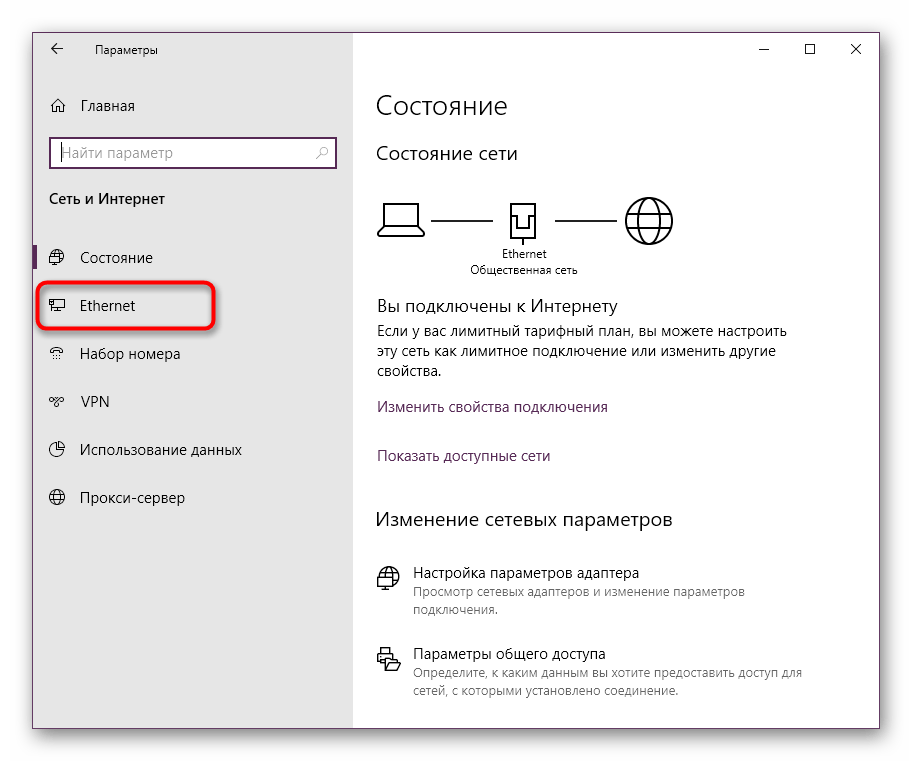
- Через панель слева перейдите в «Ethernet».
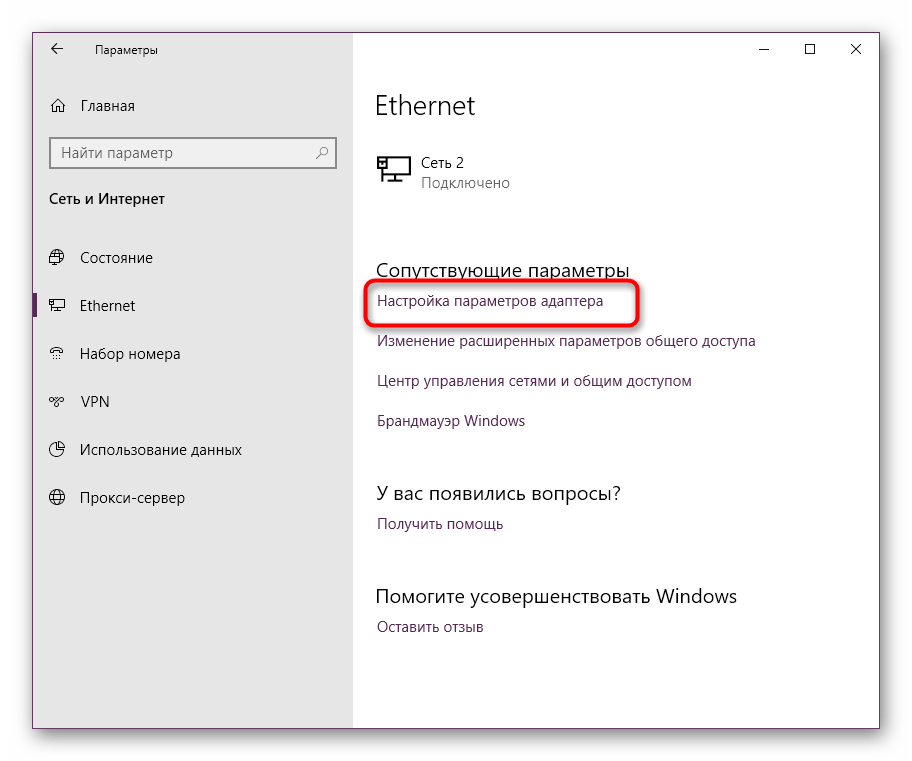
- В категории «Сопутствующие параметры» кликните по надписи «Настройка параметров адаптера».
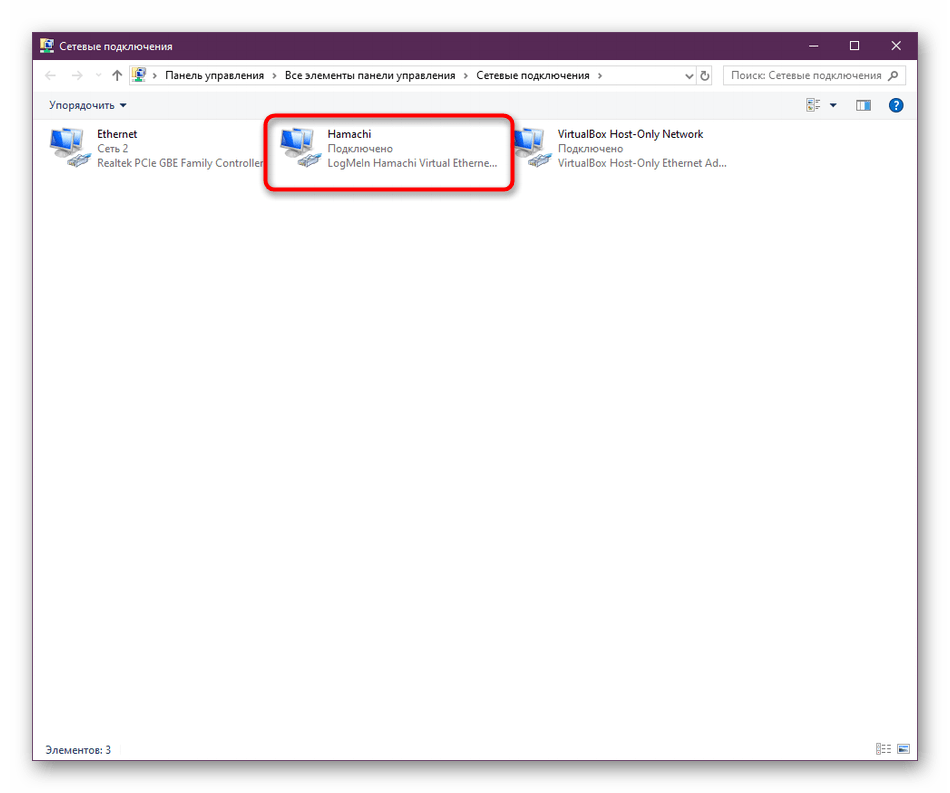
- Отыщите там «Hamachi», нажмите на это соединение ПКМ и выберите пункт «Свойства».
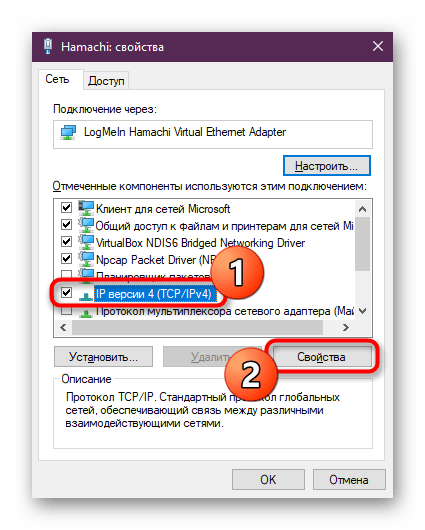
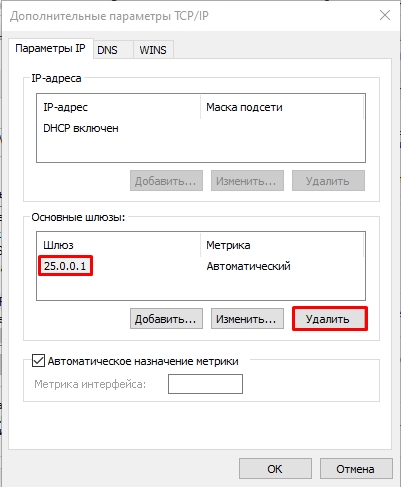
- Здесь в разделе «Сеть» выделите «IP версии 4 (TCP/IPv4)» и щелкните по кнопке «Свойства».
- Перейдите в меню «Дополнительно».
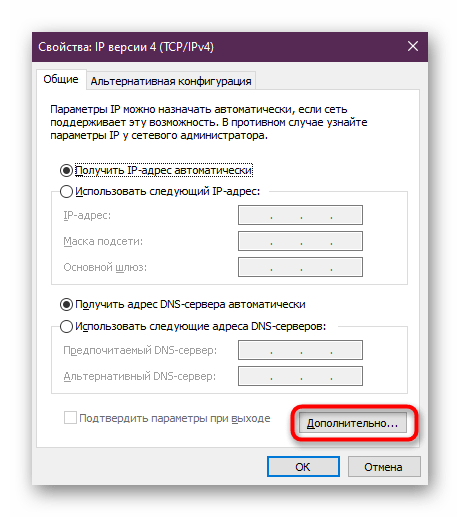
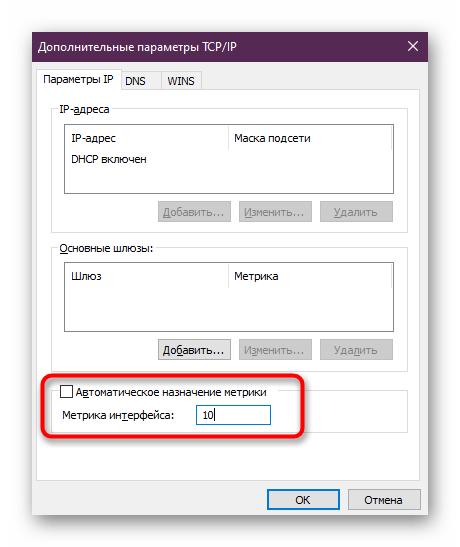
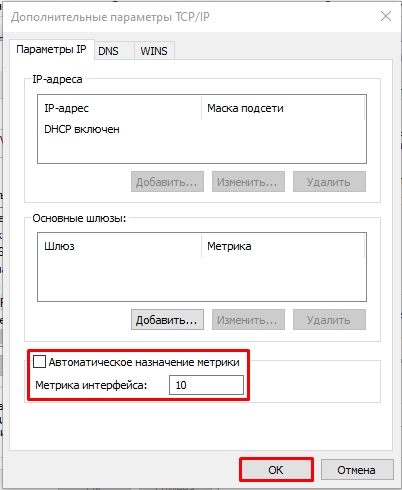
- При наличии основного шлюза удалите его, предварительно выделив.
- Метрику интерфейса установите в состояние «10».
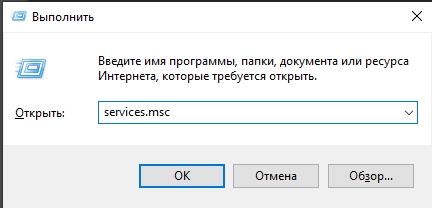
После этого опять же нужно перезапустить Хамачи или лучше всю операционную систему, чтобы внесенные изменения точно вступили в силу. Желательно обновить и работу службы программного обеспечения:
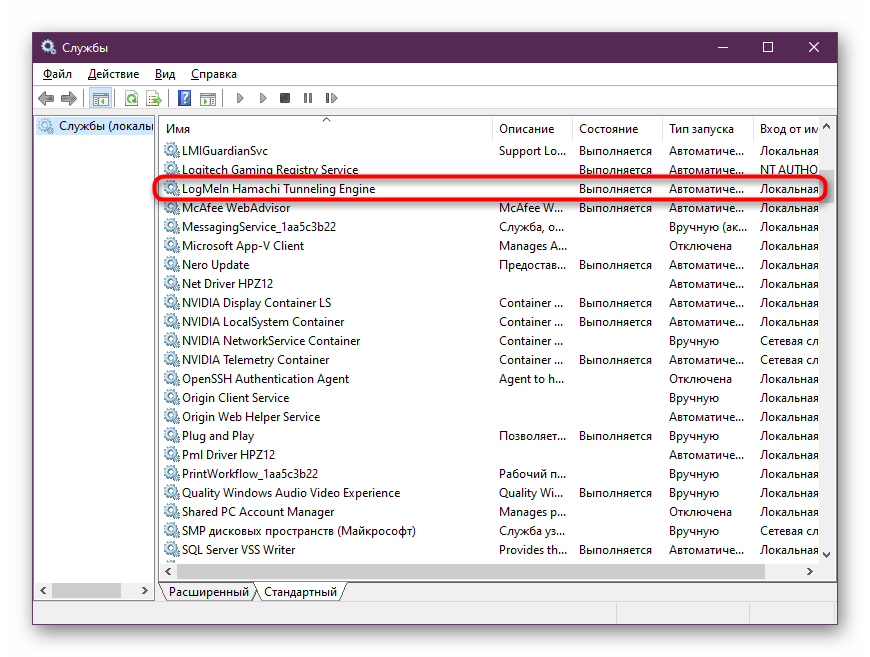
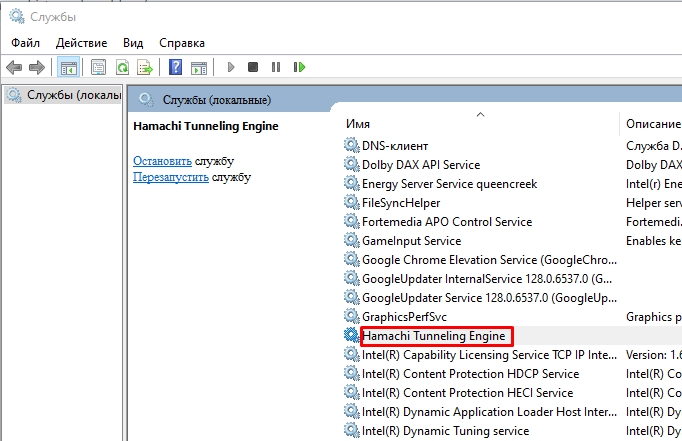
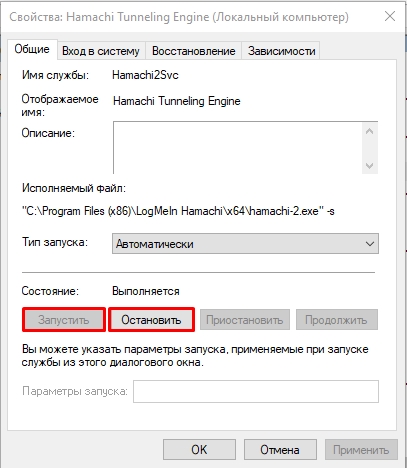
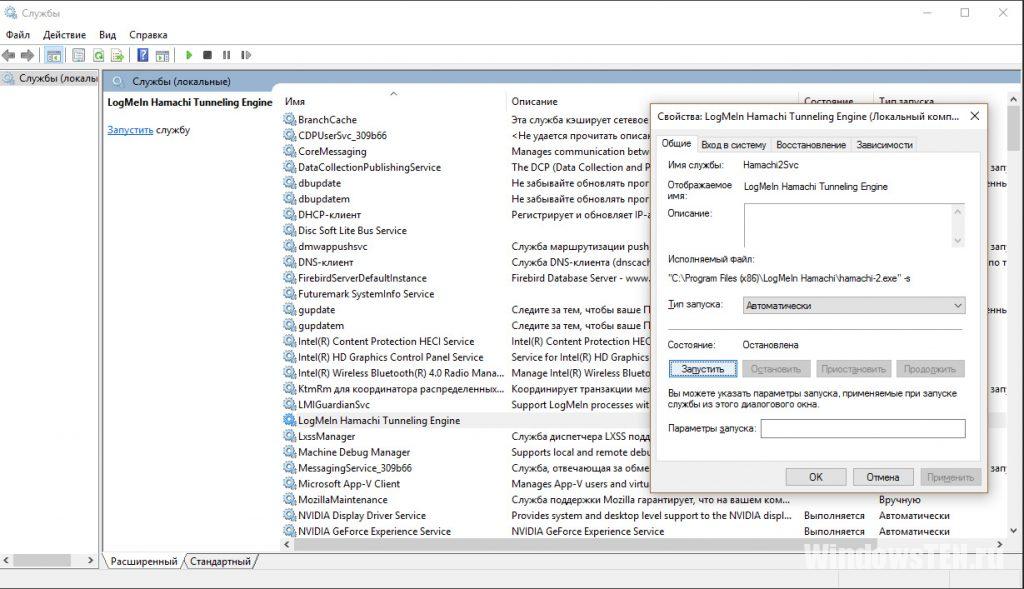
- Через меню «Пуск» в поиске отыщите «Службы» и запустите это приложение.
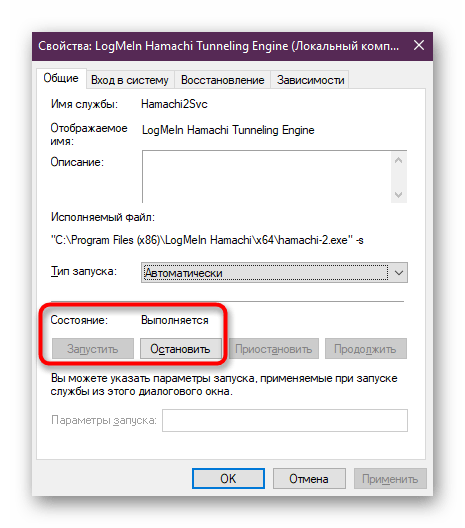
- В открывшемся окне отыщите строку «LogMeIn Hamachi Tunneling Engine» и дважды щелкните по ней ЛКМ.
- В главной вкладке остановите службу, а потом повторно запустите, чтобы обновить ее работу.

Если и этот вариант не принес никакого результата, скорее всего, неполадка заключается не в настройках.
Способ 3: Добавление Hamachi в исключения брандмауэра и антивируса
Hamachi считается дружелюбным софтом, однако некоторые антивирусы и стандартный межсетевой экран Windows могут поместить данное ПО в карантин. Связано это чаще всего с банальными сбоями и неправильным функционированием защитных инструментов, что и приводит к появлению проблем с туннелем. Решается неполадка достаточно просто — вы добавляете Хамачи в исключения установленного антивируса и стандартного брандмауэра. Все необходимые инструкции по этой теме вы найдете в других наших материалах, перейдя по указанным ниже ссылкам.
Подробнее:
Добавляем программу в исключения в брандмауэре Windows 10
Добавление программы в исключения антивируса
Способ 4: Переустановка программы
Перед выполнением этого способа обязательно проверьте на эффективность первые три, поскольку этот является достаточно радикальным. Хамачи по своей природе — достаточно сложное ПО, которое устанавливает в операционную систему множество дополнительных файлов и параметров реестра. Иногда эта операция проходит не совсем успешно, что и приводит к проблемам с работой софта. Решается это только полным удалением и повторной инсталляцией. В большинстве случаев здесь не поможет стандартная деинсталляция, понадобится дополнительно очистить все существующие «хвосты». Более детально об этом читайте в статье далее.
Подробнее: Полное удаление программы Hamachi
После этого уже загрузите последнюю версию обеспечения с официального сайта и инсталлируйте стандартным образом, следуя инструкциям, которые будут отображаться в мастере. В критических ситуациях мы дополнительно можем порекомендовать восстановить ОС и системные файлы, поскольку из-за этого тоже возникают проблемы со стабильной работой софта.
На этом наша статья подходит к своему логическому завершению. Приведенные выше руководства должны помочь разобраться с возникшей трудностью при попытке взаимодействия с Hamachi. После успешного возобновления работы софта можно смело переходить к его использованию. Если вы только собираетесь освоить Хамачи, советуем ознакомиться с соответствующими уроками, где объясняются базовые принципы управления присутствующими инструментами.
Читайте также: Использование программы Hamachi
Наша группа в TelegramПолезные советы и помощь
Hamachi is basically, a VPN or Virtual Private Network product that allows you to share data with distant computers connected to the network. To play games, many users simulate Hamachi as a VPN. Yet, sometimes, the Hamachi Tunnel Problem prevents users from using this tool. You can identify it with the help of the yellow-colored triangle displayed above the Hamachi tool in the Taskbar. In today’s guide, you will learn how to fix Hamachi Tunnel problem on Windows 10 PC.
Table of Contents
How to Fix Hamachi Tunnel Problem on Windows 10 PC
You can create and manage several VPN networks using Hamachi. It is supported by Windows, Linux, and mac operating systems.
A few of its noteworthy features include:
- Cloud-based virtual networking
- Gateway Virtual networking
- Hub-and-spoke virtual networking
- Mesh networking
- Centralized software development
- Encryption and security
Hamachi Tunnel problem can occur because of various factors ranging from internet connectivity to Hamachi drivers, such as:
- Problem with Hamachi Tunneling Engine Service: Problems with Hamachi Tunneling Engine Service will cause Hamachi Tunneling problems. However, restarting this service will help fix it.
- Outdated Virtual Adapter and Driver: Hamachi installs a virtual adapter and driver when it is installed and run for the first time. An improper or incompatible virtual adapter and driver might trigger the Hamachi Tunnel problem. Reinstalling the same should fix this.
- LogMeIn Hamachi Tunneling Service Disabled: You often experience a Tunneling problem with Hamachi when the LogMeIn Hamachi Tunneling Service is disabled or not running. Hence, enabling or restarting the said service should resolve this issue.
Listed below are tried and tested methods to fix this issue.
Method 1: Restart your Windows 10 System
Most minor technical glitches usually, get fixed when you restart or reboot your system. Since the overall performance of your system depends on how well you maintain it, you should keep the following points in mind:
- Keeping your system active or switched on for prolonged periods of time has an impact on the computer and its battery.
- It is a good practice to power off your PC rather than leave it in the Sleep Mode.
Here are some ways to restart your Windows 10 PC:
Option 1: Reboot using Windows 10 Start Menu
1. Press the Windows key to launch the Start menu.
2. Select the Power option.
Note: The Power icon is located at the bottom of the Start menu in Windows 10 system, and at the top in Windows 8 system.
3. Several options like Sleep, Shut down, and Restart will be displayed. Here, click on Restart.
Option 2: Reboot using Windows 10 Power Menu
1. Open Windows Power User Menu by pressing Windows + X keys simultaneously.
2. Select the Shutdown or sign out option.
3. Here, click on Restart, as highlighted.

Also Read: How to Install Microsoft Teredo Tunneling Adapter
Method 2: Enable/Restart LogMeIn Hamachi Tunneling Engine Service
When the Hamachi services are disabled or not running properly, Himachi Tunnel problem occurs in your Windows 10 system. This can be fixed when you enable or refresh Hamachi Services as follows:
1. Launch the Run dialog box by pressing Windows + R keys together.
2. Type services.msc and click OK to launch Services window.

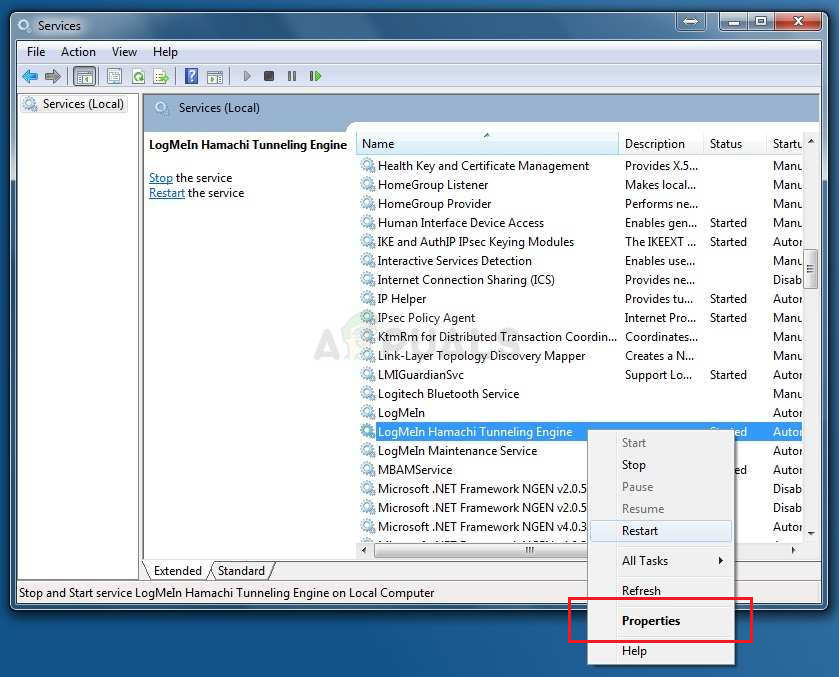
3. Scroll down and search for LogMeIn Hamachi Tunneling Engine.
4. Right-click on it and select Properties, as highlighted.
Note: You can also double-click on the LogMeIn Hamachi Tunneling Engine to open the Properties window.

5. Now, set the Startup type to Automatic, as shown below.
5A. If the Service status says Stopped, then click on the Start button.
5B: If the Service status is marked Running, click Stop and then, Start after a while.

6. Finally, click on Apply > OK to save these changes.
In case, you encounter Windows that could not start the LogMeIn Hamachi Tunneling Engine service error then, follow Steps 7-10 explained below.
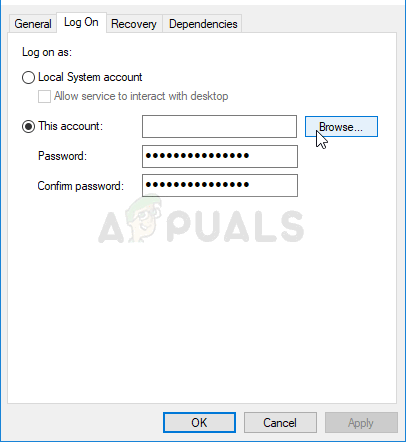
7. In the LogMeIn Hamachi Tunneling Engine Properties window, switch to the Log On tab.
8. Here, click on the Browse… button.
9. Type the name of your user account under Enter the object name to select field and click on Check Names.
10. Once the username is verified, click on OK to save the changes.

Restart your system and check if the Hamachi Tunnel problem is fixed on your Windows 10 system.
Also Read: What is a VPN and how it works?
Method 3: Disable Microsoft Network Adapter Multiplexor Protocol
Microsoft Network Adapter Multiplexor Protocol may sometimes interfere with Hamachi resulting in Hamachi Tunneling problem. This can be fixed by uninstalling Hamachi, disabling Microsoft Network Adapter Multiplexor Protocol and then, reinstalling Hamachi as explained in this method. Here’s how to fix Hamachi Tunnel Problem
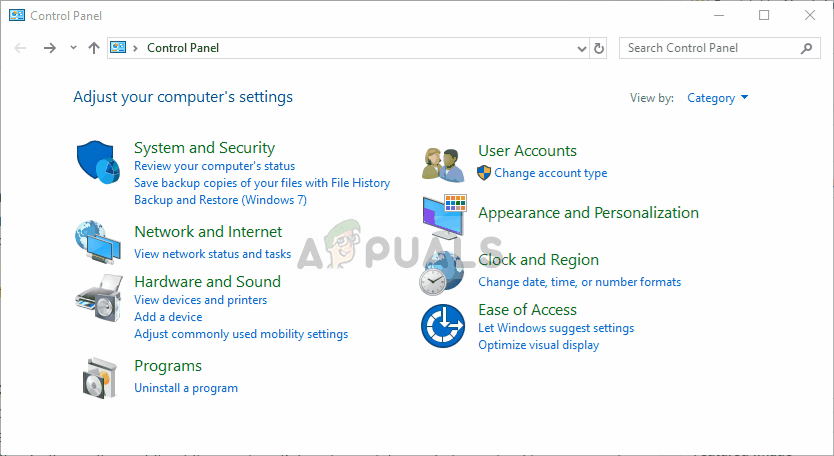
1. Launch Control Panel by searching for it in the Windows search bar.

2. Select the Programs and Features section, as shown below.

3. Now, click on LogMeIn Hamachi and click Uninstall option, as highlighted below.

4. Confirm it by clicking on Uninstall in the pop-up prompt.

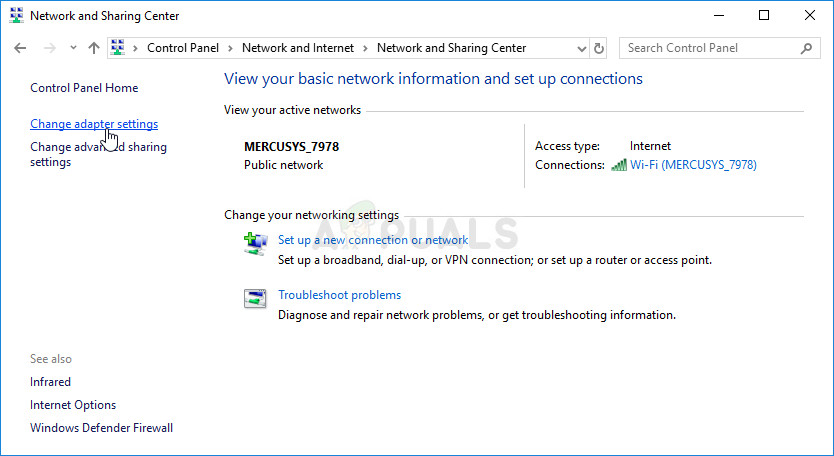
5. Next, return to Control Panel and click on Network and Sharing Center, this time.

6. Here, click on Change adapter settings as highlighted.

7. Now, right-click on your network connection and click on Properties.

8. Ensure the Microsoft Network Adapter Multiplexor Protocol is disabled. If the box is checked, uncheck it and click on the OK button to save the changes.
9. Additionally, make sure that all other options are checked. Refer pic below for clarity.

10. Now, restart your system to implement these changes.
11. Download and install the latest version of Hamachi for your Windows system.
12. Go to the Downloads folder and double-click on Hamachi installer.

13. Follow the on-screen instructions to complete the installation.
14. Then, visit LogMeIn Remote Access page to create a new LogMeIn account by typing your email and password credentials.
15. Verify the link received in your registered email to begin using the service.
Also Read: Fix Hamachi VPN Error in Windows 10
Method 4: Update Hamachi Driver
As informed earlier, outdated or incompatible drivers may lead to Hamachi Tunneling issues. Here’s how to fix Hamachi Tunnel Problem by updating the driver:
1. Log in as an Administrator on your Windows system.
2. Launch Computer Management by searching for it in the Windows search bar.

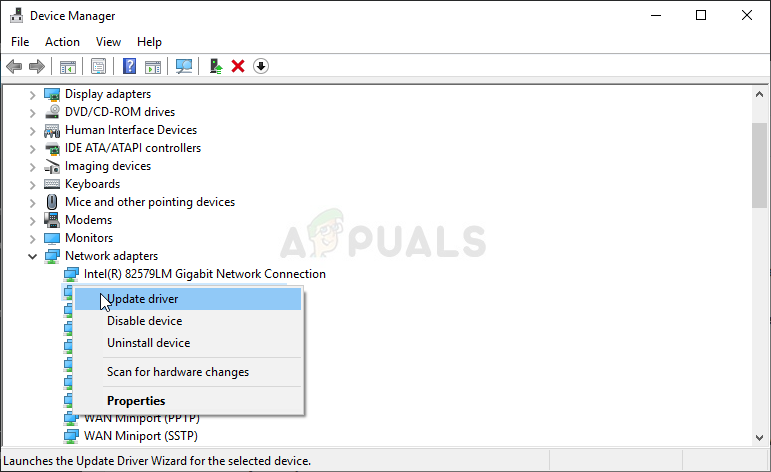
3. Click on Device Manager from the left pane and double-click on Network Adapters in the right pane, as illustrated.

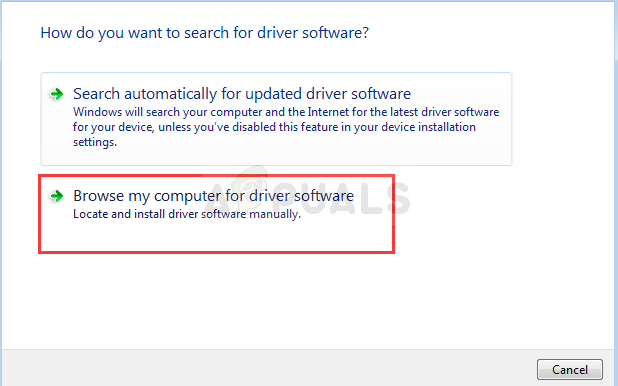
4. Right-click on LogMeIn Hamachi Virtual Ethernet Adapter and click on Update driver, as depicted below.

5. Now, click on Browse my computer for drivers to locate and install the driver manually.

6. Click on the Browse… button to choose the Hamachi installation directory. Once you have made your choice, click on the Next button.

7. The drivers will be installed and Windows will check for updates.
If the driver is updated to the latest version, the screen will display the following: The best drivers for your device are already installed. Simply, click on the Close button to exit the window.

Restart the computer and check if the LogMeIn Hamachi Tunneling problem is fixed now.
Also Read: Fix Windows could not automatically detect this Network’s Proxy settings
Method 5: Disable and Re-Enable Hamachi Connection
Many users have reported that disabling the Hamachi connection for a while and enabling it again could fix Hamachi Tunnel problem. Here are the steps to do so:
1. Launch Control Panel and open Network and Sharing Center, as earlier.
2. Click on Change Adapter Settings here.
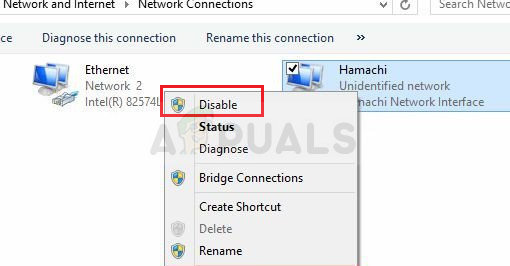
3. Right-click on Hamachi Network and click on Disable, as shown.

4. Wait for a while. Again, right-click on Hamachi to select the Enable option.

Restart your system and check if the issue persists. If it does, try the next fix.
Method 6: Run LogMeIn Hamachi as an Administrator
Multiple users also suggested that running LogMeIn as an administrator resolved the Tunneling problem for them. Here’s how to fix Hamachi Tunnel Problem on Windows 10 systems:
1. Right-click on the LogMeIn Hamachi shortcut and click on Properties.
2. In the Properties window, switch to the Compatibility tab.
3. Here, check the box titled Run this program as an administrator, as highlighted.

4. Finally, click on Apply > OK to save these changes.
Also Read: How to set up a VPN on Windows 10
Method 7: Add Hamachi as a Legacy Hardware
Alternately, you can fix this issue by adding Hamachi as Legacy hardware. Follow the below-mentioned steps to implement the same:
1. Launch Device Manager by searching for it in Windows search bar.

2. Double-click on Network Adapters to expand it.
3. Scroll down to right-click LogMeIn Hamachi Virtual Ethernet Adapter and click Uninstall device as depicted below.

4. In the prompt that states Warning: You are about to uninstall this device from your system, check the box titled Delete the driver software for this device and click on Uninstall.
5. Now, click the Action menu in the Device Manager.

6. Here, select Add legacy hardware and click on Next, as shown.

7. Select Install the hardware that I manually select from a list (Advanced) > Next.

8. Double-click on Show All Devices in the Common hardware types list and click on Next.
9. In the Add Hardware screen, click on Have Disk…

10. Now, use the Browse… option to locate the directory of the driver and select the LogMeIn Hamachi driver.

11. Follow the on-screen instructions to install the Hamachi program in your system.
Method 8: Uninstall Conflicting VPN Client
Sometimes, a VPN client installed on your system also triggers the Hamachi Tunneling program in your system. Few Dell VPN clients claimed that once VPN clients were disabled or uninstalled from their device, the Tunneling problem was fixed. Here’s how to fix Hamachi Tunnel Problem by uninstalling conflict-causing apps and programs as follows:
1. Search and click on Apps & features, to launch it as shown

2. Now, search for conflicting VPN client in the Search this list bar.
3. Click on the said app and select Uninstall.
Note: For example, the below picture shows how to uninstall Steam from your PC.

4. Finally, complete the uninstallation by clicking on Uninstall again.
Since various VPN software is known to cause problems during uninstallation hence, we have explained the steps for this method using Revo Uninstaller as well.
1. Install Revo Uninstaller from the official website by clicking on FREE DOWNLOAD.

2. Open Revo Uninstaller and navigate to the VPN client.
3. Now, click on it and click on Uninstall from the top menu bar.
Note: We have used Discord as an example to illustrate the steps for this method.

4. Check the box next to Make a System Restore Point before uninstall and click Continue in the pop-up prompt.

5. Now, click on Scan to display all the files left in the registry.

6. Next, click on Select all followed by Delete.
7. Click on Yes in the confirmation prompt.
8. Make sure that all VPN files have been deleted by repeating Step 5.
9. A prompt stating Revo uninstaller hasn’t found any leftover items should be displayed as depicted below.
10. Restart the system after the VPN client and all its files have been deleted completely.
Common Hamachi VPN Errors
Apart from the Hamachi Tunneling problem, clients faced a few other errors, as well. With the help of the aforementioned methods, you should be able to rectify these errors too.
- Network Adapter Error in Windows 10: This is the most common error with Hamachi and can be fixed by updating device drivers as explained in Method 4.
- Hamachi Service Stopped: If you face this problem, you can fix this with a simple restart of the Hamachi service as instructed in Method 2.
- Hamachi Won’t Connect to the Servers: Sometimes, many users face a common issue that they might not be able to connect to the Hamachi servers. This problem could be fixed when you uninstall Hamachi and reinstall it again as illustrated in Method 3.
- Hamachi Gateway Not Working: This is a more serious problem and you will need to follow the methods mentioned in this article, one-by-one to find a suitable fix.
Recommended:
- Top 10 Hamachi Alternatives for Virtual Gaming (LAN)
- 15 Best VPN for Google Chrome To Access Blocked Sites
- Fix Miracast Not Working on Windows 10
- Fix Windows 10 Update Stuck or Frozen
We hope that this guide was helpful to learn how to fix Hamachi Tunnel Problem in Windows 10 PC. Let us know which method worked for you the best. Also, if you have any queries or suggestions, then feel free to drop them in the comments section.
Всем привет! Проблема с туннелем в Hamachi – одна из самых популярных, и сегодня я покажу, как её можно решить. В основном она возникает из-за неправильных настроек самой программы. В некоторых случаях нужно изменить конфигурации виртуального адаптера приложения. Не будем тянуть и начнем. После каждого способа проверяйте – пропала ли проблема или нет.
Содержание
- Способ 1: Настройки программы
- Способ 2: Настройка сетевого подключения
- Способ 3: Антивирус или брандмауэр
- Способ 4: Дополнительные советы
- Видео
- Задать вопрос автору статьи
Способ 1: Настройки программы
Проблема с туннелем в Hamachi на Windows 10 или Windows 11 может возникать из-за неправильных настроек приложения.
Читаем – как настроить Hamachi для игр.
- Перейдите в «Параметры» программы, нажав по вкладке «Система» в самом верху окна программы.
- В «Параметрах» перейдите в дополнительные настройки.
- Нам поочередно нужно проверить некоторые конфигурации. Разрешите все подключения в пункте «Фильтрация трафика».
- Активируйте использование прокси-сервера.
- Найдите параметр «Включить разрешение имен по протоколу myDNS» – включаем (Да).
- Чуть ниже вы увидите подраздел «Присутствие в сети». Напротив «Включить» ставим значение «Да».

- «Режим IP-протокола» – установите только версию 4.
После этого жмем «ОК». Закройте программы и запустите её повторно. Или лучше даже перезагрузить компьютер. Проверьте соединение.
Способ 2: Настройка сетевого подключения
Hamachi использует виртуальный адаптер. Иногда некоторые конфигурации устанавливаются изначально неправильно – нам нужно это проверить. После этого мы перезапустим службу и попробуем снова подключиться к удаленному серверу.
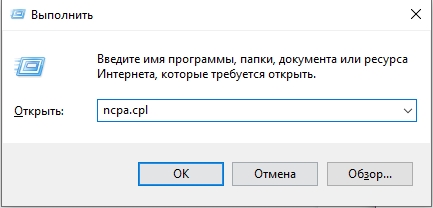
- Зажимаем клавиши:
+ R
- Вводим запрос команды:
ncpa.cpl
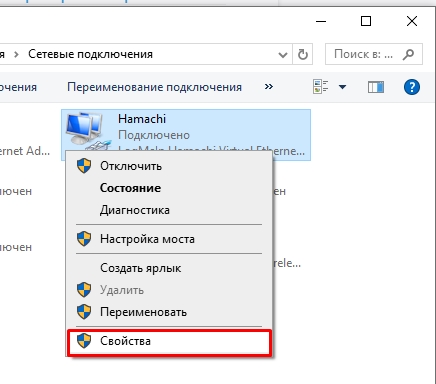
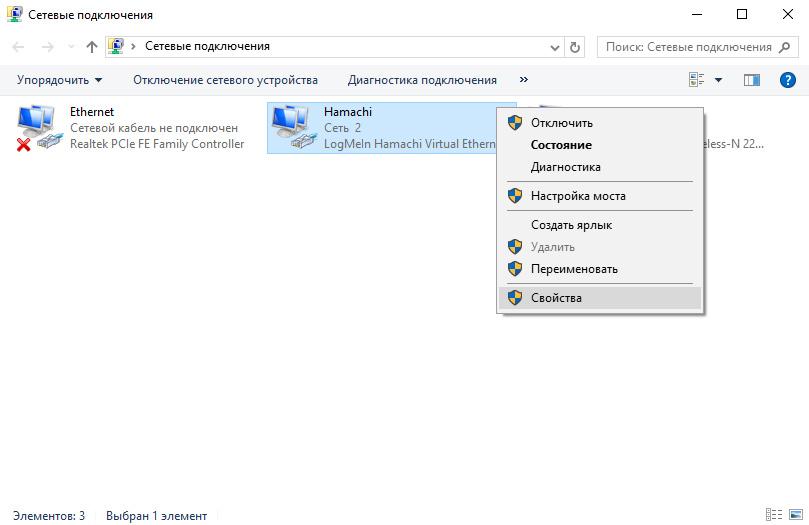
- Найдите адаптер «Hamachi», нажмите по нему ПКМ и перейдите в «Свойства».
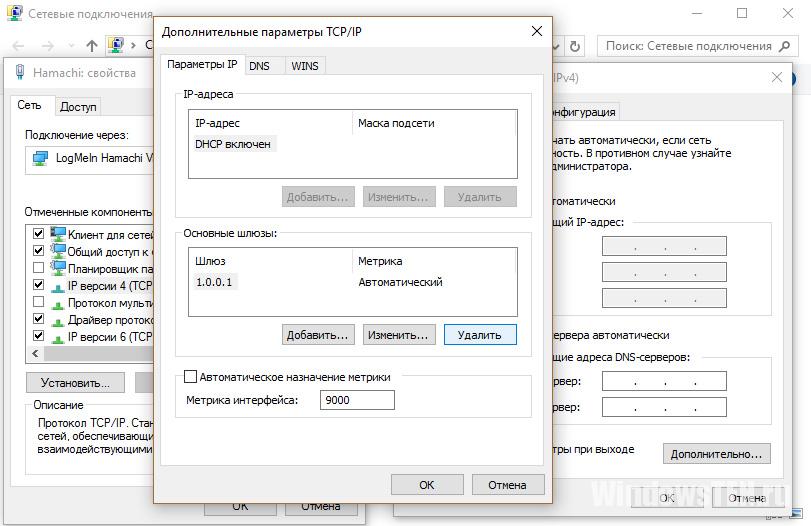
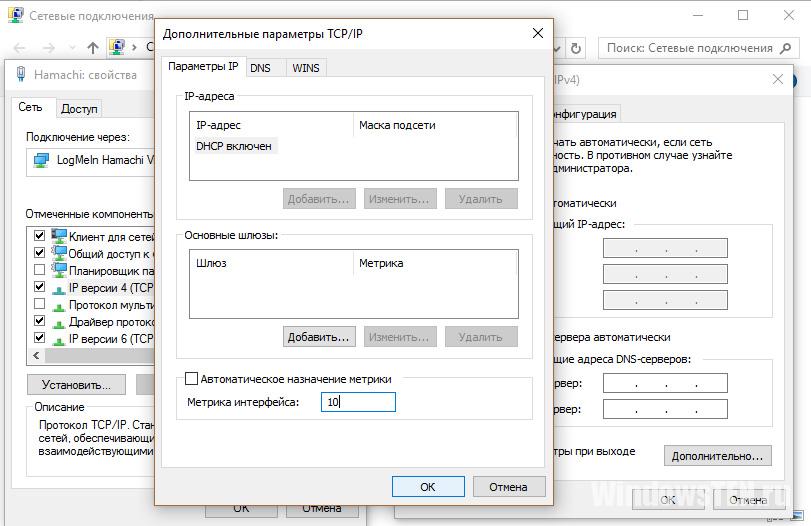
- Выделите IP 4-го поколения, как на картинке ниже, и включите сам параметр, если галочки нет. Далее заходим в «Свойства» – «Дополнительно».
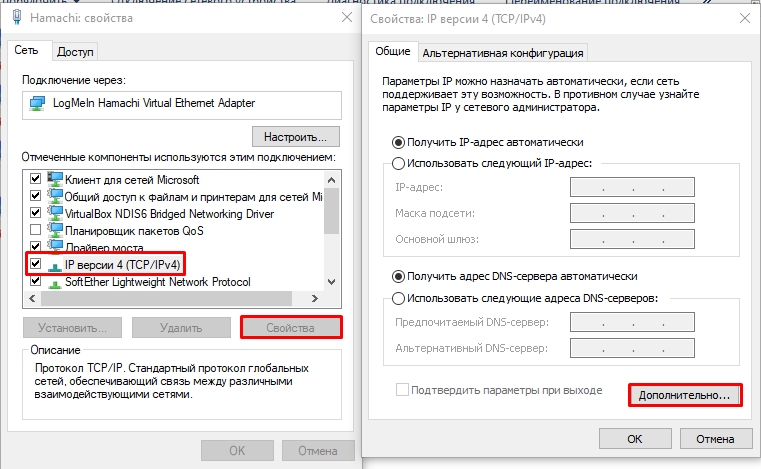
- Удалите все строчки, которые есть в «Основном шлюзе».
- Уберите нижнюю галочку и установите цифру 10.
- Жмем «ОК», чтобы применить изменения.
Попробуйте перезагрузить операционную систему и заново запустите Hamachi. Если ошибка повторится, делаем следующее:
- Жмем:
+ R
- Вводим:
services.msc
- Найдите «Hamachi Tunneling Engine». Служба может называться и по-другому – просто попробуйте найти любую службу с именем «Hamachi». Откройте её параметры или свойства через двойной щелчок левой кнопки мыши.
- Убедитесь, что «Тип запуска» автоматически запускается системой. Далее остановите и запустите службу. Жмем «Применить» и закрываем это окно.
Способ 3: Антивирус или брандмауэр
Проблема с подключением однорангового узла Hamachi может возникать, когда антивирус или брандмауэр блокирует его. Поэтому вам нужно программу внести в список исключений вашего антивируса, защитника Windows (если у вас нет антивируса) и брандмауэра. Оставлю ссылки на конкретные инструкции:
- Как добавить программу в исключения брандмауэра.
- Как добавить в исключения защитника Windows.
По антивирусу уже гуглим инструкцию для вашей защитной программы.
Способ 4: Дополнительные советы
Если проблема с Хамачи и с туннелем остается, я рекомендую попробовать дополнительные действия. Я буду оставлять ссылки на инструкции.
- Почитайте рекомендации из этой статьи. Там описаны решения при блокировке входящего трафика Хамачи. Очень велика вероятность, что какой-то из шагов поможет.
- Удалите Hamachi с ПК, скачайте свежую версию с официального сайта и попробуйте заново установить программу.
- Проверьте систему на наличие вирусов.
- Обновите Windows до последней сборки.
На этом все. Если остались вопросы – пишите в комментариях. До новых встреч на портале WiFiGiD.RU.
Видео
When you see a yellow triangle with a “tunneling problem” message in Hamachi, it means there’s a disruption in the direct connection between peers. This usually happens because the Hamachi Tunneling Engine service isn’t working correctly.
It might also be caused by problems with the Hamachi network adapter or interference from other VPN software. As a result, the connection defaults to a relayed mode, increasing latency and reducing performance.
Now that you know the causes, let’s discuss the solutions.
1. Disable and Re-enable the Hamachi Connection
Temporary problems with the Hamachi connection may cause tunneling issues. Turning the connection off and on can fix the network adapter and clear small errors or incorrect settings that might disrupt proper functioning.
- Press Windows + R to open the Run box, type ‘ncpa.cpl’, and click OK to access Internet Connection settings.
- Alternatively, open Control Panel, set “View by” to Category, then click Network and Internet. Open Network and Sharing Center and click Change adapter settings in the left menu.

- In the Internet Connection window, right-click the Hamachi network connection and select Disable. Wait a few minutes, then right-click again and select Enable. Check if the Hamachi Tunneling issue persists.

2. Restart the LogMeIn Hamachi Tunneling Engine Service
An error regarding the LogMeIn Hamachi Tunneling Engine service may be preventing Hamachi from opening properly. Services can be restarted quite easily, and this method is straightforward for anyone to perform! Make sure you follow the instructions below carefully to restart the LogMeIn Hamachi Tunneling Engine service!
- Press Windows Key + R to open the Run box, type “services.msc“, and click OK to access Services.
- Alternatively, open the Control Panel from the Start menu, set “View by” to “Large Icons”, and click Administrative Tools then Services.
- In the list, find LogMeIn Hamachi Tunneling Engine Service, right-click it, and select Properties.

- If the service is running, click Stop. If stopped, leave it as is.
- Set Startup type to Automatic. Confirm any prompts and click Start. If you see “Error 1079,” follow the steps below:
Windows could not start the LogMeIn Hamachi Tunneling Engine service on Local Computer. Error 1079: The account specified for this service differs from the account specified for other services running in the same process.
- Repeat steps 1-3 to return to the service’s properties, go to the Log On tab, and click Browse….

- Enter your account name in “Enter the object name to select”, click Check Names, then OK. Enter your password if prompted. Hamachi should now work properly.
3. Reinstall the Hamachi Virtual Ethernet Adapter
Refreshing the Hamachi Virtual Ethernet Adapter makes sure the network driver is set up correctly, removing any issues that could cause problems. This process reinstalls the adapter, fixes any conflicts, and helps Hamachi connect directly.
- Uninstall the current driver on your machine.
- Open Device Manager by typing “Device Manager” in the search field or using Windows Key + R and typing devmgmt.msc.
- Expand “Network Adapters” to see all installed adapters.
- Right-click the wireless network adapter you want, and select “Update driver“. This uninstalls the device.

- Select “Browse my computer for driver software” when prompted.

- Navigate to the Hamachi installation folder, usually C:\Program Files (x86)\LogMeIn Hamachi. You can find it by right-clicking the Hamachi icon on the Desktop and selecting “Open file location“.
- Click Next to finish and check if your issue is resolved.
If a service is causing connection problems, restarting the LogMeIn Hamachi Tunneling Engine can fix temporary issues or errors. This resets the service, helping it connect correctly with the network again.
Kevin Arrows
Kevin Arrows is a highly experienced and knowledgeable technology specialist with over a decade of industry experience. He holds a Microsoft Certified Technology Specialist (MCTS) certification and has a deep passion for staying up-to-date on the latest tech developments. Kevin has written extensively on a wide range of tech-related topics, showcasing his expertise and knowledge in areas such as software development, cybersecurity, and cloud computing. His contributions to the tech field have been widely recognized and respected by his peers, and he is highly regarded for his ability to explain complex technical concepts in a clear and concise manner.
-
О программе
-
Настройка
-
Проблема с туннелем
С течением времени поддержка старых игр прекращается, серверы закрываются и поиграть в мультиплеерном режиме через интернет не представляется возможным. В этом завсегдатым геймерам поможет программа Hamachi, которая объединяет игроков со всего мира и создает локальную сеть поверх интернета. Но что делать, если в процессе настройки возникает ошибка: Статус VPN? Чтобы избежать дальнейших ошибок, выполним правильные настройки программы.
О программе
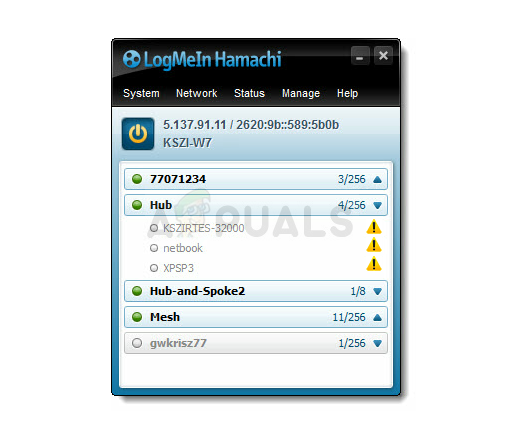
В первую очередь Hamachi – это ПО, предназначенное для построения виртуальной частной сети (VPN). Она создает собственную защищенную локальную сеть из ПК, подключенных к интернету. С помощью этого создается эмуляция локальной сети, которую успешно используют геймеры для игр по сети.
Возможности Hamachi:
- Управление и администрирование сетей.
- Создание серверов и соединение их с серым IP и клиентских ПК.
- Защита данных из-за передачи шифрованного трафика в стиле peer-to-peer.
- Создание сети с топологией “Звезда” и со шлюзом.
Настройка
В случае, если у вас появилась VPN ошибка:
- Удалите старую версию программы и перезагрузите компьютер.
- Зайдите в сетевые подключения, и проверьте, чтобы сети Hamachi у вас не было.
- Установите последнюю версию Hamachi и выполните вход в программу.
Для настройки программы:
- Нажмите ПКМ по Пуск → Сетевые подключения → ПМК по сети Hamachi → Свойства.

- Откройте IP версии 4(TCP/IPv4) → нажмите “Дополнительно” → во вкладке “Параметры IP”, в разделе “Шлюз” нажмите “Удалить”.

- В поле “Метрика интерфейса” прописывайте значение 10 и нажмите “ОК”.
- Затем зайдите в “Панель Управления” → “Брандмауэр Windows” и добавьте “LogMeIn Hamachi” в список исключения.


Чтобы устранить желтые треугольники рядом с именами участников сети:
- В программе нажмите “Система” → “Параметры” → вкладка “Параметры”.
- Во вкладке напротив пунктов “Шифрование” и “Сжатие” выставите значение “Отключено” и нажмите ОК.

- Перезагрузите Hamachi (выключив и включив кнопку в интерфейсе программы).
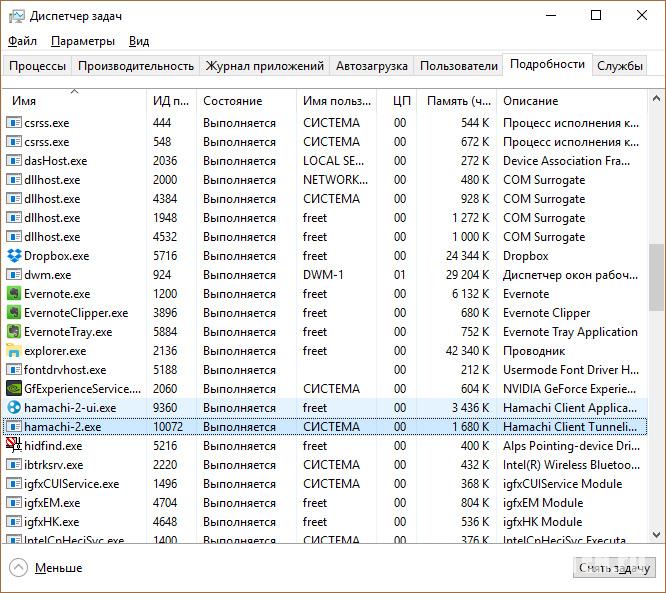
- Если желтые треугольники не пропали:
- Выключите программу.
- Проверьте в Диспетчере задач, во вкладке “Подробности”, чтобы фоновые приложения Hamachi.exe не отображались. Если есть – отключите.

- Зайдите в “Службы” (Панель управления – Администрирование) найдите службу “LogMeIn Hamachi Tunneling Engine” и выполните запуск.

- Перезагрузите ПК и подключитесь к сети.

Проблема с туннелем
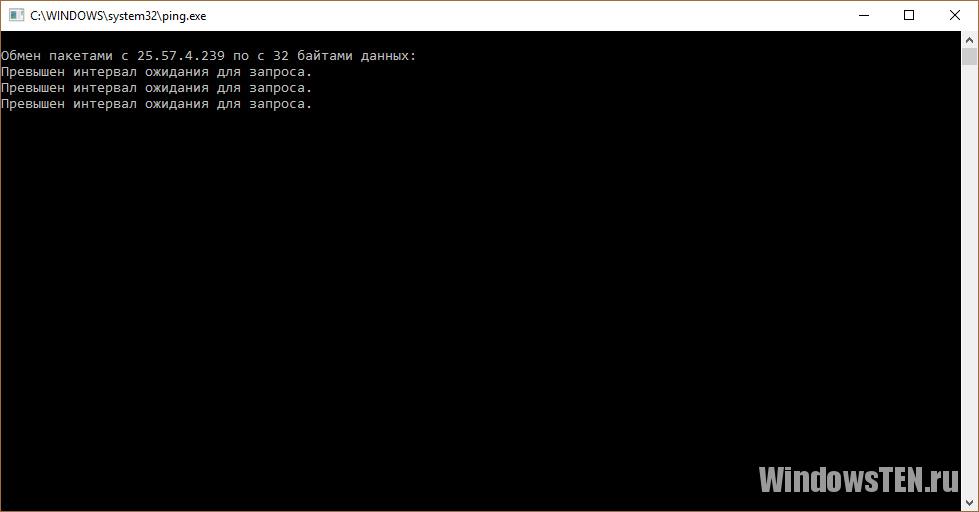
Пользователи виртуальной локальной сети сталкиваются с проблемой, связанной с задержкой передачи данных (высокий пинг). Он возникает, когда данные передаются не от компьютера к компьютеру, а через сервера Hamachi. Признак того, что связь идет не на прямую – синяя или красная иконка напротив клиента сети. Для того чтобы избавится от такой ошибки, нужно убрать туннель через ретранслятор. Для начала:
- Нажмите ПКМ по конкретному пользователю и нажмите “Проверить доступность”. Если видите сообщение “Превышен интервал ожидания для запроса” или указан пинг в среднем 500-600 мс, значит ошибка присутствует.

- Проверьте антивирусы и брандмауэры на обоих ПК. Возможно они блокируют пакеты передаваемые программой. Добавьте приложение Hamachi в список исключений.
- Чтобы сеть работала по прямому туннелю, ей нужно устойчивое соединение между ПК, поэтому на время попробуйте отключить все возможные программы, которые используют трафик (µTorrent, Steam, Браузеры и т.д).
- В случае, если используете подключение через роутер, перезагрузите его.
- Если не помогло, перейдите к настройкам клиента программы. Нажмите “Система” → “Параметры” → “Параметры” → отключить Шифрование.
- Выключите программу и выполните запуск от имени администратора.
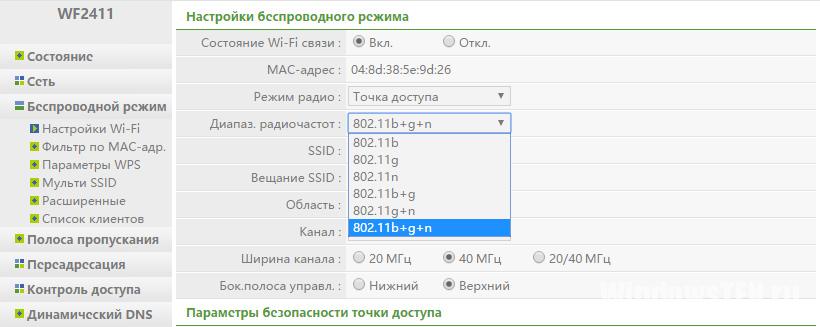
- В случае, если сообщение “туннель через ретранслятор” не исчезает, подсоедините сетевой кабель на прямую к LAN.
- Появилось сообщение “прямой тунель” – проблема в настройках роутера. Попробуйте выставить другой частотный диапазон и проверяйте работу.

Для многих игр (например RPG или пошаговые стратегии) наличие пинга 400-500 мс не критично. Это создает минимальный дискомфорт, но в целом игра по сети будет стабильна.