
HackRF One for Windows
A comprehensive tutorial for setting up and using HackRF One on Windows. This repository provides detailed step-by-step instructions, code samples, and troubleshooting tips—filling the gap left by Linux-focused guides. It also integrates modified code from jamRF_v1.py
Caution
Disclaimer
This repository is provided for educational purposes only. Unauthorized transmission of signals on any frequency band is strictly prohibited. The code is distributed «as is,» without any warranties, including but not limited to warranties of merchantability, fitness for a particular purpose, or noninfringement. The authors and contributors shall not be held liable for any damages or legal issues arising from the use or misuse of this code. Use it at your own risk, and ensure compliance with all applicable laws and regulations. By using or distributing this software, you acknowledge that you have read and understood this disclaimer.
Overview
HackRF One is a popular, low-cost, open-source software-defined radio (SDR) platform. While many setup guides assume a Linux environment, this project is tailored for Windows users. Whether you prefer using Conda, WSL, or Docker, this guide covers various methods to get you started.
Features
- Step-by-step setup guide for HackRF One on Windows
- Windows-specific code samples and scripts
- Integration of selected functions from jamRF_v1.py
- Troubleshooting tips and FAQ
Requirements
- Operating System: Windows 10 or later
- Device: HackRF One, Micro USB cable (for connecting HackRF to your PC)
- Python: Version 3.6 or higher
Note
There are two popular firmware:
- (Preferred) Stock HackRF One firmware uses a date-based tag in the YYYY.MM.DD format (e.g., 2024.02.1).
To update or verify your firmware, see the official instructions at Updating Firmware - (Most common preloaded) Mayhem (PortaPack) firmware uses semantic versioning in the vX.X.X format (e.g., v2.1.0).
For details on Mayhem updates, see the PortaPack Mayhem repository
Sometimes Mayhem (PortaPack) firmware might require using Zadig (as shown in the screenshots under the 2nd step in the conda setup section) to resolve “No HackRF boards found.” errors.
Contents
- Conda Setup
- Radioconda Setup
- WSL Setup
- Troubleshooting
Conda Setup
-
Prepare Essentials:
- Download and install Git and Miniconda (or Anaconda).
-
Connect and Verify HackRF One
-
Clone the Repository
Open a Command Prompt and run:git clone https://github.com/whiteSHADOW1234/HackRF-One-for-Windows.gitThis will download the files
jamRF_v1.pyandconfig_v1.yaml. -
Set Up the Python Environment
-
Launch Visual Studio Code (or your preferred editor) and open the cloned repository.
-
If you see unresolved package errors (e.g., as shown below), proceed with the following steps:

-
Open a Command Prompt (by) and run:
conda create -n hackrf_env -c conda-forge gnuradio gnuradio-osmosdr hackrf -y conda activate hackrf_env -
Then, in VSCode, change the Python interpreter to
hackrf_env:- Click on the status bar section that shows the current interpreter and select the one called
hackrf_env.
- Alternatively, open the Command Palette (
Ctrl + Shift + Pon Windows/Linux orCmd + Shift + Pon macOS) and typePython: Select Interpreterto choosehackrf_env.
- Click on the status bar section that shows the current interpreter and select the one called
-
And restart the terminal, the error message (
import XXX could not be found) should now be resolved.
-


Tip
You might need to restart VS Code terminal twice to clear all issues.

- Verify and Run
-
In the terminal, run the following command to ensure HackRF One details are displayed.
> hackrf_info hackrf_info version: 2024.02.1 libhackrf version: 2024.02.1 (0.9) Found HackRF Index: 0 Serial number: 0000000000000000a18c63dc2b3c6813 Board ID Number: 2 (HackRF One) Firmware Version: v2.0.1 (API:1.08) Part ID Number: 0xa000cb3c 0x00614766 Hardware Revision: older than r6 Hardware supported by installed firmware: HackRF One -
Run
python jamRF_v1.pyin the terminal> python jamRF_v1.py 1 100 JAM! The frequency currently jammed is: 2412.0MHz gr-osmosdr 0.2.0.0 (0.2.0) gnuradio 3.10.12.0 built-in sink types: uhd hackrf bladerf soapy redpitaya file Using HackRF One with firmware v2.0.1 Detected Windows OS 100 pagesize :debug: Setting pagesize to 4096 B top_block_impl :debug: Using default scheduler "TPB" UUUUUUUU
-
Radioconda Setup
-
Install Prerequisites:
- Install Git and Miniconda (or Anaconda).
- Install Radioconda. No special installation steps are needed beyond the defaults.
-
Connect and Verify HackRF One
- Plug in your HackRF One with a micro USB cable.
- Open the Device Manager to check if your PC recognizes the device.
- If HackRF One is not recognized, run Zadig, select List All Devices, choose HackRF One, and click Downgrade WCID Driver.
-
Clone the Repository
Open a Command Prompt and run:git clone https://github.com/whiteSHADOW1234/HackRF-One-for-Windows.gitThis will download the project files, including
jamRF_v1.pyandconfig_v1.yaml. -
Verify and Run
-
In the Radioconda prompt, run the following to verify that your HackRF One is correctly recognized:
> hackrf_info hackrf_info version: 2024.02.1 libhackrf version: 2024.02.1 (0.9) Found HackRF Index: 0 Serial number: 0000000000000000a18c63dc2b3c6813 Board ID Number: 2 (HackRF One) Firmware Version: v2.0.1 (API:1.08) Part ID Number: 0xa000cb3c 0x00614766 Hardware Revision: older than r6 Hardware supported by installed firmware: HackRF One -
Then, run the script:
> cd HackRF-One-for-Windows
> python jamRF_v1.py
1 100
JAM!

The frequency currently jammed is: 2412.0MHz
gr-osmosdr 0.2.0.0 (0.2.0) gnuradio 3.10.12.0
built-in sink types: uhd hackrf bladerf soapy redpitaya file
Using HackRF One with firmware v2.0.1
Detected Windows OS
100
pagesize :debug: Setting pagesize to 4096 B
top_block_impl :debug: Using default scheduler "TPB"
UUUUUUUU
-
WSL Setup
-
Install Prerequisites:
- Install Git and WSL with a Linux distrobution (take Ubuntu for example).
- Install usbipd-win (.msi) from its GitHub releases.
-
Connect and Verify HackRF One
- Plug in your HackRF One with a micro USB cable.
- Open the Device Manager to check if your PC recognizes the device.
- If not, run Zadig, select List All Devices, choose HackRF One, and click Downgrade WCID Driver.
-
Clone the Repository
Open a Command Prompt and run:git clone https://github.com/whiteSHADOW1234/HackRF-One-for-Windows.gitThis will download the files
jamRF_v1.pyandconfig_v1.yaml. -
Install Linux Dependencies in WSL:
- Open PowerShell and list your WSL distributions
- Launch your chosen Linux distribution:
wsl -d <YOUR_LINUX_DISTRIBUTION> - Install the necessary packages
sudo apt update sudo apt install gnuradio gr-osmosdr hackrf -y - Verify HackRF detection (It might not detect the device like the following output):
> lsusb
Bus 002 Device 001: ID 1d6b:0003 Linux Foundation 3.0 root hub
Bus 001 Device 001: ID 1d6b:0002 Linux Foundation 2.0 root hub
-
Bind the HackRF USB Port to WSL:
- In a new PowerShell window, list connected USB devices:
> usbipd list Connected: BUSID VID:PID DEVICE STATE 2-1 1d50:6089 HackRF One Not shared 2-3 30c9:000e HP Wide Vision HD Camera Not shared 2-10 8087:0026 Intel(R) Wireless Bluetooth(R) Not shared Persisted: GUID DEVICE - Bind and attach HackRF (replace with your HackRF’s bus ID):
> usbipd bind --busid 2-1 > usbipd list Connected: BUSID VID:PID DEVICE STATE 2-1 1d50:6089 HackRF One Shared 2-3 30c9:000e HP Wide Vision HD Camera Not shared 2-10 8087:0026 Intel(R) Wireless Bluetooth(R) Not shared Persisted: GUID DEVICE > usbipd attach --wsl --busid 2-1 > usbipd list Connected: BUSID VID:PID DEVICE STATE 2-1 1d50:6089 HackRF One Attached 2-3 30c9:000e HP Wide Vision HD Camera Not shared 2-10 8087:0026 Intel(R) Wireless Bluetooth(R) Not shared Persisted: GUID DEVICE - Confirm the attachment by rechecking in the old window with:
> lsusb
Bus 002 Device 001: ID 1d6b:0003 Linux Foundation 3.0 root hub
Bus 001 Device 002: ID 1d50:6089 OpenMoko, Inc. Great Scott Gadgets HackRF One SDR
Bus 001 Device 001: ID 1d6b:0002 Linux Foundation 2.0 root hub
- In a new PowerShell window, list connected USB devices:
-
Test and Run
- In WSL, run the following command to ensure HackRF is recognized.
$ hackrf_info hackrf_info version: unknown libhackrf version: unknown (0.6) Found HackRF Index: 0 Serial number: 0000000000000000a18c63dc2b3c6813 Board ID Number: 2 (HackRF One) Firmware Version: v2.0.1 (API:1.08) Part ID Number: 0xa000cb3c 0x00614766 - Navigate to the cloned repository and execute the script
$ python3 jamRF_v1.py
1 100
JAM!

The frequency currently jammed is: 2412.0MHz
gr-osmosdr 0.2.0.0 (0.2.0) gnuradio 3.10.1.1
built-in sink types: uhd hackrf bladerf soapy redpitaya freesrp file
[INFO] [UHD] linux; GNU C++ version 11.2.0; Boost_107400; UHD_4.1.0.5-3
libusb: warning [libusb_exit] device 2.1 still referenced
libusb: warning [libusb_exit] device 1.2 still referenced
libusb: warning [libusb_exit] device 1.1 still referenced
Using HackRF One with firmware v2.0.1
Detected Linux OS
100
UUUUUUUUUU
- In WSL, run the following command to ensure HackRF is recognized.
Troubleshooting
-
Device Not Found
- Error:
Exception has occurred: RuntimeError Failed to use '0' as HackRF device index: not enough devices File "C:\Users\<USER_NAME>\Desktop\HackRF-One-for-Windows\jamRF_v1.py", line 130, in jam osmosdr_sink = osmosdr.sink("hackrf=0") ^^^^^^^^^^^^^^^^^^^^^^^^ File "C:\Users\<USER_NAME>\Desktop\HackRF-One-for-Windows\jamRF_v1.py", line 271, in <module> jam(freq, waveform, power, t_jamming) RuntimeError: Failed to use '0' as HackRF device index: not enough devices - Solution:
Try switching to a different USB port or update the USB driver.
- Error:
-
Device Misidentification
- Observation
When runningusbipd list, HackRF appears as aUSBIP Shared Device(and similarly in Device Manager) instead ofHackRF One. - Solution
Update the USB driver, unplug and replug the HackRF, or use a different USB port.
- Observation
-
DLL Errors
- Error
python jamRF_v1.py Traceback (most recent call last): File "C:\Users\<USER_NAME>\miniconda3\envs\hackrf_env\Lib\site-packages\gnuradio\blocks\__init__.py", line 18, in <module> from .blocks_python import * ImportError: DLL load failed while importing blocks_python: 找不到指定的模組。 During handling of the above exception, another exception occurred: Traceback (most recent call last): File "C:\Users\<USER_NAME>\Desktop\WiFi-Jamming\jamRF_v1.py", line 19, in <module> from gnuradio import blocks File "C:\Users\<USER_NAME>\miniconda3\envs\hackrf_env\Lib\site-packages\gnuradio\blocks\__init__.py", line 22, in <module> from .blocks_python import * ImportError: DLL load failed while importing blocks_python: 找不到指定的模組。 - Solution
Remove any conflicting conda environments or WSL distrobutions to ensure only one is accessing the HackRF device.
- Error
-
Access Denied error, even when running as Administrator.
- Error
$ hackrf_info hackrf_info version: unknown libhackrf version: unknown (0.6) Found HackRF Index: 0 hackrf_open() failed: Access denied (insufficient permissions) (-1000) - Solution
Remove any conflicting conda environments or WSL distrobutions to ensure only one is accessing the HackRF device.
- Error
-
avahi_service_browser_new()Failed- Error
python3 jamRF_v1.py 1 100 JAM! The frequency currently jammed is: 2412.0MHz gr-osmosdr 0.2.0.0 (0.2.0) gnuradio 3.10.1.1 built-in sink types: uhd hackrf bladerf soapy redpitaya freesrp file [INFO] [UHD] linux; GNU C++ version 11.2.0; Boost_107400; UHD_4.1.0.5-3 [ERROR] avahi_service_browser_new() failed: Bad state libusb: warning [libusb_exit] device 2.1 still referenced libusb: warning [libusb_exit] device 1.2 still referenced libusb: warning [libusb_exit] device 1.1 still referenced Using HackRF One with firmware v2.0.1 100 vmcircbuf_prefs::get :error: /home/<USER_NAME>/.gnuradio/prefs/vmcircbuf_default_factory: No such file or directory gr::vmcircbuf :error: vmcircbuf_createfilemapping: createfilemapping is not available - Solution
Installavahi-daemonby executingsudo apt install avahi-daemon -yin the WSL distrobution will fix.
- Error
В предыдущей статье я рассказывал, как обновить прошивку HackRF One. Сегодня я покажу как подружить HackRF и Windows. Я работаю с HackRF в Linux (HackRF не может работать в режиме передачи в Windows), но если вы хотите использовать HackRF в Windows, я расскажу, как это сделать в этой небольшой статье.
Еще по теме: Лучшие гаджеты хакера
HackRF One — это мощный и недорогой радиоприемопередатчик, отлично подходит, как для отправки, так и для приема радиосигналов в диапазоне частот от 1 МГц до 6 ГГц.
Самым большим недостатком HackRF One, по сравнению с гораздо более дорогими SDR — то, что он работает только в полудуплексном режиме (не может одновременно отправлять и принимать). Несмотря на это ограничение, он отлично подходит для многих задач пентестера.
HackRF One и Windows
Шаг 1: Подключите HackRF One к USB-порту.
Шаг 2: Скачайте и запустите Zadig.

Шаг 3: Найдите в списке устройство HackRF One и нажмите «Установить драйвер».
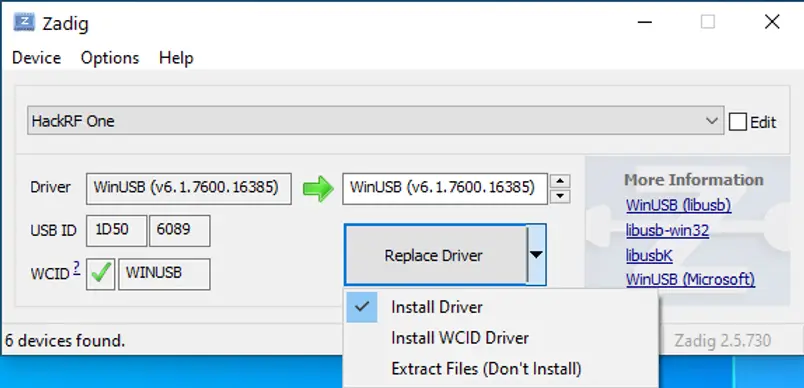
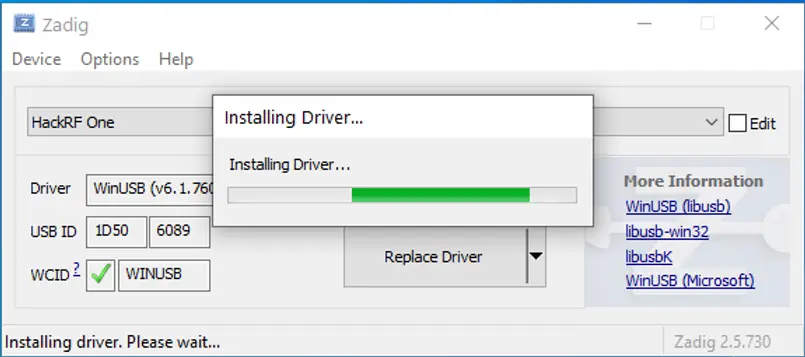
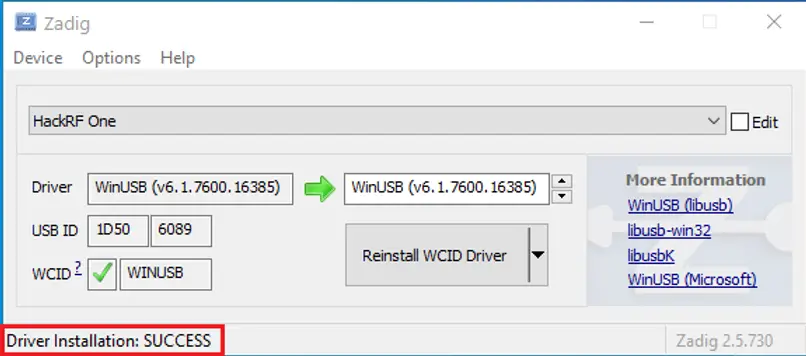
Когда установка драйвера будет завершена, появится «Driver Instalation: SUCCESS»:
Шаг 4: Теперь нужно установить последний версию файла ExtIO.dll для HackRF. Вы можете найти его здесь https://github.com/ExtIO_HackRF/releases.

Скачайте его в папку HDSDR.
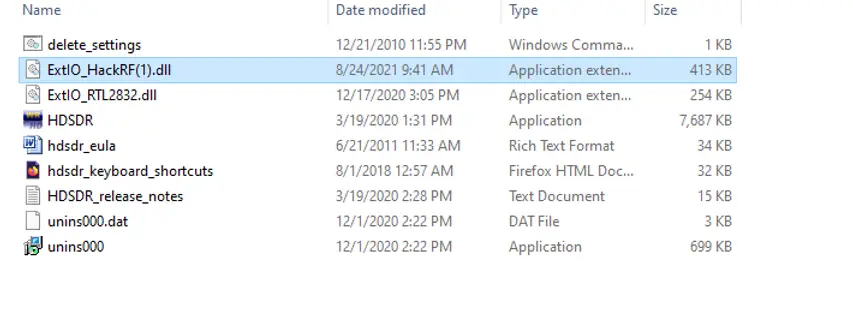
Шаг 5: После запуска HDSDR, появиться окно выбора устройства. Выберите файл ExtIO_HackRF.

После выбора файла запуститься HDSDR и будет использовать HackRF One для приема и обработки радиосигналов.

На этом все. Теперь вы знаете, как подружить HackRF One с Windows.
Еще по теме: Глушилка WiFi на ESP8266
HackRF software includes HackRF Tools and libhackrf. HackRF Tools are the commandline utilities that let you interact with your HackRF. libhackrf is a low level library that enables software on your computer to operate with HackRF.
Install Using Package Managers
Unless developing or testing new features for HackRF, we highly recommend that most users use build systems or package managers provided for their operating system. Our suggested operating system for use with HackRF is Ubuntu.
FreeBSD
You can use the binary package: # pkg install hackrf
You can also build and install from ports:
# cd /usr/ports/comms/hackrf
# make install
Linux: Arch
Linux: Fedora / Red Hat
sudo dnf install hackrf -y
Linux: Gentoo
emerge -a net-wireless/hackrf-tools
Linux: Ubuntu / Debian
sudo apt-get install hackrf
OS X (10.5+): Homebrew
brew install hackrf
OS X (10.5+): MacPorts
sudo port install hackrf
Windows: Binaries
Binaries are provided as part of the PothosSDR project, they can be downloaded here.
Installing From Source
Linux / OS X / *BSD: Building HackRF Software From Source
Acquire the source for the HackRF tools from either a release archive or git: git clone https://github.com/greatscottgadgets/hackrf.git
Once you have the source downloaded, the host tools can be built as follows:
cd hackrf/host
mkdir build
cd build
cmake ..
make
sudo make install
sudo ldconfig
If you have HackRF hardware, you may need to update the firmware to match the host tools versions.
Windows: Prerequisites for Cygwin, MinGW, or Visual Studio
cmake-2.8.12.1 or later from http://www.cmake.org/cmake/resources/software.html
libusbx-1.0.18 or later from http://sourceforge.net/projects/libusbx/files/latest/download?source=files
fftw-3.3.5 or later from http://www.fftw.org/install/windows.html
- Install Windows driver for HackRF hardware or use Zadig see http://sourceforge.net/projects/libwdi/files/zadig
If you want to use Zadig select HackRF USB device and just install/replace it with WinUSB driver.
Note for Windows build: You shall always execute hackrf-tools from Windows command shell and not from Cygwin or MinGW shell because on Cygwin/MinGW Ctrl+C is not managed correctly and especially for hackrf_transfer the Ctrl+C (abort) will not stop correctly and will corrupt the file.
Windows: Installing HackRF Software via Cygwin
mkdir host/build
cd host/build
cmake ../ -G "Unix Makefiles" -DCMAKE_LEGACY_CYGWIN_WIN32=1 -DLIBUSB_INCLUDE_DIR=/usr/local/include/libusb-1.0/
make
make install
Windows: Installing HackRF Software via MinGW
mkdir host/build
cd host/build
cmake ../ -G "MSYS Makefiles" -DLIBUSB_INCLUDE_DIR=/usr/local/include/libusb-1.0/
make
make install
Windows: Installing HackRF Software via Visual Studio 2015 x64
Create library definition for MSVC to link to C:\fftw-3.3.5-dll64> lib /machine:x64 /def:libfftw3f-3.def
c:\hackrf\host\build> cmake ../ -G "Visual Studio 14 2015 Win64" \
-DLIBUSB_INCLUDE_DIR=c:\libusb-1.0.21\libusb \
-DLIBUSB_LIBRARIES=c:\libusb-1.0.21\MS64\dll\lib\libusb-1.0.lib \
-DTHREADS_PTHREADS_INCLUDE_DIR=c:\pthreads-w32-2-9-1-release\Pre-built.2\include \
-DTHREADS_PTHREADS_WIN32_LIBRARY=c:\pthreads-w32-2-9-1-release\Pre-built.2\lib\x64\pthreadVC2.lib \
-DFFTW_INCLUDES=C:\fftw-3.3.5-dll64 \
-DFFTW_LIBRARIES=C:\fftw-3.3.5-dll64\libfftw3f-3.lib
CMake will produce a solution file named HackRF.sln and a series of project files which can be built with msbuild as follows: c:\hackrf\host\build> msbuild HackRF.sln
Hi,
So finally I got my very own HackRF One!

While I was waiting for the order to arrive, I started to learn about how to use the HackRF One and all instructions I found online pointed to one basic fact: you need to have Linux to fully use the HackRF One.
The problem is that I currently have only Windows 10 installed on my computers, because most programs I use, are only available for this operating system.
For the casual Linux use, I droped having a dedicated Linux partition and instead started to use Ubuntu inside a virtual machine. Using the free VirtualBox has been a great experience, as it works really well.
However, I discovered that for HackRF One, the bandwidth of the virtual USB port is simply not enough. While you can in fact use the HackRF inside a virtual Linux box, performance is not ideal. It does work, but don’t expect to TX/RX the full 20MHz.
I tried my luck with Pentoo, a Linux distribution on DVD that has everything radio related pre-installed. It does work, but again there was a slight annoyance: I am used to my SSD, which is really fast and I use three monitors to have plenty of desktop space. With Pengoo, everything loads from DVD and that is really slow! Also, all three monitors show the same content with a lower resolution that would be possible.
And so I ended up giving GNU Radio for Windows a shot and guess what: it works actually amazingly well!
How to set it up? Look here: https://wiki.gnuradio.org/index.php/WindowsInstall
And yes, you get FULL HackRF One support, commands like «hackrf_transfer» are available and work.

I did a first test with my new HackRF One and this image shows the capture of a few seconds of just 2MHz:

Soon I ended up recording 20MHz bandwidth (basically the whole FM band in one go) and then transmitted it at 160MHz centre frequency… Why? Because I can!

The spectrum analyzer shows how it looks like…

…and my Uniden Bearcat UBC9000XLT could perfectly receive the relayed FM stations! Simply amazing!

Now I need to learn more about GNU Radio — it is an amazing piece of software!
So here is a prrof of concept that you can use the HackRF One with Windows, as opposed to basically all quick start instructions I have found.
Cheers,
Vitor
Как подружить HackRF One и SDRSharp, первое включение!
Александр Лавандовски специально для @sdrforce
Для перехвата радиосигнала существует отличный девайс — HackRF One. С его помощью, на этапе разведки, вы сможете перехватить частоту, на которой работают рации охранников, и почерпнуть из их разговоров массу полезной информации: маршруты патрулирования, расписание пересменок и так далее.

Настройка утилиты SDRSharp в Windows
Для работы с гаджетом вам понадобится утилита SDRSharp.

Идем на сайт разработчика и скачиваем архив sdrsharp-x86.zip

- Создаем на диске «С» папку с названием sdrsharp и распаковываем туда наш архив. В распакованной папке находим файл install-rtlsdr.bat и запускаем его. На экране появится командная строка, которая автоматически закроется в течение нескольких секунд. В папке появятся файлы rtlsdr.dll и zadig.exe.
- Перед подключением SDR-приемника категорически важно произвести установку антенны, ее отсутствие грозит очень печальными последствиями для вашего устройства.
- Подключаем SDR-приемник по USB 2.0 (да, тот что не синий) и запускаем файл Zadig.exe (от имени администратора!). Нажимаем Options, ставим галочку в строке List All Devices.
- В строке Device выбираем Bulk-In, Interface (Interface 0). Могут выпадать и другие устройства, такие как RTL2832U или RTL2832UHIDIR, их тоже можно выбирать. В строке Driver после зеленой стрелки должно стоять WinUSB, в строке USB ID — 0BDA 2838 00. С
- Жмем кнопку Replace Driver, игнорируем системное сообщение с предупреждением, жмем «Установить».
- В папке с распакованной программой SDRSharp находим и запускаем файл SDRSharp.exe. После запуска программы под строкой Source нажимаем на треугольник выбора устройств. Выбираем наше устройство RTL-SDR(USB).
- Устройство выбрано — теперь нажимаем шестеренку вверху слева. Далее выходит окошко RTL-SDR Controller — задаем следующие параметры:необходимую частоту;
- тип модуляции — WFM;
- Sample Rate — 2048 MSPS;
- RTL AGC — включаем;
- Ползунок регулировать в районе 20 дБ по ситуации.
- Нажимаем кнопку Play слева вверху. Программа запущена и готова к работе.
