
Время на прочтение21 мин
Количество просмотров43K
Всем привет! Меня зовут Леонид, я являюсь разработчиком программного обеспечения (ПО) на языках программирования С++, C# и Java. Основной род деятельности за последние 10 лет создание систем сбора данных, мониторинга и автоматизации в промышленной сфере, так же участвовал в разработке ПО для финансового сектора. В одном из проектов была поставлена задача разработать пользовательское ПО, которое должно работать в операционных системах Windows, Linux и Android, используя среду .NET и оно не должно было быть WEB приложением (так как боялись за низкую производительность, да и в целом подобные SCADA системы в основном развивались в десктопном исполнении), скорее всего это была архитектурная ошибка, но благодаря ей появилась основа для нового компактного фреймворка. Забегая вперед, скажу это была достаточно амбициозная идея, так как на дворе был 2017 год и необходимых кроссплатформенных систем с пользовательским интерфейсом на .NET не существовало.
Для Windows систем был устаревший Windows Forms и все больше набирал обороты WPF, под Android был только Xamarin, который казался жутко тормозным и глючным в плане разработки, а под Linux все было совсем плохо. Имея достаточно неплохой опыт в создании пользовательских элементов управления еще со времен C++ Builder, было решено сделать свой UI с блэкджеком и шарпом.
Первые пробы
Для создания любой пользовательской графической системы необходимо:
-
Выводить на экран (отрисовывать) различные примитивы (точки, линии, многоугольники и т.д.), изображения (растровая графика, векторная графика), текст.
-
Получать информацию с устройств ввода (клавиатура, мышь, тач-панель и т.п.)
-
В некоторых случаях может понадобиться дополнительно иметь возможность проигрывать звук, взаимодействовать с функциями операционной системой, например, получать/задавать буфер обмена, выводить уведомления и т.д.
-
Делать это все максимально быстро, иначе наш интерфейс будет медленным и неудобным в использовании:)
В качестве основы будущего фреймворка LXUI был взят кроссплатформенный игровой движок MonoGame, который в свою очередь продолжал традиции XNA от Microsoft. MonoGame уже включает практически все необходимое из списка, остается только сделать надстройку над ним. На самом деле это большая и сложная работа, построить быстрый и надежный интерфейс, особенно если необходимо обрабатывать тысячи элементов управления. Даже просто вывести текст на экране с возможностью его выравнивания, переноса, обрезки, вывода большого объема текста (10ки мегабайт), потокобезопасным и чтоб при этом интерфейс был отзывчивым, требуется немало усилий и различных трюков оптимизации.
Так появился первый рабочий проект “Omega” и дальнейшие его ответвление “Trassa”.


Использование MonoGame в проекте создавало свои сложности, не везде удавалось достичь высокой производительности и совместимости, иногда приходилось городить грабли под разные платформы и функциональных возможностей уже не хватало, хотелось иметь полноценные векторные шрифты, более простое развертывание в различных системах и многое другое.
SDL2 и Material Design
В какой-то момент времени я наткнулся на замечательную компактную библиотеку SDL2, это свободно-распространяемый кроссплатформенный игровой движок с огромными встроенными возможностями и очень высокой производительностью. После внимательного изучения ее функционала было принято решение написать новую версию LXUI с 0, используя данный движок как основу. На самом деле рассматривались и другие движки, в том числе и Unity, но все они не подходили в силу большого размера исполняемых файлов и поддержкой платформ, например SDL2 по прежнему поддерживает Windows XP, кто-то скажет, что это бред и данная операционная система давно устарела, но к сожалению это не так, в государственных и финансовых структурах до сих пор иногда встречается. Задача была сделать библиотеку максимально компактной, а не монстра в сотни мегабайт для пустого проекта, и так же с максимальной поддержкой даже уже устаревших операционных систем. Поэтому LXUI написана на фреймворке .NET 4.0 (также есть адаптация под .NET Standard 2.0) и позволяет использовать устаревшие среды разработки и маломощные компьютеры, а главное не скачивать самую последнюю среду разработки и самый последний фреймворк, чтобы написать простой калькулятор :).
Накопив достаточный опыт в предыдущей версии, были понятны основные направления развития и удобства/неудобства пользования библиотекой. Одним из таких недостатков стали визуальные аспекты, стили, поведения, анимации. Тут очень многое было заимствовано из Material Design от компании Google. Например, даже основные цветовые схемы состоят из Primary, Secondary, Surface, Background и других цветов, появилась поддержка векторных шрифтов, некоторые анимации нажатия кнопок, переключателей.
LXUI
Прошли короновирусные времена (а может и не прошли вовсе), библиотека успешно использовалась в нескольких внутренних проектах и возникла мысль, а почему бы не попробовать выложить ее в свет! И тут начался непривычный кошмар :). Регистрации на различных ресурсах, публикации и самое главное документация! С ней сейчас еще предстоит много работы, поэтому сами исходные коды еще не выложены на GitHub. Но уже можно загрузить для испытаний NuGet сборки для Desktop версии (https://www.nuget.org/packages/LXUI.Desktop) и Android (https://www.nuget.org/packages/LXUI.Android). Для простенькой демонстрации был сделан проект Weather (https://github.com/lxuinet/Meteo.Test), который скомпилирован под Android и Desktop (в том числе был опробован в виртуальной машине с операционной системой Raspberry Pi). Дополнительная информация доступна на официальном сайте (http://lxui.net/), сайт к сожалению пока тоже пустой, но надеюсь со временем все наладится!

Hello World!
Итак приступим, попробуем создать простое приложение! Если вы планируете использовать один и тот же код и ресурсы в разных системах (Android/Desktop), то необходимо создать общую библиотеку классов или общий проект. Для создании Desktop версии нам необходимо создать консольный проект или проект Windows Forms, в качестве среды разработки будем использовать Microsoft Visual Studio 2019 (никто не запрещает использовать любую другую среду). Создаем консольный проект .NET Framework версии 4.0 или выше (можно использовать .NET Core проекты)

В свойствах проекта изменяем «Тип выходных данных», это нужно чтобы не отображалось окно консоли:

Подключаем NuGet пакет. В поиске вводим LXUI и выбираем LXUI.Desktop:

Теперь необходимо создать стартовую форму, это обычный класс, наследуемый от LX.Control и зададим рамку элемента через свойство BorderSize:
using LX;
namespace HelloWorld
{
    public class MainForm : Control
    {
        public MainForm()
        {
            this.BorderSize = 1;
        }
    }
}
В главной функции приложения Main, необходимо запустить LXUI и создать экземпляр нашей формы. Принцип очень схож с классическим Windows Forms:
using LX;
namespace HelloWorld
{
    class Program
    {
        static void Main(string[] args)
        {
            App.OnRun += () => new MainForm();
            App.Run();
        }
    }
}
Теперь необходимо добавить нашу форму на экран, для этого у Control есть метод AddToRoot(), вызовем данный метод в конструкторе формы:
using LX;
namespace HelloWorld
{
    public class MainForm : Control
    {
        public MainForm()
        {
            this.AddToRoot();
            this.BorderSize = 1;
        }
    }
}
Запускаем приложение!

Мы видим маленький белый прямоугольник, это дефолтные размеры и расположение нашей формы. Для выравнивания формы обратимся к свойству Alignment, здесь очень много разных возможностей выравнивания, например можно прикрепить форму к любому краю родительского элемента или разместить ее по центру. Выполним заполнение по всему родительскому элементу:
using LX;
namespace HelloWorld
{
    public class MainForm : Control
    {
        public MainForm()
        {
            this.AddToRoot();
            this.BorderSize = 1;
            this.Alignment = Alignment.Fill;
        }
    }
}
Концепция LXUI — любой элемент может содержать в себе другие элементы и как угодно их выравнивать, например, стать панелью, списком или галерей. Теперь добавим 100 текстовых меток в центре формы и запустим приложение:
using LX;
namespace HelloWorld
{
    public class MainForm : Control
    {
        public MainForm()
        {
            this.AddToRoot();
            this.BorderSize = 1;
            this.Alignment = Alignment.Fill;

            for (int i = 0; i < 100; i++)
            {
                var label = new Label();
                label.Text = "Hello World!";
                label.Alignment = Alignment.Center;
                label.AddTo(this);
            }
        }
    }
}
Все 100 надписей расположились по центру, давайте превратим нашу форму в список! Для этого используем свойство Layout:
using LX;
namespace HelloWorld
{
    public class MainForm : Control
    {
        public MainForm()
        {
            this.AddToRoot();
            this.BorderSize = 1;
            this.Alignment = Alignment.Fill;
            this.Layout = new VerticalList();

            for (int i = 0; i < 100; i++)
            {
                var label = new Label();
                label.Text = "Hello World!";
                label.Alignment = Alignment.Center;
                label.AddTo(this);
            }
        }
    }
}
Можно создавать любые пользовательские Layout и на лету менять поведение элементов внутри формы без изменения разметки формы. Обратите внимание, автоматически создалась полоса прокрутки. В LXUI нет необходимости создать различные ScrollViewer и тому подобные элементы, фреймворк сам определяет их необходимость. Видимость, размеры и цвета элементов прокрутки можно настроить в соответствующих свойствах. На текущий момент нет поддержки колеса мыши, но зато есть так называемая прокрутка “пальцем”, привычная всем пользователям тачскринов (к данному подходу очень быстро привыкаешь и в десктопных приложениях).
Теперь добавим иконку справа к нашим надписям. Добавим файл изображения в проект и укажем действие при сборке “Внедренный ресурс”. В текущей версии поддерживаются форматы изображений: Bmp, Gif (без анимации), Jpg, Png, Psd, Tga, монохромные векторные изображения, загруженные из шрифтов.

Загрузим изображение и добавим его в наши надписи:
using LX;
namespace HelloWorld
{
    public class MainForm : Control
    {
        public MainForm()
        {
            this.AddToRoot();
            this.BorderSize = 1;
            this.Alignment = Alignment.Fill;
            this.Layout = new VerticalList();

            for (int i = 0; i < 100; i++)
            {
                var label = new Label();
                label.Text = "Hello World!";
                label.Alignment = Alignment.Center;
                label.AddTo(this);

                var image = new PictureBox();
                // Подгоним размер элемента по размеру изображения
                image.AutoSize = true;
                // Расположим элемент справа от текста
                image.Alignment = Alignment.Right;
                // Загрузим изображение из ресурсов
                image.Image = Image.LoadFromResource("*.duck.png");
                // Располагаем по центру элемента
                image.ImageAlignment = Alignment.Center;
                // Добавляем элемент в текстовую метку
                image.AddTo(label);
            }
        }
    }
}
Можно упростить весь код:
using LX;
namespace HelloWorld
{
    public class MainForm : Control
    {
        public MainForm()
        {
            this.AddToRoot();
            this.BorderSize = 1;
            this.Alignment = Alignment.Fill;
            this.Layout = new VerticalList();

            for (int i = 0; i < 100; i++)
            {
                var label = this.Add("Hello World!", Alignment.Center);
                var image = label.Add(Image.LoadFromResource("*.duck.png"), Alignment.Right);
            }
        }
    }
}
Можно немного поиграться со свойствами Control. Зададим фоновой цвет надписи, на основе цвета родительского элемента с автоматической градацией, добавим скругления краев и изменим масштаб окна:
using LX;
namespace HelloWorld
{
    public class MainForm : Control
    {
        public MainForm()
        {
        		// Изменение масштаба окна
        		Window.Scale = Scale.Percent200;

            this.AddToRoot();
            this.BorderSize = 1;
            this.Alignment = Alignment.Fill;
            this.Layout = new VerticalList();

            for (int i = 0; i < 100; i++)
            {
                var label = this.Add("Hello World!", Alignment.Center);
                label.Color = Color.Parent.Auto(150);
                label.Shape = CornerShape.Oval;
 								label.Radius = 3;

                var image = label.Add(Image.LoadFromResource("*.duck.png"), Alignment.Right);
            }
        }
    }
}
Из-за более светлого фона надписи, цвет текста стал черным, это также достигается благодаря указанному по умолчанию цвету текста равному Color.Content. Авто цвета удобно использовать, если вы создаете разные темы, в том числе светлые/темные:


Аналоги и тестирование
Существует огромное количество кроссплатформенных GUI, но только не в .NET, реально мало кто назовет даже 1-2 фреймворка. Есть Xamarin.Forms, у которого нет поддержки Linux, тот же .NET MAUI скоро выйдет, опять же без поддержки Linux систем и если честно, подход использовать максимально последний .NET для запуска отпугивает, плюс выходные размеры пустого проекта становятся все больше и больше. Есть AvaloniaUI, которая очень сильно выросла за последние годы и видно была проделана просто гигантская работа в сторону повышения качества продукта. Но это все достаточно крупные игроки, до которых очень далеко.
Поскольку моей задачей является создать очень компактный и очень производительный фреймворк я просто обязан провести некоторые сравнительные тесты. Для этого будем сравнивать LXUI с фреймворками: WPF (Windows Presentation Foundation, аналог Windows Forms от Microsoft) и AvaloniaUI (кроссплатформенный фреймворк), к сожалению MAUI даже не удалось запустить, поэтому пока их исключаем из тестов. Для меня важными критериями в этих тестах являются:
-
Время запуска
-
Расход памяти
-
Общая производительность и плавность интерфейса
Конфигурация тестовой среды:
-
Процессор: Intel Xeon E5-2696 v3
-
Оперативная память: 64 Гб
-
Видеокарта: ASUS GeForce GTX 1660 Ti 6 Гб
-
Операционная система: Window 10 Pro 21H2
-
Среда разработки: Visual Studio Community 2019 Версия 16.11.15
Код тестовых примеров я буду приводить на LXUI, код других тестовых проектов можно загрузить с GitHub (https://github.com/lxuinet/LX.Test). Сразу оговорюсь, возможно, я не правильно (не оптимально) составлял тестовые примеры, надеюсь, в комментариях мне предложат другие варианты, более быстрые. Также не ставится целью кого-то обидеть или принизить, любая здравая критика только приветствуется. Поехали!
Test 1. Проверяем скорость загрузки большого числа элементов
Задача. Создать форму с вертикальным списком и прокруткой, в который добавить N-ое количество кнопок с текстом и изображением, с автоматическим размером по содержимому.
using LX;
namespace Test1.LX
{
    public class MainForm : Control
    {
        public MainForm()
        {
            this.AddToRoot();
            this.Color = Color.Surface;
            this.Padding = 8;
            this.Alignment = Alignment.Fill;
            this.Layout = new VerticalList(8);

            var source = Image.LoadFromFile("test.png");
            for (int i = 0; i < 100000; i++)
            {
                var button = new Button();
                button.Color = Color.LightGray;
                button.Layout = VerticalList.Default;
                button.AddTo(this, Alignment.TopCenter);

                var label1 = button.Add("Top " + i.ToString(), Alignment.TopRight);
                var image1 = button.Add(source, Alignment.TopCenter);
                var label2 = button.Add("Bottom " + i.ToString(), Alignment.TopLeft);
            }
        }
    }
}
WPF (N = 10 000 элементов)
-
Время запуска: ~23 c
-
Расход памяти: ~500 Мб
-
Количество сборок мусора: ~30
-
Прокрутка списка: Очень быстро
-
Изменение размера окна: ~3 c
В целом интерфейс отзывчив, визуально не видно задержек в отрисовке на события мыши, только изменение размеров окна подкачали.

AvaloniaUI (N = 10 000 элементов)
-
Время запуска: ~24 c.
-
Расход памяти: ~950 Мб
-
Количество сборок мусора: ~30
-
Прокрутка списка: Практически недоступна
-
Изменение размера окна: ~12 c
Заметны значительные задержки в прорисовке событий мыши, прокрутку сделать практически невозможно, как и изменение размера окна, так же многократно были заметны подвисания процесса при выходе.

LXUI (N = 100 000 элементов) в 10 раз больше элементов
-
Время запуска: ~4 c
-
Расход памяти: ~550 Мб
-
Количество сборок мусора: ~10
-
Прокрутка списка: Очень быстро
-
Изменение размера окна: ~100 мс
Нет никаких задержек при прорисовке, минимальные задержки при изменении размера окна.

Test 2. Создаем галерею иконок
Задача. Загрузить из папки 226 изображения, в формате PNG. Создать форму с галереей изображений и добавить в нее 226 х N элементов.
using System;
using System.IO;
using System.Linq;
using LX;

namespace Test2.LX
{
    public class MainForm : Control
    {
        public MainForm()
        {
            this.AddToRoot();
            this.Color = Color.Surface;
            this.Alignment = Alignment.Fill;
            this.Layout = new VerticalGallery();

            var list = Directory.GetFiles(AppDomain.CurrentDomain.BaseDirectory + "png-256", "*.png")
            										.Select(file => Image.LoadFromFile(file))
            										.ToList();

            for (int i = 0; i < 1000; i++)
            {
                list.ForEach(source =>
                {
                    var image = Add(source);
                    image.ImageAlignment = Alignment.Zoom;
                    image.Size = 128;
                });
            }
        }
    }
}
WPF (N = 100, 22 600 элементов)
-
Время запуска: ~3 c
-
Расход памяти: ~300 Мб
-
Количество сборок мусора: ~5
-
Прокрутка списка: Очень быстро
-
Изменение размера окна: ~100 мс
Нет никаких задержек при прорисовке, минимальные задержки при изменении размера окна.

AvaloniaUI (N = 100, 22 600 элементов)
-
Время запуска: ~4 c
-
Расход памяти: ~250 Мб
-
Количество сборок мусора: ~2
-
Прокрутка списка: Практически недоступна
-
Изменение размера окна: ~4 c
Прокрутку сделать практически невозможно, как и изменение размера окна.

LXUI (N = 1000, 226 000 элементов) в 10 раз больше элементов
-
Время запуска: ~2 c
-
Расход памяти: ~350 Мб
-
Количество сборок мусора: 0
-
Прокрутка списка: Очень быстро
-
Изменение размера окна: ~100 мс
Нет никаких задержек при прорисовке, минимальные задержки при изменении размера окна.

Test 3. Работа с текстом
Задача. Создать форму с текстовым редактором, загрузить большой текст ~17 х N символов и выровнять по правому краю.
using LX;
namespace Test3.LX
{
    public class MainForm : Control
    {
        public MainForm()
        {
            this.AddToRoot();
            this.Color = Color.Surface;
            this.Alignment = Alignment.Fill;

            var text = new TextBox();
            text.InlineAlignment = InlineAlignment.Far;
            text.VerticalScrollBar.Visible = true;
            text.MultiLine = true;
            text.WordWrap = true;
            text.Text = TextGenerator.Create(100000);
            text.AddTo(this, Alignment.Fill);
        }
    }
}
WPF (N = 10 000, 168 890 символов)
-
Время запуска: ~1.5 c
-
Расход памяти: ~100 Мб
-
Количество сборок мусора: 0
-
Прокрутка текста: Очень быстро
-
Изменение размера окна: ~1 с
-
Задержка при вводе: ~1 с
Большая задержка при вводе текста и изменении размера окна.

AvaloniaUI (N = 10 000, 168 890 символов)
-
Время запуска: ~4 c
-
Расход памяти: ~150 Мб
-
Количество сборок мусора: > 100
-
Прокрутка списка: Очень быстро
-
Изменение размера окна: ~2 c
-
Задержка при вводе: ~2 c
Большая задержка при вводе текста и изменении размера окна.

LXUI (N = 100 000, 1 788 890 символов) в 10 раз больше символов
-
Время запуска: ~0.5 c
-
Расход памяти: ~200 Мб
-
Количество сборок мусора: 3
-
Прокрутка списка: Очень быстро
-
Изменение размера окна: ~0 с
-
Задержка при вводе: ~0 c
Нет никаких задержек при прорисовке, изменений размера окна и вводе символов, максимальная плавность.

Итоги тестирования
По результатам проведенных тестов, LXUI имеет очень высокую оптимизацию производительности, более чем в 10 раз превосходящую среди сравниваемых фреймворков. Данный запас производительности дает гарантию быстрого и плавного исполнения приложений в мобильных устройствах и более слабых настольных системах. WPF достаточно неплохо справилась с данными тестами, в основном были задержки при изменении размеров окна, где происходит основной перерасчет положения элементов управления. У AvaloniaUI есть заметные проблемы с производительностью, что не может сказаться на выполнении тяжелых пользовательских интерфейсов, особенно на мобильных устройствах. Конечно, это были синтетические тесты и нужно учитывать множество факторов, например, сейчас LXUI проигрывает в скорости загрузки больших изображений (4к и выше), также требуется много и других доработок.
Вывод
На мой взгляд, LXUI мог бы стать вполне конкурентным фреймворком для построения пользовательских кроссплатформенных систем. Основным преимуществом я бы назвал:
-
Маленький размер выходных файлов, всего одна библиотека размером в 3 МБ.
-
Высокая оптимизация и производительность.
-
Простой вход для новичков, не нужно изучать язык разметки XAML и т.п. и в тоже время структура библиотеки схожа с классическим Windows Forms
-
Поддержка устаревших версий .NET, сред разработки и операционных систем, например в системе Linux достаточно установить пакеты mono-complete, libsdl2 и libsdl2-ttf, которые входят в официальные репозитории даже на таких система как Raspberry Pi.
В перспективе необходимо расширять библиотеку пользовательских элементов управления, скинов, сделать её максимально потокобезопасной, добавить поддержку векторной графики, проигрывания звука и видео, расширить список платформ, в частности планируется добавить поддержку iOS и macOS, дать разработчикам больше доступа к графической подсистеме, добавить 3D, шейдеры, а главное привести в порядок документацию, добавить больше примеров и сделать полноценный конструктор форм и пользовательских элементов управления. Одно из направлений можно развить в сторону игр, так как большинство казуальных игр строятся на GUI со стандартными элементами управления.
Текущая статья очень кратко описывает возможности LXUI, не затронуты многие темы, например: скины, таймеры, горячие клавиши, анимации.
P.S.
Это моя первая статья такого рода, приношу извинения за возможные многочисленные ошибки, жду от вас отзывов и рекомендаций, до скорой встречи!
Ссылки
Основные ресурсы:
-
Официальный сайт (http://lxui.ru/)
-
Репозиторий LXUI на GitHub
-
Репозиторий тестовых проектов на GitHub
-
NuGet сборка для Desktop
-
NuGet сборка для Android
-
Электронная почта: lxuinet@gmail.com
Используемые в статье источники:
-
MonoGame
-
SDL2
-
Material design
-
AvaloniaUI
Пройдите тест, узнайте какой профессии подходите
Работать самостоятельно и не зависеть от других
Работать в команде и рассчитывать на помощь коллег
Организовывать и контролировать процесс работы
Введение в графические интерфейсы на C
Графические интерфейсы позволяют создавать более интуитивно понятные и удобные для пользователя приложения. В языке программирования C для создания графических интерфейсов часто используются библиотеки, такие как GTK, Qt или WinAPI. В этой статье мы рассмотрим пример создания простого графического интерфейса на C с использованием библиотеки GTK.
GTK (GIMP Toolkit) — это кроссплатформенная библиотека для создания графических интерфейсов, которая широко используется в различных приложениях, включая GNOME. Она предоставляет множество готовых виджетов и инструментов для создания окон, кнопок, текстовых полей и других элементов управления. GTK поддерживает множество платформ, включая Linux, Windows и macOS, что делает её универсальным инструментом для разработки кроссплатформенных приложений.

Установка и настройка необходимых библиотек
Перед тем как начать писать код, необходимо установить библиотеку GTK и настроить окружение для разработки. В зависимости от вашей операционной системы, процесс установки может немного отличаться. Важно убедиться, что все зависимости установлены корректно, чтобы избежать проблем при компиляции и запуске приложения.
Установка на Linux
На большинстве дистрибутивов Linux GTK можно установить с помощью пакетного менеджера. Например, для Ubuntu и Debian:
Эти команды обновят список пакетов и установят необходимые библиотеки для разработки с использованием GTK. После установки вы сможете использовать утилиту pkg-config для настройки компилятора.
Установка на Windows
Для Windows можно использовать MSYS2, который предоставляет удобный способ установки и управления библиотеками. Сначала установите MSYS2, а затем выполните следующие команды в MSYS2 MinGW64:
MSYS2 включает в себя множество инструментов и библиотек, которые облегчают разработку на Windows. После установки GTK с помощью MSYS2, вы сможете компилировать и запускать приложения с графическим интерфейсом на C.
Установка на macOS
На macOS можно использовать Homebrew для установки GTK:
Homebrew — это популярный пакетный менеджер для macOS, который позволяет легко устанавливать различные библиотеки и инструменты. После установки GTK с помощью Homebrew, вы сможете настроить окружение для разработки и начать писать код.
После установки библиотеки необходимо настроить компилятор для работы с GTK. Обычно это делается с помощью утилиты pkg-config, которая помогает найти необходимые флаги для компиляции и линковки. Убедитесь, что pkg-config установлен и настроен правильно, чтобы избежать проблем при компиляции.
Создание основного окна приложения
Теперь, когда все необходимые библиотеки установлены, можно приступить к написанию кода. Начнем с создания основного окна приложения. Основное окно является центральным элементом любого графического интерфейса и служит контейнером для всех других виджетов и элементов управления.
В этом примере мы создаем основное окно с заголовком «Простое приложение на C» и устанавливаем его размер по умолчанию 400×300 пикселей. Также мы подключаем сигнал «destroy» к функции gtk_main_quit, чтобы приложение завершалось при закрытии окна. Этот код является базовым шаблоном для создания графических приложений на C с использованием GTK.
Добавление элементов управления
Теперь добавим несколько элементов управления, таких как кнопки и текстовые поля. Элементы управления позволяют пользователю взаимодействовать с приложением и выполнять различные действия.
В этом примере мы создаем вертикальный контейнер GtkBox и добавляем в него текстовое поле (GtkEntry) и кнопку (GtkButton). Затем мы добавляем этот контейнер в основное окно. Контейнеры позволяют организовывать элементы управления в окне и управлять их расположением и размерами.
Обработка событий и завершение работы приложения
Теперь добавим обработчик события для кнопки, чтобы при нажатии выводилось сообщение в консоль. Обработка событий является важной частью разработки графических приложений, так как позволяет реагировать на действия пользователя.
В этом примере мы добавляем функцию on_button_clicked, которая будет вызываться при нажатии на кнопку. Функция выводит сообщение «Кнопка нажата!» в консоль. Мы подключаем эту функцию к сигналу «clicked» кнопки с помощью g_signal_connect. Обработка событий позволяет создавать интерактивные приложения, которые реагируют на действия пользователя.
Теперь у нас есть простое приложение с графическим интерфейсом на C, которое включает основное окно, текстовое поле и кнопку с обработчиком событий. Этот пример можно расширять, добавляя новые элементы управления и функциональность в зависимости от ваших потребностей. Вы можете добавить меню, диалоговые окна, различные виджеты и другие элементы, чтобы создать более сложное и функциональное приложение.
Заключение
Создание графических интерфейсов на C с использованием библиотеки GTK может показаться сложным на первый взгляд, но с помощью этой статьи вы узнали основные шаги и принципы, которые помогут вам начать. Мы рассмотрели установку и настройку необходимых библиотек, создание основного окна приложения, добавление элементов управления и обработку событий. Эти знания являются основой для дальнейшего изучения и разработки более сложных графических приложений.
GTK предоставляет множество возможностей для создания кроссплатформенных приложений с графическим интерфейсом, и освоение этой библиотеки откроет перед вами новые горизонты в программировании. Не бойтесь экспериментировать и пробовать новые идеи, добавлять новые элементы и функциональность в свои приложения. Удачи в разработке!
Читайте также
Writing a Windows GUI Application with Windows API was avoided by many programmers due to its complexity, but is it really something to be afraid of?
In the WinAPI you essentially need the WinMain(…), CALLBACK(…) and WndProc(…) functions to create and present a GUI. You will also need a Window Class (WNDCLASS) and the CreateWindow(…) function. Content is provided in the form of Text, Cotrol Elements, Menu and MessageBoxes.
All in all it’s not that bad, mostly some typing if you know what you need. In order for you to gain this knowledge, I have summarized the essential elements along with examples in this article.
Creating a WinAPI Window in Modern C
The following article shows the creation of a basic WinAPI application with a GUI that resembles the most common applications used in the MS Windows environment.
Basics
In another article I showed how to create a very basic WinAPI GUI Application and we will reuse most of this code here. It is a lot of code to make very little happen, but it is the basis of our application and shows a MS Windows window with a text.
We will need two functions, WinMain(…) as a replacement for main() and WndProc(…) as a function that processes the MS Windows event loop. In order to use the types and functions of the WinAPI we include windows.h.
#include <windows.h>

LRESULT CALLBACK WndProc(HWND, UINT, WPARAM, LPARAM);

int WINAPI WinMain(HINSTANCE hInstance, HINSTANCE prevInstance, PSTR cmdLine, int cmdShow)
{
   ... /* code here */
}
Creating and Initializing the Window with the WinAPI
Again, the details are shown in another Article about GUI in C, so we will cover it briefly here. Instead of our beloved main(…) function we now have to use WinMain(…) together with some parameters that are necessary for Windows.
Next we create a windowclass and register it. Then we create the window itself (with a title) and show it to the screen. An EventLoop that collects operating system messages is also started.
...
int WINAPI WinMain(HINSTANCE hInstance, HINSTANCE prevInstance, PSTR cmdLine, int cmdShow)
{
    static TCHAR appName[] = TEXT("Hello WindowsAPI");
    HWND hwnd;
    MSG msg;
    WNDCLASS wndclass;

    wndclass.style = CS_HREDRAW | CS_VREDRAW;
    wndclass.lpfnWndProc = WndProc;
    wndclass.cbClsExtra = 0;
    wndclass.cbWndExtra = 0;
    wndclass.hInstance = hInstance;
    wndclass.hIcon = LoadIcon(NULL, IDI_APPLICATION);
    wndclass.hCursor = LoadCursor(NULL, IDC_ARROW);
    wndclass.hbrBackground = (HBRUSH)GetStockObject(WHITE_BRUSH);
    wndclass.lpszMenuName = NULL;
    wndclass.lpszClassName = appName;

    if(!RegisterClass(&wndclass)) {
        MessageBox(NULL, TEXT("Could not register Window Class!"), appName, MB_ICONERROR);
    }

    hwnd = CreateWindow(appName, TEXT("The Hello Windows Program"), WS_OVERLAPPEDWINDOW, CW_USEDEFAULT, CW_USEDEFAULT, CW_USEDEFAULT, CW_USEDEFAULT, NULL, NULL, hInstance, NULL);

    ShowWindow(hwnd, cmdShow);
    UpdateWindow(hwnd);

    while(GetMessage(&msg, NULL, 0, 0)) {
        TranslateMessage(&msg);
        DispatchMessage(&msg);
    }

    return msg.wParam;
}
...
Processing MS Windows Events with the WinAPI
The CALLBACK(…) function is called when the event loop fires events from the operating system. For each event you can react with whatever is necessary and/or appropriate.
The WM_DESTROY event announces the upcoming shutdown of the application, WM_PAINT is fired whenever a repaint of the window is necessary (e.g. because you moved it). WM_CREATE is fired on creation of the window and we will do something here later.
...
LRESULT CALLBACK WndProc(HWND hwnd, UINT message, WPARAM wParam, LPARAM lParam)
{
HDC hdc;
PAINTSTRUCT ps;
RECT rect;
switch (message)
{
case WM_CREATE:
/* Add Initialization Code */
return 0;
case WM_PAINT:
hdc = BeginPaint(hwnd, &ps);
GetClientRect(hwnd, &rect);
DrawText(hdc, TEXT("This is your first Windows Window!"),-1, &rect, DT_SINGLELINE | DT_CENTER | DT_VCENTER);
EndPaint(hwnd, &ps);
return 0;
case WM_DESTROY:
PostQuitMessage(0);
return 0;
default:
break;
}
return DefWindowProc(hwnd, message, wParam, lParam);
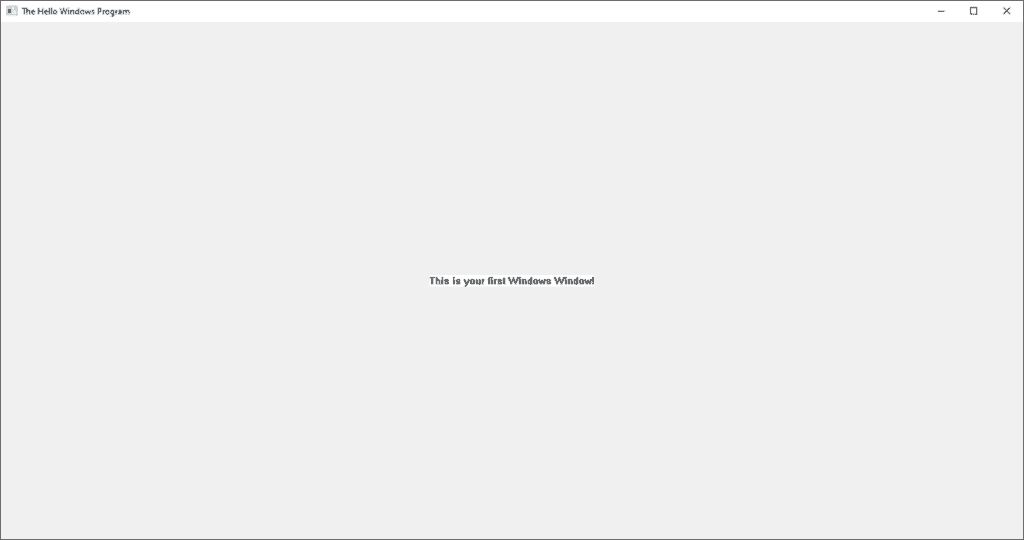
}Our Hello World Window
If you compile what we have coded so far, you should get a window with a title, a white background and a black text in the center of the screen.
Compiler Notice: You have to link gdi32 to link the Windows functionality into your code, otherwise you will get a linker error. In gcc you can do it with the -lgdi32 option (e.g. gcc main.c -o winapi -lgdi32)
Most windows have a menu bar at the top where the user can find some actions that he is able to perform with the application. Let’s create a menu bar for our example application.
On the top we add the declaration for an add_menu(…) function which takes the window reference as a parameter.
In the function itself we create four menu items, two of them are main menu items and two are sub menu items. Last we add the created menu to the main window with help of the hWnd Reference.
The & character underlines the following letter and enables access via the ALT Key+Letter (e.g. ALT+F for &File). Make sure that there are no duplicates (like &File and &Format) in the same menu level.
#include <windows.h>
...
void add_menu_bar(HWND);

int WINAPI WinMain(HINSTANCE hInstance...
...
void add_menu_bar(HWND hwnd)
{
    HMENU hFileMenu = CreateMenu();
    HMENU hHelpMenu = CreateMenu();
    HMENU hQuitItem = CreateMenu();
    HMENU hAboutItem = CreateMenu();

    AppendMenu(hQuitItem, MF_STRING, ITEM_QUIT, "&Quit");
    AppendMenuW(hFileMenu, MF_POPUP, (UINT_PTR)hQuitItem, L"&File");

    AppendMenu(hAboutItem, MF_STRING, ITEM_ABOUT, "&About");
    AppendMenuW(hFileMenu, MF_POPUP, (UINT_PTR)hAboutItem, L"&Help");

    SetMenu(hwnd, hFileMenu);
}
Now we have to call the add_menu() function in WndProc(…), namely in the WM_CREATE case so the menu is created when the GUI is created.
...
LRESULT CALLBACK WndProc(HWND hwnd, UINT message, WPARAM wParam, LPARAM lParam)
{
HDC hdc;
PAINTSTRUCT ps;
RECT rect;
switch (message)
{
case WM_CREATE:
add_menu_bar(hwnd);
return 0;
case WM_PAINT:
...
...
}
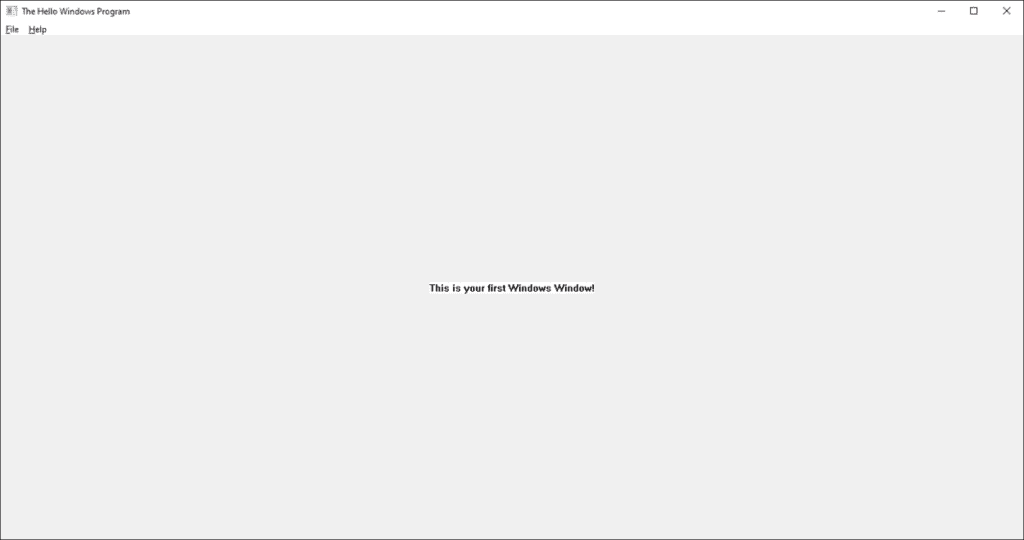
...After compiling and running the application we now have a menu bar with two items which itself contain one item each.
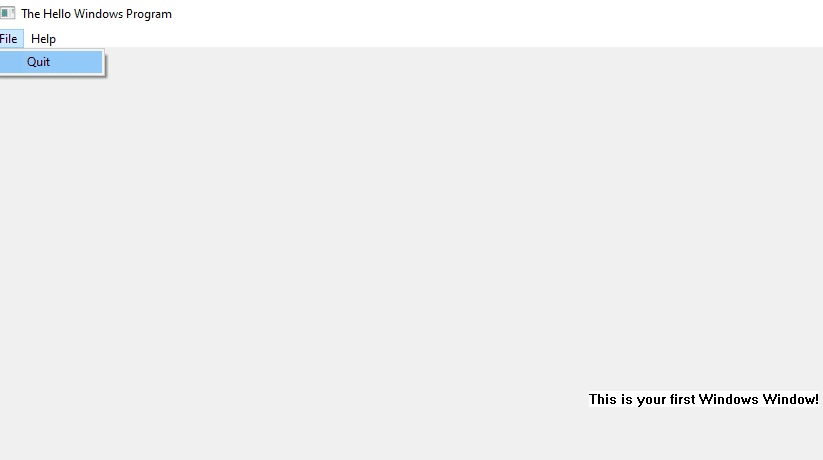
Closing the Application on Menu Item Click
Right now our Menu doesn’t do anything. We want to make the Quit item close the application. When such an item is clicked, WndProc will receive a WM_COMMAND event which we can handle appropriatly.
We extend he switch(message) block and check if ITEM_QUIT was clicked. If yes we will send the PostQuitMessage() in order to close the application.
Now the application should close if you click on File->Quit.
...
LRESULT CALLBACK WndProc(HWND hwnd, UINT message, WPARAM wParam, LPARAM lParam)
{
    ...

    switch (message)
    {
    case WM_CREATE:
    ...
    case WM_PAINT:
    ...
    case WM_COMMAND:
        switch (LOWORD(wParam))
        {
        case ITEM_QUIT:
            PostQuitMessage(0);
            break;
        default:
            /* not handled*/
            return 0;
        }
        break;
    case WM_DESTROY:
    ...
    default:
    ...
    }

    return DefWindowProc(hwnd, message, wParam, lParam);
}
...
Control Elements
A blank window with some text is mostly not what we want so lets add some control elements. First we will add an EditBox where the user can type some text. We will also add a Buttons that the user can click but will do nothing for now.
The call to the creation again happens in the WndProc(..) function where we already created the menu. We declare add_controls(…) and call it in the WM_CREATE case. We also need two new IDs for our control elements.
We also declare the EditBox Element globally so that we can use it later when we implement Message Boxes.
#include <windows.h>
#define ITEM_QUIT 1
#define ITEM_ABOUT 2
#define EDIT_BOX_ID 3
#define SEND_BUTTON_ID 4
LRESULT CALLBACK WndProc(HWND, UINT, WPARAM, LPARAM);
void add_menu_bar(HWND);
void add_controls(HWND);
HWND hEditBox;
...
LRESULT CALLBACK WndProc(HWND hwnd, UINT message, WPARAM wParam, LPARAM lParam)
{
....
switch (message)
{
case WM_CREATE:
add_menu_bar(hwnd);
add_controls(hwnd);
return 0;
case WM_PAINT:
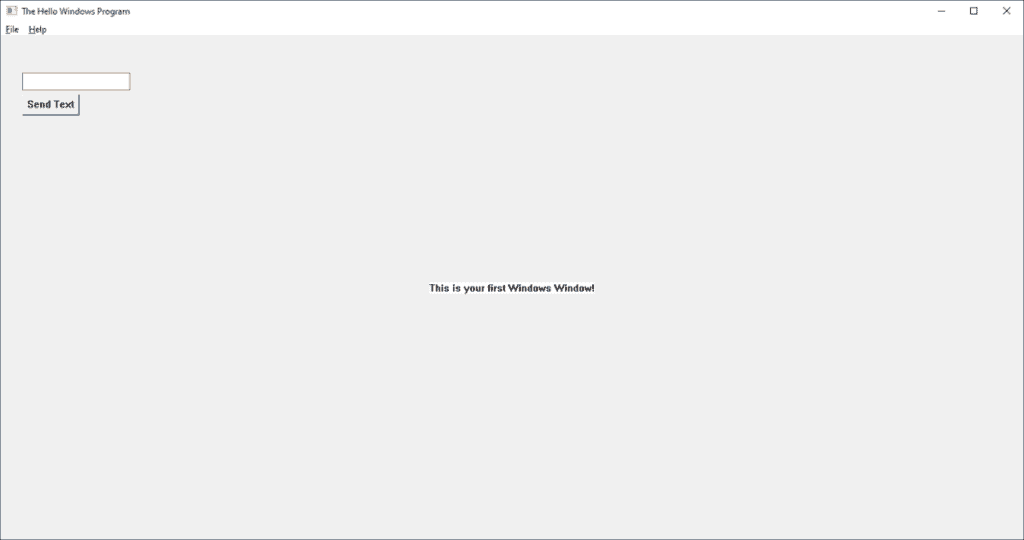
...The function itself is rather simple; we create an EditBox and a Button with the help of the CreateWindowL(…) function where the first parameter indicates the type of control that we want. The Button also gets a Text which serves as caption. The four numbers are x and y position as well as width and height of the control.
WS_CHILD makes the Element a child of the main window and WS_VISIBLE makes it visible. We also need an ID for each control in order to identify it later (e.g. for button click events, etc.).
void add_controls(HWND hwnd)
{
    hEditBox = CreateWindowW(L"Edit", NULL, WS_CHILD | WS_VISIBLE | WS_BORDER, 30, 50, 150, 25, hwnd, (HMENU)EDIT_BOX_ID, NULL, NULL);
    HWND hButtonSend = CreateWindowW(L"Button", L"Send Text", WS_CHILD | WS_VISIBLE, 30, 80, 80, 30, hwnd, (HMENU)SEND_BUTTON_ID, NULL, NULL);
}
When we compile and run the application now we get the following result:
Message Boxes
A MessageBox is also a common control element in a GUI. It is an easy way to show important information to the user or to get an answer for a request.
We will implement a simple MessageBox that will show up when we click on our About menu item in the Help section of the Menu Bar. We created this a few paragraphs ago.
In the WM_COMMAND section of the WndProc(…) function we will add another case for the About item. Instead of closing the application we now call a Windows function called MessageBox(…) which will show us a MessageBox with a Title, Text and Button.
I will only show you the part of WndProc(..) that has changed
...
LRESULT CALLBACK WndProc(HWND hwnd, UINT message, WPARAM wParam, LPARAM lParam)
{
...
  case WM_COMMAND:
        switch (LOWORD(wParam))
        {
        case ITEM_QUIT:
            PostQuitMessage(0);
            break;
        case ITEM_ABOUT:
            MessageBox(NULL, TEXT("Thank you for reading this far."), TEXT("A Message Box!"), 0);
            break;
        default:
            /* not handled*/
            return 0;
        }
        break;
...
}
If we now navigate to the menu item Help->About and click the MessageBox will appear.
Remember the Button we added in the Control Elements paragraph? We now give it something to do. When the user clicks the button we will show the text that he entered in the EditBox inside a MessageBox.
We have to visit the WndProc(…) function one last time. In the WM_COMMAND section we check if the event comes from our button (SEND_BUTTON_ID) and then check if the event was a button click (BN_CLICKED). Then we create a buffer that will hold our text and copy the contents of the EditBox into this buffer. Finally we show a MessageBox with a title and our buffer as text.
Now you see why the EditBox was declared globally – we need to access it in two different functions.
...
LRESULT CALLBACK WndProc(HWND hwnd, UINT message, WPARAM wParam, LPARAM lParam)
{
    ...

    switch (message)
    {
    case WM_CREATE:
        ....
    case WM_PAINT:
        ...
    case WM_COMMAND:
        switch (LOWORD(wParam))
        {
        case ITEM_QUIT:
            PostQuitMessage(0);
            break;
        case ITEM_ABOUT:
            MessageBox(NULL, TEXT("Thank you for reading this far."), TEXT("A Message Box!"), 0);
            break;
        case SEND_BUTTON_ID:
            if(HIWORD(wParam) == BN_CLICKED)
            {
                TCHAR buffer[1024];
                GetWindowText(hEditBox, buffer, 1024);
                MessageBox(NULL, buffer, TEXT("Sending Text:"), 0);
            }
            break;
        default:
            /* not handled*/
            return 0;
        }
        break;
    case WM_DESTROY:
        PostQuitMessage(0);
        return 0;
    default:
        break;
    }

    ...
}
Finally when we click on the button the entered text will appear inside a MessageBox.

Summary
This was a brief introduction to GUI Programming with the WinAPI in C. From here you can write your own programs and begin to add more control elements and functionality.
If you want to try out an alternative GUI that you can program in C you can e.g. read about SDL (Simple DirectMedia Layer) in this article. In contrast to WinAPI, SDL is portable.
Building Graphical User Interface using Win32 API and C language
Introduction
A collection of programs for learning to build a Graphical user interface in C using Win32 API.
The code is tested on a Windows 7 Machine.
The code can be compiled using
- Visual Studio Express Edition from Microsoft
- GCC (through MinGW Tool Chain)
Compilation
Compilation of the code can be done in GCC (MinGW) using the Following command.
C:\ gcc -o SourceFile.exe SourceFile.c -Wl,--subsystem,windows -lgdi32
-
The -Wl,—subsystem,windows linker switch ensures that the application is built as a Windows GUI application, and not a console application. Failing to do so would result in a console window being displayed whilst your application runs
-
You should link with the gdi32 library using «-lgdi32 » otherwise the code will complain about «undefined reference to GetStockObject«.
Contents
1_Hello_Windows
- MessageBox.c — Code for creating a pop up messagebox
- Simple_Window.c — Code for creating a Basic Window
- WindowComplete.c — Code for creating a Complete Window with Call Back Function
2_Windows_Messages
- Windows_Messages.c — Shows how Windows handles Messages and pass it to the callback function
3_Button_Win32
Contents
- 1 Introduction
- 2 Creating GUI Applications in C Programming Language
-
- 2.0.1 Table of Contents
- 2.1 The Importance of GUI Applications
- 2.2 Overview of C Programming Language for GUI Application Development
-
- 3 Setting up the Environment
- 3.1 Required Tools for C Programming Language
- 3.2 Installation Process
- 3.3 Configuration and Setup
- 4 Basics of C Programming Language
- 4.1 Variables, Data Types, and Operators
- 4.2 Control Statements
- 4.3 Functions and Pointers
- 5 GUI Application Development
- 5.1 Introduction to GUI Libraries
- 5.2 Setting up the Library
- 5.3 Creating a Basic GUI Application
- 6 Advanced GUI Application Development
- 6.1 GUI Application Layout
- 6.2 Creating Multiple Windows
- 6.3 Integrating User Inputs
- 7 Best Practices for GUI Application Development
- 7.1 Common Mistakes to Avoid
- 7.2 Debugging Techniques
- 7.3 Code Optimization
- 8 Conclusion
- 8.1 Summary of Key Points
- 8.2 Future Directions
- 8.3 Related
Introduction
GUI (Graphical User Interface) applications using C programming refer to programs that have a graphical interface designed to interact with the user visually, using windows, buttons, menus, and other graphical elements. C programming is a computer programming language that is widely used for system programming, embedded systems, and application development.
In order to create GUI applications using C programming, developers typically use a graphical toolkit or library that provides a set of functions and tools for creating graphical user interfaces. Examples of popular graphical toolkits used in C programming include GTK (GIMP ToolKit), Qt, and WinAPI (Windows Application Programming Interface).
These toolkits provide developers with a set of functions and tools to create graphical elements, handle user input, and manage events such as mouse clicks and keyboard input. By using these tools, developers can create complex graphical interfaces that are easy to use and interact with.
Overall, GUI applications using C programming offer a powerful way to create software with a user-friendly interface, making it easier for users to interact with and utilize software applications.
Table of Contents
The Importance of GUI Applications
GUI (Graphical User Interface) applications are important for a variety of reasons, including:
-
Ease of use: GUI applications provide a user-friendly interface that makes it easy for users to interact with software without needing to have specialized technical skills or knowledge. -
Improved productivity: GUI applications often offer a more streamlined and efficient workflow, allowing users to complete tasks more quickly and effectively. -
Better accessibility: GUI applications can be designed with accessibility in mind, including features like high-contrast themes, screen reader support, and keyboard shortcuts. -
Better accessibility: GUI applications can be designed with accessibility in mind, including features like high-contrast themes, screen reader support, and keyboard shortcuts. -
Cross-platform compatibility: GUI applications can be designed to work across different platforms, allowing users to access the same software and features regardless of the device or operating system they are using. -
Increased functionality: GUI applications can offer a wide range of features and tools that enable users to perform complex tasks and workflows, including multimedia editing, data analysis, and more.
Overall, GUI applications provide a powerful and accessible way to interact with software, making it easier for users to complete tasks and achieve their goals.
Overview of C Programming Language for GUI Application Development
C programming language is a powerful tool for developing GUI (Graphical User Interface) applications. Although it is not as commonly used for GUI application development as other languages like Java or Python, C still offers several advantages, including:
-
C programming language is a powerful tool for developing GUI (Graphical User Interface) applications. Although it is not as commonly used for GUI application development as other languages like Java or Python, C still offers several advantages, including: -
Lightweight: C is a lightweight language that does not require a lot of system resources, making it a good choice for developing GUI applications that need to run on low-power devices. -
Portability: C programs can be compiled to run on a wide range of operating systems, making it a versatile language for GUI application development. -
High-performance: C is a compiled language, which means that it can be optimized for maximum performance, making it an ideal choice for developing high-performance GUI applications. -
Large developer community: Although C is not as popular as other programming languages for GUI application development, it still has a large developer community that can provide support and resources.
To develop GUI applications using C, developers typically use a graphical toolkit or library that provides a set of functions and tools for creating graphical user interfaces. Examples of popular graphical toolkits used in C programming include GTK (GIMP ToolKit), Qt, and WinAPI (Windows Application Programming Interface).
Overall, C programming language provides developers with the ability to create powerful and high-performance GUI applications with precise control over hardware and memory usage.
Setting up the Environment
Required Tools for C Programming Language
To start programming in C, you will need a few essential tools:
-
Text editor or IDE: You will need a text editor or an integrated development environment (IDE) to write your C code. Examples of popular text editors for C programming include Visual Studio Code, Sublime Text, and Notepad++. Examples of popular IDEs include Eclipse, Code::Blocks, and NetBeans. -
Compiler: A compiler is a program that converts your C code into machine code that can be executed by the computer. Some popular compilers for C programming include GCC, Clang, and Microsoft Visual C++. -
Debugger: A debugger is a tool that helps you find and fix errors in your code. Most IDEs come with a built-in debugger, but you can also use standalone debuggers like GDB (GNU Debugger) or LLDB (LLVM Debugger). -
Documentation: It is always helpful to have documentation on hand to reference as you code. The C Standard Library is a collection of pre-written functions and macros that you can use in your programs. There are also many online resources and books available that can help you learn C programming. -
Version Control System: A version control system (VCS) is a tool that helps you manage changes to your code over time. Git is a popular VCS that many developers use for version control.
These tools are essential for C programming and will help you write, compile, debug, and manage your code.
Installation Process
The installation process for C programming tools can vary depending on your operating system and the specific tools you want to install. Here are some general steps you can follow to install C programming tools:
-
Choose your text editor or IDE and download the installation file from the vendor’s website. -
Install the text editor or IDE by double-clicking the installation file and following the on-screen instructions. -
Choose your compiler and download the installation file from the vendor’s website. -
Install the compiler by double-clicking the installation file and following the on-screen instructions. Some compilers may require additional configuration steps to integrate with your text editor or IDE. -
Choose your debugger and download the installation file from the vendor’s website. -
Install the debugger by double-clicking the installation file and following the on-screen instructions. Some debuggers may require additional configuration steps to integrate with your text editor or IDE. -
Install any additional tools or libraries that you may need for your specific project. For example, if you are using the GTK toolkit for GUI development, you will need to install the GTK library. -
Test your installation by writing a simple «Hello World» program and compiling it with your chosen compiler. If everything is installed correctly, you should be able to run the program and see the output in the console. -
Refer to the documentation and online resources to learn more about using the tools and developing C programs.
These steps are general guidelines, and the installation process may vary depending on your specific requirements and operating system. It’s always a good idea to refer to the vendor’s documentation and online resources for more detailed instructions.
Configuration and Setup
Configuration and setup for C programming tools typically involves setting up your text editor or IDE to work with your chosen compiler and debugger. Here are some general steps you can follow to configure your C programming environment:
-
Open your text editor or IDE and navigate to the preferences or settings menu. -
Look for an option to configure the compiler and debugger. In most cases, you will need to provide the path to the executable files for your chosen compiler and debugger. -
If you are using an IDE, you may also need to configure the project settings to specify the compiler and debugger to use for your project. -
Set any additional compiler or linker options that you may need for your specific project, such as include directories or linker flags. -
If you are using a graphical toolkit like GTK or Qt, you may also need to configure your environment to include the appropriate header files and libraries for the toolkit. -
Test your configuration by compiling and debugging a simple «Hello World» program. If everything is set up correctly, you should be able to compile and run the program without errors. -
Test your configuration by compiling and debugging a simple «Hello World» program. If everything is set up correctly, you should be able to compile and run the program without errors.
These steps are general guidelines, and the specific configuration steps may vary depending on your chosen tools and operating system. It’s always a good idea to refer to the documentation and online resources for your specific tools for more detailed instructions.
Basics of C Programming Language
Variables, Data Types, and Operators
Variables, data types, and operators are fundamental concepts in C programming. Here is an overview of each of these concepts:
- Variables: Variables are used to store values in a program. To declare a variable in C, you need to specify the variable’s data type and name. For example, the following code declares an integer variable called “num”:
You can then assign a value to the variable using the assignment operator “=”:
2. Data Types: C supports several data types, including integers, floating-point numbers, characters, and pointers. Here are some examples of data types and their corresponding keywords:
-
- Integer: int
- Floating-point: float, double
- Character: char
- Pointer: void *
3. Operators: Operators are symbols that are used to perform operations on variables and values. C supports many operators, including arithmetic, relational, logical, and bitwise operators. Here are some examples of operators:
- Arithmetic operators: + (addition), – (subtraction), * (multiplication), / (division), % (modulus)
- Relational operators: == (equal to), != (not equal to), > (greater than), < (less than), >= (greater than or equal to), <= (less than or equal to)
- Logical operators: && (logical and), || (logical or), ! (logical not)
- Bitwise operators: & (bitwise and), | (bitwise or), ^ (bitwise exclusive or), ~ (bitwise not), << (left shift), >> (right shift)
For example, the following code uses the arithmetic operators to add two integers and assign the result to a variable:
					int num1 = 5;
int num2 = 10;
int sum = num1 + num2;
These concepts are the building blocks of C programming and are used extensively in writing C programs. By understanding variables, data types, and operators, you can start writing simple C programs and gradually build your programming skills.
Control Statements
Control statements are used in C programming to control the flow of program execution based on certain conditions. There are several types of control statements in C, including:
-
Conditional statements: Conditional statements are used to execute certain code blocks based on a condition. The most common conditional statement in C is the “if” statement. Here is an example:
					int num = 10;
if (num > 5) {
    printf("The number is greater than 5");
}
2. In this example, the code block inside the “if” statement is executed only if the condition “num > 5” is true.
3. Loop statements: Loop statements are used to repeat a block of code multiple times. The most common loop statements in C are the “for” loop, “while” loop, and “do-while” loop. Here is an example of a “for” loop:
					for (int i = 0; i < 10; i++) {
    printf("%d\n", i);
}
This code will print the numbers 0 through 9 to the console.
3. Switch statements: Switch statements are used to execute different code blocks based on the value of a variable. Here is an example:
					int day = 2;
switch (day) {
    case 1:
        printf("Monday");
        break;
    case 2:
        printf("Tuesday");
        break;
    case 3:
        printf("Wednesday");
        break;
    default:
        printf("Invalid day");
}
In this example, the code block that matches the value of the “day” variable is executed.
These control statements are powerful tools that allow you to write complex programs that can make decisions and repeat actions based on certain conditions. By mastering these control statements, you can write more sophisticated C programs.
Functions and Pointers
Functions and pointers are important concepts in C programming. Here is an overview of each of these concepts:
-
Functions: A function is a block of code that performs a specific task. Functions are used to break down a large program into smaller, more manageable parts. In C, you can define your own functions using the following syntax:
					return_type function_name(parameter1, parameter2, ...) {
    // Function body
}
For example, here is a function that calculates the sum of two integers:
					int sum(int num1, int num2) {
    return num1 + num2;
}
You can call this function in your program by passing it two integer arguments, like this:
					int result = sum(5, 10);
printf("%d", result);
This code will print “15” to the console.
2. Pointers: A pointer is a variable that stores the memory address of another variable. Pointers are used to manipulate memory directly, which can be useful in certain situations. To declare a pointer variable in C, you use the asterisk (*) symbol. Here is an example:
					int num = 10;
int *ptr = #
In this example, “ptr” is a pointer variable that stores the memory address of “num”. You can access the value of “num” indirectly through “ptr” using the dereference operator (*):
This code will print “10” to the console.
Pointers can be used for many purposes, such as passing variables by reference, allocating memory dynamically, and creating complex data structures.
Functions and pointers are powerful tools that allow you to write efficient and flexible C programs. By understanding these concepts, you can write code that is both readable and maintainable.
GUI Application Development
Introduction to GUI Libraries
GUI libraries, also known as graphical user interface libraries, are software libraries that provide a set of tools and components for developing graphical user interfaces (GUIs) for applications. GUI libraries simplify the process of creating GUIs by providing pre-built components such as buttons, text fields, and menus, as well as layout managers that help position these components on the screen.
There are several popular GUI libraries available for C programming, including:
-
GTK+: GTK+ is a cross-platform GUI toolkit that provides a set of widgets for creating graphical user interfaces. GTK+ is widely used in open-source software and supports a wide range of programming languages, including C.
-
Qt: Qt is a popular GUI toolkit that provides a comprehensive set of tools for developing cross-platform GUI applications. Qt supports C++ programming and provides a wide range of features such as widget sets, multimedia tools, and networking capabilities.
-
FLTK: FLTK (Fast Light Toolkit) is a lightweight GUI toolkit that is designed to be fast and efficient. FLTK supports C programming and provides a small footprint, making it ideal for applications that require a simple and fast GUI.
GUI libraries provide a range of features that can help developers create applications with rich and interactive user interfaces. These features include support for graphics, multimedia, networking, and many others. By using a GUI library, developers can focus on the core logic of their application without having to worry about the low-level details of creating and managing a user interface.
Setting up the Library
To set up a GUI library in C programming, you will typically need to follow these steps:
-
Install the library: Download and install the GUI library on your system. The installation process will depend on the specific library you are using and your operating system.
-
Include the library header files: Once the library is installed, you will need to include the library’s header files in your C program. These header files contain the declarations for the library’s functions and data structures.
-
Link to the library: After including the library header files, you will need to link your program to the library. This tells the compiler to use the library’s code when building your program.
The exact steps for setting up a GUI library will depend on the specific library you are using and your development environment. Here is an example of how to set up the GTK+ library on a Linux system using the gcc compiler:
-
Install the GTK+ library:
sudo apt-get install libgtk-3-dev
2. Create a new C program and include the GTK+ header file:
					#include

int main(int argc, char *argv[]) {
    // Program code goes here
    return 0;
}
3. Compile the program and link to the GTK+ library:
gcc -o program program.c `pkg-config --cflags --libs gtk+-3.0`
This command tells the gcc compiler to compile the program.c file and link to the GTK+ library using the pkg-config tool.
By following these steps, you should be able to set up a GUI library in C programming and start building graphical user interfaces for your applications.
Creating a Basic GUI Application
To create a basic GUI application using a library like GTK+ in C programming, you will need to follow these general steps:
-
Include the necessary header files: In your C program, you will need to include the necessary header files for the GUI library you are using. For example, for GTK+, you would include <gtk/gtk.h>.
-
Initialize the library: Before using the GUI library, you will need to initialize it. For example, in GTK+, you can use the gtk_init() function to initialize the library.
-
Create the main window: Use the GUI library’s functions to create the main window of your application. This typically involves creating a GtkWidget object and setting its properties such as the title, size, and position.
-
Create other widgets: Use the GUI library’s functions to create other widgets such as buttons, text fields, and menus. These widgets can be added to the main window or to other containers such as boxes or grids.
-
Handle events: Use the GUI library’s event handling mechanisms to handle user events such as button clicks or menu selections. This typically involves defining callback functions that are triggered when an event occurs.
-
Run the main loop: Once your application is set up, you will need to run the main loop of the GUI library to handle events and keep the application running. In GTK+, you can use the gtk_main() function to run the main loop.
Here is an example of a basic GUI application using GTK+ in C programming:
					#include

// Callback function for the "Quit" button
void on_button_clicked(GtkWidget *button, gpointer data) {
    gtk_main_quit();
}

int main(int argc, char *argv[]) {
    // Initialize GTK+
    gtk_init(&argc, &argv);

    // Create the main window
    GtkWidget *window = gtk_window_new(GTK_WINDOW_TOPLEVEL);
    gtk_window_set_title(GTK_WINDOW(window), "My Application");
    gtk_window_set_default_size(GTK_WINDOW(window), 200, 200);

    // Create a button
    GtkWidget *button = gtk_button_new_with_label("Quit");

    // Add the button to the main window
    gtk_container_add(GTK_CONTAINER(window), button);

    // Connect the "clicked" signal of the button to the callback function
    g_signal_connect(button, "clicked", G_CALLBACK(on_button_clicked), NULL);

    // Show the window and all its contents
    gtk_widget_show_all(window);

    // Run the main loop
    gtk_main();

    // Exit the program
    return 0;
}
This program creates a simple window with a single button labeled “Quit”. When the button is clicked, the program exits. This is accomplished by defining a callback function called on_button_clicked() and connecting it to the “clicked” signal of the button using the g_signal_connect() function.
Advanced GUI Application Development
GUI Application Layout
In a GUI application, the layout refers to the arrangement of the graphical user interface elements such as buttons, menus, text fields, and other widgets on the application window. The layout is an important aspect of a GUI application as it affects the user experience and can affect the usability and functionality of the application.
There are several approaches to laying out GUI elements in a GUI application:
-
Absolute positioning: This involves specifying the exact coordinates and sizes of each widget on the window. This approach gives complete control over the layout but can be difficult to maintain and adjust as the application evolves.
-
Grid layout: This involves arranging widgets in a grid-like structure, with each widget occupying a cell in the grid. This approach can be flexible and easy to maintain, but may not always provide precise control over widget placement.
-
Box layout: This involves arranging widgets in a horizontal or vertical box, with each widget being added to the end of the box. This approach can be flexible and easy to maintain, but may not always provide precise control over widget placement.
-
Tabbed layout: This involves organizing widgets into separate tabs, with each tab representing a different area or functionality of the application. This approach can be useful for applications with a lot of functionality and can help to reduce clutter on the application window.
-
Custom layouts: Some GUI libraries provide the ability to create custom layouts that can be tailored to specific requirements of the application.
When designing a GUI application layout, it’s important to consider factors such as usability, user experience, and accessibility. The layout should be organized and easy to navigate, with important elements being placed in prominent positions. It’s also important to consider the target audience of the application and design the layout to meet their needs and expectations.
Creating Multiple Windows
In a GUI application, it’s often necessary to create multiple windows to handle different tasks or display different information. Here are the basic steps to create multiple windows in a GUI application:
-
Import the necessary libraries: Depending on the GUI library you’re using, you may need to import specific libraries to create multiple windows.
-
Create a function to handle the new window: This function should create a new window object and define its properties, such as size and position.
-
Create a button or menu item to open the new window: This button or menu item should call the function created in step 2 when clicked.
-
Implement any necessary functionality in the new window: Depending on the purpose of the new window, you may need to add additional widgets or functionality.
-
Update the main loop to handle the new window: Depending on the GUI library you’re using, you may need to update the main loop to handle events and interactions with the new window.
It’s important to keep the user experience in mind when creating multiple windows. Consider using consistent design elements across all windows to create a cohesive user interface. Also, be mindful of how the user will navigate between the different windows and ensure that it’s intuitive and easy to use.
Integrating User Inputs
Integrating user inputs is a crucial aspect of GUI application development. User inputs can come in various forms such as mouse clicks, keyboard inputs, button presses, and more. Here are some steps to integrate user inputs into your GUI application:
-
Determine the type of input: Before you can integrate user inputs, you need to determine the type of input you want to capture. This will depend on the specific functionality of your application.
-
Create the widget to capture the input: Depending on the type of input you want to capture, you may need to create a widget such as a text field, button, or checkbox.
-
Attach an event handler to the widget: An event handler is a function that’s called when the user interacts with the widget. Depending on the GUI library you’re using, you may need to specify the event you want to capture and the function to call.
-
Implement the functionality: Once the input has been captured, you can use it to implement the desired functionality in your application. This could involve updating the display, performing calculations, or triggering other events.
-
Validate the input: Depending on the type of input, you may need to validate it to ensure that it meets certain criteria. For example, if you’re capturing text input, you may need to check that it’s in the correct format or length.
When integrating user inputs, it’s important to consider user experience and ensure that the input capturing process is intuitive and easy to use. You should also consider potential errors or edge cases that could occur and handle them appropriately.
Best Practices for GUI Application Development
Common Mistakes to Avoid
Here are some common mistakes to avoid when developing GUI applications using C programming:
-
Failing to properly allocate and deallocate memory: Memory management is crucial in C programming, and failing to properly allocate and deallocate memory can lead to memory leaks or program crashes. Always use functions such as malloc and free to allocate and deallocate memory appropriately.
-
Overcomplicating the user interface: A cluttered or confusing user interface can make it difficult for users to interact with your application. Keep your user interface simple and intuitive to ensure a positive user experience.
-
Ignoring cross-platform compatibility: If you plan to distribute your application across multiple platforms, it’s important to consider cross-platform compatibility. Make sure to test your application on different operating systems and ensure that it functions correctly on each one.
-
Failing to validate user input: User input should always be validated to ensure that it’s in the correct format and meets any necessary requirements. Failing to validate user input can lead to errors or unexpected behavior.
-
Not considering performance: GUI applications can be resource-intensive, and failing to consider performance can lead to slow or unresponsive applications. Optimize your code and use efficient algorithms to ensure that your application runs smoothly.
-
Not following coding standards: Consistency is important when writing code, and failing to follow coding standards can make your code difficult to read and maintain. Always follow established coding standards and guidelines to ensure that your code is easy to understand and work with.
By avoiding these common mistakes, you can create robust and effective GUI applications using C programming.
Debugging Techniques
Debugging is a critical part of the software development process, and it’s important to have effective techniques to identify and fix bugs in your code. Here are some debugging techniques that can be used when developing GUI applications using C programming:
-
Print statements: One of the simplest debugging techniques is to use print statements to output the values of variables or other important information at key points in your code. This can help you identify where a bug is occurring and what values are causing the issue.
-
Debugging tools: Many Integrated Development Environments (IDEs) and GUI libraries come with built-in debugging tools that can help you identify and fix bugs. These tools allow you to step through your code, set breakpoints, and inspect variables to identify issues.
-
Code reviews: Having a colleague or peer review your code can help you identify issues or bugs that you may have missed. A fresh set of eyes can often spot issues that you may have overlooked.
-
Divide and conquer: If you’re dealing with a complex bug, try breaking down the problem into smaller pieces and testing each piece individually. This can help you identify where the issue is occurring and narrow down the root cause.
-
Error handling: Proper error handling can help you identify and fix issues in your code. Make sure to include error handling code that will catch and handle any errors that occur, and provide useful error messages to help identify the issue.
By using these debugging techniques, you can identify and fix bugs in your GUI applications and ensure that they function correctly.
Code Optimization
Code optimization is the process of improving the performance and efficiency of your code. In GUI application development using C programming, code optimization can help to reduce the application’s memory usage, decrease its startup time, and improve its responsiveness. Here are some tips for optimizing your code:
-
Use efficient data structures: Choosing the right data structure for your application can make a big difference in its performance. For example, using a hash table or binary search tree can provide faster access to data than using a simple array.
-
Minimize memory usage: GUI applications can be memory-intensive, so it’s important to minimize memory usage wherever possible. This can be done by using dynamic memory allocation, freeing memory when it’s no longer needed, and minimizing the use of global variables.
-
Optimize loops: Loops are a common performance bottleneck in C programming. To optimize loops, try to minimize the number of iterations and use more efficient loop constructs like “for” loops instead of “while” loops.
-
Avoid unnecessary function calls: Function calls can be expensive in terms of performance, so try to avoid unnecessary function calls. This can be done by inlining small functions or combining multiple functions into a single function.
-
Use compiler optimizations: C compilers often include optimization options that can help to improve your code’s performance. Enabling these options can result in faster code and reduced memory usage.
-
Profile your code: Profiling your code can help you identify performance bottlenecks and areas where optimization is needed. Use profiling tools to identify which parts of your code are taking the most time and focus your optimization efforts on those areas.
By following these tips, you can optimize your GUI application code and improve its performance and efficiency.
Conclusion
Summary of Key Points
Here are the key points to keep in mind when developing GUI applications using C programming:
-
GUI applications provide a visual interface for users to interact with your software.
-
C programming language can be used to develop GUI applications using various libraries like GTK+, Qt, and WinAPI.
-
To develop GUI applications using C, you will need to set up the necessary tools and libraries, such as an IDE and the appropriate GUI library.
-
Basic programming concepts like variables, data types, operators, control statements, functions, and pointers are essential to GUI application development using C.
-
GUI libraries provide pre-built user interface elements like buttons, text fields, and windows that can be used to create GUI applications.
-
To create a GUI application, you will need to define the layout, create multiple windows, and integrate user inputs.
-
Common mistakes to avoid in GUI application development include improper memory management, failing to handle errors, and neglecting to properly test your code.
-
Debugging techniques like print statements, using debugging tools, code reviews, dividing and conquering, and error handling can help you identify and fix bugs in your code.
-
Code optimization techniques like using efficient data structures, minimizing memory usage, optimizing loops, avoiding unnecessary function calls, and profiling your code can help improve your GUI application’s performance and efficiency.
-
GUI applications can be resource-intensive, so it’s important to optimize your code to minimize resource usage and improve performance.
-
To optimize your code, you can use techniques like minimizing the number of function calls, inlining small functions, and using more efficient loop constructs like “for” loops.
-
Using a C compiler with optimization options enabled can also help improve performance.
-
It’s important to test your GUI application thoroughly to ensure that it works correctly and is free of bugs.
-
You can use testing techniques like unit testing, integration testing, and regression testing to ensure that your GUI application is functioning as expected.
-
Finally, it’s important to keep your GUI application’s user experience (UX) in mind throughout the development process. This includes making sure that the application is intuitive and easy to use, and that it provides helpful error messages when something goes wrong.
By keeping these key points in mind, you can develop high-quality GUI applications using C programming that are efficient, performant, and user-friendly.
Future Directions
In the future, we can expect continued development and improvement of GUI libraries for C programming, with a focus on making it easier and more efficient to develop GUI applications.
One potential direction for development is the incorporation of more advanced GUI features, such as touch screen support, 3D graphics, and virtual and augmented reality. This would enable developers to create more immersive and interactive GUI applications that can take advantage of modern hardware.
Another area of potential development is the integration of artificial intelligence and machine learning into GUI development. This could enable applications to provide more personalized and intelligent interactions with users, such as predicting user preferences and behavior.
Additionally, there may be a trend towards more cross-platform and web-based GUI development tools, allowing developers to create applications that can be run on a variety of platforms and devices.
Overall, the future of GUI application development using C programming is likely to involve ongoing innovation and improvement, with a focus on providing developers with more powerful and flexible tools for creating high-quality and engaging user interfaces.