
How to Install Guacamole on Windows 10
Guacamole is a clientless remote desktop gateway that supports standard protocols such as VNC, RDP, and SSH. It allows users to access remote desktop applications through a web browser without needing to install any plugins or software. In this tutorial, we will guide you on how to install Guacamole on Windows 10.
Prerequisites
Before you proceed with the installation, ensure that the following prerequisites are met:
- Windows 10 Operating System
- Java 8 or later installed on your machine
- MySQL or MariaDB server installed and running
Steps to Install Guacamole
-
Download the latest version of Guacamole from the official website — https://guacamole.apache.org/releases.
-
Extract the downloaded ZIP file to any directory of your choice.
-
Open the terminal/command prompt and navigate to the Guacamole directory where you extracted the files using the
cdcommand. -
Run the following command to build the Guacamole client:
mvn package -DskipTests -
Once the build is complete, navigate to the
guacamole-serversubdirectory and run the following command to install the server:msiexec /i guacd-*.msi -
After installing the server, navigate to the
guacamole-clientsubdirectory and install the client:msiexec /i guacamole-*.msi -
During the client installation, you will be prompted to enter the MySQL/MariaDB database credentials. Enter the correct details, and the installation will complete.
-
Once the installation is complete, start the Guacamole service by running the following commands from the command prompt:
net start guacd net start guacamole -
Finally, open your web browser and navigate to
http://localhost:8080/guacamole/to access the Guacamole web interface.
Congratulations! You have successfully installed Guacamole on your Windows 10 machine.
Conclusion
In this tutorial, we have guided you on how to install Guacamole on Windows 10. With Guacamole, you can now access remote desktop applications on your machine through a web browser without needing to install any software or plugins.
If you want to self-host in an easy, hands free way, need an external IP address, or simply want your data in your own hands, give IPv6.rs a try!
Alternatively, for the best virtual desktop, try Shells!
Currently Guacamole 1.1.0 is not compatible with the default encryption of Windows. If you disable NLA it should work.
Open Registry editor ‚regedit‘ and make the following settings:
[HKEY_LOCAL_MACHINE\SYSTEM\CurrentControlSet\Control\Terminal Server\WinStations\RDP-Tcp]
Change “SecurityLayer” value to dword:00000001
Verify “UserAuthentication” value is dword:0x00000000
This should work without reboot.
Or use NLA
If you want to use NLA you have to set SecurityMode to NLA of the connection. And you have to set username and password!
If your username and password in guacamole are the same on windows machine (if you have active directory and ldap auth in guacamole) you can use:
Username: ${GUAC_USERNAME}
Password: ${GUAC_PASSWORD}
Now guacamole uses the guacamole user credentials for the connection.
As a system administrator, you may find yourself (today or in the future) working in an environment where Windows and Linux coexist.
It is no secret that some big companies prefer (or have to) run some of their production services in Windows boxes and others in Linux servers.
[ You might also like: 11 Best Tools to Access Remote Linux Desktop ]
If that is your case, you will welcome this guide with open arms (otherwise go ahead and at least make sure to add it to your bookmarks).
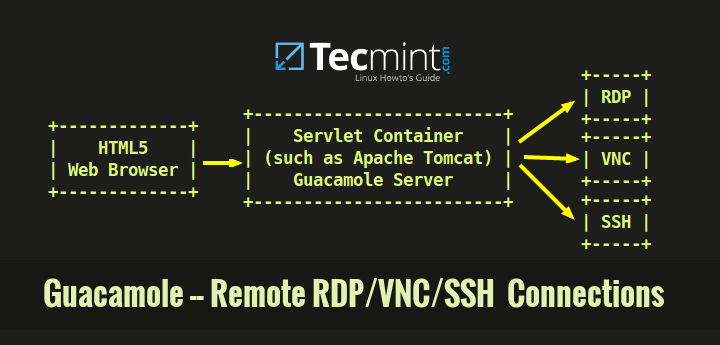
In this article, we will introduce you to guacamole, a remote desktop gateway powered by Tomcat that only needs to be installed on a central server.
[ You might also like: How to Access Remote Linux Desktop Using TightVNC ]
Guacamole will provide a web-based control panel that will allow you to switch quickly from one machine to another – all within the same web browser window.
Testing Environment
In this article, we have used the following machines. We will install Guacamole in an Ubuntu box and use it to access a Windows 10 box over Remote Desktop Protocol (RDP) and an RHEL box using SSH network protocol:
Guacamole server: Ubuntu 20.04 - IP 192.168.0.100
Remote SSH box: RHEL 8 – IP 192.168.0.18
Remote desktop box: Windows 10 – IP 192.168.0.19
That said, let’s get started.
Installing Guacamole Server in Ubuntu
1. Before installing guacamole, you will need to take care of its dependencies first.
$ sudo apt update
$ sudo apt install -y gcc vim curl wget g++ libcairo2-dev libjpeg-turbo8-dev libpng-dev \
libtool-bin libossp-uuid-dev libavcodec-dev libavutil-dev libswscale-dev build-essential \
libpango1.0-dev libssh2-1-dev libvncserver-dev libtelnet-dev freerdp2-dev libwebsockets-dev \
libssl-dev libvorbis-dev libwebp-dev tomcat9 tomcat9-admin tomcat9-user
2. Download and extract the tarball. As of early February 2021, the latest version of Guacamole is 1.3.0. You can refer to the Guacamole Downloads page to find out the latest version at a given time.
$ wget https://dlcdn.apache.org/guacamole/1.3.0/source/guacamole-server-1.3.0.tar.gz
$ tar zxf guacamole-server-1.3.0.tar.gz
3. Compile the software.
$ cd guacamole-server-1.3.0/
$ ./configure
As it is to be expected, configure will check your system for the presence of the required dependencies and for supported communication protocols (as can be seen in the highlighted square, Remote Desktop Protocol (RDP) and SSH are supported by the dependencies installed earlier).
If everything goes as expected you should see this when it completes (otherwise, make sure you installed all the necessary dependencies):
As the last line in the above image suggests, run make and make install to compile the program:
$ make
$ sudo make install
4. Update the cache of installed libraries.
$ sudo ldconfig
and hit Enter.
Installing Guacamole Client in Ubuntu
After completing the above steps, the guacamole server will have been installed. The following instructions will now help you to set up guacd (the proxy daemon that integrates Javascript with communication protocols such as RDP or SSH) and guacamole.war (the client), the component that makes up the final HTML5 application that will be presented to you.
Note that both components (guacamole server and client) need to be installed on the same machine – there is no need to install a so-called client on the machines you want to connect to).
To download the client, follow these steps:
5. Download the web application archive and change its name to guacamole.war.
Note: Depending on your distribution, the Tomcat libraries directory may be located at /var/lib/tomcat.
$ cd /var/lib/tomcat9/
$ sudo wget https://dlcdn.apache.org/guacamole/1.3.0/binary/guacamole-1.3.0.war
$ sudo mv guacamole-1.3.0.war webapps/guacamole.war
6. Create the configuration file (/etc/guacamole/guacamole.properties). This file contains the instructions for Guacamole to connect to guacd:
$ sudo mkdir /etc/guacamole
$ sudo mkdir /usr/share/tomcat9/.guacamole
$ sudo nano /etc/guacamole/guacamole.properties
Insert the following contents to /etc/guacamole/guacamole.properties. Note that we are referencing a file we will create in the next step (/etc/guacamole/user-mapping.xml):
guacd-hostname: localhost
guacd-port:    4822
user-mapping:    /etc/guacamole/user-mapping.xml
auth-provider:    net.sourceforge.guacamole.net.basic.BasicFileAuthenticationProvider
basic-user-mapping:    /etc/guacamole/user-mapping.xml
And create a symbolic link for Tomcat to be able to read the file:
$ sudo ln -s /etc/guacamole/guacamole.properties /usr/share/tomcat9/.guacamole/
7. Guacamole uses the user-mapping.xml, create this file to define which users are allowed to authenticate to the Guacamole web interface (between <authorize> tags) and which connections they can use (between <connection> tags):
$ sudo nano /etc/guacamole/user-mapping.xml
The following user mapping grants access to the Guacamole web interface to a user tecmint with password tecmint01. Then, inside the SSH connection, we need to place a valid username to log in to the RHEL box (you will be prompted to enter the corresponding password when Guacamole initiates the connection).
In the case of the Windows 10 box, there is no need to do that as we will be presented with the login screen over RDP.
To obtain the md5 hash of the password tecmint01, type the following command:
# printf '%s' "tecmint01" | md5sum
Then insert the output of the command in the password field inside the <authorize> tags:
<user-mapping>
        <authorize
                username="tecmint"
                password="8383339b9c90775ac14693d8e620981f"
                encoding="md5">
                <connection name="RHEL 8">
                        <protocol>ssh</protocol>
                        <param name="hostname">192.168.0.18</param>
                        <param name="port">22</param>
                        <param name="username">gacanepa</param>
                </connection>
                <connection name="Windows 10">
                        <protocol>rdp</protocol>
                        <param name="hostname">192.168.0.19</param>
                        <param name="port">3389</param>
                </connection>
        </authorize>
</user-mapping>
As it is the case with all files that contain sensitive information, it is important to restrict the permissions and change the ownership of the user-mapping.xml file:
$ sudo chmod 600 /etc/guacamole/user-mapping.xml
$ sudo chown tomcat:tomcat /etc/guacamole/user-mapping.xml
Start Tomcat and guacd.
$ sudo service tomcat9 start
$ sudo /usr/local/sbin/guacd &
Launching the Guacamole Web Interface
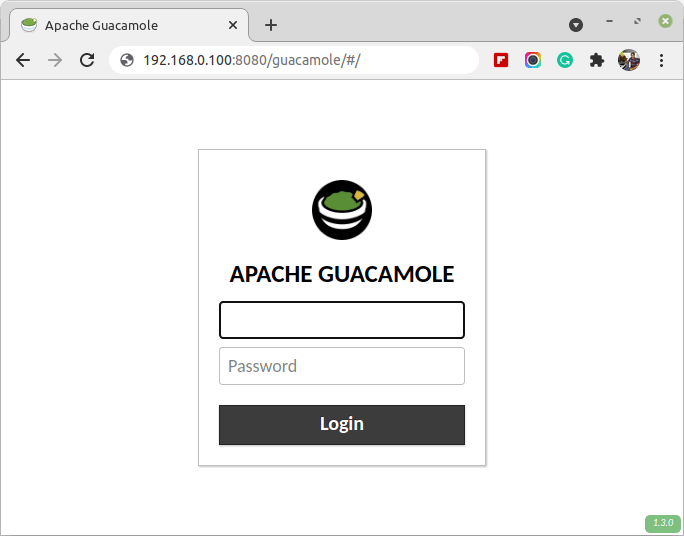
8. To access the Guacamole web interface, launch a browser and point it to http://server:8080/guacamole where the server is the hostname or IP address of your server (in our case it is http://192.168.0.100:8080/guacamole) and log in with the credentials given earlier (username: tecmint, password: tecmint01):
9. After clicking on Login, you will be taken to the administrative interface where you will see the list of connections user tecmint has access to, as per user-mapping.xml:
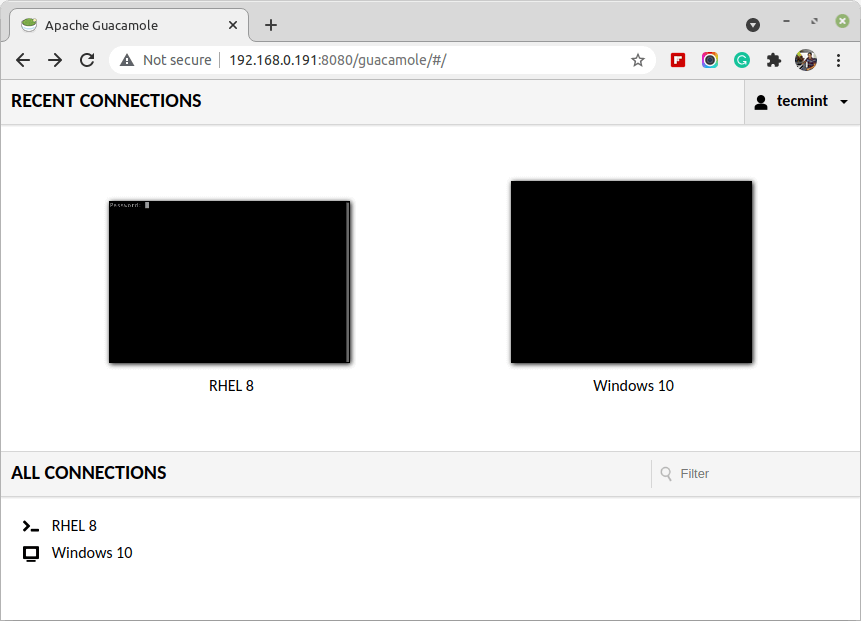
10. Go ahead and click on the RHEL 8 box to log in as gacanepa (the username specified in the connection definition).
Note how the connection source is set to 192.168.0.100 (the IP of the Guacamole server), regardless of the IP address of the machine that you use to open the web interface:
11. If you want to close the connection, type exit and hit Enter. You will be prompted to return to the main interface (Home), reconnect, or log out from Guacamole:
12. Now it’s time to try the remote desktop connection to Windows 10:
Congratulations! Now you can access a Windows 10 machine and an RHEL 8 server from within a web browser.
Summary
In this article, we have explained how to install and configure Guacamole to allow access to remote machines over RDP and SSH. The official website provides extensive documentation to help you set up access using other protocols, such as VNC and other authentication mechanisms, such as DB-based…
As always, don’t hesitate to drop us a note if you have any questions or suggestions about this article. We also look forward to hearing your success stories.
As a system administrator, you may find yourself (today or in the future) working in an environment where Windows and Linux coexist. It is no secret that some big companies prefer (or have to) run some of their production services in Windows boxes and others in Linux servers. If that is your case, you will welcome this guide with open arms (otherwise go ahead and at least make sure to add it to your bookmarks).

Install Guacamole for Remote Desktop and SSH Access
In this article we will introduce you to guacamole, a remote desktop gateway powered by Tomcat that only needs to be installed on a central server.
Read Also: How to Access Remote Linux Desktop Using TightVNC
Guacamole will provide a web-based control panel that will allow you to switch quickly from one machine to another – all within the same web browser window.
Testing Environment
In this article we have used the following machines. We will install Guacamole in an Ubuntu box and use it to access a Windows 10 box over Remote Desktop Protocol (RDP) and a RHEL 7 box using SSH:
Guacamole server: Ubuntu 14.04 - IP 192.168.0.100
SSH box: RHEL 7 – IP 192.168.0.18
Remote desktop box: Windows 10 – IP 192.168.0.19
That said, let’s get started.
Installing Guacamole Server
1. Before installing guacamole, you will need to take care of its dependencies first.
In Debian and Ubuntu (use sudo):
$ sudo apt-get install libcairo2-dev libjpeg62-dev libpng12-dev libossp-uuid-dev libfreerdp-dev libpango1.0-dev libssh2-1-dev libssh-dev tomcat7 tomcat7-admin tomcat7-user
In RHEL / CentOS / Fedora 18-21:
# yum install cairo-devel libjpeg-devel libpng-devel uuid-devel freerdp-devel pango-devel libssh2-devel libssh-dev tomcat tomcat-admin-webapps tomcat-webapps
In Fedora 22-23:
# dnf install cairo-devel libjpeg-devel libpng-devel uuid-devel freerdp-devel pango-devel libssh2-devel libssh-devel tomcat tomcat-admin-webapps tomcat-webapps
2. Download and extract the tarball.
As of early February, 2016, the latest version of Guacamole is 0.9.9. You can refer to the Downloads page to find out the latest version at a given time.
# wget http://sourceforge.net/projects/guacamole/files/current/source/guacamole-server-0.9.9.tar.gz
# tar zxf guacamole-server-0.9.9.tar.gz
3. Compile the software.
# cd guacamole-server-0.9.9
# ./configure
As it is to be expected, configure will check your system for the presence of the required dependencies and for supported communication protocols (as can be seen in the highlighted square, Remote Desktop Protocol (RDP) and SSH are supported by the dependencies installed earlier).
If everything goes as expected you should see this when it completes (otherwise, make sure you installed all the necessary dependencies):
Guacamole Server Installation
As the last line in the above image suggests, run make and make install to compile the program:
# make
# make install
4. Update the cache of installed libraries.
# ldconfig
and hit Enter.
Installing Guacamole Client
After completing the above steps, the guacamole server will have been installed. The following instructions will now help you to set up guacd (the proxy daemon that integrates Javascript with communication protocols such as RDP or SSH) and guacamole.war (the client), the component that makes up the final HTML5 application that will be presented to you.
Note that both components (guacamole server and client) need to be installed on the same machine – there is no need to install a so-called client on the machines you want to connect to).
To download the client, follow these steps:
5. Download the web application archive and change its name to guacamole.war.
Note: Depending on your distribution, the Tomcat libraries directory may be located at /var/lib/tomcat.
# cd /var/lib/tomcat7
# wget http://sourceforge.net/projects/guacamole/files/current/binary/guacamole-0.9.9.war
# mv guacamole-0.9.9.war guacamole.war
6. Create the configuration file (/etc/guacamole/guacamole.properties). This file contains the instructions for Guacamole to connect to guacd:
# mkdir /etc/guacamole
# mkdir /usr/share/tomcat7/.guacamole
Insert the following contents to /etc/guacamole/guacamole.properties. Note that we are referencing a file we will create in the next step (/etc/guacamole/user-mapping.xml):
guacd-hostname: localhost
guacd-port:    4822
user-mapping:    /etc/guacamole/user-mapping.xml
auth-provider:    net.sourceforge.guacamole.net.basic.BasicFileAuthenticationProvider
basic-user-mapping:    /etc/guacamole/user-mapping.xml
And create a symbolic link for Tomcat to be able to read the file:
# ln -s /etc/guacamole/guacamole.properties /usr/share/tomcat7/.guacamole/
7. Guacamole uses the user-mapping.xml, create this file to define which users are allowed to authenticate to the Guacamole web interface (between <authorize> tags) and which connections they can use (between <connection> tags):
The following user mapping grants access to the Guacamole web interface to user tecmint with password tecmint01. Then, inside the SSH connection we need to place a valid username to log in to the RHEL box (you will be prompted to enter the corresponding password when Guacamole initiates the connection).
In the case of the Windows 10 box, there is no need to do that as we will be presented with the login screen over RDP.
To obtain the md5 hash of the password tecmint01, type the following command:
# printf '%s' "tecmint01" | md5sum
Then insert the output of the command in the password field inside the <authorize> tags:
<user-mapping>
<authorize
username="tecmint"
password="8383339b9c90775ac14693d8e620981f"
encoding="md5">
<connection name="RHEL 7">
<protocol>ssh</protocol>
<param name="hostname">192.168.0.18</param>
<param name="port">22</param>
<param name="username">gacanepa</param>
</connection>
<connection name="Windows 10">
<protocol>rdp</protocol>
<param name="hostname">192.168.0.19</param>
<param name="port">3389</param>
</connection>
</authorize>
</user-mapping>
As it is the case with all files that contain sensitive information, it is important to restrict the permissions and change the ownership of the user-mapping.xml file:
# chmod 600 /etc/guacamole/user-mapping.xml
# chown tomcat7:tomcat7 /etc/guacamole/user-mapping.xml
Start Tomcat and guacd.
# service tomcat7 start
# /usr/local/sbin/guacd &
Launching the Guacamole Web Interface
8. To access the Guacamole web interface, launch a browser and point it to http://server:8080/guacamole where server is the hostname or IP address of your server (in our case it is http://192.168.0.100:8080/guacamole) and login with the credentials given earlier (username: tecmint, password: tecmint01):

Guacamole Login Interface
9. After clicking on Login, you will be taken to the administrative interface where you will see the list of connections user tecmint has access to, as per user-mapping.xml:

Guacamole User Connections
10. Go ahead and click on the RHEL 7 box to login as gacanepa (the username specified in the connection definition).
Note how the connection source is set to 192.168.0.100 (the IP of the Guacamole server), regardless of the IP address of the machine that you use to open the web interface:

Guacamole: Access Remote Linux
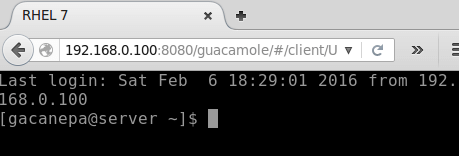
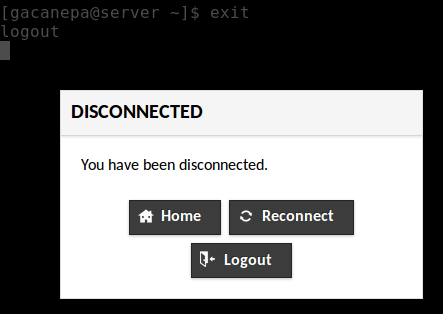
11. If you want to close the connection, type exit and hit Enter. You will prompted to return to the main interface (Home), reconnect, or logout from Guacamole:

Guacamole Session Disconnection
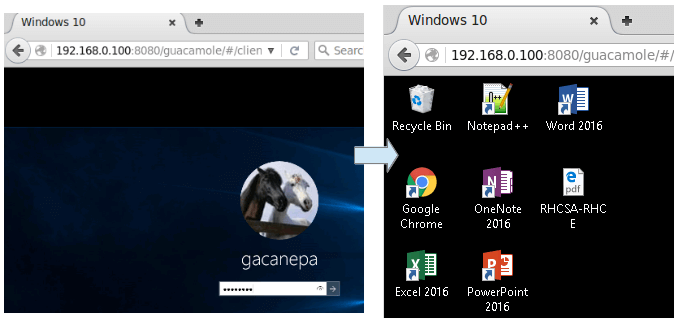
12. Now it’s time to try the remote desktop connection to Windows 10:

Connect Windows Machine from Linux
Congratulations! Now you can access a Windows 10 machine and a RHEL 7 server from within a web browser.
Summary
In this article we have explained how to install and configure Guacamole to allow access to remote machines over RDP and SSH. The official website provides an extensive documentation to help you set up access using other protocols, such as VNC and other authentication mechanism, such as DB-based..
As always, don’t hesitate to drop us a note if you have any questions or suggestions about this article. We also look forward to hearing your success stories.
Reference Links: http://guac-dev.org/
Source:http://www.tecmint.com/guacamole-access-remote-linux-windows-machines-via-web-browser/
Время на прочтение5 мин
Количество просмотров241K

Remote Desktop Protocol — один из самых распространенных протоколов для удаленного управления, потому что он используется для работы с операционными системами Windows, которые часто незаменимы в корпоративной среде. Естественно, самый распространенный способ подключения к удаленной системе — использование средств встроенных в саму систему, но он не единственный и, более того, совершенно неприменимый, если используется другая ОС или сильно устаревшая Windows.
В этой статье я расскажу о нескольких альтернативных решениях, отличных от встроенных в дистрибутивы операционных систем: программу MobaXterm и два сервиса не требующих от пользователя установки приложений и работающих в обычном браузере.
MobaXterm
Эта программа для Windows. Немного неправильно называть MobaXterm RDP-клиентом, потому что это целый комбайн. Список поддерживаемых протоколов впечатляет: SSH, Telnet, Rlogin, RDP, VNC, XDMCP, FTP, SFTP и Serial.
Почему я рекомендую этот клиент? Меня уже давно не радует Putty. Громоздкий и запутанный интерфейс из времен W95, не вызывающий ностальгию, если приходится часто с ним работать, плохая поддержка экранов высокого разрешения, собственный формат ключей, отсутствие поддержки вкладок и прочее. MobaXterm лишен всех этих недостатков, это удобная и современная программа. Портативная версия состоит из одного единственного exe’шника и файла настроек, интерфейс интуитивный, а если нужна помощь, то, в отличии от Putty, в самой программе есть исчерпывающая документация.
Кроме соединения через перечисленные протоколы можно локально поднимать некоторые сервисы для удаленного доступа, такие как: FTP, SSH/SFTP, HTTP и другие. Если вы не любите консольные nano и vi, то в программе есть текстовый редактор с удобным графическим интерфейсом. В терминале есть настраиваемая подсветка синтаксиса и автодополнение.
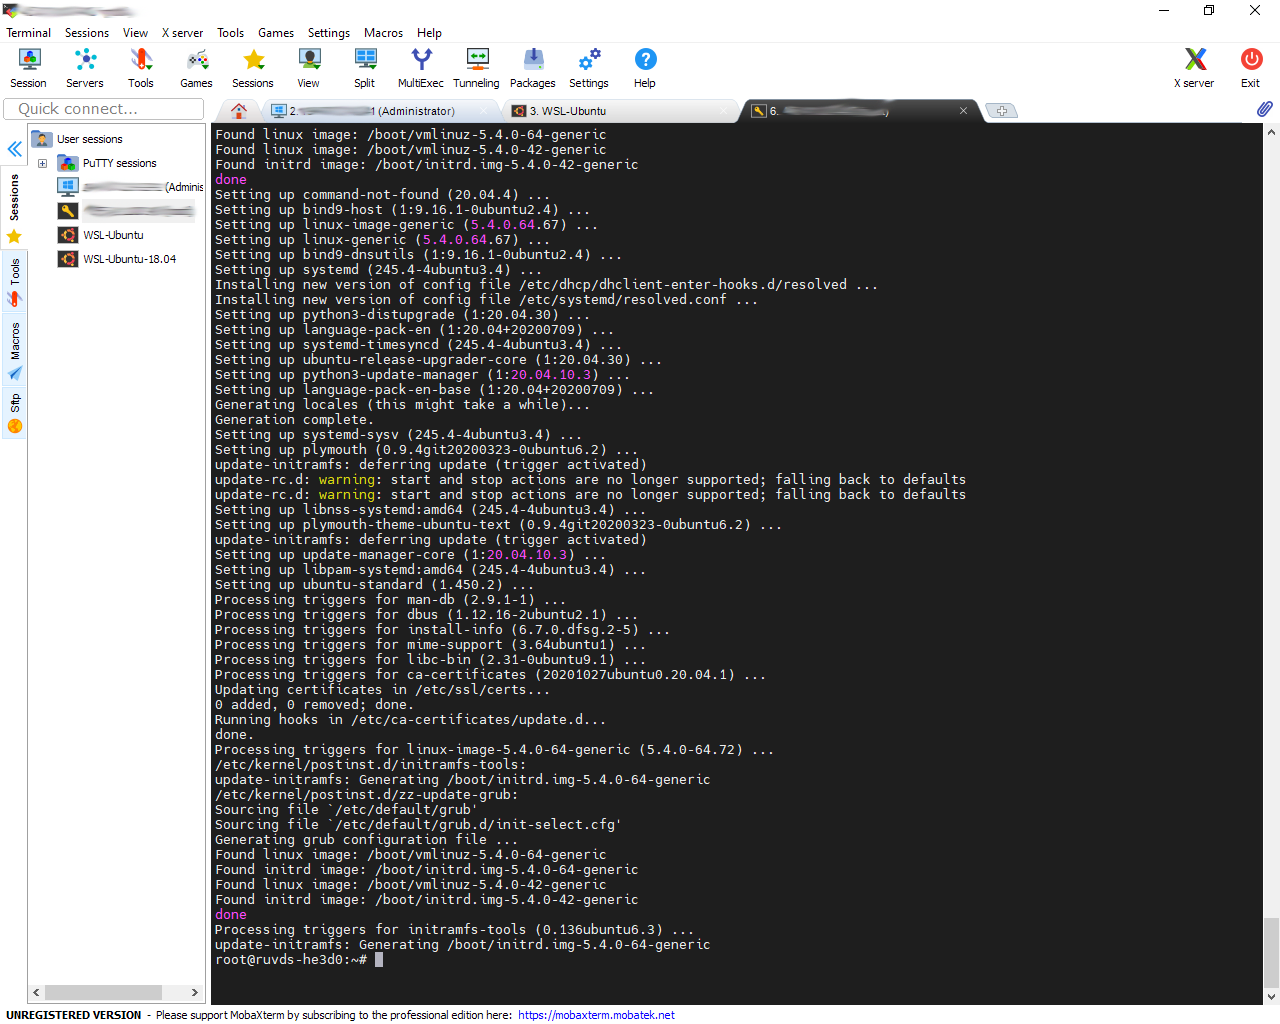
Сразу после запуска программа нашла ранее используемые мной подключения, импортировала настройки из Putty и обнаружила установленную в системе WSL-Ubuntu:
Нет смысла перечислять все возможности приложения, они очень многочисленны, есть даже инструменты для тестирования сетей. Приложение платное, но портативной бесплатной версии хватит за глаза для подавляющего количества задач системного администратора.
Apache Guacamole
Современные тенденции DevOps предполагают перенос окружения для разработки с локальной машины на сервер компании или к облачному провайдеру. Один из простых примеров ранее описывался в статье: Установка Visual Studio Code в облаке, приложения для удаленного подключения этого тоже не избежали.
Apache Guacamole, это клиентский шлюз для удаленного подключения, работающий на HTML5, позволяет пользоваться протоколами: VNC, Telnet, RDP, Kubernetes и SSH / SFTP — через web-интерфейс. Не требуется установки никаких программ, подписок на сторонние сервисы, все работает прямо в браузере, независимо от того, какой операционной системой пользуется разработчик. Все что требуется: установить и настроить службы на сервере. По сути, это web-интерфейс для FreeRDP — бесплатной реализации протокола RDP, с открытым исходным кодом.
Сценарий работы с этим сервисом типичен для последних тенденций удаленной работы и оптимизации рабочего места. Разработчики подключаются к своему окружению из любой точки земного шара. Им не требуется держать дома мощный десктоп или носить с собой высокопроизводительный ноутбук, забота об этом перекладывается на серверы компании, а работнику достаточно подключения к интернету и любого ноутбука, на котором не будет лагать браузер.
Настройка сервиса подробнейшим образом документирована, мануал впечатляет своими размерами. Установка возможна несколькими способами: из репозиториев, компиляция исходников и разворачивание образа Docker. К счастью, как это часто бывает, один прошаренный DevOps-инженер решил автоматизировать процесс установки с наиболее типичными настройками и выложил готовый скрипт на github: guac-install. Из его кода легко понять, что он пошел по пути установки образа Docker, и все действия сводятся к вводу всего нескольких команд.
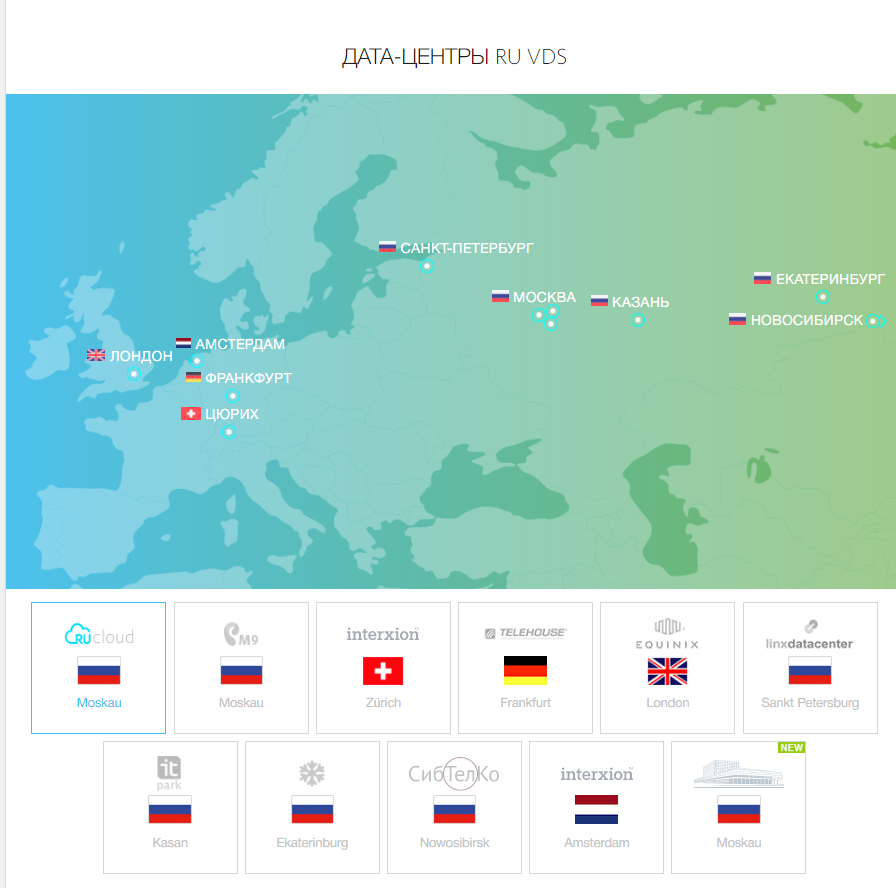
Начнем с того, что настроим виртуальный сервер для установки AG. Его характеристики будут зависеть от количества пользователей, но разработчики рекомендуют не меньше 2 гигабайт оперативной памяти. Размещение сервера выберем в Москве, для минимального пинга, что критично для работы с удаленными компьютерами.
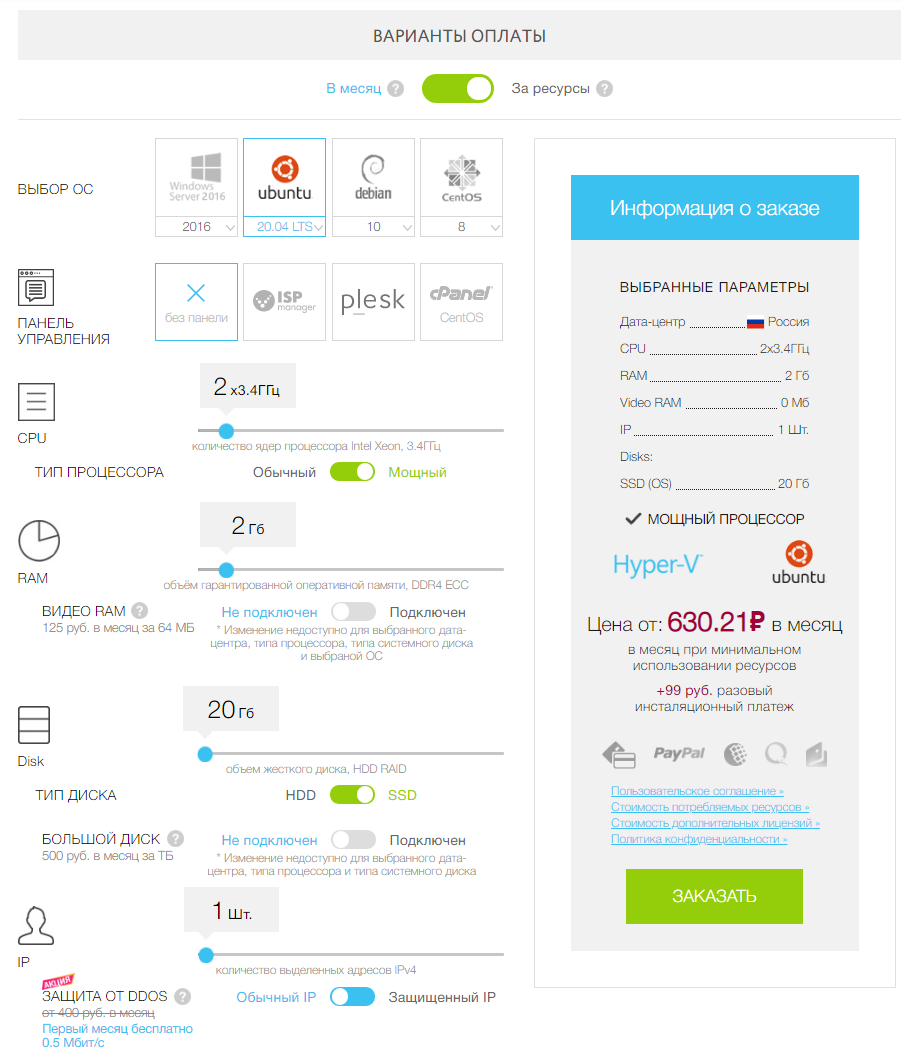
В качестве тестовой машины я выбрал такие параметры VPS:
После того, как будет создана виртуальная машина, подключимся к ней (используя MobaXterm, конечно же). Теперь можно приступать к работе.
Сначала надо скачать скрипт установки:
wget https://git.io/fxZq5 -O guac-install.shВыдать ему разрешение на исполнение:
chmod +x guac-install.shИ запустить:
./guac-install.shВ процессе работы будут установлены нужные образы и задано несколько вопросов о настройке паролей для MySQL. В конце скрипт выдаст сообщение о том, что установка завершена, напишет адрес для подключения к сервису и сообщит пароль/логин, который настоятельно порекомендует потом поменять:
Installation Complete
- Visit: http://localhost:8080/guacamole/
- Default login (username/password): guacadmin/guacadmin
***Be sure to change the password***.
Все готово, надо только заменить localhost на внешний айпи-адрес нашего сервера и ввести пару логин/пароль в форму логина на сайте:
После авторизации открывается доступ к довольно аскетичной панели администрирования, где можно заниматься управлением привилегий пользователей и доступными им подключениями к различным системам.
При первом логине система запросит настройку двухфакторной авторизации, на экране появится QR-код, который надо будет отсканировать с помощью любого удобного приложения. Я воспользовался для этого Google Authenticator на смартфоне. После сканирования приложение сгенерирует шестизначный код, который потребуется ввести в поле на сайте.
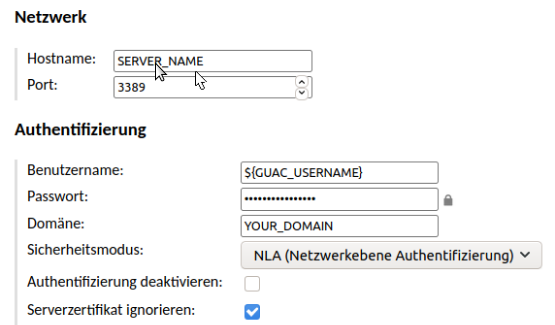
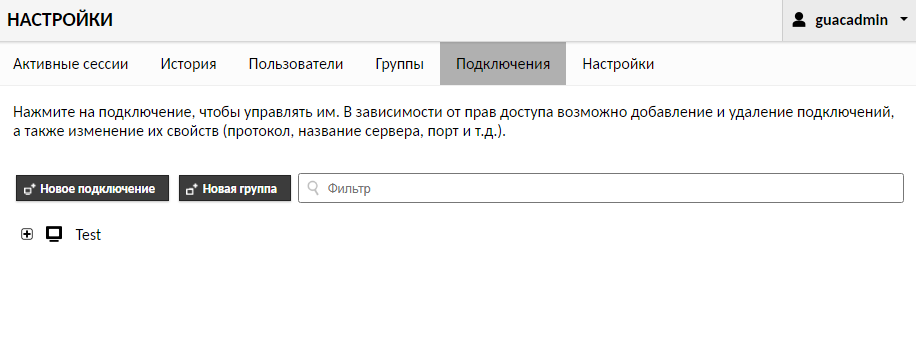
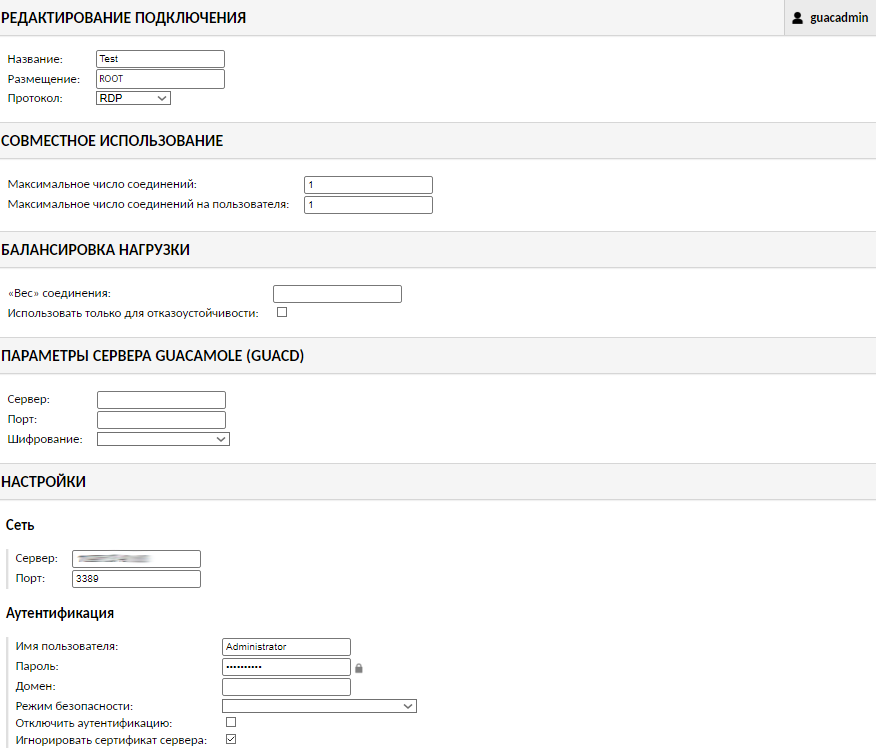
В качестве примера подключимся к серверу под управлением Windows по протоколу RDP. Для этого надо зайти в “Настройки” и выбрать опцию “Подключения”. Интерфейс переведен на несколько языков, и сложностей при работе с ним ни у кого не возникнет.
Дальше надо заполнить следующие поля (я перечислю минимально необходимые):
В разделе “РЕДАКТИРОВАНИЕ ПОДКЛЮЧЕНИЯ” заполнить поле “Название” и в поле “Протокол” выбрать “RDP”.
В разделе “СОВМЕСТНОЕ ИСПОЛЬЗОВАНИЕ” поставить требуемые числа в поля “Максимальное число соединений” и “Максимальное число соединений на пользователя”. Любое необходимое, но не меньше 1.
В разделе “НАСТРОЙКИ” и подразделе “Сеть” ввести айпи-адрес удаленного сервера под управлением Windows и “Порт”: 3389.
Далее заполнить поля “Имя пользователя” и “Пароль”. В моем случае еще потребовалось отметить опцию “Игнорировать сертификат сервера”.
Остальное настройки заполняются по необходимости, в зависимости от специфики серверов, к которым требуется подключаться.
В итоге выглядит это примерно так:
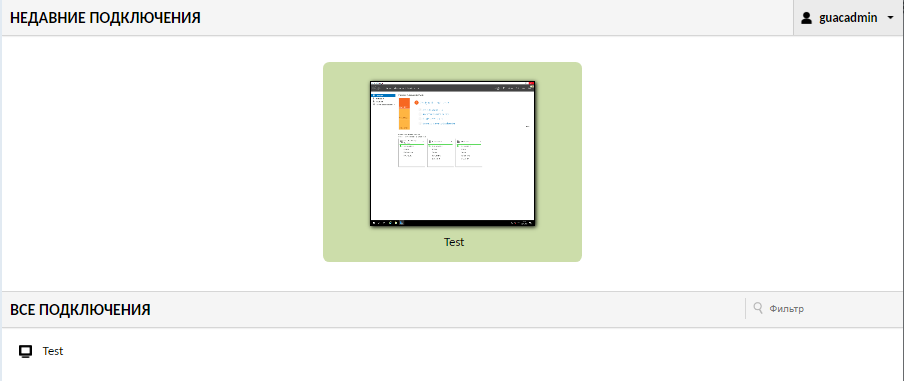
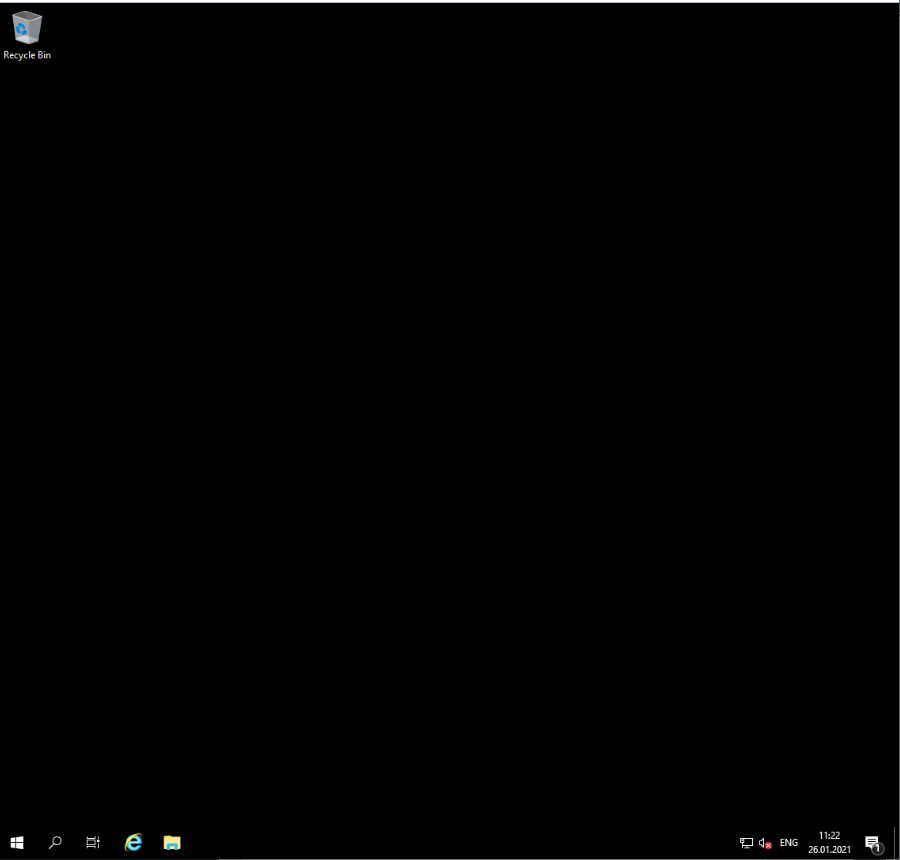
В самом низу страницы нажимаем кнопку “СОХРАНИТЬ” и можно подключаться с главной страницы панели управления:
Все работает, мы видим рабочий стол нашего виртуального сервера:
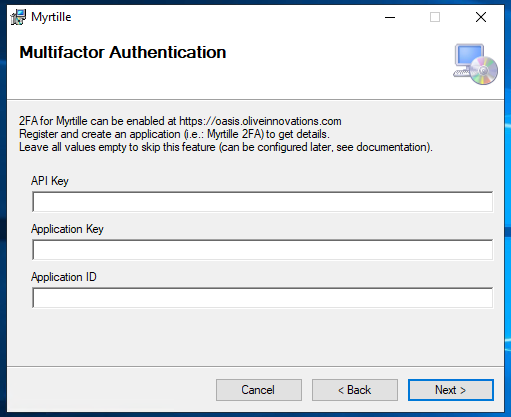
Myrtille
На основе FreeRDP разрабатывается еще один проект: Myrtille, аналогичный Apache Guacamole, но работающий на системе Windows. Его установка — традиционный Windows-way, надо всего лишь скачать файл инсталлятора с GitHub и запустить его. Приложение поддерживает двухфакторную авторизацию и позволяет настроить ее в процессе установки:
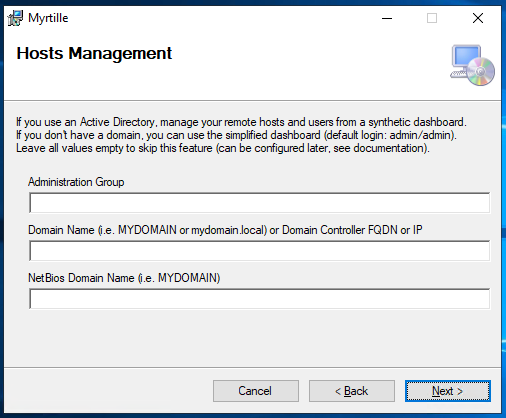
В следующем диалоговом окне можно настроить работу с Active Directory:
А затем порты для подключения:

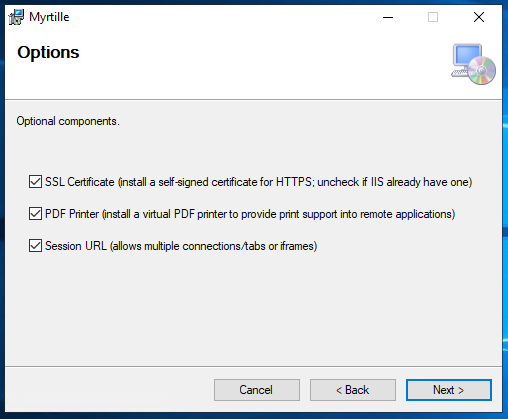
Далее следует диалог с выбором опций для установки сертификата, драйвера для PDF-принтера и разрешения множественных подключений:
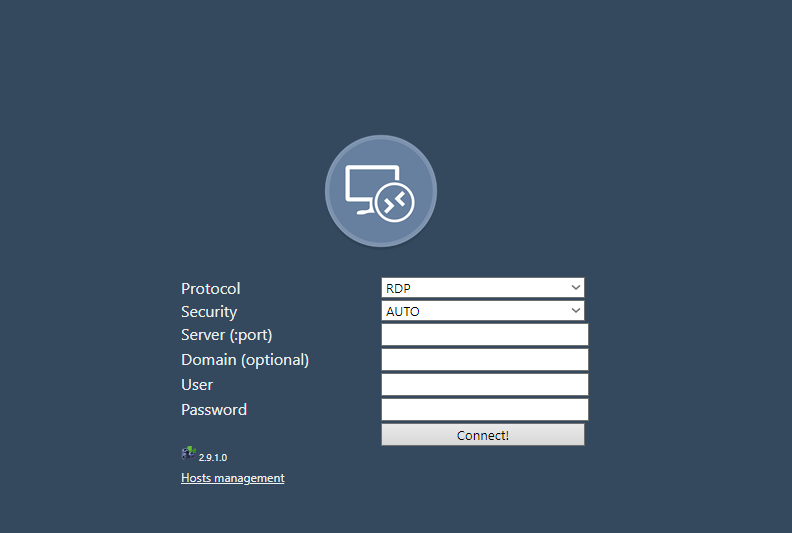
Потом выбирается директория, куда будет устанавливаться программа и запускается процесс установки. На этом все, сервисом можно пользоваться, перейдя по ссылке: https://ip-address/Myrtille/, где вместо ip-address надо подставить адрес сервера и web-клиент готов к подключению:
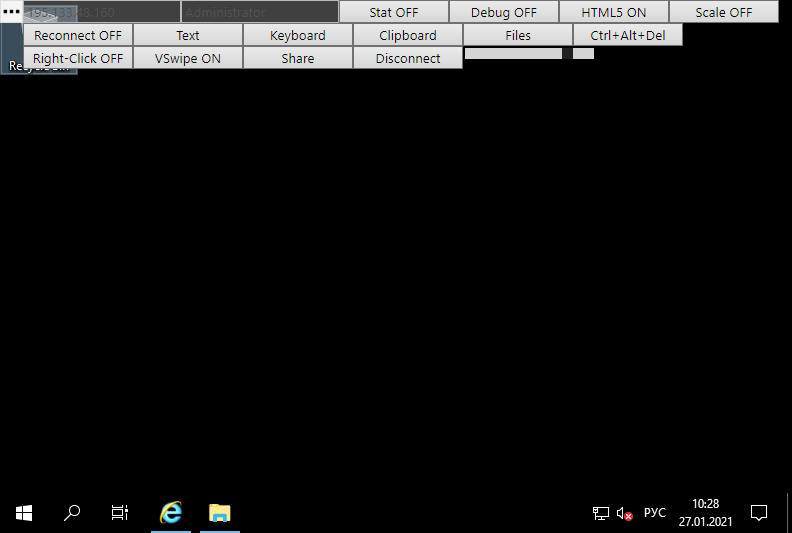
Надо заметить, что он не позволяет управлять группами пользователей и подключениями как AG и довольно аскетичен в настройках. Меню сервиса хоть и не блещет красотой, но вполне функционально:
Вот таким образом, можно отказаться от еще одного локального инструмента для работы и пользоваться обычным браузером, который есть на любом компьютере.
