
The Protected Users security group was introduced with Windows Server 2012 R2 and continued in Windows Server 2019. This group was developed to provide better protection for high privileged accounts from credential theft attacks. Members of this group have non-configurable protection applied. In order to use the Protected Users group, PDC should be running with a minimum of Windows Server 2012 R2 and the client computers should be running with a minimum of Windows 8.1 or Windows 2012 R2.
If a member of this group logs into Windows 8.1, Windows Server 2012 R2, Windows 10, Windows Server 2016 or Windows server 2019, we can expect the following:
• Members of this group cannot use NTLM, digest authentication, or CredSSP for authentication. Plain text passwords are not cached. So, any of the devices using these protocols will fail to authenticate to the domain.
• Kerberos long-term keys not cached. For accounts in this group, the Kerberos protocol verifies authentication at each request (the TGT acquired at log on).
• Sign-in is offline. A cached verifier is not created at sign-in.
For the Protected Users group feature, it is not a must to have a domain or forest functional level run on Windows Server 2012 R2 or higher (Windows Server 2008 is the minimum as Kerberos needs to use AES). The only requirement is to run the PDC emulator FSMO role in the Windows Server 2012 R2 domain controller.
If the AD environment uses Windows Server 2012 R2 or Windows Server 2016 domain functional levels, it provides additional protections with Protected User groups, as:
• No NTLM authentication
• No DES or RC4 encryption in Kerberos pre-authentication
• No delegation using the unconstrained or constrained method
• No Kerberos TGT valid more than 4 hours
[su_note]Service accounts and computers cannot be members of the Protected Users’ security group. These accounts can be protected using different features, such as policy silos, which I will explain later in this chapter.[/su_note]
To start with, we can review the Protected Users security group using the following command:
Get-ADGroup -Identity «Protected Users»
The following screenshot shows the output for the preceding command:

We can add users to the Protected Users group using ADAC, ADUC MMC, and PowerShell. This group is located in the default Users container in AD.
In here, we are going to add the user account Adam in to the Protected Users group using the following command:
Get-ADGroup -Identity «Protected Users» | Add-ADGroupMember –Members «CN=Adam,CN=Users,DC=rebeladmin,DC=com»
The first part of the command will retrieve the group and the second part will add the user Adam to it.
After the user is added to the group, we can verify group membership using the following command:
Get-ADGroupMember -Identity «Protected Users»
The following screenshot shows the output for the preceding command:

In order to test this, we are going to use a tool called mimikatz (https://github.com/gentilkiwi/mimikatz/blob/master/README.md), which can be used to do experiments with Windows security.
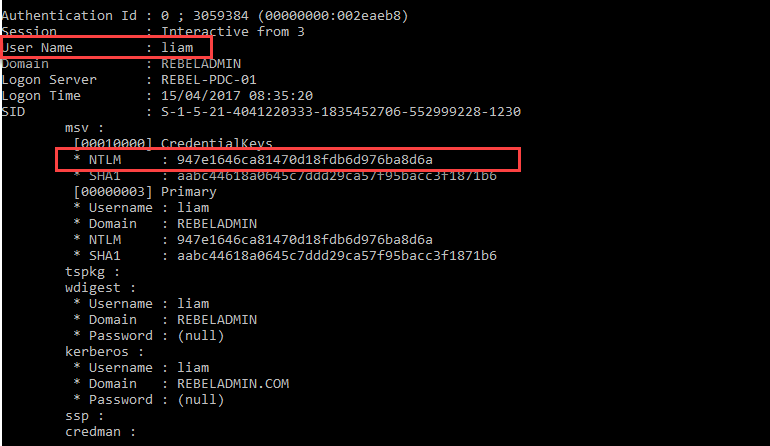
I logged in to a computer as user liam , and he is not part of the Protected Users group. When I list keys from LSASS for users, I can see Liam’s NTLM hash clearly:
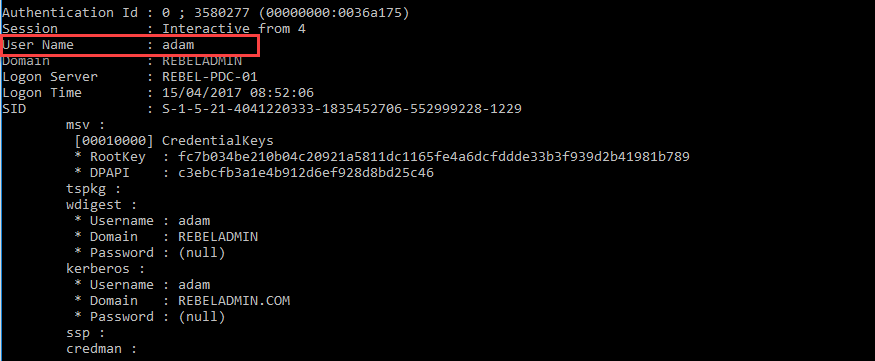
When I do the same thing for user adam, who is a member of the Protected Users group, I cannot see the NTLM hash stored in the LSASS memory because members in the protected group do not use NTLM and don’t save any credentials in the cache:
This marks the end of this blog post. Hope now you have better understanding how protect user groups works. If you have any questions feel free to contact me on rebeladm@live.com also follow me on twitter @rebeladm to get updates about new blog posts.
on
security group in active directory, you can create when you plan to manage permission in sharepoint from AD end. This provides additional security, tracking, control and manage permission for the secure contents present in sharpeoint sites. You need to create AD groups of type security in domain controller in windows server 2019. Then add security group to sharepoint site by following the option “Grant Permissions” from ribbon.
Types of group scopes
There are three group scopes like Domain local, Global, Universal.
Types of active directory groups
There are two types of AD groups like Security Groups, Distribution Groups.
Real world situation, there are dedicated organizational unit or we call as OU unit where groups are created. Here i am focusing on creating AD group. Follow the step by step process described in this post and understand how to create security group in AD with global group scope.
- Open “Active Directory Users and Computers” from start menu or following dsa.msc snap in windows server 2019.
- Right click on “OU”, navigate to “New” and select “Group” to create AD group.

- Enter AD group name, select group scope as “Global”, select group type as “Security” and click on “OK” to apply changes.

- Active directory group is created. Right click on the group, select “Properties”.

- Clcik on global security group properties general to see details in it.
- Global security group properties Memebrs to add users to the group created.Click on “Add” to add users.
- “Members Of” properties to see this group is part of any other group.
- global security group properties security to check oermission of this group. You can check in , check out box to edit or modify changes.
- managed by group property can find details as below.
- global security group properties object will display details as below.
Powershell to create security group in active directory
We can create security group in active directory using powershell command New-ADGroup as well so as to make it quick.
New-ADGroup -DisplayName "SPMCSE-Owners" -GroupScope DomainLocal -Name "SPMCSE-Owners"
New-ADGroup -DisplayName "SPMCSE-Contributor" -GroupScope DomainLocal -Name "SPMCSE-Contributor"
New-ADGroup -DisplayName "SPMCSE-Reader" -GroupScope DomainLocal -Name "SPMCSE-Reader"
New-ADGroup -DisplayName "SPMCSE-ViewOnly" -GroupScope DomainLocal -Name "SPMCSE-ViewOnly"
Categories: administration, powershell, powershell command, SharePoint 2019, windows server 2019
Tags: Active Directory, active directory security group, active directory users and computers, ad groups, add security group to sharepoint site, create a security group in active directory, create ad group, create ad group powershell, create ad groups from csv, create ad security group, create security group in ad using powershell, creating groups in active directory, dsa.msc, group scope in active directory, group scope in ad, group types in active directory, New-ADGroup, organizational unit in ad, powershell script, sharepoint active directory groups, windows server 2019 active directory

How To Create And Apply A Security Group In Windows 2019 Active Professor robert mcmillen shows you how to reate and apply a security group in windows 2019 active directory more. Security groups can provide an efficient way to assign access to resources on your network. by using security groups, you can: assign user rights to security groups in ad. assign user rights to a security group to determine what members of that group can do within the scope of a domain or forest.

Create Users And Groups In Active Directory Windows Server 2019 Open the gpo and navigate to computer configuration > policies > windows settings > security settings > restricted groups. right click and choose add group. if you want to add users to the local administrators group enter administrators. Keep ou structure simple by learning how to apply gpo to computer group in active directory. this is a more efficient way to limit a policy scope without having to create a new ou for some specific needs. In this guide, i’ll describe everything i know about security groups, how to create groups in active directory and the best tools (like my personal favorite access rights manager) you can use to better manage and monitor user permissions in ad. Open active directory users and computers. then right click on the organizational unit. then select new>group. creating a new group within the organizational unit. a wizard will immediately be displayed to assign the group name and manage other aspects. such as the scope and type of the group. setting the parameters of the new group.

Create Users And Groups In Active Directory Windows Server 2019 In this guide, i’ll describe everything i know about security groups, how to create groups in active directory and the best tools (like my personal favorite access rights manager) you can use to better manage and monitor user permissions in ad. Open active directory users and computers. then right click on the organizational unit. then select new>group. creating a new group within the organizational unit. a wizard will immediately be displayed to assign the group name and manage other aspects. such as the scope and type of the group. setting the parameters of the new group. That is all that is needed to create a security group in windows active directory environment. but if you wish to implement advanced security for your service accounts, you may need to create a domain group and place the service account in that group. In this guide, you will learn you how to create single and bulk active directory security groups with powershell. i will provide examples and a script for creating bulk groups from a csv file. in this article. the new adgroup cmdelet is the command used to create active directory groups. In this video we will take a look at creating, populating, and verifying security groups in microsoft windows active directory. we will be working with a windows server 2019 domain. Discover how to create groups in active directory efficiently, either manually or via powershell, with this detailed step by step guide.
A Complete Guide to Managing Users and Groups in Windows Server 2019
The robust operating system Windows Server 2019 is capable of efficiently managing users and groups. Any organisation must manage users and groups in Windows Server 2019 because it improves security and resource management.
This guide will cover effective user and group management in Windows Server 2019.
Establishing Users and Groups
Creating new users and groups is the first step in managing users and groups in Windows Server 2019.
Follow these steps to create a new user:
- Launch the «Local Users and Groups» section of the Server Manager console.
- From the context menu, click «Users» and choose «New User.»
- Type the user’s name, full name, description, and password in the «New User» dialogue box.
- To create a new user, click «Create.»
The steps below should be followed to create a new group:
- Launch the «Local Users and Groups» section of the Server Manager console.
- From the context menu, click «Groups,» then choose «New Group.»
- Enter the group name, description, and group type in the «New Group» dialogue box.
- To create the new group, click «Create.»

Taking care of Users and Groups
The next step is to manage new users and groups efficiently after they have been created.
Various tools are available in Windows Server 2019 to manage users and groups.
These tools consist of:
- Active Directory Users and Computers: This application is used for Active Directory user and group management.
- Local Users and Groups: On a local computer, users and groups are managed using this tool.
- PowerShell: PowerShell is an effective scripting language that can be used to manage users and groups.
Active Directory Users and Computers User Management
Follow these steps to manage users with Active Directory Users and Computers:
- Launch the console for Active Directory Users and Computers.
- Locate the container labelled «Users.»
- Double-click the user whose account you wish to manage.
- You can change a number of attributes, including the user’s name, description, password, and group membership, in the user’s properties dialogue box.
- To save the changes, click «OK.»
Using Active Directory Users and Computers for Group Management
The steps listed below can be used to manage groups with Active Directory Users and Computers:
- Launch the console for Active Directory Users and Computers.
- Select the «Groups» container from the list.
- Double-click the group that needs management.
- You can change a number of attributes, including the group’s name, description, membership, and scope, in the group’s properties dialogue box.
- To save the changes, click «OK.»
Using PowerShell for User and Group Management
An effective command-line interface for managing users and groups is offered by PowerShell.
Follow these steps to manage users and groups using PowerShell:
- Launch the PowerShell console.
- Use the «Get-ADUser» and «Set-ADUser» cmdlets to manage users.
- Use the «Get-ADGroup» and «Set-ADGroup» cmdlets to manage groups.
- Use the appropriate parameters to change different user and group attributes.
Managing Permissions for Users and Groups
Enhancing security and resource management requires managing user and group permissions.
Various tools are available in Windows Server 2019 to manage user and group permissions.
These tools consist of:
- File Explorer: File Explorer can be used to control folder and file permissions.
- Security Configuration Wizard: You can set up security settings on servers and applications using the Security Configuration Wizard.
- Group Policy: Group Policy allows users and groups to have their security settings customised.
File Explorer’s User and Group Permissions Management
2. Select «Security» from the tabs.
3. To change the permissions, click the «Edit» button.
4. You can edit the permissions for users and groups in the «Permissions for [file or folder]» dialogue box by adding or removing them.
5. To save the changes, click «OK.»
Utilizing Group Policy to Manage User and Group Permissions
The steps listed below can be used to manage user and group permissions using Group Policy:
- Launch the console for Group Policy Management.
- Make changes to an existing Group Policy Object (GPO) or create a new one.
- Select «Computer Configuration> Policies> Windows Settings> Security Settings> Local Policies> User Rights Assignment.»
- Double-click the user right that needs to be changed.
- You have the option to add or remove users and groups in the user right properties dialogue box.
- Press «OK» to save the modifications.
Conclusion
In conclusion, optimising security and resource management in an organisation requires managing users and groups in Windows Server 2019.
In order to effectively manage users, groups, and resources, Windows Server 2019 offers a variety of features and tools.
Using tools like Active Directory Users and Computers, Local Users and Groups, and PowerShell, we covered how to create and manage users and groups in Windows Server 2019 in this guide.
We also covered the use of tools like File Explorer, Security Configuration Wizard, and Group Policy for managing user and group permissions.
You can effectively manage users and groups in Windows Server 2019 and improve resource management and security in your company by following the instructions provided in this guide.
FAQs
- How do I define Windows Server 2019?
The robust operating system Windows Server 2019 is made for servers, and it offers many features and tools for efficiently managing users, groups, and resources.
- In Windows Server 2019, what role does managing users and groups play?
Enhancing security and resource management in an organisation requires managing users and groups in Windows Server 2019.
It aids in maintaining data integrity and limiting access to resources.
- What tools are available in Windows Server 2019 for managing users and groups?
Active Directory Users and Computers, Local Users and Groups, PowerShell, and other tools are available in Windows Server 2019 to manage users and groups.
- In Windows Server 2019, how do I manage user and group permissions?
In Windows Server 2019, tools like File Explorer, the Security Configuration Wizard, and Group Policy can be used to manage user and group permissions.
- What advantages does Windows Server 2019’s management of user and group permissions offer?
In Windows Server 2019, managing user and group permissions improves resource management and security within an organisation. It aids in regulating resource access, preserving data integrity, and preventing unauthorised access.
Today we will talk a bit about the organizational structure in Windows Server. Specifically, about the Active Directory Groups in the Domain. Previously we saw how to create a user in the domain controller. However, today we will go further and see how to create Groups. This allows you to group several users within a single unit. Consequently, it is easier to manage the permissions and rules assigned. For this reason, today we will see how to create Active Directory Groups in Windows Server 2019/2016.
How to create Active Directory Group in Windows Server 2019
For better administration, Windows Server classifies the groups as follows:
- Distribution groups. Used to create e-mail distribution lists
- Security groups. Implemented to assign permissions to shared resources in the domain
As for the scope of location, Windows Server classifies the groups in:
- Universal: Applies to both local and external connections
- Global: Applies to all computers and servers in the domain
- Domain local: This applies only to the local server with Windows Server 2019
Before starting to create the group it is advisable to create an organizational unit, as I show you here. The first thing you have to do is go to the Server Manager. Then, from the Tools menu please select Active Directory Users and Computer:

Then right-click on the organizational unit. Then select New>Group

A wizard will immediately be displayed to assign the group name and manage other aspects. Such as the scope and type of the group.

Finally, you can see the successfully created group:

How to add members to a group in Windows Server
There are a couple of methods to add users to a group on Windows Server. The first is through the properties of the group itself. To do this, double-click on the group and then click on the Members tab. Then click on Add.

Then enter the name of the user you want to add to the group. It is also necessary to check the name to verify the existence of the user.

Back to the previous screen you can see that the user has been added successfully. Please press OK to save the changes.

The other way to add a user to a group is through the user’s own properties. With this in mind, double-click on it and then select the Member of tab

Once again, add the name of the group and check to verify its existence:

Back to the previous window, you can see the new group added. Please click OK to save the changes.

Conclusion
At the end of the day we have seen how to create Active Directory Groups in Windows Server 2019/2016. Therefore, user management tasks are greatly facilitated. All right, that’s it for now. Stay tuned for more info on Windows Server. See you later!
— Advertisement —
Everything Linux, A.I, IT News, DataOps, Open Source and more delivered right to you.
Subscribe
«The best Linux newsletter on the web»