
Добавить учетные записи для других членов семьи в Windows 10 можно по-разному. Покажем пять различных способов, как добавить учетную запись в Windows 10.
Windows 10: добавление новой учетной записи пользователя
-
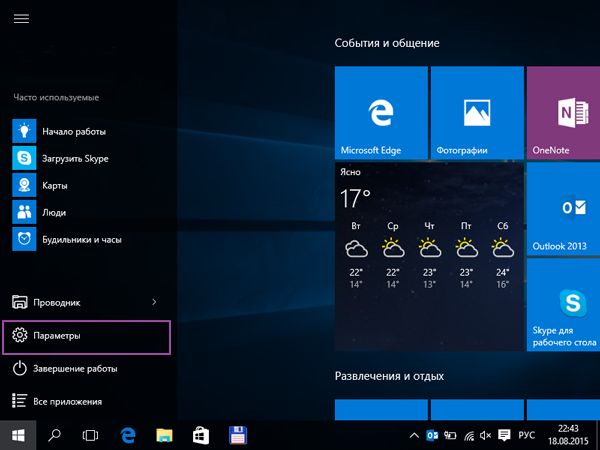
Откройте меню «Пуск» в Windows 10 и выберите Параметры со значком шестеренки.

Windows 10: параметры системы -
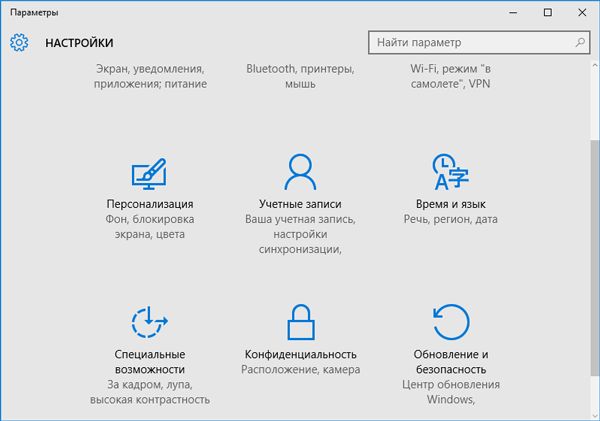
Откройте категорию Учетные записи. Здесь вы можете настроить учетную запись Microsoft или локальную учетную запись.

Настройка учетных записей в Windows 10 -
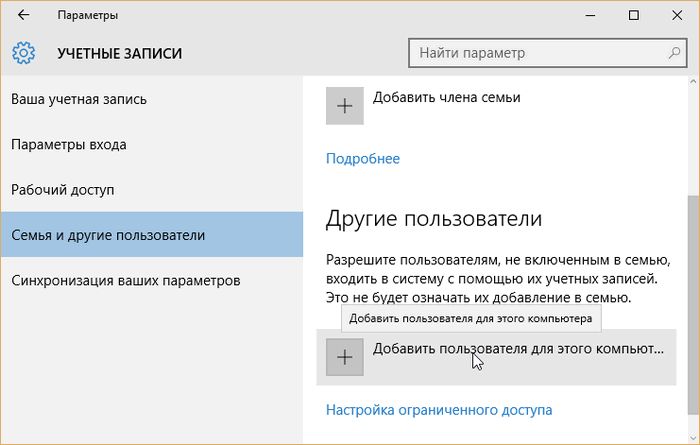
Перейдите к категории Семья и другие пользователи слева и нажмите Добавить пользователя для этого компьютера.

Windows 10: добавление нового пользователя - По умолчанию Microsoft хочет, чтобы вы добавили нового пользователя через учетную запись Microsoft. Если для вас это не проблема, просто введите его e-mail или номер телефона, использовавшийся при регистрации учетной записи, и нажмите Далее. Новый пользователь будет добавлен автоматически, вся его информация будет взята из учетной записи Microsoft.
Как создать пользователя в Windows 10 без учетной записи Microsoft?
Если же вам нужно создать пользователя в Windows 10 для человека без учетной записи Microsoft, выполните следующее:
-
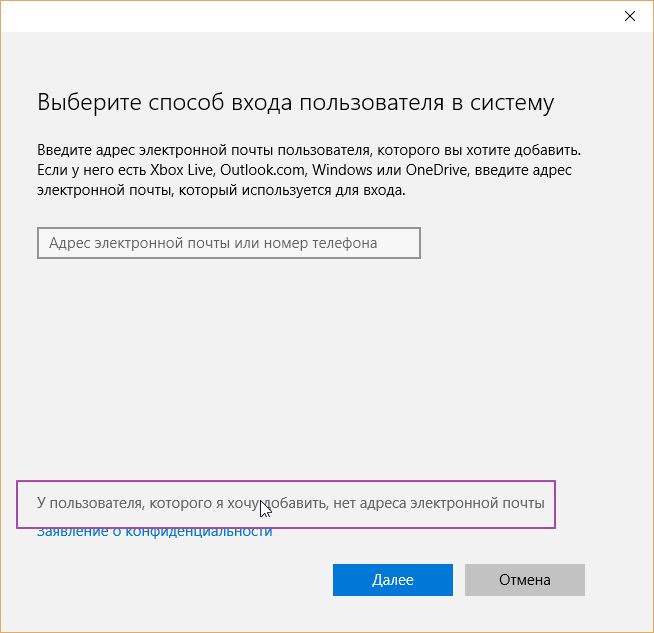
В окне выбора способа входа в систему нажмите У пользователя, которого я хочу добавить, нет адреса электронной почты.

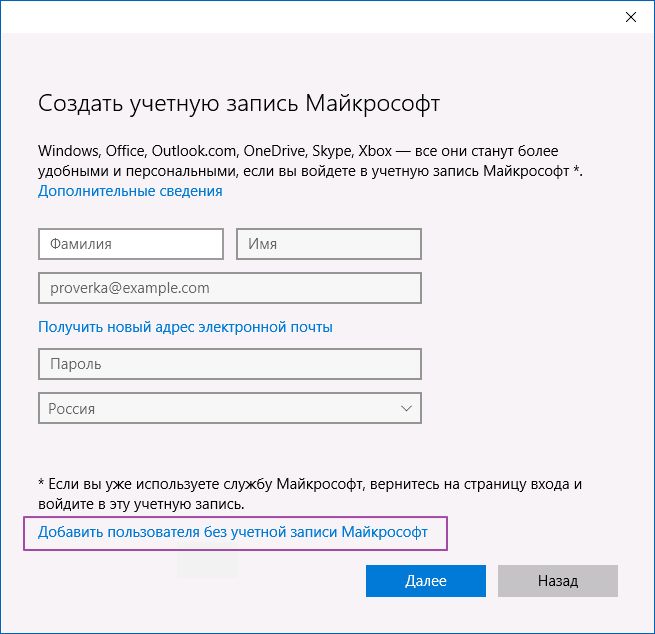
Windows 10: создание локального пользователя - В следующем окне выберите один из двух вариантов, который вам наиболее удобен: либо создайте для человека учетную запись Microsoft, введя имя, пароль и выбрав страну, либо нажмите Добавить пользователя без учетной записи Microsoft.

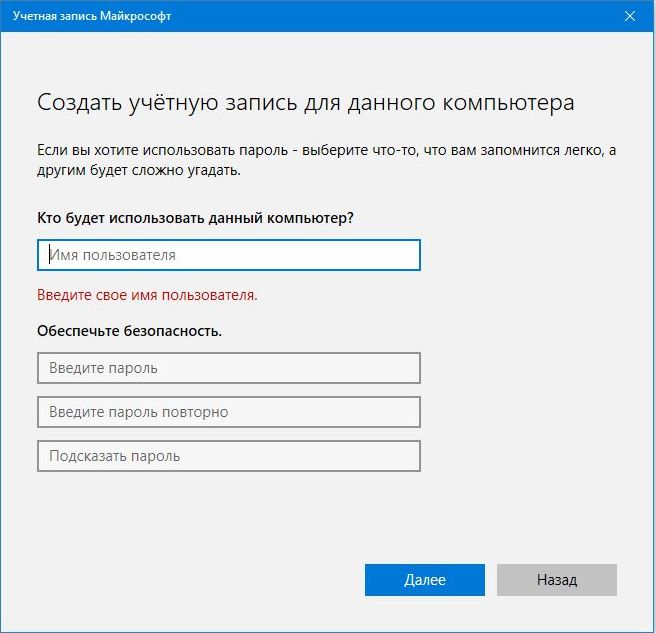
Windows 10: добавление пользователя без учетной записи Microsoft - Откроется окно создания локальной учетной записи Windows 10. Введите имя, пароль, подтверждение и подсказку, нажмите Далее. Пользователь будет создан.
Как создать пользователя в Windows 10 через утилиту управления учетными записями?
Еще один способ добавления пользователя в Windows 10, которым мало кто пользуется. Заключается он в том, чтобы запустить утилиту управления учетными записями пользователей.
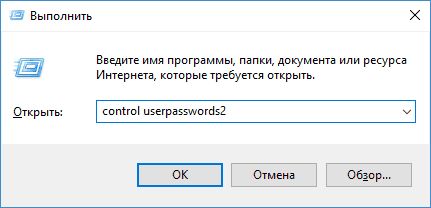
- Нажмите Win + R и в окне Выполнить введите: control userpasswords2 и нажмите Enter.

Запуск управления учетными записями в Windows 10 - В отобразившемся окне нажимаем кнопку добавления нового пользователя.
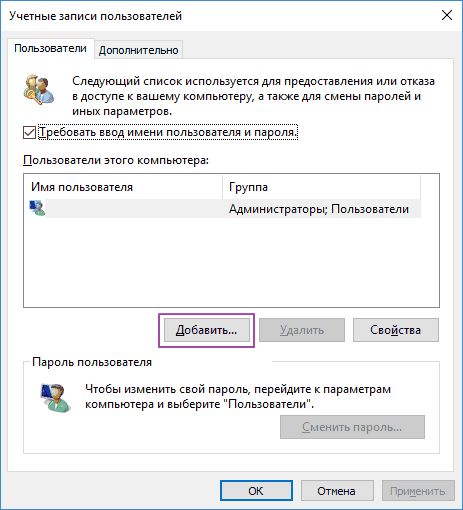
Дальнейшая процедура полностью аналогична тому, что описано выше — либо добавляем пользователя с учетной записью Microsoft, либо без.
Как добавить пользователя в Windows 10 через групповые политики?
Еще один способ создания учетной записи — использовать элемент управления «Локальные пользователи и группы».
- Нажмите клавиши Win+R, в окне Выполнить введите: lusrmgr.msc и нажмите Enter.
- Выберите Пользователи на панели слева, кликните правой кнопкой мыши списке пользователей и нажмите Новый пользователь.

Создание пользователя через управление групповыми политиками в Windows 10 - Задайте параметры для нового пользователя.

При использовании этого способа созданный пользователь будет локальным — то есть, он позволяет создать пользователя без учетной записи Microsoft.
Как добавить пользователя в Windows 10 через командную строку?
Последний способ создать пользователя — с помощью командной строки Windows 10. В этом случае новая учетная запись также будет локальной.
- Запустите командную строку от имени администратора (например, через меню правого клика по кнопке «Пуск»).
- Введите команду (если имя пользователя или пароль содержат пробелы, используйте кавычки):
net user имя_пользователя пароль /add
3. Нажмите Enter. Пользователь с заданным именем и паролем будет добавлен.
Этот способ всегда сработает, если не добавляется пользователь в Windows 10 стандартными средствами — например, после неудачного обновления.
Читайте также:
- 5 ошибок при запуске Windows 10, и что с ними делать
- Что лучше, Windows 7 или Windows 10: сравнительная таблица
- Локальная учетная запись Windows: как ее создать, удалить или изменить
Фото: авторские, pixabay.com
Organizations today are highly dynamic, with employees, contractors, and other users constantly joining. Accordingly, IT administrators often need to create user objects in Active Directory (AD) or Entra ID (formerly Azure AD). While manually creating a single user is easy, repeating that process for multiple users is tedious and time-consuming. Moreover, it is highly prone to errors that can put security and productivity at risk.
This article explains how you can streamline the process of creating AD users in bulk using PowerShell, as well as how to create users in bulk in Entra ID using the native wizard. Then it offers a third-party solution that enables you to easily create users in AD or Entra ID right from an intuitive interface.
Bulk User Creation in Active Directory via PowerShell
Microsoft PowerShell is a popular option for bulk creation of Active Directory users. You must have the ISE PowerShell module installed and have administrative rights to create user accounts in Active Directory.
Keep in mind that only IT pros with solid scripting skills should use PowerShell. Never run a script that you do not thoroughly understand.
- Build a CSV file with details about the users you want to create. The file must include the following fields: SAMAccount, FirstName, LastName, Password and OU. You can add more fields if you want to. Here is an example of a csv file as it appears in Notepad:

For a clearer view of the rows and columns, you can open the file in Microsoft Excel:

- Create the users. Run the following PowerShell script from the Windows PowerShell ISE:
# Import the PowerShell module for running AD cmdlets
Import-Module activedirectory
#Store the data from your CVS file in the $ADUsers variable
$ADUsers = Import-csv C:\BulkUsers.csv
#Read each row of input data and assign each user’s details to variables
foreach ($User in $ADUsers)
{
$Username = $User.name
$Password = $User.password
$Firstname = $User.firstname
$Lastname = $User.lastname
$OU = $User.OU
$email = $User.email
$streetaddress = $User.address
$city = $User.city
$state = $User.state
$country = $User.country
$zipcode = $User.zipcode
$telephone = $User.telephone
$jobtitle = $User.title
$company = $User.company
$department = $User.department
#Check whether the user already exists in the AD
if (Get-ADUser -F {SamAccountName -eq $Username})
{
#If the user already exists, display a warning
Write-Warning "A user account with username $Username already exists in Active Directory."
}
else
{
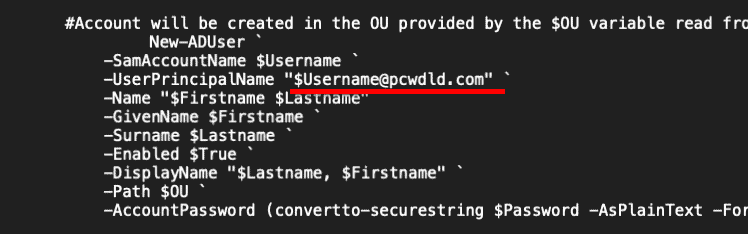
#Otherwise, create the new user account in the specified OU
New-ADUser SamAccountName $Username UserPrincipalName "$Username@milkyway.local" Name “$Firstname $Lastname” GivenName $Firstname Surname $Lastname Enabled $True DisplayName "$Lastname, $Firstname" Path $OU City $city Company $company State $state StreetAddress $streetaddress OfficePhone $telephone EmailAddress $email Title $jobtitle Department $department AccountPassword (convertto-securestring $Password -AsPlainText Force) ChangePasswordAtLogon $True
}
}
- Verify the results. You can review the user objects in Active Directory Users and Computers (ADUC).
Bulk User Creation in Entra ID
Entra ID enables you to create users in bulk with no scripting. Here are the steps to take:
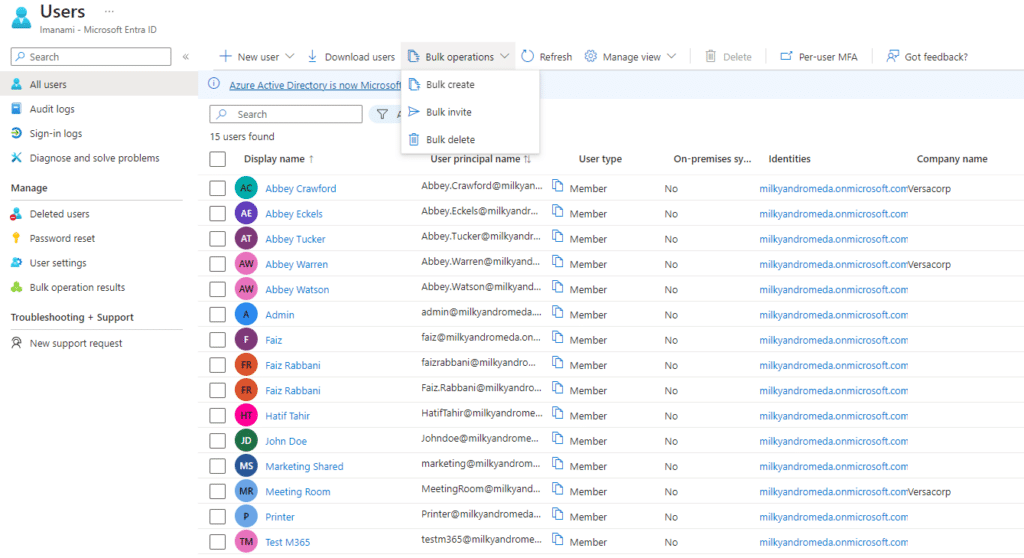
- Open the Bulk User Creation Wizard. Sign into the portal as a User Administrator or Global Administrator. Navigate to Users. Click the Bulk operations option and select Bulk create, as shown below.
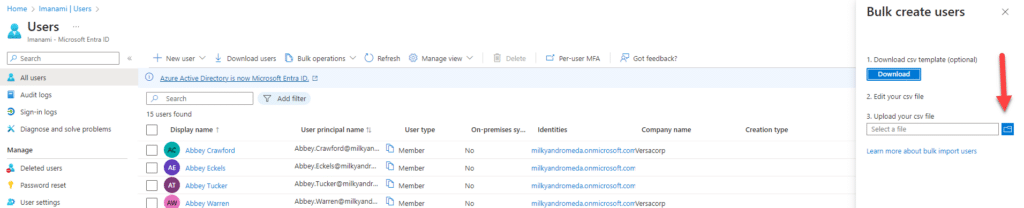
- Create a CSV file of the users. The wizard will provide a template CSV file. Replace the example row with a row for each user you want to create, specifying all the required attributes and any optional attributes you like. Save the file.
- Upload the file. Click Upload your File and select the file you created. The system will begin creating the users.
- Review the results. You can review successful and unsuccessful outcomes and a summary of the user accounts created from the notification bar at the top. To check the user accounts, go to the Users tab.
Bulk User Creation with Netwrix Directory Manager
Netwrix Directory Manager empowers you to create users in bulk easily using the Synchronize module. Simply create a new job and follow the steps in the wizard:
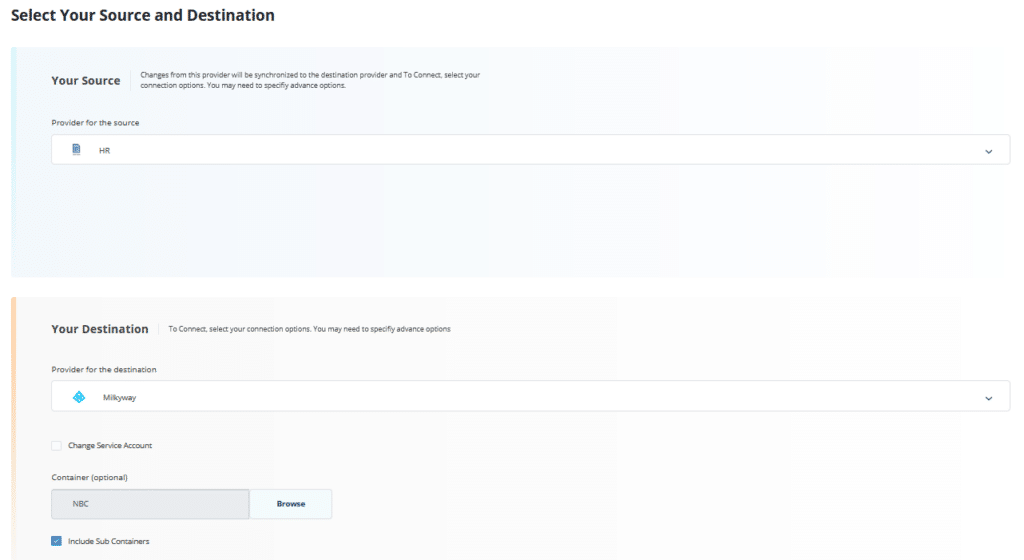
- Specify the data source and the destination identity store. Supported data sources include CSV files and popular databases like Oracle and SQL Server. Supported identity store providers include Active Directory and Entra ID, as well as generic LDAP and Google Workspace. Let’s select HR (which contains a CSV file) as the source data provider, and create the users in the NBC container in the AD identity provider Milkyway:
- Choose the type of object to be created.In this case, we will choose to create user objects:
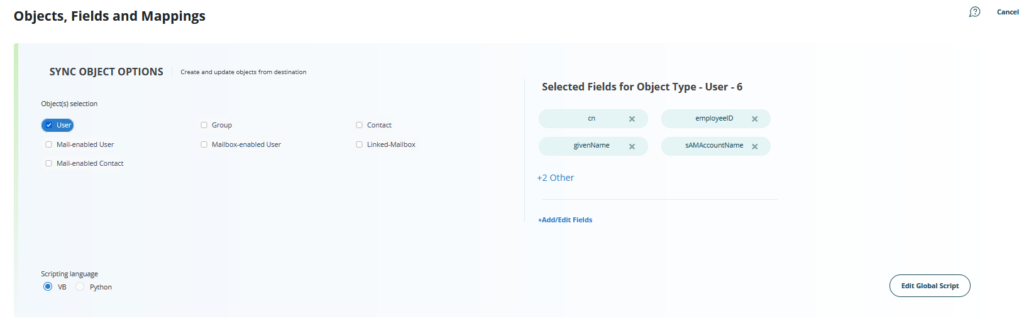
- Map user attributes from source to destination. Click +Add/Edit Fields, choose the Create radio button, and select the attributes to include in each user object being created. Click Save.
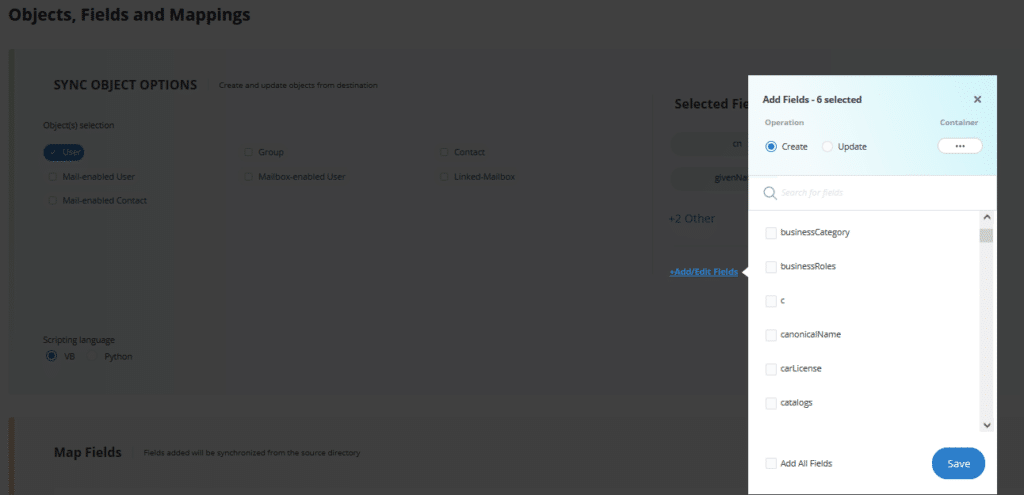
- In the lower part of the dialog, specify the attribute mapping from source to destination:

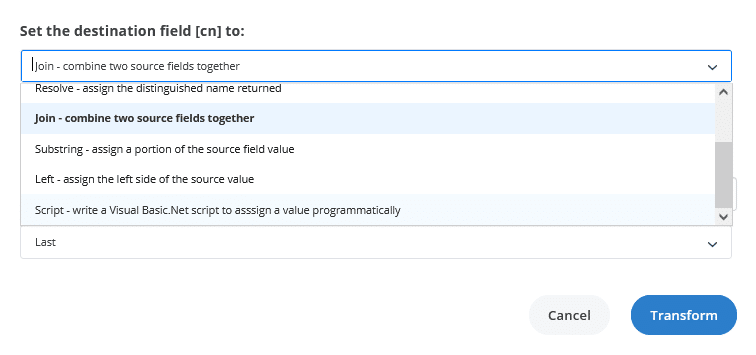
- Transform the source data (optional). You can choose to manipulate the source data before it is used to create users at the destination. For example, you could combine the values of two source fields into one destination field or assign a string constant to a field. If you like, you can write your transformation scripts using the Visual Basic .NET editor.
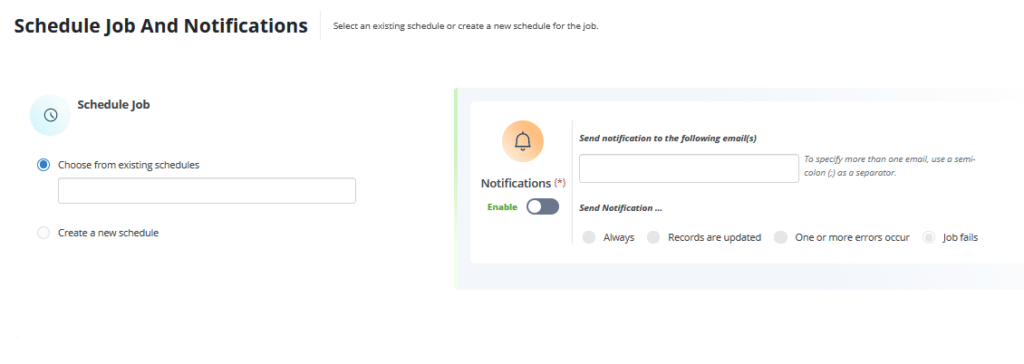
- Set up job notifications. Specify one or more email address for job notifications. You can also specify the conditions for sending notifications.
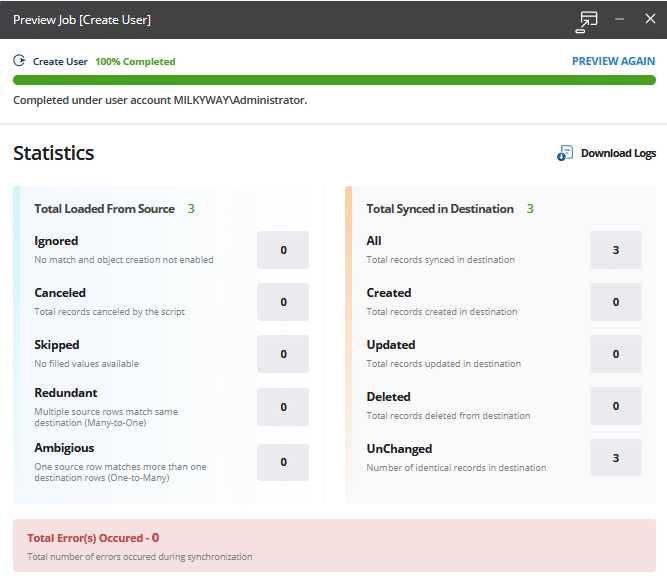
- Preview and run the job. The wizard provides a preview of your job and enables you to easily revise any area that does not meet your needs. When the job is correct, run it to create the users in bulk, and review the resulting statistics.
Updating Users in Bulk
Sometimes, administrators need to an existing set of user objects rather than create new users. Like manual user creation, manual user updates are time-consuming and error-prone. To help, Netwrix Directory Manager allows you to save the job that you used to create users as a template; if you later need to update those users, simply edit the job and run it. You can even schedule the job to run periodically and notify you when it has been performed.
Since 2012, Jonathan Blackwell, an engineer and innovator, has provided engineering leadership that has put Netwrix GroupID at the forefront of group and user management for Active Directory and Azure AD environments. His experience in development, marketing, and sales allows Jonathan to fully understand the Identity market and how buyers think.
Creating an Active Directory user is not a big deal, except when you need to create many on a daily basis. Managing user accounts manually one by one starts to become a tedious and time-consuming process.
The best solution would be to generate multiple AD user accounts in bulk. You would need to gather all the user’s information required to open an AD account (like first name, last name, username/password, OU, etc) in a single CSV or XLS file. And then, import this file into a script or software that bulk-creates all these users at once.
In this tutorial, we’ll go through the process of creating Active Directory users’ accounts in bulk using two methods: the task automation tool “PowerShell” and “GUI-based AD Import User Tool”. We’ll start with command-line PowerShell and then move on with the GUI-AD Admin tool. Both methods are different but accomplish the same. You can skip command-line scripting with PowerShell and if you prefer the GUI method.
Table of Contents
- PowerShell vs GUI-based AD Import User Tool
- Using PowerShell to create bulk users in Active Directory.
- Using the GUI-based AD Admin Tool
- Install PowerShell Modules
- Install the PowerShell Active Directory Module
- Install the ISE Module
- Create Users in Bulk with PowerShell
- Create the .CSV file
- Determine the OU Path
- Modify and run the PowerShell script
- Using an AD Admin GUI-Tool to Import Bulk Users
- Install and Open the SolarWinds User Import Tool
- Map Custom Fields
- Review Accounts
- Conclusion
1. PowerShell vs GUI-based AD Import User Tool
If you are managing a couple of user accounts, and adding 1-2 new users per week, creating user accounts in bulk is not as effective as if you manage more than 10 users. Large organizations dealing with many user accounts can benefit from automation tools such as PowerShell or AD admin tools.
a. Using PowerShell to create bulk users in Active Directory
To use PowerShell to manage AD user accounts, you would need to install a PowerShell module named “ActiveDirectory”. A PowerShell module is a package that contains cmdlets, variables, providers, functions, etc. This AD module lets you add AD commands to your PowerShell session and use them as if they were built-in.
The method for installing the module varies according to the Windows version. For example, if you have the Remote Server Administration Toolkit (RSAT), already, then you don’t need to download and install the module (more on this below).
To create users in bulk with PowerShell, you’ll need the following:
- PowerShell module already loaded
- CSV file with information from new users
- PowerShell script to import data and create new accounts
PowerShell gives you more flexibility and control to create bulk users but can get complicated if you don’t have scripting skills.
b. Using the GUI-based AD Admin Tool
The second method to create Active Directory users in bulk is using a free AD admin tool from SolarWinds. This GUI tool lets you import the list of users with CSV or XLS, then lets you map the fields from your file to the existing fields in AD.
To create bulk users in AD with the free AD admin tool, you’ll need the following.
- The SolarWinds GUI-tool is already installed
- The user’s list in CSV or XLS
The SolarWinds AD admin tool allows you to create users in bulk much easier and faster. Still, it doesn’t give much control and flexibility as PowerShell does.
2. Install PowerShell Modules
Let’s begin, by installing two modules, the Active Directory Module and the ISE Module.
- Active Directory (AD) module for Windows PowerShell A set of special cmdlets for AD, that lets you manage AD domains, AD LDS configuration sets, and the AD Database Mounting Tool
- ISE PowerShell Module This is a PowerShell module management toolkit. ISE simply allows you to streamline the management of PowerShell modules
We’ll start by installing the PowerShell Active Directory module, then following up to install the ISE Module Browser.
a. Install the PowerShell Active Directory Module
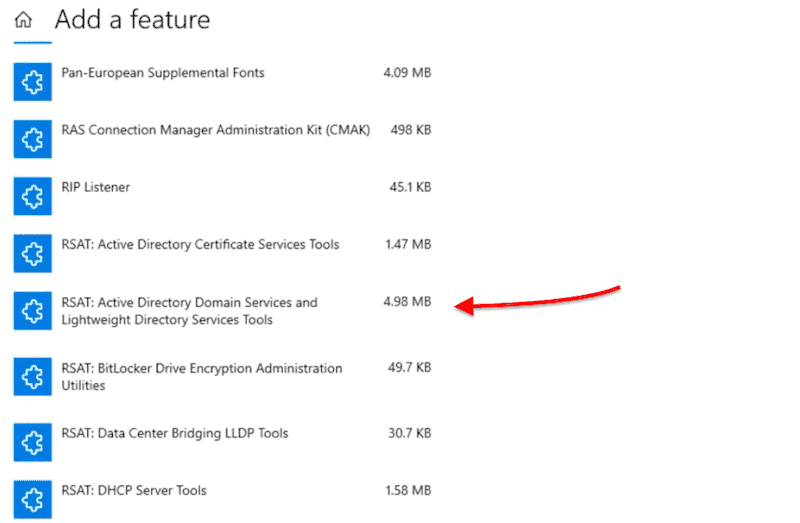
For Windows 10, you’ll only need to install the Remote Server Administration Tools (RSAT). When you install RSAT, all tools including the AD PowerShell module will be enabled by default. To get RSAT, you’ll need to:
Find: “Manage Optional Features” > click on “+ Add Feature” > find “RSAT” > and click on “Install”.
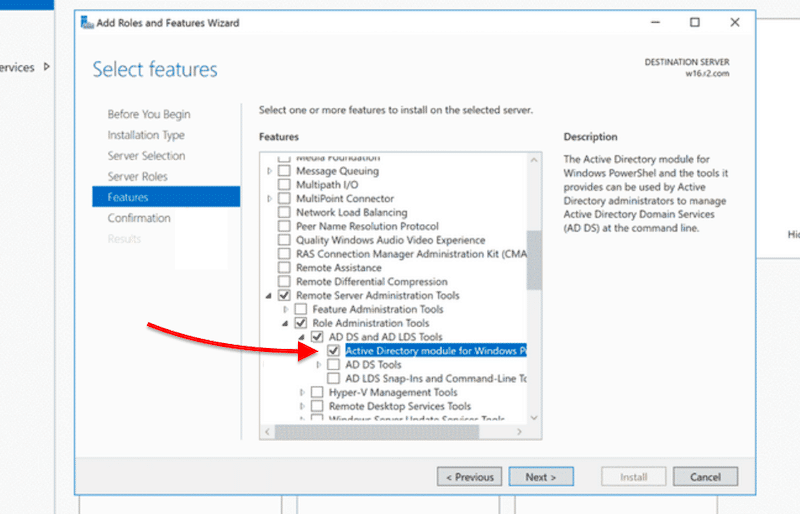
For Windows Server 2012, Windows Server 2012 R2, and Windows Server 2016, the RSAT is already there. So, all you need to do is add the PowerShell module as a feature using Server Manager.
- Go to Server Manager
- Click on “Manage” > click on “Add Roles and Features”
- Click “Next” until you find “Features”
- Go to “Remote Server Administration Tools” > Role Administration Tools > AD DS and AD LDS Tools > enable “Active Directory Module for Windows PowerShell”
Another way to install the RSAT-AD PowerShell module (on Windows Server 2012, 2012R, and 2016) is to install it right from the PowerShell console.
Open PowerShell and type:
- Add-WindowsFeature RSAT-AD-PowerShell

b. Install the ISE PowerShell Module
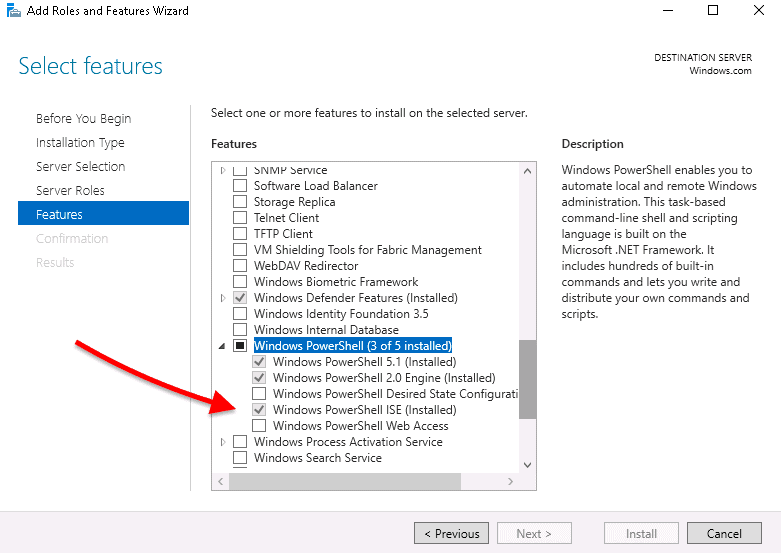
For Windows Server 2012, Windows Server 2012 R2, and Windows Server 2016, you can do a similar process as shown before. You can add the Windows PowerShell ISE as a feature with Server Manager.
- Open “Server Manager”
- Click on “Add Roles and Features”
- Click “Next” until you find “Features”
- Find the feature “Windows PowerShell” > select and install “Windows PowerShell ISE”
3. Create Users in Bulk with PowerShell
So the PowerShell modules are already loaded, now all you’ll need to do is create a CSV file listing all the user’s information and import it into a PowerShell script, to automate the entire process.
Bear in mind, that you’ll need to have administrative rights to login and create user accounts.
a. Create the .CSV file
The PowerShell script wouldn’t produce results without input data. First, we need to create a CSV file containing AD data fields like name, username, password, OU, description, or more— to feed into our PowerShell Script.
Let’s create a simple CSV file with the following data fields
- firstname
- lastname
- username
- password
- OU
So, below is a screenshot of a spreadsheet created using Google sheets— which you can later export as Comma Separated Value (CSV). You can create a CSV using notepad or MS Excel.
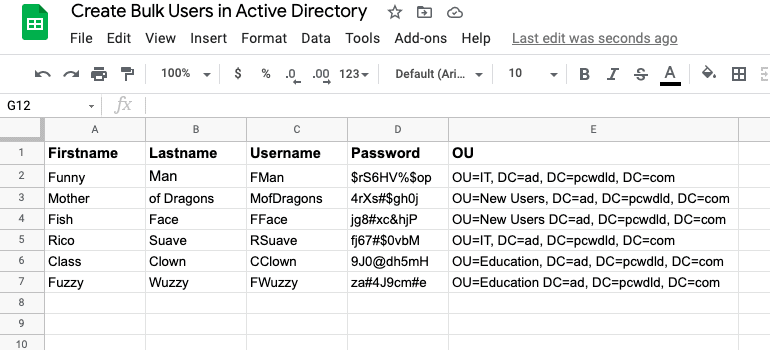
This document contains the required data fields, First name, Last name, Username, Password, and OU. It is recommended to use strong password policies, like avoid mixing repetitive password configurations and requiring password change at the next logon (which is done in the PowerShell script).
Notice that when defining the OU, you can set the accounts to import into different OUs. For example, two accounts are going to be imported into OU=IT, two accounts into OU=New Users, and two accounts into OU=Education.
b. How to Determine the OU?
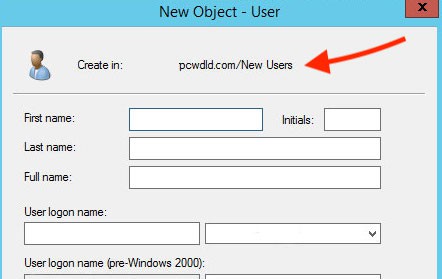
An OU stores users and computer accounts, and provides an organizational structure to help sort objects according to geography, department, etc. When you create a new user in Active Directory Users and Computers, you’ll need to select the Domain Controller (i.e. pcwdld.com) and then an OU (such as New Users).
For example, this particular new user will be created in this “OU Path” > pcwdld.com/New Users
This OU Path is an attribute referred to as “DistinguishedName.”
In our CSV file example, we have three departments (sub-organizational OUs) where our new users are going to be created (IT, Marketing, and Sales). Our OU paths would look something like this:
- pcwdld.com/IT
- pcwdld.com/Marketing
- pcwdld.com/Sales
To find this OU Path, open “Active Directory Users and Computers,” > and browse the OU where you want to import your new user (or users). Right-click on the OU and click on “Properties”.
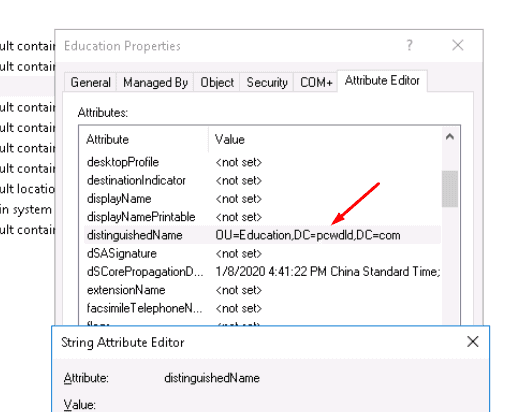
Go to the “Attribute Editor” label, and find the Attribute with the name: “DistinguishedName” > double-click on it to open the “String Attribute Editor” and copy the “Value”.
Now, go ahead and paste this value (OU path) into the OU column of your CSV fil
Your CSV file should be ready to be imported into PowerShell. Now all you need is to create and set up the PowerShell script.
c. Modify and Run the PowerShell Script
So, your PowerShell Active Directory module has been already loaded and you have already created the CSV file containing the right information on your new users. Now, it is time to open and test the PowerShell script.
Import Bulk Users.zip
Open the Script
To open the PS script, make sure to open the PowerShell console with administrator rights. To successfully create users in bulk, by importing the data from CSV, you’ll need to update some information on the script.
To open and modify the script (ps), you can either use PowerShell ISE by right-clicking on the .ps file and selecting “Edit”. Or, open the file using .txt editors like notepad or notepad++, then use the “save as” option with the .ps extension.
Modify the Script:
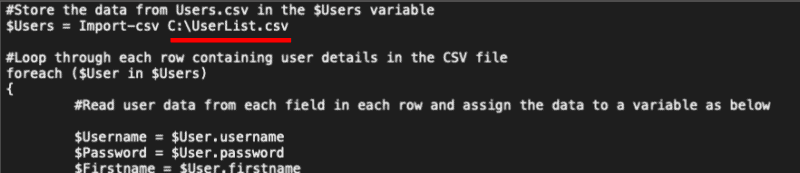
Update the default path (C:\UserList.csv) of the CSV file with your path.
- $Users = Import-csv “your path”
Update the UPN “UserPrincipalName” to your correct domain name.
- UserPrincipalName “$your domain”
Save your changes.
Run the Script
Now, that the CSV file contains the right data from all users and your PowerShell script is already modified to input/output the right information, it is time to run the PS script.
To execute the script:
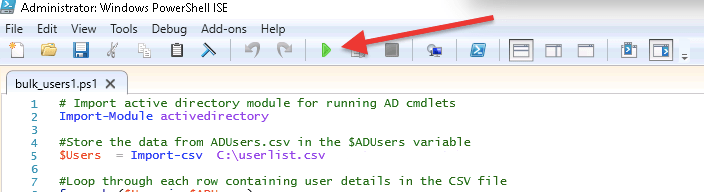
- Open it using PowerShell ISE. Right-click on the file and click on “Edit”. Click the Green button to execute the script.

- The prompt below will show you whether the script ran successfully or any warning messages (such as accounts that already exist).
- Verify that all user accounts have been created. Open the Active Directory Users and Computers and open the right domain and OU to ensure all new users have been successfully created.
4. Using an AD Admin GUI-Tool to Import Bulk Users
SolarWinds Admin Bundle for Active Directory is a free GUI bundle of mini-utilities that features three AD management tools. With this bundle, you can find inactive users and machines, remove them, and of course import users in bulk.
Download SolarWinds GUI-tool for importing users in bulk. The tool is 100% free.
a. Install and Open the SolarWinds User Import Tool
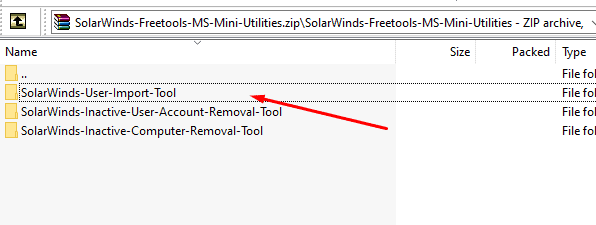
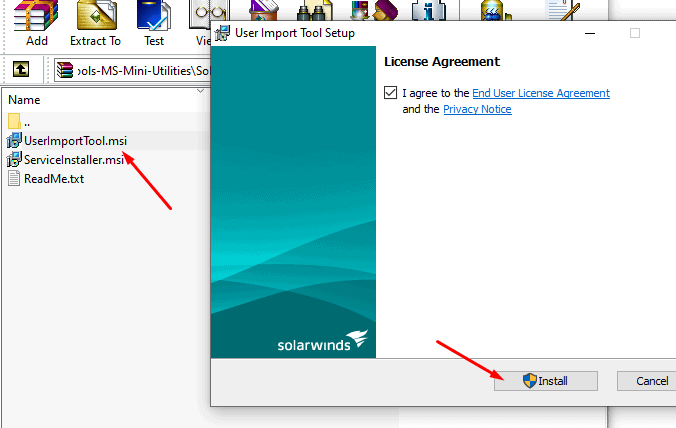
Once downloaded, go ahead and open the “SolarWinds-User-Import-Tool” folder from the zip file, and open the UserImportTool.msi file
Go ahead and “Agree to the terms and conditions”, and click “Install”.
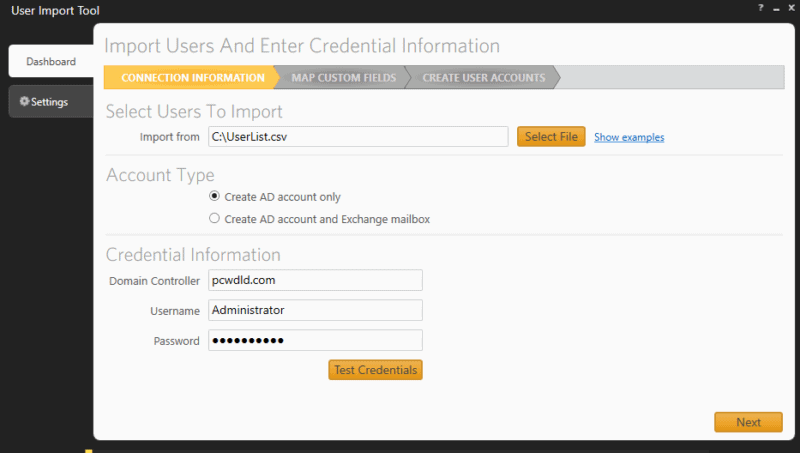
Once installed, go ahead and open the SolarWinds “User Import Tool”. To create bulk users with this tool, all you’ll need to provide is the file with your user’s information.
- Select your file To import data from your CSV, click on “Select File” and browse your file. You can also import data from an Xls file.
- Select Account type Select “Create AD account only”, unless you also want to create Exchange Mailbox.
- Provide the Credential Information Use administrator credentials, and click “Next.”
b. Map Custom Fields
The Next screen “Map Custom Fields,” will show you the fields in your CSV file. Now, you’ll need to map the custom fields “From” your file to what is actually available in your Active Directory. For example, user > SAM, department > Organizational Unit, etc.
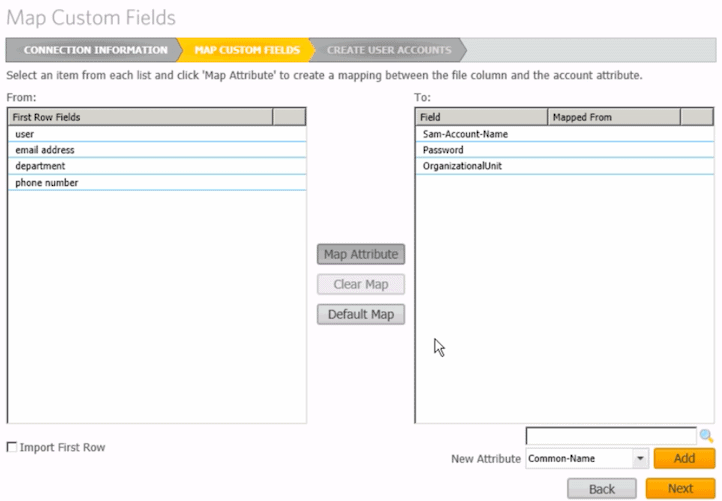
If an attribute does not exist, you can add it, using the bottom-right button “Add” to add the new attribute.
c. Review Accounts
- Click “Next” to see the “Create User Accounts” summary. Here, you’ll be able to see the User preview and select (or de-select) any users to be created (or excluded).
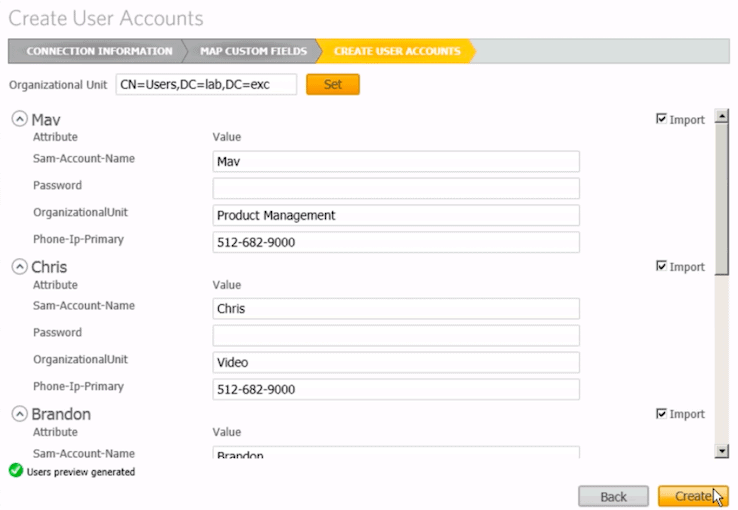
- Click on “Create” to import all users from a CSV file and create all users in bulk.
- Verify whether all users have been created successfully Go to Active Directory Users and Computers and check on the Users OU. Verify that all the user accounts have been created.
ManageEngine ADManager Plus – FREE TRIAL
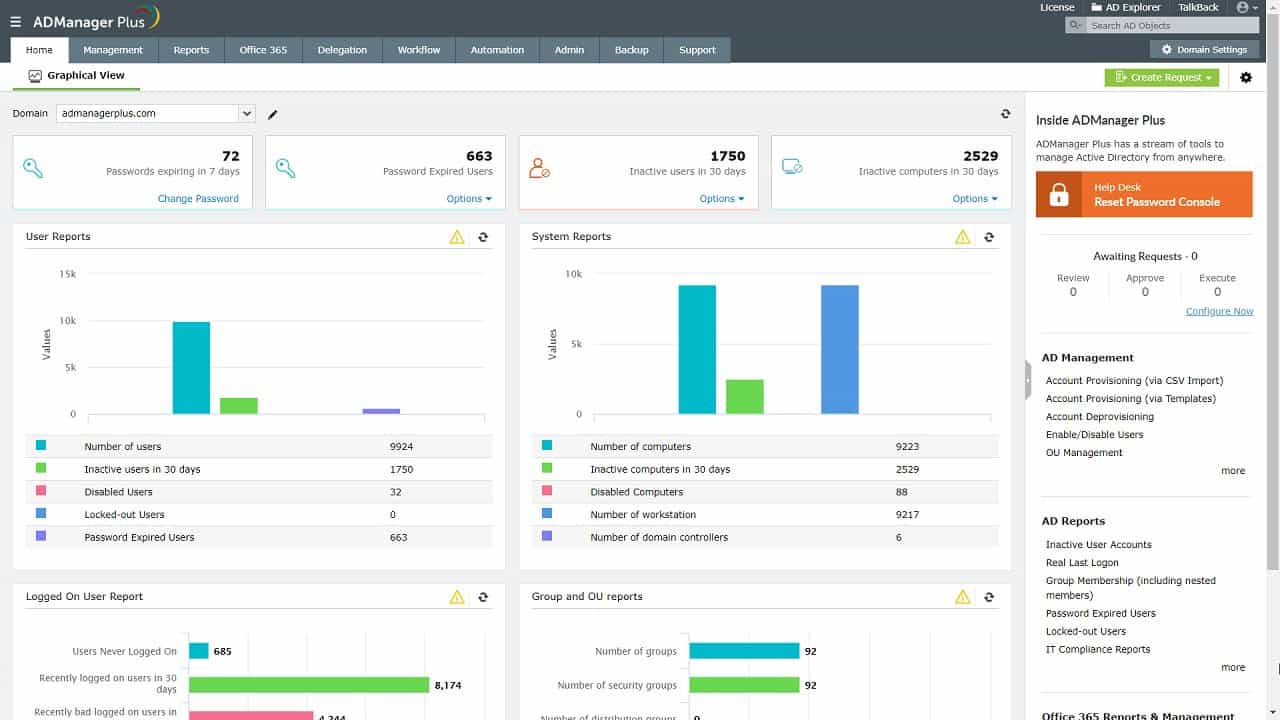
ManageEngine ADManager Plus is another third-party tool that allows you to create users in bulk.
Key Features:
- Supports enterprise-level bulk automations
- Supports native graphing and robust reporting
- Has manual and automated account auditing capabilities
Distinctive Feature
A distinctive feature of Admin Bundle For Active Directory is that it has three tools in one: inactive account removal, inactive computer removal, and user import. Plus, it is also worth noting that this bundle is easy to use and set up. You can deploy it without needing any extra consulting or services.
Why do we recommend it?
We tested the Admin Bundle For Active Directory and found it to be a lifesaver for managing user and computer accounts in Active Directory environments. This bundle of automated tools saves administrators time and streamlines account management in Active Directory.
Who is it recommended for?
If you’re a system admin or a network manager wrestling with Active Directory, this bundle of tools will become your new best friend. It is an ideal tool to improve security. It handles inactive accounts and optimizes time and resources.
Pros:
- Detailed reporting, can generate compliance reports for all major standards (PCI, HIPAA, etc.)
- Supports multiple domains
- Supports delegation for NOC or helpdesk teams
- Allows you to visually view share permissions and the details of security groups
Cons:
- Is a comprehensive platform that takes time to fully explore
This system uses a template to standardize user account data. So, the first step in creating a batch of user accounts is to define the template that should be used for accounts. You can figure out your requirements with a 30-day free trial.
Conclusion
In this tutorial, we learned how to create users in bulk in Active Directory using two different methods: the PowerShell script and the GUI User Import Tool.
Both methods can be highly effective. If you want more control and flexibility, use PowerShell. But bear in mind that you’ll need some scripting abilities to update and troubleshoot your script. On the other hand, creating bulk users in Active Directory with the SolarWinds User Import Tool is much easier and faster, because it saves you from customizing scripts.
Create Bulk Users in Active Directory FAQs
How do I create AD user in CSV?
A CSV file is a plain-text file with comma-separated values. You can create such a file with Notepad or some other text editor. However, it is easier to create a CSV file of Active Directory user accounts in a spreadsheet, such as Excel. Spreadsheet systems allow you to save your file in CSV format. Put headings at the top of the first few columns in your spreadsheet. These headings will be the fields of data in your CSV file for import into Active Directory. The least you will need are the following columns:
- First Name
- Last Name
- Username
- Password
- OU
Enter data into each of these columns. This will create a number of records with each row representing a new user account. Select to save the file in CSV format. For example, in Excel, expand the drop-down list that is shown below the file name field – CSV is an option in this list.
How do I create a bulk user in Active Directory Azure?
To create users in bulk for Azure AD, follow these instructions:
- In the AzureAD console, select Users.
- Click on Bulk create in the ribbon menu at the top of the All Users list. This opens a side panel.
- Click on the Download button in the Bulk create user window. This will give you a template.
- Open the template in a text editor or a spreadsheet.
- Enter the values for each column in the template, creating one line for each new user.
- Save the template with a different name by Selecting Save As from the File menu.
- Go back to the console with the Bulk create user window still open.
- Click on the folder icon next to the 3. Upload your csv file field.
- Find your file and click Select. The system will validate your file.
- Click on Submit in the next screen to upload your new user accounts.
What are bulk users?
When people talk about bulk users in Active Directory they are just using bad grammar. What they are really trying to say is “create user accounts in bulk,” which means they want to insert a batch of user accounts rather than entering each one individually.
Active Directory (AD) administrators often need to create multiple user accounts at once. Doing this manually for a large number of users can be time-consuming and error-prone. In this article, we review two methods for bulk user creation using PowerShell, updated to reflect best practices. All techniques leverage the standard ActiveDirectory PowerShell module, which is fully supported on modern Windows Server versions (including Windows Server 2022) and in Windows PowerShell 5.1 or PowerShell 7+. The primary cmdlets used are New-ADUser, Get-ADUser, Remove-ADUser, Export-CSV, and Import-CSV – all of which remain available and function the same in current environments. We will also use Microsoft Excel as a convenient tool for editing CSV files, though any spreadsheet or text editor could be used.
Overview: We’ll demonstrate two scenarios for bulk account creation:
- Scenario 1 – Uniform Accounts: Creating multiple AD user accounts that share a common naming pattern and similar parameters (e.g., User1, User2, … all with a default password). This is useful for test accounts or temporary access accounts that have minimal required attributes.
- Scenario 2 – Customized Accounts: Creating multiple AD user accounts with individual attributes by importing details from a CSV file. This approach is suited for onboarding many new employees or any situation where each account has distinct information (name, department, etc.).
Important: These operations directly modify AD. Ensure you have the ActiveDirectory module installed (on a Domain Controller or via RSAT on a workstation) and appropriate permissions to create users. It’s recommended to practice in a test environment or have a current backup of AD, as bulk changes can be destructive if something is misconfigured. The examples below assume a domain Test.local and an OU named Users_New where new accounts will be created.
Bulk AD Account Creation with Typical Settings (Uniform Accounts)
First, we’ll create a batch of AD user accounts that have a consistent name format and identical settings. In this example, we create 15 users named Client1 through Client15, all in the OU Users_New in the Test.local domain. Each account will be enabled with a default password that varies by user (e.g., Password1 for Client1, Password2 for Client2, etc.). We will use the New-ADUser cmdlet in a loop to achieve this.
1. Verify no conflicting accounts exist: Before creating new accounts, it’s wise to check that accounts with the intended naming pattern don’t already exist, to avoid duplicates. We use Get-ADUser with an LDAP filter to search for any existing users whose name starts with “Client”:
Get-ADUser -Filter 'name -Like "Client*"'
Output: If no such users exist, this command returns nothing (an empty result confirms we’re clear to proceed).
2. Create the new user accounts: We can create multiple users in one go using a PowerShell range and the ForEach-Object loop (aliased as %). The following command will iterate from 1 to 15 and create a user for each number:
1..15 | ForEach-Object {

New-ADUser -Name "Client$_" -SamAccountName "Client$_" `

-AccountPassword (ConvertTo-SecureString "Password$_" -AsPlainText -Force) `

-Enabled $true -Path "OU=Users_New,DC=Test,DC=local"

}
3. In this command, the placeholder $_ represents the current number in the loop. For each iteration, New-ADUser is called with a unique Name and SamAccountName (Client1, Client2, …), and a secure string password is created from the text “Password<Number>”. We specify -Enabled $true to activate the account upon creation, and -Path to target the Users_New OU. (By default, if -Path is not given, accounts would be created in the domain’s default container, but it’s best practice to specify the OU explicitly.)
Note: In modern usage, the SamAccountName (the user’s logon name* in pre-Windows 2000 format) should always be provided when creating a user. In our example, we set SamAccountName equal to the Name for simplicity. If this parameter is omitted, the New-ADUser cmdlet will try to use the Name as the SamAccountName by default; however, it’s recommended to specify it to avoid any ambiguity or length issues. We also ensure an AccountPassword is set because enabling an account at creation time requires a password.
4. Confirm the accounts were created: After running the above, we can query AD again to list the new users and verify their status:
Get-ADUser -Filter 'name -Like "Client*"' -SearchBase "OU=Users_New,DC=Test,DC=local" |

Format-Table Name, Enabled, DistinguishedName

Output showing the newly created users Client1–Client15, all Enabled, under the specified OU. As expected, all 15 accounts have been created with the default settings we provided (enabled and with the given password). Each account’s DistinguishedName confirms the location in the Users_New OU.
5. Cleanup (if necessary): If these accounts were created for testing or temporary use, you may eventually want to remove them. The Remove-ADUser cmdlet deletes a user account. For example, to remove all 15 test accounts without confirmation prompts, you can run:
1..15 | ForEach-Object { Remove-ADUser "Client$_" -Confirm:$false }
This loops through the same range and deletes Client1 … Client15. We include the parameter -Confirm:$false to suppress the interactive confirmation for each deletion (which is useful when deleting many objects at once). Always use caution with bulk deletion – you can omit -Confirm:$false to be prompted for each removal, or run a filtered Get-ADUser piped to Remove-ADUser for more control (e.g., Get-ADUser -Filter ‘Name -like “Client*”‘ | Remove-ADUser).
At this point, we have demonstrated creating multiple AD users with uniform settings using a single PowerShell one-liner. This method is efficient for generating accounts that follow a simple pattern. Next, we will explore a more complex scenario where each account has individual attributes, and we’ll leverage a CSV file to import those details.
Bulk AD Account Creation with Individual Settings (CSV Import)
In the second scenario, each new user account will have distinct properties (name, department, etc.). Automating this requires a bit of one-time setup: preparing a CSV file with all the desired user attributes, and then using PowerShell to import that data and create accounts. While this approach involves some manual preparation, it significantly reduces repetitive input for large numbers of users.
Overview of steps: We will export a “template” user’s attributes to a CSV to get the correct column structure, edit that CSV (using Excel for convenience) to add our new users’ details, save it, then run an Import-CSV + New-ADUser script to create all the accounts in one go.
1. Export a Template User to CSV
First, decide on a template user account that has many of the fields filled in that you want to replicate (e.g., a dummy account or an existing account with representative attributes). This will help generate the CSV with proper headers. In this example, we use a test account John Doe as the template.
Use Get-ADUser to retrieve the template user and Export-CSV to save all its properties to a CSV file. We include the -Properties * flag to get all possible attributes of the user:
Get-ADUser -Filter 'name -Like "John*"' -Properties * | Export-CSV C:\Temp\exp.csv
This command exports John Doe’s AD user object to C:\Temp\exp.csv. If it runs successfully, it will produce no output (aside from creating the file). We recommend adding the -NoTypeInformation switch to Export-CSV in modern PowerShell, which omits the type header line (#TYPE …) from the CSV.
2. Prepare and Edit the CSV in Excel
Now we’ll use Excel to edit exp.csv – removing unnecessary columns and adding new user rows:
a. Open the CSV in Excel: Launch Excel and go to the Data tab. Click Get Data → From Text/CSV. Navigate to the C:\Temp directory and select exp.csv, then click Import.

Using Excel’s import wizard to open the exported CSV (select the file and click Import).
Excel will open the Text Import Wizard to guide importing the CSV. Use the following settings in the wizard:
Step 1: Choose Delimited as the data type, and set Start import at row to 2 (to skip the #TYPE header line, if present). Ensure the file origin/encoding is correct (e.g., 437 for OEM US). Then click Next.

Text Import Wizard – Step 1: Select “Delimited” and start at row 2 (skip the first line).
Step 2: Under Delimiters, uncheck Tab and check Comma (the CSV is comma-separated). You should see the preview split into columns after doing this. Click Next.

Text Import Wizard – Step 2: Specify the delimiters (comma-separated, no tab).
Step 3: For our purposes, we can accept all columns as General data type. (If any column should be treated as text or date specifically, you could set it here, or choose to skip certain columns directly in the import. We will instead remove unwanted columns after import.) Click Finish.

Text Import Wizard – Step 3: Finish the import (no special formatting changes needed).
When prompted, choose to put the data in the Existing worksheet (e.g., starting at cell $A$1) and click OK to import. The CSV content will now populate the Excel sheet.
At this stage, you will see a sheet with a header row containing every possible AD attribute (as columns), and below it the data from the template user (John Doe). There will likely be dozens of columns, many of which you won’t need to set for new users.
b. Remove unnecessary columns: Identify which attributes are not needed or will not be managed for the new accounts, and delete those columns to simplify the file. For example, you might remove attributes like ObjectGUID, LastLogonDate, etc., that should not be manually specified for new accounts. Focus on keeping the columns that you plan to define (such as Name, SamAccountName, GivenName, Surname, Department, EmailAddress, etc.).
To delete columns in Excel: select the column(s), right-click and choose Delete. Repeat as needed. In our example, we removed dozens of columns and kept a core set of attributes.

Removing unnecessary columns in Excel (example: deleting several attribute columns that aren’t needed in the import).
Which columns to keep depends on your requirements. At minimum, ensure you keep Name and SamAccountName (and ideally UserPrincipalName) since these are critical for user creation. Also keep AccountPassword (we will fill in plaintext passwords here for each user, which the script will convert to secure strings) and any profile fields you want to set (e.g., department, title, etc.). You should also keep the Enabled column (set to TRUE/FALSE) and ChangePasswordAtLogon if you want to enforce password change on first login. In our example, we retained columns for Name, Enabled, ChangePasswordAtLogon, GivenName, ObjectClass, SamAccountName, Surname, UserPrincipalName, AccountPassword, EmailAddress, etc.
c. Add new user rows: Below the template row (or replacing the template row), enter the details for each new user account you want to create, under the appropriate columns. Each row will represent a new user object. For instance, we add users James Hunter, William Nelson, Olivia Moore, Heather Murphy, Ryen Jackson, and Katie Griffin in our sheet, each with their own attributes (see image below). For Boolean fields like Enabled or ChangePasswordAtLogon, use TRUE or FALSE. For AccountPassword, enter a default password in plain text for each user (the script will convert it securely). Make sure values like SamAccountName are unique in the domain and conform to username rules (≤20 characters for SamAccountName). Also double-check the ObjectClass/Type column: it should be “user” for all new entries (this was inherited from John Doe’s object class).

Edited CSV data in Excel: each row represents a new user with specified attributes. In this example, six new users (James, William, Olivia, Heather, Ryen, Katie) have been added.
d. Save the edited CSV: Once all new user rows are added and you are satisfied with the data, save the file as a new CSV. Go to File -> Save As, choose CSV (Comma delimited) as the format, and name the file (e.g., imp.csv in C:\Temp). If Excel warns about features not supported in CSV (this is normal), confirm that you want to keep using that format (click Yes). The file C:\Temp\imp.csv now contains the headers and data for the users to import.
3. Import the CSV and Create Users with PowerShell
With imp.csv ready, the final step is to write a PowerShell script that reads each row of the CSV and calls New-ADUser with those parameters. Below is a PowerShell script (which we’ll call Import.ps1) to perform the bulk import:
# Import the CSV data into a PowerShell array of objects

$CSVData = Import-Csv "C:\Temp\imp.csv"

# Define the target OU (distinguished name format)

$TargetOU = "OU=Users_New,DC=Test,DC=local"

# Loop through each record (user) in the CSV data

foreach ($Rec in $CSVData) {

New-ADUser `

-Name $Rec.Name `

-Path $TargetOU `

-Enabled ([bool]$Rec.Enabled) `

-ChangePasswordAtLogon ([bool]$Rec.ChangePasswordAtLogon) `

-AccountExpirationDate $Rec.AccountExpirationDate `

-AccountPassword (ConvertTo-SecureString $Rec.AccountPassword -AsPlainText -Force) `

-City $Rec.City `

-Company $Rec.Company `

-Country $Rec.Country `

-Department $Rec.Department `

-Description $Rec.Description `

-DisplayName $Rec.DisplayName `

-Division $Rec.Division `

-EmailAddress $Rec.EmailAddress `

-EmployeeID $Rec.EmployeeID `

-EmployeeNumber $Rec.EmployeeNumber `

-Fax $Rec.Fax `

-GivenName $Rec.GivenName `

-HomeDirectory $Rec.HomeDirectory `

-HomeDrive $Rec.HomeDrive `

-HomePage $Rec.HomePage `

-HomePhone $Rec.HomePhone `

-Initials $Rec.Initials `

-LogonWorkstations $Rec.LogonWorkstations `

-Manager $Rec.Manager `

-MobilePhone $Rec.MobilePhone `

-Office $Rec.Office `

-OfficePhone $Rec.OfficePhone `

-Organization $Rec.Organization `

-OtherName $Rec.OtherName `

-POBox $Rec.POBox `

-PostalCode $Rec.PostalCode `

-ProfilePath $Rec.ProfilePath `

-SamAccountName $Rec.SamAccountName `

-ScriptPath $Rec.ScriptPath `

-ServicePrincipalNames $Rec.ServicePrincipalNames `

-State $Rec.State `

-StreetAddress $Rec.StreetAddress `

-Surname $Rec.Surname `

-Title $Rec.Title `

-Type $Rec.Type `

-UserPrincipalName $Rec.UserPrincipalName

}
A few things to note in this script:
- We import the CSV into $CSVData. Each row from the CSV becomes an object in this array, with properties corresponding to the column headers.
- We set the target OU in $TargetOU for convenience. All new users will be created in Users_New, Test.local (modify this string for your domain/OU as needed).
- In the foreach loop, we use $Rec to represent each user record. For each one, we call New-ADUser with the various parameters. We map each AD user attribute to the corresponding $Rec.<Property> from the CSV. For boolean values like Enabled and ChangePasswordAtLogon, we cast the CSV string (“TRUE”/”FALSE”) to boolean [bool] so that New-ADUser receives a proper boolean type (creating-bulk-user-accounts-ad-via-powershell.docx). For the password, we convert the plaintext string from CSV into a secure string on the fly using ConvertTo-SecureString … -AsPlainText -Force.
- Not every parameter needs to be included. We included many commonly used attributes for demonstration, but you can simplify the script to include only the fields you kept in the CSV. (Any parameters not supplied will take AD defaults or remain blank. For example, if ProfilePath is not needed, it can be omitted from both the CSV and the script.)
- The -Type parameter is shown using $Rec.Type. This corresponds to the object class of the account. In most cases this will be “user” for standard AD user accounts. If the CSV doesn’t have a Type column, or it’s blank, New-ADUser will default to creating a normal user object.
Save this script (Import.ps1) and then execute it in PowerShell:
C:\Temp\Import.ps1
If everything is set up correctly, the script will run without errors and produce no output. It silently creates each user in AD. (We did not include error-handling or output messages for brevity, but in a production script you might add logging or error capture.)
4. Verify the New Accounts in AD
Finally, we confirm that the new accounts have been created in the target OU with the desired settings:
Get-ADUser -SearchBase "OU=Users_New,DC=Test,DC=local" -Filter * | Format-Table Name, Enabled, DistinguishedName
This command lists all user accounts in the Users_New OU. It should include the users we added from the CSV, along with their Enabled status.

Output from Get-ADUser showing the newly imported users (James Hunter, William Nelson, etc.) in the OU, and their accounts are enabled or disabled as specified.
Each account’s Distinguished Name is shown, confirming they were created in the correct OU. At this point, the accounts are ready to use. Each user can log in with the password set in the CSV (unless ChangePasswordAtLogon was TRUE, in which case they’ll be prompted to change it on first login).
Conclusion
We have explored two ways to automate bulk user creation in Active Directory using PowerShell. The first method quickly generates many similar accounts using a simple script, and the second method leverages CSV import to create multiple accounts with individual attributes. Both approaches use the standard ActiveDirectory PowerShell module cmdlets (New-ADUser, Get-ADUser, Remove-ADUser, etc.). Using these techniques can save significant time and reduce errors, especially in large-scale user provisioning tasks. Always remember to double-check your scripts and data (such as CSV entries) in a test environment before running them in production.
This is the guide, I’ll show you two options on how to bulk create users in Active Directory. Both options allow you to create AD users from a csv file. By using a PowerShell script or a tool you can streamline the user creation process and save yourself lots of time.
In this article.
- Option 1. Bulk Create AD Users with the AD Pro Toolkit
- Option 2. Bulk Create AD Users with PowerShell
- Verify AD User Import
- Bulk Modify Users After Import
Option 1. Bulk Create AD Users with the AD Pro Toolkit
In this first example, I’ll use the AD User Creation Tool that is included with the AD Pro Toolkit. This tool makes it very easy to bulk import users and is a great alternative if you don’t want to deal with PowerShell scripts. Also, there are certain user fields that PowerShell does not support and a 3rd party import tool is needed.
You can download a free trial of the toolkit and try it for yourself.
Below is a summary of how to bulk create Active Directory users with the AD Pro Toolkit.
- Open the “Import Users” Tool.
- Click the “Download CSV Template” button.
- Fill out the CSV file and save it. Use the provided template as a reference.
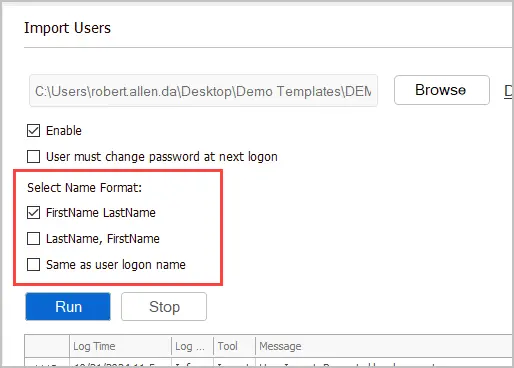
- Select the “Import Options” button and change any options you need.
- Click “Browse” to select your csv template and click “Run” to start the import.
In the example below, I bulk created 42 users, added them to multiple groups, set the users manager and multiple other attributes.

If any accounts from the CSV fail to import it will provide an error in the logs. You can see below I had six accounts that did not create because the logon name already exists.
Requirements
I recommend the follow CSV headers and settings when creating new user accounts. You can remove any column in the CSV that you do not need.
- SamAccountName (required) = This will be the users logon name.
- password (required) = users password. Make sure it meets your password requirements.
- givenName (required) = First name
- sn (required) = Last name
- OU = The organizational unit to add the user accounts into. This is the distinguished name of the OU. If you leave it blank it will import into the default users container.
- DisplayName = This is the users display name.
- Groups = Groups to add the users to. Separate each group with a comma.
- Force Password Change at Next Logon = Click the import options button to enable this for each user.
Download the included CSV template as a reference or starter template.

Here is a screenshot of my CSV file (click to enlarge).

You can download my CSV template here.
Import Options
Under import options you can change the follow settings.
- Enable Users = This will enable the accounts when they are created (on by default).
- Force Password Change = Select this to enable force password change at next logon
- Name = Select this to change the name format to LastName, FirstName.

User Name Format
You can choose from 3 different name formats when bulk creating accounts.
- FirstName LastName
- LastName, FirstName
- Same as user logon name.
Before clicking run select the name format for your user accounts.
The GUI tool is a huge time saver and makes importing user accounts into Active Directory super easy. Plus, you don’t have to modify any scripts or need PowerShell experience.
The AD Pro Toolkit also includes a Bulk User Update Tool to modify multiple user accounts at once. This is a huge time saver for when you need to mass update user information such as department, telephone number, email addresses, and so on.
Try the AD Pro Toolkit for FREE, download your copy here.
Option 2: Bulk Create AD Users with PowerShell
What you will need:
- PowerShell Active Directory Module loaded – The script I provide will load the module you just need to run it from a computer that has RSAT tools installed or the AD role.
- Rights to create user accounts in Active Directory
- CSV File (See below)
- PowerShell Script (See below)
Step 1: Setup the CSV file
A basic CSV file should have the following headers. Technically you can import new accounts with just the SamAccountName, Name, and the password column but that is not recommended.
- SamAccountName = this will be the users logon name
- password = users password. Make sure it meets your password requirements.
- path = OU where you want to import users to. This is the distinguished name of the OU. If you leave it blank it will import into the default users container.
- GivenName = First name
- Surname = Last name
- Name = Name
- DisplayName = Display Name
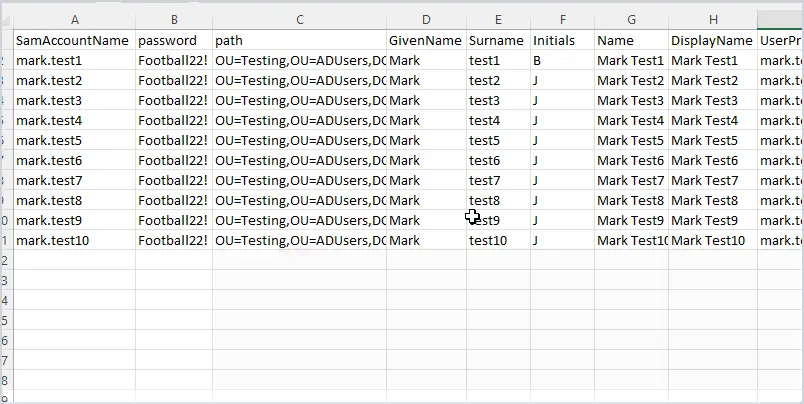
Above is an example of my CSV file.
How do you find the OU path?
The OU path is the distinguishedName attribute, to find this open up Active Directory Users and Computers and browse to the OU you want to import to, then right click and select properties then select attribute editor.
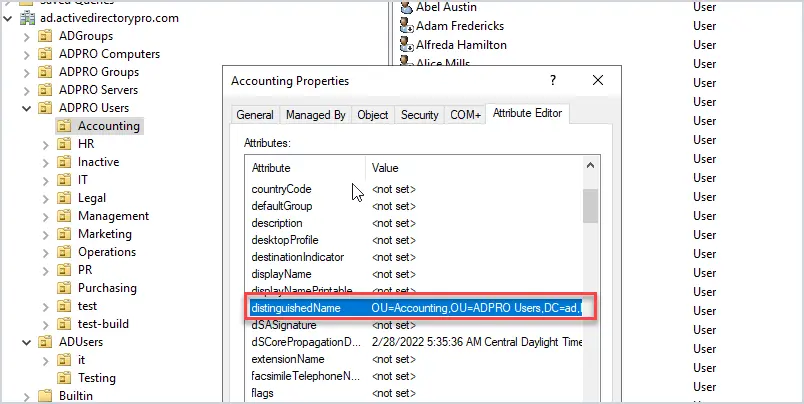
Copy the path into the path column in the CSV file.
At this point the CSV file has the required fields, you can jump to step 2 (setting up the PowerShell script) or keep reading to configure optional fields for user accounts.
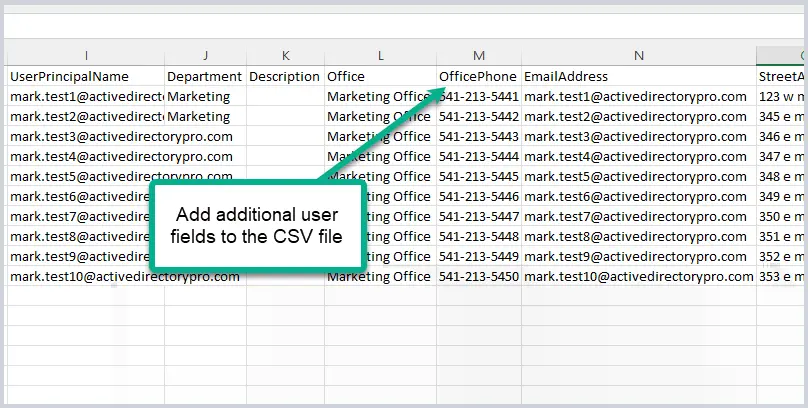
Add additional user fields to the CSV file.
You may want to include some additional user fields in the CSV. Just know that whatever columns you add to the CSV you will also need to include them in the PowerShell script.
I’ve included several common user fields in the CSV template and PowerShell script.
- UserPrincipalName
- Department
- Description
- Office
- OfficePhone
- EmailAddress
- StreetAddress
- POBox
- City
- State
- PostalCode
- Title
- Company
To add more I recommend looking at the PowerShell new-aduser cmdlet to see which parameters are supported.
I like to keep the name of the headers the same as the new-aduser parameters, it makes it easier to troubleshoot.
At this point, you should have a CSV file configured, and save the file to your local computer.
Step 2: Configure the PowerShell Script
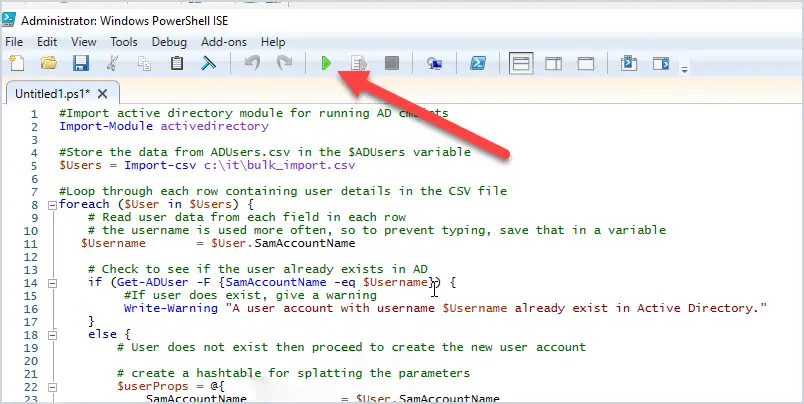
Copy the script below and modify it as needed.
#Import active directory module for running AD cmdlets
#Author: Robert Allen
#Website: activedirectrypro.com
Import-Module activedirectory
#Store the data from ADUsers.csv in the $ADUsers variable
$Users = Import-csv c:\it\users.csv
#Loop through each row containing user details in the CSV file
foreach ($User in $Users) {
# Read user data from each field in each row
# the username is used more often, so to prevent typing, save that in a variable
$Username = $User.SamAccountName
# Check to see if the user already exists in AD
if (Get-ADUser -F {SamAccountName -eq $Username}) {
#If user does exist, give a warning
Write-Warning "A user account with username $Username already exist in Active Directory."
}
else {
# User does not exist then proceed to create the new user account
# create a hashtable for splatting the parameters
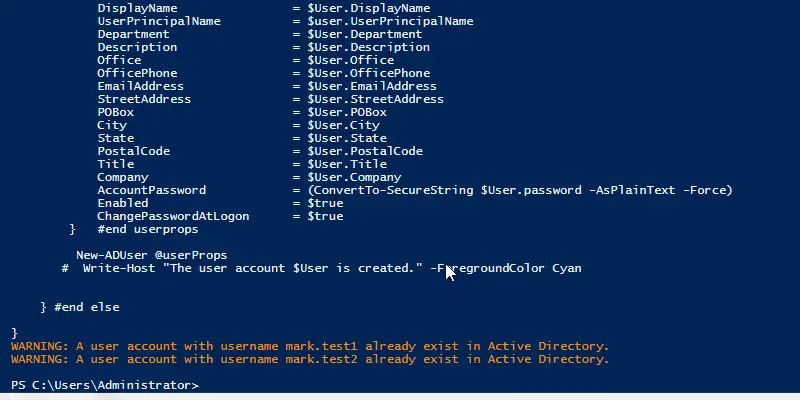
$userProps = @{
SamAccountName = $User.SamAccountName
Path = $User.Path
GivenName = $User.GivenName
Surname = $User.Surname
Initials = $User.Initials
Name = $User.Name
DisplayName = $User.DisplayName
UserPrincipalName = $user.UserPrincipalName
Department = $User.Department
Description = $User.Description
Office = $User.Office
OfficePhone = $User.OfficePhone
StreetAddress = $User.StreetAddress
POBox = $User.POBox
City = $User.City
State = $User.State
PostalCode = $User.PostalCode
Title = $User.Title
Company = $User.Company
Country = $User.Country
EmailAddress = $User.Email
AccountPassword = (ConvertTo-SecureString $User.Password -AsPlainText -Force)
Enabled = $true
ChangePasswordAtLogon = $true
} #end userprops
New-ADUser @userProps
# Write-Host "The user account $User is created." -ForegroundColor Cyan
} #end else
}You will need to modify the path to the CSV file you saved from step 1 (unless it matches what I have in the script).
$ADUsers = Import-csv C:\it\bulk_import.csvBy default, the script sets the accounts to enable. You can change this by setting Enabled to false
Enabled = $falseBy default, the script sets the accounts to change password at the next logon. To change this set “ChangePasswordAtlogon to false.
ChangePasswordAtLogon = $falseThat should do it for configuring the script. It’s pretty much ready to go as is.
Step 3: Run the PowerShell Script to import the accounts
At this point, the CSV file should be setup with the user’s information and the Powershell script should be modified (if needed)
Now it’s time to execute the script.
In PowerShell ISE just click the green button to run the script. If you saved the script to a ps1 file just run the script instead of running directly from ISE.
It will return the prompt when completed. Any errors will be displayed in the console.
Now check Active Directory to verify the accounts imported.
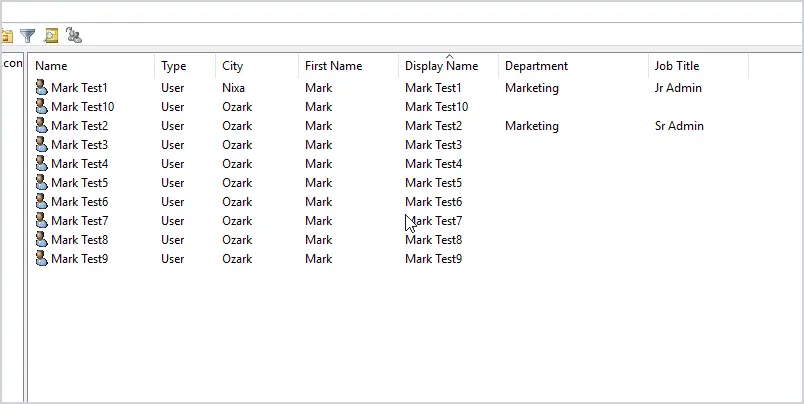
This step is optional but I like to list all accounts from the domain or OU I imported to as a way to verify the import. It’s also useful for getting a list of user accounts and exporting it to csv.
Below is the PowerShell command to get all domain users. The results are sent to a gridview to make it easier to read.
You can add or remove whatever user attributes you need.
Get-ADUser -filter * -properties * | select-object samaccountname, givenname, surname,streetaddress,st,physicalDeliveryOfficeName,manager,mail,title,company,whenCreated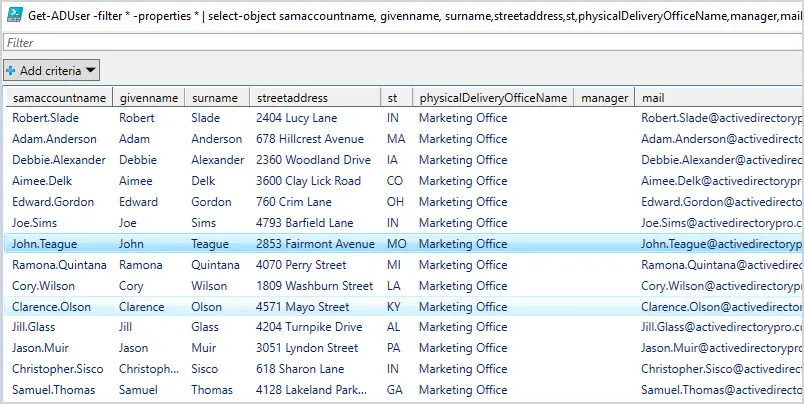
Another option is to use the user export tool that is included in the AD Pro Toolkit. You can select to list all domain users, users from an OU or from a group. You can also easily add or remove columns to the report.

Bulk Modify Users After Import
What if you made an error during the import or forgot to include user details in the CSV?
No worries, you can bulk modify user accounts after the import completes. You can use PowerShell and the GUI tool to bulk update existing AD users. Check out the guides and resources below.
- How to bulk modify Active Directory User Attributes
- How to bulk update ProxyAddresses Attribute
The AD Pro Toolkit includes the Bulk Updater Tool. It also works by using a CSV file, just fill it out and run the tool to bulk modify user attributes.

Additional Resources
- LDAP Mapping – Shows a mapping of the user fields in the Active Directory User and Computer console to their LDAP attribute names.
- Active Directory Pro Documentation – Guides and examples on how to use the AD Pro Toolkit.