
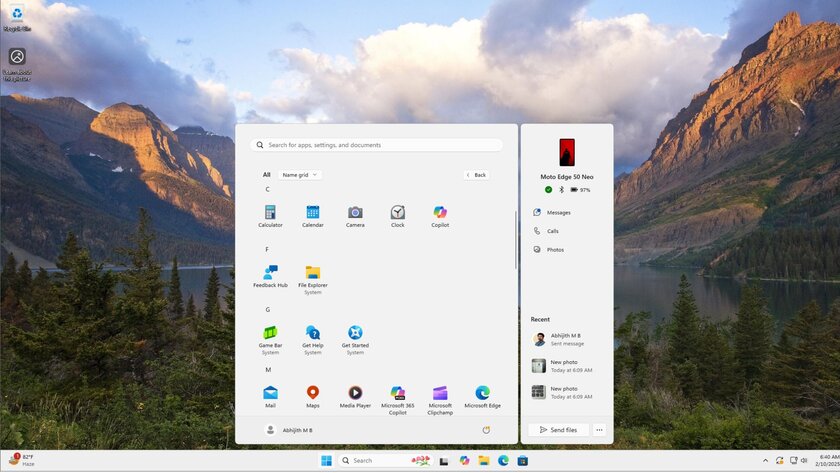
Некоторое время назад стало известно, что компания Microsoft намерена внедрить новые группировки приложений в одном из самых главных элементов управления операционной системы Windows 11 — меню «Пуск». И вот теперь эти группировки стали доступны участникам программы тестирования в сборке за номером 22635.4805. Авторы тематического ресурса Windows Insider показали, как выглядят нововведения.
Список приложений в меню «Пуск» остаётся неизменным на протяжении многих лет — чтобы добраться до последнего приходится долго прокручивать его (особенно если установлено большое количество программного обеспечения). Теперь с помощью «Сетки имён» такая группировка становится более компактной и интуитивно понятной. Тесты показали, что она работает без каких-либо сбоев.
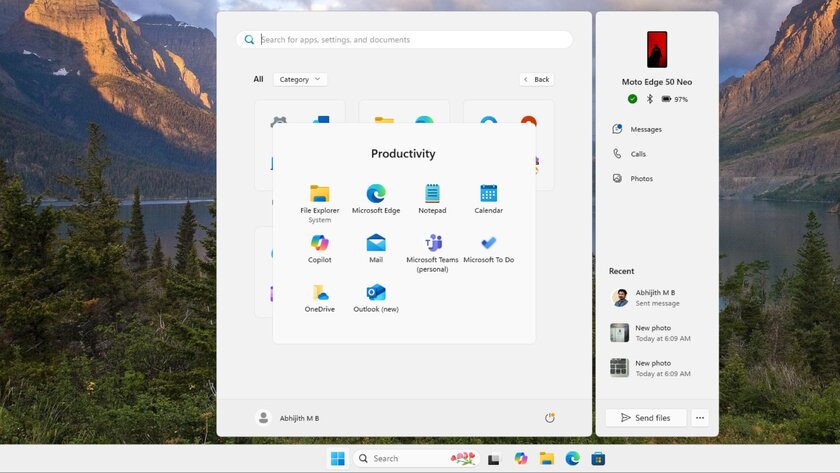
Но ещё более интересной оказалась опция «Категория», которая группирует приложения по их назначению, то есть они будут рассортированы по специальным папкам в зависимости от того, какую функцию выполняют. Некоторые попадут в папку «Производительность», другие — «Креатив». И так далее. Если пользователь кликнет по иконке приложения, оно будет запущено, а если кликнет по меньшему кластеру приложений, система покажет всплывающее окно, в котором можно найти всё программное обеспечение, входящее в выбранную категорию.
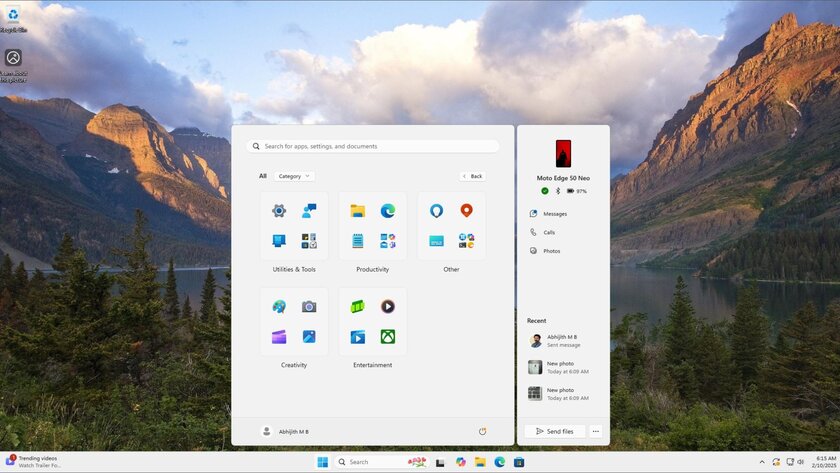
Плохая новость заключается в том, что пользователи не смогут редактировать категории или добавлять собственные. Как считают журналисты, такое ограничение введено из-за того, что Windows 11 просто не поймёт контекст пользовательской категории и не сможет определить, какие приложения к ней относить.
Пока нововведение находится на стадии тестирования. Когда оно доберётся до стабильных версий операционной системы, неизвестно.
Источник
Windows 11 регулярно получает новые функции и изменения в дизайне. Начиная со сборки Windows 11 с номером 2257, Вы можете в Меню «Пуск» группировать приложения с помощью папок.
Многим пользователям это изменение придется по душе. Если в меню «Пуск» на начальном экране, присутствует большое количество закрепленных приложений, и вы не готовы открепить некоторые из них, группировка решит проблему. Папки в меню пуск Windows 11, напоминают группировку приложений в Windows 10, с помощью которых вы можете организовывать свои приложения. Размещение ваших приложений и игр в отдельных группах влияет на повышение производительности и несомненно, облегчит вам жизнь.
Как создать папку для группировки приложений в меню Пуск Windows 11
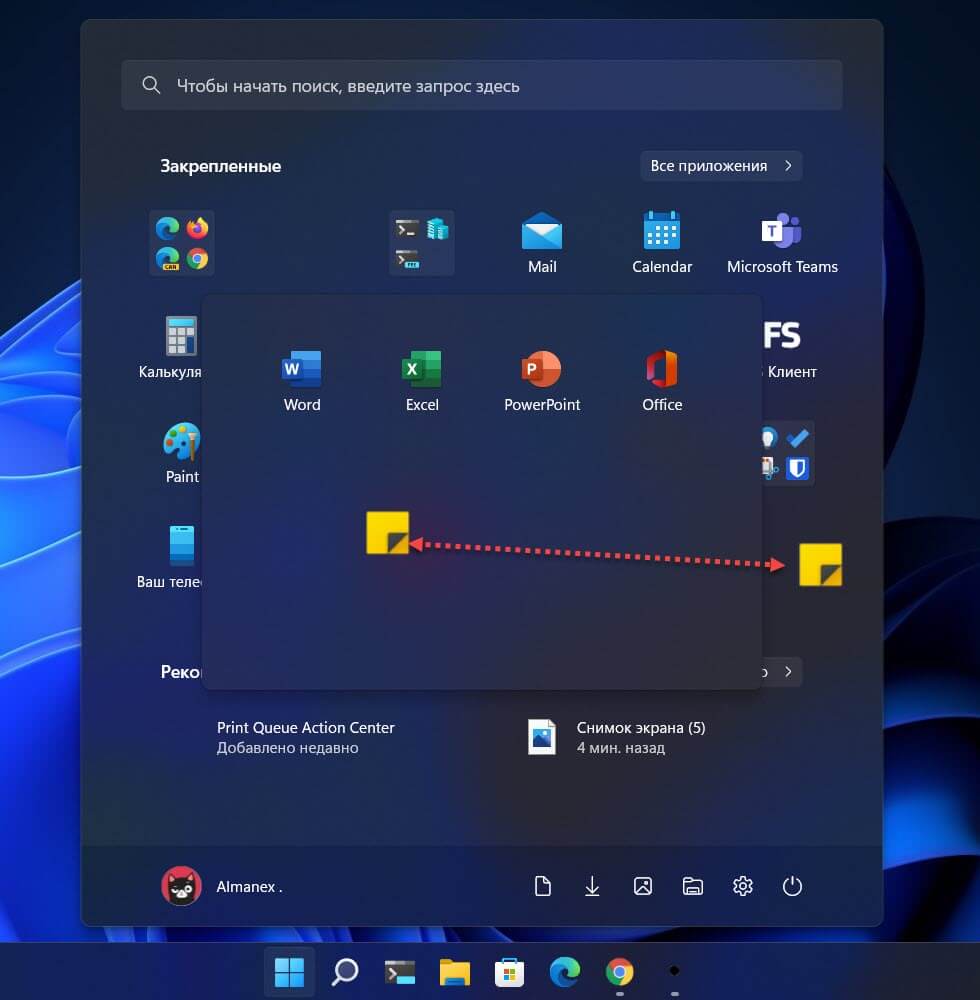
Шаг 1: Чтобы создать папку с приложениями в меню «Пуск», откройте его.
Шаг 2: Перетащите с помощью мыши значок приложения на значок другого и отпустите его.
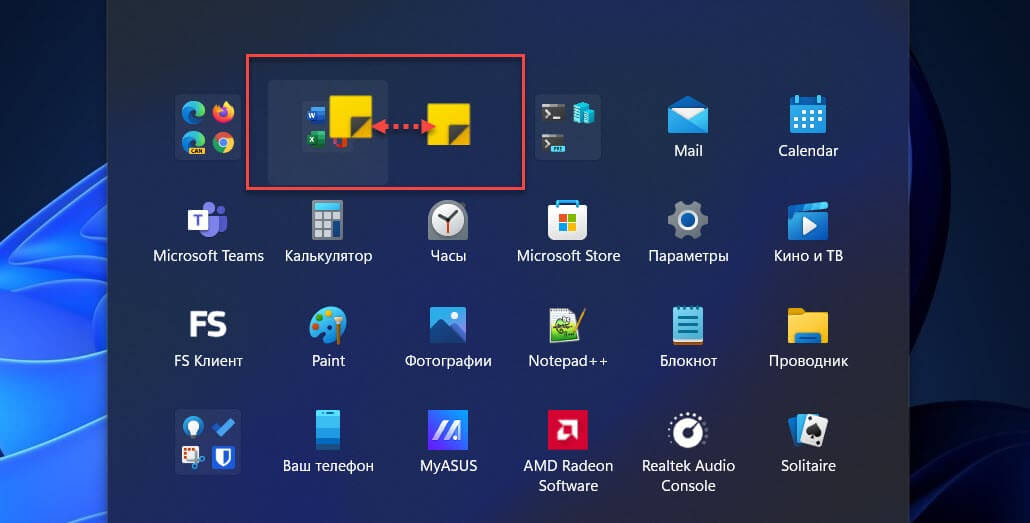
Это действие автоматически создаст папку в меню «Пуск». Папка будет отображать значки приложений, которые в ней находятся.
Шаг 3: Кликните папку, она откроется, и вы сможете увидеть все приложения, которые находятся в ней, повторный клик на одном из приложений откроет его.
Шаг 4: Чтобы добавить в папку больше приложений, просто перетащите их в папку.
Стоит отметить, что, папка в свернутом состоянии будут показывать только первые четыре приложения. Но, вы можете изменить порядок приложений в папке. Откройте ее и перетащите приложение чтобы изменить порядок.
Шаг 5: Если хотите удалить приложение из папки, перетащите его из созданной ранее группы в любое место на начальном экране. Оно будет автоматически удалено из папки и появится справа от редактируемой папки, независимо от того, куда вы его перетащите.
Чтобы удалить папку полностью, вам придется перетащить оттуда все приложения, пока не останется только одно.
На данный момент созданной группе нельзя присвоить имя. Но это предварительная версия функционала. Надеюсь в следующих выпусках появилась возможность подписывать и переименовывать папки.
Группировка приложений привносит дополнительный функционал в меню «Пуск», не нарушая при этом эстетику Windows 11. Те из вас кто применял это в Windows 10, будут рады подобным нововведениям, остальные могут просто игнорировать его.
Вам может быть интересно: Как закрепить файлы и папки из проводника в меню Пуск в Windows 11
If you have a question in mind i.e. How do I group taskbar icons in Windows 11, then this blog post is dedicated to you.
Microsoft has added limited options to customize the taskbar in Windows 11 and grouping taskbar icons is one of them. Check out how to make the taskbar transparent in Windows 11.
If you made up this blog post then you want to group your favorite apps on the taskbar so that you can quickly access them, right?
Officially it’s impossible to arrange or group taskbar icons in Windows 11, but you can take the help of a freeware app named Taskbar Groups.
So let’s learn how to use the Taskbar Groups app to group icons on the taskbar in Windows 11.
Download the Taskbar Groups app zip file from GitHub.
Extract the zip file to obtain the folder containing the Taskbar Groups applications.
Double-click to open Taskbar Groups app.
In the Taskbar Groups app UI, you need to click on the Add Taskbar group button.

In the New Group window, give your group a name. I want to create a taskbar group for a browser so I will name it Browsers.
Set the Group icon. For that, click on the Big Plus icon next to Select group icon. Locate the icon, select and open it.

Select the apps shortcut. For that click on the Big plus icon next to Add new shortcut. This will open the Programs folder, where you will find shortcuts for all apps installed on the PC. Again I will select all browser shortcuts.

Next, you need a select a color scheme for the group window, it could be dark, light, or custom color. You can also manage the opacity of the window as well.
To show App shortcuts in the group vertically, you need to set the Width to 1. To show them horizontally, select the number depending on the list of shortcuts. If you add 4 shortcuts, then set it to 4.
At last, click on the Save button.
Now open the Taskbar Groups folder that you obtained in the first step. Now open the Shortcuts folder inside it, open it, and you will find a shortcut for the group that you have created recently.
To pin the same shortcut, drag-and-drop it to the Taskbar or right-click > Show more options > Pin to taskbar.
Now, if you click on the Shortcut, it will show you shortcuts for either apps or games, depending on what you have added in the particular Taskbar group.

As simple as that!
What is your opinion about the Taskbar Groups application for Windows 11? Did you like it? Are you useful for another taskbar customization tool? Let us know in the comments.
Viney Dhiman, the mind behind GeekerMag, is a seasoned content writer with over 12 years of experience. Specializing in simplifying complex tech concepts, he covers Windows OS, Android, iOS, web apps, and product reviews. His work can be found on popular tech websites like Gizmodo and The Verge, and he has been interviewed by the Microsoft Edge team.
В «Пуске» теперь можно включить автоматическую группировку приложений по категориям.
Microsoft новую инсайдерскую сборку Windows 11 под номером 22635.4950. В ней изменился интерфейс меню «Пуск» и появилась полноценная панель обмена файлами, которая раньше была скрыта и требовала активации через сторонний инструмент.
В «Пуске» теперь можно переключаться между двумя вариантами организации приложений. Первый — сортировка по алфавиту, которая упрощает поиск программ. Второй — автоматическая группировка по категориям, работающая по принципу каталога приложений в iOS. В последнем случае создавать собственные папки нельзя: система сама распределяет софт по разделам. Также в боковой панели добавили уведомления, сообщения и список запущенных приложений с Android-смартфона, если он подключён через «Связь с Windows».

1 / 0

2 / 0
Обновлённая панель обмена файлами впервые появилась в январской сборке 22635.4805, но тогда Microsoft не афишировала её появление, а для активации приходилось использовать утилиту ViVeTool. Теперь функция включена по умолчанию. Чтобы отправить файл, нужно зажать его курсором, перетащить в верхнюю часть экрана и в появившемся окне выбрать, куда его передать.

Когда эти изменения станут доступны всем пользователям Windows 11, пока неизвестно. Microsoft лишь уточнила, что релиз обновления ожидается до конца года.
Sign in to your MUO account
Is your Windows 11 desktop a disorganized mess? If so, you can organize it better by grouping shortcut icons into category boxes. Windows 11 doesn’t have any feature that enables you to group icons into boxes on the desktop.
Some users stump up for Stardock Fences to organize their desktop icons better. However, you can group desktop shortcut icons with the freeware iTop Easy Desktop and ToolBox software packages for Windows 11.
How to Group Desktop Icons With iTop Easy Desktop
The iTop Easy Desktop software for Windows 11, 10, 8.1, and 7 enables you to add transparent boxes with different titles to the desktop. Then you can organize your software shortcuts into distinct groups by moving them into the category boxes. This is how you can group desktop shortcuts with iTop Easy Desktop:
- Open the iTop Easy Desktop webpage in your browser and click the Download Now button.
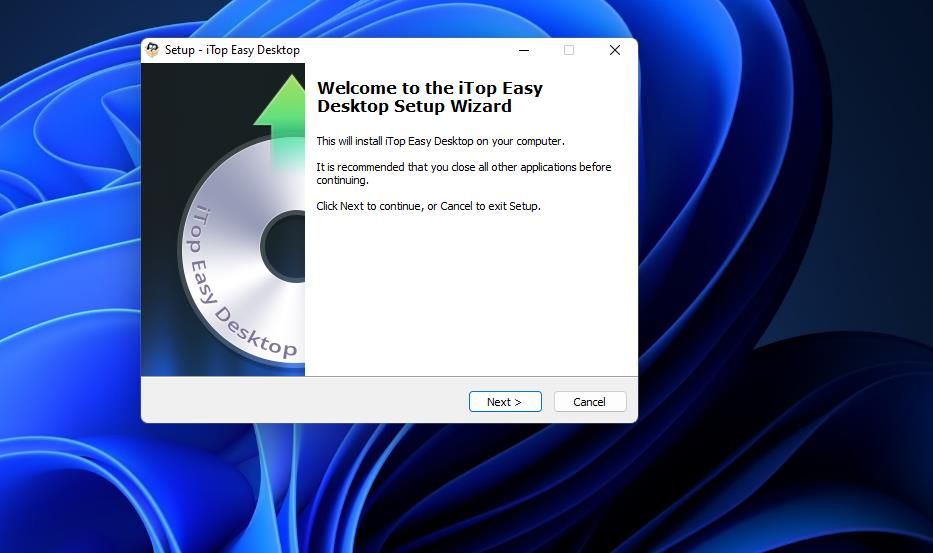
- Once it’s done, run the itop-easy-desktop-setup.exe file.
-
Select Next to install iTop Easy Desktop.

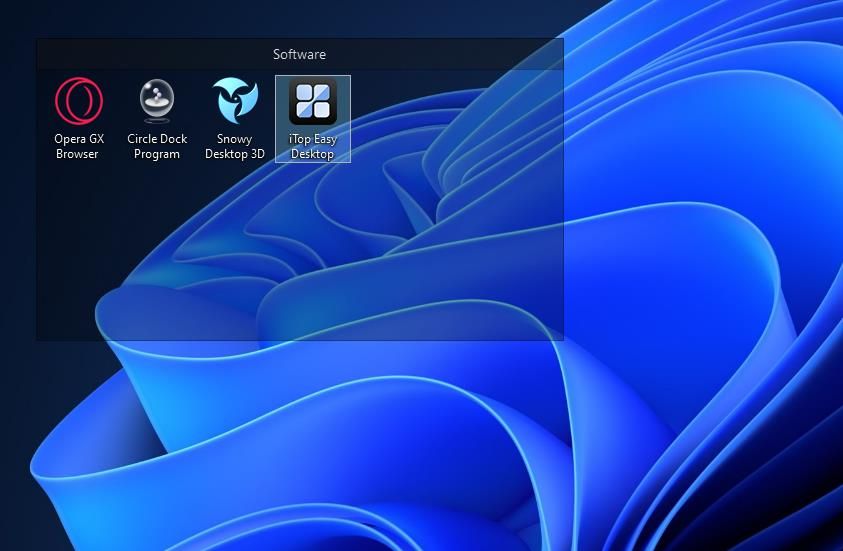
- Click Finish with the Launch iTop Easy Desktop checkbox selected.
- Move the iTop Easy Desktop window that opens to the side of the desktop to make some space for adding boxes.
- Left-click on the desktop, hold the mouse button, and then drag an outline for a box with the cursor.
-
Release the mouse button and select Create a Box. You can further adjust the size of the box after adding it by placing the cursor along its border and dragging the mouse.

-
Double-click the top of the box to add a category title for it. For example, you could enter titles for software categories like games, browsers, productivity apps, multimedia, system maintenance utilities, etc.

- Repeat steps eight to 10 to add more boxes to the desktop.
- Then drag-and-drop icons on the desktop into the category boxes to group them.

You can access options for the boxes by clicking the Menu buttons on their top left corners. Move the cursor over the Sort by option to select one of several options for organizing the icons in their respective boxes. There you can also select to rename and remove boxes.

The View submenu on that menu also includes a Roll up box option. Selecting that option rolls up the box to its title bar, as shown below. That’s a handy feature for preserving desktop space. To unroll a box when you need to access it, deselect the same option.
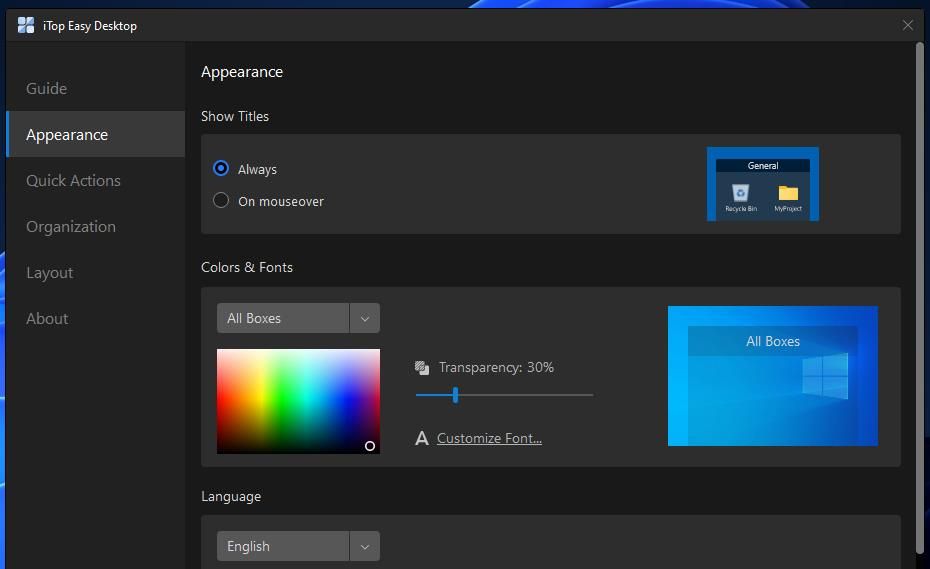
You can customize the appearance of all desktop boxes or individual ones from the Appearance tab on the iTop Easy Desktop window. There you can customize colors by selecting All Boxes or an individual one on the drop-down menu and selecting colors on the palette. Drag the Transparency bar’s slider to make boxes more or less transparent.
The Quick Actions tab on that window shows iTop Easy Desktop’s hotkeys. The Win + F3 hotkey listed there is a particularly noteworthy one. Pressing the Windows + F3 key combination opens (and closes) a search tool in the middle of the desktop. You can search for and find apps, documents, and files in Windows 11 with that utility.
If you ever want to disable the desktop boxes, uncheck the Enable iTop Easy Desktop checkbox on the Guide tab. Deselecting that setting will restore all your shortcuts on the desktop as they originally were before you grouped them in boxes. Reselecting the same option will display all boxes you added.
ToolBox is older software for grouping desktop shortcuts that dates back to Windows 3.1. So, you can utilize it on a wide range of Windows platforms, including the most recent addition to the series. ToolBox isn’t actively updated anymore, but it packs in more customization settings than iTop Easy Desktop. You can group shortcuts on your desktop with ToolBox as follows:
- Open the ToolBox homepage and download the file from the Download section at the top right of that page.
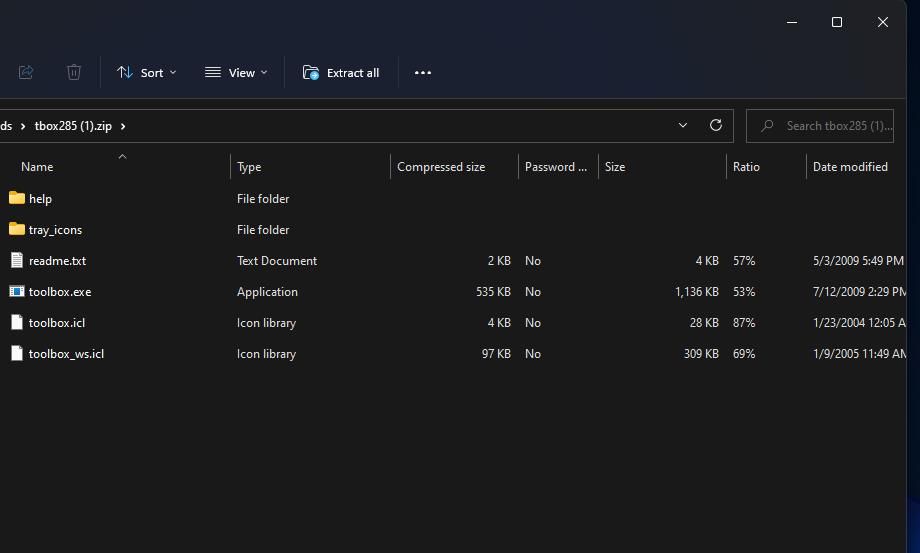
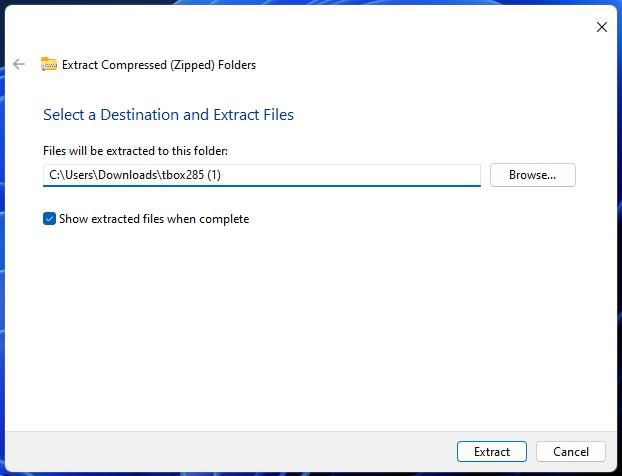
- Click the tbox285.zip to open the ZIP file, and select Extract all at the top of File Explorer.
-

- Click the Show extracted files option’s checkbox to select it.
-
Next, select Extract to open an extracted tbox285 directory.

- Double-click toolbox.exe to start ToolBox.
-
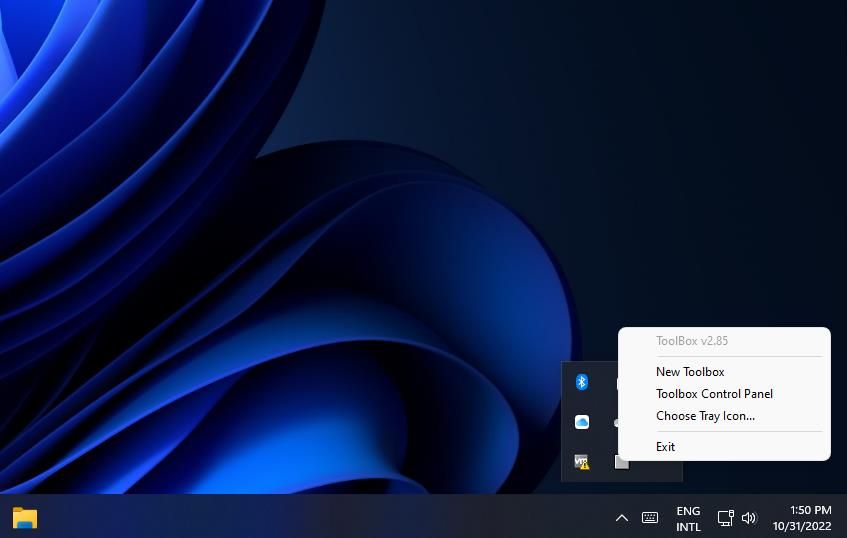
To add a new box, right-click the ToolBox system tray icon and select New Toolbox.

-
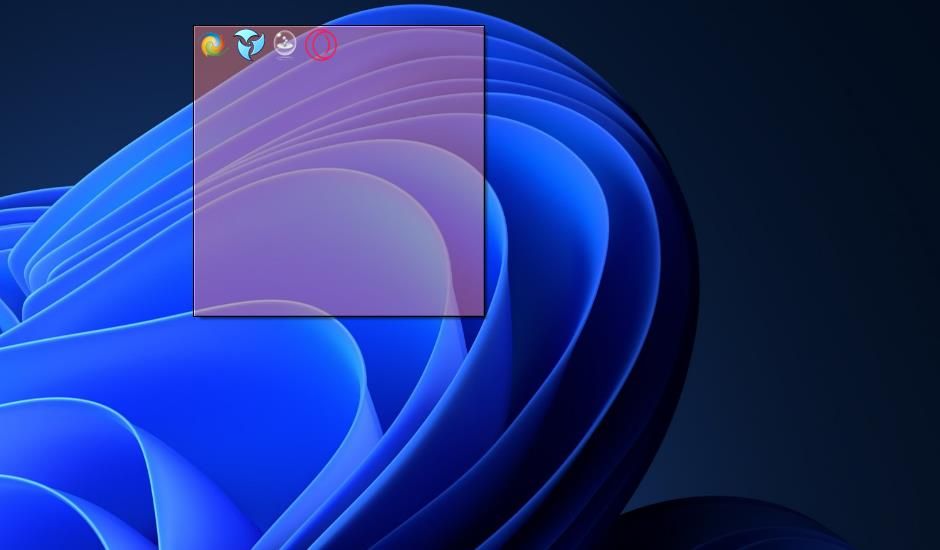
Right-click the box and select New > Shortcut to Application or File.
Картинка с сайта: www.makeuseof.com
You can customize a desktop box by right-clicking it and selecting Toolbox Properties. The Toolbox Properties window includes options for resizing boxes. Drag the Tile Width and Tile Height bars’ sliders to make a box bigger or smaller. Alternatively, drag the Row or Column bars’ sliders to change the number of rows and columns a box has for its shortcuts.
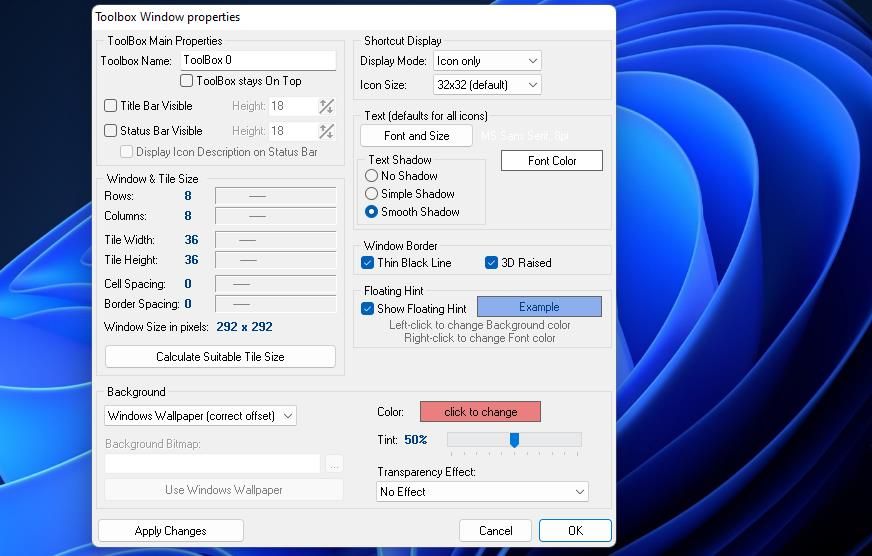
If you want to add a title to the box, select the Title Bar Visible checkbox. Then input a title for the box in the Toolbox Name box. You can further configure the title by clicking the Font and Size button. Choose a different font, style, and size option on the window that appears.
The boxes are transparent by default. You can adjust the transparency level by moving the Tint bar’s slider left and ride. Click the Transparency Effect drop-down menu to choose one of the four effect options there.
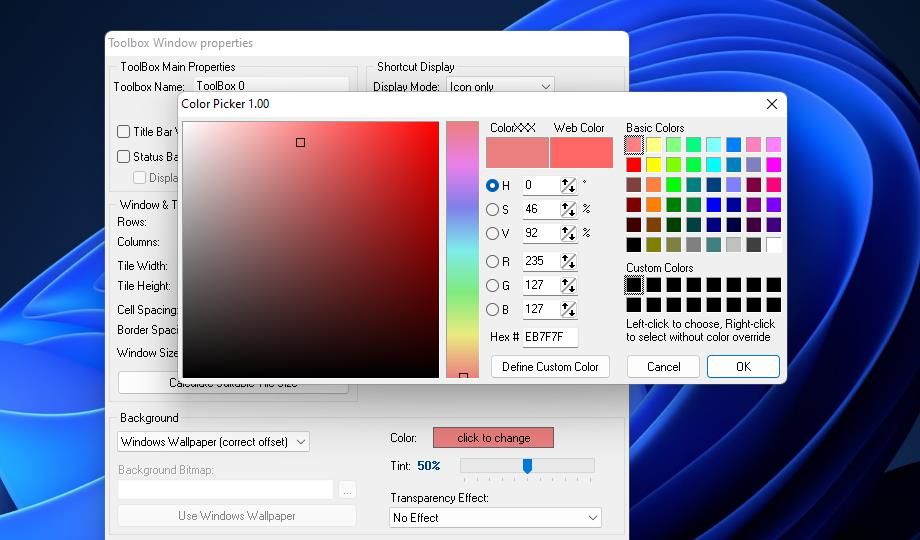
To change the color of a box, press the click to change button for the Color option; then select an alternative on the Color Picker window and click OK. Press the Apply Changes button to save the new color.
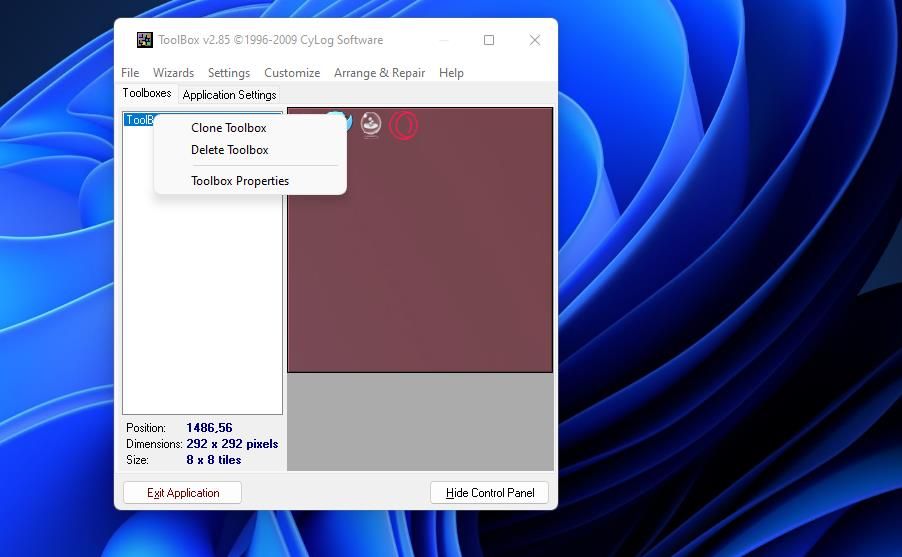
There are more options available on the ToolBox control panel. Right-click the program’s system tray icon and select ToolBox Control Panel. The ToolBoxes tab there displays a list of your boxes. You can remove a box from the desktop by right-clicking it and selecting Delete ToolBox.
Select the Application Settings tab to view more general ToolBox software settings. Select the Start Toolbox when Windows starts setting there if you want the program to run automatically. There you can also add two pre-made boxes to the desktop by clicking Wizard and selecting Create System Folders Toolbox or Create Toolbox for Drives.
Organize Your Desktop Better in Windows 11
ToolBox and iTop Easy Desktop are ideal for organizing the Windows 11 desktop more efficiently. It’s quick and easy to group your desktop’s software, folder, and file shortcuts into different box categories with both those software packages. They’re decent alternatives to Fences that pack in a good range of options and features.