
Add windows to grub
Created At :
Count:95
Views 👀 :
- Files
- Install OS-Prober
- Enable os-prober in grub
- Update grub
Files
I’t write DO NOT EDIT THIS FILE
But I’ve done it, it was useless, I think I had to do it only if I was on MBR.
I added this content in this file Techbrown/boot/grub/grub.cfg
This file was used to enable os-prober/etc/default/grub
Install OS-Prober
sudo pacman -S os-prober
Run it:
sudo os-prober
Output:
/dev/sda2@/efi/Microsoft/Boot/bootmgfw.efi:Windows Boot Manager:Windows:efi
Enable os-prober in grub
edit /etc/default/grub
add GRUB_DISABLE_OS_PROBER=false
Update grub
sudo grub-mkconfig -o /boot/grub/grub.cfg
Adding Windows to GRUB
If you’re dual-booting Windows and Linux, you’ll need to use GRUB to select which operating system to boot into. By default, GRUB will only list the Linux kernel, but you can easily add Windows to GRUB so that you can choose between the two operating systems at boot time.
Adding Windows to GRUB is a relatively simple process, but there are a few things you need to know before you get started. In this article, I’ll walk you through the steps of adding Windows to GRUB, so you can have both operating systems on your computer and easily choose between them at boot time.
What is GRUB?
GRUB is a boot loader that is used to load the operating system kernel. When you turn on your computer, the BIOS will look for a boot loader to load the operating system. If GRUB is installed, it will be loaded and will display a menu of operating systems that you can choose to boot into.
How to add Windows to GRUB
To add Windows to GRUB, you’ll need to:
1. Find the Windows installation media.
2. Boot from the Windows installation media.
3. Select Install now.
4. At the Where do you want to install Windows? screen, select Custom.
5. Select the Drive 0 Partition 1 (or whichever partition you installed Windows to) and click Format.
6. Click Next.
7. Click Install.
8. When the installation is complete, reboot your computer.
Once your computer has rebooted, you should see the GRUB menu. Use the arrow keys to select Windows and press Enter to boot into Windows.
Adding Windows to GRUB is a relatively simple process, but it’s important to follow the steps carefully to avoid any problems. By following the steps in this article, you can have both Windows and Linux on your computer and easily choose between them at boot time.
| Step | Instructions | Notes |
|---|---|---|
| 1 | Boot into the live environment of your Linux distribution. | |
| 2 | Open a terminal window. | |
| 3 | Install the grub-efi package. | This package provides the GRUB bootloader for EFI systems. |
| 4 | Create a new entry for Windows in the GRUB configuration file. | The following is an example of a GRUB configuration entry for Windows:
menuentry “Windows 10” { You can find more information about creating GRUB configuration entries in the GRUB documentation. |
| 5 | Reboot your system. | When your system boots, you should see the GRUB menu. Use the arrow keys to select the Windows entry and press Enter to boot into Windows. |
GRUB is a boot loader that can be used to select the operating system that will be booted when a computer is turned on. GRUB can be used to boot multiple operating systems from a single hard drive, or to boot from a USB drive or CD-ROM. GRUB is configured using a text file called `/etc/grub.conf`.
What is GRUB?
GRUB is a free and open-source boot loader that can be used to select the operating system that will be booted when a computer is turned on. GRUB can be used to boot multiple operating systems from a single hard drive, or to boot from a USB drive or CD-ROM. GRUB is configured using a text file called `/etc/grub.conf`.
GRUB was originally developed by Erich Stefan Boleyn in 1995. It was originally called GRand Unified Bootloader, but the name was later shortened to GRUB. GRUB is now maintained by a team of developers under the auspices of the GNU Project.
GRUB is a very versatile boot loader. It can be used to boot a wide variety of operating systems, including Linux, Windows, macOS, and FreeBSD. GRUB can also be used to boot from a USB drive or CD-ROM.
GRUB is configured using a text file called `/etc/grub.conf`. This file contains a list of all the operating systems that GRUB can boot, as well as the options that are used to boot each operating system.
How to add Windows to GRUB
To add Windows to GRUB, you will need to know the location of the Windows boot loader. The Windows boot loader is located in the `\boot\bcd` directory.
To add Windows to GRUB, you will need to edit the `/etc/grub.conf` file. You can do this using any text editor.
To add Windows to GRUB, you will need to add a new entry to the `/etc/grub.conf` file. The new entry should look something like this:
menuentry “Windows 10” {
chainloader /EFI/Microsoft/Boot/bootmgfw.efi
}
Once you have added the new entry to the `/etc/grub.conf` file, you will need to save the file and then reboot your computer.
When your computer reboots, you will be presented with a GRUB menu. You can use the arrow keys to select the Windows entry and then press Enter to boot into Windows.
GRUB is a powerful and versatile boot loader that can be used to boot multiple operating systems from a single hard drive. Adding Windows to GRUB is a relatively simple process, and it can be done by following the steps outlined in this article.
Additional Resources
- [GRUB documentation](https://www.gnu.org/software/grub/manual/grub.html)
- [GRUB tutorial](https://www.howtogeek.com/howto/13055/how-to-add-windows-to-the-grub-boot-loader/)
- [GRUB FAQ](https://www.gnu.org/software/grub/faq/)
Adding Windows to GRUB
GRUB is a boot loader that can be used to select the operating system that will be booted when a computer is turned on. By default, GRUB only lists Linux operating systems, but it can be configured to also list Windows operating systems.
To add Windows to GRUB, you will need to:
1. Install the GRUB boot loader on your Windows system.
2. Create a GRUB configuration file that lists the Windows operating system.
3. Update the GRUB configuration file.
Installing the GRUB boot loader on Windows
The GRUB boot loader can be installed on Windows using the GRUB2Win32 tool. To install GRUB2Win32, follow these steps:
1. Download the GRUB2Win32 tool from the GRUB2Win32 website.
2. Extract the downloaded file to a location on your Windows system.
3. Open the GRUB2Win32 tool.
4. Click the “Install” button.
The GRUB boot loader will be installed on your Windows system.
Creating a GRUB configuration file
The GRUB configuration file is a text file that lists the operating systems that GRUB will boot. To create a GRUB configuration file, follow these steps:
1. Open a text editor.
2. Type the following code into the text editor:
menuentry “Windows” {
insmod part_msdos
insmod ext2
set root=(hd0,gpt1)
search –no-floppy –fs-uuid –set=root 55AA55AA-55AA-55AA-55AA-55AA55AA55AA
chainloader /EFI/Microsoft/Boot/bootmgfw.efi
}
The code above lists the Windows operating system and specifies the location of the Windows boot loader.
Updating the GRUB configuration file
Once you have created the GRUB configuration file, you need to update the GRUB configuration file. To update the GRUB configuration file, follow these steps:
1. Open a terminal window.
2. Change to the directory where the GRUB configuration file is located.
3. Run the following command:
grub-mkconfig -o /boot/grub/grub.cfg
The GRUB configuration file will be updated.
Booting Windows from GRUB
Once you have added Windows to GRUB, you can boot Windows from GRUB by following these steps:
1. Turn on your computer.
2. Press the F12 key or the ESC key to open the boot menu.
3. Select the Windows entry from the boot menu.
Windows will be booted from GRUB.
Troubleshooting GRUB problems
If you are having problems with GRUB, there are a few things you can check:
- Make sure that the Windows boot loader is located in the correct directory. The Windows boot loader is usually located in the `\EFI\Microsoft\Boot` directory.
- Make sure that the `/etc/grub.conf` file is correct. The `/etc/grub.conf` file contains the configuration information for GRUB. You can use the `grub-editenv` command to view the `/etc/grub.conf` file.
- Try reinstalling GRUB. You can reinstall GRUB using the `grub-install` command.
Tips for using GRUB
GRUB can be used to do more than just select the operating system that will be booted. You can also use GRUB to:
- Change the boot order of your operating systems.
- Boot into a recovery environment.
- Create a bootable USB drive or CD-ROM.
To change the boot order of your operating systems, you can use the `set default` command. To boot into a recovery environment, you can use the `recovery` command. To create a bootable USB drive or CD-ROM, you can use the `grub-mkrescue` command.
GRUB is a powerful tool that can be used to manage the boot process on your computer. By adding Windows to GRUB, you can easily boot Windows from your Linux system.
Q: How do I add Windows to GRUB?
A: To add Windows to GRUB, you will need to:
1. Boot into the Linux operating system.
2. Open the terminal.
3. Type the following command:
sudo grub-install –target=i386-pc –recheck /dev/sda
This will install GRUB to the master boot record (MBR) of the hard drive where Windows is installed.
4. Reboot the system.
5. When the GRUB boot menu appears, use the arrow keys to select the Windows operating system and press Enter.
Q: What if I get an error message when I try to install GRUB?
A: If you get an error message when you try to install GRUB, it may be because the Windows operating system is not installed on the first hard drive. To fix this, you can try the following:
1. Boot into the Linux operating system.
2. Open the terminal.
3. Type the following command:
sudo parted /dev/sda
This will open the parted utility.
4. Use the following commands to move the Windows partition to the first hard drive:
p
1
t
2
n
p
1
5. Press Enter to save the changes.
6. Reboot the system.
7. Try to install GRUB again.
Q: What if I want to remove Windows from GRUB?
A: To remove Windows from GRUB, you will need to:
1. Boot into the Linux operating system.
2. Open the terminal.
3. Type the following command:
sudo grub-editenv list
This will list all of the operating systems that are currently configured in GRUB.
4. Find the entry for Windows and note the name of the kernel file.
5. Type the following command to remove the Windows entry from GRUB:
sudo grub-editenv delete
6. Reboot the system.
Q: What if I want to change the order of the operating systems in GRUB?
A: To change the order of the operating systems in GRUB, you will need to:
1. Boot into the Linux operating system.
2. Open the terminal.
3. Type the following command:
sudo grub-editenv list
This will list all of the operating systems that are currently configured in GRUB.
4. Find the entry for Windows and note the number of the entry.
5. Type the following command to change the order of the Windows entry:
sudo grub-editenv set
6. Reboot the system.
In this tutorial, we have discussed how to add Windows to GRUB. We first discussed the prerequisites for adding Windows to GRUB, then we showed you how to add Windows to GRUB using the terminal. Finally, we showed you how to add Windows to GRUB using a graphical user interface.
We hope that this tutorial has been helpful. If you have any questions, please feel free to leave a comment below.
Author Profile
-
Hatch, established in 2011 by Marcus Greenwood, has evolved significantly over the years. Marcus, a seasoned developer, brought a rich background in developing both B2B and consumer software for a diverse range of organizations, including hedge funds and web agencies.
Originally, Hatch was designed to seamlessly merge content management with social networking. We observed that social functionalities were often an afterthought in CMS-driven websites and set out to change that. Hatch was built to be inherently social, ensuring a fully integrated experience for users.
Now, Hatch embarks on a new chapter. While our past was rooted in bridging technical gaps and fostering open-source collaboration, our present and future are focused on unraveling mysteries and answering a myriad of questions. We have expanded our horizons to cover an extensive array of topics and inquiries, delving into the unknown and the unexplored.
Latest entries
Все способы:
- Способ 1: Установка Windows на диск с Linux
- Способ 2: Обнаружение раздела Windows
- Способ 3: Ручное добавление загрузчика
- Вопросы и ответы: 0
Способ 1: Установка Windows на диск с Linux
Одной из наиболее распространенных причин отсутствия Windows 10 в загрузочном меню «Grub» является установка Windows не на тот же физический диск, на который устанавливается Linux. Если нужно установить на один компьютер Windows и Linux, устанавливайте их по возможности на один физический жесткий диск, причем первой необходимо установить Windows. Если сперва будет установлена Linux, а затем Windows, то есть большая вероятность, что загрузчик Windows затрет «Grub».
Способ 2: Обнаружение раздела Windows
Если переустановка Windows 10 по какой-то причине невозможна, попробуйте обнаружить ее из среды Linux и добавить в загрузчик последней.
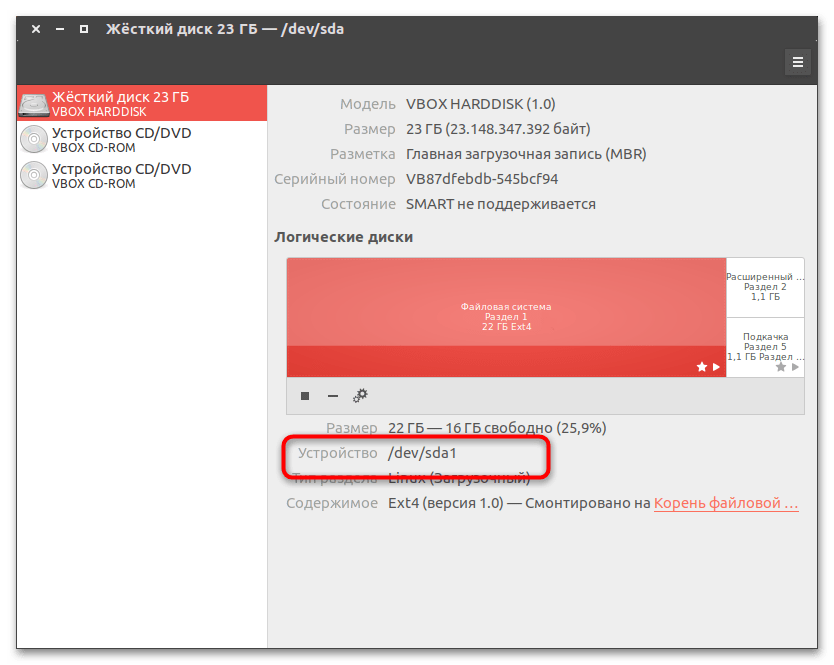
- Определите в Linux название раздела, на который установлена Windows. Получить сведения о дисках и разделах в Linux можно как из «Терминала», так и с помощью штатного приложения «Дисковая утилита». Скопируйте или запомните название устройства. Например, это будет «/dev/sda1».
- Откройте «Терминал» и примонтируйте раздел с Windows 10, для чего выполните команду
sudo mount -t ntfs-3g -o ro /dev/sda1, где /dev/sda1 — полученный на предыдущем этапе путь к тому с Windows. - Чтобы обнаружить Windows 10, выполните тут же в «Терминале» команду
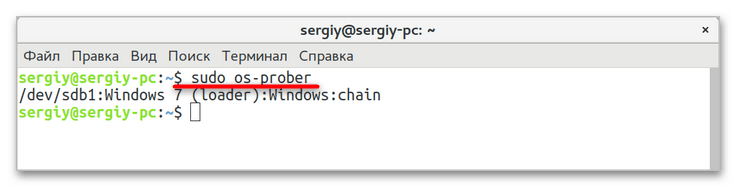
sudo os-prober. - В случае успешного обнаружения Windows обновите конфигурацию «Grub» командой
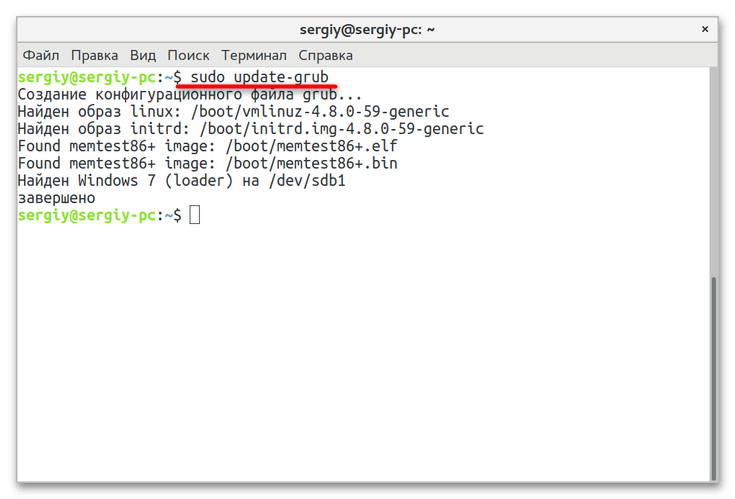
sudo update-grubлибо жеsudo grub2-mkconfig -o /boot/grub/grub.cfg.
Способ 3: Ручное добавление загрузчика
При использовании первого способа вероятность сходу обнаружить и прописать Windows 10 в линуксовый загрузчик довольно невелика. Более сложным, но и более эффективным способом восстановления записи Windows 10 в загрузочном меню Grub является ручное добавление. Способ универсальный, использовать его можно не только при потере Windows 10, но и других операционных систем Windows.
- Узнайте название раздела с Windows как было показано в первом пункте предыдущего способа.
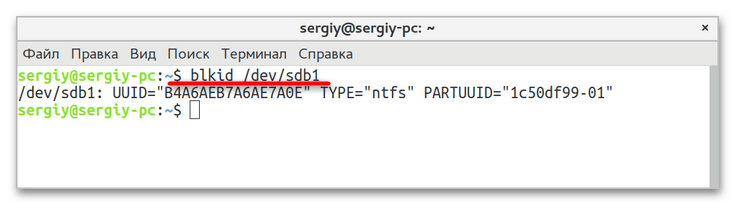
- Определите UUID раздела, на котором установлена Windows 10, для чего выполните в «Терминале» команду
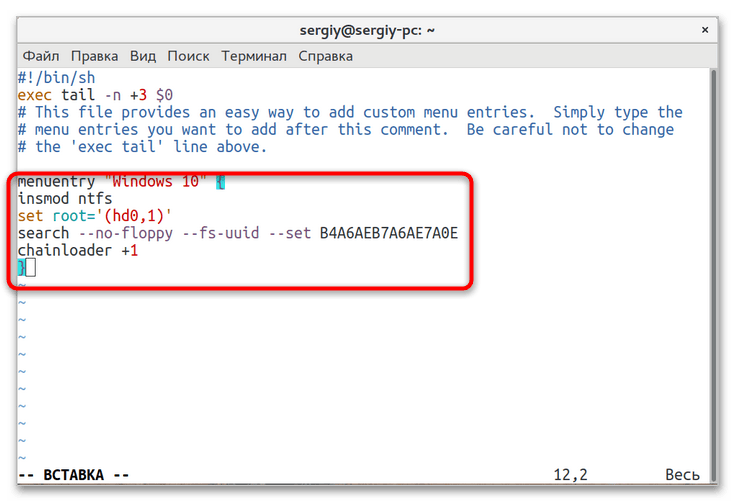
blkid /dev/sda1, где /dev/sda1 — название раздела с Windows. - Откройте любым текстовым редактором файл
/etc/grub.d/40_customи вставьте в него следующий код, где XXXXXXXXXXXXXXXX — полученный на предыдущем шаге UUID:menuentry "Windows 10" {.
insmod ntfs
set root='(hd0,1)'
search --no-floppy --fs-uuid --set XXXXXXXXXXXXXXXX
chainloader +1
}
Сохраните файл. - Обновите конфигурацию Grub командой
sudo update-grub, перезагрузите компьютер и посмотрите, появилась ли Windows в загрузочном меню Grub.
Если восстановить/добавить запись Windows 10 в загрузочное меню «Grub» не удалось, проверьте, не удален ли на диске служебный 100 МБ NTFS-раздел с загрузочными файлами. Если удален, можно будет попробовать его восстановить, но будет гораздо проще переустановить Windows и Linux. В том случае, когда используется «Grub 2» на UEFI, попробуйте включить в BIOS режим «Legacy».
Наша группа в TelegramПолезные советы и помощь
Skip to content
After a recent malware attack in my Windows 10 PC, I was unable to use it for many days. So this time I decided to install both Windows 10 and Ubuntu 16.04.3 in the dual boot configuration, so that if Windows fails to boot, I can still access all my files using the Ubuntu. And of course, you can always use the powerful Ubuntu Linux on the same PC any time you want. But after installing Ubuntu 16.04.3 on the Windows 10 PC, I found no way to use Windows 10 as the Ubuntu setup somehow failed to add the Windows entry to the Grub menu.
If you are also experiencing a similar problem then you can quickly fix this problem using just two commands. Here is how:
- Boot into Ubuntu (well, there is no other option at the moment but to boot into Ubuntu).
- Press Ctrl + Alt + T to open the terminal window.
- In the terminal window type the following command: sudo os-prober and press Enter.

- If you see it detect Windows 10 then all you have to do is type the command sudo update-grub and press Enter. It will add new entries to the grub menu and update it. Now you can reboot your PC and you will see options to boot into Windows.

However, if you do not see the Windows 10 detected after issuing the sudo os-prober command, then you will have to use some extra steps. We have already posted about boot-repair utility that can be used from within Linux to fix most of the boot problems. You can read more about the boot-repair utility from how to restore Ubuntu Linux after re-installing Windows. This tool should be enough to fix the problems and you will never need any of the commands to be used manually or to edit the grub menu by yourself.
We use cookies on our website to give you the most relevant experience by remembering your preferences and repeat visits. By clicking “Accept”, you consent to the use of ALL the cookies.
Readers help support Windows Report. We may get a commission if you buy through our links.
Read our disclosure page to find out how can you help Windows Report sustain the editorial team. Read more
GRUB (GRand Unified Bootloader) is the bootloader that allows you to choose between different operating systems installed on your computer when you start it up. It provides a menu that lists all the available operating systems, and you can select the one you want to boot into.
However, when you install a new operating system, it may not appear in the GRUB menu. This can happen if the new operating system wasn’t set up to work with GRUB during installation or the bootloader was overwritten.
This article will explain why GRUB may not show Windows 11 and how you can add it to the GRUB menu in just a few steps.
Why is GRUB not showing Windows 11?
There are a few different reasons why Windows 11 may not be showing up in the GRUB menu.
- Incomplete installation – One possibility is that the installation or boot process did not correctly set up Windows 11 to work with GRUB. This can happen if the installer does not detect the other operating systems on the computer.
- Overwriting during installation – This can happen if the user chooses to install Windows 11 in the same partition as an existing operating system or if the user chooses to install Windows 11 to the same drive as the bootloader.
If Windows 11 is not showing up in the GRUB menu, you can add it by editing the GRUB configuration file and adding an entry for Windows 11. Below we outline the steps you must take.
1. Update GRUB
- Boot into an operating system that is already listed in the GRUB menu.
- Press Ctrl + Alt + T to launch the Terminal.
- Lastly, enter the script below:
sudo update-grub

This will update the GRUB configuration file and scan all partitions on your hard drive to detect operating systems that aren’t listed in the GRUB menu.
2. Manually add a GRUB entry
- Press Ctrl + Alt + T to launch the Terminal.
- Enter the script below to open the GRUB configuration file:
sudo nano /etc/grub.d/40_custom
- Now, paste the below lines of code at the end of the file (ensure to replace hdx,y with the partition where Windows 11 is installed):
menuentry "Windows 11" {
set root=(hdx,y)
chainloader +1
ntldr /bootmgr
} - Press Ctrl + X, then Y to save the changes made.
- Again, the script below to apply your changes:
sudo update-grub - Finally, restart the computer.

- Microsoft pushes Windows 11, but this project wants you to switch to Linux instead
- Sony engineers worked on greatly enhancing Microsoft’s exFAT File System on Linux
- How to Delete Windows 11 Saved Passwords
- How to Download DirectX 12 Agility SDK [Installation Guide]
It is important to note that some details may vary depending on your specific system configuration. However, back up your current GRUB configuration before making any changes. Also, select the proper partition and drive to avoid boot problems.
Note that there are different related issues users have faced, including GRUB rescue as well as deleted GRUB, but we covered them in other guides.
Let us know in the comments below what worked for you.
Afam Onyimadu
Windows Software Expert
Afam is a geek and the go-to among his peers for computer solutions. He has a wealth of experience with Windows operating systems, dating back to his introduction to Windows 98. He is passionate about technology amongst many other fields. Aside from putting pen to paper, he is a passionate soccer lover, a dog breeder, and enjoys playing the guitar and piano.