
Like in any other digital world, boot issues can be pretty intimidating when greeted with the GRUB Rescue prompt rather than your operating system. GRUB stands for Grand Unified Bootloader. It loads your operating system. Fail this task, and you may end up in rescue mode with nothing but a feeling of helplessness. Knowing GRUB Rescue and how to use GRUB rescue commands could be just the game-changer in those moments.
Rescue Mode – the mode you enter GRUB if it can’t find the correct bootloader config or a slew of important files has become corrupted. That can happen due to a bunch of misconfigured partitions, failed updates, or even some hard disk errors. When you enter this mode, your system refuses to boot normally and forces the command-line interface for GRUB. Relax, with the proper GRUB commands and how to work in GRUB rescue mode, you shall be able to restore your system and get out of this frustrating situation.
In this guide, we’ll embark on the world of GRUB rescue, delve into very detailed grub rescue commands, go deeper into the grub command line environment, and deal with practical solutions for recovery. Along the way, we will briefly touch on some ideas about how CyberPanel can complement your recovery process in hosting environments.
Understanding GRUB Rescue and the Role of GRUB Rescue Commands
GRUB rescue is a low-level environment that GRUB brings into operation when it cannot locate the appropriate files to start booting you up in your operating system. Major reasons to enter this mode include the following:
- Corrupt file(s) configuration in GRUB.
- Incorrect changes or deletions in partition.
- Failed operating system upgrade.
- Master Boot Record error.
There are very few commands you can work with in GRUB Rescue, but the right ones can perhaps do enough to get your system up and running again. Armed with a good understanding of GRUB rescue commands, you will understand how to locate your operating system, download the necessary modules, and then boot successfully.
Core GRUB rescue commands: Savior In Case of Any Troubleshooting
Let’s get current with some popular GRUB rescue commands you can put to good use when facing that ominous GRUB Rescue prompt.
Tech Delivered to Your Inbox!
Get exclusive access to all things tech-savvy, and be the first to receive
the latest updates directly in your inbox.
1. ls
The command ls, on the GRUB command line, assists you in listing out all available partitions and devices.

This command will show all the drives and partitions. You can use it to identify which partition contains your operating system.
2. set
The set command displays or changes environment variables in GRUB.

Where the GRUB is installed, you can modify the prefix and root to correct your wrong listed partition.
3. Insmod
This GRUB command is used to load modules in GRUB. You can use this to load the normal module to boot your system normally.

If this command runs successfully, you can use the normal command to return to the standard GRUB bootloader interface.
4. normal
After loading the required modules, you may use the normal command to revert to the standard GRUB menu.

This will return you to the GRUB boot menu. From here you may choose which OS to boot from.
5. boot
Once you have set the root partition and loaded the modules necessary for your operating system, boot into your operating system using the boot command.

Proper use of this command will make sure to boot up your system to avoid the necessity of GRUB rescue mode.
Enhance Your CyerPanel Experience Today!
Discover a world of enhanced features and show your support for our ongoing development with CyberPanel add-ons. Elevate your experience today!

Working in the GRUB Command Line
The GRUB command line is a far more powerful tool than the GRUB rescue mode. While the latter environment has very few commands and capabilities, the GRUB command line offers far greater flexibility and options for boot-related troubleshooting and management. It’s a mini-stropping operating system command-line interface that enables your ability to diagnose and fix problematic boot settings to get back up and running.
These are just a few more GRUB commands you might have to learn to use here:
- find: A real command used to locate some particular files, such as GRUB configuration files.
- help: This command prints out a list of all the commands available along with their descriptions.
- configfile: Used to load a specific configuration file.
Knowing how to get around at the GRUB command line keeps you from letting boot problems become major problems when they first start occurring.
Finding the Boot Files
At the GRUB rescue prompt, you need to know which partition contains your systems files. To see what partitions exist use the command “ls”:

All of the partitions will be listed but not all of them will have your boot files. You should find each by checking what is contained with the following command:

Look for files like vmlinuz (the kernel) and initrd.img. Once found, set the correct root using:

This will ensure that GRUB points to the partition with your boot files.
Reinstall GRUB from a Live CD/USB
If you cannot boot into the system from GRUB Rescue, you can have to reinstall GRUB. Boot the system from a live CD or USB. Open the terminal and mount your root partition. For example:

Next, install GRUB on your disk:

File System Check using fsck
Sometimes the problem with GRUB is that your file system has gone wrong. Just in case, check and possibly correct your file system before proceeding to GRUB rescue: boot from a live CD and run:

This command will check for and possibly correct the file system: it may well be what is currently preventing it from booting at all.
The incorporation of these methods, coupled with other GRUB commands, has served to enlarge the possibilities for recovery of a system and can help avoid future bootloader problems.
Windows 7 Grub Rescue
If you dual boot Windows 7, and GRUB Rescue shows up, it means you are encountering an error message that the GRUB bootloader did not find your proper boot partition. If this happens most of the time, there has probably been a change in partition settings or corrupt files. To fix this, follow these steps:
Boot from the installation CD/USB of Windows 7.
Select Repair Your Computer.
Open the Command Prompt and run

These commands will repair the MBR and allow Windows 7 to boot normally.
Windows 10 Grub Rescue
Similar to Windows 7, booting in a dual-boot setup of Windows 10 with Linux most probably would lead to the GRUB Rescue from changes in the partition configuration. You could resolve this problem by either:
Booting from a Windows 10 recovery disk or USB.
Select Command Prompt.
Run

GRUB Rescue Commands Windows 10
For Windows 10-specific issues, use the GRUB commands to troubleshoot the bootloader. If you get a GRUB Rescue prompt, you should see commands like the ones shown below:

It allows GRUB to mount NTFS filesystems typically used in Windows systems and will find the appropriate boot partition.
Additionally, from the recovery mode for Windows 10:
Open the Command Prompt and run:

This will ensure that Windows 10 boots directly.
Grub Rescue Unknown Filesystem
The Unknown Filesystem error often occurs when the GRUB bootloader cannot find the filesystem on a partition. This generally is the case when due to file system corruption or incorrect partitioning. To debug this error follow these steps:
1. Identify the availability of partitions by executing the ls command in the GRUB rescue environment.
2. Try each partition and see if any of them list recognizable files.

3. You can also use a live CD or USB to run a file system check

This will try to repair the file system.
Grub Rescue Kali Linux
If you get a GRUB Rescue problem on your Kali Linux, especially after you have updated or installed something there, then just follow the following instructions.
1. Boot into GRUB Rescue mode.
2. Use the command ls to determine which partition you are using.
3. Set the root using:

4. Load the normal module now:

If this fails, you can reinstall GRUB using a live Kali Linux session:

Grub Rescue Ubuntu
You’ll often see Ubuntu users stuck in GRUB Rescue mode after an incorrect update or partition change. How to resolve this
Boot the pc into the GRUB rescue prompt and run:

Set the partition as the root

If this does not work then you can boot from a live Ubuntu USB and re-install GRUB

Exit Grub Rescue
Provided that you can restore the bootloader or boot into the system, you should now be able to exit GRUB Rescue. Attempt the following instructions to boot normally by loading the correct partition first:
You should be able to find your boot partition using ls.
Create the partition with:

Load the GRUB modules:

The Role of CyberPanel in GRUB Rescue for VPS Hosting
In hosting environments, indeed, one can often find problems related to GRUB if the server goes offline. The situation can be attributed to a suitable solution for such problems with the powerful web hosting control panel referred to as CyberPanel, which is conceived with user-friendliness in mind and fits with the VPS systems.
How CyberPanel Can Contribute to Handling GRUB Problems
Scheduled Backups: CyberPanel lets you schedule regular automated backups of your entire server. This is handy if you’re required to reinstall GRUB or in a situation where the bootloader is corrupted.
Snapshots Management: In a VPS system, you can establish snapshots at specific time intervals so you can roll back your server to a working state in case it contains errors for GRUB.
File Recovery: CyberPanel helps you recover important files in the worst-case situation where a GRUB configuration file gets deleted or corrupted.
Installing CyberPanel on your server management will help you avoid the worst-case situation of GRUB problems leading to further downtime.
Frequently Asked Questions
1. Why is someone getting a GRUB Rescue mode?
The most common reasons for the GRUB Rescue mode are corrupted GRUB configuration files, incorrect changes in partition settings, errors in system upgrades, or a bad Master Boot Record (MBR).
2. How to repair GRUB Rescue without reinstalling the OS?
You can fix GRUB rescue by using the GRUB rescue commands for the manual location of files and loading them onto your system to boot. But most of all, set, insmod, and boot commands are a must for it.
3. Can I recover GRUB from a live CD or USB?
Yes, it is possible: you can boot into a live CD or USB. Then, using terminal commands you can reinstall GRUB within your system so that the bootloader is correctly set up.
4. How do I know which partition I should use in GRUB Rescue mode?
Use the ls command to print a list of available partitions. Now you can use the set to print which partition is being used with GRUB and make appropriate adjustments.
5. What happens if I just close the GRUB Rescue mode?
If you close the GRUB Rescue mode dialog box, your computer won’t be able to boot normally. You will not be able to access your operating system until the problem is corrected.
6. Is it possible to not be restricted with GRUB issues anymore?
It may be possible in the future to avoid problems of GRUB related by doing regular backups, being careful in the creation of the partition, and also upgrading the system cautiously. Tools like CyberPanel ensure that the data remains safe even if the bootloader fails.
Culmination: GRUB Rescue, the Fine Art of Boot Recovery
To sum up, debugging GRUB Rescue errors may be a nightmare, but with the right tools and knowledge, bootloader problems will instantly disappear. From detecting the boot partition to running recovery commands, proper GRUB error handling guarantees that your Linux system will run smoothly and securely.
In a nutshell, for users operating servers dependent on CyberPanel for its operation, one set of tools needs to be included, and lo and behold, they are Linux-based tools such as GRUB. CyberPanel offers a very managed server environment that makes working with issues like system failures or booting issues easier than usual.
Don’t let boot errors get you down— learn to master GRUB Rescue commands and, definitely, always keep your system running perfectly. CyberPanel gives you the perfect companion to ensure that after all those recovery processes, the management of your system remains smooth. Take control today and optimize your server with CyberPanel!
In this article, Let’s learn how to boot windows from grub rescue screen. Linux is the best platform available on the planet, it offers great customization. A highly customizable platform like Linux offers enormous benefits but has only one downside that it can potentially break your system and you can eventually land up in Linux grub rescue screen. If you are looking to boot Linux from grub rescue you can refer to this article.
Steps for how to boot windows from grub rescue.
Step 1 — Listing Partitions from Grub Rescue:
First, we need to find out our EFI partition or the partition where your boot files are stored. In order to find that we need to see the available partition, so simply execute the ls command.
ls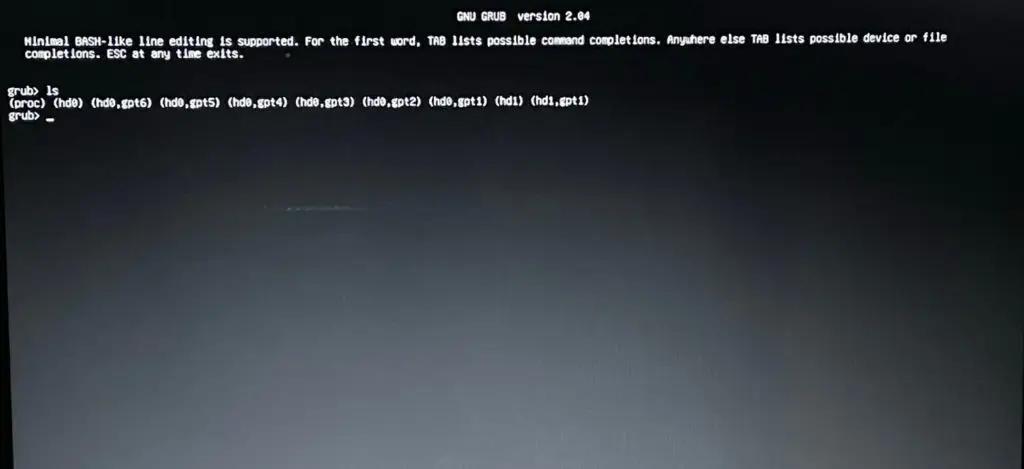
Step 2 — Listing EFI Partition from Grub Rescue
In the first step, we have got our directory listing. Now, we need to find the appropriate partitions where our boot files reside. Typically it resides in a partition that is very small in size (typically less than 1GB) and having an EFI/ partition in it. So, In order to find that you can simply execute the ls (hdx,gpty)/ one by one.
Note: You need to replace x with the hard disk number, and y with the partition number.
ls (hdx,gpty)/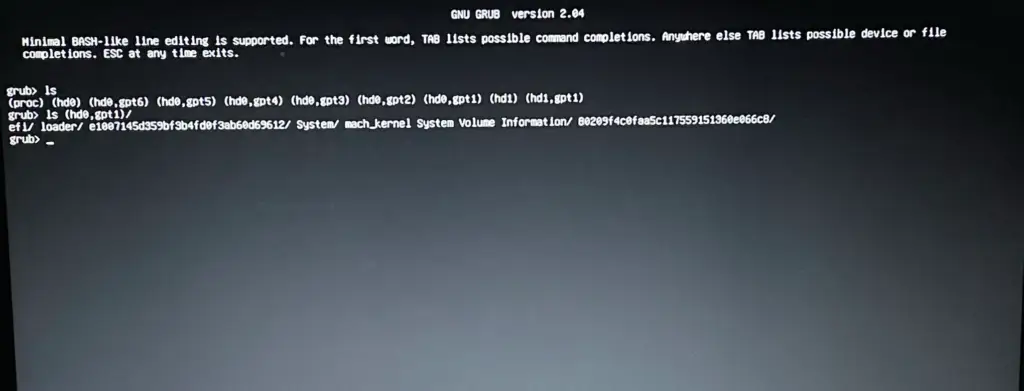
For me, the same is found in (hd0,gpt1)
Step 3 — Select the EFI Partition
Since we have found the partition, now we need to select the partition. So simply execute the below command.
set root=(hdx,gpty)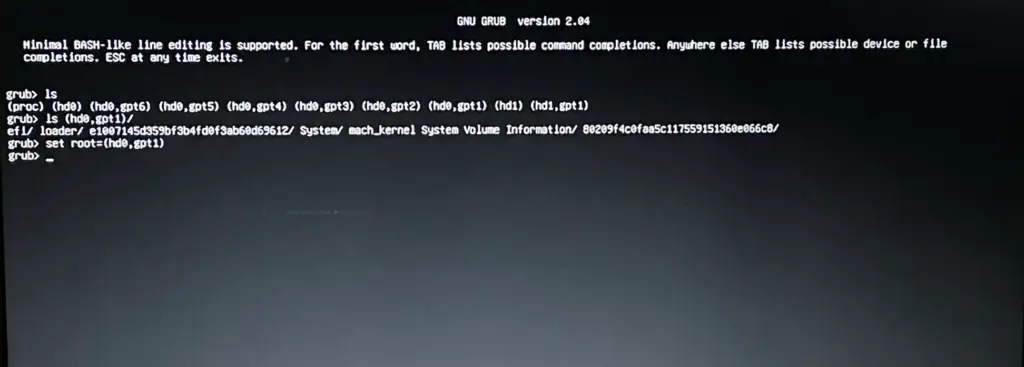
Step 4 — Chainloading the Windows EFI File.
Now, we have selected the partition in which our boot files are present, now we need to execute the command chainloader for loading a boot file, so we can boot from that.
chainloader /efi/Microsoft/Boot/bootmgfwi.efi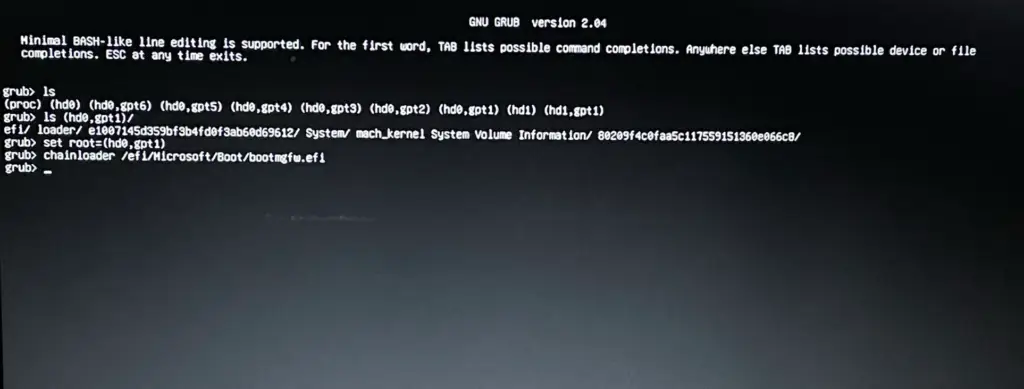
Step 5 — Boot Windows from Grub rescue:
Finally, you are all set to boot windows from grub rescue. Just we need to execute the below command.
bootConclusion — Boot windows:
ls
ls (hdx,gpty)/
set root=(hdx,gpty)
chainloader /efi/Microsoft/Boot/bootmgfw.efi
boot
That’s it for this article, If you have any queries or suggestion please write down in comment section below.
Check out our Latest Best Linux Picks
Если при загрузке компьютера вместо привычной операционной системы появляется приглашение командной строки grub rescue, это означает, что произошла ошибка загрузчика Grub. Не паникуйте — из этого состояния можно выйти, зная основные команды grub rescue.
Вот несколько основных шагов, которые помогут вам восстановить работу системы:
1. Проверка разделов жесткого диска
Сначала нужно выяснить, какие разделы есть на жестком диске. Для этого введите команду:
ls (hdX,Y)/
Здесь X — номер жесткого диска, Y — номер раздела. Эта команда покажет, какие разделы имеются на диске и какие из них активны.
2. Установка раздела по умолчанию
Чтобы установить раздел по умолчанию, который будет использоваться для загрузки, применяется команда:
set root=(hdX,Y)
Где X и Y — номер нужного вам раздела. Обычно это раздел с установленной операционной системой.

3. Загрузка операционной системы
После того как раздел выбран, можно приступать к загрузке ОС. Для загрузки Linux используйте:
linux (hdX,Y)/vmlinuz root=/dev/sda2 ro
A для Windows:
chainloader (hdX,Y)+1
Где X, Y — номер раздела с системой.
4. Восстановление загрузчика grub rescue
Если проблема возникает не впервые, имеет смысл восстановить загрузчик Grub полностью. Это можно сделать из командной строки ugrub rescue командыб rescue.
Для Linux выполните:
grub-install /dev/sda
Для Windows:
bootrec /fixmbr
Эти команды переустановят Grub заново.

5. Обновление BIOS
Иногда ошибки Grub вызваны устаревшей прошивкой BIOS. Рекомендуется обновить BIOS до последней версии, это может решить проблему.
Вот основные шаги по устранению неполадок grub rescue и запуску системы. Если они не помогли, возможно, проблема в более серьезных поломках, и требуется обращение к специалисту. Но в большинстве случаев эти простые команды grub rescue позволяют быстро восстановить работоспособность ПК.
6. Дополнительные причины ошибки grub rescue
Помимо перечисленных выше основных причин, сбой grub может возникнуть по ряду других причин. Рассмотрим некоторые из них.
Одной из распространенных причин является повреждение таблицы разделов GPT (GUID Partition Table). Эта таблица отвечает за хранение информации о разделах диска. Если в нее внесены ошибки или искажения, grub не сможет корректно определить разделы.
Также на ошибку может повлиять неправильная установка или настройка параметров grub. Например, если в конфигурационном файле grub указан неверный раздел с ОС или неправильный путь к ядру Linux.
Проблемы могут возникнуть после изменения порядка разделов на диске или их перемещения. Grub записывает информацию о местоположении разделов, и при их перестановке эти данные становятся неактуальными.
Наконец, сбои могут быть связаны с аппаратными неисправностями — дефектами HDD или материнской платы. В этом случае потребуется более серьезный ремонт оборудования.
Зная о разнообразных причинах ошибки grub rescue, можно более эффективно диагностировать и устранять эту распространенную проблему при загрузке компьютера.
7. Восстановление grub после переустановки Windows
Один из частых случаев возникновения ошибки grub — переустановка Windows на компьютере с двойной загрузкой. При этом Windows перезаписывает загрузчик на свой, и grub перестает работать.
Чтобы восстановить grub после переустановки Windows, нужно:
- Загрузиться с любого лайв диска Linux (например, Ubuntu).
- Выполнить команды для монтирования разделов Linux и Windows.
- Установить пакеты os-prober и grub.
- Запустить команду update-grub.
- Установить grub на главный загрузочный раздел командой grub-install.
После этого при перезагрузке должна появиться загрузочное меню grub с обеими ОС.
8. Восстановление grub через live-CD
Если загрузочная система полностью недоступна, для восстановления grub потребуется live CD или флешка с Linux.
Алгоритм следующий:
- Загрузиться с live носителя.
- Найти раздел с системой командой lsblk.
- Смонтировать найденный раздел командой mount.
- Скопировать файлы ядра и initrd с раздела в /boot дистрибутива live.
- Установить и настроить grub, указав найденные файлы ядра.
- Установить grub в MBR диска командой grub-install.
После перезагрузки компьютера без live носителя должна загрузиться система с восстановленным grub.
9. Восстановление grub с помощью утилиты Boot-Repair
Для автоматического восстановления grub rescue после сбоя можно воспользоваться утилитой Boot-Repair.
Для этого нужно:
- Загрузиться с live USB или DVD с Boot-Repair.
- Запустить Boot-Repair через меню или командную строку.
- Выбрать пункт «Recommended repair» в меню программы.
- Дождаться окончания процедуры и перезагрузки.
Boot-Repair сам обнаружит установленные ОС и автоматически переустановит и настроит grub.
10. Предупреждение проблем с grub
Чтобы избежать ошибок grub в дальнейшем, рекомендуется:
- Делать резервное копирование данных.
- Не изменять порядок разделов без необходимости.
- Создавать точки восстановления системы.
- Периодически переустанавливать и обновлять grub.
- Следить за обновлениями BIOS и драйверов.
Соблюдение этих простых мер позволит минимизировать риск возникновения проблем с загрузчиком grub и избежать ошибки grub rescue в будущем.

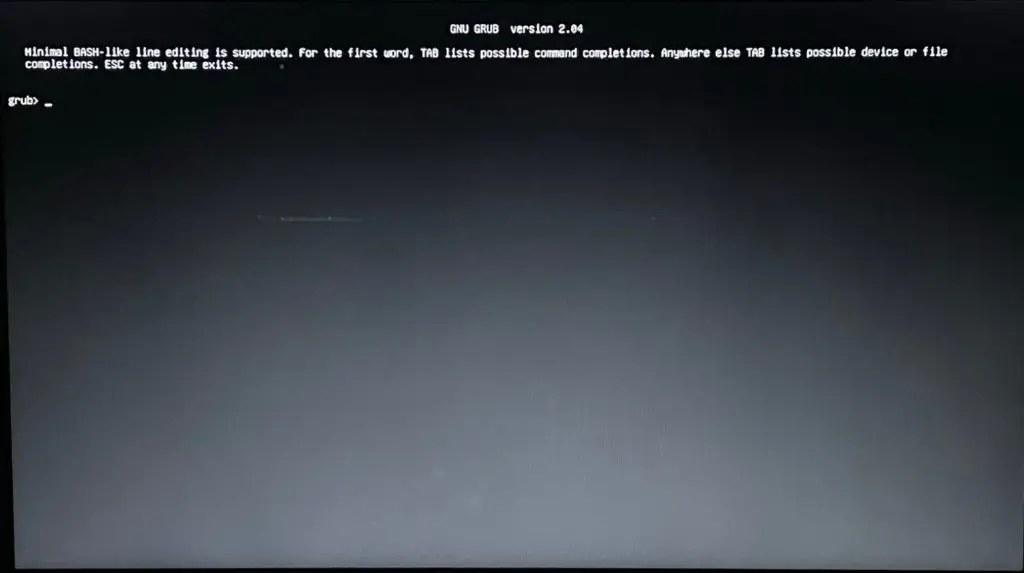
How to Use GRUB Rescue
Image Credit:
agrobacter/E+/GettyImages
For Windows and Mac users, startup is a pretty simple thing. You turn your computer on, it loads up Windows or OSX, and you get down to doing what you do. Clearly, things are going on under the hood, but you don’t usually need to know what they are. That’s not the case for Linux users, who often install their OS alongside Windows or OSX, or may even have multiple Linux operating systems on their computer. Linux uses a bootloader called GRUB to manage and boot those operating systems, and GRUB rescue to fix problems when they occur.
So What Exactly Is a Bootloader?
Your computer goes through a series of steps when you turn it on. The first thing it does is run a few pieces of code built into chips on the computer that check to make sure all the appropriate pieces of hardware are present and in good working order. Then, it checks the computer’s drives, usually starting with the main hard drive, to look for a small piece of software called a bootloader. The bootloader’s job is to keep track of where your operating system is installed and to get it up and running for you.
Single Boot vs. Multiboot Bootloaders
Both Windows and OSX have bootloaders, but those have a simple life because they each typically only load one operating system. The Linux bootloader needs to keep track of multiple operating systems and be able to load whichever one the user selects at any given time, so it’s sometimes described as a multiboot bootloader. That’s where the name comes from, in fact: It’s an acronym for GRand Unified Bootloader. After you make your choice from the boot menu, GRUB loads the kernel – the core part of the OS – for whichever operating system you’ve chosen.
Mostly It Works, but Not Always
Ordinarily, the computer begins its boot and then pauses for a moment with the GRUB menu on the screen. If you don’t do anything, your computer boots into whichever OS – usually Linux – you’ve chosen as your default. Alternatively, you can choose from any other operating system on the menu or revert to an older version of your main OS if necessary. Occasionally, though, your menu and OS doesn’t load correctly, and you are kicked out to the GRUB rescue command prompt. You can also choose this option from the GRUB menu if you suspect your system has problems and want to try to fix them.
The GRUB Command Line
The GRUB command line looks much like the command line interface you’d see if you opened up a Terminal window on Linux or, for that matter, if you ran the command command from the Run box on your Windows menu. It’s essentially a stripped-down version of the full Linux command line interface. You don’t have the full set of Linux tools and programs at your disposal, but you have plenty of options for fixing some of the common problems you might encounter with your system.
A Quick Clarification About GRUB Versions
If you’re having GRUB problems and you’re crawling the internet in search of solutions, it’s important to pay attention to the date of the advice you find. The original version of GRUB hasn’t seen any development for over a decade and has mostly been replaced by a newer version. Older sites refer to the two versions as GRUB and GRUB2, while newer sites now refer to GRUB2 simply as GRUB, while the original version is legacy GRUB. Advice meant for legacy GRUB often won’t work on a current system and might cause damage. This article assumes you’re using GRUB2 on Ubuntu 18.04 LTS, although the information should apply to any current version of Linux.
The Priority GRUB Rescue Repair
Each one of the dozens of commands available to you in GRUB rescue is complicated and needs an article-length discussion of its own. That’s a bit much for a quick read, so let’s focus on its most important use: Getting your system up and running and fixing whatever went wrong in GRUB.
What Your Drives Are Called
GRUB and the Linux OS itself use different terminology for your hard drives. Ubuntu and other versions of Linux refer to the first hard drive in your system as sda, the second as sdb and so on. In GRUB rescue, GRUB refers to the first physical hard drive as hd0, the second as hd1 and so on. That becomes important in a moment.
GRUB Manual Boot
Follow these steps to restart your computer with GRUB rescue if the bootloader breaks, and Ubuntu – or your other OS of choice – won’t load. There are plenty of other things you can fix, once your computer is running, but you need to get your computer working first before you can do them.
- Type the command ls to find out what partitions your hard drive contains. It’ll show your actual hard drive first, as (hd0) or something similar, followed by a series of related numbers – (hd0, gpt1), (hd0, gpt2) and so on – which represent the partitions on your hard drive. If you have multiple operating systems, there can be a lot of those.
- Identify the system Ubuntu boots from by typing ls again but specifying a partition. You don’t need to include the prefix for the partition, just the number, so a typical command might look like ls (hd0, 3) if you had checked the first two partitions and were now looking at the third. Keep going until you find one that contains the telltale Linux directories, such as bin/, boot/, dev/, etc/ and usr/. That’s the one you need to boot from.
- Now that you know where the boot files are, you need to let GRUB in on the secret. If the correct partition was (hd0, 3), as in the example above, you’d type set root=(hd0, 3) at the GRUB command line and then click Enter.
- The files you need to boot the computer are on the boot/ directory of that partition, so start typing linux /boot/vmlinuz at the command prompt. It will auto-fill the correct version of the vmlinuz file for you with a lengthy number identifying the Linux kernel version. Select the Tab key to accept it. Before you press Enter, add the root command again, but this time instead of saying root=(hd0, 3) – which is GRUB’s terminology for the third partition of the first hard drive – you type root=/dev/sda3, which, you’ll remember, is how Linux itself identifies the same partition.
- Type initrd at the GRUB command line and again click the Tab key to accept its suggestion – it should match the kernel number from the previous command – and then Enter.
- Type boot at the prompt to boot your system.
If Your Prompt Says Grub Rescue>
Ordinarily, your command line prompt at this stage should read grub>, but if your system is really messed up, it might say grub rescue> instead. This means you’re using a bare-bones version of the GRUB rescue shell, and you won’t be able to use the Tab key to complete your commands. Instead, you’ll need to find those long version numbers manually and write them down. Assuming they’re on the same partition, you do it like this:
- Type ls (hd0, 3) /boot and look at the information on the screen. The two files you’re looking for are the one starting with vmlinuz and the one starting with initrd. Write them down or snap a shot of the screen with your phone’s camera so you can refer to it carefully, digit by digit.
- Now type set root=(hd0, 3) and press Enter. At this point, you need to manually load two modules that would have been loaded for you if you were getting the grub> prompt. These use the insmod command, short for «install module.»
- Type insmod normal and press Enter. Now type normal to run the module you’ve just installed. Finally, type insmod linux and press Enter, so you can move on to specify the boot files.
- Type that same linux command, but this time you’ll fill it out manually from start to finish. For an Ubuntu 18.04 system on the same partition we’ve used as our example throughout, that might read linux /boot/vmlinuz-4.15.0-44-generic and follow it again with root=/dev/sda3 before pressing Enter.
- Do the same with the initrd command, also using the entire number you’ve written down. In the example, it would look like initrd.img-4.15.0-44-generic.
- Type boot and press Enter to boot your system.
Reinstalling GRUB After You’ve Booted
Your computer should boot up normally at this point, and you should be able to log in as you usually would. This isn’t a process you want to use every day, though, so priority one is to fix GRUB properly. Click the Applications icon at the bottom of your Dash and type Terminal into the search bar. Once your Terminal window is open, type update-grub and press Enter. Several things will happen and then you’ll get a message saying done and be back to the GRUB command line. Type grub-install /dev/sda, assuming your partition was on the first physical drive. GRUB is now reinstalled, and your computer should start normally when you reboot.
If You’re Intimidated at This Point
The Linux community, in general, has always had a healthy DIY attitude, but if you’re new to the Linux world or just want to get your computer back up and running with a minimum of fuss, you might find these manual repairs cumbersome. There are automated tools you can use instead, which don’t need you to get your hands dirty playing with the actual workings of GRUB and Linux. Boot-repair is an example.
Using Boot-Repair Instead
To use boot-repair, you need the DVD or USB drive you used to install Ubuntu. If you don’t have it, borrow a working computer long enough to download and burn a new copy. When you have it, put the OS into the disk drive or USB port, as needed, and reboot your computer. You might need to enter the bootup menu screen by pressing Esc or F2 as your computer boots and tell it to check the DVD drive or USB drive before trying to boot from the hard drive. Once that’s done, choose Try Ubuntu from the disc’s boot menu.
Downloading and Installing Boot-Repair
The disc or USB will take you to a slow but fully functional Ubuntu desktop, where you can do all the things you normally do with your computer. The boot-repair program is maintained as a personal package archive (PPA), so the first thing you need to do is add the appropriate PPA as a software source for your computer.
- Open a terminal window and type sudo add-apt-repository ppa:yannubuntu/boot-repair.
- Then type sudo apt update.
- Finally, type sudo apt install boot-repair to install the program.
Running Boot-Repair
To run the actual boot-repair utility, type boot-repair in the same terminal window. Boot-repair will scan your system for GRUB- and boot-related issues and then pop up a dialog box. From the box, you can choose to fiddle around with manual settings or select Recommended repair to have boot-repair fix the most common problems for you automatically. When it’s done, it will usually tell you repairs have been completed and give you a link you can click to read a log file explaining everything that’s been done. To finish, restart your computer, remove the boot disc when prompted, and then wait while it boots normally.

Grub, or the Grand Unified Bootloader, is the go-to bootloader for many Linux distributions, providing a versatile and user-friendly experience. In this article, we will discuss the Grub bootloader, its features, and the essential Grub rescue commands to help you navigate and troubleshoot bootloader-related issues. Let’s dive in!
What is Grub Bootloader?
Grub is a bootloader for Linux systems that is responsible for loading and transferring control to the operating system kernel. It is the first software that runs when your computer starts up, allowing you to choose which installed operating system to boot. It supports multiple operating systems and filesystems, including Linux, Windows, and macOS.
Key Features of Grub
- Multi-boot Support: Grub makes it easy to have multiple operating systems on a single machine by offering a customizable boot menu.
- Support for Various Filesystems: Grub supports an extensive range of filesystems, including ext2, ext3, ext4, XFS, JFS, ReiserFS, Btrfs, and FAT.
- Modularity and Portability: Grub is modular, which means you can include only the required features and drivers, making it suitable for various systems and hardware configurations.
- Scripting and Customization: Grub offers a scripting language that enables users to create custom boot entries and modify the boot menu appearance easily.
Grub Rescue Commands: Your Lifesaver
In case of a Grub failure or a corrupted bootloader, you may encounter a Grub rescue prompt. But don’t worry! Grub rescue commands can help you get back on track. Here are some essential commands you can use to troubleshoot and fix the issue:
1. ls
The ls command lists all the available partitions and devices. Use this command to identify the partition containing your Linux root filesystem.
grub rescue> ls2. set
The set command displays the current values of Grub environment variables. This information can help you identify the correct partition and configuration settings.
grub rescue> set3. set prefix
To set the correct partition containing the Grub modules, use the set prefix command followed by the partition path.
grub rescue> set prefix=(hd0,msdos1)/boot/grubReplace (hd0,msdos1) with the appropriate partition identifier.
4. set root
Similar to the prefix, you need to set the root partition using the set root command.
grub rescue> set root=(hd0,msdos1)5. insmod
The insmod command is used to load Grub modules, such as normal and linux. Start by loading the normal module:
grub rescue> insmod normal6. normal
After loading the normal module, execute the normal command to exit the Grub rescue mode and return to the standard Grub menu.
grub rescue> normal7. boot
If you’ve manually set up the boot parameters using Grub commands, use the boot command to boot the system.
grub rescue> bootRemember: You must load the required modules and set the boot parameters correctly before using the boot command.
Example: Fixing a Broken Grub Configuration
Let’s walk through an example of how to fix a broken Grub configuration using Grub rescue commands.
Suppose you have a dual-boot system with Windows and Debian installed. You accidentally deleted the Linux partition, and now, when you turn on your computer, you see the Grub rescue prompt.
Here’s how to fix the issue and boot into Windows:
- List the partitions: Use the
lscommand to list all available partitions.
grub rescue> lsYou may see output like this:
(hd0) (hd0,msdos5) (hd0,msdos2) (hd0,msdos1)Identify the Windows partition: You need to find the partition containing the Windows boot files. Check each partition using the ls command followed by the partition identifier, like this:
grub rescue> ls (hd0,msdos1)When you find the partition containing the “Boot” folder, proceed to the next step.
Set the root partition: Set the root partition using the partition identifier found in the previous step.
grub rescue> set root=(hd0,msdos1)Load the ntldr module: Use the insmod command to load the ntldr module, which is required for booting Windows.
grub rescue> insmod ntldrSet the boot file: Point Grub to the Windows boot file using the ntldr command.
grub rescue> ntldr /bootmgrBoot the system: Finally, use the boot command to boot into Windows.
grub rescue> boot
Once you’ve successfully booted into Windows, consider reinstalling Grub or another bootloader to regain access to your Linux system. If you need help with reinstalling a Linux distribution like Debian, check out this helpful Debian installation tutorial.
Conclusion
Grub bootloader is an essential component of many Linux systems, providing support for multiple operating systems and filesystems. When faced with Grub-related issues, Grub rescue commands can help you navigate and troubleshoot the problem. By understanding these commands and their applications, you can tackle boot issues and restore your system’s functionality.
Always remember to back up your data and Grub configuration files to avoid potential data loss. Happy computing!