
In this article, Let’s learn how to boot windows from grub rescue screen. Linux is the best platform available on the planet, it offers great customization. A highly customizable platform like Linux offers enormous benefits but has only one downside that it can potentially break your system and you can eventually land up in Linux grub rescue screen. If you are looking to boot Linux from grub rescue you can refer to this article.
Steps for how to boot windows from grub rescue.
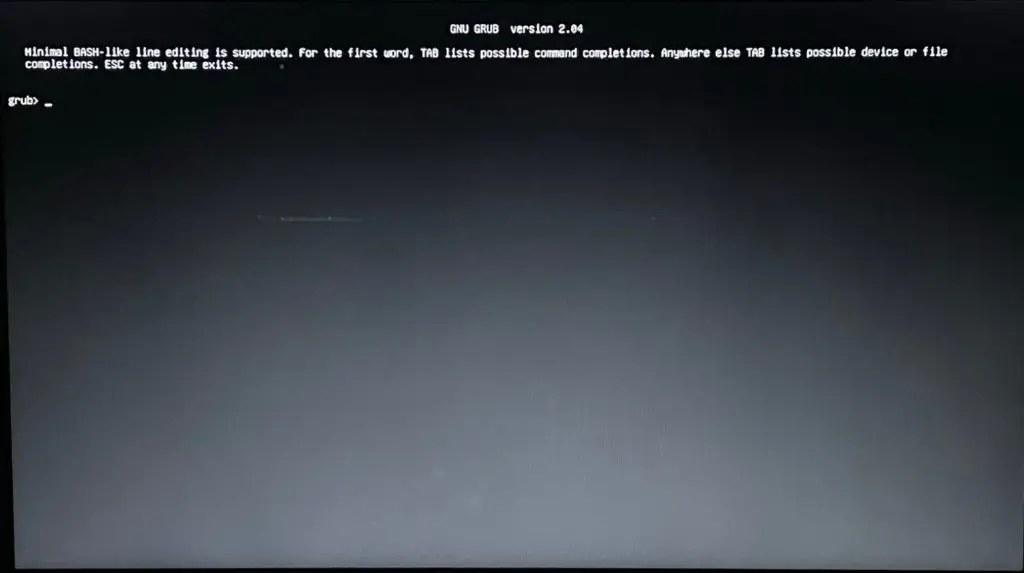
Step 1 — Listing Partitions from Grub Rescue:
First, we need to find out our EFI partition or the partition where your boot files are stored. In order to find that we need to see the available partition, so simply execute the ls command.
ls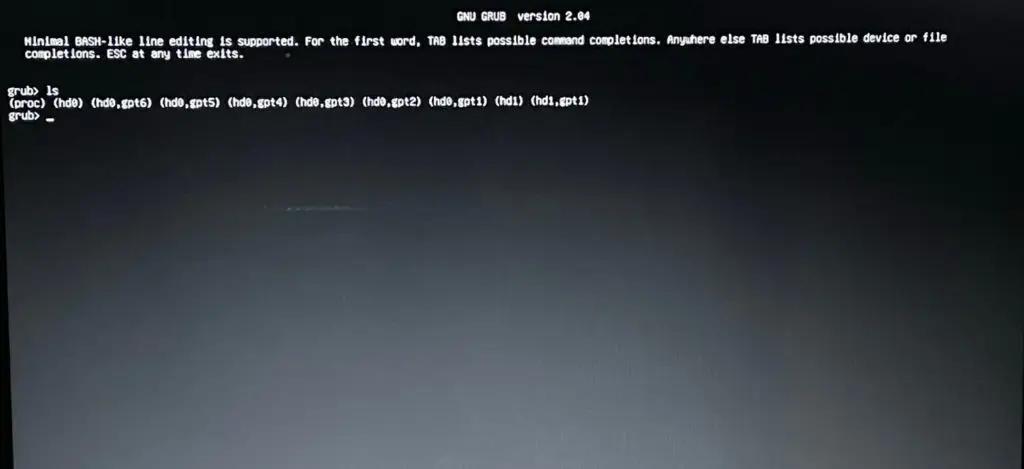
Step 2 — Listing EFI Partition from Grub Rescue
In the first step, we have got our directory listing. Now, we need to find the appropriate partitions where our boot files reside. Typically it resides in a partition that is very small in size (typically less than 1GB) and having an EFI/ partition in it. So, In order to find that you can simply execute the ls (hdx,gpty)/ one by one.
Note: You need to replace x with the hard disk number, and y with the partition number.
ls (hdx,gpty)/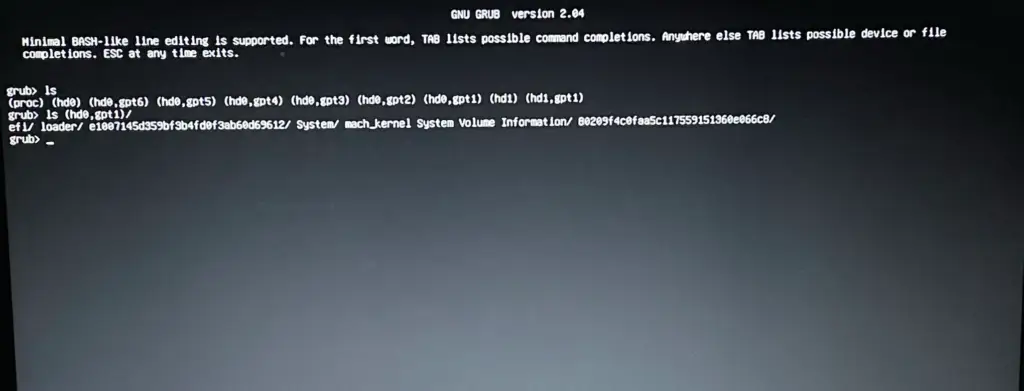
For me, the same is found in (hd0,gpt1)
Step 3 — Select the EFI Partition
Since we have found the partition, now we need to select the partition. So simply execute the below command.
set root=(hdx,gpty)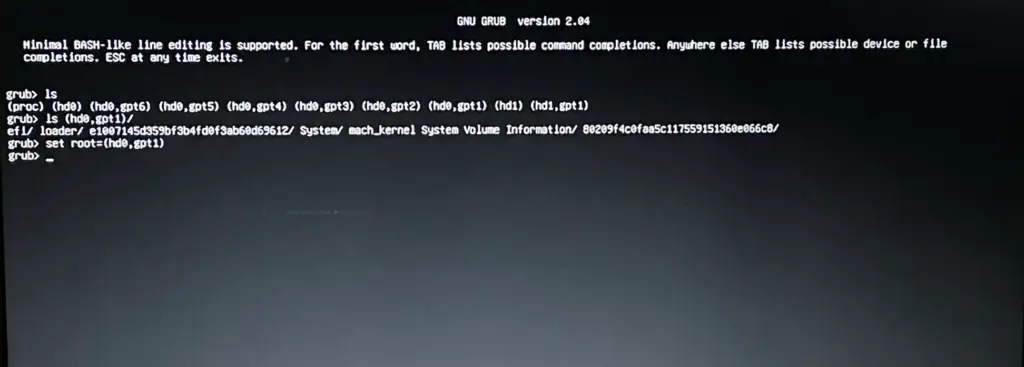
Step 4 — Chainloading the Windows EFI File.
Now, we have selected the partition in which our boot files are present, now we need to execute the command chainloader for loading a boot file, so we can boot from that.
chainloader /efi/Microsoft/Boot/bootmgfwi.efi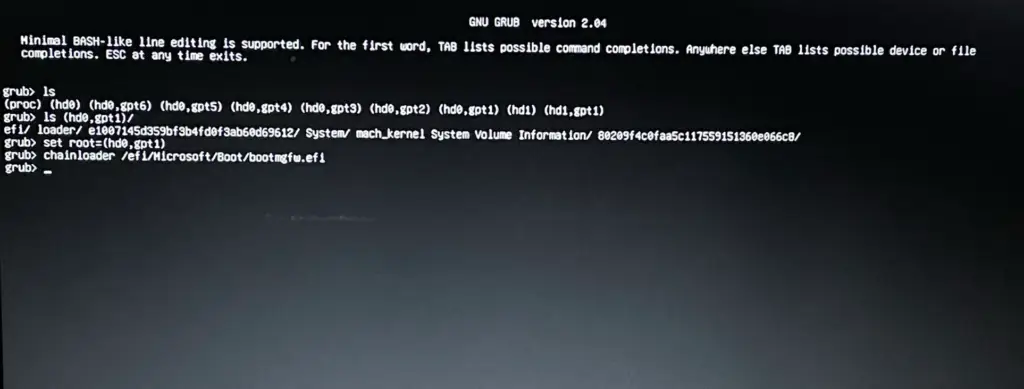
Step 5 — Boot Windows from Grub rescue:
Finally, you are all set to boot windows from grub rescue. Just we need to execute the below command.
bootConclusion — Boot windows:
ls
ls (hdx,gpty)/
set root=(hdx,gpty)
chainloader /efi/Microsoft/Boot/bootmgfw.efi
boot
That’s it for this article, If you have any queries or suggestion please write down in comment section below.
Check out our Latest Best Linux Picks
Boot Windows with GRUB
If you’re dual-booting Windows and Linux, you’ll need to use a bootloader to choose which operating system to load at startup. GRUB is a popular bootloader that can be used to boot both Windows and Linux. In this article, we’ll show you how to install and configure GRUB so that you can dual-boot Windows and Linux.
We’ll start by installing GRUB on a Linux system. Then, we’ll show you how to add Windows to GRUB’s boot menu. Finally, we’ll walk you through the process of booting Windows from GRUB.
By the end of this article, you’ll be able to dual-boot Windows and Linux with GRUB. So let’s get started!
| Column 1 | Column 2 | Column 3 |
|---|---|---|
| Title | Description | Link |
| How to Boot Windows with GRUB | This guide will show you how to boot Windows from GRUB, the bootloader that is used by most Linux distributions. | How to Boot Windows from GRUB |
| Troubleshooting GRUB Boot Problems | This guide will help you troubleshoot problems that you may encounter when trying to boot Windows from GRUB. | Troubleshooting GRUB Boot Problems |
GRUB is a boot loader that can be used to boot multiple operating systems from a single hard drive. It is a free and open-source software that is available for a wide range of operating systems, including Windows, Linux, and macOS. GRUB is typically installed on the master boot record (MBR) of the hard drive, and it is responsible for loading the operating system kernel into memory.
This guide will show you how to install GRUB on a Windows PC so that you can boot into other operating systems, such as Linux or macOS.
What is GRUB?
GRUB is a Grand Unified Bootloader, and it is a popular bootloader for Linux distributions. It can also be used to boot other operating systems, such as Windows and macOS. GRUB is a modular bootloader, which means that it can be configured to boot different operating systems from different locations on the hard drive. This makes it a good choice for dual-booting or multi-booting systems.
GRUB is a free and open-source software project, and it is available for a wide range of operating systems. It is also supported by a large community of users and developers, which means that there is plenty of documentation and support available if you need it.
How to install GRUB?
To install GRUB, you will need to:
1. Create a bootable USB drive or CD-ROM.
2. Download the GRUB installation files.
3. Boot from the bootable media.
4. Follow the on-screen instructions to install GRUB.
Creating a bootable USB drive or CD-ROM
The first step is to create a bootable USB drive or CD-ROM. You can use a variety of tools to do this, but the easiest way is to use the `dd` command.
To create a bootable USB drive, follow these steps:
1. Download the `dd` command-line utility.
2. Connect the USB drive to your computer.
3. Open a terminal window.
4. Type the following command:
dd if=/path/to/grub-install.iso of=/dev/sdX bs=4M
Where `/path/to/grub-install.iso` is the path to the GRUB installation ISO file, and `/dev/sdX` is the device node for your USB drive.
To create a bootable CD-ROM, follow these steps:
1. Download the `syslinux` package.
2. Create a new CD-ROM.
3. Open a terminal window.
4. Type the following command:
syslinux -i -c /dev/cdrom
Where `/dev/cdrom` is the device node for your CD-ROM drive.
Downloading the GRUB installation files
The next step is to download the GRUB installation files. You can download the latest version of GRUB from the GRUB website.
Once you have downloaded the GRUB installation files, extract them to a folder on your computer.
Booting from the bootable media
Now that you have created a bootable USB drive or CD-ROM, you can boot from it. To do this, you will need to change the boot order in your BIOS.
The exact steps for changing the boot order will vary depending on your motherboard, but the general process is as follows:
1. Power on your computer.
2. Press the BIOS key (usually F2, F10, or Delete).
3. Use the arrow keys to navigate to the Boot menu.
4. Use the arrow keys to select the bootable USB drive or CD-ROM.
5. Press Enter to save your changes.
Your computer will now boot from the bootable media.
Following the on-screen instructions
Once your computer has booted from the bootable media, you will be presented with a series of on-screen instructions. Follow these instructions to install GRUB.
The installation process will vary depending on your operating system, but the general process is as follows:
1. Select the operating system that you want to install GRUB for.
2. Select the location where you want to install GRUB.
3. Click Install.
GRUB will now be installed on your computer.
In this guide, you learned how to install GRUB on a Windows PC. GRUB is a powerful tool that can be used to boot multiple operating systems from a single hard drive. By following the steps in this guide, you can easily install GRUB and start enjoying the benefits of multi-booting.
Additional resources
*
GRUB is a boot loader that can be used to boot multiple operating systems from a single hard drive. This can be useful if you want to dual-boot Windows and Linux, or if you want to have multiple versions of Windows installed on the same computer.
To boot Windows with GRUB, you will need to:
1. Install GRUB on your computer.
2. Configure GRUB to boot Windows.
3. Set Windows as the default operating system.
Installing GRUB
To install GRUB, you will need to download the GRUB ISO file and burn it to a CD or USB drive. Once you have created the bootable media, you can boot your computer from it.
When you boot from the GRUB ISO file, you will be presented with the GRUB menu. From here, you can select the option to install GRUB.
The GRUB installation process is fairly straightforward. You will be asked to select the location where you want to install GRUB, and then you will be asked to confirm your selection.
Once GRUB has been installed, you will need to reboot your computer.
Configuring GRUB
Once GRUB has been installed, you will need to configure it to boot Windows. To do this, you will need to edit the GRUB configuration file.
The GRUB configuration file is located at `/boot/grub/grub.cfg`. You can open this file using any text editor.
In the GRUB configuration file, you will need to find the section that lists the operating systems that GRUB can boot. This section will look something like this:
menuentry “Windows 10” {
linuxefi /EFI/Microsoft/Boot/bootmgfw.efi
initrdefi /EFI/Microsoft/Boot/bootmgfw.efi
}
To add Windows to the GRUB menu, you will need to add a new entry to this section. The new entry should look something like this:
menuentry “Windows 10” {
linuxefi /EFI/Microsoft/Windows/grub/bootmgfw.efi
initrdefi /EFI/Microsoft/Windows/grub/bootmgfw.efi
}
Once you have added the new entry, you will need to save the GRUB configuration file and reboot your computer.
Setting Windows as the Default Operating System
By default, GRUB will boot the first operating system that it finds in the list. If you want to set Windows as the default operating system, you will need to edit the GRUB configuration file.
In the GRUB configuration file, you will need to find the line that starts with `default`. This line will look something like this:
default 0
The number on the right side of the equal sign represents the index of the operating system that GRUB should boot by default. To set Windows as the default operating system, you will need to change this number to 0.
Once you have changed the default operating system, you will need to save the GRUB configuration file and reboot your computer.
Booting Windows with GRUB
Once you have installed and configured GRUB, you can boot Windows by following these steps:
1. Power on your computer.
2. Press the key that you used to boot from the GRUB ISO file.
3. Select the Windows entry from the GRUB menu.
4. Press Enter.
Windows will start to boot.
How to Use GRUB?
Once GRUB has been installed and configured, you can use it to boot multiple operating systems from a single hard drive. To use GRUB, you will need to:
1. Boot your computer from the GRUB menu.
2. Select the operating system that you want to boot.
3. Press Enter to boot the operating system.
Booting your computer from the GRUB menu
To boot your computer from the GRUB menu, you will need to press the key that you used to boot from the GRUB ISO file. This key is usually the Escape key, the F10 key, or the Delete key.
Once you have pressed the key, you will be presented with the GRUB menu. From here, you can select the operating system that you want to boot.
Selecting the operating system that you want to boot
To select the operating system that you want to boot, you will need to use the arrow keys to highlight the operating system and then press Enter.
Once you have selected the operating system, you will
Q: What is GRUB?
GRUB is an acronym for GRand Unified Bootloader. It is a bootloader that can be used to boot multiple operating systems from a single hard drive. GRUB is free and open source software, and it is available for a wide variety of operating systems, including Windows, Linux, and macOS.
Q: How do I install GRUB?
To install GRUB, you will need to first create a bootable USB drive. You can do this using a tool like Rufus. Once you have created the bootable USB drive, you can follow these steps to install GRUB:
1. Boot your computer from the bootable USB drive.
2. Select the “Install GRUB” option.
3. Select the hard drive where you want to install GRUB.
4. Select the operating system that you want to boot from GRUB.
5. Click “Install”.
Q: How do I set GRUB as the default bootloader?
To set GRUB as the default bootloader, you will need to edit the /boot/grub/grub.cfg file. You can do this using a text editor like vi or nano. Once you have opened the file, find the line that starts with “default” and change the value to “0”. This will tell GRUB to boot the first operating system in the list.
Q: How do I change the GRUB boot menu?
To change the GRUB boot menu, you will need to edit the /boot/grub/grub.cfg file. You can do this using a text editor like vi or nano. Once you have opened the file, you can add or remove entries for the operating systems that you want to boot. You can also change the order of the entries.
Q: How do I troubleshoot GRUB problems?
If you are having problems with GRUB, there are a few things that you can check. First, make sure that you have installed GRUB correctly. You can do this by following the instructions in the “How do I install GRUB?” section above. If you are still having problems, you can try reinstalling GRUB. To do this, follow the instructions in the “How do I install GRUB?” section above, but make sure to delete the old GRUB installation first. If you are still having problems, you can try asking for help on a forum or mailing list.
Q: What are the advantages of using GRUB?
There are a few advantages to using GRUB. First, GRUB is free and open source software. This means that you can use it without having to pay any licensing fees. Second, GRUB is very versatile. It can be used to boot multiple operating systems from a single hard drive. Third, GRUB is very easy to use. You can easily create a bootable USB drive with GRUB, and you can also easily edit the GRUB boot menu.
Q: What are the disadvantages of using GRUB?
There are a few disadvantages to using GRUB. First, GRUB can be complex to configure. If you are not familiar with GRUB, you may have trouble setting it up correctly. Second, GRUB can be slow to boot. This is because GRUB has to scan the hard drive for operating systems every time it boots. Third, GRUB is not supported by all operating systems. For example, GRUB is not supported by macOS.
Q: Is GRUB the best bootloader?
There is no one-size-fits-all answer to this question. The best bootloader for you will depend on your specific needs. If you need a bootloader that is free, open source, and easy to use, then GRUB is a good option. However, if you need a bootloader that is fast and supports all operating systems, then GRUB may not be the best option for you.
In this blog post, we discussed how to boot Windows with GRUB. We first introduced GRUB and its role in the boot process. Then, we showed you how to install GRUB on a hard drive and set it as the default boot loader. Finally, we walked you through the process of booting Windows from GRUB.
We hope that this blog post has been helpful. If you have any questions, please feel free to leave a comment below.
Here are some key takeaways from this blog post:
- GRUB is a bootloader that can be used to boot multiple operating systems from a single hard drive.
- To install GRUB, you must first create a bootable USB drive.
- Once you have created the bootable USB drive, you can install GRUB by following the steps in the tutorial.
- To boot Windows from GRUB, you must first select the Windows installation from the GRUB menu.
Author Profile
-
Hatch, established in 2011 by Marcus Greenwood, has evolved significantly over the years. Marcus, a seasoned developer, brought a rich background in developing both B2B and consumer software for a diverse range of organizations, including hedge funds and web agencies.
Originally, Hatch was designed to seamlessly merge content management with social networking. We observed that social functionalities were often an afterthought in CMS-driven websites and set out to change that. Hatch was built to be inherently social, ensuring a fully integrated experience for users.
Now, Hatch embarks on a new chapter. While our past was rooted in bridging technical gaps and fostering open-source collaboration, our present and future are focused on unraveling mysteries and answering a myriad of questions. We have expanded our horizons to cover an extensive array of topics and inquiries, delving into the unknown and the unexplored.
Latest entries
Время на прочтение5 мин
Количество просмотров151K
Привет, Хабр! Сегодня мы рассмотрим ситуацию, когда при двойной установке Linux & Windows загрузчик GRUB не стартует, давая возможность выбрать ОС, а автоматически загружается Windows. Немного теории:
GRUB (GRand Unified Bootloader) — программа-загрузчик операционных систем.
GRUB может загрузить любую совместимую с ней операционную систему. Среди них: Linux, FreeBSD, Solaris и многие другие. Кроме того, GRUB умеет по цепочке передавать управление другому загрузчику, что позволяет ему загружать Windows (через загрузчик NTLDR), MS-DOS, OS/2 и другие системы.
Значит с теорией мы немного разобрались (думаю этого будет достаточно), теперь же рассмотрим, какие бывают подводные камни, при установке Dual Boot Windows и Linux на одном компьютере.
Эксперимент производился на рабочей станции со следующими характеристиками:
Base Board Information
- Manufacturer: Acer
- Product Name: Aspire XC600
Memory Device
- Size: 4096 MB
- Type: DDR3
- Speed: 1333 MHz
- Manufacturer: Kingston
- Rank: 2
HDD
- product: ST500DM002-1BD14
- vendor: Seagate
- physical id: 0.0.0
- bus info: scsi@0:0.0.0
- logical name: /dev/sda
- size: 465GiB (500GB)
- capabilities: gpt-1.00 partitioned partitioned:gpt
Доказано, что проблем с установкой Debian 8.6 Jessie совместно с Windows 10 не обнаружено. Debian корректно прописывается в автозагрузке, GRUB запускается без ошибок и две ОС также работают нормально.
Но, как показала практика, не со всеми дистрибутивами такое происходит. При установке Ubuntu 16.04.1 вместо Debian на ту же рабочую станцию вылез первый подводный камень — GRUB не стартовал, и Windows 10 автоматом шла на загрузку.
Решение проблемы было найдено спустя недели три-четыре (тогда уже надоело считать, сколько времени убито на решение проблемы). Оно оказалось неожиданным, но в тоже время вся система заработала. Значит, если вы столкнулись с такой же проблемой, приведенная ниже инструкция может вам пригодится и сэкономить кучу времени.
Важно! До начала выполнения инструкции нужно подготовить LiveCD с дистрибутивом Linux Mint — все операции мы будем выполнять на нем (я выбрал этот дистрибутив из-за того, что на него спокойно можно установить Midnight Commander, что сложно сделать на LiveCD с Ubuntu, так мы получаем больше пространства для маневров). Также стоит заметить, что команда из под консоли update-grub вам не поможет, так как она рассчитана на случай, когда GRUB запускается, но не видит другие ОС кроме Линукса. Также рекомендую создавать резервные копии файлов/каталогов, над которыми вы осуществляете хоть малейшие изменения.
- Через терминал, с правами root смонтировать раздел с EFI в папку /mnt. В моем случае, это была команда mount /dev/sda2 /mnt.
- Введите команду sudo -s и подтвердите пароль (он пустой по умолчанию) для последующих операций (многие советуют не делать этого, а вводить sudo и команду для выполнения — я поддерживаю это мнение, но инструкция рассчитана на опытных пользователей системы Linux, которые понимаю, что делают все на свой страх и риск).
- Запустить Midnight Commander командой mc.
- Найти в файловой системе следующий каталог: EFI в папке /mnt.
- Переименовать каталог Microsoft во что-нибудь другое, например в Microsoft2.
- Создаем новый каталог с именем Microsoft.
- Заходим в только что созданный каталог Microsoft и частично создаем внутри его иерархию папок аналогичную старому Microsoft (тому, что переименовали). В моем случае он имел такую структуру папок: /boot/, затем куча папок и файл bootmgfw.efi рядом с ними. Нужно воссоздать структуру папок ровно до этого файла. Т.е. всё, что лежит рядом с ним — не нужно, а всё, что идет до него (т.е. родительские папки, соседние с ними тоже не нужны) воссоздаем в нашей новой папке Microsoft. В моем случае понадобилось создать только папку /boot, итоговый путь до нового каталога вышел таким: /EFI/Microsoft/boot. Можно просто скопировать все папки и файлы — проверено, это работает и можно не создавать все вручную.
- Находим в каталоге из шага 6 папку с именем нашего дистрибутива Линукса, в нашем случае это Ubuntu. Копируем (оригиналы файлов и папку ubuntu на всякий случай оставляем, не помешают) все файлы из данной в папки в итоговый каталог, созданный на предыдущем шаге: /EFI/Microsoft/boot.
- В получившейся файловой системе находим файл grubx.efi или grubx64.efi (будет только один из них: в зависимости от разрядности установленного Линукса). Переименовываем его в bootmgfw.efi.
- Находим файл /boot/grub/grub.cfg в файловой системе установленного Линукса. Открываем его для редактирования. Внутри него находим слово «Microsoft» в контексте строки, начинающейся с «chainloader» и заменяем это слово (должно быть только одно вхождение и именно в строке с «chainloader», так что не ошибетесь) на название каталога, в который мы переименовали Microsoft (т.е. на Microsoft2 в нашем примере). Сохраняем изменения в файле.
Также, в этом файле вы можете поменять названия в списке, который выводит GRUB. Например, вместо
openSUSE Leap 42.2 27.01
в части кода:
menuentry 'openSUSE Leap 42.2 27.01'  --class opensuse --class gnu-linux --class gnu --class os $menuentry_id_option 'gnulinux-simple-996b3ed5-150f-4de3-a40c-6d385e27d6de' {
	load_video
	set gfxpayload=keep
	insmod gzio
	insmod part_gpt
	insmod ext2
	set root='hd0,gpt6'
	if [ x$feature_platform_search_hint = xy ]; then
	  search --no-floppy --fs-uuid --set=root --hint-bios=hd0,gpt6 --hint-efi=hd0,gpt6 --hint-baremetal=ahci0,gpt6  996b3ed5-150f-4de3-a40c-6d385e27d6de
	else
	  search --no-floppy --fs-uuid --set=root 996b3ed5-150f-4de3-a40c-6d385e27d6de
	fi
	echo	'Загружается Linux 4.4.36-8-default …'
	linuxefi /boot/vmlinuz-4.4.36-8-default root=UUID=996b3ed5-150f-4de3-a40c-6d385e27d6de ro  resume=/dev/sda7 splash=silent quiet showopts
	echo	'Загружается начальный виртуальный диск …'
	initrdefi /boot/initrd-4.4.36-8-default
}
Написать
openSUSE The best choice!:)
:
menuentry 'openSUSE The best choice!:)'  --class opensuse --class gnu-linux --class gnu --class os $menuentry_id_option 'gnulinux-simple-996b3ed5-150f-4de3-a40c-6d385e27d6de' {
	load_video
	set gfxpayload=keep
	insmod gzio
	insmod part_gpt
	insmod ext2
	set root='hd0,gpt6'
	if [ x$feature_platform_search_hint = xy ]; then
	  search --no-floppy --fs-uuid --set=root --hint-bios=hd0,gpt6 --hint-efi=hd0,gpt6 --hint-baremetal=ahci0,gpt6  996b3ed5-150f-4de3-a40c-6d385e27d6de
	else
	  search --no-floppy --fs-uuid --set=root 996b3ed5-150f-4de3-a40c-6d385e27d6de
	fi
	echo	'Загружается Linux 4.4.36-8-default …'
	linuxefi /boot/vmlinuz-4.4.36-8-default root=UUID=996b3ed5-150f-4de3-a40c-6d385e27d6de ro  resume=/dev/sda7 splash=silent quiet showopts
	echo	'Загружается начальный виртуальный диск …'
	initrdefi /boot/initrd-4.4.36-8-default
}
Хоть мелочь, а приятно! Остальное в коде советую не трогать.
Если трудно разобраться с управлением Midnight Commander (в этом нет ничего страшного, у меня тоже в первый раз были проблемы с этой программой), все операции можно выполнить в файловом менеджере Nautilus (или в другом, не суть важно), но изначально запустив его под правами пользователя root.
После этого идем на перезагрузку и радуемся результату. Но, как оказывается, такая проблема есть и у дистрибутива OpenSUSE Leap 42.2. Как показала практика, если на компьютере установлен дистрибутив OpenSUSE с Windows 10, то приведенная выше инструкция не поможет. Точнее, она поможет, но только ее нужно дополнить. После выполнения основной части выполняем следующие шаги:
- После выполнения всех операций заходим в папку /EFI/opensuse/x86_64-efi/ (название итоговой папки x86_64-efi может быть другим в зависимости от архитектуры ПК)
- Копируем файл grub.efi (если у вас включена опция Secure Boot, там будет еще файл shim.efi, тогда советую скопировать их вместе)
- Заходим в папку /EFI/Boot и удаляем все файлы, которые там есть (при обновлении загрузчика они снова появятся, но в этом нет ничего страшного)
- Вставляем файл (или файлы), которые мы скопировали и спокойно идем на перезагрузку.
Вот и вся инструкция. Думаю, кому-то пригодится…
P.S. Если же у вас все хорошо, GRUB с OpenSUSE запускается, но не видит Windows, радуйтесь — проблема решается всего одной командной: grub2-mkconfig -o /boot/grub2/grub.cfg, а если у вас стоит Ubuntu, нужно выполнить просто update-grub.
Для тех же, кого заинтересовала данная тема, рекомендую прочитать статью: «Начальный загрузчик GRUB 2 — полное руководство».
Содержание
После переноса виртуальной машины с Windows XP 1) из Virtualbox в Proxmox при загрузке возникла ошибка:
Disk Error
Press any key to restart
Проблема была явно с загрузчиком 2), а поскольку быстро устранить её не удалось (bootrec /fixmbr и /fixboot не помогли и вот почему), то это стало отличным поводом вовсе заменить загрузчик курильщика Windows на GRUB. Способ действует не только для Windows XP, но и для современных ОС Windows. Как показала практика, GRUB гораздо более «живуч» при изменениях аппаратной конфигурации компьютера, переносе системы на другое оборудование или миграции виртуальных машин. 3)
В конфигурации GRUB есть недокументированная команда ntldr 4) для передачи процесса загрузки в Windows-загрузчик NTLDR (для Windows XP) или BootMGR (для более поздних версий Windows). Именно ей можно воспользоваться, чтобы заменить штатный загрузчик.
Windows XP
Действия по шагам для загрузчика NTLDR (Windows NT 5.2): 5)
-
загрузить Live-дистрибутив Linux с GRUB (например, Rescatux)
-
примонтировать раздел с Windows XP
mount /dev/sda1 /mnt
-
установить GRUB:
grub-install --boot-directory=/mnt /dev/sda
-
создать файл конфигурации GRUB в его каталоге
- /mnt/grub/grub.cfg
-
set default="Windows XP"
set timeout=5
menuentry "Windows XP" --class windows --class os {
  insmod part_msdos
  insmod ntfs
  insmod ntldr
  set root='(hd0,msdos1)'
  search --no-floppy --set=root --label MULTIKEY
  search --no-floppy --set=root --fs-uuid 2C08-8FE5
  ntldr ($root)/ntldr
}
-
отмонтировать раздел
umount /mnt && sync
-
перезагрузить виртуальную машину
reboot
7, 8, 2008, 2012
Всё то же самое для BootMGR 6) (Windows NT 6.x), только загрузка другого файла: 7)
- /mnt/grub/grub.cfg
-
set default="Windows 7"
set timeout=5
menuentry "Windows 7" --class windows --class os {
  insmod part_msdos
  insmod ntfs
  insmod ntldr
  set root='(hd0,msdos1)'
  ntldr ($root)/bootmgr
}
Загрузчик Windows
Загрузить любую версию Windows используя её собственный исправный загрузчик (расположенный в PBR) можно через chainloader:
- /boot/grub/grub.cfg
-
menuentry "Start Windows" --class windows --class os {
  set root='(hd0,1)'
  search --no-floppy --set=root --label CAVALWIN
  chainloader  '+1'
}
Такой способ бывает полезен при «мультизагрузке»  нескольких ОС с одного диска.
Veracrypt
Если в системе два физических диска, на первом установлен GRUB, а на втором ОС Windows со своим родным загрузчиком, то бывает полезно передать загрузку полностью на второй диск. Такое бывает необходимо, например, для загрузки с зашифрованного с помощью Veracrypt диска (бывший Truecrypt), так как загрузчик Veracrypt не поддерживает «обычную» мультизагрузку.
Чтобы этот способ сработал, BIOS компьютера должен пытаться передать загрузку следующему диску при неудачной попытке на первом. Если BIOS позволяет явно задать порядок загрузки дисков, то нужно указать первым диск с GRUB, вторым с Windows.
Но в большинстве BIOS можно указать только порядок загрузки «устройств», например: первый Hard Disk, второй CD-ROM, третья сетевая карта. В таком случае нужно указать порядок дисков в разделе Hard Disks.
Чтобы передать загрузку второму диску достаточно сделать «выход» из GRUB и BIOS сам перейдёт к загрузке со второго диска:
- /boot/grub/grub.cfg
-
menuentry "Windows Veracrypt" {
        # Boot from next disk
        exit
}