
From Wikipedia, the free encyclopedia
|
|
Parts of this article (those related to Windows 10 issues) need to be updated. Please help update this article to reflect recent events or newly available information. (September 2018) |
Group Policy is a feature of the Microsoft Windows NT family of operating systems (including Windows 8.1, Windows 10, Windows 11) that controls the working environment of user accounts and computer accounts. Group Policy provides centralized management and configuration of operating systems, applications, and users’ settings in an Active Directory environment. A set of Group Policy configurations is called a Group Policy Object (GPO). A version of Group Policy called Local Group Policy (LGPO or LocalGPO) allows Group Policy Object management without Active Directory on standalone computers.[1][2]
Active Directory servers disseminate group policies by listing them in their LDAP directory under objects of class groupPolicyContainer. These refer to fileserver paths (attribute gPCFileSysPath) that store the actual group policy objects, typically in an SMB share \\domain.com\SYSVOL shared by the Active Directory server. If a group policy has registry settings, the associated file share will have a file registry.pol with the registry settings that the client needs to apply.[3]
The Policy Editor (gpedit.msc) is not provided on Home (& Starter) editions of Windows.
Group Policies, in part, control what users can and cannot do on a computer system. For example, a Group Policy can be used to enforce a password complexity policy that prevents users from choosing an overly simple password. Other examples include: allowing or preventing unidentified users from remote computers to connect to a network share, or to block/restrict access to certain folders. A set of such configurations is called a Group Policy Object (GPO).
As part of Microsoft’s IntelliMirror technologies, Group Policy aims to reduce the cost of supporting users. IntelliMirror technologies relate to the management of disconnected machines or roaming users and include roaming user profiles, folder redirection, and offline files.
To accomplish the goal of central management of a group of computers, machines should receive and enforce GPOs. A GPO that resides on a single machine only applies to that computer. To apply a GPO to a group of computers, Group Policy relies on Active Directory (or on third-party products like ZENworks Desktop Management) for distribution. Active Directory can distribute GPOs to computers which belong to a Windows domain.
By default, Microsoft Windows refreshes its policy settings every 90 minutes with a random 30 minutes offset. On domain controllers, Microsoft Windows does so every five minutes. During the refresh, it discovers, fetches and applies all GPOs that apply to the machine and to logged-on users. Some settings — such as those for automated software installation, drive mappings, startup scripts or logon scripts — only apply during startup or user logon. Since Windows XP, users can manually initiate a refresh of the group policy by using the gpupdate command from a command prompt.[4]
Group Policy Objects are processed in the following order (from top to bottom):[5]
- Local — Any settings in the computer’s local policy. Prior to Windows Vista, there was only one local group policy stored per computer. Windows Vista and later Windows versions allow individual group policies per user accounts.[6]
- Site — Any Group Policies associated with the Active Directory site in which the computer resides. (An Active Directory site is a logical grouping of computers, intended to facilitate management of those computers based on their physical proximity.) If multiple policies are linked to a site, they are processed in the order set by the administrator.
- Domain — Any Group Policies associated with the Windows domain in which the computer resides. If multiple policies are linked to a domain, they are processed in the order set by the administrator.
- Organizational Unit — Group policies assigned to the Active Directory organizational unit (OU) in which the computer or user are placed. (OUs are logical units that help organizing and managing a group of users, computers or other Active Directory objects.) If multiple policies are linked to an OU, they are processed in the order set by the administrator.
The resulting Group Policy settings applied to a given computer or user are known as the Resultant Set of Policy (RSoP). RSoP information may be displayed for both computers and users using the gpresult command.[7]
A policy setting inside a hierarchical structure is ordinarily passed from parent to children, and from children to grandchildren, and so forth. This is termed inheritance. It can be blocked or enforced to control what policies are applied at each level. If a higher level administrator (enterprise administrator) creates a policy that has inheritance blocked by a lower level administrator (domain administrator), this policy will still be processed.
Where a Group Policy Preference Settings is configured and there is also an equivalent Group Policy Setting configured, then the value of the Group Policy Setting will take precedence.
WMI filtering is the process of customizing the scope of the GPO by choosing a (WMI) filter to apply. These filters allow administrators to apply the GPO only to, for example, computers of specific models, RAM, installed software, or anything available via WMI queries.
Local Group Policy (LGP, or LocalGPO) is a more basic version of Group Policy for standalone and non-domain computers, that has existed at least since Windows XP,[when?] and can be applied to domain computers.[citation needed] Prior to Windows Vista, LGP could enforce a Group Policy Object for a single local computer, but could not make policies for individual users or groups. From Windows Vista onward, LGP allow Local Group Policy management for individual users and groups as well,[1] and also allows backup, importing and exporting of policies between standalone machines via «GPO Packs» – group policy containers which include the files needed to import the policy to the destination machine.[2]
Group Policy preferences
[edit]
Group Policy Preferences are a way for the administrator to set policies that are not mandatory, but optional for the user or computer.
There is a set of group policy setting extensions that were previously known as PolicyMaker. Microsoft bought PolicyMaker and then integrated them with Windows Server 2008. Microsoft has since released a migration tool that allows users to migrate PolicyMaker items to Group Policy Preferences.[8]
Group Policy Preferences adds a number of new configuration items. These items also have a number of additional targeting options that can be used to granularly control the application of these setting items.
Group Policy Preferences are compatible with x86 and x64 versions of Windows XP, Windows Server 2003, and Windows Vista with the addition of the Client Side Extensions (also known as CSE).[9][10][11][12][13][14]
Client Side Extensions are now included in Windows Server 2008, Windows 7, and Windows Server 2008 R2.
Group Policy Management Console
[edit]
Originally, Group Policies were modified using the Group Policy Edit tool that was integrated with Active Directory Users and Computers Microsoft Management Console (MMC) snap-in, but it was later split into a separate MMC snap-in called the Group Policy Management Console (GPMC). The GPMC is now a user component in Windows Server 2008 and Windows Server 2008 R2 and is provided as a download as part of the Remote Server Administration Tools for Windows Vista and Windows 7.[15][16][17][18]
Advanced Group Policy Management
[edit]
Microsoft has also released a tool to make changes to Group Policy called Advanced Group Policy Management[19] (a.k.a. AGPM). This tool is available for any organization that has licensed the Microsoft Desktop Optimization Pack (a.k.a. MDOP). This advanced tool allows administrators to have a check in/out process for modification Group Policy Objects, track changes to Group Policy Objects, and implement approval workflows for changes to Group Policy Objects.
AGPM consists of two parts — server and client.
The server is a Windows Service that stores its Group Policy Objects in an archive located on the same computer or a network share.
The client is a snap-in to the Group Policy Management Console, and connects to the AGPM server. Configuration of the client is performed via Group Policy.
Group Policy settings are enforced voluntarily by the targeted applications. In many cases, this merely consists of disabling the user interface for a particular function.[20]
Alternatively, a malevolent user can modify or interfere with the application so that it cannot successfully read its Group Policy settings, thus enforcing potentially lower security defaults or even returning arbitrary values.[21]
Later enhancements to Group Policy
[edit]
Group Policy was enhanced following its initial release in Windows 2000. For example, Windows XP has introduced a new feature called Group Policy Update which replaced the secedit command.[22] This feature allows an administrator to force a group policy update on all computers with accounts in a particular Organizational Unit. This overrides the default scheduled task on the computer which runs the gpupdate command within 90 minutes, adjusted by a random offset to avoid overloading the domain controller.[23]
Group Policy Infrastructure Status was introduced, which can report when any Group Policy Objects are not replicated correctly amongst domain controllers.[24]
Group Policy Results Report also has a new feature that times the execution of individual components when doing a Group Policy Update.[25]
- Administrative Template
- Group Policy improvements in Windows Vista
- Workgroup Manager
- ^ a b Tara Meyer (Aquent LLC) (25 July 2008). «Step-by-Step Guide to Managing Multiple Local Group Policy Objects». go.microsoft.com.
- ^ a b Sigman, Jeff. «SCM v2 Beta: LocalGPO Rocks!». Microsoft. Archived from the original on 2016-03-01. Retrieved 2018-11-24.
- ^ «[MS-GPOD]: Group Policy Protocols Overview». Microsoft. Section 1.1.5 Group Policy Data Storage. Retrieved 2020-02-22.
- ^
Gpupdate - ^ «Group Policy processing and precedence». Microsoft Corporation. 22 April 2012.
- ^ «Group Policy — Apply to a Specific User or Group — Windows 7 Help Forums». www.sevenforums.com.
- ^ Archiveddocs (18 April 2012). «Gpresult». technet.microsoft.com.
- ^ «Group Policy Preference Migration Tool (GPPMIG)». Microsoft.
- ^ «Group Policy Preference Client Side Extensions for Windows XP (KB943729)». Microsoft Download Center.
- ^ «Group Policy Preference Client Side Extensions for Windows XP x64 Edition (KB943729)». Microsoft Download Center.
- ^ «Group Policy Preference Client Side Extensions for Windows Vista (KB943729)». Microsoft Download Center.
- ^ «Group Policy Preference Client Side Extensions for Windows Vista x64 Edition (KB943729)». Microsoft Download Center.
- ^ «Group Policy Preference Client Side Extensions for Windows Server 2003 (KB943729)». Microsoft Download Center.
- ^ «Group Policy Preference Client Side Extensions for Windows Server 2003 x64 Edition (KB943729)». Microsoft Download Center.
- ^ «How to Install GPMC on Server 2008, 2008 R2, and Windows 7 (via RSAT)». 2009-12-23. Archived from the original on 2009-12-26. Retrieved 2010-03-12.
- ^
Microsoft Remote Server Administration Tools for Windows Vista - ^
Microsoft Remote Server Administration Tools for Windows Vista for x64-based Systems - ^
Remote Server Administration Tools for Windows 7 - ^ «Windows — Official Site for Microsoft Windows 10 Home & Pro OS, laptops, PCs, tablets & more». www.microsoft.com.
- ^ Raymond Chen, «Shell policy is not the same as security»
- ^ Russinovich, Mark (2019-06-26) [2005-12-12]. «Circumventing Group Policy as a Limited User». Microsoft Community Hub. Microsoft. Retrieved 2023-06-10.
- ^ «How to Force Group Policy Update in Windows 2000, XP, Vista, 8 and 10». Help Desk Geek — Tech Tips from Trusted Tech Experts. 2009-06-16. Retrieved 2024-12-03.
- ^ «Why your Windows group policy doesn’t take effect immediately — IUKB». servicenow.iu.edu. Retrieved 2024-12-03.
- ^ «Updated: What’s new with Group Policy in Windows 8». 17 October 2011.
- ^ «Windows 8 Group Policy Performance Troubleshooting Feature». 23 January 2012.
- «Group Policy for Beginners». Windows 7 Technical Library. Microsoft. 27 April 2011. Retrieved 22 April 2012.
- «Group Policy Management Console». Dev Center — Desktop. Microsoft. 3 February 2012. Retrieved 22 April 2012.
- «Step-by-Step Guide to Managing Multiple Local Group Policy Objects». Windows Vista Technical Library. Microsoft. 25 July 2008. Retrieved 22 April 2012.
- «Group Policy processing and precedence». Windows Server 2003 Product Help. Microsoft. 21 January 2005. Retrieved 22 April 2012.
- Official website
- Group Policy Team Blog Archived 2010-04-20 at the Wayback Machine
- Group Policy Settings Reference for Windows and Windows Server
- Force Gpupdate
Как системным администраторам в предприятиях, так и домашним пользователям рано или поздно приходится настраивать компьютеры, а также конфигурацию пользовательских учетных записей. В домашних условиях вы можете просто применить к своему компьютеру и необходимым учетным записям твики реестра, при помощи которых большинство настроек будут применены после перезагрузки компьютера или настраивать его вручную, что может занять очень много времени. Но как же быть, если вы работаете администратором в крупной компании, где нужно настроить десятки, а может и сотни компьютеров. Причем, в вашей организации, скорее всего, существует несколько отделов, у каждого из которых должны быть индивидуальные настройки. Например, компьютеры, расположенные в конференц-залах, предназначенные для проведения презентаций должны быть оснащены обоями рабочего стола с корпоративным логотипом. Или сотрудники отдела маркетинга не должны иметь права на запуск оснастки служб системы или редактора системного реестра. Большинство настроек локального компьютера, а также компьютеров, которые входят в состав доменной сети, настраиваются при помощи групповых политик.
Групповые политики – это набор правил, обеспечивающих инфраструктуру, в которой администраторы локальных компьютеров и доменных служб Active Directory могут централизовано развертывать и управлять настройками пользователей и компьютеров в организации. Все настройки учетных записей, операционной системы, аудита, системного реестра, параметров безопасности, установки программного обеспечения и прочие параметры развертываются и обновляются в рамках домена при помощи параметров объектов групповой политики GPO (Group Policy Object). Групповые политики являются компонентом операционной системы Windows и основываются на тысячах отдельных параметров политик, иначе говоря, политик, определяющих определённую конфигурацию для своего применения.
История групповых политик
Для операционных систем Windows концепция групповых политик не является инновационным шагом в области системной безопасности и настройки операционных систем. Первые политики появились еще в Windows NT 4.0 и назывались системными политиками. Эти политики предназначались только для изменения данных системного реестра и основывались на файлах, которые назывались шаблонами adm. Для создания этих политик использовался специальный редактор системных политик. На то время системные политики были значительным шагом в обеспечении безопасности операционных систем Windows, несмотря на то, что объекты локальной политики не использовались, и система Windows NT 4.0 не поддерживала службы Active Directory.
Групповые политики появились в операционной системе Windows 2000 и включали в себя около 900 настроек для пользователей и компьютеров, которые могли в полной мере применяться к клиентским компьютерам. Из утилиты, предназначенной для изменения данных системного реестра, групповые политики операционной системы Windows 2000 превратились в компонент, предназначенный для изменения параметров конфигурации операционной системы. Групповые политики по-прежнему расположены в шаблонах ADM. Система Windows 2000 Server уже позволяет распространять объекты групповых политик для компьютеров, расположенных в домене и подразделениях (OU) в Active Directory.

В операционных системах Windows XP и Windows Server 2003 возможности групповых политик были расширены. С появлением этих систем у администраторов появилась возможность управлять параметрами безопасности и установкой приложений, а количество политик увеличилось до 1400. Локальные объекты групповой политики существовали независимо от того, входит ли компьютер в состав домена, рабочей группы или вовсе не принадлежит к сетевой среде. Все это объекты хранились в папке %SystemRoot%System32Group Policy. Политики распространялись только на тот компьютер, где хранятся сами GPO. В том случае, если компьютер не принадлежал к домену, локальная политика использовалась только для настройки конфигурации локального компьютера. Но если он входил в состав домена Active Directory, то параметры, привязанные к инфраструктурной единице домена (домен, лес, сайт) заменяли параметры локального объекта групповой политики.

Операционные системы Windows Vista и Windows Server 2008 уже поддерживают около 2500 настроек групповых политик. Новые категории управления политиками теперь уже обеспечивают управление питанием, возможность блокировки установки устройств, улучшенные параметры безопасности, расширение настроек Internet Explorer, а также возможность делегировать пользователям право устанавливать драйверы принтеров. В этих операционных системах было создано расширение для формата шаблонов политик. У форматов adm был значительный недостаток – для реализации локализации групповых политик нужно было создавать отдельный adm-файл для каждого языка. Теперь административные шаблоны представляют собой пару XML-файлов — *.admx файл, который определяет изменения в реестре, а также .adml файл, который отвечает за языковые настройки указанной политики. Несмотря на эти изменения, в одной системе могут сосуществовать как adm, так и admx/adml шаблоны без всяких проблем. В операционной системе Windows Server 2008 можно создавать стартовые объекты групповой политики. Использование стартового объекта групповой политики позволяет хранить набор параметров административных шаблонов политик в одном объекте и включать эти параметры в новые объекты групповой политики. Также для каждого объекта групповых политик появились возможности добавления комментариев, а сведения о подключенных сетях обеспечивают улучшение отклика групповой политики на изменение сетевых условий.

В операционной системе Windows Server 2008 появился следующий функционал:
- Предпочтения групповых политик. Эти предпочтения предоставляют множества расширений для групповой политики. С помощью предпочтений групповой политики можно управлять сопоставлениями дисков, параметрами реестра, локальными пользователями и группами, службами, файлами и папками без необходимости изучения языка сценариев.
- Служба групповой политики. Инфраструктура групповой политики усовершенствована за счет разработки новой архитектуры для выполнения групповой политикой уведомлений и обработки.
- Ведение журнала. Для записи сообщений о событиях групповой политики теперь используется журнал системы, а не журнал приложения. В средстве «Просмотр событий» эти новые сообщения с указанием источника Microsoft-Windows-GroupPolicy.
- Работа с несколькими объектами локальной групповой политики. В отличие от групповой политики операционных систем Windows XP и Windows Server 2003, теперь появилась возможность управления несколькими локальными объектами групповой политики на одном компьютере, что облегчает управление для среды, где нужно управлять групповыми политиками только на одном компьютере.
В операционных системах Windows 7 и Windows Server 2008 R2 уже насчитывается около 3200 настроек групповых политик, а также появились следующие изменения по сравнению с предыдущими версиями Windows:
- Командлеты Windows PowerShell для управления групповой политикой. Теперь, в операционных системах Windows 7 и Windows Server 2008 R2 появилась возможность управления групповыми политиками средствами мощнейшей оболочки и языка сценариев Windows – PowerShell. Для выполнения этих задач можно использовать свыше 25 командлетов.
- Изменения в предпочтениях групповых политик. С появлениями новых систем также обновились предпочтения групповых политик. Простейшим примером того служит улучшение расширения предпочтения «Параметры обозревателя», где добавлены элементы предпочтения для Internet Explorer 8.
- Изменения в начальных объектах групповых политик. Помимо начальных объектов групповых политик в Windows 7 и Windows Server 2008 R2 появились системные начальные объекты групповой политики. Это объекты, предназначенные только для чтения, и представляющие основу для параметров определенного сценария.
- Улучшение пользовательского интерфейса параметров политик. В новейших операционных системах очень сильно изменился внешний вид параметров политики. В предыдущих версиях Windows диалоговое окно свойств политики административного шаблона содержало три отдельных вкладки: Параметр, Объяснение и Комментарий. В Windows Server 2008 R2 эти настройки выполняются в одном месте диалогового окна свойств.

Из цикла статей, посвященных, посвященных групповым политикам Windows вы узнаете о функционале:
- оснастки консоли управления «Редактор локальной групповой политики»;
- локальных политиках безопасности (поднаборе политик, связанных с безопасностью компьютера);
- шаблонах безопасности и групповых политик;
- управлении политиками средствами PowerShell;
- создании собственных административных шаблонов.
В статьях, посвященных функционалу групповых политик в Windows Server 2008/2008R2 вы узнаете о работе:
- оснастки «Консоль управления групповой политикой»;
- предпочтениях групповых политик;
- использовании приоритетов для одного и того же параметра политики в подразделении;
- фильтрах инструментария управления Windows;
- начальных объектах групповой политики;
- делегировании прав групповых политик;
- анализе и настройке безопасности.
Также будут рассмотрены утилиты командной строки, которые являются аналогами мастера результатов групповой политики, оснастки «Анализ и настройка безопасности», оснастки «Мастер настройки безопасности», а также предназначенные для включения аудита успешных изменений службы каталогов на контроллере домена.
The Local Group Policy Editor (gpedit.msc) is a Windows tool used by Administrators to modify group policies. Group Policy is used by Windows domain administrators to modify Windows policies for all or a particular PC on the domain. With the help of gpedit.msc, you can easily control which application can run by which users can lock down certain features for particular users, restrict access to specific folders, modify Windows user interface and the list goes on.
Also, there is a difference between Local Group Policy and Group Policy. If your PC is not in any domain then the gpedit.msc can be used to edit policies that apply on the particular PC and in this case, it is called Local Group Policy. But if the PC is under a domain, the domain administrator can modify policies for a particular PC or all the PCs under the said domain and in this case, it is called Group Policy.

Now Group Policy Editor is also referred to as gpedit.msc as you may have noticed above, but this is because the filename of the Group Policy Editor is gpedit.msc. But sadly, Group Policy is not available for Windows 10 Home Edition users, and it’s only available for Windows 10 Pro, Education, or Enterprise edition. Not having gpedit.msc on Windows 10 is a huge drawback but don’t worry. In this article, you will find a way to easily enable or install the Group Policy Editor (gpedit.msc) on Windows 10 Home Edition.
For Windows 10 Home Edition users, they have to make changes through Registry Editor which is quite a task for a novice user. And any wrong click can seriously damage your system files and may lock you out of your own PC. So without wasting any time, let’s see How to Install Group Policy Editor on Windows 10 Home with the help of the below-listed tutorial.
Table of Contents
Make sure to create a restore point just in case something goes wrong.
First, see if you have Group Policy Editor installed on your PC or not. Press Windows Key + R and this will bring up the Run dialog box, now type gpedit.msc and hit Enter or click OK if you don’t have the gpedit.msc installed on your PC then you will see the following error message:
“Windows cannot find ‘gpedit.msc’. Make sure you typed the name correctly, and then try again.”

Now it is confirmed that you don’t have Group Policy Editor installed, so let’s continue with the tutorial.
Method 1: Install GPEdit Package in Windows 10 Home Using DISM
1. Open Command Prompt. The user can perform this step by searching for ‘cmd’ and then press Enter.

2. Type the following command one by one and hit Enter after each one:
FOR %F IN ("%SystemRoot%\servicing\Packages\Microsoft-Windows-GroupPolicy-ClientTools-Package~*.mum") DO (DISM /Online /NoRestart /Add-Package:"%F")

FOR %F IN ("%SystemRoot%\servicing\Packages\Microsoft-Windows-GroupPolicy-ClientExtensions-Package~*.mum") DO (DISM /Online /NoRestart /Add-Package:"%F")

3. Wait for the command to finish executing, and this will install the ClientTools and ClientExtensions packages on Windows 10 Home.
Microsoft-Windows-GroupPolicy-ClientTools-Package~…~amd64~~….mum
Microsoft-Windows-GroupPolicy-ClientTools-Package~…~amd64~en-US~….mum
Microsoft-Windows-GroupPolicy-ClientExtensions-Package~…~amd64~~….mum
Microsoft-Windows-GroupPolicy-ClientExtensions-Package~…~amd64~en-US~….mum
4. Press Windows Key + R then type gpedit.msc and hit Enter to open Group Policy Editor.
Note: No reboot is required to run Group Policy Editor successfully.
5. This will successfully launch Group Policy Editor, and this GPO is fully functional and contains all the necessary policies available in Windows 10 Pro, Education, or Enterprise edition.

Method 2: Install Group Policy Editor (gpedit.msc) using a third-party installer
Note: This article will use a third-party installer or patch to install gpedit.msc on Windows 10 Home edition. Credit for this file goes to davehc for posting it in Windows7forum, and user @jwills876 posted it on DeviantArt.
1. Download Group Policy Editor (gpedit.msc) from this link.
2. Right-click on the downloaded zip file then selects Extract here.
3. You will see a Setup.exe where you extracted the archive.
4. Right-click on the Setup.exe and select Run as Administrator.
5. Now, without closing the setup file, if you have 64-bit Windows, you will need to follow the below steps.

a. Next, navigate to C:\Windows\SysWOW64 folder and copy the following files:
GroupPolicy
GroupPolicyUsers
gpedit.msc

b. Now press Windows Key + R then type %WinDir%\System32 and hit Enter.
c. Paste the files & folders you copied in step 5.1 in the System32 folder.

6. Continue with the installation but at the last step, don’t click on Finish and don’t close the installer.
7. Navigate to C:\Windows\Temp\gpedit\ folder, then right-click on x86.bat (For 32bit Windows Users) or x64.bat (For 64bit Windows Users) and Open it with Notepad.

8. In the Notepad, you will find 6 string lines containing the following:
%username%:f

9. You need to replace %username%:f with “%username%”:f (Including the quotes).

10. Once finished, save the file and make sure to run the file as Administrator.
11. Finally, click on the Finish button.
Fix MMC could not create the snap-in error:
1. Press Windows Key + R then type sysdm.cpl and hit Enter to open System Properties.
2. Switch to Advanced tab then click on “Environment Variables” button at the bottom.

3. Now under the System variables section, double-click on “Path“.

4. On the Edit environment variable window, click on New.

5. Type %SystemRoot%\System32\Wbem and hit Enter.

6. Click OK then again click OK.
This should fix MMC could not create the snap-in error but if you’re still stuck then follow this tutorial.
Method 3: Use Policy Plus (Third-party tool)
If you don’t want to use Group Policy Editor or find the above tutorial too technical, don’t worry you can easily download and install a third-party tool called Policy Plus, an alternative to Windows Group Policy Editor (gpedit.msc). You can download the utility for free from the GitHub. Just download the Policy Plus and run the application as it doesn’t require installation.

Recommended:
- Clear Clipboard using Command Prompt or Shortcut
- What is a VPN, and how it works?
- Increase Microphone Volume in Windows 10
- Run Android Apps on Windows PC
That’s it you have successfully Install Group Policy Editor (gpedit.msc) on Windows 10 Home Edition but if you still have any queries regarding this tutorial then feel free to ask them in the comment’s section.
Introduction
In this blogpost, we’ll discuss about the Group Policies in Active directory, which is one of the important elements of AD. We’ll cover concepts like :
- What are Group Policies in Active Directory
- Why Group Policies are required
- What can be accomplised using Group policies
- How group policies can be enumerated and compromised
Group policies are created to centrally manage the operating system, users and computers in the whole Active Directory domain. These policies allow us to manage user and computer settings from a centralized console called as GPMC (Group Policy Management Console).
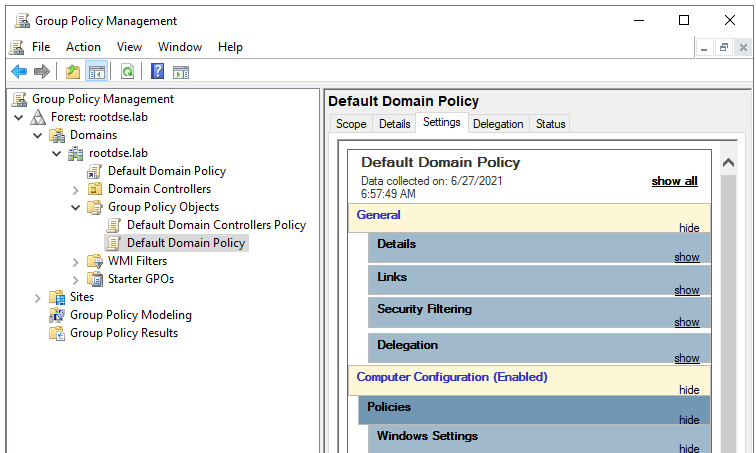
The shortcut to open Group Policy Management Console is gpmc.msc
Group Policy Objects
A GPO (Group policy object) contains the Group Policy settings and represents the files related to policy settings in the file system and in the Active Directory. As you can see in the above screenshot, there are only two GPOs under Group policy Objects container. These two are the core GPOs which are created automatically when an domain is created.
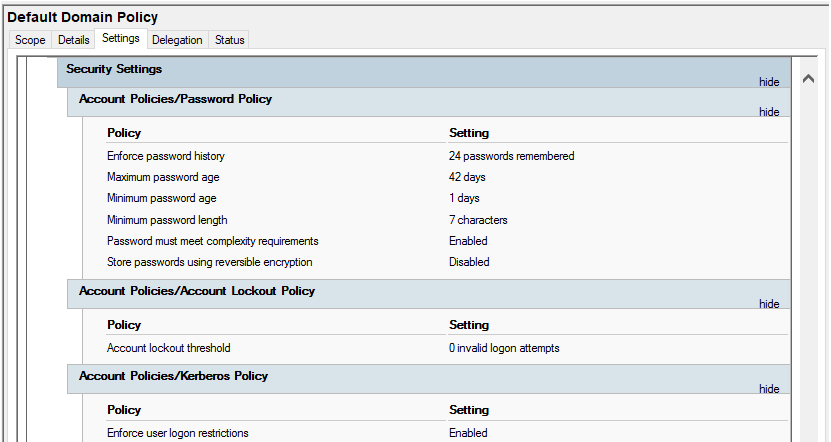
Default Domain Policy
This default policy defines a set of basic settings for all users and computers in a domain in terms of password policy, Kerberos policy and account lockout policy.
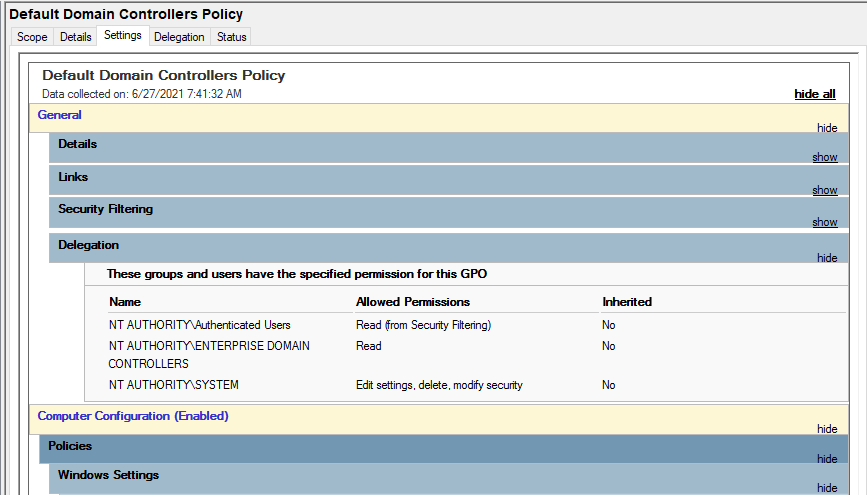
Default Domain Controllers Policy
The Default Domain Controllers Policy defines a set of basic security and auditing settings for all domain controllers in a domain.
Group policy objects are a set of policies that are grouped together and applied to either computer or user objects.
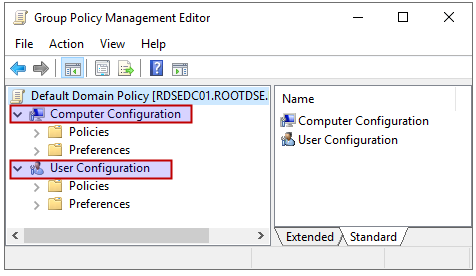
Group Policy Management Editor
The shortcut to open Group Policy Management Editor is gpedit.msc. This is the user interface where you can edit the group policies. As you can see in the above screenshot, the policy settings are divided into two categories: computer configuration and user configuration.
Computer Configuration
Let’s say if the settings of a GPO is specified under computer configuration, and it is applied on a particular computer object, then that computer object will have that specified security settings, system behavior, application settings, and computer startup and shutdown scripts as specified by the GPO irrespective of the user who logs on to the computer on which GPO is applied.
User Configuration
In this case, the policies defined under user configuration defines the user specific system behavior, application settings, security settings, assigned and published applications, user logon and logoff scripts, and folder redirection. If a policy is defined for a particular user, it will be applicable on any system where that user logs in.
Note:- The policies defined under the computer-configuration override the ones which are defined under user configuration.
Once a GPO is created, it needs to be linked to one or more AD containers, like to the whole domain or some particular OU (organizational unit) in order to take effect. For example, if you want to create a Group Policy to grant all members of DB Admins team access to required shared folders for SQL, then this GPO has to be linked to just the DBAdmins OU.
Common GPOs
Some common type of group policies that are used to enable different kind of tasks like setting up:
- Security policies like disabling NTLM authentication, and custom policies like restricting access to the command prompt for normal users
- IT policies like restricting access to USB drives, configuring logon banner to display legal notices to end users etc.
- Policies for audit and compliance like enabling the advanced windows auditing policies to enable audit for important objects and logging the recommended important windows events IDs in the events viewer etc.
- Complex password policies in a domain to deal with password spraying attacks
- Automation policies like deploying standard tools on multiple computers/servers, mapping network drives, automating logon/logoff tasks and much more.
Group Policy Refresh Interval
There is a refresh interval which defines when the time when a particular domain computer or server requests the group policy updates from a domain controller to make sure to replicate the changes in any of the Group policies. The daefault refresh interval is 90 minutes with a random offset interval added to every computer/server to prevent all the domain machines from requesting group policy updates from DC at the same time. Will discuss more about GPOs later in this series.
SYSVOL
One of the most important network share in AD is SYSVOL since it stores the Group policy templates and is shared by default on domain controllers. All the domain computers access this share to check the domain policies. It’s default location is %SYSTEMROOT%\SYSVOL\sysvol in the domain controller. And the location on network would be \\<domain_name>\SYSVOL
A sysvol folder is made up of following components:
Scripts (i.e. startup scripts and files like .bat, vbs etc. that are referenced in GPOs)
Group Policies folder and templates (replicated throughout the domain)
Junction Points (work like a shortcut. One directory can point to a different directory)
SYSVOL Policies folder
The SYSVOL policies folder contains all the GPOs. And folder name for each GPO is same as that GPO’s GUID.
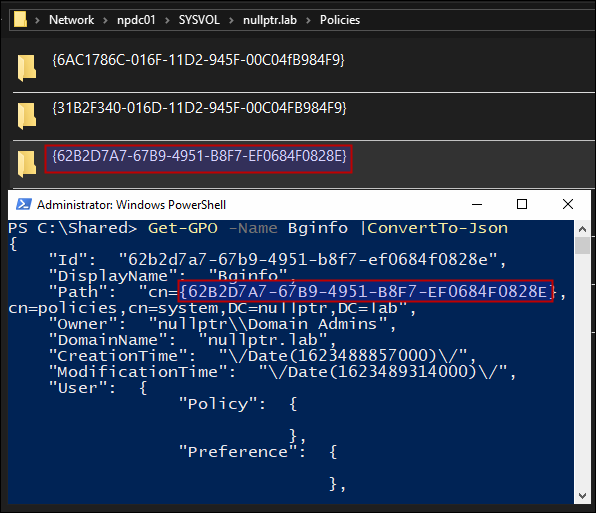
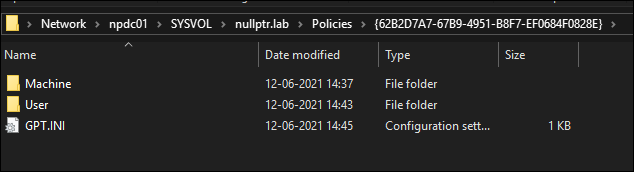
Below are the components of a Policy folder in SYSVOL.
Machine – (stores GPO’s machine specific config)
User – (stores GPO’s user specific config)
GPT.INI – (stores GPO config)
SYSVOL replication is done by DFSR (Distributed File System Replication) which is the default replication mechanism for SYSVOL folder replication domain-wide.
Group Policy Preferences
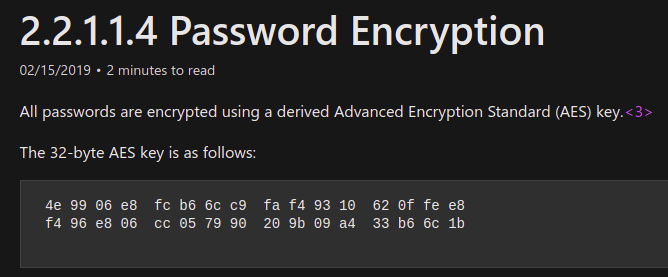
Microsoft introduced an important feature called as “Group Policy Preferences” which helped to store and use credentials in scenarios like creating scheduled tasks, changing local admin password on all workstations etc. It was really helpful for administrators since it provides an automated mechanism (instead of doing it with the help of scripts) where the passwords are not saved in cleartext like in case of scripts, but were stored as AES-256 bit encrypted in the xml file in SYSVOL directory. But later Microsoft published the private key on their MSDN portal which allowed to decrypt any password stored in the xml files created like this.
Since everyone has read access to SYSVOL, it is just a matter of finding the cpassword in the XML files and decrypting the passwords.
PowerSploit’s GPP-Password searches xml in sysvol policies directory for cpassword field and decrypts it using the key that Microsoft published earlier.
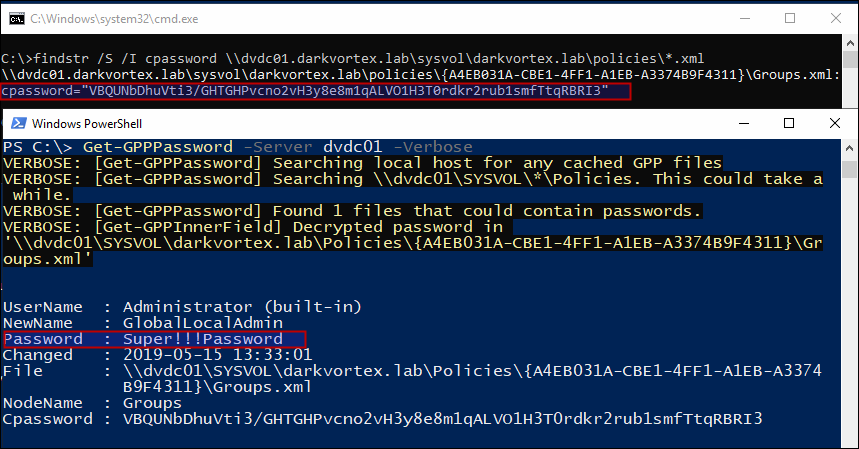
Though Microsoft released a patch later and disabled the option to enter password like this but the XML files are still there if not removed by admins and a lot of times the password works and is a good practice to hunt for these files. And then later, Microsoft introduced a way to change local Administrator password by using LAPS (Local Administrator Password Solution).
Best practices:
- For system administrators is to delete the existing GPP xml files in the SYSVOL folder which have passwords and make sure there are no such files there. And
- For pentesters, the best practice is to enumerate the SYSVOL policies folder to hunt for xml files containing
cpassword. - Best practice for defenders is to create AD decoys to have xml files with passwords in it and enable auditing to get alerts when someone access those folders which are not linked to actual GPOs. I’ll write a detailed post on this later in this series.
Finding the GPOs in a Domain
To check all the GPOs in a domain, we can use below command:
PS C:\> Get-GPO -All | Select DisplayName

DisplayName
-----------
Remove OneDrive
Default Domain Policy
Bginfo
Default Domain Controllers Policy
Remove windows features
No auto-restart (wupdates)
No Sleep
Viewing the Settings of a GPO
To view the settings of a GPO, we can run
PS C:\> Get-GPOReport -Name "<GPO Name>" -Path <Path With File Name> -ReportType "<HTML|XML>"
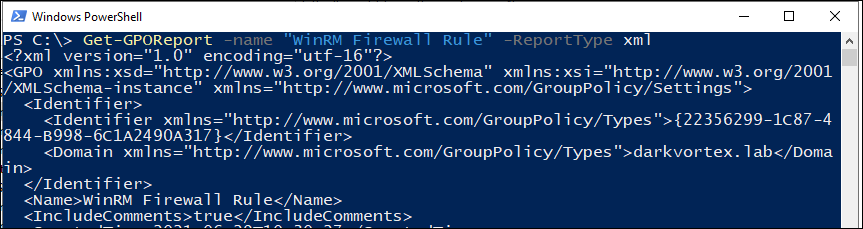
We can actually see the definition of a policy in xml format, like what is GPO doing if it is enabling a firewall rule or running a script etc:
  <Computer>
    <VersionDirectory>1</VersionDirectory>
    <VersionSysvol>1</VersionSysvol>
    <Enabled>true</Enabled>
    <ExtensionData>
      <Extension xmlns:q1="http://www.microsoft.com/GroupPolicy/Settings/WindowsFirewall" xsi:type="q1:WindowsFirewallSettings">
        <q1:GlobalSettings>
          <q1:PolicyVersion>
            <q1:Value>541</q1:Value>
          </q1:PolicyVersion>
        </q1:GlobalSettings>
        <q1:InboundFirewallRules>
          <q1:Version>2.29</q1:Version>
          <q1:Action>Allow</q1:Action>
          <q1:Name>Allow WinRM port 5985 </q1:Name>
          <q1:Dir>In</q1:Dir>
          <q1:LPort>5985</q1:LPort>
          <q1:Protocol>6</q1:Protocol>
          <q1:Active>true</q1:Active>
        </q1:InboundFirewallRules>
      </Extension>
      <Name>Windows Firewall</Name>
    </ExtensionData>
    <ExtensionData>
      <Extension xmlns:q2="http://www.microsoft.com/GroupPolicy/Settings/Registry" xsi:type="q2:RegistrySettings">
        <q2:Blocked>false</q2:Blocked>
      </Extension>
      <Name>Registry</Name>
    </ExtensionData>
  </Computer>
  <User>
    <VersionDirectory>1</VersionDirectory>
    <VersionSysvol>1</VersionSysvol>
    <Enabled>true</Enabled>
  </User>
</GPO>
In the above config, we can see it is enabling a rule in Windows Firewall.
Finding misconfigured Group policies
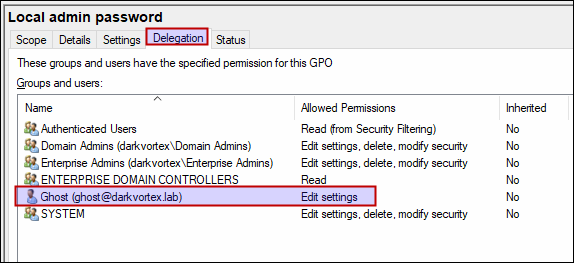
To demonstrate this, I created a GPO and provided a user ghost permissions to edit the GPO.
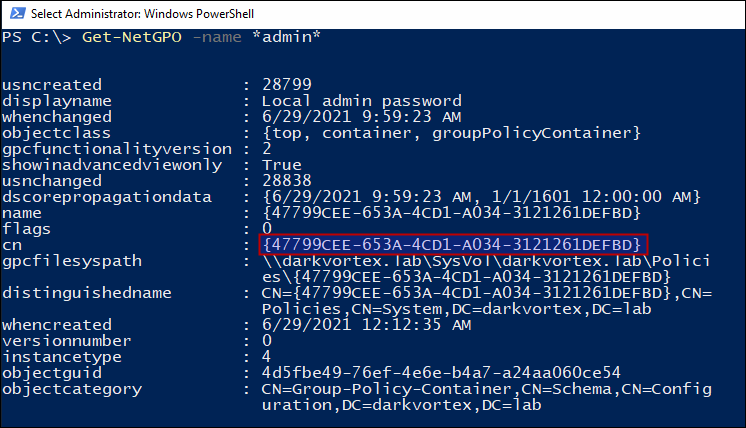
Now, we’ll get the cn of the GPO “Local Admin Password”
And do an ACL check on this GPO and see the permissions that user ghost has that we configured earlier.
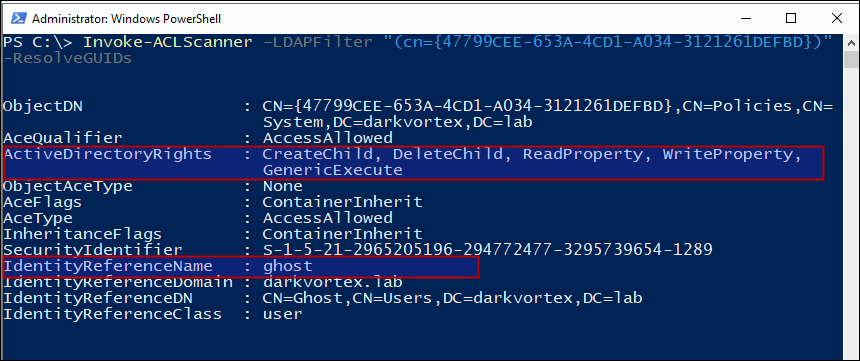
This is how a misconfigured Group policy object looks like. Since user ghost has the permissions to edit the GPO, the settings can be edited and some other task be accomplished from this GPO without domain admin privileges.
Group Policy usage in this GitHub repository
Microsoft Security Compliance Toolkit
This set of tools allows enterprise security administrators to download, analyze, test, edit and store Microsoft-recommended security configuration baselines for Windows and other Microsoft products, while comparing them against other security configurations.
Microsoft Security Compliance Toolkit includes multiple files and useful programs that are required for the Harden Windows Security Module to operate.
-
Official link to download Microsoft Security Compliance Toolkit
-
Microsoft Security Compliance Toolkit 1.0 — How to use

Microsoft Security Baseline
Microsoft is dedicated to providing its customers with secure operating systems, such as Windows and Windows Server, and secure apps, such as Microsoft 365 apps for enterprise and Microsoft Edge. In addition to the security assurance of its products, Microsoft also enables you to have fine control over your environments by providing various configuration capabilities.
Even though Windows and Windows Server are designed to be secure out-of-the-box, many organizations still want more granular control over their security configurations.
Continue reading more in the Microsoft website
When you unzip the Microsoft Security Baseline file, you will find this folder structure:
-
Documentation — contains PDF and Excel files describing the differences between the previous baseline release and the new settings that were added. contains the default
policyrulesfile, which is used with the Security Compliance Toolkit, you can view it using Policy Analyzer program. - GP Reports — contains reports in HTML format, describes the GPO settings that can be applied for each category.
- GPOs – contains GPO objects for different scenarios, these are the actual policies that will be applied.
-
Scripts — contains multiple PowerShell scripts for different scenarios and helps us easily import GPO settings to our system. The most important PowerShell script here is
Baseline-LocalInstall.ps1. -
Templates – contains additional Group Policy Object templates that are not available by default on Windows, such as
MSS-legacy.admx, these are inADMXandADMLformats. They will be copied toC:\Windows\PolicyDefinitions, where they belong, so that the new Security Baselines GPOs can be interpreted.
LGPO
Quoting from the PDF file supplied by LGPO:
LGPO.exe is a command-line utility that is designed to help automate management of Local Group Policy. It can import and apply settings from Registry Policy (Registry.pol) files, security templates, Advanced Auditing backup files, as well as from formatted «LGPO text» files and Policy Analyzer ‘.PolicyRules’ XML files.
It can export local policy to a GPO backup. It can export the contents of a Registry Policy file to the ‘LGPO textformat’ that can then be edited, and can build a Registry Policy file from an LGPO text file. (The syntax for LGPO text files is described later in this document.)
LGPO.exe has four command-line forms: for importing and applying settings to local policy – including to Multiple Local Group Policy Objects (MLGPO)1 ; for creating a GPO backup; for parsing a Registry Policy file and outputting «LGPO» text; for producing a Registry Policy file from an LGPO text file.
All output is written to LGPO.exe’s standard output, and all diagnostic and error information is written to its standard error. Both can be redirected to files using standard command shell operations. To support batch file use, LGPO.exe’s exit code is 0 on success and non-zero on any error.
LGPO is the most crucial program for our workflow, it is part of the Security Compliance Toolkit (SCT)
What is the Local Group Policy Object (LGPO) tool?
LGPO.exe — Local Group Policy Object Utility
How to Manually Back up Group Policy Objects From a System Using LGPO.exe
Use this command to back up the currently set local group policies to drive C
How to Import Group Policy Objects From a Backup, Created Using LGPO.exe, to the Local System
.\LGPO.exe /g 'Path to the backup'
Example:
.\LGPO.exe /g 'C:\{841474E6-33EC-418C-B884-EA0F7C8195DB}'
How to Import Only the Settings From a Registry Policy File Into Computer (Machine) Configuration
(This only contains everything in Computer (Machine) Configuration -> Administrative Templates and some policies in Computer Configuration -> Windows Settings)
Registry Policy File Format
.\LGPO.exe /m <Path to registry.pol file>
How to Import only the Security policies file into Computer (Machine) Configuration
(This only contains everything in Computer (Machine) Configuration -> Windows Settings => Security Settings => everything in the subfolders except for the Advanced Audit Policy Configuration)
Security policy settings
.\LGPO.exe /s ".\GPOX\DomainSysvol\GPO\Machine\microsoft\windows nt\SecEdit\GptTmpl.inf"
Policy Analyzer
Quoting from the PDF file supplied by Policy Analyzer:
Policy Analyzer is a lightweight utility for analyzing and comparing sets of Group Policy Objects (GPOs). It can highlight when a set of Group Policies has redundant settings or internal inconsistencies and can highlight the differences between versions or sets of Group Policies.
It can also compare one or more GPOs against local effective state. You can export all its findings to a Microsoft Excel spreadsheet.
Policy Analyzer lets you treat a set of GPOs as a single unit, and represents all settings in one or more GPOs in a single «.PolicyRules» XML file. You can also use .PolicyRules files with LGPO.exe v3.0 to apply those GPOs to a computer’s local policy, instead of having to copy GPO backups around.
What is the Policy Analyzer tool?
Policy Analyzer Tool
About Compare to Effective State
In Policy Analyzer, there is an option called Compare to Effective State. Quoting from the PDF file that ships with Policy Analyzer program regarding that option:
Enable one or more of the Policy Rule sets’ checkboxes and click «Compare to Effective State» to compare the selected baselines against the local computer’s current configured state. The operation will require UAC elevation if any of the selected baselines include security template or advanced auditing settings that require elevation to retrieve.
The Policy Viewer will show the combined settings from all the selected Policy Rule sets in one column under the heading «Baseline(s),» and the corresponding current settings on the local computer and the logged-on user in a separate column under the heading «Effective state.»
The effective state settings are also saved to a new .PolicyRules file with a name combining «EffectiveState_,» the current computer name, and the current date and time in the format «yyyyMMdd- HHmmss.» For example, «EffectiveState_WKS51279_20200210-183947.PolicyRules.»
How Are Group Policies Used by the Harden Windows Security Module?
-
The module downloads the official Microsoft Security Baselines from Microsoft servers and applies them to the system.
-
It then uses the group policies included in the Module files for security measures explained on the readme page and applies them to the system, on top of Microsoft Security Baselines, so where there is a conflict of policy, the module will replace the configurations set by Microsoft Security Baselines.
-
When applying the Microsoft Security Baselines, you have the option to apply the optional overrides too, you can find the details of those overrides in here,, they are required to be applied if you are using Harden Windows Security Module in Azure VMs and highly recommended in general.
How Are Group Policies for the Module Created and Maintained?
How I Created Them for the First Time
-
Installed the newest available Windows build on a fresh Hyper-V VM, fully updated it, created a standard checkpoint.
-
Opened Group Policy editor and started applying security measures described in the Readme page.
-
After completing each category, used
LGPO.exe /b C:to backup Group Policies of the system by creating a full GPO. -
Then I took only files needed from the backup,
registry.polandGptTmpl.infand put them in a folder, renamed it toSecurity-Baselines-X
How I Maintain Them
-
As long as the VM is still using the latest available build of Windows, I use the standard checkpoint I had created to revert the VM back to that new state. If there is a newer build of Windows available, I delete that old VM, download the new Windows ISO file from Microsoft servers, then I create a fresh Hyper-V VM using it.
-
I copy the Group Policy files,
registry.polorGptTmpl.infto the VM, import them by using.\LGPO.exe /m "path"forregistry.polfiles or.\LGPO.exe /s "path"forGptTmpl.inffiles. -
Open Group Policy editor and change anything that is needed, once I’m done, I create a full backup of the Group Policies of the system using
LGPO.exe /b C:command, again take out the modified file, eitherregistry.polorGptTmpl.inf. -
Use
PolicyAnalyzerto double check everything by comparing the old file with the new one and making sure the correct changes are applied. -
Replace the old Group Policy file with the new file in the Security-Baselines-X directory and upload it to the GitHub repository.
We Can Use Policy Analyzer for Verification and Comparison
To Verify the Settings Are Applied Correctly by The Module
-
Use folder options in Control Panel or File Explorer to show hidden files and folder.
-
Open Policy Analyzer program, Navigate to Add -> File -> Add files from GPO(s)… -> Browser for this folder «C:\Windows\System32\GroupPolicy», Select the folder -> Import -> save the Policy Rules file in
\Documents\PolicyAnalyzer\ -
Back at the main window, use View/Compare button to view applied Group Policies. The result that you will see is all of the Group Policies that are applied to your system.
Another way to verify the applied Group Policies is to perform the 3 tasks above; What it will give you is the Policy Rules file which is generated from Group Policy state after using the module. If we take this policy rules file to a different machine where we just clean installed Windows and use Policy Analyzer to compare it to the Effective State of the system, we will see what Group Policy settings have changed as a result of using the module.
Note: At first, when we clean install Windows, the Group Policy folder C:\Windows\System32\GroupPolicy is empty, it will get populated with empty folders and a 1kb file that contains only 1 word when we first open the local Group Policy editor. It will get more populated with actual policies once we start modifying any group policies.
How to verify Security-Baselines-X directory and 100% trust it?
-
Download the files from here.
-
Open the Policy Analyzer, Navigate to Add -> File -> Select either
Add User Configuration (registry.pol)orAdd Security Template (*.inf)-> Browser for theSecurity-Baselines-Xdirectory, navigate to the category you want. -
Select either
.polor.inffile, Import it, give it a name, save it in\Documents\PolicyAnalyzer\ -
Back at the main window, use «Compare to Effective State» button to view what policies are included in the file.
-
As you will see, everything is according to what has been explicitly stated in the GitHub’s Readme page.
Using Configuration Service Providers (CSPs) and Provisioning Packages (Work in Progress)
This command gets the information about all installed provisioning packages on your system.
Get-ProvisioningPackage -AllInstalledPackages
-
Configuration service providers for IT pros
-
Settings changed when you uninstall a provisioning package
-
Why Intune and CSPs are the future of Windows management instead of Group Policy
Download Windows Configuration Designer from Microsoft Store or from Windows ADK or from Windows insiders ADK, to easily create provisioning packages for your device(s)
You can use gpresult to see more info about Group Policies on your computer
# What policies are applied to your computer:
gpresult /z
# or
gpresult /v

# What policies are applied to the current user:
gpresult /scope user /v
We can manually backup and restore Group Policy settings by copying this folder and all of its content:
C:\Windows\System32\GroupPolicy
How to Get All CIM Namespaces, Their Methods and Properties in PowerShell
# Defining the custom class for CIM instance classes
class CimClassInfo {
    [System.String]$ClassName
    [System.Collections.Generic.List[System.String]]$Methods
    [System.Collections.Generic.List[System.String]]$Properties

    CimClassInfo([System.String]$ClassName) {
        $this.ClassName = $ClassName
        $this.Methods = [System.Collections.Generic.List[System.String]]::new()
        $this.Properties = [System.Collections.Generic.List[System.String]]::new()
    }
}

# Defining the custom class for namespaces
class NamespaceInfo {
    [System.String]$NamespaceName
    [System.Collections.Generic.List[CimClassInfo]]$Classes

    NamespaceInfo([System.String]$NamespaceName) {
        $this.NamespaceName = $NamespaceName
        $this.Classes = [System.Collections.Generic.List[CimClassInfo]]::new()
    }
}

function Get-NamespaceInfo {
    [OutputType([System.Collections.Generic.List[NamespaceInfo]])]
    param (
        [System.String]$RootNamespace = 'root',
        [System.String]$OutputFile = $null
    )

    # Initialize a list to hold NamespaceInfo objects
    $NamespaceInfos = [System.Collections.Generic.List[NamespaceInfo]]::new()

    # Initialize a list to hold namespaces
    $Namespaces = [System.Collections.Generic.List[System.String]]::new()
    $Namespaces.Add($RootNamespace)

    # Initialize an index to track the current namespace
    $Index = 0

    # Loop through namespaces
    while ($Index -lt $Namespaces.Count) {
        # Get the current namespace
        $CurrentNamespace = $Namespaces[$Index]

        # Create a new NamespaceInfo object
        $NamespaceInfo = [NamespaceInfo]::new($CurrentNamespace)

        # Get child namespaces of the current namespace
        $ChildNamespaces = Get-CimInstance -Namespace $CurrentNamespace -ClassName __Namespace

        # Add child namespaces to the list
        foreach ($ChildNamespace in $ChildNamespaces.Name) {
            $Namespaces.Add("$CurrentNamespace\$ChildNamespace")
        }

        # Get classes in the current namespace
        $Classes = Get-CimClass -Namespace $CurrentNamespace

        # Add classes to the NamespaceInfo object
        foreach ($Class in $Classes) {
            # Create a new CimClassInfo object
            $CimClassInfo = [CimClassInfo]::new($Class.CimClassName)

            # Get methods of the class
            $Methods = ($Class.CimClassMethods).Name

            # Add methods to the CimClassInfo object
            foreach ($Method in $Methods) {
                $CimClassInfo.Methods.Add($Method)
            }

            # Get properties of the class
            $Properties = ($Class.CimClassProperties).Name

            # Add properties to the CimClassInfo object
            foreach ($Property in $Properties) {
                $CimClassInfo.Properties.Add($Property)
            }

            # Add the CimClassInfo object to the NamespaceInfo object
            $NamespaceInfo.Classes.Add($CimClassInfo)
        }

        # Add the NamespaceInfo object to the list
        $NamespaceInfos.Add($NamespaceInfo)

        # Move to the next namespace
        $Index++
    }

    # Export to JSON too if OutputFile is specified
    if ($OutputFile) {
        $NamespaceInfos | ConvertTo-Json -Depth 100 | Out-File -FilePath $OutputFile
    }

    return $NamespaceInfos
}

$NamespaceInfo = Get-NamespaceInfo -RootNamespace 'root' -OutputFile 'NamespaceInfo.json'
$NamespaceInfo