
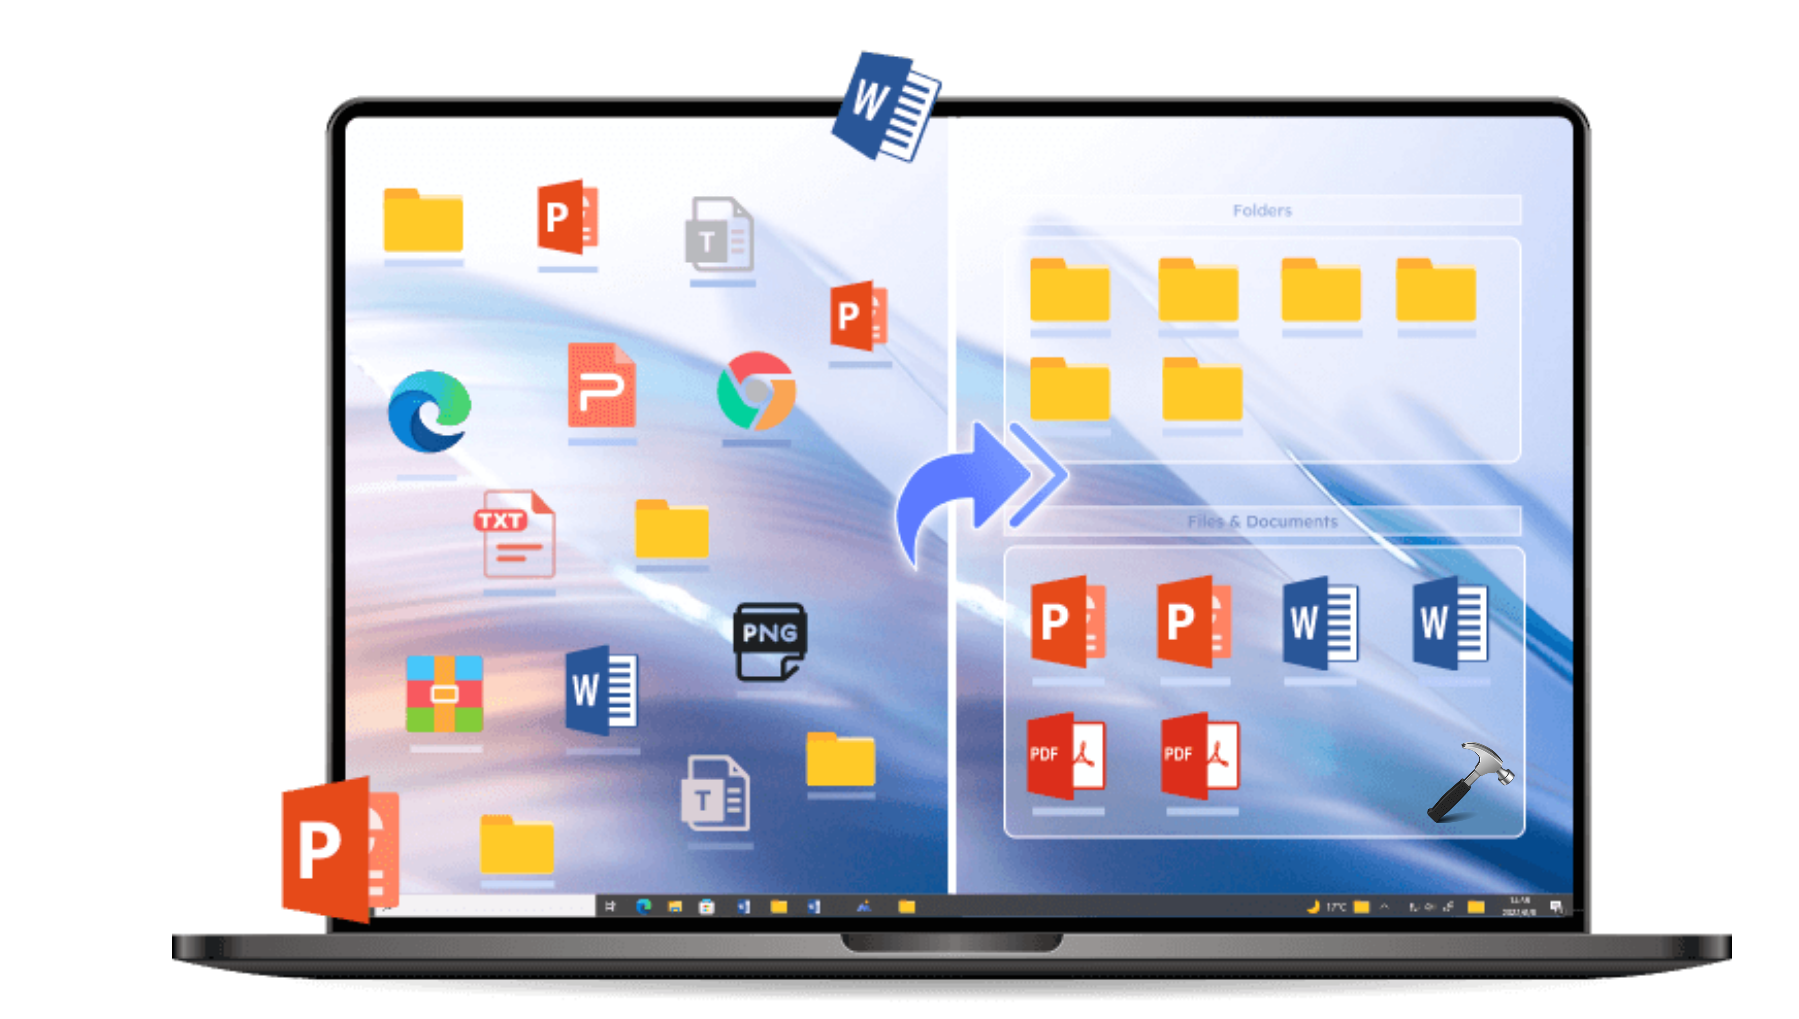
Windows 11 has ushered in many striking changes and features that enhance user experience, from aesthetic overhauls to more functional updates. Among these changes, the management of desktop icons is a practicality that many users often overlook. Grouping desktop icons not only helps in organizing your workspace but also enhances productivity by minimizing the time spent searching for files, applications, and folders. In this comprehensive guide, we will walk you through various methods to group desktop icons in Windows 11, ensuring you can maintain a tidy and efficient layout on your desktop.
Understanding Windows 11 Desktop Environment
Before diving into the techniques for grouping icons, it is essential to understand the desktop environment in Windows 11. The desktop serves as an initial workspace and can be cluttered with various icons, including shortcuts to applications, files, and folders. Windows 11 promotes a more streamlined and visually appealing desktop experience, but it lacks intuitive organizational features out-of-the-box. Consequently, users must manually manage their icons to create a more efficient workspace.
Benefits of Grouping Desktop Icons
Grouping icons on your desktop can yield numerous advantages:
- Improved Productivity: A clutter-free desktop can help you focus on tasks without distractions.
- Enhanced Accessibility: Grouping similar types of icons together makes it easier to access them quickly.
- Personalization: Custom groups allow you to design a workspace that aligns with your working style and preferences.
- Reduced Clutter: Organizing your icons can prevent feelings of overwhelm, enabling a more serene working environment.
Methods to Group Desktop Icons
1. Creating Folders
The simplest and most effective way to group desktop icons is to create folders. Folders allow you to categorize items logically and can be customized to reflect your organization style.
Steps to Create a Folder:
-
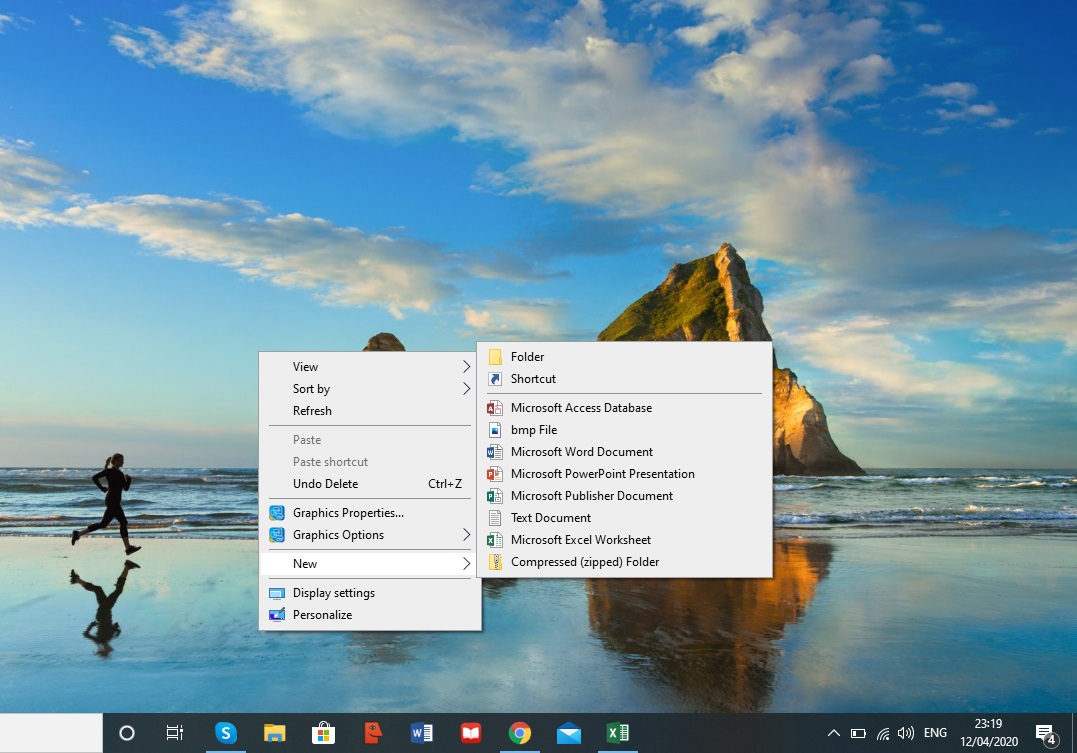
Right-click on the Desktop: On an empty space on your desktop, right-click to open the context menu.
-
Select “New”: Hover over the ‘New’ option in the menu.
-
Select “Folder”: Click on ‘Folder’ from the resulting list.
-
Rename the Folder: The new folder will appear on your desktop, usually labeled «New Folder.» To rename it, right-click it and select ‘Rename’, typing in your desired name.
-
Add Icons to the Folder:
- Click and drag icons into the folder.
- Alternatively, right-click icons, select ‘Cut’ or ‘Copy’, open the folder, and then select ‘Paste’.
Tips for Using Folders:
- Naming Convention: Use clear and descriptive names to make finding items easier later on.
- Color-Coding: Consider assigning color-coded icons for the folders to improve visual differentiation.
2. Using Stacks
Windows 11 does not inherently support dynamic icon groupings or «stacks» as seen in macOS, but you can simulate this functionality by appropriately organizing folders and minimizing icon clutter.
Group with Stacks:
-
Group Icons into Folders: As outlined above, create folders on the desktop for different categories (e.g., Work, Personal, Projects).
-
Set Folder View Options: Optimize folder options by right-clicking on the folder, selecting ‘Properties’, then choosing different views, such as ‘Details’ or ‘Icons’, based on your preferences.
-
Regular Maintenance: Make it a habit to periodically review your desktop icons and adjust or remove items. Regularly refreshing your desktop helps prevent clutter from building up.
3. Utilizing Desktop Widgets
Windows 11 features an array of built-in widgets that can replace specific desktop functionalities. Use widgets to minimize desktop icon usage by showcasing essential information without needing additional shortcuts.
Adding Widgets:
-
Access the Widgets Panel: Click on the Widgets icon on the Taskbar (it looks like two overlapping squares). This opens the Widgets panel.
-
Add Useful Widgets: Click on the ‘Add Widgets’ button to see a list of available widgets. Use widgets such as to-do lists, calendars, weather, news, and more.
-
Arrange Widgets: Drag and drop widgets to organize them as you see fit in the panel.
Incorporating widgets can help declutter your desktop. Instead of placing icons for frequently used applications, you can address your tasks and information needs through widgets.
4. Customizing Icon Sizes and Arrangement
Adjusting the size and alignment of desktop icons can help create a more organized and visually appealing layout.
Changing Icon Sizes:
-
Right-click on the Desktop: On an empty space, right-click to bring up the context menu.
-
Select “View”: Hover over the ‘View’ option in the menu.
-
Choose Icon Size: You will have three size options – Small, Medium, and Large. Selecting a smaller size may save space, while larger icons may suit those who prefer easy readability.
Arranging Icons:
-
Right-click on the Desktop: Again, access the context menu.
-
Select “Sort by”: Hover over ‘Sort by’ to see sorting options (e.g., Name, Size, Item type, Date modified).
-
Auto-arrange: You can also choose to enable ‘Auto-arrange icons’, which keeps icons organized in a uniform grid.
5. Using Third-party Software
For those who desire more advanced organization options, third-party applications can offer enhanced functionality for icon grouping and management.
Recommended Software:
-
Fences: Fences allows users to create shaded areas on the desktop to place icons. You can group icons freely within these boundaries, and it also comes with built-in options to hide or show the desktop icons easily.
-
DesktopOK: This tool allows you to save your desktop icon layout, making it easier to restore if icons have been moved around.
-
Nimi Places: Provides a way to create customizable containers for organizing desktop content more freely and visually.
Using Third-party Software:
-
Download and Install: Ensure to get applications from reputable sources. Download the software and follow the installation instructions.
-
Configure Settings: Each software has its configuration options. Customize it to fit your icon grouping needs.
6. Keyboard and Mouse Shortcuts for Quick Organization
Streamlining your process for organizing desktop icons can be done using keyboard and mouse shortcuts.
Recommended Shortcuts:
-
Select Multiple Icons: Hold down the
Ctrlkey while clicking to select multiple icons. You can also drag the cursor to create a selection box around multiple items. -
Quick Folder Creation: After selecting multiple icons, you can right-click and select
Send to > New Folderto create a new folder containing all selected icons. -
Moving Icons: Select an icon and drag it to the desired folder or location. You can also use
Ctrl + Xto cut an icon andCtrl + Vto paste it in a new location.
7. Organizing with Virtual Desktops
While not directly related to desktop icons, Windows 11’s virtual desktop feature allows users to further categorize their workspace.
Setting Up Virtual Desktops:
-
Access Task View: Click the Task View button on the Taskbar (next to the Widgets button) or use the shortcut
Windows + Tab. -
Add a Desktop: Click “New Desktop” at the top of the screen.
-
Organize Applications: You can drag applications from one virtual desktop to another, allowing you to have different sets of applications running in their respective desktops.
-
Switching Desktops: Easily toggle between desktops using the Task View menu or by using
Ctrl + Windows + left/right arrows.
Organizing your work across multiple virtual desktops can further reduce clutter on your primary desktop.
8. Using the Taskbar
Another method to declutter your desktop is by using the taskbar for applications you frequently access. Instead of keeping shortcuts on the desktop, pinning applications to the taskbar integrates direct access without visually crowding your workspace.
Pinning Applications:
-
Locate the Application: Open the Start menu by clicking the Windows icon on the taskbar.
-
Find the Application: Scroll through the list or use the search bar.
-
Right-click and Select “Pin to taskbar”: This will create a shortcut in the taskbar.
Benefits of Taskbar Pinning:
- It provides quick access to essential applications.
- Lessening the number of icons on the desktop fosters a cleaner appearance.
9. Regular Maintenance of Desktop Icons
Finally, maintaining a well-organized desktop requires periodic cleanup. Schedule time to review your desktop once a week or month, removing unnecessary icons or completely outdated files.
Maintenance Tips:
-
Purge Unused Icons: Delete shortcuts or files you haven’t used in a while. Use the Recycle Bin as a holding area before permanent deletion.
-
Archive Old Projects: Move older projects to a dedicated folder or archive location rather than leaving them on the desktop.
-
Evaluate Folder Structure: Periodically revisit your folder arrangements and rename or reorganize them based on current needs.
Conclusion
Grouping desktop icons in Windows 11 is pivotal in maintaining an efficient and productive working environment. Through various methods, such as creating folders, utilizing virtual desktops, and adopting third-party applications, you can tailor your desktop to be functional, organized, and inviting. While Windows 11 streamlines many processes, it ultimately relies on user initiative to achieve optimal organization. By taking the time to group your desktop icons effectively, you can foster an environment where efficiency thrives, making your daily tasks more straightforward and enjoyable. Regular upkeep and mindful organization will unlock the full potential of your desktop, ensuring your workspace works seamlessly alongside your productivity needs.
In the modern world, where digital organization plays a crucial role in productivity, managing your desktop can significantly influence your workflow. Windows 11 introduces a refined aesthetic that aims to boost user experience, but with many applications, files, and shortcuts cluttering the desktop, it can lead to chaos. Thus, learning how to effectively group desktop icons is essential. This article will provide you with a comprehensive guide on organizing your desktop icons to create a more efficient workspace.
Understanding Desktop Icons in Windows 11
Before diving into the methods of grouping desktop icons, it’s essential to understand what desktop icons are and their various types. Desktop icons in Windows 11 serve as shortcuts to files, folders, and applications that you frequently use. The desktop acts as a launching pad for these items, allowing for quick access to essential resources.
Types of Desktop Icons
-
Application Shortcuts: Icons that launch programs installed on your computer, like Microsoft Word or your favorite web browser.
-
Files: Individual documents, spreadsheets, and other file types that you may access frequently.
-
Folders: Groupings of files that help you organize related documents together.
-
System Icons: These include critical system functions such as This PC, Recycle Bin, and network connections.
-
External Device Icons: When you connect external drives or devices, their shortcuts may also appear on your desktop.
Why Group Desktop Icons?
The key benefits of grouping desktop icons include:
-
Enhanced Visibility: By organizing similar items together, it becomes easier to locate what you need quickly.
-
Improved Productivity: A clutter-free workspace can enhance focus and efficiency.
-
Personalized Aesthetics: Grouping icons allows you to personalize your workspace according to your preferences, making your computer feel more like your own.
-
Ease of Access: With everything organized, you can access your files and applications with fewer clicks.
Methods to Group Desktop Icons in Windows 11
Now that we understand the significance of organizing desktop icons, let’s explore several techniques to effectively group them in Windows 11.
1. Using Folders to Group Icons
One of the most straightforward methods of grouping desktop icons is creating folders. This approach involves categorizing similar items together in dedicated folders.
Steps to Create Folders
-
Right-click on a blank area of your desktop.
-
Select New from the context menu.
-
Click on Folder. A new folder will appear on your desktop, labeled “New folder.”
-
Rename the folder by right-clicking on it and selecting Rename or by simply clicking on the name, typing your preferred name, and pressing Enter.
-
Drag and drop relevant icons into the folder. You can highlight multiple icons by holding down the Ctrl key while clicking different items, then dragging them into the folder.
Organizing Folders
Consider creating folders named «Work,» «Personal,» «Media,» «Games,» or any other categories that fit your use case. This hierarchical structure allows for easier navigation.
2. Utilizing Stacks for Grouping Icons
Windows 11 has a feature called «Stacks,» which allows users to group similar icons automatically. This dynamic grouping can simplify your desktop organization, especially if you have multiple icons representing similar applications or documents.
Steps to Use Stacks:
-
Ensure you are running Windows 11. This feature is exclusive to Windows 11 users.
-
Navigate to your desktop where your icons are located.
-
Right-click on an empty space on the desktop and select View.
-
Select Auto arrange icons. This will automatically arrange your icons in a grid format.
-
Hover over stacks — Windows will group similar application icons into stacks.
-
Click on a stack to expand it, enabling you to access the applications quickly.
3. Changing Icon Size and Arrangement
A visually appealing desktop can often enhance organization. Adjusting the size and arrangement of your icons can help create more visual clarity.
Steps to Change Icon Size
-
Right-click on the desktop.
-
Select View from the context menu.
-
Choose the size of the icons: Small, Medium, or Large.
-
Small icons allow for more items on the desktop but can be hard to read.
-
Medium icons are generally the default and offer a good balance.
-
Large icons make identifying files and shortcuts easier, especially for users with visual impairments.
-
Steps to Arrange Icons
-
Right-click on the desktop.
-
Navigate to Sort by.
-
You can sort icons by Name, Size, Item type, or Date modified. Choose whichever option best suits your organization style.
-
To further customize, you can select Align icons to grid, which ensures that icons snap to an organized grid, reducing clutter.
4. Using Desktop Gadgets or Widgets
Windows 11 integrates widgets that offer quick insights and access to tasks or information. Although not exactly grouping icons, using widgets can prevent desktop clutter by allowing you to access frequently needed information without needing as many shortcuts visible on the desktop.
Steps to Enable Widgets:
-
Click on the Widget icon found on the taskbar (it looks like a small square).
-
If the widget panel doesn’t appear, you might have to enable it by right-clicking on the taskbar, selecting Taskbar settings, and toggling the Widgets option.
-
From here, you can add various widgets related to weather, calendar events, to-do lists, and more, reducing the need for some desktop icons.
5. Customizing Icon Arrangement with Third-party Tools
While Windows 11 offers built-in features for icon management, several third-party applications can enhance desktop organization. These tools provide advanced options, such as creating custom layouts, sorting, and grouping functions.
Popular Third-party Applications
-
Fences: A highly regarded application that allows you to create shaded areas on your desktop, where you can group icons. This visually appealing method keeps your icons organized.
-
DesktopOK: This tool helps save and restore the position of desktop icons, ensuring your organization remains even after changing resolutions or connecting different monitors.
-
Nimi Places: An app where you can create containers for your desktop icons that automatically refresh with new files, ensuring you always have relevant shortcuts available.
6. Utilizing Virtual Desktops for Better Organization
If your workload consists of multiple tasks that require separate sets of applications and files, consider using virtual desktops. Windows 11 allows you to create different desktops to separate your workspaces.
Steps to Create and Manage Virtual Desktops
-
Click on the Task View icon on the taskbar (it looks like two overlapping rectangles) or press
Windows key + Tab. -
Select New Desktop at the top of the screen. This will create a new virtual desktop.
-
You can switch between desktops by clicking on the Task View icon again and selecting the desktop you want to access.
-
Launch the necessary applications and shortcuts relevant to that construct and organize your desktop accordingly.
7. Keyboard Shortcuts for Quick Access
Keyboard shortcuts can enhance your efficiency when managing desktop icons. Familiarizing yourself with these shortcuts can speed up your workflow.
| Shortcut | Function |
|---|---|
Ctrl + N |
Create a new folder on the desktop |
Ctrl + A |
Select all items on the desktop |
Ctrl + Drag |
Copy selected items to a folder |
Shift + Delete |
Permanently delete selected items |
By incorporating these shortcuts into your workflow, you can quickly jump between various organizational methods without relying heavily on the mouse.
8. Regular Maintenance and Updates
Finally, effective organization requires regular maintenance. Set aside a time each week or month to evaluate your desktop’s setup. Clear out unnecessary icons, remove outdated files, and ensure that your organization system remains relevant to your changing needs.
Tips for Maintenance
-
Evaluate usage: Periodically check which icons you actually use and which can be removed or archived.
-
Update categories: As your work or personal projects evolve, adapt the categories you created for better alignment with your current needs.
-
Backup important files: As you organize, ensure that critical files are backed up to prevent data loss.
Conclusion
Grouping desktop icons in Windows 11 is essential for maintaining a productive and aesthetically pleasing workspace. Through various methods, including using folders, navigating the Stacks feature, customizing sizes, utilizing widgets, and employing third-party tools, you can effectively create an organized digital environment tailored to your needs.
The implementation of these strategies will not only help your desktop look more attractive but will also enhance your efficiency, allowing you to navigate through your tasks with greater ease. So, take the time to organize your desktop; it is an investment that will pay off in higher productivity and reduced stress.
By incorporating regular maintenance and mindful organization practices, you can cultivate a workspace that remains functional, effective, and enjoyable.
Our Windows desktop is often our go-to location to put files and folders, especially if we want quick and convenient access. As a result, our desktops could look like a massive heap of clutter – a hodgepodge of files on screen.
In part this is the fault of the operating system; the Desktop appears first in just about every file save dialog making it an incredibly handy place to stow “just a couple of files”. Unfortunately, these couple of files quickly accumulate into so much more. Your desktop quickly ends up looking like chaos.
It doesn’t have to be that way. Organizing your Windows desktop is a lot easier than cleaning up real-life clutter, and you don’t even have to stop using the Desktop as your default organizing space. In this article, we will show you how to get your Windows desktop organized so that it’s clutter-free, efficient, and convenient.
(Just need a short-term fix for a crowded desktop without doing a major reorganization? You might try our tutorial on how to shrink your desktop icons, although that’s only a temporary fix.)
Windows has some built-in features for organizing files and folders, which might just be what you need. For a more robust solution, there are some third-party packages which you can use to group desktop icons into specific categories. Let’s have a closer look at both of these solutions.
Organizing the Desktop Icons With Folders
The most straightforward way of getting your desktop under control is to use folders. Adding new folders to the desktop is simple. First, right-click on the desktop, and select New. Then, click on Folder from the drop down to create an empty folder.
It’s a good idea to name the folder when you make it to be more organized. But in case you forget, you can always rename it by right-clicking on the folder and selecting Rename. You can then type in a name for it. Remember that you are trying to make your desktop more organized, and the least thing you want is seeing your folders named New Folder, New Folder (2), New Folder (3), and so on.
Now you can drag and drop the appropriate desktop shortcuts into your new folder. This will save the files in your folder instead of having them scattered around your screen. You could add any number of folders to the desktop for alternative shortcut categories such as applications, utilities, multimedia software, and so on. Then you could move the icons into the folders as in the snapshot below.
If you have a lot of files on your desktop, getting them organized can be difficult, especially if they start overlapping. One useful technique is to use the built-in sorting functions of Windows 10 to sort your files by type. This will put all the files of the same type together, so that for example if you have a “Movies” folder, doing a sort by type will put all the video files in one place. This way, you can you can easily group-select and drag them to your “Movies” folder. Just right-click on the desktop, click Sort by -> Item type.

Third-Party Tools
Nimi Places
The built-in folder system for Windows is simple and effective, but it isn’t feature-rich. One feature you might want to have is the ability to see inside folders without having to open them, just to remind you whats in there. You can create folders like that using a third-party tool called Nimi Places. It is a portable software package that you can use to add folder groups to the desktop. Open this page and click “Download Nimi Places” and save the executable. Then click on the .exe file and select “Extract Nimi Places” to launch the software.
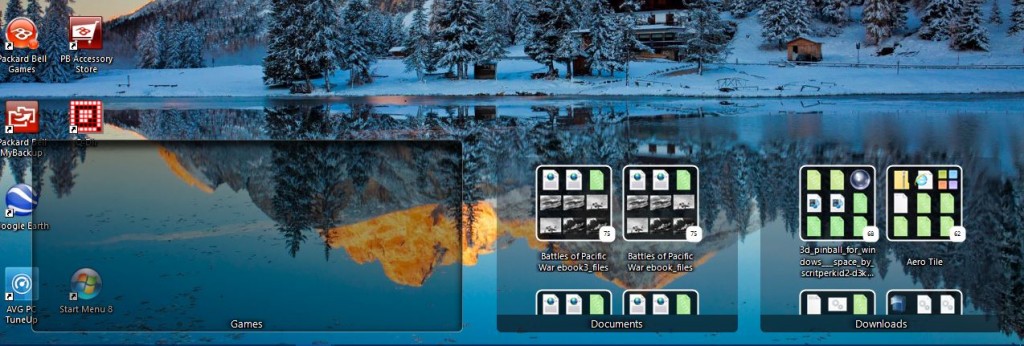
Nimi Places launches with four ready-made container groups for Applications, Games, Documents, and Downloads. You can copy and paste desktop shortcuts into those boxes by right-clicking an icon and selecting “Copy.” Then right-click inside one of the container boxes and click “Paste” to add the copied shortcut to it.
You can also drag the containers to re-position them on the desktop. However, there is a tendency for you to drag them around the screen by accident. To avoid this, just right click on a container and click Lock. You can unlock them the same way, by right-clicking the container and selecting Unlock.
To add your own group containers to the desktop, click the Nimi Places icon in the system tray. This will open the window as shown in the screenshot below. Click the + button at the bottom right to make a new container. Then click Place, and select one of your desktop shortcut folders. That will add the folder container to the desktop, and you can open the shortcuts it includes from there.

You can resize the containers by clicking dragging their borders with the mouse. Note that you can also scroll through the contents of larger containers with a scroll bar by clicking the right side of a container and then dragging its scroll bar up and down.
To edit the containers’ titles, right-click on the title bar at the top of the container box. Then, select the Rename container option, which opens the text box below. Enter an alternative title for the container there.

The software has some other customization options for the containers. To see them, right-click a container and select Appearance and Theme from the sub-menu. This will let you choose some alternative backgrounds for the containers.

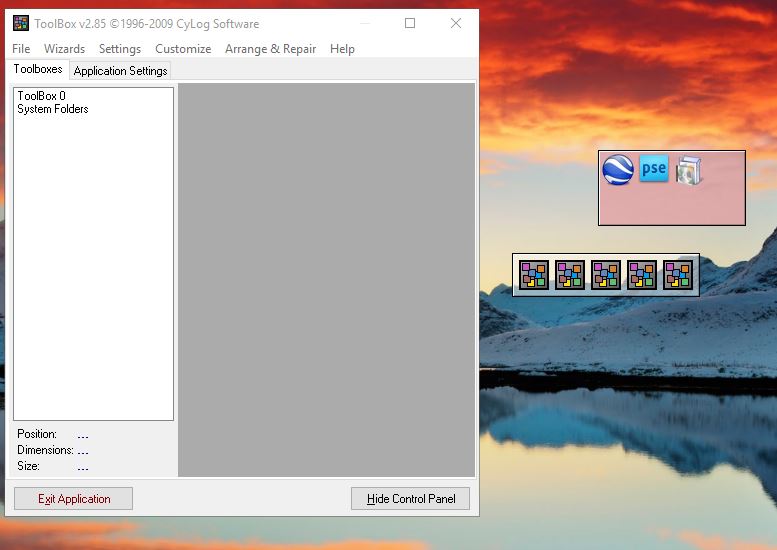
ToolBox
ToolBox is another third-party package you can use to group your desktop icons. You can download the program from here. Click tbox285.zip to save its Zip. Then open the Zip folder in File Explorer and click Extract all to extract the contents of the folder. When you’ve extracted the Zip file’s contents, you can run ToolBox from there.
Now you can set up new icon boxes for the desktop by right-clicking the ToolBox icon on the system tray and selecting New Toolbox. That adds a box to the desktop as you can see in the screenshot below. Drag desktop icons into the box or boxes to organize them.
To further customize those desktop icon boxes, right-click one and select Toolbox Properties from the contextual menu. That opens the window in the snapshot directly below. There, you can resize the boxes, alter their colors, and apply new effects to them.
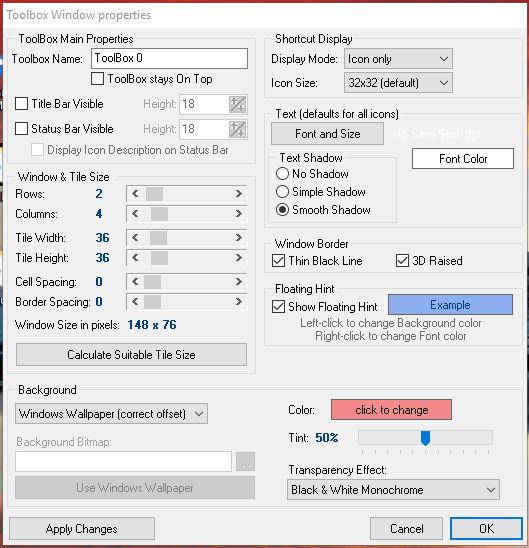
To resize the icon boxes, drag the bars under Window & Tile Size. Drag the Rows bar to expand or contract the height of the box. Alternatively, you can drag the Columns bar right or left to alter the width.
You can alter the colors of the boxes by clicking the box next to Color. That will open a color palette from which you can choose other colors. Or you can add some background wallpaper to the box by selecting Bitmap from the drop-down menu and pressing the … button beside the Background Bitmap path box.
You can include the title at the top the box by clicking the Title Bar Visible check box (or hide the title by unchecking it). Enter new titles for the box in the Toolbox Name text box at the top of the window.
Once you’re done, click the Apply Changes button to apply any newly selected settings.
The Toolbar Control Panel lists all your icon boxes. You can right-click a box and select Toolbar Control Panel to open the window shown below. The Toolboxes tab lists the desktop icon boxes. You can a delete a box by right-clicking its title there and selecting Delete Toolbox. Click Settings > Save all toolbox settings to quickly save all the shortcuts, effects, and desktop positions of the icon boxes.

In addition, you can also set up boxes that include system tray shortcuts. The Toolbar Control Panel includes a Wizards menu at the top. Select that to open a small menu where you can set up a system folder, drive, and megapack shortcut box.
With Windows 10 folders, Nimi Places, and ToolBox, you can now effectively group your desktop icons and organize shortcuts. You might also look at app launchers as a way to clear up a cluttered desktop, as covered in our How to add new app Launchers to Windows 10 article.
When it comes to desktop organizing apps, not many surpass the brilliance of Stardock Fences. The app’s simple and easy-to-understand interface and innovative features make it the best in the business. The only drawback is that Stardock Fences is now a paid app. Although you can enjoy a 30-day free trial, you will have to pay a decent amount of money every month to enjoy all the features, and not many people can afford that.
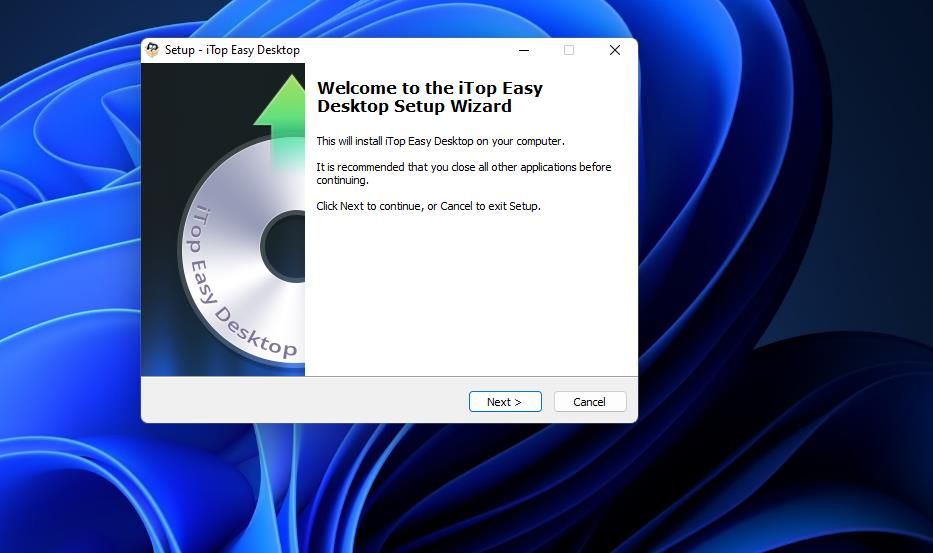
But that does not mean that you can not have a decent desktop organization app for Windows. Not everyone has the time or energy to declutter and manage their desktop. Hence, to avoid a world of virtual clutter, there are several other free apps that you can use as an alternative to Stardock Fences. Among these, iTop Easy Desktop is arguably the best free Stardock Fences alternative.
Page Contents
Benefits and advantages of iTop Easy Desktop
iTop Easy Desktop provides a lot. From different functionalities and perks to a handy user interface, iTop Easy Desktop offers several benefits and advantages.
Perks and features
iTop Easy Desktop can help you place all the icons in an orderly manner and arrange them exactly where you want them to be. Moreover, you can also categorize the icons inside the boxes by name, manual, type, or usage. So, if you want to keep your work-related apps separate from games or pictures from videos, iTop Easy Desktop can make it possible. And to top it all, while you are navigating through your desktop, not only will it be easy for you to find the desired icon, but using this tool makes the navigation significantly more smooth and more seamless.
And that is not the end of it. After you have finalized your preferred boxes, you can edit them by re-sizing, deleting, collapsing, or hiding the boxes. Hence, you can search and access any desired file relatively conveniently and rapidly.
Convenient and handy user interface:
Sometimes, a tool may possess numerous functionalities and innovative features. But a user may not be able to make use of any of them due to the complicated and complex nature of the tool. For this reason, it is vital for a Windows desktop organizer to have a simple and self-explanatory user interface.
None of the features or perks of iTop Easy Desktop are challenging to use. The entire user interface is so handy and convenient that even if you are not a computer geek, you will not have a hard time using this tool while sorting and organizing your desktop.
Step-by-step guide
If you are convinced by the perks and advantages of iTop Easy Desktop but are worried about how to use it, do not worry because I have got you covered. Here is a simple, step-by-step guide for first-timers to help you utilize the most out of this iTop tool without making you scratch your heads. Here are the details:
- Download and install the iTop Easy Desktop app on iTop official website. It is an easy and smooth process.
- During installation, you will be asked whether you want to make the boxes manually (which is preferred if you are familiar with the app) or use the default mode (which is preferred if you are new to the app).
- If you go for the default mode, you will notice an instant and dramatic difference in how your desktop appears. The app will sort the icons into appropriate categories automatically.
- If you choose the manual option, you will have to organize and arrange all the files and apps yourself. That way, you can choose and sort the boxes the way you want.
- Configure the settings, save the desktop layout, and exit the app.
RELATED ARTICLES
Sign in to your MUO account
Is your Windows 11 desktop a disorganized mess? If so, you can organize it better by grouping shortcut icons into category boxes. Windows 11 doesn’t have any feature that enables you to group icons into boxes on the desktop.
Some users stump up for Stardock Fences to organize their desktop icons better. However, you can group desktop shortcut icons with the freeware iTop Easy Desktop and ToolBox software packages for Windows 11.
How to Group Desktop Icons With iTop Easy Desktop
The iTop Easy Desktop software for Windows 11, 10, 8.1, and 7 enables you to add transparent boxes with different titles to the desktop. Then you can organize your software shortcuts into distinct groups by moving them into the category boxes. This is how you can group desktop shortcuts with iTop Easy Desktop:
- Open the iTop Easy Desktop webpage in your browser and click the Download Now button.
- Once it’s done, run the itop-easy-desktop-setup.exe file.
-
Select Next to install iTop Easy Desktop.

- Click Finish with the Launch iTop Easy Desktop checkbox selected.
- Move the iTop Easy Desktop window that opens to the side of the desktop to make some space for adding boxes.
- Left-click on the desktop, hold the mouse button, and then drag an outline for a box with the cursor.
-
Release the mouse button and select Create a Box. You can further adjust the size of the box after adding it by placing the cursor along its border and dragging the mouse.

-
Double-click the top of the box to add a category title for it. For example, you could enter titles for software categories like games, browsers, productivity apps, multimedia, system maintenance utilities, etc.

- Repeat steps eight to 10 to add more boxes to the desktop.
- Then drag-and-drop icons on the desktop into the category boxes to group them.

You can access options for the boxes by clicking the Menu buttons on their top left corners. Move the cursor over the Sort by option to select one of several options for organizing the icons in their respective boxes. There you can also select to rename and remove boxes.

The View submenu on that menu also includes a Roll up box option. Selecting that option rolls up the box to its title bar, as shown below. That’s a handy feature for preserving desktop space. To unroll a box when you need to access it, deselect the same option.

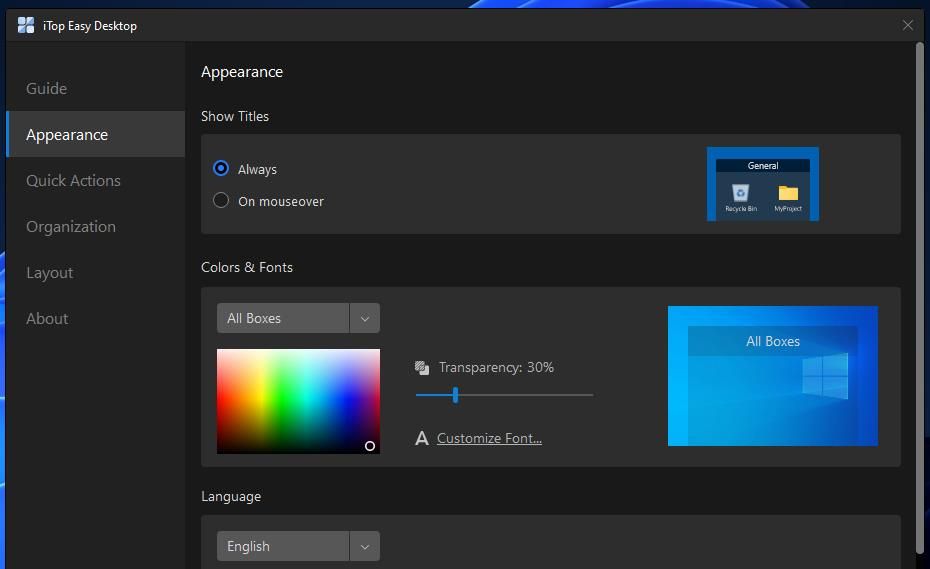
You can customize the appearance of all desktop boxes or individual ones from the Appearance tab on the iTop Easy Desktop window. There you can customize colors by selecting All Boxes or an individual one on the drop-down menu and selecting colors on the palette. Drag the Transparency bar’s slider to make boxes more or less transparent.
The Quick Actions tab on that window shows iTop Easy Desktop’s hotkeys. The Win + F3 hotkey listed there is a particularly noteworthy one. Pressing the Windows + F3 key combination opens (and closes) a search tool in the middle of the desktop. You can search for and find apps, documents, and files in Windows 11 with that utility.
If you ever want to disable the desktop boxes, uncheck the Enable iTop Easy Desktop checkbox on the Guide tab. Deselecting that setting will restore all your shortcuts on the desktop as they originally were before you grouped them in boxes. Reselecting the same option will display all boxes you added.
ToolBox is older software for grouping desktop shortcuts that dates back to Windows 3.1. So, you can utilize it on a wide range of Windows platforms, including the most recent addition to the series. ToolBox isn’t actively updated anymore, but it packs in more customization settings than iTop Easy Desktop. You can group shortcuts on your desktop with ToolBox as follows:
- Open the ToolBox homepage and download the file from the Download section at the top right of that page.
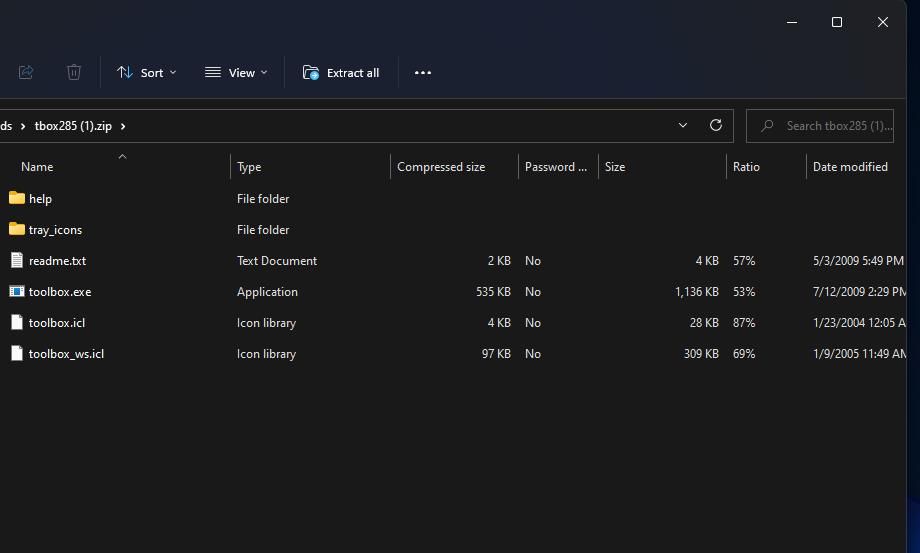
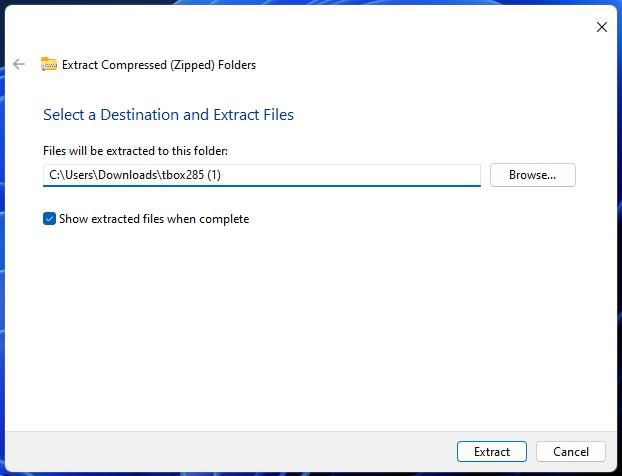
- Click the tbox285.zip to open the ZIP file, and select Extract all at the top of File Explorer.
-

- Click the Show extracted files option’s checkbox to select it.
-
Next, select Extract to open an extracted tbox285 directory.

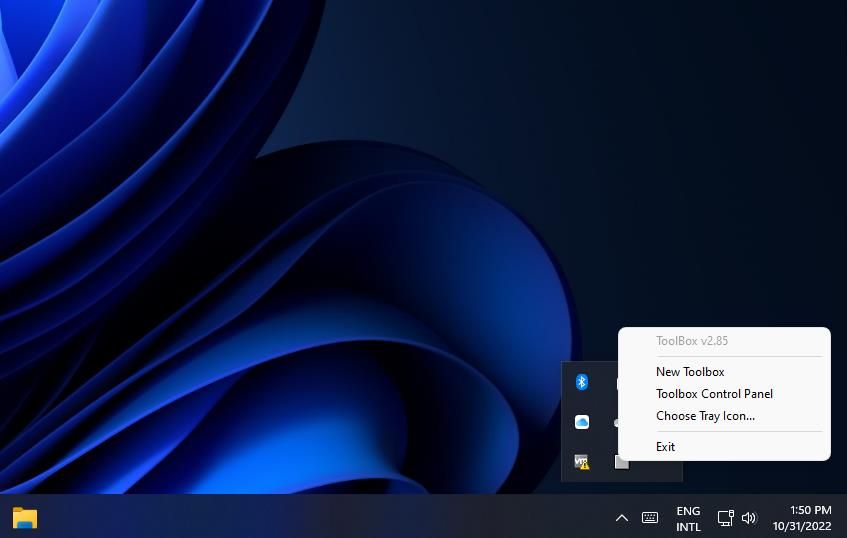
- Double-click toolbox.exe to start ToolBox.
-
To add a new box, right-click the ToolBox system tray icon and select New Toolbox.

-
Right-click the box and select New > Shortcut to Application or File.
Картинка с сайта: www.makeuseof.com

You can customize a desktop box by right-clicking it and selecting Toolbox Properties. The Toolbox Properties window includes options for resizing boxes. Drag the Tile Width and Tile Height bars’ sliders to make a box bigger or smaller. Alternatively, drag the Row or Column bars’ sliders to change the number of rows and columns a box has for its shortcuts.
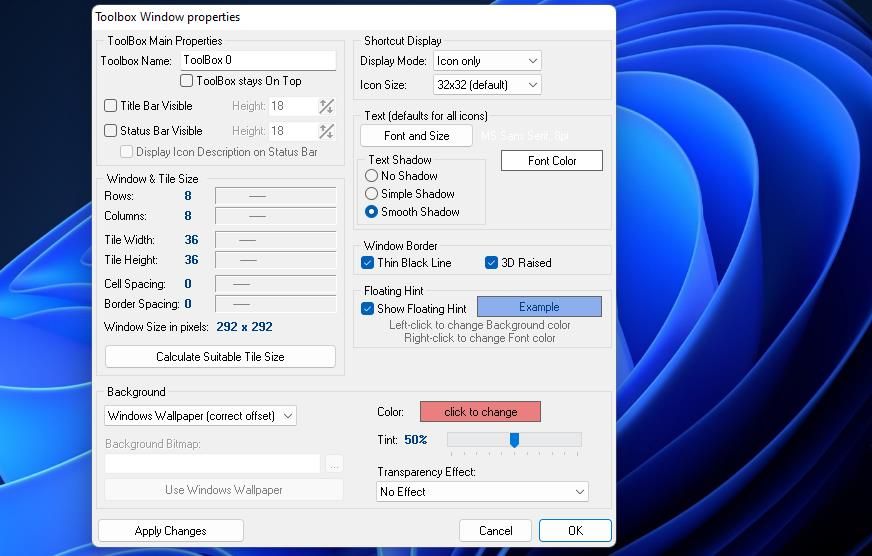
If you want to add a title to the box, select the Title Bar Visible checkbox. Then input a title for the box in the Toolbox Name box. You can further configure the title by clicking the Font and Size button. Choose a different font, style, and size option on the window that appears.
The boxes are transparent by default. You can adjust the transparency level by moving the Tint bar’s slider left and ride. Click the Transparency Effect drop-down menu to choose one of the four effect options there.
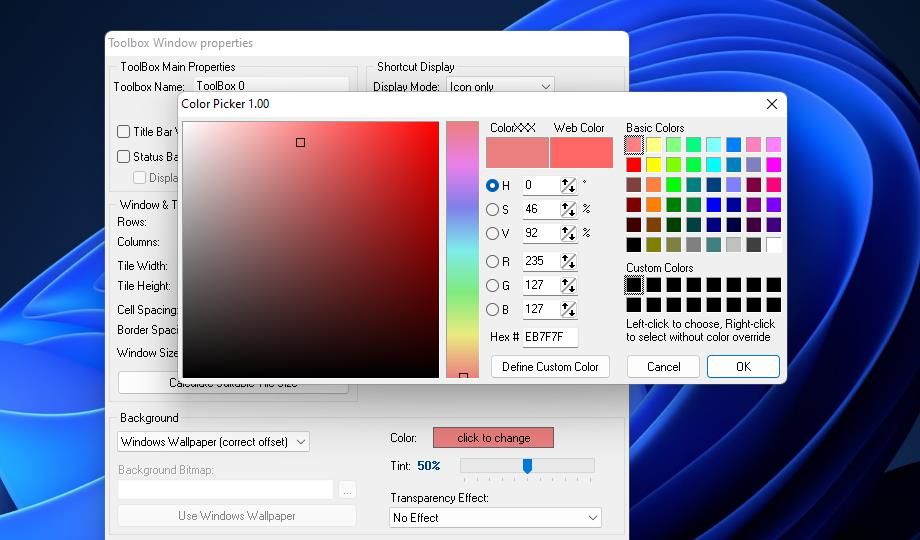
To change the color of a box, press the click to change button for the Color option; then select an alternative on the Color Picker window and click OK. Press the Apply Changes button to save the new color.
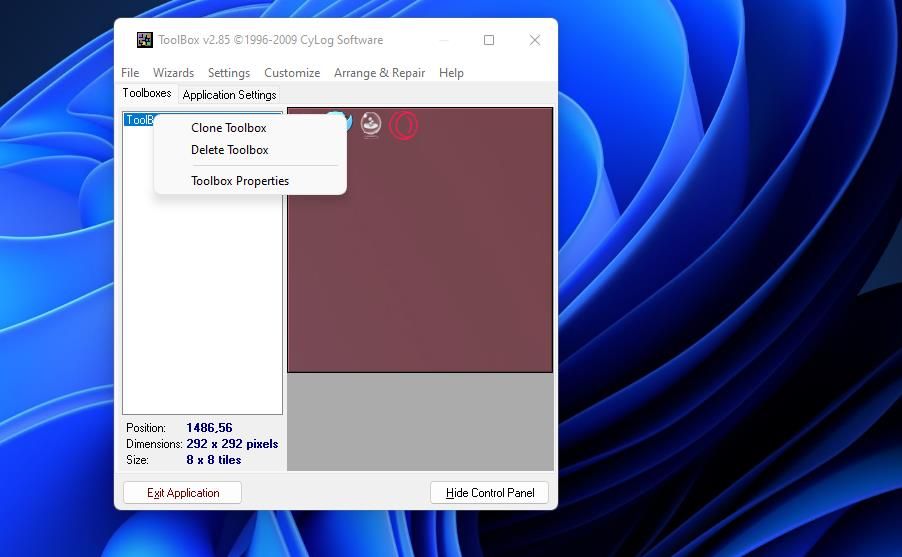
There are more options available on the ToolBox control panel. Right-click the program’s system tray icon and select ToolBox Control Panel. The ToolBoxes tab there displays a list of your boxes. You can remove a box from the desktop by right-clicking it and selecting Delete ToolBox.
Select the Application Settings tab to view more general ToolBox software settings. Select the Start Toolbox when Windows starts setting there if you want the program to run automatically. There you can also add two pre-made boxes to the desktop by clicking Wizard and selecting Create System Folders Toolbox or Create Toolbox for Drives.
Organize Your Desktop Better in Windows 11
ToolBox and iTop Easy Desktop are ideal for organizing the Windows 11 desktop more efficiently. It’s quick and easy to group your desktop’s software, folder, and file shortcuts into different box categories with both those software packages. They’re decent alternatives to Fences that pack in a good range of options and features.