
Время на прочтение2 мин
Количество просмотров179K
grep
Многим любителям шела нравится чудная команда grep.
К сожалению, windows нативно не имеет такой команды, по этому некоторые ставят себе наборы различных консольных утилит в *nix стиле, включая grep.
Мне, как любителю посидеть в консоли Windows очень мешало отсутствие грепа, по этому мои скрипты под Win всегда были не так хороши, как могли бы быть. Но мои скрипты должны работать на любой (ну, или почти на любой) Windows, так как же быть?
К счастью, в Windows XP (и выше) появились две команды, которые призваны исправить положение — это find и более мощный вариант — findstr.
первая простая, и имеет явный недостаток — искомый текст надо заключать в кавычки. Не знаю, как вам — но мне очень не удобно печатать кавычки каждый раз 
findstr же этого не требует, и к тому же позволяет искать используя мощь регулярных выражений.
Таким образом, теперь надо помнить, что мы не в bash\zsh\etc, а в Win, и набирать findstr вместо grep.
Ну а на своей машине я сделал следующее:
echo findstr %1 %2 %3 %4 %5 > %systemroot%\grep.cmd
теперь можно не задумываясь грепать вывод:
C:\WINDOWS>netstat -an | grep LISTEN
C:\WINDOWS>findstr LISTEN
TCP 0.0.0.0:135 0.0.0.0:0 LISTENING
TCP 0.0.0.0:445 0.0.0.0:0 LISTENING
TCP 0.0.0.0:1963 0.0.0.0:0 LISTENING
TCP 10.198.17.58:139 0.0.0.0:0 LISTENING
TCP 127.0.0.1:1025 0.0.0.0:0 LISTENING
TCP 127.0.0.1:9050 0.0.0.0:0 LISTENING
TCP 127.0.0.1:9051 0.0.0.0:0 LISTENING
TCP 192.168.56.1:139 0.0.0.0:0 LISTENING
Ну и на закуску:
ifconfig:
echo IF "%1"=="-a" (ipconfig /all) ELSE (ipconfig %1) > %systemroot%\ifconfig.cmd
man:
echo %1 /?> %systemroot%\man.cmd
ls:
echo IF "%1"=="-a" (dir) ELSE (IF "%1"=="-al" (dir) ELSE (dir %1 %2 %3 %4 %5)) > %systemroot%\ls.cmd
Я часто на автомате даю ключ(и) -a(l) команде ls, по этому добавил их «обработку»
UPD перенёс в «Системное администрирование»
In this tutorial, we will learn how to install the grep command on the Windows operating system. We will then look at a few examples to learn how to search for text patterns with the grep command.
After you install grep on Windows, you can use it on both CMD and Windows PowerShell. You can pipe CMD and PowerShell commands to the grep to filter the output.
Install Grep on Windows
There are a couple of ways to install grep on Windows. The easiest way is to install git using the winget package manager.
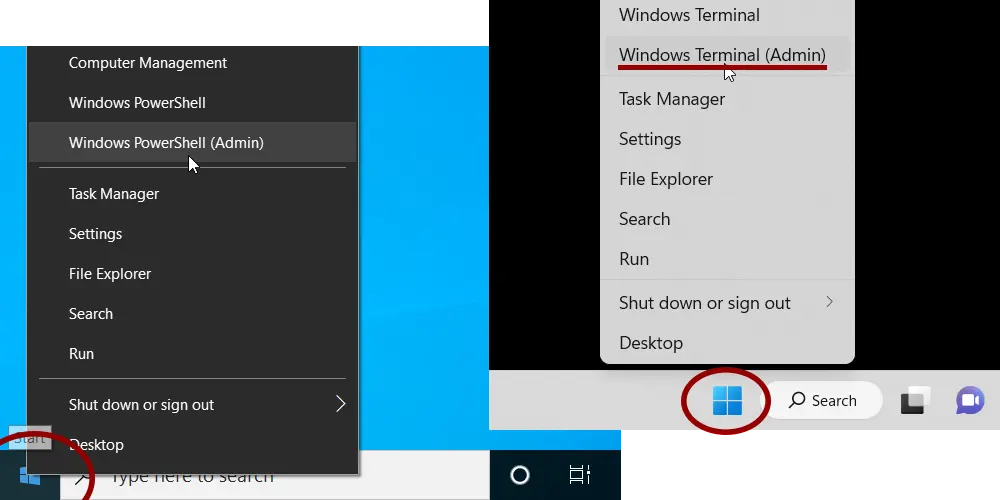
To get started, start an Administrator console: Right-click the Start button and choose Windows Terminal (Admin) if you are on Windows 11 or PowerShell (Admin) if you are on Windows 10.
Execute the following command to install Git:
winget install --id Git.Git -e --source wingetNext, run the following command to add the bin directory to the system PATH variable:
$PATH = [Environment]::GetEnvironmentVariable("PATH", "Machine"); [Environment]::SetEnvironmentVariable("PATH", "$PATH;C:\Program Files\Git\usr\bin", "Machine")After that, exit and re-open the PowerShell console. And that is it. The grep command is now available in both CMD and Windows PowerShell.
If for some reason, you don’t like to install Git Bash, there is an alternative. That is to install grep using the chocolatey package manager. You can do that by running the following two commands:
Set-ExecutionPolicy Bypass -Scope Process -Force; [System.Net.ServicePointManager]::SecurityProtocol = [System.Net.ServicePointManager]::SecurityProtocol -bor 3072; iex ((New-Object System.Net.WebClient).DownloadString('https://chocolatey.org/install.ps1'))
choco install -y grep
This will only install the grep command. The Git Bash package installs other Linux command-line tools such as awk, sed, and find under the C:\Program Files\Git\usr\bin directory.
Grep Command Examples
There are two ways to use grep. First, grep can be used to search strings on one or more files. Second, grep can be used to filter the output of another command.
In the following section, we will go through a number of examples to learn the grep command.
Basic Text Searching
In its basic form, we use the grep command to search strings in files and grep prints lines that match.
grep 'string' filenameYou can search on multiple files at once if you want:
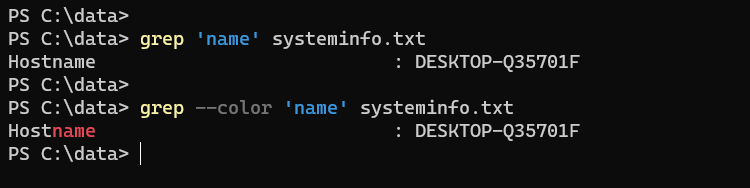
grep 'string' file1 file2 file3In the following example, we search for the string ‘name’ in the text file called systeminfo.txt:
grep 'name' systeminfo.txtThe command will display lines that contain the given string anywhere in it. You can add the --color option to colorize the matching pattern in the output.
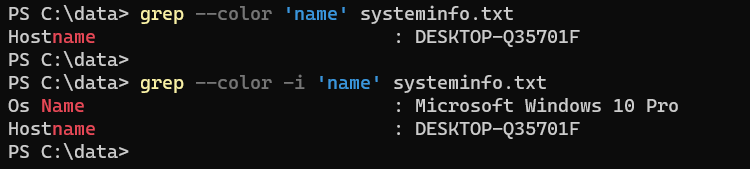
Windows grep command is case-sensitive. Use the -i option to ignore capitalization:
grep -i 'name' systeminfo.txtThe -i option, you will use it more often than not.
Important: Always put the search string inside quotes. Especially if there are spaces in your search.
Below you will find the most basic search options you should know about.
| -i | Ignore the case. |
| -n | Print line numbers. |
| -v | Display non-matching lines. |
| -c | Print line count. |
| -w | Match only whole words. |
| -x | The entire line should match. |
| -o | Prints only the text that matches instead of the entire line. |
| -a | Read binary files as if they are text files. |
| -f | Take search strings from a file. |
| -e | Specify multiple patterns. |
| —color | Colorize the search pattern in the output. |
Using -n to display the line number of the matching line:
grep -in 'windows' systeminfo.txtUsing the -v option to display lines that do not match:
grep -iv 'windows' systeminfo.txtIn the following example, we are using -v and -c options to count all the lines that do not contain Windows:
grep -ivc 'windows' systeminfo.txtIf you want to search more than one pattern, use the -e option as shown in the following example:
grep -i -e 'name' -e 'win' systeminfo.txt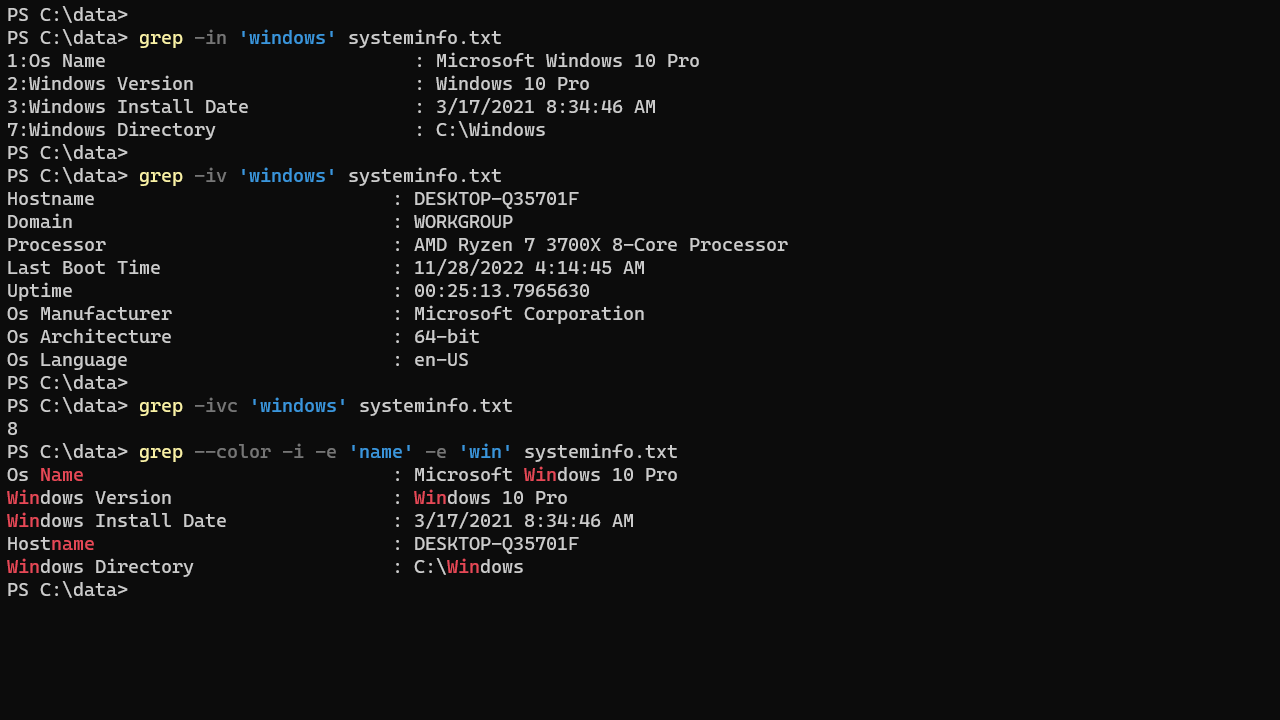
Send Output From Another Command
As a system administrator, most of the time, you will use the grep command to filter the output of another command.
tasklist | grep -i explorerIn the previous example, the output of the tasklist command is piped into the grep command, which will then display only those lines that contain the string explorer.
You can also use grep to filter PowerShell commands:
Get-ComputerInfo | grep -i 'network'It is also possible to chain grep commands together any number of times, as shown in the following example:
tasklist | grep -i 'exe' | grep -i 'service'Recursive Search
Using the -r option, we can search for a particular string throughout all files in a directory or entire filesystem.
grep -i -r 'error' C:\Windows\Logs\The preceding command finds all instances of error in all files under the C:\Windows\Logs\ and its subdirectories.
Add the -l option to the previous command, and it prints only the names of files.
grep -irl 'error' C:\Windows\Logs\The -L (uppercase) does the opposite. It prints the names of files containing no match.
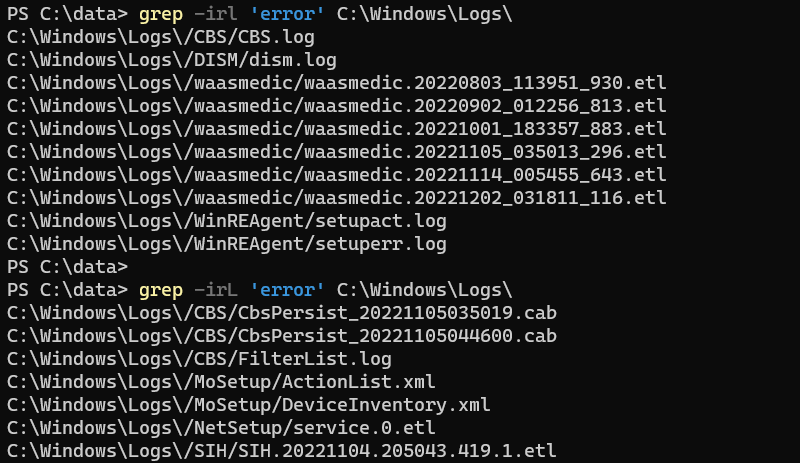
To include or exclude a file pattern, use --include or --exclude options, respectively.
grep -ir 'error' C:\Windows\Logs\ --include=*.log
grep -ir 'error' C:\Windows\Logs\ --exclude=*.log
In the above example, the first command searches the given string on all files with the .log extension, while the second command searches all files except the ones that end with the .log extension.
| -r | Search for matching files under each directory recursively. |
| -R | Search for matching files under each directory recursively. Follow all symbolic links, unlike -r. |
| -l | Display only the names of files with matching lines. |
| -L | Display only the names of files with no matching lines. |
| —include=GLOB | Search only files that match a file pattern. |
| —exclude=GLOB | Skip files that match a file pattern. |
Metacharacters
As a system administrator, you should be familiar with a few important regular expressions for advanced text searching.
The asterisk(*) is by far the most commonly used metacharacter. In the following example, we filter the output of the systeminfo command to find any occurrence of ‘pro’ followed by any number of characters.
systeminfo | grep -i 'pro*'Positional Searching
The grep command has metacharacters that we can use to search patterns at the start and end of a line and the start and end of a word.
| ^ | Find the pattern at the start of the line. |
| $ | Find the pattern at the end of the line. |
| \< | Find the pattern at the start of a word. |
| \> | Find the pattern at the end of a word. |
| \s | Any whitespace character. |
Examples
Search for the lines starting with Windows:
grep -i '^windows' systeminfo.txtSearch for the lines that end with Windows:
grep -i 'windows$' systeminfo.txtFind the lines that have words starting with the letters ‘ver’:
systeminfo | grep --color -i '\<ver'Find the lines that have words ends with the letters ‘ver’:
systeminfo | grep --color -i 'ver\>'Find Windows surrounded by whitespace:
grep -i '\swindows\s' systeminfo.txt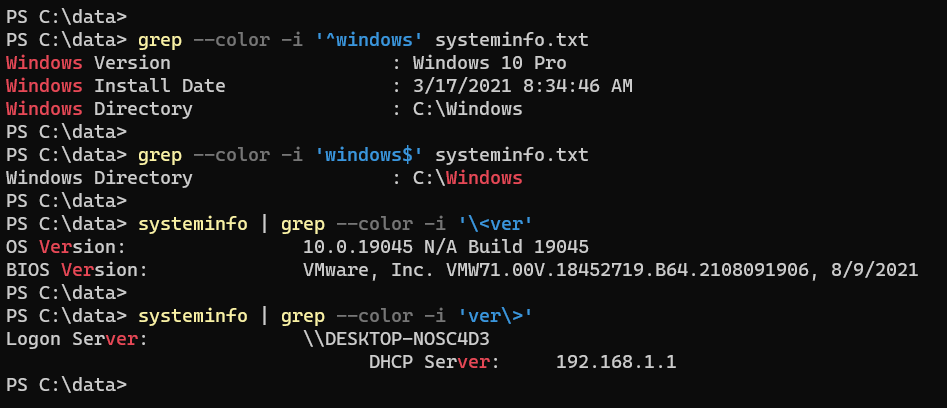
Escaping Metacharacters
If a meta character (for example, the dollar sign) is part of the string, you need to escape it with a black slash (\).
For example, let’s say you are searching for an amount that contains the dollar sign. Since the dollar sign is a metacharacter, you need to escape it with a black slash to make it part of the string:
grep '10\$' systeminfo.txtGrep comes with a handful of options that control the way it displays the results. To view information on all available options, type grep --help.
Windows Command Prompt also has a text search tool called findstr, which is very similar to the grep command.
The `grep` command is not natively available in Windows CMD, but you can use the `findstr` command to search for strings in files with a similar functionality.
Here’s an example of how to use `findstr` to search for the word «example» in a text file called `file.txt`:
findstr "example" file.txt
What is Grep?
`Grep` is a powerful command-line utility that stands for “global regular expression print.” Its primary function is to search for specific patterns within text files, making it invaluable for filtering and finding data swiftly. Grep originated in Unix/Linux environments and has since become one of the essential tools in any programmer or system administrator’s toolkit.
While it’s often associated with Unix-like systems, the functionality of `grep` can be replicated in Windows command-line environments, specifically in CMD. This article focuses on how to use Windows CMD grep, allowing Windows users to harness the power of searching and filtering text data effectively.
Windows Cmd Repair: Quick Fixes You Need to Know
Why Use Cmd Windows Grep?
Using cmd windows grep offers several benefits:
- Efficiency: Grep can quickly search through large files or several files simultaneously to find specific strings or patterns, saving users an immense amount of time.
- Versatility: It provides a wide range of options, allowing for case-insensitive searches, recursive directory searches, and more, accommodating various user needs.
- Command-line Integration: As part of a larger suite of command-line tools, it allows users to incorporate grep into scripts, automating tasks that involve searching through files.
Windows Cmd Repair Commands: A Quick Guide
Setting Up Grep in Windows CMD
Installing Grep on Windows
To utilize `grep` within Windows, users can opt for one of two main approaches:
-
Cygwin: This software creates a Unix-like environment on Windows, allowing users to run various Unix commands, including `grep`.
- To install Cygwin:
- Download the setup executable from the [Cygwin website](https://www.cygwin.com/).
- Follow the installer instructions, making sure to select `grep` during the package selection process.
- To install Cygwin:
-
Windows Subsystem for Linux (WSL): WSL enables users to run a Linux distribution directly on Windows, providing full access to Linux command-line tools.
- To install WSL:
- Open PowerShell as an administrator.
- Run the command:
wsl --install- Choose a Linux distribution and follow the prompts to set it up, then simply install grep through your chosen distribution’s package manager (e.g., using `apt` for Ubuntu).
- To install WSL:
Setting Environment Variables
After installation, setting the `PATH` variable is crucial for easy access to `grep`. Ensure that the directory containing the `grep` executable is added to your system’s PATH variable, typically found in environment settings.
To add `grep` to the PATH variable, follow these steps:
- Right-click on This PC and select Properties.
- Click on Advanced system settings.
- In the System Properties window, click the Environment Variables button.
- Under System variables, select the Path variable and click Edit.
- Click New and add the path to the directory containing `grep`.
- Click OK to save.
Mastering Windows Cmd Arp for Networking Success
Basic Syntax of Grep Windows CMD
The general syntax of the `grep` command follows this structure:
grep [options] pattern [file...]
Commonly Used Options
There are numerous options available to refine your searches with `grep`. Here are a few essential ones:
- `-i`: Ignore case distinctions, allowing for more flexible searches.
- `-v`: Invert the search, displaying lines that do NOT match the pattern.
- `-r`: Perform a recursive search within directories.
Example Usage:
To search for the term «example» in a file named `myfile.txt` without considering case sensitivity, the command would look like this:
grep -i "example" myfile.txt
Windows Cmd Remove File: Quick and Easy Guide
Practical Examples of Using Cmd Windows Grep
Searching Through Text Files
Using `grep` to search through a single text file is straightforward. For instance, if you want to search for the word “error” in `log.txt`, simply run:
grep "error" log.txt
Using Grep with Multiple Files
To find a specific string across all `.txt` files in a directory, use a wildcard. Here’s how:
grep "keyword" *.txt
This command searches for the word «keyword» in all text files within the current directory, providing results from each applicable file.
Combining Grep with Other Commands
Grepping can also be beneficial when combined with other commands. For example, if you want to search for the word «important» in the output of `cat myfile.txt`, you can pipe the results like this:
cat myfile.txt | grep "important"
This technique showcases the interoperability of command-line tools, allowing users to streamline their workflow.
Mastering Windows Cmd Remote Desktop: Quick Command Guide
Advanced Grep Techniques
Using Regular Expressions with Grep
Regular expressions provide enhanced search capabilities. They enable users to create complex patterns for more granular control over what they’re searching for.
For instance, to match lines that start with an uppercase letter followed by any characters ending with the word «error,» the command would be:
grep '^[A-Z].*error' myfile.txt
Filtering Based on Context
The `-B` and `-A` options allow users to include context lines before and after matching lines. For instance, if you want to see two lines before each occurrence of «warning,» you would run:
grep -B 2 "warning" logs.txt
Count Occurrences of a String
To count how many times a specific string appears in a file, utilize the `-c` option:
grep -c "success" results.txt
This command outputs the number of lines containing “success” in `results.txt`, giving users immediate insight into the frequency of that string.
Windows Cmd Clear: Refresh Your Command Line Effortlessly
Troubleshooting Common Issues
Grep Not Found or Not Recognized Command
If you encounter the error message “grep is not recognized as an internal or external command,” possible causes could include the `grep` executable not being installed properly or missing from your system’s PATH. Ensure that you’ve successfully installed `grep` and adjusted your PATH correctly.
Case Sensitivity Problems
If you find that your searches are case-sensitive and returning no results when you expect them, ensure you’re using the `-i` option. This option allows for non-case-sensitive matches, widening your search results.
Mastering Windows Cmd Route: A Concise Guide
Alternatives to Grep in Windows CMD
While `grep` is powerful, Windows also offers other commands that can accomplish similar tasks:
- `find`: This command can search for a string in a file but lacks regex capabilities.
- `findstr`: A more advanced built-in alternative that supports searching for strings with regular expressions, making it a viable substitute for grep in certain scenarios.
Comparison: Generally, `grep` excels in pattern matching and flexibility, while `findstr` offers quicker access for simpler searches within Windows CMD.
Mastering Windows Cmd Version: Essential Tips and Tricks
Best Practices for Using Grep in Windows CMD
To maximize the efficacy of using windows cmd grep, consider these best practices:
- Familiarize Yourself with Options: Understanding different grep options can significantly enhance your command-line productivity.
- Regular Use of Contextual Searches: Using the context options (`-B` and `-A`) can provide valuable insights into why certain strings are present, enabling better analysis.
- Automate with Scripts: Consider integrating `grep` commands into batch scripts for routine searches, easing repetitive tasks.
Mastering Windows Cmd Copy Directory in No Time
Conclusion
Incorporating windows cmd grep into your command-line toolkit allows for efficient and effective searching, filtering, and data management. By understanding its capabilities and practicing with various examples, users can dramatically improve their command-line proficiency and productivity. Practice with the examples provided above, and continue exploring advanced command-line tools and techniques for even greater efficiency.
Understanding Windows Cmd Exit Code: A Quick Guide
Call to Action
If you found this guide helpful, subscribe for more insightful articles and resources on mastering CMD and command-line utilities! Explore the world of command-line tools to enhance your workflow today!
Windows Grep
Command line grep-like file search utility for Windows.
No bloated gui or custom console. Just a fast, simple tool that runs in native cmd/powershell.
Supports
— Regular Expressions
— Chained commands
— Filter by Filetype/Filepath/Filesize
— Exports
— Mass replace/delete
— Ease of use: Run from cmd, Powershell and Windows Explorer
INSTALLATION
Installer
- Visit the release tab (https://github.com/sLill/Windows-Grep/releases)
- Download and run WindowsGrepSetup.msi (This is the only file you need)
This will install Windows Grep in Program Files (x86), add «grep» to PATH for command line use, and insert a registry key for context menu use within Windows Explorer.
Manual Compilation
- Clone repo and build the
WindowsGrepproject as Release - Publish
WindowsGrep - Download Wix Toolset & Wix VS Extension
- Build the
WindowsGrep.Setupproject to generate a msi installer in theWindowsGrep.Setupbin
USAGE
Right-click in File Explorer > Windows Grep
OR
Open cmd/powershell > «grep [command]»

REFERENCE
| Recursive Search | -r | —recursive |
| Target Directory | -d | —directory= |
| Context Characters | -c | —context= |
| Limit n Results | -n | —results= |
| Suppress output | -s | —suppress |
| Ignore Line Breaks | -b | —ignore-breaks |
| Ignore Case | -i | —ignore-case |
| Target File | -f | —file= |
| Plain Text Search | -F | —fixed-strings |
| Regular Expression Search | -G | —basic-regexp |
| Filter Files by Type(s) [Inclusive] | -t | —filetype-filter= |
| Filter Files by Type(s) [Exclusive] | -T | —filetype-exclude-filter= |
| Filter Filepath(s) by Expression(s) [Inclusive] | -p | —path-filter= |
| Filter Filepath(s) by Expression(s) [Exclusive] | -P | —path-exclude-filter= |
| Filenames Only | -k | —filenames-only |
| FileSize Minimum | -z | —filesize-minimum= |
| FileSize Maximum | -Z | —filesize-maximum= |
| Write Output to File | -w | —write= |
| Replace Text | -RX | —replace= |
| Delete Files | -DX | —delete-files |
| File Hashes | —hash= (0=SHA256, 1=MD5) |
* See documentation for detailed command descriptions
Command Order
Order of flags and the search term is completely flexible
EXAMPLE COMMANDS
Recursive search for file content containing «Dug».
-r Dug
Recursive search for file names containing «Dug».
-r -k Dug
Search for «Dug» or «Dig». Ignore-case.
-i D[ui]g
Filter for .txt and .cs files only. Additionally, filter out files in bin and obj subdirectories
Dug -t .txt;.cs -P bin;obj
Show 100 characters of context around the match.
Dug -c 100
Search for filenames containing «Dug». Additionally, search the files returned from command one for content containing «mike»
-r Dug -k | -i mike
Recursive search for US zipcodes. Filter out .dll’s, limit results 10 and write output to a .csv
-r \d{5}(-\d{4})? -T .dll -n 10 -w ‘C:\output.csv’
For even more examples and detailed descriptions of each flag, visit the wiki
The grep command in Linux is widely used for parsing files and searching for useful data in the outputs of different commands.
The findstr command is a Windows grep equivalent in a Windows command-line prompt (CMD).
In a Windows PowerShell the alternative for grep is the Select-String command.
Below you will find some examples of how to “grep” in Windows using these alternatives.
Cool Tip: Windows touch command equivalent in CMD and PowerShell! Read more →
Grep Command in Windows
Grep the output of a netstat command for a specific port:
# Windows CMD
C:\> netstat -na | findstr /c:"PORT"

# Windows PowerShell
PS C:\> netstat -na | Select-String "PORT"
If a command in PowerShell returns some objects, before parsing, they should be converted to strings using the Out-String -Stream command:
# Windows CMD
PS C:\> Get-Alias | Out-String -Stream | Select-String "curl"
Grep a file for a pattern that matches a regular expression (case insensitive):
# Windows CMD
C:\> findstr /i /r /c:"^SEARCH.*STRING$" file.txt

# Windows PowerShell
PS C:\> Select-String "^SEARCH.*STRING$" file.txt
Options used by the findstr command in the example above:
| Option | Description |
|---|---|
/i |
Case-insensitive search. |
/c:"string" |
Use string as a literal search string. Without this option if the search string contains multiple words, separated with spaces, then findstr will return lines that contain either word (OR). |
/r |
Evaluate as a regular expression. |
Display help for the Windows grep command equivalents:
# Windows CMD
C:\> findstr /?

# Windows PowerShell
PS C:\> get-help Select-String
Cool Tip: Windows cat command equivalent in CMD and PowerShell! Read more →
Was it useful? Share this post with the world!