
Provide feedback
Saved searches
Use saved searches to filter your results more quickly
Sign up
Introduction
Window Node exporter is agent that collect and send the window machine hardware utilization metrics to the Prometheus server by using HTTP protocol metric, It used port 9182 by default.
Prerequisites
Up and running Prometheus server, Grafana Server in your machine / network environment or you can use the given link to setup Prometheus and Grafana on ubuntu machine to perform this window machine monitoring.
To install Prometheus – https://www.devopstricks.in/install-prometheus-on-ubuntu-22-04/
To install Grafana – https://www.devopstricks.in/installing-grafana-10-on-ubuntu-22-04-lts/
In this post, We will show you how to install window exporter on window machine to get enable monitoring like CPU, Memory, Disk Space, processes and bandwidth etc.
Step 1: Download Window Exporter Package
We need to download the window exporter package by using given link.
https://github.com/prometheus-community/windows_exporter/releases
You can choose the package as per your architecture.
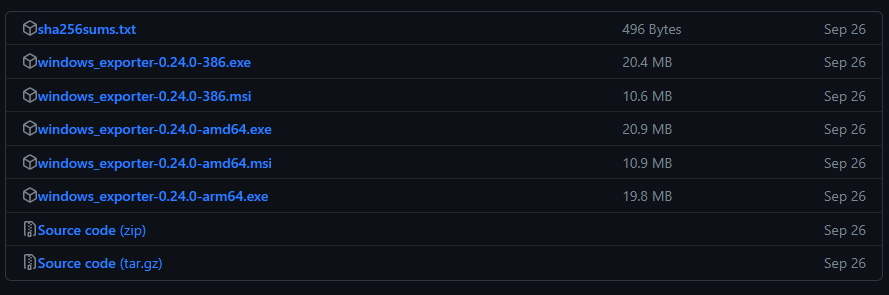
Click the download the right package, In my case i am using window 10 Prod 64 bit So then i can download windows_exporter-0.24.0-amd64.msi or windows_exporter-0.24.0-arm64.exe.
While downloading the package we should get pop-up like this, We need to click in Keep button and ignore warning that this time.

Step 2: Installing Window Exporter
After downloaded the window exporter, We need to run the package and allow the installation.
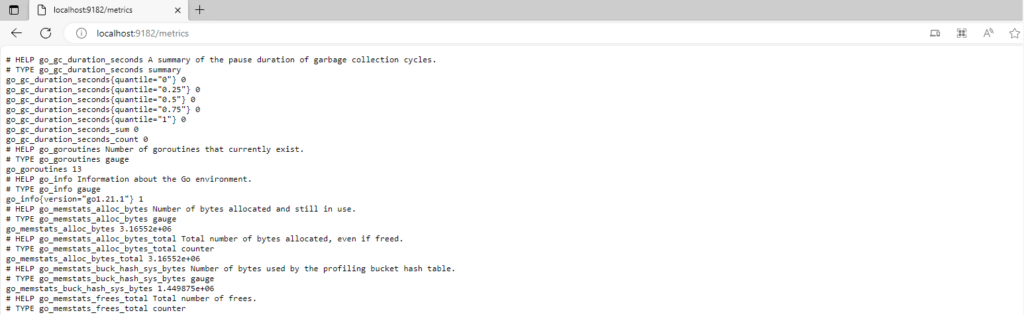
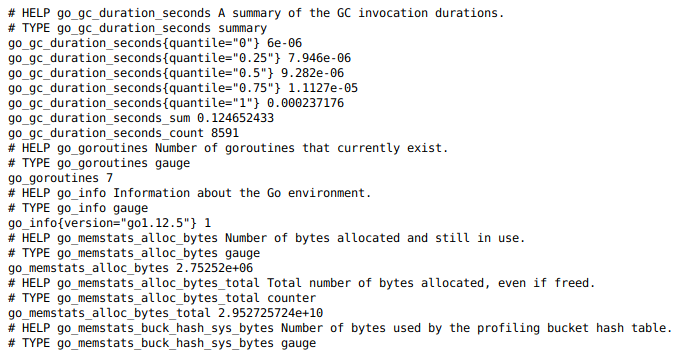
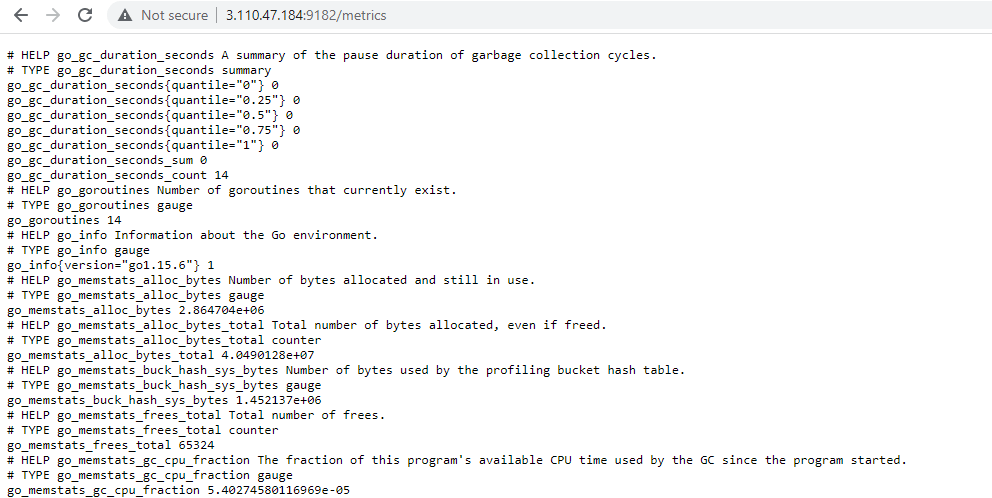
After installation of window exporter package, We need to check the followings endpoint to get window machine metrics like this.
Expose metric URL – localhost:9182/metrics
Step 3: Add Firewall Rules
We need to open the port 9182 port in your window machine and your cloud environment in order to fetch window metrics from Prometheus server.
Step 4: Configure Prometheus
We need to add the window machine endpoint to fetch metrics To do that we need to add the followings configure in Prometheus configuration file.
To open Prometheus configuration file.
sudo vim /etc/prometheus/prometheus.ymlAdd the in the last following config.
  - job_name: window
    # If prometheus-node-exporter is installed, grab stats about the local
    # machine by default.
    static_configs:
      - targets: ['Type-Window-IP-Here:9182']
This is my sample configuration file with window exporter.
# Sample config for Prometheus.

global:
  scrape_interval:     15s # Set the scrape interval to every 15 seconds. Default is every 1 minute.
  evaluation_interval: 15s # Evaluate rules every 15 seconds. The default is every 1 minute.
  # scrape_timeout is set to the global default (10s).

  # Attach these labels to any time series or alerts when communicating with
  # external systems (federation, remote storage, Alertmanager).
  external_labels:
      monitor: 'example'

# Alertmanager configuration
alerting:
  alertmanagers:
  - static_configs:
    - targets: ['localhost:9093']

# Load rules once and periodically evaluate them according to the global 'evaluation_interval'.
rule_files:
  # - "first_rules.yml"
  # - "second_rules.yml"

# A scrape configuration containing exactly one endpoint to scrape:
# Here it's Prometheus itself.
scrape_configs:
  # The job name is added as a label `job=<job_name>` to any timeseries scraped from this config.
  - job_name: 'prometheus'

    # Override the global default and scrape targets from this job every 5 seconds.
    scrape_interval: 5s
    scrape_timeout: 5s

    # metrics_path defaults to '/metrics'
    # scheme defaults to 'http'.

    static_configs:
      - targets: ['localhost:9090']

  - job_name: node
    # If prometheus-node-exporter is installed, grab stats about the local
    # machine by default.
    static_configs:
      - targets: ['localhost:9100']
  - job_name: window
    # If prometheus-node-exporter is installed, grab stats about the local
    # machine by default.
    static_configs:
      - targets: ['100.100.100.00:9182']
Save and exit from the vim text editor.
Step 5: Restart Prometheus Service
To get updated and new changes with Prometheus config file, We need to restart the Prometheus service.
To restart.
sudo systemctl restart prometheus.serviceTo check status.
sudo systemctl status prometheus.serviceWe are all good to here, Now we need to validate the window target metrics in Prometheus UI.
Step 6: Validate the Window Exporter with Prometheus
To validate the window exporter endpoint with Prometheus to know window Machin’s metric is showing with Prometheus or not.
Access to Prometheus endpoints with http://Prometheus-IP:9090
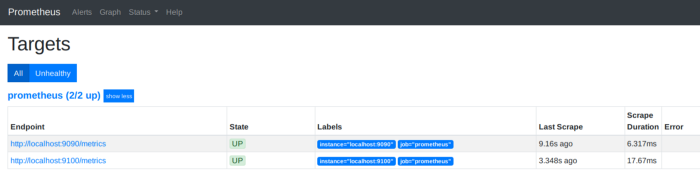
Click on status > targets
We should get output like this.
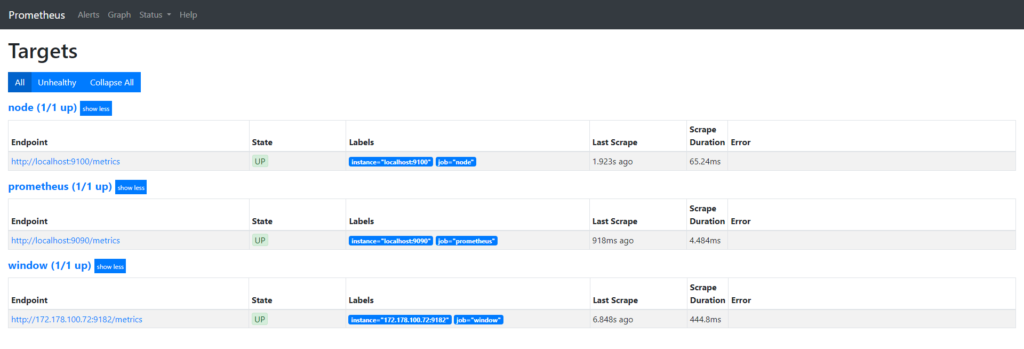
Here we can see that 1 window machine is showing that we just configured, Now we are good to use Grafana.
Step 7: Importing Window Node Exporter Grafana Dashboard
We use the following links to get predefine Window Node Exporter Grafana dashboard.
https://grafana.com/grafana/dashboards/14451-windows-exporter-for-prometheus-dashboard-en/ (Recommended )
https://grafana.com/grafana/dashboards/15620-windows-node-exporter/
https://grafana.com/grafana/dashboards/14694-windows-exporter-dashboard/
https://grafana.com/grafana/dashboards/18699-windows-node-exporter-full-1/
https://grafana.com/grafana/dashboards/14499-windows-node/
https://grafana.com/grafana/dashboards/14510-windows-exporter-node/
https://grafana.com/grafana/dashboards/6593-windows-node/

Conclusion
We have done successfully enabled window machine monitoring by using window node exporter, Still you are having any issue, So please leave a comment below.
-
Expertise in Linux, Git, Jenkins, Docker, Ansible, AWS/Azure, K8s, Terraform, and other DevOps tools.
View all posts
Many great free and open-source monitoring solutions are available for monitoring your servers and applications. In case you have not heard about the free and open-source monitoring solution, Prometheus, we will look at the Prometheus node exporter to scrape metrics and monitor both Linux system metrics and Windows system metrics. Let’s take a look at server monitoring with Prometheus and Grafana.
What is Prometheus?
First, what is Prometheus, and how can we use it for monitoring? Prometheus is an open-source monitoring and alerting solution originally built at SoundCloud. Since the development of Prometheus, many have adopted the solution, and it is actively being developed along with a strong user community.
The project is solely free and open source and is no longer associated with any organization. Prometheus is now part of the Cloud Native Computing Foundation as of 2016 as the second hosted project, after Kubernetes.
It can be used to monitor all types of infrastructure – Linux, Windows, Docker, containers, Kubernetes cluster environments, batch jobs, etc.
Setup Node Exporter on Kubernetes cluster
You can monitor arguably anything with Prometheus and Node Exporter. It is an especially popular solution to monitor Kubernetes cluster environments by installing the Kubernetes components and Node Exporter daemonset. You can create a Node Exporter namespace, etc, and install the components using Kubernetes manifests.
What is the Prometheus Node Exporter?
Prometheus Node Exporter is written for Linux systems and NIX kernels and exposes hardware and kernel-related metrics so these can be scraped with Prometheus for monitoring purposes. So, Node Exporter is only written for Linux server systems, including 32-bit and 64-bit Linux amd64. With the Prometheus Node Exporter metrics, you can expose the following example metrics specific to the system:
-
CPU load
-
Node metrics
-
Network statistics
-
Memory usage
-
TCP resources
-
Boot time
-
CPU time spent
There are default-enabled collectors that are defined in the monitoring spec and metrics related to many different areas of the system.
Node exporter can be run as a Docker container or installed on the remote Linux systems you want to manage. Configuring Node Exporter is fairly easy as well and is referenced in the Prometheus configuration file.
See the official documentation here: Monitoring Linux host metrics with the Node Exporter | Prometheus
What can you monitor with Node Exporter?
There are many different “versions” of Node Exporter. While the primary version is written for NIX systems, a Windows Exporter allows you to export key performance indicators for your Windows Systems.
How to enable collectors
Collectors define which data you can pull from the target operating system. This also varies by the operating system itself.
Collectors are enabled by providing:
-
a –collector.<name> flag.
-
Collectors that are enabled by default can be disabled by providing a –no-collector.<name> flag.
-
To enable only some specific collector(s), use –collector.disable-defaults –collector.<name> …
How can Prometheus metrics be used in Splunk?
This Splunk add-on provides two modular inputs to ingest Splunk metrics from Prometheus:
-
A scraping input which polls a Prometheus exporter and indexes all exposed metrics in Splunk.
-
It is also designed to be able to poll a Prometheus servers for metrics gathering
Look at the official documentation here: GitHub – lukemonahan/splunk_modinput_prometheus: A Splunk modular input for ingesting Prometheus metrics
Grafana is an open source solution that works with Prometheus server to take data source and display these as a beautiful dashboard to easily create an open source monitoring system. You can take multiple data sources from Prometheus server or even the same server and present all the metrics as charts and graphs.
With Grafana, you can graph the following from your Linux server or Windows Server, using the installed Prometheus and Node Exporter installations.:
-
Disk space
-
memory utilization
-
OS metrics
-
Existing metrics
Configure Prometheus and Node Exporter metrics cAdvisor Grafana
Let’s look at how to install Prometheus and Node Exporter metrics along with cAdvisor and Grafana. To configure both Prometheus, install Grafana, and Node Exporter using Docker, we can use a Docker Compose file to do this:
version: '3.8'
networks:
  monitoring:
    driver: bridge
volumes:
  prometheus_data: {}
services:
  node-exporter:
    image: prom/node-exporter:latest
    container_name: node-exporter
    restart: unless-stopped
    volumes:
      - /proc:/host/proc:ro
      - /sys:/host/sys:ro
      - /:/rootfs:ro
    command:
      - '--path.procfs=/host/proc'
      - '--path.rootfs=/rootfs'
      - '--path.sysfs=/host/sys'
      - '--collector.filesystem.mount-points-exclude=^/(sys|proc|dev|host|etc)($$|/)'
    ports:
      - 9100:9100
    networks:
      - monitoring
  prometheus:
    image: prom/prometheus:latest
    user: "1001"
    environment:
      - PUID=1001
      - PGID=1001
    container_name: prometheus
    restart: unless-stopped
    volumes:
      - ~/promgrafnode/prometheus/prometheus.yml:/etc/prometheus/prometheus.yml
      - ~/promgrafnode/prometheus:/prometheus
    command:
      - '--config.file=/etc/prometheus/prometheus.yml'
      - '--storage.tsdb.path=/prometheus'
      - '--web.console.libraries=/etc/prometheus/console_libraries'
      - '--web.console.templates=/etc/prometheus/consoles'
      - '--web.enable-lifecycle'
    ports:
      - 9090:9090
    networks:
      - monitoring
  grafana:
    image: grafana/grafana:latest
    user: "1001"
    container_name: grafana
    ports:
      - 3000:3000
    restart: unless-stopped
    volumes:
      - ~/promgrafnode/grafana/provisioning/datasources:/etc/grafana/provisioning/datasources
      - ~/promgrafnode/grafana:/var/lib/grafana
    networks:
      - monitoring
  cadvisor:
    image: gcr.io/cadvisor/cadvisor:latest
    container_name: cadvisor
    ports:
      - 8081:8080
    networks:
      - monitoring
    volumes:
      - /:/rootfs:ro
      - /var/run:/var/run:rw
      - /sys:/sys:ro
      - /var/lib/docker/:/var/lib/docker:ro
    depends_on:
      - redis
  redis:
    image: redis:latest
    container_name: redis
    ports:
      - 6379:6379
    networks:
      - monitoring
There are many ways to setup and configure node exporter. It can be provisioned as a Docker container running on your Linux host. It can also be installed as a single Prometheus binary you can install via the Linux amd64 tar.gz tarball and run a Prometheus service, using a Prometheus sudo systemctl. Download, extract, and run the installation with the following command:
wget https://github.com/prometheus/node_exporter/releases/download/v*/node_exporter-*.*-amd64.tar.gz
tar xvfz node_exporter-*.*-amd64.tar.gz
cd node_exporter-*.*-amd64
./node_exporter
Starting Prometheus Server
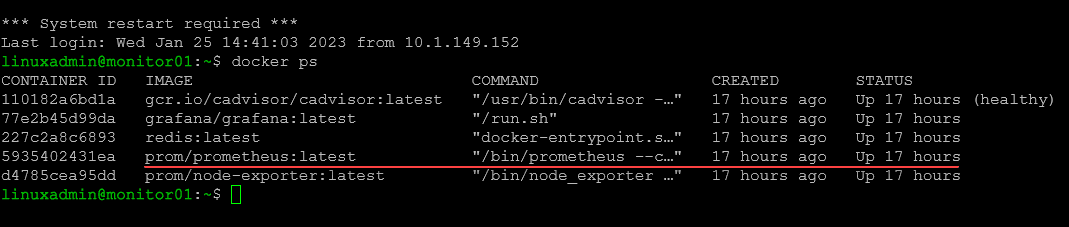
If you are running Prometheus server as a Docker container (which I highly recommend) starting the Prometheus Server is as simple as starting your Prometheus Server Docker container.
Running Node Exporter as a Service (Optional)
If you want to create a systemd service to run Node Exporter, you can do that. Create a new service file:
sudo vi /etc/systemd/system/node_exporter.serviceIn the service file, add the following:
[Unit]
Description=Node Exporter
After=network.target

[Service]
User=node_exporter
Group=node_exporter
Type=simple
ExecStart=/usr/local/bin/node_exporter

[Install]
WantedBy=multi-user.target
Prometheus configuration file
Your Prometheus configuration file is the file that directs Prometheus to the nodes you want to monitor with Node Exporter installed.
global:

  scrape_interval: 1m

scrape_configs:

  - job_name: "prometheus"

    scrape_interval: 1m

    static_configs:

    - targets: ["localhost:9090"]

  - job_name: "node"

    static_configs:

    - targets: ["node-exporter:9100"]

  - job_name: "cadvisor"

    scrape_interval: 5s

    static_configs:

    - targets: ["10.1.149.19:8081"]

  - job_name: "hvhost01"

    scrape_interval: 5s

    static_configs:

    - targets: ["10.1.149.191:9182"]
Prometheus and Node Exporter architecture
Prometheus and Node Exporter work together. You can run Prometheus and Node Exporter on the same box as one another. However, most likely you will want to run Node Exporter on many other remote Linux hosts.
Once you have Node Exporter installed, you reference the Node Exporter instance in your Prometheus configuration file and all the nodes you want to monitor. These may be Linux virtual machines running in your environment.
Prometheus will collect data from the Node Exporter http endpoint located on your remote Prometheus instances. You can enabled additional collectors and gather the metric needed and access these with Prometheus.
The Prometheus UI allows you to view your service discovery and test your targets added to the Prometheus config. In the Prometheus configuration file, you define the endpoint and the port for connecting your Prometheus server to the Node Exporter instance configured. Again, you can verify your connection in the Prometheus user interface.
Below is the service discovery screen in the Prometheus UI.
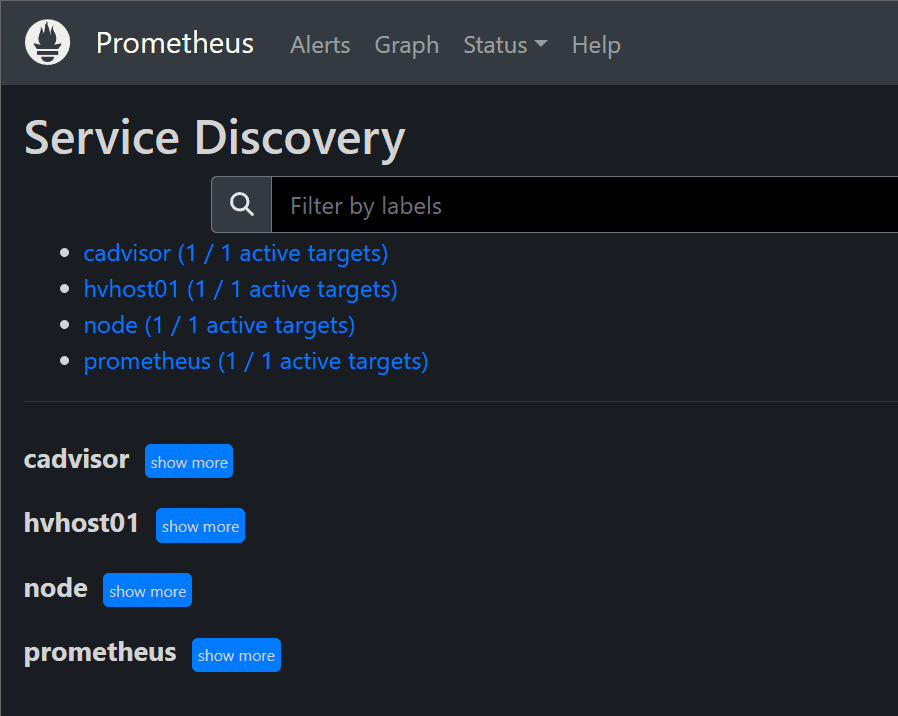
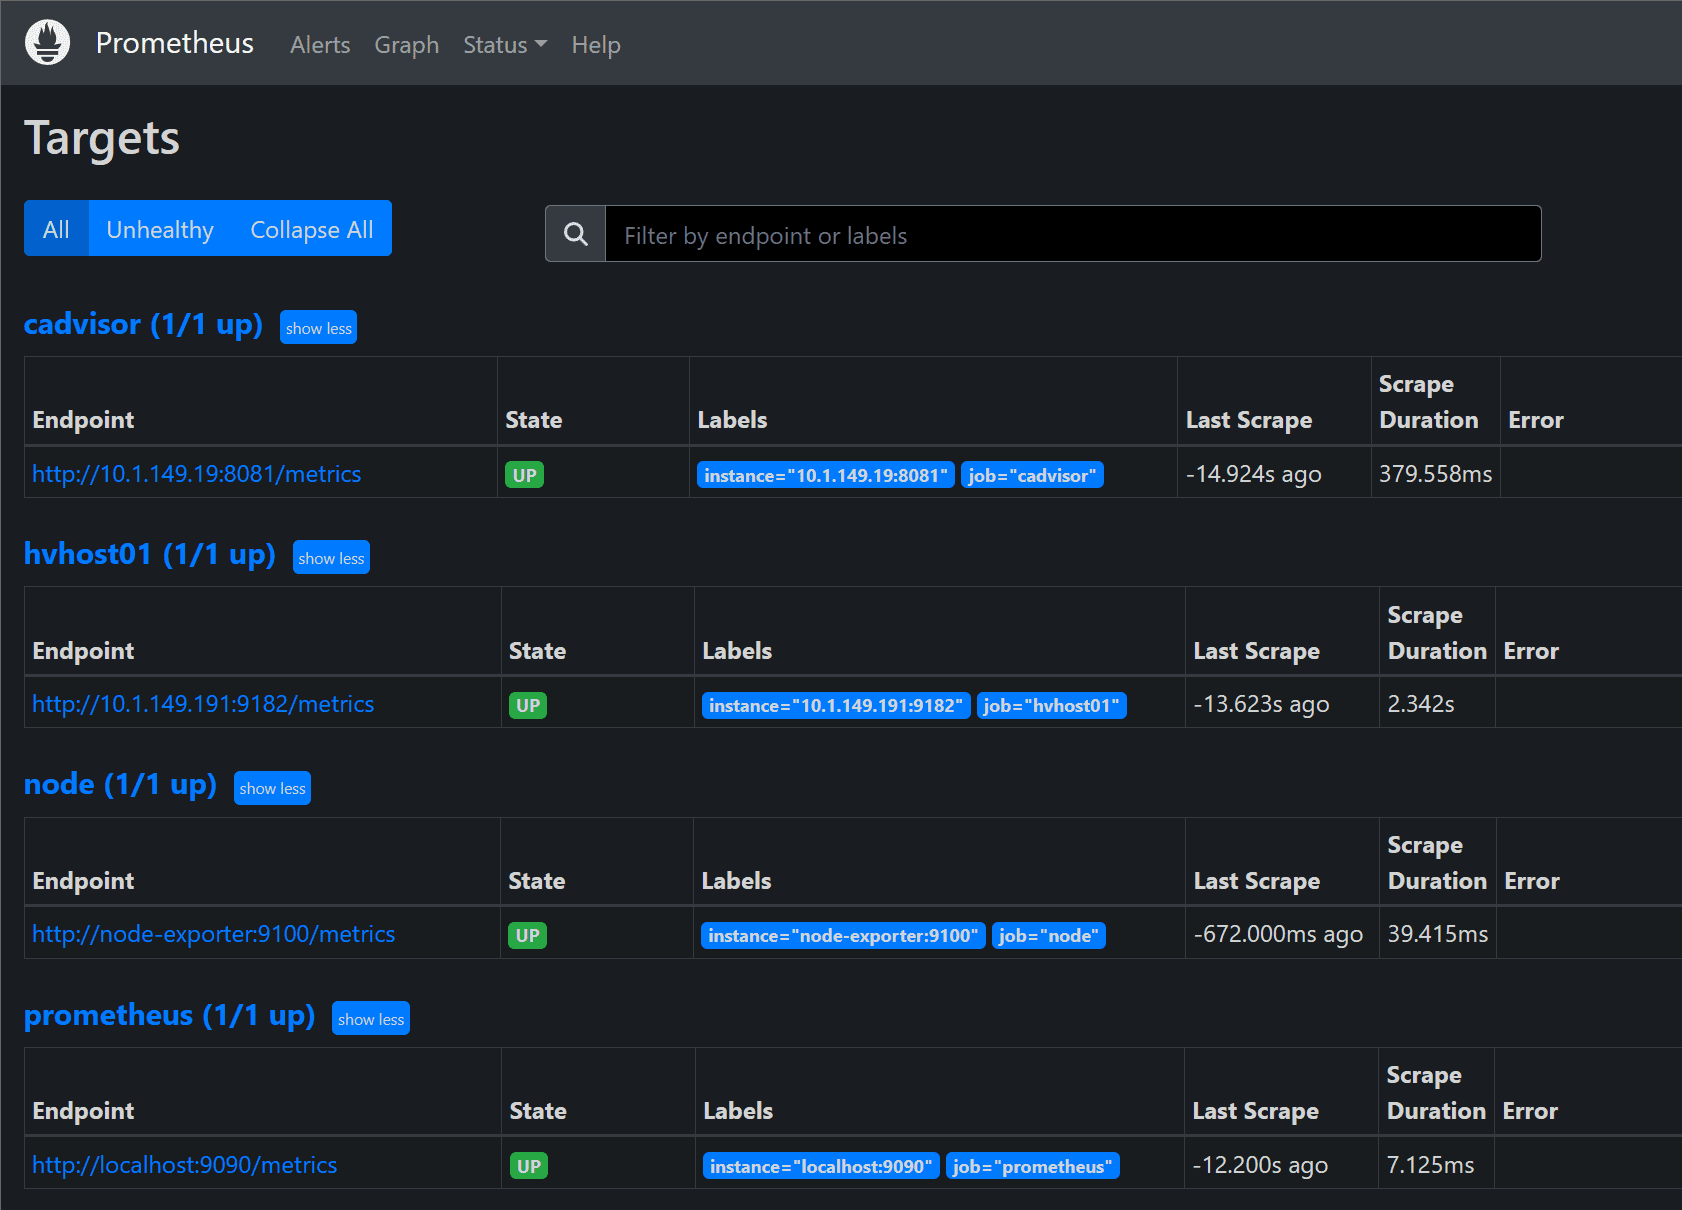
The targets screen is great for troubleshooting connectivity to your Node Exporter endpoints. The State shows the state of the connection. You will see the status of the last scrape attempt.
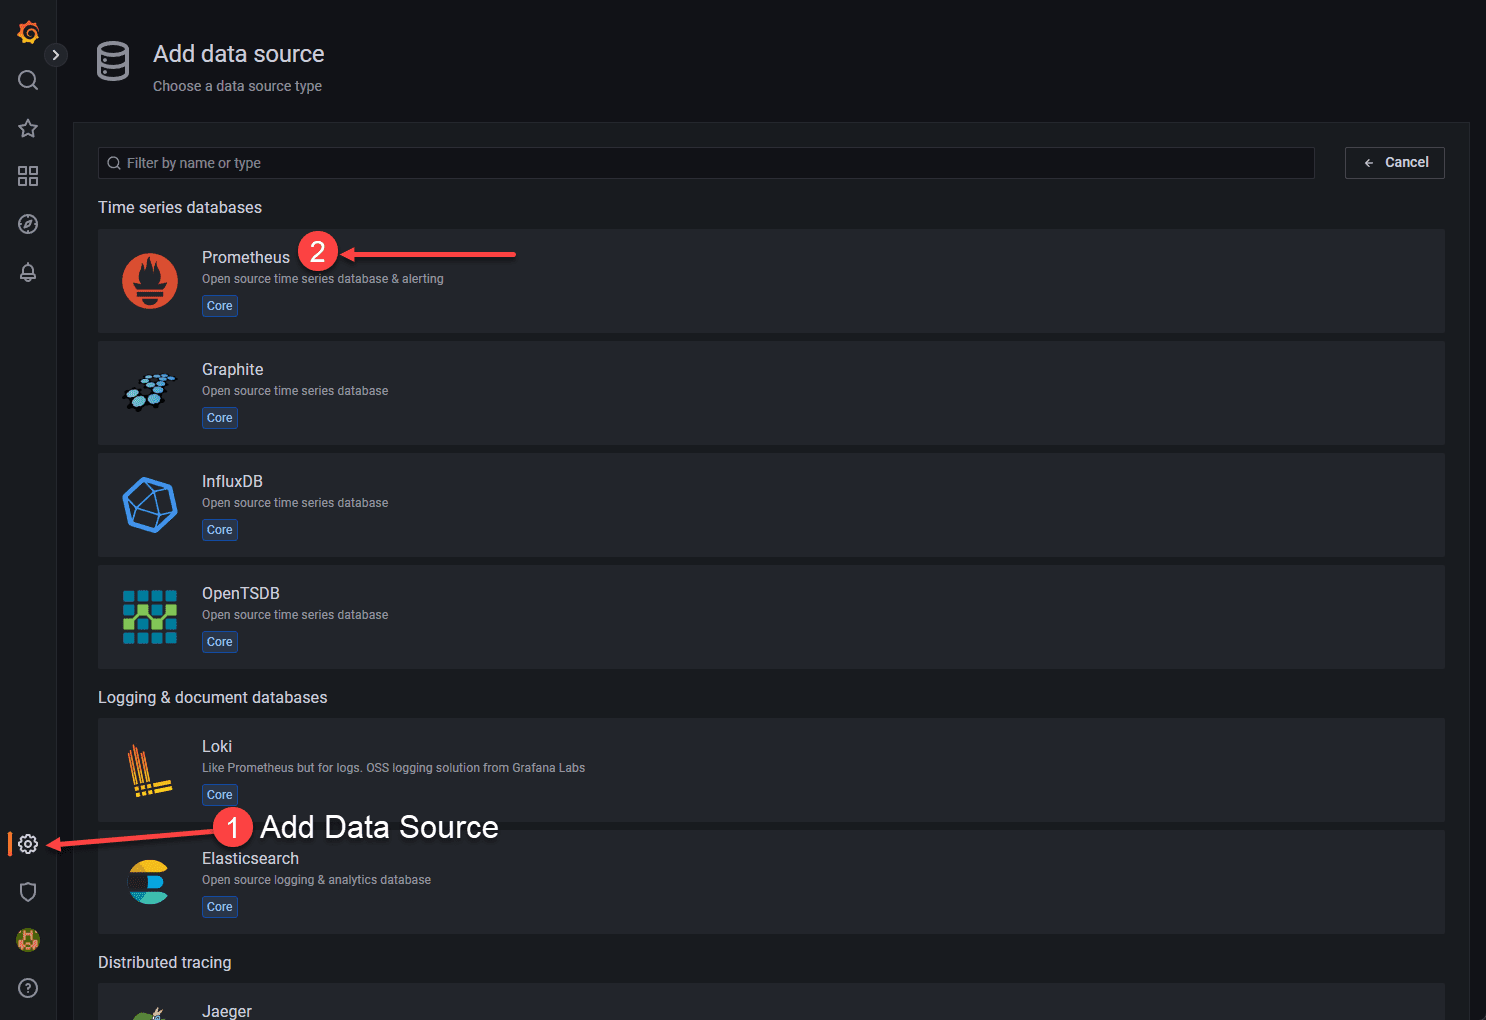
Configuring Grafana with the Prometheus Server monitoring URL
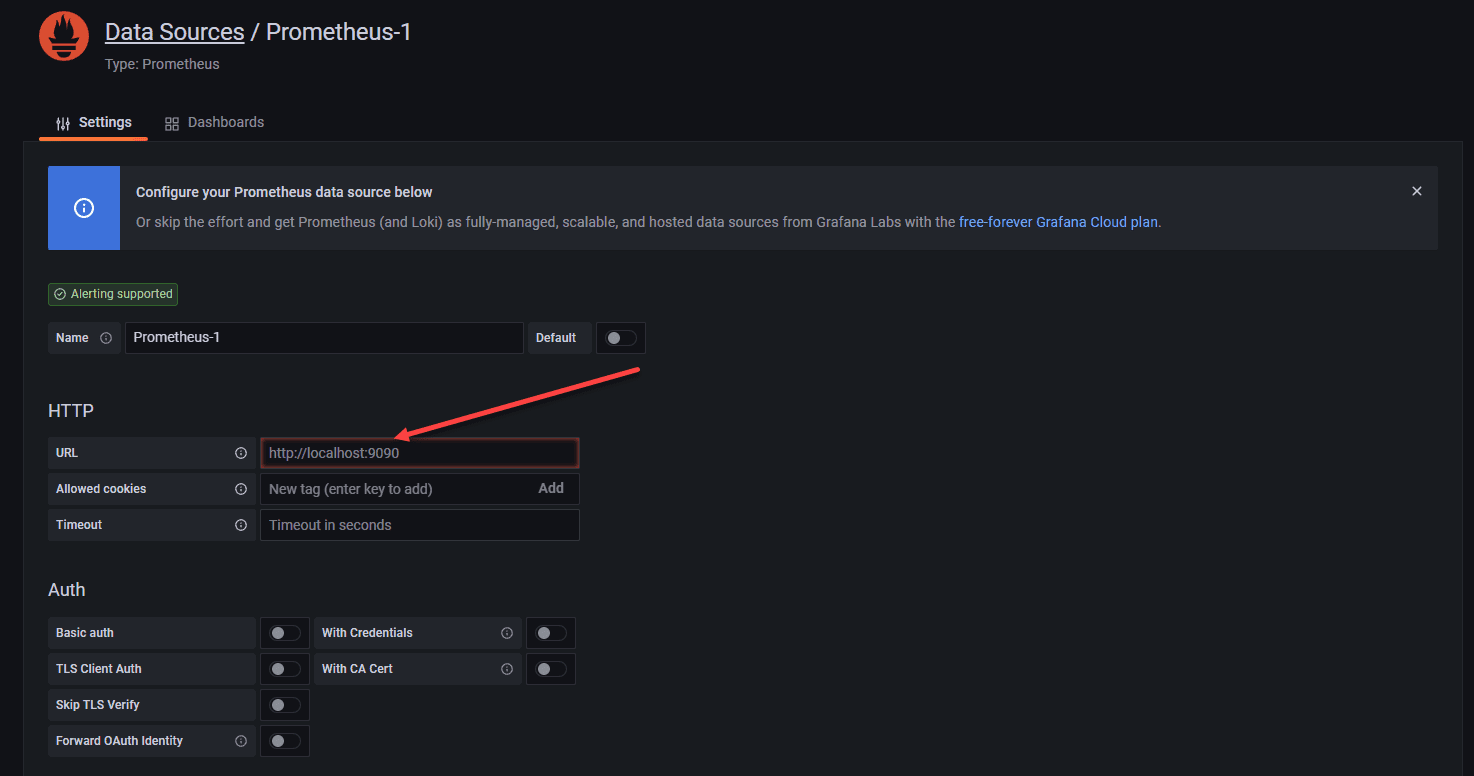
Once your containers are up and running, you must add your Prometheus data source to Grafana. Open Grafana, and click the settings cog in the lower left-hand corner. Then click Prometheus to configure Grafana with the URL of the Prometheus server.
Add the IP and port of your Prometheus Server URL which pulls the metrics in the Prometheus format.
Visualizing Prometheus Node Exporter Metrics as Grafana Dashboards
Using Prometheus Node Exporter with Grafana is a very popular way to easily create beautiful dashboards and use Grafana’s main expression bar to build Promql expressions to query the data ingested to Grafana by the Prometheus server. Dashboards allow you to easily visualize the output of the data you are collecting using the Node Exporter metrics.
Once you add your Prometheus instance, you will see metrics populated and use the powerful query language to write queries from the scraped metrics from your Linux machine.
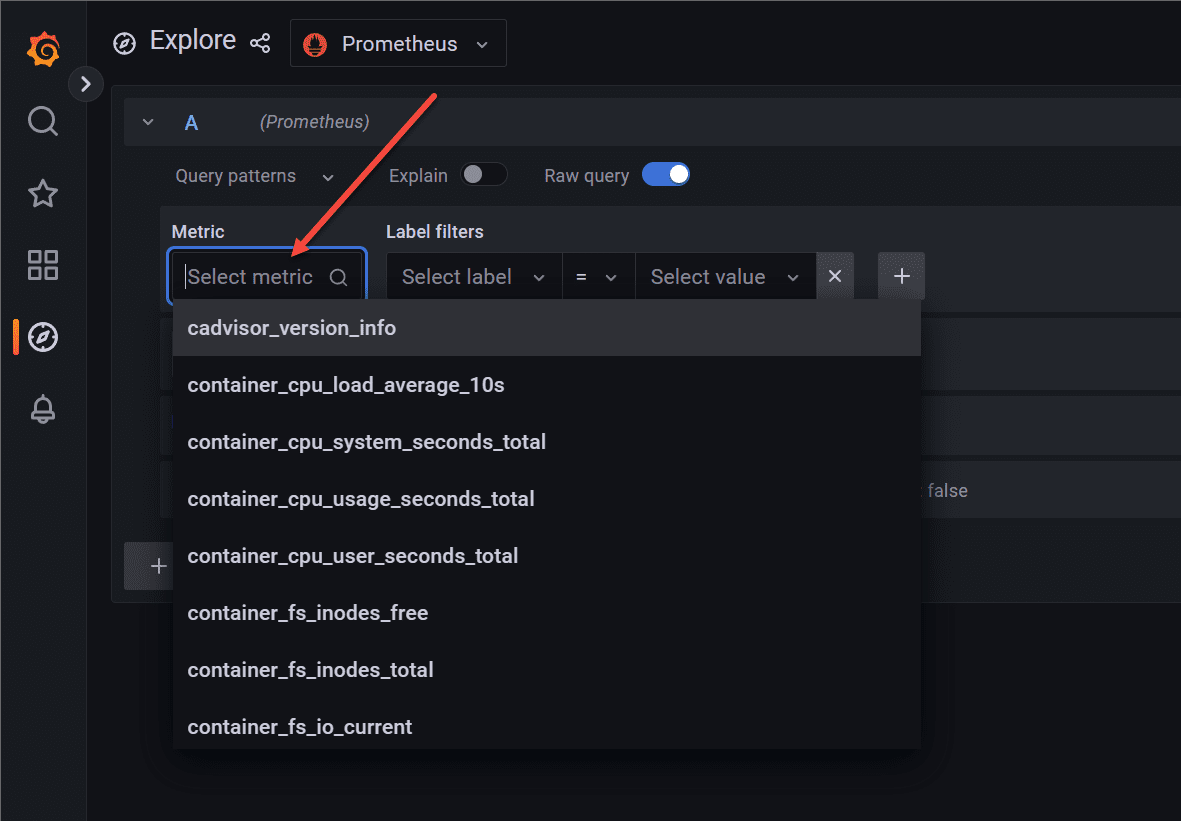
Grafana allows you to view time series data view beautiful dashboards you can easily download from Grafana.com or git clone https repo. Below is the Node Exporter Full dashboard you can download from the link I have listed below.
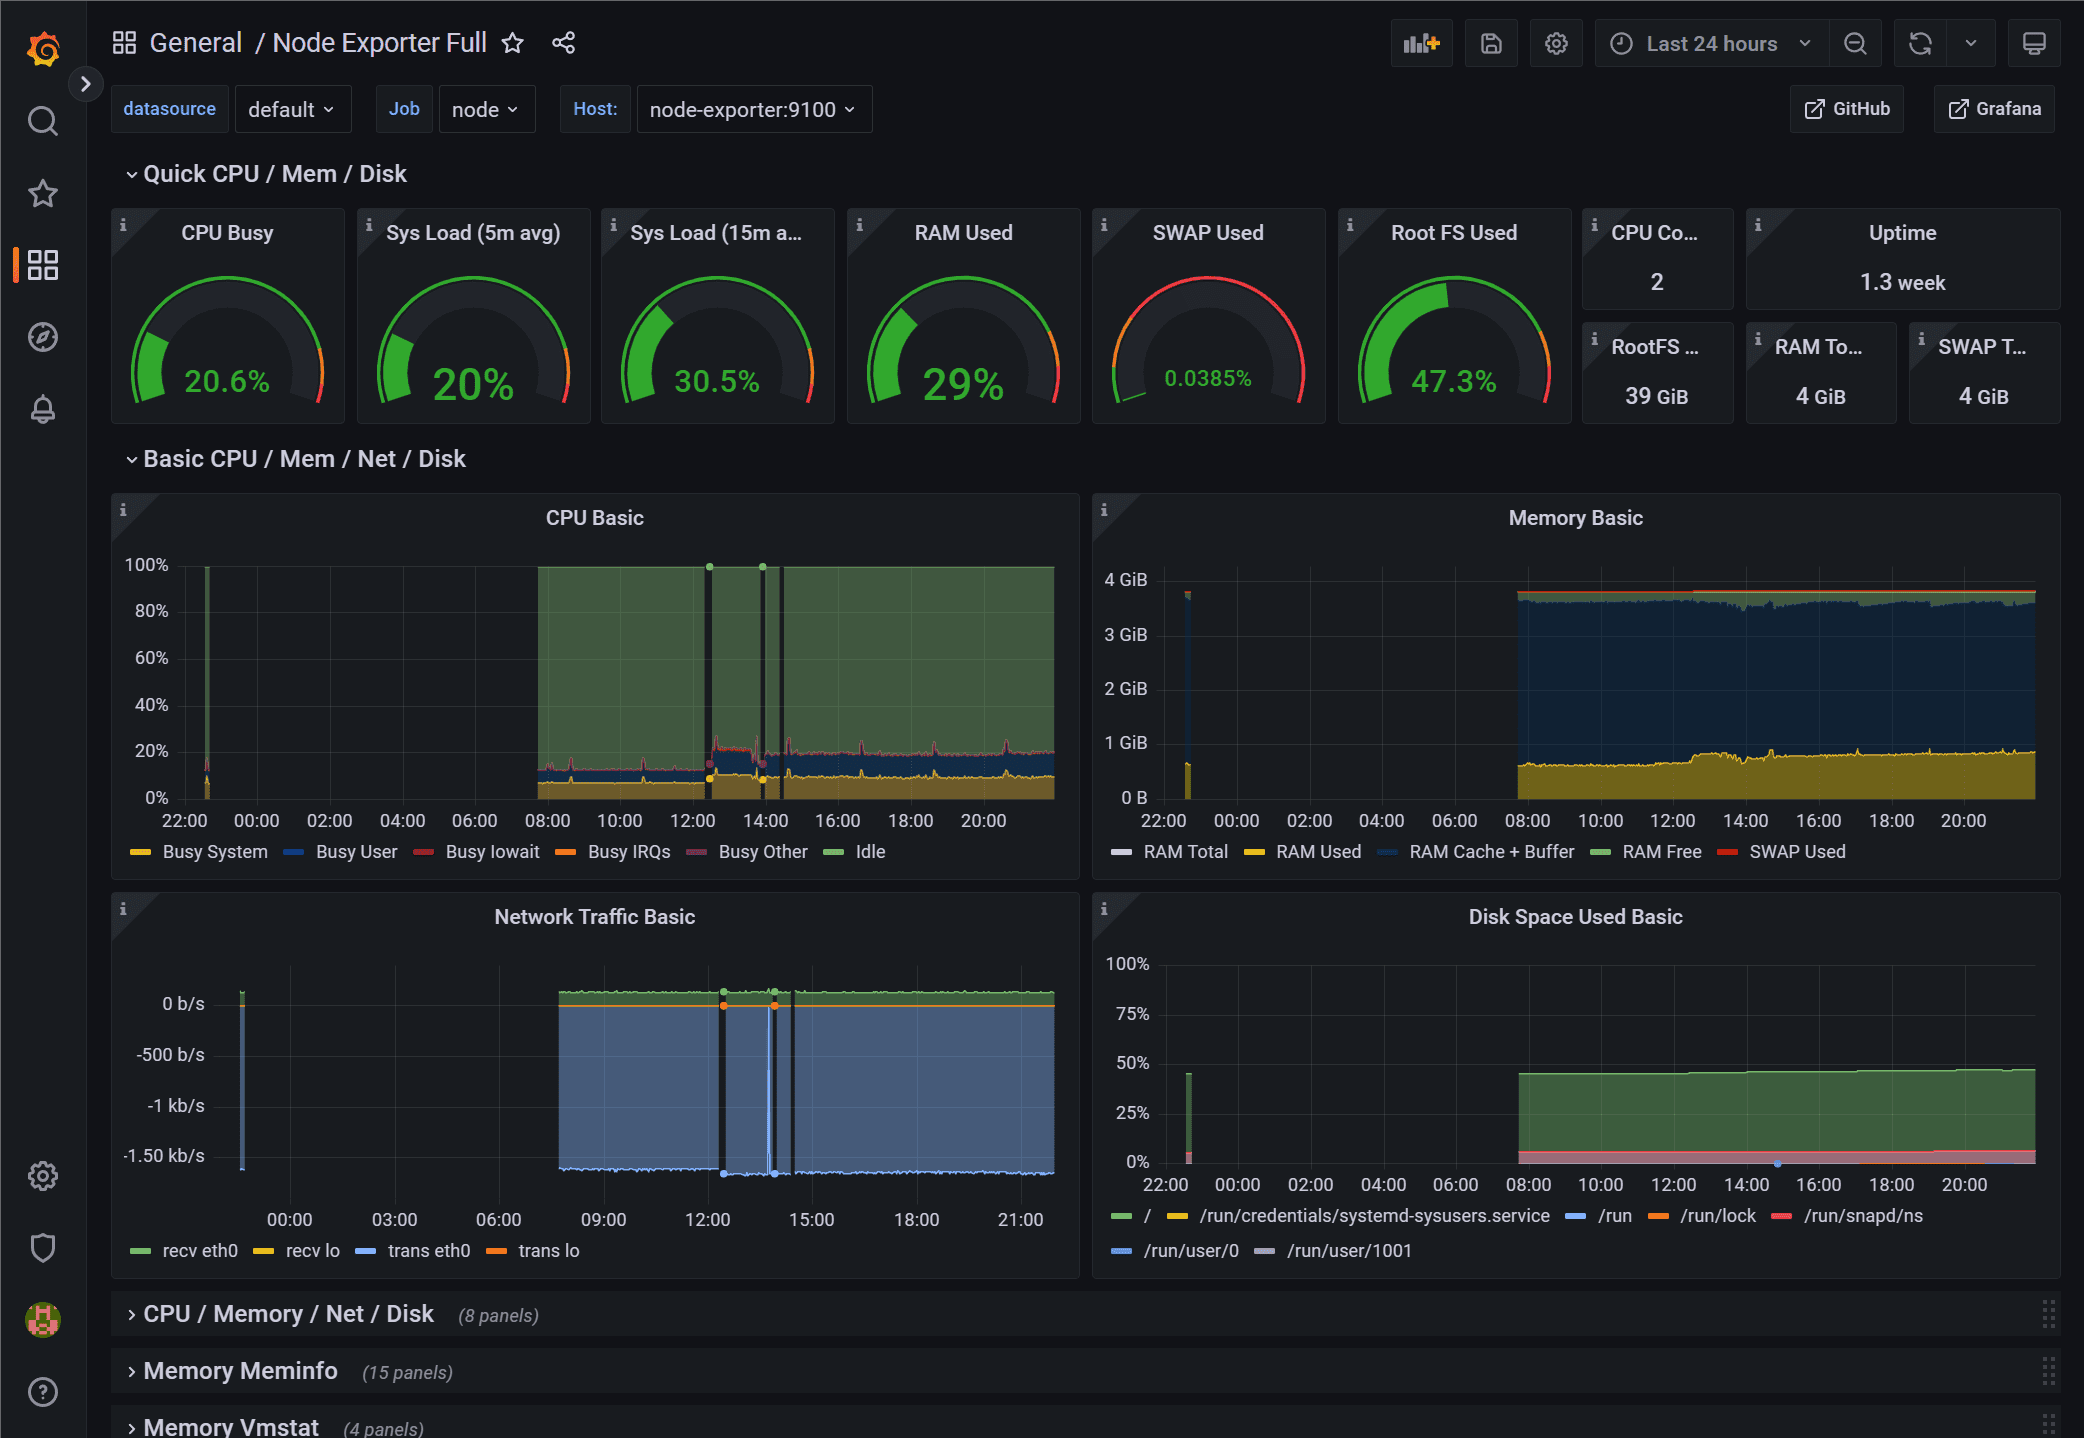
On Grafana.com, you can download IDs or JSON templates to create quick and easy dashboards, as it takes the heavy lifting out of the manual dashboard creation process. The dashboards are free to download, and generally, you can find what you are looking for using the Grafana dashboard search here:
https://grafana.com/grafana/dashboards/
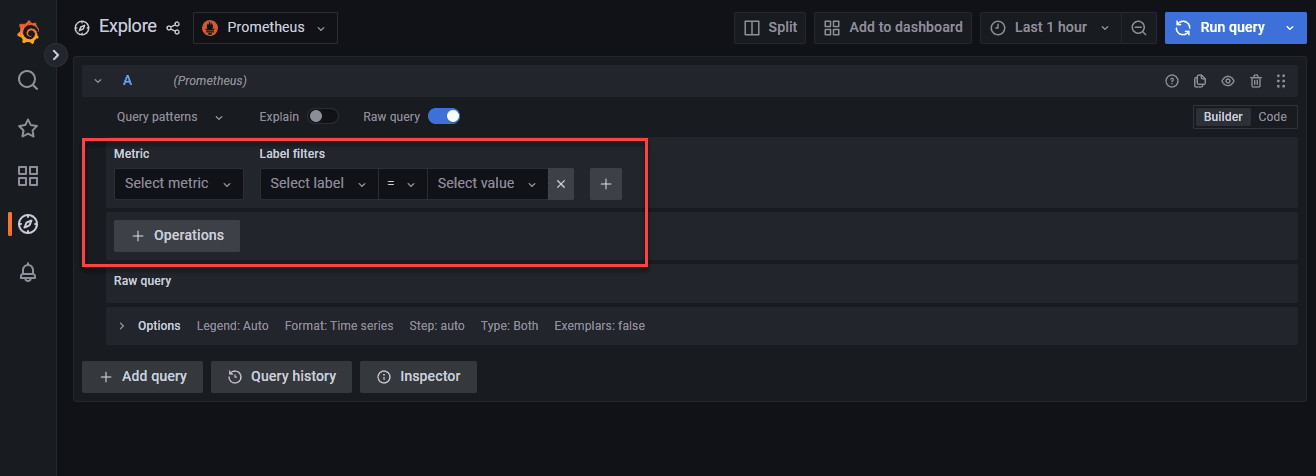
Expression Browser, Console Templates, and Grafana
Grafana has an expression browser that allows querying data.
Windows Exporter
There is also a project to add the Node Exporter functionality to Windows. It is called Windows Exporter. It is an open-source project to add similar exporter features for the Windows operating system and allow you to have this capability in Grafana to visualize Windows metrics.
GitHub – prometheus-community/windows_exporter: Prometheus exporter for Windows machines
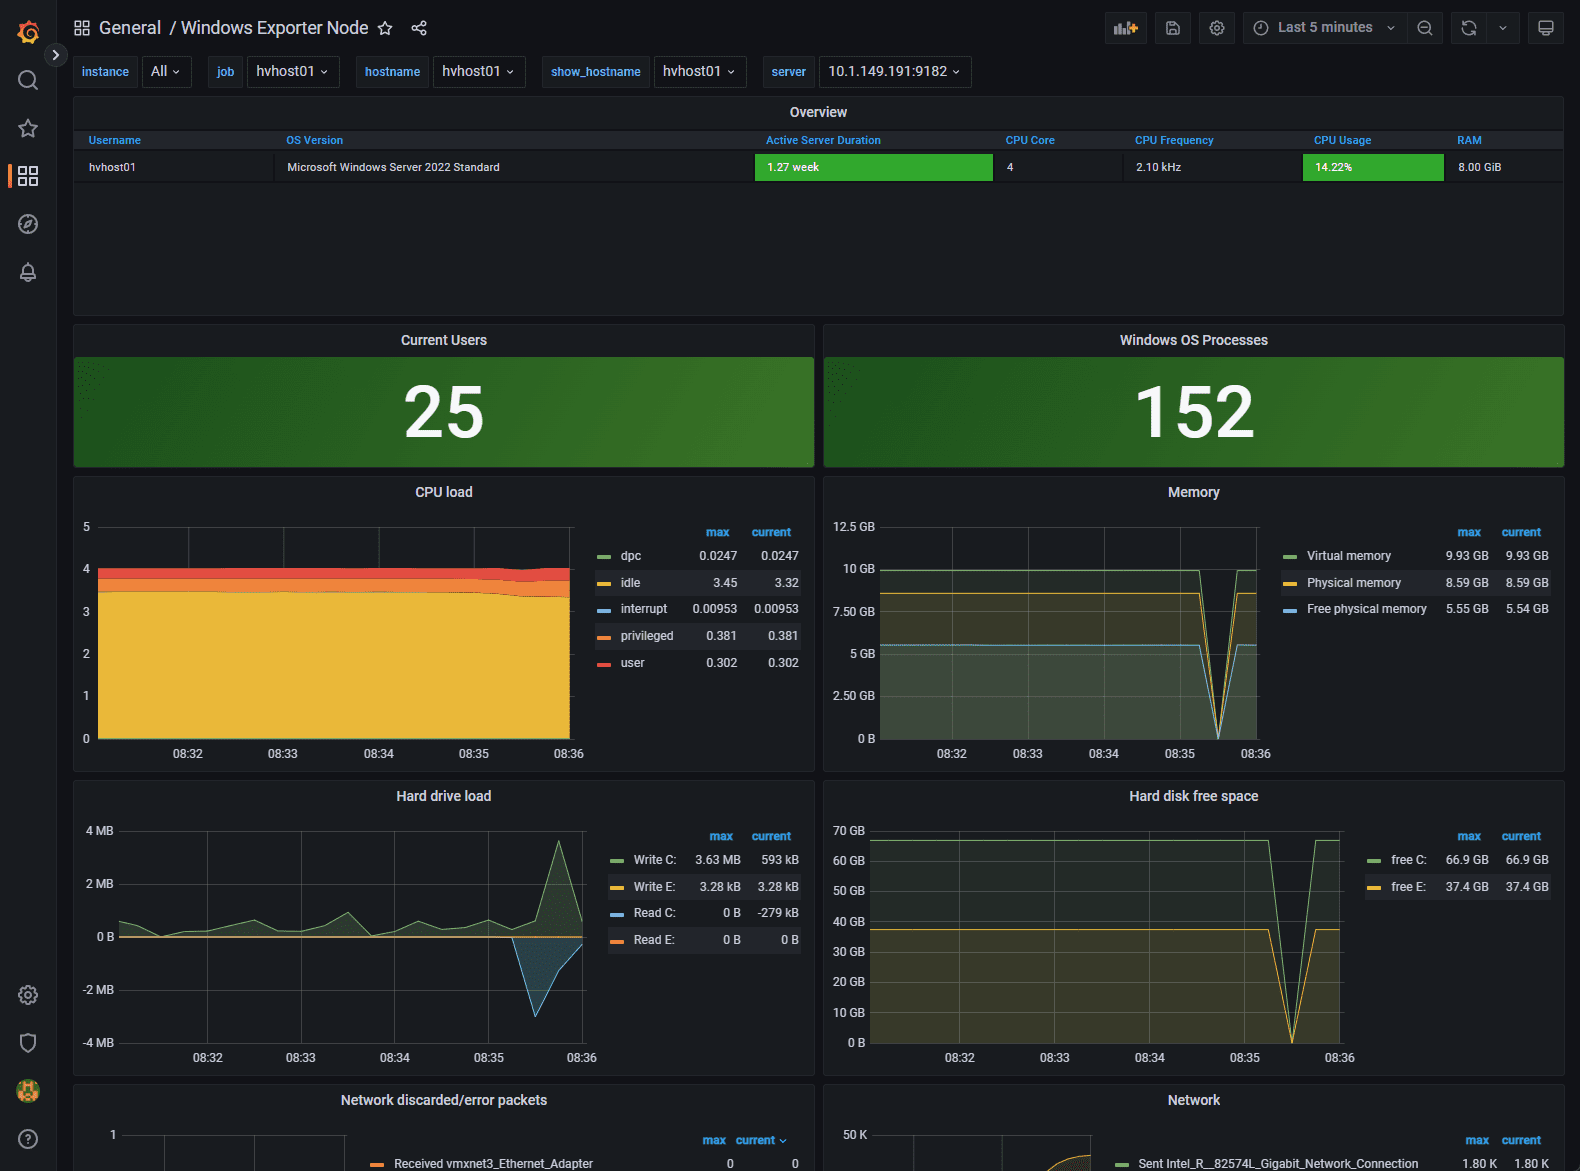
Below, we have added a Windows Server to Prometheus monitoring by installing the Windows Exporter.
Monitoring Docker
To Monitor Docker along with the general system metrics, you need to use an additional solution called cAdvisor. cAdvisor (Container Advisor) provides container resource usage and performance metrics for running containers.
It does this by collecting, aggregating, processing, and exporting information about running containers. For each container, it keeps resource parameters, resource usage (including historical), histograms, and network statistics. This data is exported by container and machine-wide.
You can Download cAdvisor here: google/cadvisor: Analyzes resource usage and performance characteristics of running containers. (github.com)
Below is the Docker compose code to spin up the cAdvisor containers needed, included Redis.
cadvisor:
    image: gcr.io/cadvisor/cadvisor:latest
    container_name: cadvisor
    ports:
      - 8081:8080
    networks:
      - monitoring
    volumes:
      - /:/rootfs:ro
      - /var/run:/var/run:rw
      - /sys:/sys:ro
      - /var/lib/docker/:/var/lib/docker:ro
    depends_on:
      - redis
  redis:
    image: redis:latest
    container_name: redis
    ports:
      - 6379:6379
    networks:
      - monitoring
Wrapping Up
Prometheus Node Exporter is a great tool to export key performance indicators for your Linux Servers, Docker containers, Kubernetes clusters, etc. You can also use the Windows Exporter tool to expose the performance and other metrics of Windows Servers to Prometheus and then have all of these visualized in Grafana.
With the expression browser, console templates, and Grafana, you can create a free and open source monitoring environment to monitor your servers.
Время на прочтение4 мин
Количество просмотров95K

Мониторинг нужен всем: и серверам крупных технологических компаний и домашним Raspberry PI. Мониторинг позволяет узнать, когда сервер выходит из строя, когда заканчивается дисковое пространство и даже когда подходит время апгрейда.
В этой статье рассмотрим настройку базового мониторинга с помощью Prometheus, Node Exporter и Grafana.
Обзор решения
-
Основной компонент — Prometheus. Prometheus получает метрики из разных сервисов и собирает их в одном месте.
-
Node exporter — небольшое приложение, собирающее метрики операционной системы и предоставляющее к ним доступ по HTTP. Prometheus собирает данные с одного или нескольких экземпляров Node Exporter.
-
Grafana — это вишенка на торте. Grafana отображает данные из Prometheus в виде графиков и диаграмм, организованных в дашборды.
Примечание — в этом руководстве используется Ubuntu, но все эти инструменты поддерживаются и другими дистрибутивами Linux и даже Windows.
Приступаем к работе
Node Exporter
Первый шаг — установка Node Exporter. Его можно найти на github по ссылке ниже. На момент написания статьи последняя версия 0.18.1.
https://github.com/prometheus/node_exporter
Node Exporter распространяется в виде одного бинарного файла, который можно запустить из любого места в системе. Так что установка довольно проста. После запуска переходим в браузере по адресу «<server_address>:9100/metrics» и смотрим собираемые метрики.
Prometheus
Второй шаг — установка Prometheus и его настройка на сбор данных с установленного ранее Node Exporter. Ссылка на github ниже. На момент написания статьи последняя версия 2.13.1.
https://github.com/prometheus/prometheus
Установка Prometheus немного сложнее, но все же достаточно проста. Как и Node Exporter, это один бинарный файл, но дополнительно требуется файл конфигурации и папка для хранения данных.
Для настройки Prometheus на сбор метрик из ранее установленного экземпляра Node Exporter необходимо изменить файл конфигурации. Добавим в раздел static_configs еще один URL:
static_configs:
    - targets: [‘localhost:9090’, ‘localhost:9100’]
Здесь мы настроили Prometheus на сбор метрик из двух сервисов: самого себя (localhost:9090) и локального экземпляра Node Exporter (localhost:9100).
После запуска Prometheus можно открыть его пользовательский интерфейс в браузере «<server_address>:9090». На странице «/targets» отображается статус систем, с которых вы получаете метрики. Если все хорошо, то в колонке статуса (State) будет “UP”.
Уже используя только Prometheus, можно делать запросы к собранным данным, и строить графики с помощью инструментов на странице «/graph». Это хороший инструмент для изучения собираемых метрик и написания сложных запросов к данным. Но мы возложим эту работу на Grafana.
Grafana
Grafana — последний компонент нашего решения. Ее задача — подключиться к Prometheus и отобразить собранные метрики на графиках и дашбордах. Grafana взаимодействует только с Prometheus, так как все собираемые метрики хранятся там.
Grafana вы также можете найти на github:
https://github.com/grafana/grafana
Однако, установка Grafana еще несколько сложнее, чем Prometheus и Node Exporter, но, к счастью, на сайте Grafana есть отличная документация. Для Ubuntu все просто: скачайте deb-пакет и установите его:
wget https://dl.grafana.com/oss/release/grafana_6.4.3_amd64.deb
dpkg -i grafana_6.4.3_amd64.deb
После завершения установки перейдите в браузере по адресу «<server_address>:3000». Пользователь и пароль по умолчанию «admin»/»admin». При первом входе пароль необходимо будет изменить.
Настройка Grafana
После установки всех компонент можно приступить к настройке Grafana.
Источник данных (datasource)
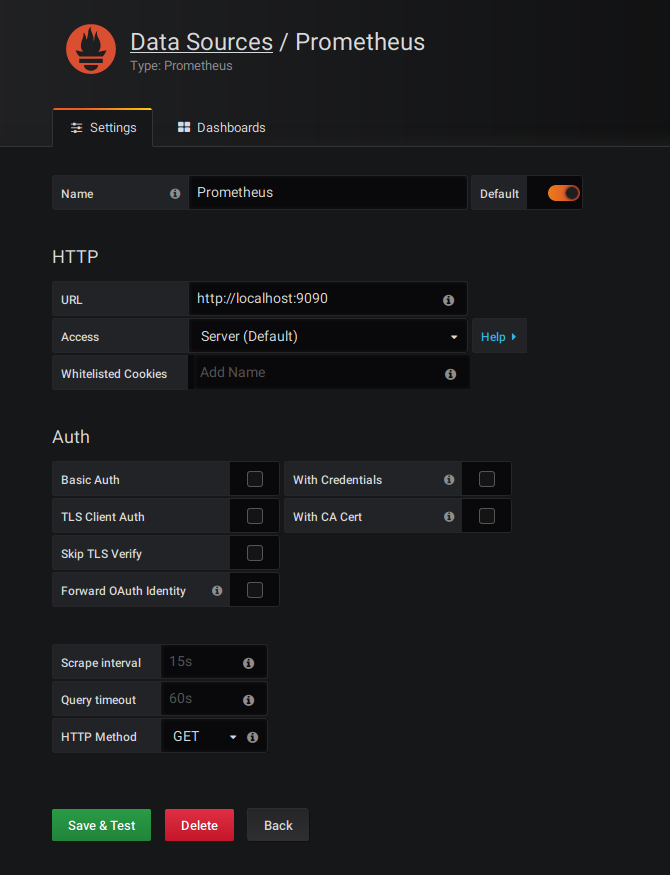
Первый шаг — настройка источника данных (datasource). По сути, это источник метрик для Grafana. Мы будем получать метрики с нашего сервера Prometheus, поэтому в качестве источника данных выбираем Prometheus и указываем URL http://localhost:9090. Остальные параметры оставляем по умолчанию.
Стоит отметить, что помимо Prometheus, Grafana может запрашивать и обрабатывать данные из множества других систем.
Дашборд (dashboard)
После настройки Datasource, мы можем создать дашборд. Дашборд — это просто набор панелей, расположенных на одной странице. Панели бывают разные: от простого текста до круговых диаграмм. Каждую панель можно настроить для отображения различных метрик.
Создание своего дашборда с нуля может быть нелегкой задачей. К счастью, Grafana предоставляет простой способ импорта дашбордов, созданных другими пользователями. После импорта дашборд можно настроить в соответствии с вашими потребностями.
Для примера я буду использовать готовый дашборд, созданный «cordobatyc» и расположенный по следующей ссылке:
https://grafana.com/grafana/dashboards/10795
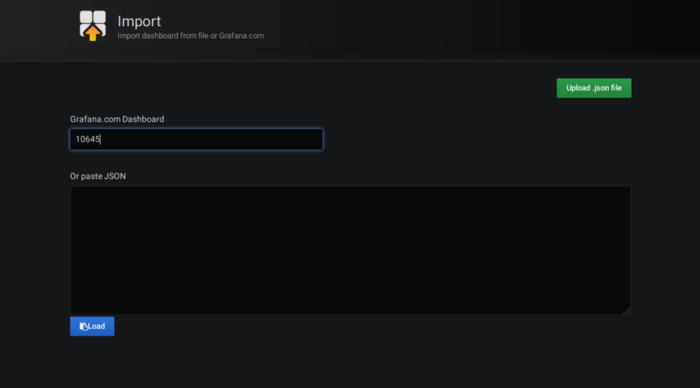
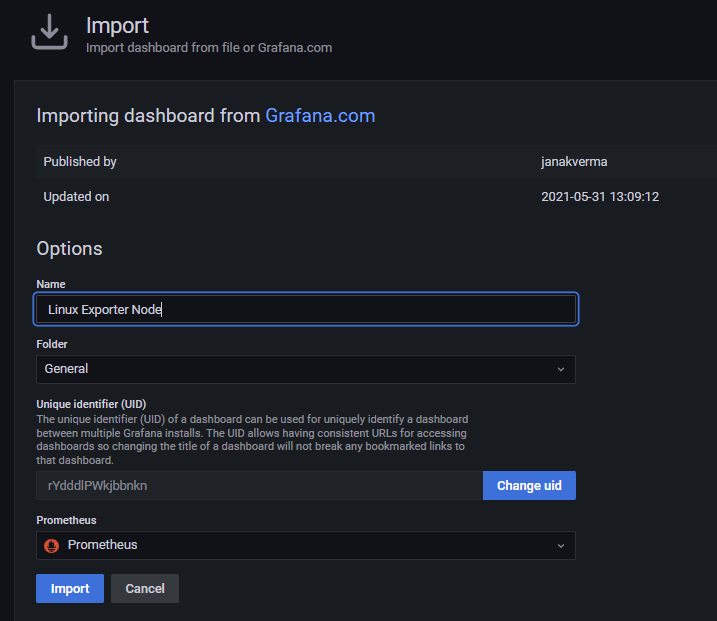
Чтобы установить дашборд, укажите его ID на странице Import.
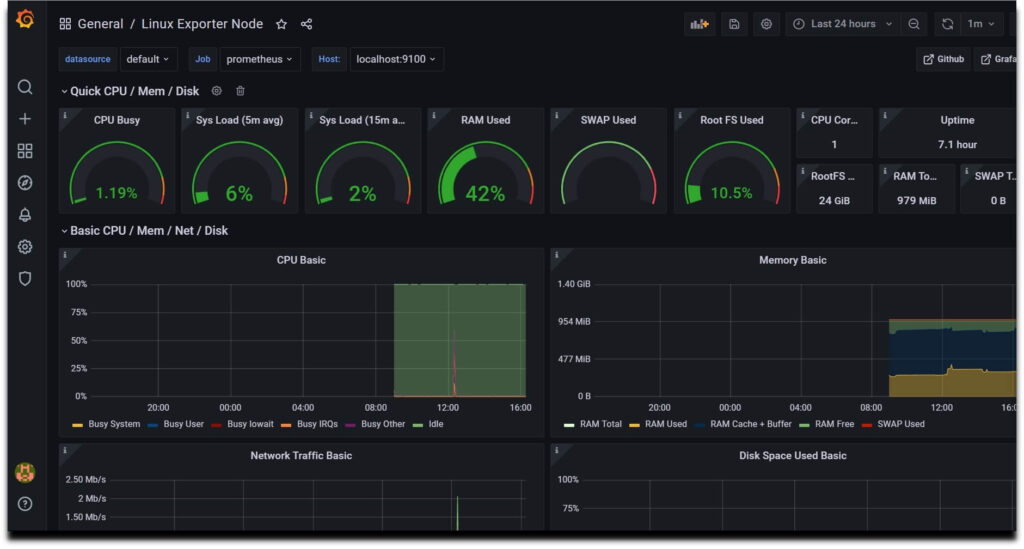
После импорта откройте установленный дашборд с помощью выпадающего списка в левом верхнем углу. При первом открытии он выглядит следующим образом.

Плагины
Хотя плагины не являются обязательными, но наш дашборд содержит панель, которая использует сторонний плагин, отсутствующий по умолчанию. Эту панель можно удалить (возможно, заменив ее чем-то другим), либо установить недостающий плагин.
Необходимый нам плагин предназначен для отображения круговых диаграмм. Его можно найти по ссылке ниже.
https://grafana.com/grafana/plugins/grafana-piechart-panel
Установка плагина описана на его странице. Откройте командную строку и выполните следующую команду:
grafana-cli plugins install grafana-piechart-panelДля завершения установки плагина перезапустите Grafana:
service grafana-server restartДалее можно обновить страницу — панель с круговой диаграммой должна отображаться правильно.
Заключение
После установки всех компонент и настройки Grafana у вас должно получиться что-то вроде этого:

Взглянув на эту страницу, вы можете получить информацию о состоянии сервера: начиная с того, как долго он работает, заканчивая загрузкой процессора и использованием памяти.
Это руководство лишь введение в мониторинг. С рассмотренными инструментами вы сможете сделать гораздо больше, включая настройку автоматических алертов при достижении метриками определенных пороговых значений. Теперь у вас есть основа для настройки и запуска базового мониторинга.
Для более глубокого изучения этой темы я рекомендую обратиться к документации Prometheus и Grafana.
Ресурсы
-
Node Exporter Github
-
Prometheus Github
-
Grafana Github
-
Grafana Homepage
-
Grafana dashboard
-
Grafana Pie-Chart plugin
Всех желающих приглашаем на открытый урок «Системы логирования (ELK, EFK, Graylog2)» в OTUS, который состоится 21 февраля. На уроке сравним различные системы логирования, присутствующих на рынке: ELK, EFK — fluentd, Graylog2.
In this article we are going to cover Install Prometheus and Grafana on Ubuntu 20.04 LTS with Node Exporter and WMI Exporter | Windows and Linux Server Monitoring using Prometheus and Grafana
Table of Contents
What is prometheus?
- Prometheus is a open source Linux Server Monitoring tool mainly used for metrics monitoring, event monitoring, alert management, etc.
- Prometheus has changed the way of monitoring systems and that is why it has become the Top-Level project of Cloud Native Computing Foundation (CNCF).
- Prometheus uses a powerful query language i.e. “PromQL”.
- In Prometheus tabs are on and handles hundreds of services and micro services.
- Prometheus use multiple modes used for graphing and dashboarding support.
Why we used prometheus?
- A multi-dimensional data model with time series data identified by metric name and key/value pairs
- PromQL, a flexible query language to leverage this dimensionality
- Pushing time series is supported via an intermediary gateway
- Multiple modes of graphing and dashboarding support
Prometheus Architecture
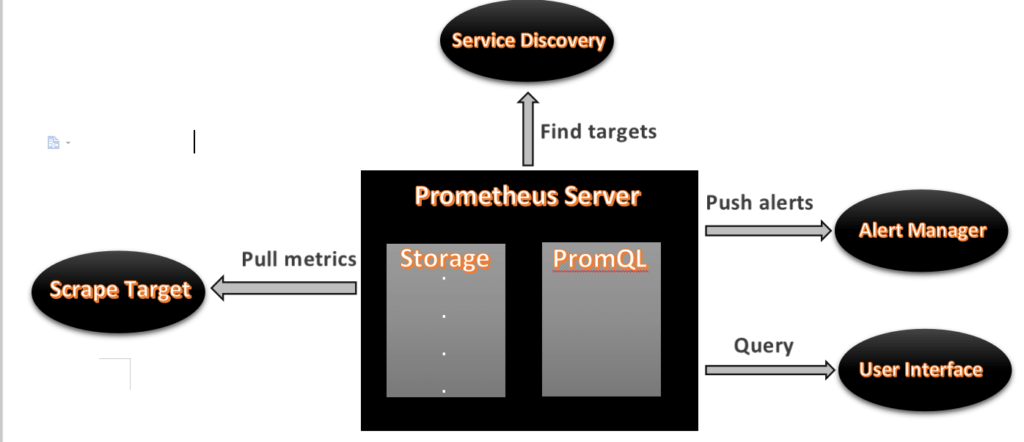
- As above we can see an architecture of Prometheus monitoring tool.
- We made a basic design to understand it easily for you people.
Now lets understand the Prometheus components one-by-one
Prometheus Components
- Prometheus server is a first component of Prometheus architecture.
- Prometheus server is a core of Prometheus architecture which is divided into several parts like Storage, PromQL, HTTP server, etc.
- In Prometheus server data is scraped from the target nodes and then stored in the database.
1.a. Storage
- Storage in Prometheus server has a local on disk storage.
- Prometheus has many interfaces that allow integrating with remote storage systems.
1.b. PromQL
- Prometheus uses its own query language i.e. PromQL which is a very powerful querying language.
- PromQL allows the user to select and aggregate the data.
2. Service Discovery
- Next and very important component of Prometheus Server is the Service Discovery.
- With the help of Service discovery the services are identified which need to be scraped.
- To Pull metrics, identification of services and finding the targets are compulsory needed.
- Through Service discovery we monitor the entities and can also locate its targets.
3. Scrape Target
- Once the services are identified and the targets are ready then we can pull metrics from it and can scrape the target.
- We can export the data of the end point using node exporters.
- Once the metrics or other data is pulled, Prometheus stores it in a local storage.
4. Alert Manager
- Alert Manager handles the alerts which may occurs during the session.
- Alert manager handles all the alerts which are sent by the Prometheus server.
- Alert manager is one of the very useful components of the Prometheus tool.
- If in case any big error or any issue occurs, alert manager manage those alerts and contact with human via E-mail, Text Messages, On-call, or any other chat application service.
5. User Interface
- User interface is also an important component as it builds a bridge between the user and the system.
- In Prometheus, user interfaces are note that much user friendly and can be used till graph queries.
- For good exclusive dashboards Prometheus works together with Grafana (visualization tool).
- Using Grafana over Prometheus to visualize properly we can use custom dashboards.
- Grafana dashboards display via pie charts, line charts, tables, good data graphs of CPU usage, RAM utilization, network load, etc with indicators.
- Grafana supports and run with Prometheus by querying language i.e. PromQL.
- To fetch data from Prometheus and to display the results on Grafana dashboards PromQL is used.
What is Grafana ?
- Grafana is a free and open source visualization tool mostly used with Prometheus to which monitor metrics.
- Grafana provides various dashboards, charts, graphs, alerts for the particular data source.
- Grafana allows us to query, visualize, explore metrics and set alerts for the data source which can be a system, server, nodes, cluster, etc.
- We can also create our own dynamic dashboard for visualization and monitoring.
- We can save the dashboard and can even share with our team members which is one of the main advantage of Grafana.
What is Node Exporter ?
- Node exporter is one of the Prometheus exporters which is used to expose servers or system OS metrics.
- With the help of Node exporter we can expose various resources of the system like RAM, CPU utilization, Memory Utilization, disk space.
- Node exporter runs as a system service which gathers the metrics of your system and that gathered metrics is displayed with the help of Grafana visualization tool.
What is WMI Exporter?
- It is same like Node Exporter but Node Exporter for Linux and WMI Exporter for Windows
- WMI Exporter is an exporter utilized for windows servers to collects metrics like CPU usage, memory, and Disk usage.
- It is open-source which can be installed on Windows servers using the .msi installer
Prerequisite:
Good internet connectivity
Security Groups Configured properly
Any web Browser
Security Groups Configured on EC2 Instances:
Port 9090 — Prometheus Server
Port 9100 — Prometheus Node Exporter
Port 9182—-WMI Exporter
Port 3000 — Grafana
We will update the system repository index by using the following command.
sudo apt update -yswitch to root user
sudo su -
#1. Creating Prometheus System Users and Directory
We will have to create a Prometheus user named Prometheus and a Prometheus directory named as Prometheus.
Using below commands we can create a user and directory.
sudo useradd --no-create-home --shell /bin/false prometheus
sudo useradd --no-create-home --shell /bin/false node_exporter
sudo mkdir /etc/prometheus
sudo mkdir /var/lib/prometheus
#2. Update Prometheus user
As user groups and directories are created successfully which store the Prometheus data and files.
Now we will have to update the group and user ownership on the newly created directories.
By using the below command we update the ownership.
sudo chown prometheus:prometheus /var/lib/prometheus
#3. Download Prometheus Binary File on Ubuntu
Now we will download the latest version of Prometheus. We can copy the download link as per our Operating System from Prometheus download page
Using the below command we can download Prometheus, here we are downloading Prometheus 2.31.1 version, you use the above link to download specific version.
Navigate to /tmp directory
cd /tmp/
Download the Prometheus setup using wget
wget https://github.com/prometheus/prometheus/releases/download/v2.31.1/prometheus-2.31.1.linux-amd64.tar.gz
Now we have successfully downloaded the Prometheus file and now we will extract that file.
#4. Install Prometheus and Grafana on Ubuntu 20.04 LTS
Extract the files using tar command :
tar -xvf prometheus-2.31.1.linux-amd64.tar.gz
#5. Move the configuration file and set the owner to the prometheus user:
cd prometheus-2.31.1.linux-amd64
sudo mv console* /etc/prometheus
sudo mv prometheus.yml /etc/prometheus
sudo chown -R prometheus:prometheus /etc/prometheus
#6. Update Prometheus user ownership on Binaries
Now we will update the user and group ownership on the binaries of Prometheus.
Using following commands we will update the user and group ownership.
sudo mv prometheus /usr/local/bin/
sudo chown prometheus:prometheus /usr/local/bin/prometheus
#7. Check Prometheus Version
Now the Prometheus is successfully installed on our system. We will check the version of Prometheus and to configure it.
Follow the commands to verify prometheus version.
prometheus --version

#8. Prometheus configuration file
We have already copied /tmp/prometheus-2.31.1.linux-amd64/prometheus.yml file /etc/prometheus directory, verify if it present and should look like below and modify it as per your requirement.
sudo nano /etc/prometheus/prometheus.yml
# my global config
global:
  scrape_interval: 15s # Set the scrape interval to every 15 seconds. Default is every 1 minute.
  evaluation_interval: 15s # Evaluate rules every 15 seconds. The default is every 1 minute.
  # scrape_timeout is set to the global default (10s).

# Alertmanager configuration
alerting:
  alertmanagers:
    - static_configs:
        - targets:
          # - alertmanager:9093

# Load rules once and periodically evaluate them according to the global 'evaluation_interval'.
rule_files:
  # - "first_rules.yml"
  # - "second_rules.yml"

# A scrape configuration containing exactly one endpoint to scrape:
# Here it's Prometheus itself.
scrape_configs:
  # The job name is added as a label `job=<job_name>` to any timeseries scraped from this config.
  - job_name: "prometheus"

    # metrics_path defaults to '/metrics'
    # scheme defaults to 'http'.

    static_configs:
      - targets: ["localhost:9090"]
#9. Creating Prometheus Systemd file
Now we will create a system service file in /etc/systemd/system location.
sudo nano /etc/systemd/system/prometheus.service
After creating file successfully, copy the below files and it to the newly created file. /etc/systemd/system/prometheus.service
[Unit]
Description=Prometheus
Wants=network-online.target
After=network-online.target

[Service]
User=prometheus
Group=prometheus
Type=simple
ExecStart=/usr/local/bin/prometheus \
    --config.file /etc/prometheus/prometheus.yml \
    --storage.tsdb.path /var/lib/prometheus/ \
    --web.console.templates=/etc/prometheus/consoles \
    --web.console.libraries=/etc/prometheus/console_libraries

[Install]
WantedBy=multi-user.target
After adding the program save the file with Ctrl+O and exit with Ctrl+X.
To use the newly created service we will have to reload the daemon services, Use the below command to reload daemon services.
sudo systemctl daemon-reload
start and enable prometheus service using below commands
sudo systemctl start prometheus
sudo systemctl enable prometheus
We will check the Prometheus status weather it is running or not
sudo systemctl status prometheus
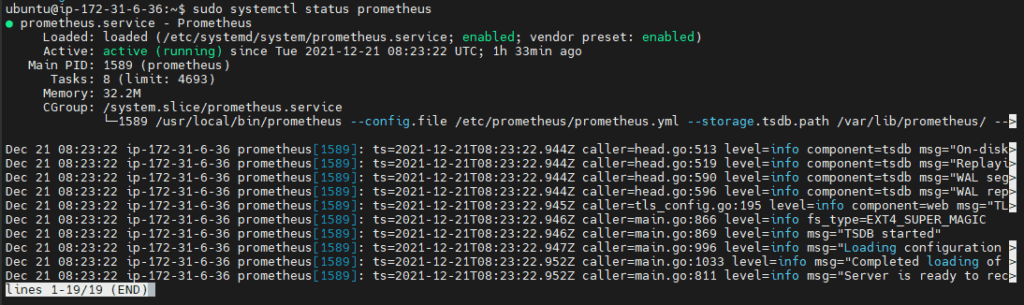
Prometheus installation and configuration is set up, We can see status Active: active(running)
#10. Accessing Prometheus on Browser
Now as Prometheus installation and configuration is set up and it is ready to use we can access its services via web interface.Also check weather port 9090 is UP in firewall.
Use below command to enable prometheus service in firewall
sudo ufw allow 9090/tcp
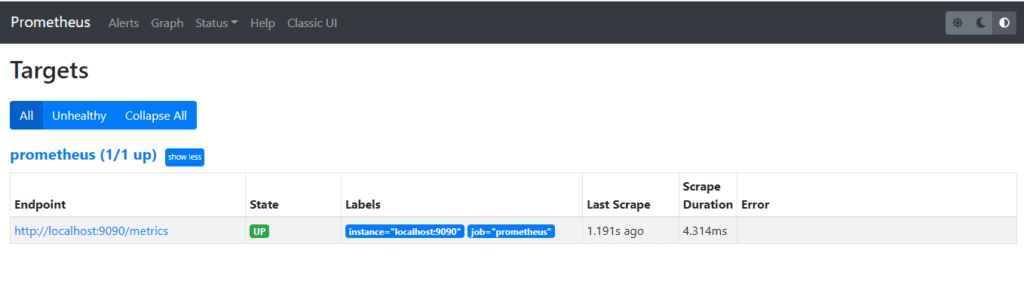
Now Prometheus service is ready to run and we can access it from any web browser.
http://server-IP-or-Hostname:9090.
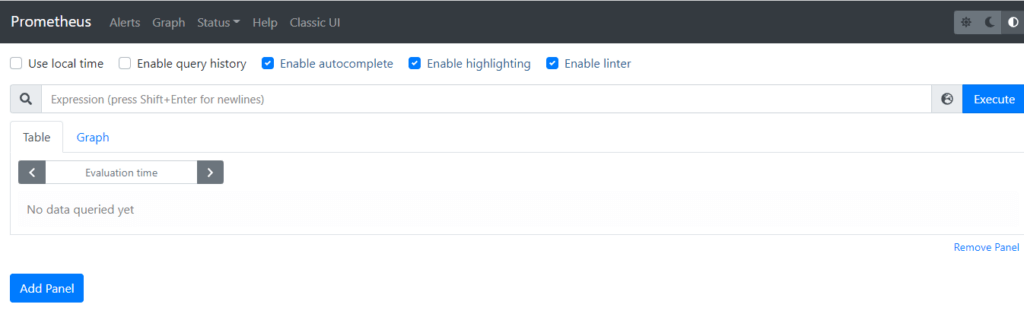
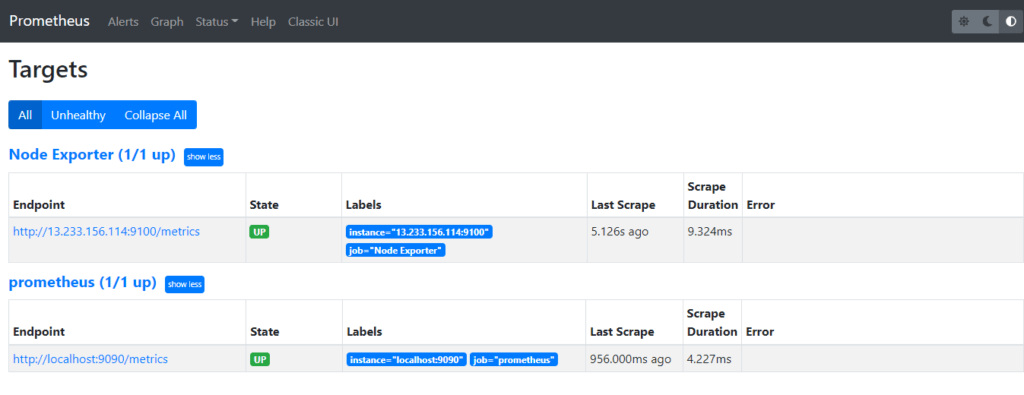
As we can see the Prometheus dashboards, we can also check the target.As we can observe Current state is UP and we can also see the last scrape.
#11. Install Grafana on Ubuntu
Download the Grafana GPG key with wget, then pipe the output to apt-key. This will add the key to your APT installation’s list of trusted keys, which will allow you to download and verify the GPG-signed Grafana package:
wget -q -O - https://packages.grafana.com/gpg.key | sudo apt-key add -
In this command, the option -q turns off the status update message for wget, and -O outputs the file that you downloaded to the terminal. These two options ensure that only the contents of the downloaded file are pipelined to apt-key.
Next, add the Grafana repository to your APT sources:
sudo add-apt-repository "deb https://packages.grafana.com/oss/deb stable main"
Refresh your APT cache to update your package lists:
sudo apt update
You can now proceed with the installation:
sudo apt install grafana
Once Grafana is installed, use systemctl to start the Grafana server:
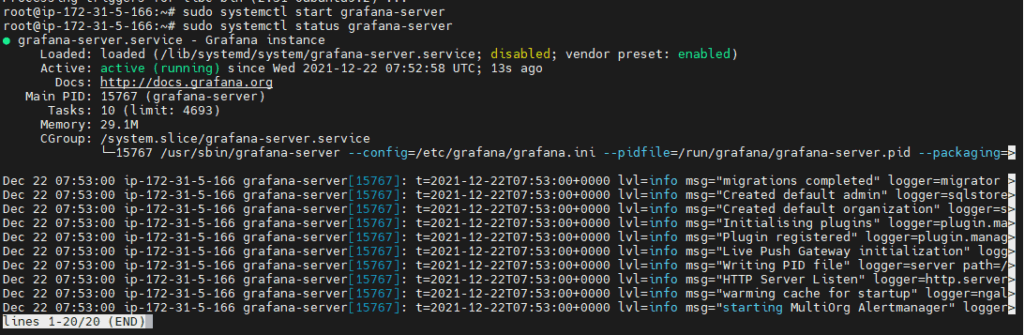
sudo systemctl start grafana-server
Next, verify that Grafana is running by checking the service’s status:
sudo systemctl status grafana-server
You will receive output similar to this:
Now finally enable the Grafana service which will automatically start the Grafana on boot
sudo systemctl enable grafana-server.service
To access Grafana Dashboard open your favorite browser, type server IP or Name followed by grafana default port 3000.
http://your_ip:3000
Here you can see Login page of Grafana now you will have to login with below Grafana default UserName and Password.
Username – admin
Password – admin
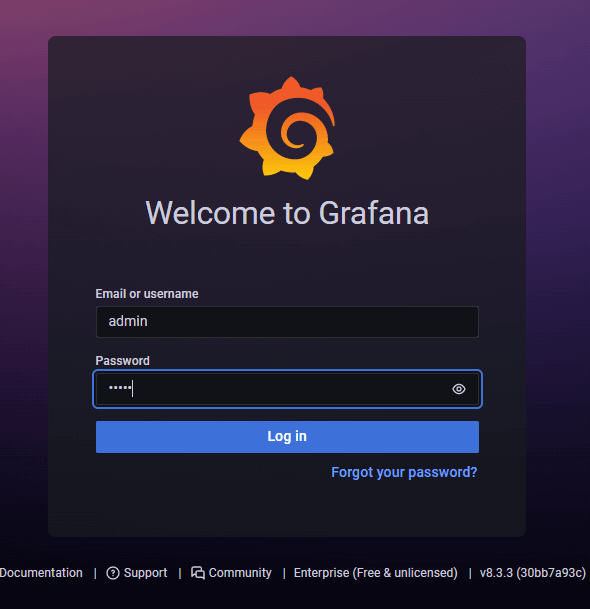
It is always a good practice to change your login credentials.

Provide your New Password and click on Change Password
Now here you can see Home Dashboard page of Grafana

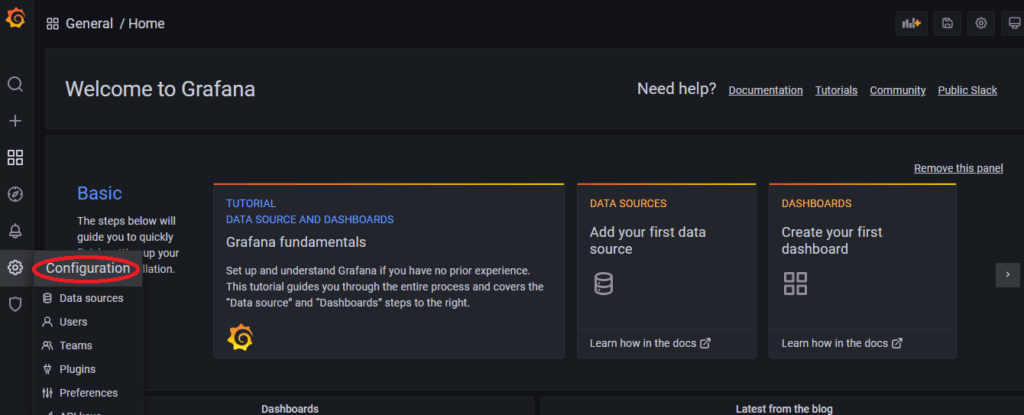
#12. Configure Prometheus as Grafana Data Source
Once you logged into Grafana Now first Navigate to Settings Icon ->> Configuration ->> data sources
Now lets click on Add Data sources and select Prometheus
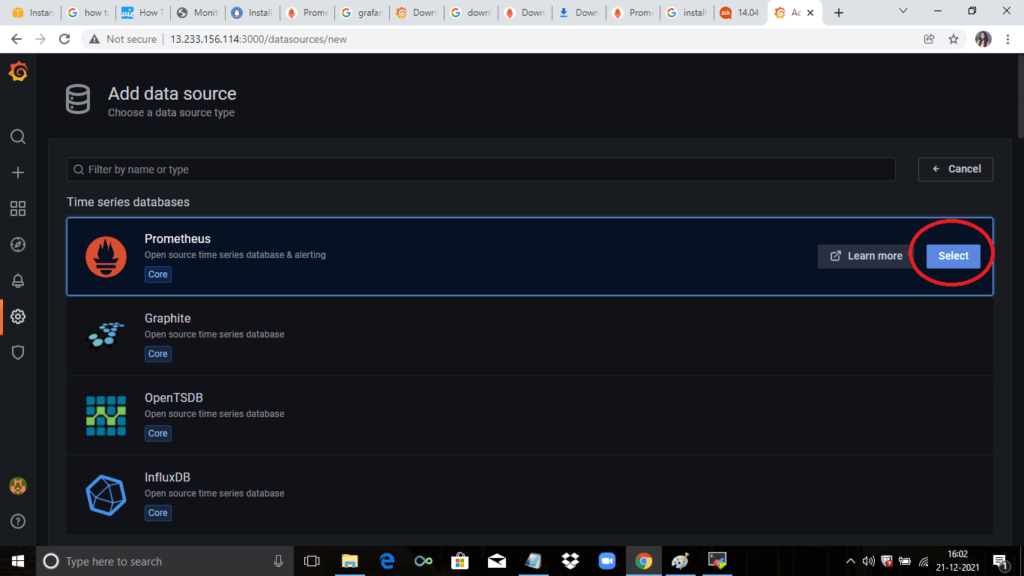
Now configure Prometheus data source by providing Prometheus URL
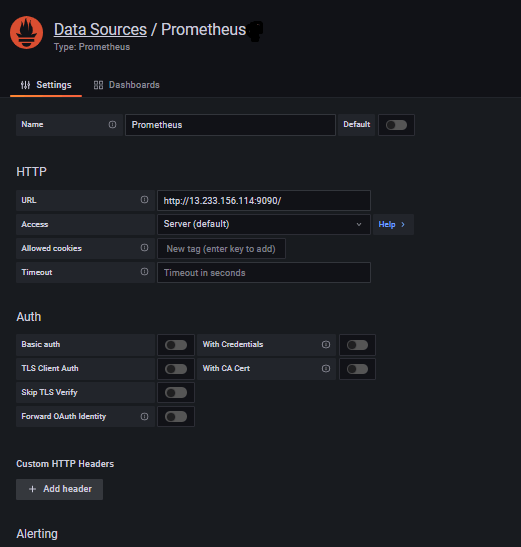
As per your requirement you can do other changes or you can also keep remaining configuration as default.
Now click on Save & test so it will prompt a message Data Source is working.

#13. Install Node Exporter on Ubuntu 20.04 LTS
Node Exporter collects the metrics of your system such as Memory usage, CPU usage, RAM, disk space, etc.
To install Node Exporter first navigate to Prometheus official download page, Scroll down and you will get node_exporter section and then select Linux OS for amd64.
Now right click on node exporter and copy link address

Now lets run the copied URL with wget command
cd /tmp
wget https://github.com/prometheus/node_exporter/releases/download/v0.18.1/node_exporter-0.18.1.linux-amd64.tar.g
Unzip the downloaded the file using below command
tar xvfz node_exporter-*.*-amd64.tar.gz
Move the binary file of node exporter to /usr/local/bin location.
sudo mv node_exporter-*.*-amd64/node_exporter /usr/local/bin/
Create a node_exporter user to run the node exporter service.
sudo useradd -rs /bin/false node_exporter
#14. Create a node_exporter service file in the /etc/systemd/system directory
sudo nano /etc/systemd/system/node_exporter.service
Paste the below content in your service file
[Unit]
Description=Node Exporter
After=network.target
[Service]
User=node_exporter
Group=node_exporter
Type=simple
ExecStart=/usr/local/bin/node_exporter
[Install]
WantedBy=multi-user.target
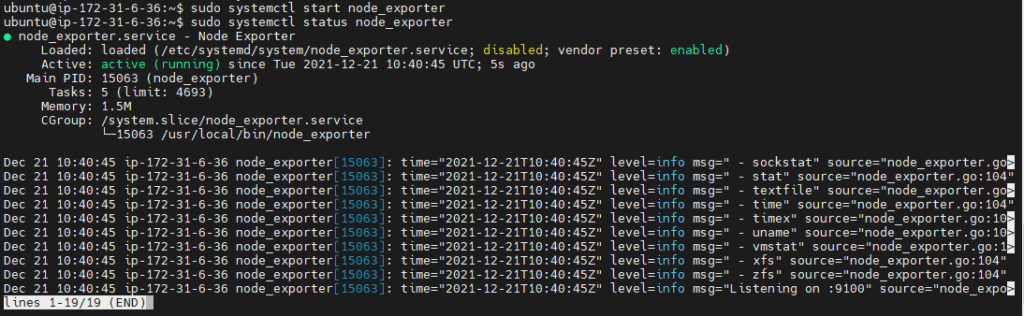
Now lets start and enable the node_exporter service using below commands
sudo systemctl daemon-reload
sudo systemctl enable node_exporter
sudo systemctl start node_exporter
sudo systemctl status node_exporter
We have covered How to Install Prometheus and Grafana on Ubuntu 20.04 LTS with Node Exporter.
#15. Configure the Node Exporter as a Prometheus target
Now to scrape the node_exporter lets instruct the Prometheus by making a minor change in prometheus.yml file
sudo nano /etc/prometheus/prometheus.yml
-job_name: 'Node_Exporter'

    scrape_interval: 5s

    static_configs:

      - targets: ['<Server_IP_of_Node_Exporter_Machine>:9100']
After changing in config file you need to restart to prometheus
Now restart the Prometheus Service
sudo systemctl restart prometheus
Hit the URL in your web browser to check weather our target is successfully scraped by Prometheus or not
https://localhost:9100/targets
#16. Creating Grafana Dashboard to Monitor Linux Server
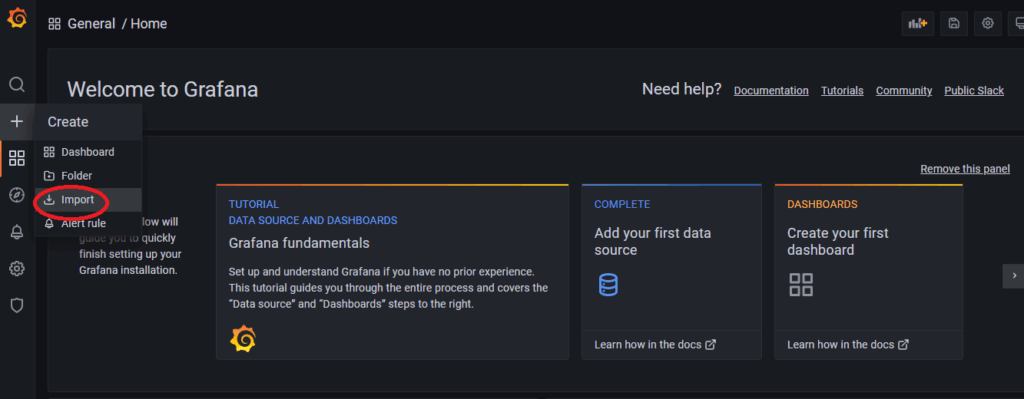
Now lets build a dashboard in Grafana so then it will able to reflect the metrics of the Linux system.So we will use 14513 to import Grafana.com, Lets come to Grafana Home page and you can see a “+” icon. Click on that and select “Import”

Now provide the Grafana.com Dashboard ID which is 14513 and click on Load
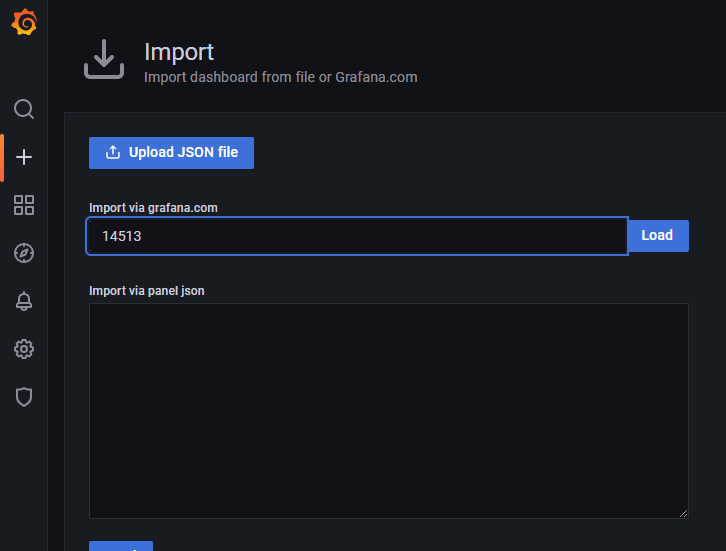
Now provide the name and select the Prometheus Datasource and click on Import.
There you are done with the setup. Now your Dashboard is running up!.
#17. Install WMI Exporter on Windows
For Windows hosts, you are going to use the Windows exporter.
You can download the latest version of windows installer from here

When the download is done, simply click on the MSI file and start running the installer.
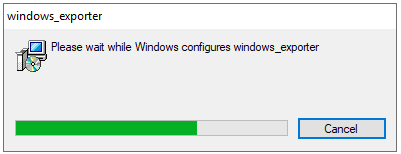
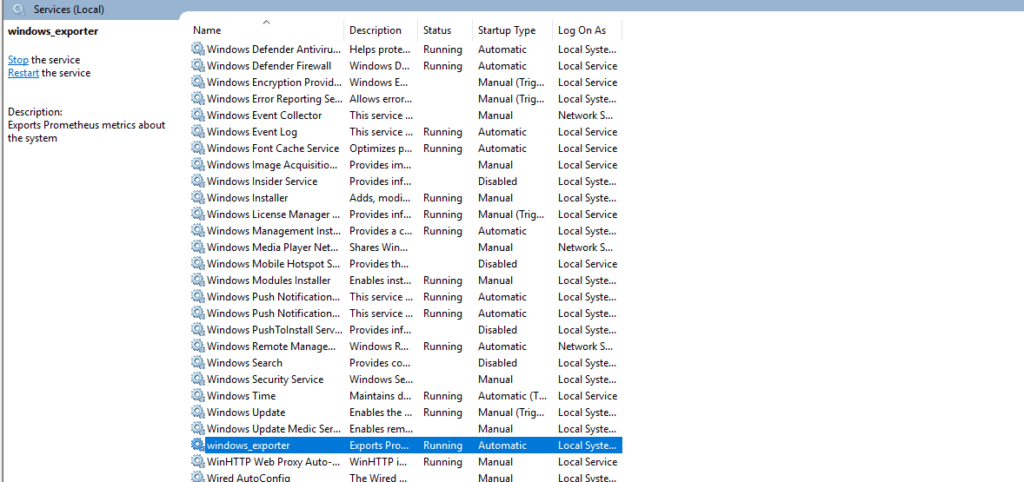
After Installation of WMI Exporter lets check its sucessfully installed or not
So go to services and search windows exporter.
Make sure windows exporter service is running.
Now that your exporter is running, it should start exposing metrics on
http://localhost:9182/metrics
So let’s check
#18. Configure the WMI Exporter as a Prometheus Target
Now run the below command to update config file
sudo nano /etc/prometheus/prometheus.yml
Update config file with below code:
 - job_name: "WMI Exporter"

    # metrics_path defaults to '/metrics'
    # scheme defaults to 'http'.

    static_configs:
      - targets: ["Host_ip:9182"]
Now save the file nd exit
After changing in config file you need to restart prometheus server with below commands:
sudo systemctl restart prometheus
sudo systemctl status prometheus
Hit the URL in your web browser to check weather our target is successfully scraped by Prometheus or not
https://localhost:9182/targets

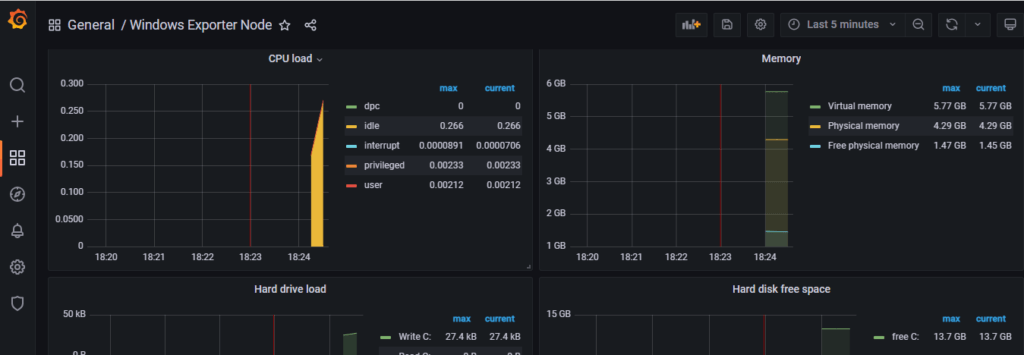
#19. Creating Grafana Dashboard to monitor Windows server
Now lets build a dashboard in Grafana so then it will able to reflect the metrics of the Windows system.
So we will use 14510 to import Grafana.com, Lets come to Grafana Home page and you can see a “+” icon. Click on that and select “Import”
On the next window, simply enter the dashboard ID in the corresponding field
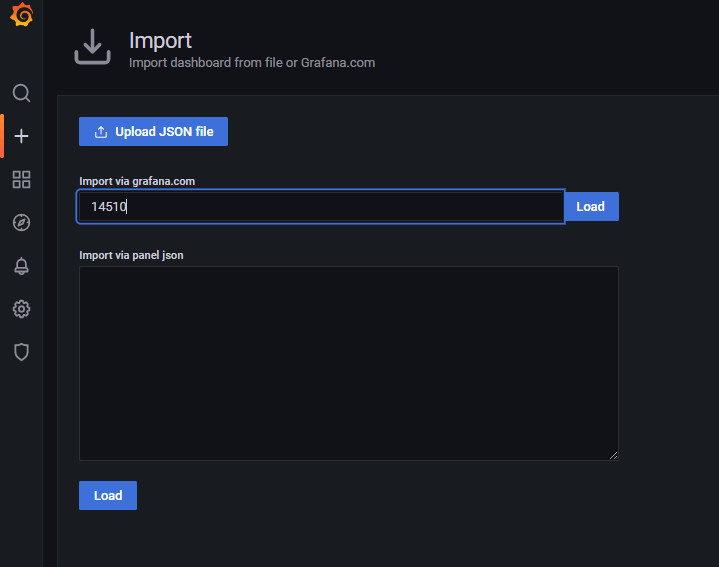
Now provide the name and select the Prometheus Datasource and click on Import.
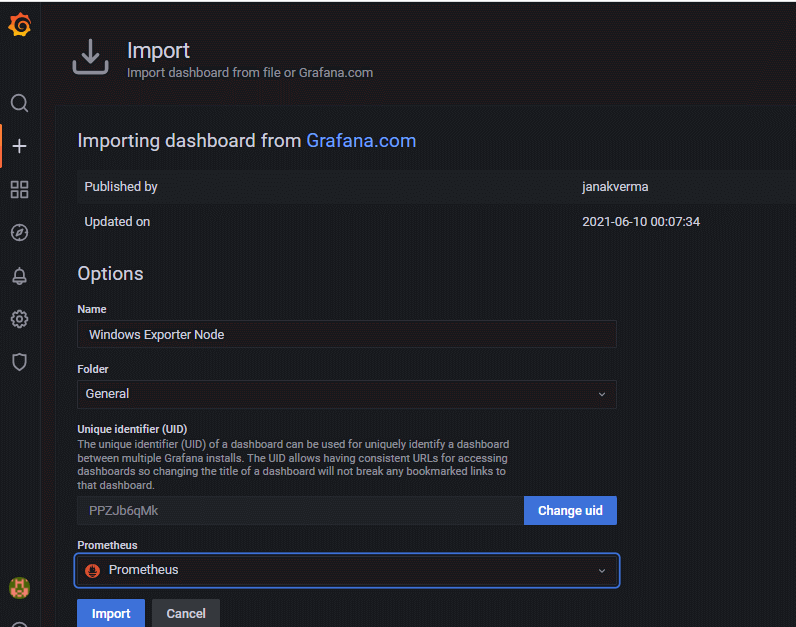
There you are done with the setup. Now your Dashboard is running up!
Conclusion:
In this article we have covered Install Prometheus and Grafana on Ubuntu 20.04 LTS with Node Exporter and WMI Exporter | Windows and Linux Server Monitoring using Prometheus and Grafana.
Related Articles:
Kubernetes cluster Monitoring with Prometheus and Grafana
Reference:
Prometheus official site
Grafana official site