
Single GPU Passthrough (for Nvidia GPUs)
Passing through your main GPU from your Linux host into a Windows 10 VM
Contents:
- Introduction
- Goals
- Key Notes
- Credits
- Hardware and Software
- Preparation
- Hooks & Device Passthrough
- VM WITHOUT GPU Passthrough
- GPU Passthrough Settings & Setup
- Starting VM with GPU Passthrough
- Tips and Tricks
Introduction
This tutorial walks you through the process of passing through your main GPU from your Linux host into a Windows 10 VM, and back to your Linux host automatically when you shut down the Windows VM. It will also have some tips and tricks on how to get it working as well as some important pointers to bear in mind.
Goals
As is likely with most people, you will likely have only a single GPU in your system. If you need to passthrough the GPU to your Windows VM, say for gaming or running Windows specific programmes, this guide will walk you through the process.
Key Notes
-
I wrote this guide as a note for myself, but also to help anyone in a similar situation. It has been culled from different passthrough guides (see Credits).
-
Please note that there are more comprehensive guides available (see Credits) for you to follow and learn about GPU passthrough, as well as doing it on different hardwares, OSs (even if the base distro is the same) and different boot environments (GRUB vs systemd for example).
-
This method will shut down your display manager and make your host lose its session even if you have more than one GPU. I have tried every other passthrough guide available and only this one works for me specifically. All guides I have seen have lead me to believe that you can’t unbind your GPU from the display manager without shutting down the display manager.
-
Some may notice that I have a second graphics card in my system. It is used to power my second monitor. However, due to the age of the card, it is not possible to utilise this as the primary card for the Linux system. It should make no difference on being able to passthrough your main card.
-
I am using the default display manager that comes with Pop OS (Gnome Display Manager).
-
This may also work if you have an integrated GPU with an Nvidia dedicated GPU or an Optimus setup but your mileage may vary
Credits
Credits always end up in the bottom of a guide, but I have to note that in this case, everything I am about to write here has been culled from other guides. The reason for writing this guide is that each of the guides have some end result which did not neatly match mine, and I’m adding my bit to improve the experience for others. That said, credits go to these sites / persons:
-
Bryan Steiner and his excellent GPU Passthrough Tutorial
This gets the first mention as it was the guide that got me thinking that I could do this (oh boy!). It was elegently written and well documented. Unfortunately one factor I realised (too late) is that Bryan does not use his Nvidia GPU for video output, and only has it set to compute. This is a small but very key factor — if you use your card for video output, you will not be able to unbind the GPU if you use his method (at least I couldn’t). This is however still the most thorough and succint guide and most of the non-GPU sections are actually culled from his guide. -
Heiko Seiger’s guides at his blog
Heiko Seiger’s guides just work. The guides are great as he walks you through passing through the GPU by removing it from the host OS and reserving it for the guest (VM). There are also pictures of bios settings etc. that will help you through the way. The only reason why this does not work for me is that all the resources are reserved and cannot be used by the host, which is not possible for me. -
Joe Knockenhauer’s Single GPU Passthrough
I used his single GPU passthrough setup to guide to finally get this working. All the GPU passthrough scripts are basically from his guide. -
Others:
- Mathias Hueber’s blog
- Arch Linux Wiki’s PCI Passthrough via OVMF Guide
- SpaceInvader One’s How to easily passthough a Nvidia GPU as primary without dumping your own vbios! video guide
Hardware and Software
The following is my hardware setup:
  CPU :           Ryzen 3900X
  MB  :           Gigabyte Aorus Pro WiFi (using latest bios as of August 2020)
  RAM :           32GB
  Main Storage:   1TB P1 NVME SSD
  Host Storage:   500GB BX500 Sata SSD
  GPU:            NVidia GTX 1070 8GB
Monitor:
G-Sync monitor attached to Nvidia card
Software:
- Fresh install of Pop OS updated using
sudo apt updateand thensudo apt upgrade - Downloaded Windows 10 (version 2004) ISO
Preparation
Enable bios functionalities
The first and foremost step you have to follow is to check if virtualisation is enabled on your device. You have to, at a minimum, enable SVM and IOMMU in your bios settings. The other settings are good to have — if you don’t see them, you may still be able to passthrough your hardware (though your mileage may vary). You will have to dig in through the menus of your board as the layout of the menu changes even through boards and generations (for example, my previous Gigabyte B450 board had a very different layout to the current one).
Also note that some bios versions may enable or disable certain functionalities in the latest bios, such as AER and ARI settings. This happened in the b450 board, and so you may want to roll back one generation if the latest bios is not needed for you (for example if the newer bios is just there for adding compatibility of newer CPUs).
I enabled the following settings in my bios. Please ensure that the settings are set to Enabled and not Auto:
Tweak
└── Advanced CPU Settings
    └── SVM Mode
        └── Enabled
Settings
└── AMD CBS
    └── NBIO Common Options
        └── IOMMU -> Enabled
        └── ACS Enable -> Enabled
        └── PCIe ARI Support -> Enabled
        └── PCIe ARi Enumeration -> Enabled
        └── Enable AER Cap -> Enabled
Save and exit bios.
Please note that some of the AMD CBS settings may not be actually required for the passthrough, but I enabled them anyway and have had no issues. Again do not worry if you don’t have all the options. You can go ahead and try anyway.
Check & Prep your OS
Check for IOMMU support: dmesg | grep IOMMU
You should get an output similar to this:
[    0.818189] pci 0000:00:00.2: AMD-Vi: IOMMU performance counters supported
[    0.822627] pci 0000:00:00.2: AMD-Vi: Found IOMMU cap 0x40
[    0.823711] perf/amd_iommu: Detected AMD IOMMU #0 (2 banks, 4 counters/bank).
[    3.861007] AMD-Vi: AMD IOMMUv2 driver by Joerg Roedel <jroedel@suse.de>
Check for CPU virtualisation support: dmesg | grep AMD-Vi
You should get an output similar to this:
[    0.818189] pci 0000:00:00.2: AMD-Vi: IOMMU performance counters supported
[    0.822627] pci 0000:00:00.2: AMD-Vi: Found IOMMU cap 0x40
[    0.822628] pci 0000:00:00.2: AMD-Vi: Extended features (0x58f77ef22294ade):
[    0.822629] AMD-Vi: Interrupt remapping enabled
[    0.822630] AMD-Vi: Virtual APIC enabled
[    0.822630] AMD-Vi: X2APIC enabled
[    0.822707] AMD-Vi: Lazy IO/TLB flushing enabled
[    3.861007] AMD-Vi: AMD IOMMUv2 driver by Joerg Roedel <jroedel@suse.de>
You’re now ready to get started
Pass the hardware-enabled IOMMU functionality into the kernel as a kernel parameter (note that kernelstub is already built in to Pop OS):
sudo kernelstub --add-options "amd_iommu=on"
Install all required packages: sudo apt install libvirt-daemon-system libvirt-clients qemu-kvm qemu-utils virt-manager ovmf
I’d suggest at this point to reboot
Check for IOMMU groupings:
#!/bin/bash
shopt -s nullglob
for g in /sys/kernel/iommu_groups/*; do
    echo "IOMMU Group ${g##*/}:"
    for d in $g/devices/*; do
        echo -e "\t$(lspci -nns ${d##*/})"
    done;
done;
This is my output. Any hardware you want to passthrough to your VM must be in its own group. You must passthrough all hardware in your group, except for dummy, non hardware entries such as PCI bridge.
IOMMU Group 0:
    00:01.0 Host bridge [0600]: Advanced Micro Devices, Inc. [AMD] Starship/Matisse PCIe Dummy Host Bridge [1022:1482]
IOMMU Group 1:
    00:01.1 PCI bridge [0604]: Advanced Micro Devices, Inc. [AMD] Starship/Matisse GPP Bridge [1022:1483]
IOMMU Group 10:
    00:07.1 PCI bridge [0604]: Advanced Micro Devices, Inc. [AMD] Starship/Matisse Internal PCIe GPP Bridge 0 to bus[E:B] [1022:1484]
IOMMU Group 11:
    00:08.0 Host bridge [0600]: Advanced Micro Devices, Inc. [AMD] Starship/Matisse PCIe Dummy Host Bridge [1022:1482]
IOMMU Group 12:
    00:08.1 PCI bridge [0604]: Advanced Micro Devices, Inc. [AMD] Starship/Matisse Internal PCIe GPP Bridge 0 to bus[E:B] [1022:1484]
IOMMU Group 13:
    00:14.0 SMBus [0c05]: Advanced Micro Devices, Inc. [AMD] FCH SMBus Controller [1022:790b] (rev 61)
    00:14.3 ISA bridge [0601]: Advanced Micro Devices, Inc. [AMD] FCH LPC Bridge [1022:790e] (rev 51)
IOMMU Group 14:
    00:18.0 Host bridge [0600]: Advanced Micro Devices, Inc. [AMD] Matisse Device 24: Function 0 [1022:1440]
    00:18.1 Host bridge [0600]: Advanced Micro Devices, Inc. [AMD] Matisse Device 24: Function 1 [1022:1441]
    00:18.2 Host bridge [0600]: Advanced Micro Devices, Inc. [AMD] Matisse Device 24: Function 2 [1022:1442]
    00:18.3 Host bridge [0600]: Advanced Micro Devices, Inc. [AMD] Matisse Device 24: Function 3 [1022:1443]
    00:18.4 Host bridge [0600]: Advanced Micro Devices, Inc. [AMD] Matisse Device 24: Function 4 [1022:1444]
    00:18.5 Host bridge [0600]: Advanced Micro Devices, Inc. [AMD] Matisse Device 24: Function 5 [1022:1445]
    00:18.6 Host bridge [0600]: Advanced Micro Devices, Inc. [AMD] Matisse Device 24: Function 6 [1022:1446]
    00:18.7 Host bridge [0600]: Advanced Micro Devices, Inc. [AMD] Matisse Device 24: Function 7 [1022:1447]
IOMMU Group 15:
    01:00.0 Non-Volatile memory controller [0108]: Micron/Crucial Technology P1 NVMe PCIe SSD [c0a9:2263] (rev 03)
IOMMU Group 16:
    02:00.0 PCI bridge [0604]: Advanced Micro Devices, Inc. [AMD] Matisse Switch Upstream [1022:57ad]
IOMMU Group 17:
    03:03.0 PCI bridge [0604]: Advanced Micro Devices, Inc. [AMD] Matisse PCIe GPP Bridge [1022:57a3]
IOMMU Group 18:
    03:04.0 PCI bridge [0604]: Advanced Micro Devices, Inc. [AMD] Matisse PCIe GPP Bridge [1022:57a3]
IOMMU Group 19:
    03:08.0 PCI bridge [0604]: Advanced Micro Devices, Inc. [AMD] Matisse PCIe GPP Bridge [1022:57a4]
    06:00.0 Non-Essential Instrumentation [1300]: Advanced Micro Devices, Inc. [AMD] Starship/Matisse Reserved SPP [1022:1485]
    06:00.1 USB controller [0c03]: Advanced Micro Devices, Inc. [AMD] Matisse USB 3.0 Host Controller [1022:149c]
    06:00.3 USB controller [0c03]: Advanced Micro Devices, Inc. [AMD] Matisse USB 3.0 Host Controller [1022:149c]
IOMMU Group 2:
    00:01.2 PCI bridge [0604]: Advanced Micro Devices, Inc. [AMD] Starship/Matisse GPP Bridge [1022:1483]
IOMMU Group 20:
    03:09.0 PCI bridge [0604]: Advanced Micro Devices, Inc. [AMD] Matisse PCIe GPP Bridge [1022:57a4]
    07:00.0 SATA controller [0106]: Advanced Micro Devices, Inc. [AMD] FCH SATA Controller [AHCI mode] [1022:7901] (rev 51)
IOMMU Group 21:
    03:0a.0 PCI bridge [0604]: Advanced Micro Devices, Inc. [AMD] Matisse PCIe GPP Bridge [1022:57a4]
    08:00.0 SATA controller [0106]: Advanced Micro Devices, Inc. [AMD] FCH SATA Controller [AHCI mode] [1022:7901] (rev 51)
IOMMU Group 22:
    04:00.0 Network controller [0280]: Intel Corporation Wi-Fi 6 AX200 [8086:2723] (rev 1a)
IOMMU Group 23:
    05:00.0 Ethernet controller [0200]: Intel Corporation I211 Gigabit Network Connection [8086:1539] (rev 03)
IOMMU Group 24:
    09:00.0 VGA compatible controller [0300]: NVIDIA Corporation GP104 [GeForce GTX 1070] [10de:1b81] (rev a1)
    09:00.1 Audio device [0403]: NVIDIA Corporation GP104 High Definition Audio Controller [10de:10f0] (rev a1)
IOMMU Group 25:
    0a:00.0 VGA compatible controller [0300]: Advanced Micro Devices, Inc. [AMD/ATI] Cape Verde PRO [Radeon HD 7750/8740 / R7 250E] [1002:683f]
    0a:00.1 Audio device [0403]: Advanced Micro Devices, Inc. [AMD/ATI] Oland/Hainan/Cape Verde/Pitcairn HDMI Audio [Radeon HD 7000 Series] [1002:aab0]
IOMMU Group 26:
    0b:00.0 Non-Essential Instrumentation [1300]: Advanced Micro Devices, Inc. [AMD] Starship/Matisse PCIe Dummy Function [1022:148a]
IOMMU Group 27:
    0c:00.0 Non-Essential Instrumentation [1300]: Advanced Micro Devices, Inc. [AMD] Starship/Matisse Reserved SPP [1022:1485]
IOMMU Group 28:
    0c:00.1 Encryption controller [1080]: Advanced Micro Devices, Inc. [AMD] Starship/Matisse Cryptographic Coprocessor PSPCPP [1022:1486]
IOMMU Group 29:
    0c:00.3 USB controller [0c03]: Advanced Micro Devices, Inc. [AMD] Matisse USB 3.0 Host Controller [1022:149c]
IOMMU Group 3:
    00:02.0 Host bridge [0600]: Advanced Micro Devices, Inc. [AMD] Starship/Matisse PCIe Dummy Host Bridge [1022:1482]
IOMMU Group 30:
    0c:00.4 Audio device [0403]: Advanced Micro Devices, Inc. [AMD] Starship/Matisse HD Audio Controller [1022:1487]
IOMMU Group 4:
    00:03.0 Host bridge [0600]: Advanced Micro Devices, Inc. [AMD] Starship/Matisse PCIe Dummy Host Bridge [1022:1482]
IOMMU Group 5:
    00:03.1 PCI bridge [0604]: Advanced Micro Devices, Inc. [AMD] Starship/Matisse GPP Bridge [1022:1483]
IOMMU Group 6:
    00:03.2 PCI bridge [0604]: Advanced Micro Devices, Inc. [AMD] Starship/Matisse GPP Bridge [1022:1483]
IOMMU Group 7:
    00:04.0 Host bridge [0600]: Advanced Micro Devices, Inc. [AMD] Starship/Matisse PCIe Dummy Host Bridge [1022:1482]
IOMMU Group 8:
    00:05.0 Host bridge [0600]: Advanced Micro Devices, Inc. [AMD] Starship/Matisse PCIe Dummy Host Bridge [1022:1482]
IOMMU Group 9:
    00:07.0 Host bridge [0600]: Advanced Micro Devices, Inc. [AMD] Starship/Matisse PCIe Dummy Host Bridge [1022:1482]
Note that these are the things I want to passthrough:
- One set of USB ports (Group 29)
- The whole WiFi network / Bluetooth controller (Group 22)
- GPU (Group 24)
- Sata Controller (Group 20 or 21)
If your groups are not neatly divided, you can utilise the ACS patch — I would suggest reviewing Steiner’s guide (see Credits) on this. Other than the GPU, passing through all the other items are optional for GPU passthrough.
NOTE:
At this point the guide steps differ from the other guides in one fundamental way. Given the various issues you may face in passing through your GPU, I suggest following Joe Knockenhauer’s point of creating a working VM first before attempting any kind of GPU passthrough. I have already tried passing through my other devices several times, and so I will start with that.
! Important.
From this point on, there will be fundamental changes, and issues you will have to be mindful of as you move along. For example, you can choose not to pass through neither USB devices (keyboard and mouse) nor a USB Controller, BUT that will mean that when you passthrough your GPU, you will have no way of controlling your VM. This is a catch-22 for most systems if you cannot passthrough your USB for one reason or another.
Note that you can actually passthrough specific USB devices and do not necessarily need to pass through a whole controller.
Hooks & Device Passthrough
We will begin prepping for the passthrough by creating the hooks.
Install the Hook Helper tool:
sudo wget 'https://raw.githubusercontent.com/PassthroughPOST/VFIO-Tools/master/libvirt_hooks/qemu' \
     -O /etc/libvirt/hooks/qemu
Convert to executable sudo chmod +x /etc/libvirt/hooks/qemu then restart Libvirt sudo service libvirtd restart.
Change over to the Libvirt hooks folder: cd /etc/libvirt/hooks. Running ls -a shows that there is only one folder qemu in the folder. Create the following folders:
sudo mkdir qemu.d qemu.d/win10 qemu.d/win10/prepare qemu.d/win10/prepare/begin qemu.d/win10/release qemu.d/win10/release/end
Check that your folder and file tree (sudo apt install tree) are as follows:
The output should be as follows:
/etc/libvirt/hooks
├── qemu
└── qemu.d
    └── win10
        ├── prepare
        │   └── begin
        └── release
            └── end
Change over to the begin folder cd qemu.d/win10/prepare/begin
Start the Nano file editor in sudo via sudo nano
Paste in your script:
#!/bin/bash
## Helpful to read output when debugging
set -x

## Load vfio
modprobe vfio
modprobe vfio_iommu_type1
modprobe vfio_pci

## Unbind the devices you would like to utilise in your vm
## USB
virsh nodedev-detach pci_0000_0c_00_3

## WIFI & BT Card
virsh nodedev-detach pci_0000_04_00_0

## SATA Controller
virsh nodedev-detach pci_0000_08_00_0
Note that for each PCI device you’re passing through, convert colons and dots to underscore like these: 07:00.0 -> 0000_07_00_00 or 06:00.3 -> 0000_06_00_03. You have to put in YOUR own device’s pci id.
For Group 21 (SATA Controller), we do not need to pass through the PCI bridge
IOMMU Group 21:
    03:0a.0 PCI bridge [0604]: Advanced Micro Devices, Inc. [AMD] Matisse PCIe GPP Bridge [1022:57a4]
    08:00.0 SATA controller [0106]: Advanced Micro Devices, Inc. [AMD] FCH SATA Controller [AHCI mode] [1022:7901] (rev 51)
Press Ctrl + O to save. Name the file any name ending with .sh. I named mine unbind.sh. Exit nano by pressing Ctrl + X
You need to make the file executable by typing the following sudo chmod +x unbind.sh.
Change the folder to the end folder:
cd /etc/libvirt/hooks/qemu.d/win10/release/end
Start Nano again using sudo nano
#!/bin/bash
set -x

## Re-Bind all devices
virsh nodedev-reattach pci_0000_0c_00_3
virsh nodedev-reattach pci_0000_04_00_0
virsh nodedev-reattach pci_0000_08_00_0

## Unload vfio
modprobe -r vfio_pci
modprobe -r vfio_iommu_type1
modprobe -r vfio
Save using Ctrl + O. As before name the file with something ending with .sh. I have named mine rebind.sh.
Exit Nano using Ctrl + X
Convert end.sh into executable using sudo chmod +x rebind.sh
Check that your folder and files are in the following order:
tree /etc/libvirt/hooks
/etc/libvirt/hooks
/etc/libvirt/hooks
├── qemu
└── qemu.d
    └── win10
        ├── prepare
        │   └── begin
        │       └── unbind.sh
        └── release
            └── end
                └── rebind.sh
That’s it for the scripts (sans any GPU passthrough settings).
VM WITHOUT GPU Passthrough
It’s now time to create your Windows VM without the GPU passtrough.
Go to your Virtual Machine Manager (Virtman):

First and foremost, if this is your first time creating a VM, go to Edit, then Preferences and select Enable XML Settings under the General tab.

Now click on Create a new virtual machine. Select local install.

Click Browse and select your Windows 10 ISO file. It is recommended that you do not rename your Windows 10 ISO file — this way Virtman recognises the ISO as being a Windows 10 OS and will select the operating system automatically. If it doesn’t detect it, uncheck the Automatically detect check box and just start typing ‘Windows’ and it will show Windows 10 as an option.

Select the amount of RAM you would like to passthrough as well as the number of CPUs. In this case, the maximum number of CPU’s is actually the number of threads. You may want to keep some for the host system, especially if you are doing a host passthrough of your CPU (see later in this section).

Select your storage option and the appropriate size. The image shows the default option (which you would use if you are not passing through an SSD / NVMe / HDD). I have unchecked mine as I am aiming to pass through the whole SATA Controller (with its attached SATA drive).

In this section, check that the Name of the VM is win10 specifically. This is important as Qemu will look up the hooks according to the name of the VM (of which we created the win10 folder and the hooks within this folder). Ensure that you select Customise configuration before install as you will need to make additional changes before starting the VM. Select Finish.

You will now be in the settings section. The first thing to do is change the Firmware from BIOS to OVMF_CODE.fd. Click Apply.

Go to the CPUs section and uncheck Copy Host CPU configuration. Under Model, type in host-passthrough and click Apply.

Go to Boot Options and select Enable boot menu, ensure that SATA Disk 1 as well SATA CDROM 1 is selected. Move the Sata Disk 1 up to the first position. Click Apply.

For now, I have left all the remaining items except Tablet (to remove, right click and select Remove Hardware). You can leave it in.
Now to add the hardware we are adding. Click on Add Hardware.

Go to PCI Host Device, select the first item you are adding and click Finish. Repeat this for all the other hardware you are adding. You should now see in the left section all the items you have added.

Note, if you are not passing through a full USB Controller, you can pass through individual USB devices (see below). See the section on passing through USB devices on Steiner’s guide for more information.

This is how it should look now:

We should theoretically be ready to start the VM now.
Go ahead and select Begin Installation. At this point, if you have done everything right, you should see a pop up and a few seconds later a window that opens up with TianoCore in the Splash Screen. Press any key to enter into the Windows setup once you see the prompt and you can now proceed to install Windows in your VM.


GPU Passthrough Settings & Setup
Ok, now that your VM successfully runs (make sure to test it a few times — it should not hang when you unbind or rebind), it’s time to finally get to the main part of this tutorial — passing through the GPU.
Getting ROM for your card and including it on boot
Before you start this section, you should have your device bios ready. I looked up my bios via the Techpowerup GPU Database (thanks to a guide by SpaceInvader One’s How to easily passthough a Nvidia GPU as primary without dumping your own vbios! in KVM unRAID — YouTube) but there are several ways you can approach this. I would suggest visiting Joe’s guide on patching the GPU ROM for this as it has most of the ways you can use. Once you have your ROM ready, the following sections will walk you through the rest of the process.
Editing the hooks
We go back to the original unbind.sh and rebind.sh scripts to now add in our GPU scripts.
First, edit the unbind.sh file.
cd /etc/libvirt/hooks/qemu.d/win10/prepare/begin
Add the following lines to your file just below the set -x
# Stop display manager
systemctl stop display-manager.service
## Kill the Gnome Display Manager
killall gdm-x-session

# Unbind VTconsoles
echo 0 > /sys/class/vtconsole/vtcon0/bind
echo 0 > /sys/class/vtconsole/vtcon1/bind

# Unbind EFI-Framebuffer
echo efi-framebuffer.0 > /sys/bus/platform/drivers/efi-framebuffer/unbind

# Avoid a Race condition by waiting 2 seconds. This can be calibrated to be shorter or longer if required for your system
sleep 2

# Unload all Nvidia drivers
modprobe -r nvidia_drm
modprobe -r nvidia_modeset
modprobe -r nvidia_uvm
modprobe -r nvidia
and below ## Unbind the devices you would like to utilise in your vm
## GPU
virsh nodedev-detach pci_0000_09_00_0
virsh nodedev-detach pci_0000_09_00_1
Please note that you should change your display driver pci id accordingly, based on your IOMMU groupings. Mine is below, and you will notice that you have to pass through both the controller (09:00.0) and the audio device on the graphics card (09:00.1). Please ensure you pass through all your GPU devices that sit under this group.
IOMMU Group 24:
    09:00.0 VGA compatible controller [0300]: NVIDIA Corporation GP104 [GeForce GTX 1070] [10de:1b81] (rev a1)
    09:00.1 Audio device [0403]: NVIDIA Corporation GP104 High Definition Audio Controller [10de:10f0] (rev a1)
Your full unbind.sh file should now look like this (cleaned up):
#!/bin/bash
## Helpful to read output when debugging
set -x

# Stop display manager
systemctl stop display-manager.service
## Uncomment the following line if you use GDM
killall gdm-x-session

# Unbind VTconsoles
echo 0 > /sys/class/vtconsole/vtcon0/bind
echo 0 > /sys/class/vtconsole/vtcon1/bind

# Unbind EFI-Framebuffer
echo efi-framebuffer.0 > /sys/bus/platform/drivers/efi-framebuffer/unbind

# Avoid a Race condition by waiting 2 seconds. This can be calibrated to be shorter or longer if required for your system
sleep 2

# Unload all Nvidia drivers
modprobe -r nvidia_drm
modprobe -r nvidia_modeset
modprobe -r nvidia_uvm
modprobe -r nvidia

## Load vfio
modprobe vfio
modprobe vfio_iommu_type1
modprobe vfio_pci

## Unbind the devices you would like to utilise in your vm

## GPU
virsh nodedev-detach pci_0000_09_00_0
virsh nodedev-detach pci_0000_09_00_1

## USB
virsh nodedev-detach pci_0000_0c_00_3

## WIFI & BT Card
virsh nodedev-detach pci_0000_04_00_0

## SATA Controller
virsh nodedev-detach pci_0000_08_00_0
Press Ctrl + O and Enter to save and then Ctrl + X to exit.
Now time to edit the rebind.sh file.
cd /etc/libvirt/hooks/qemu.d/win10/release/end
Paste the following below the ## Re-Bind all devices section,
virsh nodedev-reattach pci_0000_09_00_0
virsh nodedev-reattach pci_0000_09_00_1
and the following below the ## Unload vfio section.
# Rebind VT consoles
echo 1 > /sys/class/vtconsole/vtcon0/bind
echo 1 > /sys/class/vtconsole/vtcon1/bind

nvidia-xconfig --query-gpu-info > /dev/null 2>&1
echo "efi-framebuffer.0" > /sys/bus/platform/drivers/efi-framebuffer/bind

modprobe nvidia_drm
modprobe nvidia_modeset
modprobe nvidia_uvm
modprobe nvidia

# Restart Display Manager
systemctl start display-manager.service
Your cleaned up rebind.sh file should look like this:
#!/bin/bash
set -x

## Re-Bind all devices
virsh nodedev-reattach pci_0000_0c_00_3
virsh nodedev-reattach pci_0000_04_00_0
virsh nodedev-reattach pci_0000_08_00_0
virsh nodedev-reattach pci_0000_09_00_0
virsh nodedev-reattach pci_0000_09_00_1

## Unload vfio
modprobe -r vfio_pci
modprobe -r vfio_iommu_type1
modprobe -r vfio

# Rebind VT consoles
echo 1 > /sys/class/vtconsole/vtcon0/bind
echo 1 > /sys/class/vtconsole/vtcon1/bind

nvidia-xconfig --query-gpu-info > /dev/null 2>&1
echo "efi-framebuffer.0" > /sys/bus/platform/drivers/efi-framebuffer/bind

modprobe nvidia_drm
modprobe nvidia_modeset
modprobe nvidia_uvm
modprobe nvidia

# Restart Display Manager
systemctl start display-manager.service
Again save by pressing Ctrl + O and then Enter and then exit by pressing Ctrl + X.
Including GPU into VM
Add device
Now you are ready to add your GPU to your VM. Open up Virtman.

Click on your Windows 10 VM and then click Open on the menu above.

You will see the blank window above. Click on the i button to show the settings.

Click on Add Hardware and add the 2 devices associated with your GPU. Please ensure that you add all the devices in your GPU (you may have more than 2).
Remove other displays
Remove Display Spice and Video QXL (right click on the device and select Remove).
Add ROM File
Create a new folder called vgabios in your /usr/share/ folder via sudo mkdir /usr/share/vgabios
Copy your ROM file to the folder.
sudo cp -v -i '/home/yourusername/gtx1070_modified.rom' /usr/share/vgabios/gtx1070_modified.rom
(the above command is copying the modified ROM file in my Home folder to the vgabios folder. Change the line /home/yourusername/gtx1070_modified.rom to where ever your ROM is stored and also the name of the file).
The file does not need to have a specific name. Also, your file may be either a .rom or .bin, which should be fine.
Go back to your Virtman. Select your GPU device (the main one only — it usually is the one ending with 0).

Add the following line (edit the name of your file):
<rom file='/usr/share/vgabios/gtx1070_modified.rom'/>
to the XML (see picture above)
<hostdev mode="subsystem" type="pci" managed="yes">
  <rom file='/usr/share/vgabios/gtx1070_modified.rom'/>
  ...
</hostdev>
Click Apply.
Edit XML Script
You’re almost ready to launch the VM with your GPU passed through, but one last set of items to edit.
Navigate back to Overview in the settings of Virtman. Click on the XML tab.
Add the following lines:
  <features>
    ...
    <hyperv>
      ...
      <vendor_id state="on" value="kvm hyperv"/>
    </hyperv>
    ...
  </features>
and
  <features>
    ...
    <hyperv>
      ...
    </hyperv>
    <kvm>
      <hidden state="on"/>
    </kvm>
    ...
  </features>
and finally
  <features>
    ...
    <ioapic driver="kvm"/>
  </features>
Your section should now look like this:
  <features>
    <acpi/>
    <apic/>
    <hyperv>
      <relaxed state="on"/>
      <vapic state="on"/>
      <spinlocks state="on" retries="8191"/>
      <vendor_id state="on" value="kvm hyperv"/>
    </hyperv>
    <kvm>
      <hidden state="on"/>
    </kvm>
    <vmport state="off"/>
    <ioapic driver="kvm"/>
  </features>
Click Apply to apply the settings.
! Note
Please note that before you move on to the next section (start your VM), you should save anything you have open in Linux as all applications will be closed once you shut down the display manager.
Starting VM with GPU Passthrough
You are now ready to start your VM! Press the Play buttion on the menu.
If everything goes right, your screen will go blank, and you will see the TianoCore launch screen and boot into Windows.
To go back to Linux, just shut down your Windows, and Libvirt should automatically take you back to Linux (your log in screen).
Tips and Tricks
-
Before proceeding to the GPU section, ensure that your USB passthrough works correctly. Whether you are passing through your USB devices or your whole USB controller, you should check that it works correctly. If you accidentally forget this part, and your USB does not work, you will just have to reset your PC to exit.
-
The fastest way to get your ROM is to get it from the Techpowerup site. Often, ROMs on this site already have the bios edited but your mileage may vary. Please note that you should look up your exact device and revision as there are differences between brands, AND revisions of the same model.
-
You can theoretically leave applications in Linux running in the background while on your VM, but this is not advisable.
-
You can store your ROM in a different folder than the one suggested, but this may sometimes be an issue. If you get an error along the lines of failed to find / load romfile (in your log file, see pointer number 6), then this is likely to be the cause.
-
At this point, this guide does not include optimisations for your VM. The section on improving VM performance in Steiner’s guide is a good place to get some optimisation tips and tricks.
-
If you run into issues, you can check the log file at
nano /var/log/libvirt/qemu/win10.logto see if it has helpful pointers. -
You can change the boot order after having installed Windows in your VM.
Conclusion
I hope this guide works for you. If you notice any errors, please do let me know.
In some scenarios, you may need to use a video card (containing a GPU), also called a graphic adapter or display adapter, on a virtual machine. However, using an emulated video card in a Hyper-V virtual machine may not be enough for tasks utilizing OpenGL, Direct3D, CUDA, and other hardware-related features. Fortunately, it is possible to attach a physical video card to a VM on a Hyper-V host by using the Hyper-V GPU passthrough feature.
What Is GPU Passthrough?
GPU Passthrough is a feature that allows you to connect a physical video card installed on a physical host to a virtual machine without emulation. As a result, the virtual machine can use a physical graphics adapter directly.
By default, Hyper-V virtual machines use an emulated graphics card, which relies on the Hyper-V host’s CPU. However, this approach only allows users to work with the most basic tasks but is not enough for tasks that require more graphics performance.
NOTE: A GPU can be integrated into the chipset on a motherboard or into a central processing unit (CPU), also called a processor (for the latest Intel processor generations and related architecture). A high-performance GPU is a chip on a discrete video card attached to a motherboard using the PCI Express interface (PCIe).
Key Benefits of GPU Passthrough in Hyper-V
A physical graphics card connected via GPU passthrough in a Hyper-V virtual machine can be used by home users, developers, designers, and others in specific scenarios. The most common scenarios are:
- Running applications using graphics-intensive workloads (graphic design, 3D modeling, AutoCAD drawing, engineering and calculations, game design and game development, etc.). Using hardware-accelerated rendering.
- Running games with hardware acceleration features. Some games may not work without a physical video card.
- Running machine learning (ML) and artificial intelligence (AI) applications using a GPU.
The benefits of the GPU passthrough mode are:
- Better graphics performance with VMs directly accessing a graphics card for graphic-intensive applications or games. Video playback is smoother. Hardware-accelerated graphics and the latest APIs are available.
- Flexible utilization of hardware resources. Using one Hyper-V host for multiple VMs with uneven graphics-intensive tasks in cases where using dedicated workstations is not optimal.
- Cost-efficiency. GPU passthrough can save costs in some scenarios, especially in terms of using hardware resources. This feature can be also used for a virtual desktop infrastructure (VDI).
- Security. The security advantages are similar to those of virtualization in general. If vulnerabilities are exploited in VMs, the VMs run in an isolated environment, and there are more possibilities to mitigate the issue. In case of serious issues, it is possible to restore VMs rapidly from a backup.
Requirements
To configure a VM with GPU passthrough on a Hyper-V host, you must meet certain hardware and software requirements. Not all video cards can be used for this feature.
Hardware specifications for GPU Passthrough
- The CPU on the Hyper-V host must support Intel-VT or AMD-V virtualization features. The appropriate virtualization feature must be enabled for your processor on your Hyper-V host in UEFI/BIOS settings.
- The Input-Output Memory Management Unit (IOMMU) must be supported by the CPU on the Hyper-V host. This feature is required for PCI passthrough, including video card or GPU passthrough.
- A video card with a GPU that supports GPU virtualization technologies, such as NVIDIA GRID or AMD MxGPU (Multiuser GPU). These technologies are vendor-specific. Using server-class hardware improves success rates. Older devices that use PCI Interrupts (INTx) are not supported.
- SR-IOV (Single Root Input/Output Virtualization) should be supported and enabled to avoid errors.
Software requirements for Hyper-V Passthrough
- Windows Server 2016 or later Windows Server version (preferred)
- Windows 10 or Windows 11
- The Hyper-V role (feature) must be enabled in Windows.
- The latest graphics drivers must be installed on the Hyper-V host and VM guest using GPU passthrough.
- Only Generation 2 Hyper-V VMs must be used for GPU passthrough with DDA.
Limitations and Unsupported Configurations
Note the configurations that are not supported for using GPU passthrough:
- VMs using Hyper-V Dynamic Memory, that is, the feature to allocate and deallocate RAM for a VM as needed, cannot use GPU passthrough.
- GPU Passthrough is available only on the highest Windows editions, such as Windows Server 2019 Datacenter.
- If Windows Subsystem for Linux is deployed on the Hyper-V host, then an error with code 43 can occur on the VM.
- Clustering features such as High Availability and VM live migration are not supported.
- Save and restore with VM checkpoints are not supported.
Setting Up GPU Passthrough: What You Need to Know
You should be aware that GPU passthrough configuration may be more complex than most regular VM configuration tasks. The scalability of virtual environments when using GPU passthrough is not as high when using the default method for video card emulation. You cannot migrate VMs using the GPU passthrough feature between Hyper-V hosts because these VMs are bound to physical graphic adapters installed in the host.
Up to Windows Server 2016, the RemoteFX feature was used for GPU passthrough to virtual machines. After Windows Server 2019 and Windows 10 build 1809, the RemoteFX feature is no longer available, and only Hyper-V Direct Device Assignment (DDA) can be used to pass through a graphics card, similarly to any other PCI/PCIe devices, including NVMe storage devices. DDA is the analog of VMware PCI passthrough.
RemoteFX is an extension for RDP (Microsoft Remote Display Protocol) used to connect USB devices (that are attached to the host) to a virtual machine. RemoteFX vGPU was used for graphics cards accordingly. RemoteFX allowed the sharing of one GPU for multiple VMs, which is not possible with Discrete Device Assignment. RemoteFX also limited the amount of dedicated video memory to 1 GB for each VM and the maximum FPS is 30. In the case of DDA, there is no such video RAM limitation, and FPS can be set to 60.
If you use Windows Server 2016 Datacenter or other Windows versions and editions that used to support RemoteFX, you can install a Windows update to completely remove this feature from Hyper-V and avoid any potential security vulnerabilities. The official version from Microsoft is that RemoteFX was removed to avoid architectural Hyper-V vulnerabilities. RemoteFX was attractive for high-density virtual environments when it was not possible to assign a dedicated physical graphics card to each VM. Note that DDA works on Windows Server versions (not on client versions, such as Windows 10).
GPU partitioning in PowerShell can be a solution on client Windows versions, but copying video drivers from the host OS to a Guest OS (that must be the same as on the host OS) is tricky. Generation 2 VMs must be used. A graphics card must support GPU partitioning in this case.
Configuring GPU Passthrough in Hyper-V
Follow the steps below to prepare the environment and configure Hyper-V GPU passthrough.
Preparing to configure GPU passthrough
- Ensure that your hardware and software support GPU virtualization.
- Enable Intel VT-d or AMD-V virtualization features for your CPU in UEFI/BIOS on the Hyper-V host.
- Enable IOMMU. The IOMMU setting can be enabled in different ways on different motherboards with different UEFI/BIOS versions. Sometimes, this setting can be located in the North Bridge configuration. Or IOMMU can be enabled when you enable Intel VT-d or AMD-V. Check the feature called Memory Remap in UEFI/BIOS.
You can check whether IOMMU is enabled on a Hyper-V host machine with the PowerShell command (as Administrator):
(Get-VMHost).IovSupport; (Get-VMHost).IovSupportReasonsTrue – enabled; False – disabled.
- Remove all checkpoints for the VM that you are going to configure using GPU passthrough.
If automatic checkpoints are enabled for the VM, you can disable them with the PowerShell command:
Set-VM -Name VMName -AutomaticStopAction TurnOff
GPU passthrough in Windows Server
- To set cache and limits for 32-bit (3 GB for 32-bit operating systems) MIMO space, run this PowerShell command as Administrator:
Set-VM -Name VMName -GuestControlledCacheTypes $True -LowMemoryMappedIoSpace 3Gb -HighMemoryMappedIoSpace 33280MbAlternatively, you can use three separate commands:
Set-VM -GuestControlledCacheTypes $true -VMName YourVMNameSet-VM -LowMemoryMappedIoSpace 3Gb -VMName YourVMNameSet-VM -HighMemoryMappedIoSpace 33280Mb -VMName YourVMNameThese limits define the memory that makes the device accessible for the VM. You can use a machine profile script from Microsoft to set the most precise MIMO limit values. The optimal values can be different for different video adapters. If you get a message that there are not enough resources when starting a VM, you should shut down the VM and modify these values. 33280 MB is used for a MIMO space greater than 32-bit.
- Check the physical address of the PCI Express device (the device’s location path), which is the needed graphics card that you want to pass through.
It can be done in Device Manager. You can open Device Manager by running the
devmgmt.msccommand. In Device Manager:- Right-click the needed display adapter in the Display Adapters section and hit Properties in the context menu.
- Select the Details tab in the adapter properties window.
- Select the Location paths property in the drop-down menu and copy the value (the values can be different for each computer).
You can also use PowerShell to identify a device’s location path:
Get-PnpDevice | Where-Object {$_.Present -eq $true} | Where-Object {$_.Class -eq "Display"}|select Name,InstanceIdand
Get-PnpDevice -Class Display | ForEach-Object { Write-Output "$($_.FriendlyName) has a device id of $($_.DeviceId) and is located at $($_ | Get-PnpDeviceProperty DEVPKEY_Device_LocationPaths | Select-Object -ExpandProperty Data | Where-Object { $_ -like "PCIROOT*" })"; }The output should contain a string like this:
‘PCIROOT(0)#PCI(0300)#PCI(0000)’

- Disable this graphics card in Device Manager. Right-click the video adapter and hit Disable device in the context menu.

- Dismount a disabled display adapter in PowerShell:
Dismount-VmHostAssignableDevice -LocationPath "PCIROOT(0)#PCI(0300)#PCI(0000)" -ForceWhere:
-Force is required when a partition driver (optional) is not installed. This is not a driver for a graphics card installed in a guest OS. Sometimes, a device vendor can provide this security mitigation driver for a device. If you are going to install this driver, you should install it before you dismount the PCI Express device from the host partition.
The location path used in this command is just for illustration purposes, and you should use your specific value.
- Run the command to assign this video card to a virtual machine with GPU passthrough via DDA:
Add-VMAssignableDevice -VMName VMName -LocationPath "PCIROOT(0)#PCI(0300)#PCI(0000)" - Power on the VM and verify whether a physical video card is displayed in the Device Manager of the Windows VM together with the default emulated video adapter called Microsoft Hyper-V video.
- Install drivers for the video card on the VM’s guest OS. You can download video drivers on the official NVIDIA or AMD website.
- If you want to disconnect the video card from the VM, stop the VM and use the command on the host:
Remove-VMAssignableDevice -VMName YourVMName -LocationPath $locationPathNext, run the command to connect the video card back to the Hyper-V host:
Mount-VMHostAssignableDevice -LocationPath $locationPath


Configuration in Windows 10
On client Windows versions, such as Windows 10 and Windows 11 (starting from Windows 10 build 1903), the workflow to configure Hyper-V GPU passthrough is different and is possible by using the GPU partitioning method:
- Check whether your video card supports GPU partitioning in Windows 10 with the PowerShell command:
Get-VMPartitionableGpuIn Windows 11, the command is:
Get-VMHostPartitionableGpu - For GPU passthrough to a VM, the
Add-VMGpuPartitionAdaptercmdlet is used. However, you must copy graphic drivers from the Hyper-V host machine to the virtual machine. Note that the driver version must be the same. A free Easy-GPU-PV script can be used to copy drivers because this is a tricky process. Download this script in a ZIP file and extract the contents of the ZIP archive to a folder on the Hyper-V host. This script can use GPU paravirtualization by utilizing mechanisms used for Windows Subsystem for Linux (WSL2) and Windows Sandbox. - Open PowerShell as Administrator and run the command to allow script execution:
Set-ExecutionPolicy -Scope Process -ExecutionPolicy Bypass -ForceSet-ExecutionPolicy -ExecutionPolicy RemoteSigned -Scope CurrentUser - Shut down the VM. Run the script from the folder where the downloaded script is extracted to copy installed graphic drivers from the Hyper-V host to the VM and install the drivers on the VM:
.\Update-VMGpuPartitionDriver.ps1 -VMName YourVMName -GPUName "AUTO" - Configure the VM to make it ready for GPU passthrough and video card association:
Set-VM -VMName VMName -GuestControlledCacheTypes $true -LowMemoryMappedIoSpace 1Gb -HighMemoryMappedIoSpace 32GbAdd-VMGpuPartitionAdapter -VMName YourVMName- If you update the graphic drivers on a Hyper-V host, you must update the graphic drivers on the VM too. The VM must be powered off.
.\Update-VMGpuPartitionDriver.ps1 -VMName YourVMName -GPUName "AUTO" - If you need to remove a video card from the VM, you can use the command:
Remove-VMGpuPartitionAdapter -VMName "YourVMName"
- If you update the graphic drivers on a Hyper-V host, you must update the graphic drivers on the VM too. The VM must be powered off.
If the video card has been connected to the VM successfully, you should see the appropriate display adapter in the Device Manager of the VM. You will also see visual effects for the guest Windows desktop theme, such as transparency, etc.
Note that some games and applications may not run even after configuring GPU passthrough. This can happen when an application forcibly initiates a compatibility check of the graphics card. The information about the connected video card in the guest OS is different from the information on the host OS. Some applications can perform the “running in a VM” check.
If applications using OpenGL do not work in the VM, installing OpenGL Compatibility Pack can help in some cases.
When using the GPU partitioning method for Windows 10 and Windows 11, the video adapter model displayed in Device Manager differs from the physical graphic adapter model displayed on the Hyper-V host. You can see a special Microsoft driver for this device. Vendor-specific tools, such as NVIDIA Control Panel (or AMD Control Panel), are not available in the VM.
Another issue that you may encounter happens if you close an RDP connection without disconnecting from an RDP session. In this case, all GPU memory can be disconnected, and all applications using the GPU will notify you about inaccessible video memory. These applications will stop working in this case, and reconnection via RDP will not fix the issue. Restarting applications using the GPU will be required.
Troubleshooting GPU Passthrough Issues
If you configured Hyper-V GPU passthrough and connected a video card to a VM, but the video card doesn’t work properly, check the following:
- Make sure that the latest graphic drivers are installed and there are no driver-related errors. Open Device Manager and check the device and driver status. You must install drivers downloaded from official vendor’s websites (NVIDIA, AMD, Intel) and not by using Windows Update.
- Ensure that you have assigned enough MIMO space for your VM.
- Check that the GPU passthrough configuration is supported by the vendor for your graphic adapter. Not all video cards of customer series can support this feature. Vendors can prefer enabling GPU passthrough only for top video cards.
- An application running inside a VM must support your video card and its drivers for proper work.
- Enable a group policy to use the GPU when connecting via Remote Desktop to a VM:
Computer Configuration\Administrator Templates\Windows Components\Remote Desktop Services\Remote Desktop Session Host\Remote Session Environment\Use hardware graphics adapters for all Remote Desktop Services sessionsSet the group policy value to Enabled.
- If you see an error like “The operation failed because the object was not found” or Error 12, try to add the registry keys in
HKEY_LOCAL_MACHINE\SOFTWARE\Policies\Microsoft\Windows\HyperVwith the values:
RequireSecureDeviceAssignment = 0 (REG_DWORD)RequireSupportedDeviceAssignment = 0 (REG_DWORD)You can set these values with PowerShell commands:
Set-ItemProperty -Path "HKLM:\SOFTWARE\Policies\Microsoft\Windows\HyperV" -Name "RequireSecureDeviceAssignment" -Type DWORD -Value 0 -ForceSet-ItemProperty -Path "HKLM:\SOFTWARE\Policies\Microsoft\Windows\HyperV" -Name "RequireSupportedDeviceAssignment" -Type DWORD -Value 0 -Force - Disable hypervisor checks for graphics drivers inside the VM. This configuration can be done in Enterprise Windows Driver Kit (WDK).
- Mount the WDK ISO file to the virtual DVD drive of the VM.
- Execute E:\LaunchBuildEnv.cmd (where E: is a virtual DVD drive of the VM) and then run the powershell command.
- Go to the directory where the
Remove-HypervisorChecks.ps1script is located. - Run the command to remove hypervisor checks for a video driver (on an example of NVIDIA):
./Remove-HypervisorChecks.ps1 -Nvidia -DriverPath "C:\path-to-driver\package.exe" - Wait until script execution is completed.
- Copy the prepared driver (a patched-driver.zip file) to the virtual machine, enable the test mode on the VM, and install the driver in a guest OS.
- If you encounter Error 43, ensure that the GPU and sound PCI bus (NVIDIA video cards may also have sound features) are kept together when using virtual machine GPU passthrough.
- If you see the following error when running the command:
Update-VMGpuPartitionDriver.ps1 -VMName "YourVMName" -GPUName "AUTO"This error can be caused by multiple partitions (volumes) on a virtual hard disk. Try to set the hidden attribute for non-system (OS) partitions or temporarily delete these partitions after copying the needed data. An alternative option is to set the needed system (OS) partition explicitly in the PowerShell script or command.
Conclusion
Using a virtual machine with GPU passthrough on a Hyper-V host can be the optimal solution in some cases but be aware of the limitations. Server-grade hardware and Windows Server operating systems are generally preferred for using a discrete video card on virtual machines. Check for supported software and hardware before starting the configuration. Don’t forget to back up Hyper-V VMs to avoid losing data and time if something goes wrong when configuring a video card for VMs.
You may need a video card (GPU) in a virtual machine for tasks like OpenGL, Direct3D, and CUDA. In that case, we usually use an emulated video card, which is not as good of a performer as a dedicated GP. Therefore, in this post, we will learn how to attach a physical video card to a VM on a host.
How do I pass my GPU through Hyper-V?
To attach a physical video card to a VM on a Hyper-V host, we will use GPU Passthrough.
GPU passthrough is an advanced feature that allows you to assign a physical GPU to a virtual machine. This feature is particularly useful for applications such as gaming or 3D rendering, where high-performance graphics are required. In this setup, the virtual machine gains direct access to the physical graphics adapter without the overhead of emulation, which can significantly improve graphics performance. By default, virtual machines in Hyper-V use an emulated graphics card, which may not be sufficient for demanding graphics tasks. With GPU passthrough, the virtual machine can harness the full power of the physical GPU, enabling it to handle more intensive graphics workloads efficiently.
What are the system requirements for GPU Passthrough?
Before we go ahead and set up GPU Passthrough, let us make sure to meet the following prerequisites.
Hardware requirements
- You need to make sure that your processor supports Intel-VT or AMD-V Virtualization.
- For PCI Passthrough, your processor must support an Input-Output Memory Management Unit (IOMMU).
- Your GPU must support GPU Virtualization technologies such as NVIDIA GRID or AMD MxGPU. These technologies are specific to individual vendors. Success rates can be improved by utilizing server-class hardware. Older devices that rely on PCI Interrupts (INTx) are not compatible.
- Finally, your system should support Single Root Input/Output Virtualization.
Software requirements:
- Operating System: Windows Server 2016 (or later) or Windows 11/10.
- Features: Hyper-V must be enabled.
- VM Generation: The virtual machine should be Generation 2.
- Drivers: All the GPU drivers should be updated to the latest version.
Limitations of GPU Passthrough:
If you want to use GPU Passthrough, you must avoid the following configuration.
- Your virtual machine should not be using Dynamic Memory.
- GPU Passthrough is only available on the highest Windows editions, like Windows Server 2019 Datacenter.
- If Windows Subsystem for Linux is deployed on the Hyper-V host, a VM error with code 43 can occur.
- Clustering features such as high availability and live VM migration are not supported.
- Save and restore with VM checkpoints are not supported.
After meeting the requirements mentioned earlier, we can leverage GPU Passthrough.
To attach a physical video card to a VM on a Hyper-V host using GPU Passthrough, follow the below steps.
- Enable Intel-VT or AMD-V Virtualization
- Configure your computer for GPU Passthrough
- Set up GPU Passthrough for Windows 11/10
- Set up GPU Passthrough for Windows Server
Let us talk about them in detail.
1] Enable Intel-VT or AMD-V Virtualization
As mentioned in the prerequisites, our first step should be to enable Hardware Virtualization. So, if you are using an Intel CPU, you should enable Intel-VT, and AMD users, should enable AMD-V Virtualization.
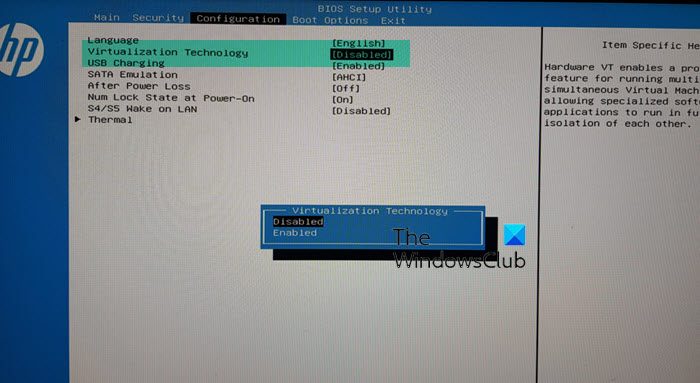
To do so, boot into BIOS, go to the Configuration > Virtualization Technology, and then set it to Enabled, since these steps are exclusive to HP, you can go to the linked post to see how to enable the feature for your computer.
Read: How to enable or disable Nested Virtualization for VMs in Hyper-V?
2] Configure your computer for GPU Passthrough

Next, we need to configure the host computer for GPU Passthrough. We started by enabling Hardware Virtualization, as mentioned earlier. Next, we need to make sure that IOMMU is enabled and automatic checkpoints are disabled.
So, you can check the linked guide on enabling hardware virtualization to enable IOMMU, but it is usually enabled by default. We can open PowerShell and run the following query to check if it is enabled.
(Get-VMHost).IovSupport; (Get-VMHost).IovSupportReasons
If it says, True, the feature is enabled, you can move on to the next configuration, but if it says, False, you need to enable this feature.
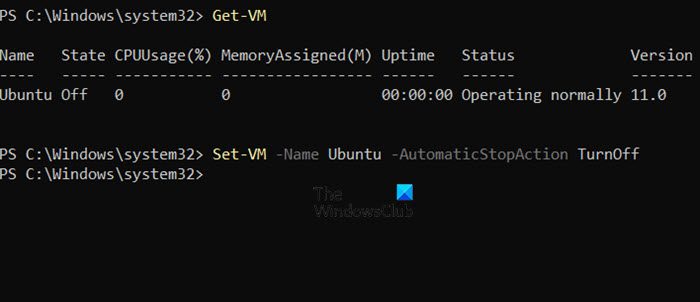
Now, go ahead and delete all the checkpoints of your VM, and then use the following commands to disable it.
Get-VM
Set-VM -Name NameOfVM -AutomaticStopAction TurnOff
Note: Replace the variable NameOfVM with the actual name of the virtual machine that you can fetch by running the previous command.
Read: How to enable Hyper-V on Windows 365 Cloud PC?
3] Set up GPU Passthrough for Windows 11/10

First, let us learn how to enable GPU Passthrough on Windows client operating systems.
You need to run the following command to check if your video card supports GPU Passthrough.
Windows 11
Get-VMHostPartitionableGpu
Windows 10
Get-VMPartitionableGpu
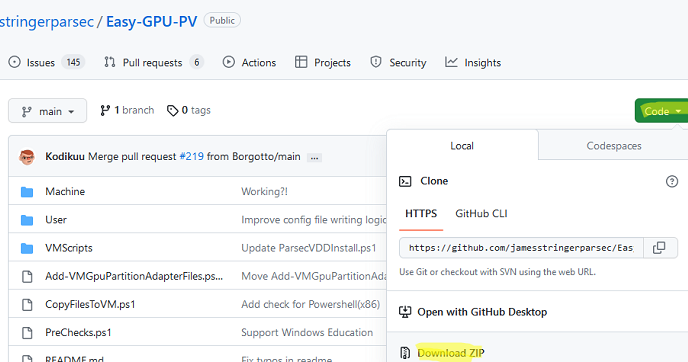
Next, we need to copy the graphics driver from the host client to the VM. To simplify the process, we recommend downloading the ZIP file from github.com and extracting it somewhere.

To run this script, we first need to allow script execution using the following two commands.
Set-ExecutionPolicy -Scope Process -ExecutionPolicy Bypass -Force

Set-ExecutionPolicy -ExecutionPolicy RemoteSigned -Scope CurrentUser
After running the command, you need to run the script using the following command. You can run it before and/or after adding your VM to GPU Passthrough
.\Update-VMGpuPartitionDriver.ps1 -VMName <VMNAME> -GPUName "AUTO"
Note: Make sure to add the path of the script and <VMNAME>. In my case, the script would be C:\Users\yusuf\Downloads\Easy-GPU-PV-main\Easy-GPU-PV-main\Update-VMGpuPartitionDriver.ps1 -VMName Ubuntu -GPUName “AUTO”.
Now, run the following command add your VM to GPU Passthrough.
Set-VM -VMName VMName -GuestControlledCacheTypes $true -LowMemoryMappedIoSpace 1Gb -HighMemoryMappedIoSpace 32Gb
Add-VMGpuPartitionAdapter -VMName <VMNAME>
To remove the GPU Partition, run – Remove-VMGpuPartitionAdapter -VMName <VMNAME>.
4] Set up GPU Passthrough for Windows Server
If you are using Windows Server, you need to run the following command in the elevated mode of PowerShell to set cache and limits for 32-bit (3 GB for 32-bit operating systems) MIMO space.
Set-VM -Name VMNAME -GuestControlledCacheTypes $True -LowMemoryMappedIoSpace 3Gb -HighMemoryMappedIoSpace 33280Mb
These limits define the memory allowing VM access to the device. Use a Machine Profile script from learn.microsoft.com to set accurate MIMO limits. Adjust values if VM shows resource shortage; 33280 MB is needed for MIMO space larger than 32-bit.
Next up, we need to check the PCI Express device’s location. To do so, run the following queries.
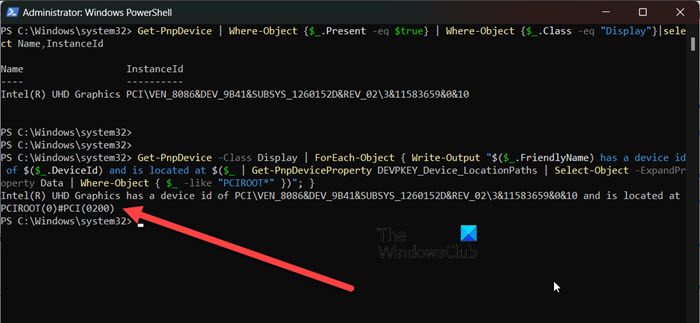
Get-PnpDevice | Where-Object {$_.Present -eq $true} | Where-Object {$_.Class -eq "Display"}|select Name,InstanceId
AND
Get-PnpDevice -Class Display | ForEach-Object { Write-Output "$($_.FriendlyName) has a device id of $($_.DeviceId) and is located at $($_ | Get-PnpDeviceProperty DEVPKEY_Device_LocationPaths | Select-Object -ExpandProperty Data | Where-Object { $_ -like "PCIROOT*" })"; }
You need to see where your GPU is located, it should be something like PCIROOT(0)#PCI(0200).
Finally, follow the steps mentioned below.
- Open Device Manager, expand Display adapters, right-click on your display drivers, and click on Disable device.
- Run the following command to dismount the GPU driver after changing the PCI address.
Dismount-VmHostAssignableDevice -LocationPath "PCIROOT(0)#PCI(0200)" -Force
- After changing the PCI address and VM name, run the following command to assign a GPU device to the VM.
Add-VMAssignableDevice -VMName VMNAME -LocationPath "PCIROOT(0)#PCI(0200)"
- Turn on the VM and check for a physical video card in the Device Manager.
- Install the video card drivers from the NVIDIA or AMD website.
If you want to switch back to the host machine, shut down the VM and run the following query on the host device.
Remove-VMAssignableDevice -VMName VMNAME -LocationPath $locationPath
Then, run the following command to connect the video card back to the Hyper-V host.
Mount-VMHostAssignableDevice -LocationPath $locationPath
That’s it!
Also Read: Configure Secured-core Server for Windows Server.
В предыдущих версиях Hyper-V (начиная с Windows 7/Windows Server 2008R2) для проброса дискретной видеокарты с хоста в виртуальную машину можно было использовать технологию RemoteFX vGPU. Однако, начиная с Windows 10 1809 и Windows Server 2019, Майкрософт отключило поддержку RemoteFX. Вместо нее предлагается использовать новую технологию Discrete Device Assignment (DDA).
Содержание:
- Проброс видеокарты в виртуальную машину на Windows Server с Hyper-V
- Использование GPU в виртуальных машинах Hyper-V на Windows 10/11
DDA позволяет пробросить PCI/PCIe устройства (включая GPU, NVMe) с хоста в виртуальную машину Hyper-V.
Основные требования к инфраструктуре для использования DDA в Hyper-V:
- Доступно только для виртуальных машин Hyper-V второго поколения (Gen 2);
- На ВМ должно быть отключены динамическая память и чекпоинты;
- Физическая карта должна поддерживать технологию GPU Partitioning;
- Если на хосте развернута среда WSL (Windows Subsystem for Linux), то при пробросе видеокарты с помощью GPU-P, в ВМ может появляться ошибка видеокарты с кодом 43;
- Хотя SR-IOV (Single Root Input/Output Virtualization) не заявлена в требованиях DDA, без ее поддержки проброс GPU в ВМ работает не корректно.
Discrete Device Assignment доступна только в Windows Server с ролью Hyper-V. В десктопных версиях Windows 10/11 для предоставления общего доступа к видеокарте в виртуальных машинах можно использовать GPU Partitioning. В этой статье мы покажем, как пробросить видеокарту в виртуальную машину на Hyper-V.
Проброс видеокарты в виртуальную машину на Windows Server с Hyper-V
Discrete Device Assignment (DDA) позволяет пробросить PCIe устройства в виртуальную машину во всех версиях Windows Server, начиная с 2016.
Перед пробросом GPU в ВМ, нужно изменить ее конфигурацию.
Отключить автоматическое создание снапшотов (описано в статье об управлении запуском и порядке загрузки ВМ на Hyper-V):
Set-VM -Name VMName -AutomaticStopAction TurnOff
Настроить кэш и лимиты памяти для 32-разрядного пространства MMIO:
Set-VM -Name VMName -GuestControlledCacheTypes $True -LowMemoryMappedIoSpace 3Gb -HighMemoryMappedIoSpace 33280Mb
Затем нужно получить физический путь к PCIe устройству видеокарты на хосте Hyper-V. Для этого нужно открыть свойства GPU в диспетчере устройств, перейти на вкладку Details и выбрать свойство Location paths. Скопируйте значение, которое начинается с PCIROOT.
Либо вы можете получить это значение с помощью PowerShell:
Get-PnpDevice | Where-Object {$_.Present -eq $true} | Where-Object {$_.Class -eq "Display"}|select Name,InstanceId
Отключить эту видеокарту на сервере Hyper-V в диспетчере устройств или с помощью PowerShell:
Dismount-VmHostAssignableDevice -LocationPath "PCIROOT(0)#PCI(0300)#PCI(0000)" –force
Теперь нужно пробросить GPU адаптер в виртуальную машину:
Add-VMAssignableDevice -VMName VMName -LocationPath "PCIROOT(0)#PCI(0300)#PCI(0000)"
Затем включите ВМ и проверьте, что ваша видеокарта появилась в диспетчере устройств в разделе Display Adapters вместе с устройством Microsoft Hyper-V Video.
Драйвера видеокарты должны быть предварительно установлены в ВМ.
Чтобы отключить GPU от ВМ и подключить его к хосту:
Remove-VMAssignableDevice -VMName VMName -LocationPath $locationPath
Mount-VMHostAssignableDevice -LocationPath $locationPath
Использование GPU в виртуальных машинах Hyper-V на Windows 10/11
GPU Partitioning (GPU-P) доступно в виртуальных машинах Hyper-V на Windows 10/11, начиная с билда 1903. Проверьте, что ваша видеокарта поддерживает режим GPU Partitioning с помощью команды Get-VMPartitionableGpu (Windows 10) или Get-VMHostPartitionableGpu (для Windows 11).
Для проброса видеокарты в ВМ используется командлет Add-VMGpuPartitionAdapter. Чтобы скопировать драйвера видеокарты с хоста Hyper-V в виртуальную машину нужно использовать скрипт Easy-GPU-PV (https://github.com/jamesstringerparsec/Easy-GPU-PV).
Скачайте ZIP архив с скриптом и распакуйте его в папку на хосте Hyper-V.
Откройте консоль PowerShell с правами администратора и разрешите запуск PowerShell скриптов в текущей сессии (подробнее о PowerShell Execution Policy):
Set-ExecutionPolicy -Scope Process -ExecutionPolicy Bypass –Force
Выполняйте скрипт:
.\Update-VMGpuPartitionDriver.ps1 -VMName VMName -GPUName "AUTO"
Скрипт скопирует драйвера видеокарты с хоста в ВМ.

Теперь осталось настроить ВМ и пробросить в нее GPU:
Set-VM -VMName VMName -GuestControlledCacheTypes $true -LowMemoryMappedIoSpace 1Gb -HighMemoryMappedIoSpace 32Gb
Add-VMGpuPartitionAdapter -VMName VMName
Если вы обновили драйвера видеокарты на хосте Hyper-V, нужно обновить их в ВМ:
.\Update-VMGpuPartitionDriver.ps1 -VMName VM Name -GPUName "AUTO"
As Windows enthusiasts and virtualization aficionados, you may find yourself wanting to leverage the full power of your graphics card within a virtual machine. This article provides a comprehensive guide on setting up GPU passthrough for a Windows 11 virtual machine (VM) using Proxmox. Despite the potential complexities involved, following the steps outlined below will allow you to access your ultra-fast graphics card in a Windows 11 VM, unlocking capabilities such as gaming and GPU-intensive applications.

Understanding GPU Passthrough
GPU passthrough allows virtual machines to utilize physical GPU hardware directly, enabling significantly improved graphical performance compared to traditional virtualized graphics solutions. This is particularly useful for tasks like gaming, video editing, and running graphically intensive applications within a virtual environment. Utilizing Proxmox for GPU passthrough can provide excellent performance comparable to a native installation, but it does require careful configuration of both the Proxmox server and the Windows VM.
Prerequisites
Before diving into the installation process, ensure you meet the following requirements:
- Proxmox VE 6.1 or later: Check your Proxmox version to ensure compatibility.
- Supported GPU: An NVIDIA, AMD, or Intel GPU that supports passthrough.
- Windows 11 ISO: Obtain a legitimate copy of the Windows 11 installation ISO.
- VirtIO Drivers: Download these drivers which are essential for optimal performance and compatibility.
- A Proxmox server: Ensure your hardware supports virtualization (VT-d for Intel CPUs or AMD-Vi for AMD CPUs) and that it is enabled in the BIOS.
Creating a Windows 11 VM
The first step in this process is creating a Windows 11 virtual machine in Proxmox.
Step-by-Step Guide
- Download Necessary Files: Download both the Windows 11 ISO and the VirtIO drivers ISO from their respective sources.
- Upload ISOs to Proxmox:
- Access your Proxmox web interface.
- Navigate to the ISO Images tab of your node and upload the downloaded files. [*Create the VM:
- Click on Create VM in the upper right corner.
- Fill in the VM Name and select the Windows 11 ISO as the ISO Image.
- Set the Guest OS type to «Microsoft Windows» and proceed through the setup wizard.
- In the CD/DVD settings, ensure the VirtIO drivers ISO is added to facilitate driver installation later. [*Configure Hardware Settings:
- Use the default settings for CPU and Memory unless specific adjustments are needed for heavy workloads.
- Ensure you select Intel E1000 as the Network driver.
- Complete the setup and start your VM. [*Installing Windows 11:
- Boot from the Windows 11 ISO using the noVNC console.
- Follow the installation prompts. When selecting the storage drive, choose the VirtIO drivers corresponding to the specific disk controller.
- If network connectivity issues arise during setup, you can bypass these by using the command
OOBE\BYPASSNROin the terminal (press Shift + F10 during setup).
Installing GPU Drivers on the Windows 11 VM
After successfully setting up Windows 11, you need to install the appropriate GPU drivers to ensure full functionality. [*Prepare for Driver Installation:
- Power off the VM and go to the Hardware tab.
- Add the physical GPU by selecting the «PCI Device» option.
- Enable the relevant options regarding the GPU and configure it as needed. [*Download GPU Drivers:
- Start your VM and download the GPU drivers from your GPU manufacturer’s website.
- If you encounter internet connectivity issues, use USB passthrough for a USB-to-WLAN adapter. [*Install Drivers:
- Run the GPU driver installation with administrative privileges.
- Verify successful installation by checking under Device Manager.
Accessing the GPU via Remote Desktop
Using the GPU within the Windows 11 VM usually requires Remote Desktop (RDP), particularly for graphical applications. Here’s how to configure RDP for your VM: [*Configure RDP:
- Power off the VM, return to Proxmox, and in the Hardware tab, enable the Primary GPU option.
- Restart the VM. [*Connect Using RDP:
- On a Windows client, open the Run dialog (Win + R), type
mstsc, and hit Enter. - Enter the IP address of the VM and connect using the VM’s credentials provided during setup. [*Addressing Latency Issues:
- While RDP is effective, it can introduce latency, particularly for gaming. Consider using Parsec, which offers optimized streaming performance for graphical applications and gaming.
Making the Most of Your GPU’s Power Inside the VM
Once you’re connected successfully, you can begin utilizing your GPU for demanding workloads.
Performance Considerations
[*Video Editing*: Applications like Premiere Pro and DaVinci Resolve can leverage the GPU for accelerated rendering and real-time effects, making your workflow smoother. [Machine Learning/Training Tasks**: Use frameworks like TensorFlow or PyTorch within your Windows 11 VM to harness the full capabilities of the GPU, whether for model training or inference. [*Gaming: While RDP and other remote desktops may not be ideal for fast-paced action games due to latency, using software like Parsec can mitigate these issues, providing a more seamless experience.
Troubleshooting Common Issues
- No Display: If your Windows 11 interface does not display, double-check that the VM’s GPU configuration is correct and that the GPU is not being used by the host OS.
- Network Issues: Ensure that the VirtIO drivers are correctly installed, as these tend to resolve most network-related complications within VMs.
- Driver Installation Failures: If drivers are not displaying the GPU correctly, revisit Proxmox settings and ensure the GPU is correctly passed through.
Conclusion
Setting up GPU passthrough for a Windows 11 VM in Proxmox can seem daunting, but with the right guidance, it can be achievable and incredibly rewarding. By following the steps outlined above, you can use your graphics card for heavy workloads and enjoy high-performance applications in your virtual environment. Whether you’re gaming or video editing, the combination of Proxmox and GPU passthrough offers a potent solution for maximizing your system’s capabilities. By staying up to date with the latest Proxmox updates and GPU drivers, you can ensure a smooth and efficient experience with your Windows 11 VM.
This guide aims to provide both a thorough understanding and practical steps to enable GPU passthrough in a Windows 11 environment. Engage with the community to share your experiences, and let’s enhance our virtual environments together. Source: XDA How to use GPU passthrough on a Windows 11 VM in Proxmox?