
Групповые политики Active Directory позволяют централизованно применять одинаковые настройки ко множеству компьютеров и/или пользователей домена и существенно упрощают управление конфигурацией в доменной среде. Консоль Group Policy Management Console (GPMC.msc) – это основной инструмент для управления групповыми политиками (Group Policy Object, GPO) в Active Directory.
Содержание:
- Установка консоли GPMC в Windows
- Управление групповыми политиками Active Directory с помощью консоли Group Policy Management
Установка консоли GPMC в Windows
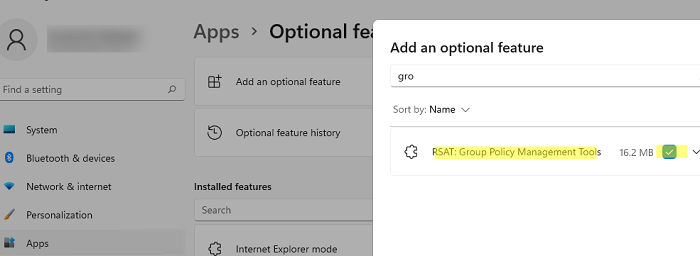
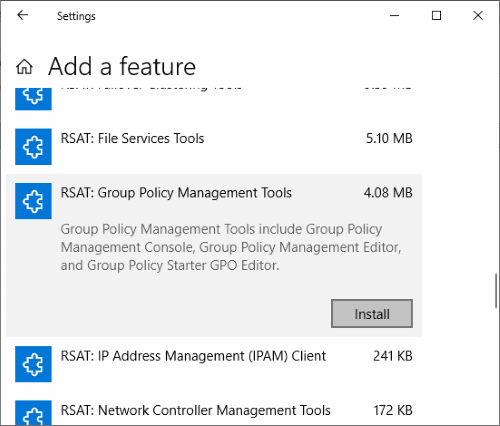
В Windows 10 и 11 консоль GPMC входит в состав RSAT, и вы можете установить ее через панель Settings. Перейдите Settings -> Apps -> Optional Features -> Add an optional feature -> выберите в списке RSAT: Group Policy Management Tools и нажмите Install.
Также вы можете установить консоль управления групповыми политиками в Windows 10 и 11 с помощью PowerShell:
Add-WindowsCapability -Online -Name Rsat.GroupPolicy.Management.Tools~~~~0.0.1.0
Или с помощью DISM:
DISM.exe /Online /add-capability /CapabilityName:Rsat.GroupPolicy.Management.Tools~~~~0.0.1.0
Обратите внимание, что в современных версиях Windows 10 и 11 для установки инструментов управления RSAT, ваш компьютер должен быть подключен к Интернету. Подробнее про установку инструментов администрирования (RSAT) в Windows описано в статье по ссылке.
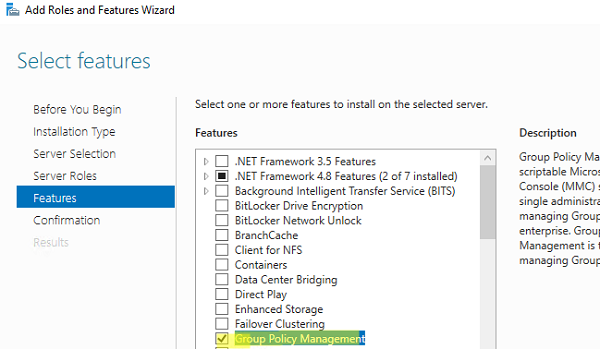
В Windows Server 2022/2019/2016/2012R2 вы можете установить консоль управления GPO через Server Manager: Add Roles and Features -> Features -> Group Policy Management.
Также можно установить консоль GPMC в Windows Server с помощью PowerShell командлета Install-WindowsFeature:
Install-WindowsFeature GPMC

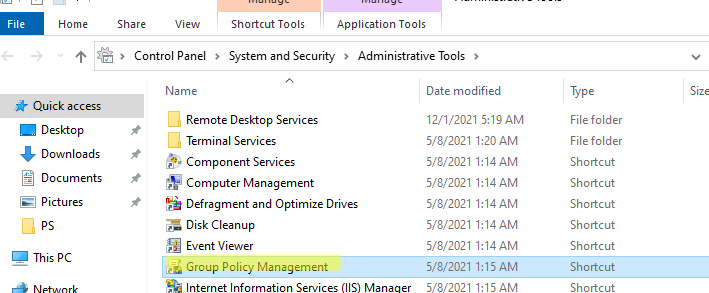
После установки, проверьте что ярлык Group Policy Management появится в разделе Administrative Tools в панели управления (Control Panel\System and Security\Administrative Tools). Ярлык ссылается на MMC оснастку
%SystemRoot%\system32\gpmc.msc
.
Управление групповыми политиками Active Directory с помощью консоли Group Policy Management
Консоль GPMC позволяет управлять групповыми политиками на уровне сайтов AD, доменов и организационными подразделениями (Organizational Unit).
Для запуска консоли выполните команду:
gpmc.msc
По умолчанию консоль подключается к контроллеру домена с FSMO ролью Primary Domain Controller Emulator (PDC). Вы можете подключиться к любому другому DC. Для этого щелкните правой кнопкой по имени домена и выберите Change Domain Controller (для комфортной работы рекомендуем подключиться к вашему Logon Server-у).
Разверните Forest -> Domain -> Ваш домен.
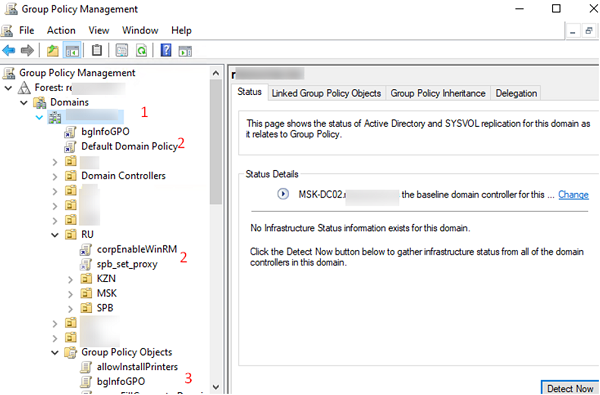
На этом скриншоте выделены:
- Имя домена, к которому подключена консоль;
- Групповые политики, которые назначены на различные OU (отображается вся структура OU, которую вы видите в консоли ADUC);
- Полный список политик (GPO) в текущем домене доступен в разделе Group Policy Objects.
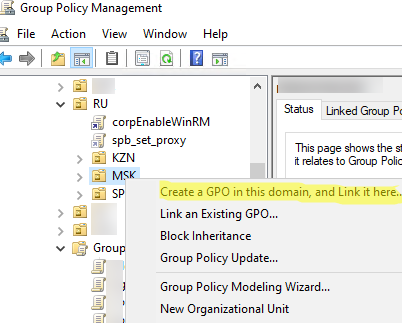
Групповые политики Active Directory можно назначить на OU, сайт или весь домен. Чаще всего политики привязываются к OU с компьютерами или пользователями.
Чтобы создать новую GPO и сразу назначить ее на OU, щелкните по нужному контейнеру правой кнопкой и выберите Create a GPO in this domain, and Link it here.
Задайте имя GPO:
В консоли GPMC вы увидите вашу новую GPO, которая сразу назначена на выбранный вами контейнер (OU).
GPO активна (
Link Enabled = True
), это значит что ее настройки будут применяться ко всем объектом в данном OU.
Чтобы изменить настройки GPO выберите Edit.
Для управления параметрами групповой политики на компьютере Windows используется консоль локального редактора GPO – gpedit.msc. Он позволяет настроить параметры Windows с помощью одной или множественных локальных политик (MLGPO).
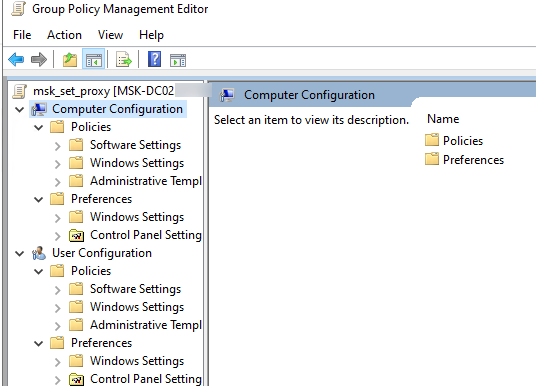
Перед вами откроется консоль редактора GPO, аналогичная локальному редактору GPO. Все настройки GPO разделены на две секции:
- Computer Configuration — здесь можно настроить параметров компьютера (Windows);
- User Сonfiguration – параметры, которые нужно применить для пользователей AD.
В каждой секции есть три подраздела:
- Software Settings – используется для установки и обновления программ через GPO;
- Windows Settings — здесь расположены основные параметры безопасности Windows: настройки политики паролей, блокировки аккаунтов, политики аудита, назначения прав пользователей и т.д;
- Administrative Templates – содержит параметры различных компонентов Windows. Здесь доступны как стандартные административные шаблоны Windows, так и дополнительно admx шаблоны, установленные администратором (например, admx шаблоны для управления программами Microsoft Office или шаблоны для Google Chrome). Рекомендуем использовать центральное хранилище административных шаблонов GPO для удобства управления.
Также здесь есть отдельный раздел Preferences. Здесь содержится дополнительный набор настроек Group Policy Preferences (GPP), которые вы можете задать для клиентских устройств через GPO.
Закройте редактор политики и вернитесь в консоль GPMC. Все настройки, которые вы изменили в GPO будут применены на клиентах при следующем цикле обновления настроек групповых политик.
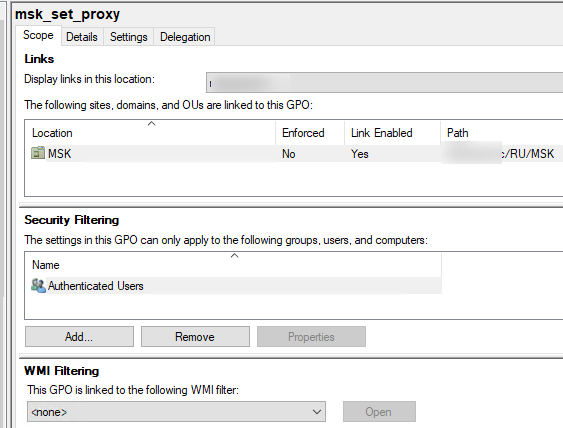
Выберите вашу GPO, чтобы вывести ее основные параметры. Здесь доступны 4 вкладки:
- Scope – здесь видно на какие OU назначена эта политики. В разделе Security Filtering можно настроить группы безопасности, для членов которых должна применяться политики (по умолчанию здесь задано Authenticated Users, это значит, что политика применяется ко всем объектам в OU). В параметре WMI filtering можно задать дополнительные правила фильтрации объектов для которых должна применяться GPO (см. WMI фильтры GPO);
- Details – содержится базовая информация о GPO (владелец, когда создана и изменена, версия, GUID);
- Settings – содержится отчет о всех настроенных параметрах GPO (отчет похож на результаты команды gpresult);
- Delegation – выводит текущие разрешения GPO, позволяет изменить их.
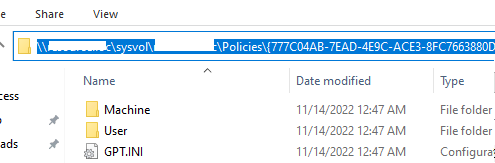
Active Directory хранит GPO хранятся в виде набора файлов и папок в каталоге SYSVOL, который реплицируется между DC. Вы можете найти каталог определенной GPO по ее GUID (на вкладке Details). Используйте следующий UNC путь:
\\winitpro.ru\sysvol\winitpro.ru\Policies\{GUID}
Если вы хотите, чтобы политика перестала действовать на клиенты в данном OU, можно либо удалить ссылку (
Delete
, при этом сама объект GPO не будет удален), либо временно отключить ее действие (
Link Enabled = False
).
Обратите внимание, что в домене уже есть две политики, которые действуют на все компьютеры и контроллеры домена соответственно:
- Default Domain Policy
- Default Domain Controller Policy
В большинстве случае не рекомендуется использовать эти GPO для настройки параметров клиентов. Лучше создать новые политики и назначить их на уровень всего домена или контейнера Domain Controllers.
Также консоль Group Policy Management позволяет:
- Импортировать/экспортировать, создавать резервные копии и восстанавливать GPO
- Создавать результирующие отчеты политик — Resultant Set of Policy (RSoP)
- Удаленно обновлять настройки GPO на компьютерах
- Подготавливать GPO к миграции между доменами
В отдельной статье “Почему не применяется групповая политика к компьютеру?” рассмотрены такие основные элементы групповых политик Active Directory как:
- Наследование в групповых полотках
- Область действия и порядок применения GPO (LSDOU)
- Приоритете и управление порядком применения политик
- Замыкание групповых политик (Loopback Processing mode)
- Фильтрация GPO
- Форсирование применения GPO
Рекомендуем внимательно ознакомиться с этой статьей для более эффективного использования возможностей групповых политик и понимания принципов их работы.
If you are a computer geek, you may already know the built-in Group Policy Editor (gpedit.msc) in Windows 11 and 10. It is used only to manage the policies of the local computer. But if you are a domain administrator within an organization, you may also need the Group Policy Management Console, a.k.a. GPMC.
The two tools are slightly different from one another but perform the same tasks. Today we are going to talk about what the Group Policy Management Console is and how to install it on your Windows computer.
Table of Contents
What is Group Policy Management Console (GPMC)
The Group Policy Management Console is part of the Remote Server Administration Tool (RSAT) that unifies Group Policy management across the entire domain. So, if an administrator wants to manage the domain’s Group Policy from a Windows operating system (as opposed to a Windows Server), they will need to install the GPMC.
Before GPMC, administrators had to open different tools to get the job done, such as the following:
- Active Directory Users and Computers
- Active Directory Sites and Services
- Resultant Set of Policy
- ACL Editor
- GPMC Delegation Wizard
However, with GPMC, all these attributes are centralized under a single tool. Moreover, it also has the following attributes:
- A convenient User Interface (UI).
- Backup, restore, import, and copy Group Policy objects (GPOs).
- Simplified management of Group Policy-related security.
- Reporting of GPO settings and Resultant Set of Policy (RSoP) data.
- Programmatic access to the preceding GPO operations.
That said, GPMC needs to be installed on a Windows computer to use it.
Install Group Policy Management Console (GPMC) on Domain Computer
Note: To use GPMC after installation, you must be signed in as a domain user and not as a local computer user. Otherwise, you will see the following prompt:
Perform the following steps to install GPMC on a Windows computer connected to your enterprise’s domain:
-
Navigate to the following:
Settings app >> Apps >> Optional Features
-
Here, click View features in front of “Add an optional feature.”
 In Windows 11/10 2")
View optional features -
In the “Add an optional feature” popup, search for “Group policy.” Then, check the box next to “RSAT: Group Policy Management Tools” and click Next.
Select feature -
On the next page, click Install.
Install feature
 In Windows 11/10 2")
 In Windows 11/10 3")
 In Windows 11/10 4")
The Group Policy Management Console will now be installed on your PC.
How to Open Group Policy Management Console (GPMC)
Once GPMC is installed, there are 2 methods to open it.
Using GPMC.MSC Cmdlet
One way is by calling the Microsoft Management Console (MMC) through the command line. To do so, simply type in the following in either the Run Command box, Command Prompt, or Windows PowerShell and hit Enter.
gpmc.mscAnother way to go about it is through the Microsoft Management Console Snap-in.
From MMC Snap-In
Perform the following steps to open and connect GPMC to your domain controller:
Note: To connect GPMC to your domain controller successfully, make sure that your network configuration is correct, meaning the Windows device can communicate with the Domain Controller.
-
Open the Microsoft Management Console by typing in MMC in the Run Command box.
Open MMC -
Click File and then click “Add/Remove Snap-in.”
 In Windows 11/10 7")
Add/Remove Snap-in -
From the popup window, select “Group Policy Management Editor” under Available snap-ins and click Add.
 In Windows 11/10 8")
Add snap-in -
You will now be asked to add a Group Policy Object (GPO). Click Browse and select the domain. When selected, click Finish.
Add Group Policy Object -
Now back in the “Add or Remove Snap-ins” window, click Ok.
Click Ok
 In Windows 11/10 7")
 In Windows 11/10 8")
 In Windows 11/10 9")
 In Windows 11/10 10")
You can now begin managing your domain’s Group Policy from a Windows computer with this simple RSAT GPMC tool.
Closing Words
The GPMC is a centralized administrative tool you can use on a client PC, without having to transfer to a Windows Server computer. However, if you are using the Home edition of Windows OS, you cannot install RSAT tools on it, which in turn prevents you from installing the Group Policy Management Tools.
Frequently Asked Questions
Can an administrator launch the Group Policy Management Console (GPMC) from a workstation?
Yes, a domain administrator can launch and use the Group Policy Management Console from a workstation. However, they need to be using either the Pro or Enterprise edition of Windows and have the Remote Server Administration Tools (RSAT) installed, with the Group Policy Management Tools present in specific.
Can Remote Server Administration Tools (RSAT) be installed on Windows Home edition?
The RSAT packages are only available to download in Windows Professional and Enterprise editions. Thus, cannot be installed on the Home edition.
How to open the Group Policy Management Console (GPMC)?
The quickest method to open the Group Policy Management Console is by typing in gpmc.msc in the Run Command box.

The ability to manage Group Policy on a domain via the Group Policy Management Console is not available on Microsoft Windows 10 or Windows 8 by default. You will need to install Remote Server Administration Tools first, then activate it. Here’s how it’s done.
Note: You can install Remote Server Administration Tools for Windows 10 only on the full release of Windows Professional or Windows Enterprise. Otherwise you will receive a “This update does not qualify for your computer.” message when you try to install it.
Windows 10 Version 1809 and Higher
- Right-click the Start button and choose “Settings” > “Apps” > “Manage optional features” > “Add feature“.
- Select “RSAT: Group Policy Management Tools“.
- Select “Install“, then wait while Windows installs the feature. It should eventually appear as an option under “Start” > “Windows Administrative Tools“.

Windows 8 and Windows 10 Version 1803 or Lower
- Download and install one of the following depending on your version of Windows:
- Remote Server Administrator Tools For Windows 10
- Remote Server Administrator Tools For Windows 8
- Remote Server Administrator Tools For Windows 8.1
- Right-click the Start button and choose “Control Panel“. (Note: In some configurations, you may be able to skip to step 8.)
- Select “Programs“.
- From the “Programs and Features” section, select “Turn Windows features on or off“.
- Scroll down and expand the “Remote Server Administration Tools” section.
- Expand “Feature Administration Tools“.
- Ensure that “Group Policy Management Tools” is checked, then select “OK“.
- You should now have an option for “Administrative Tools” on the Start menu. From there, select any of the Group Policy tools you need.
Author Mitch Bartlett
Through my career that spans over 20 years I have become an expert in Microsoft Systems Administration, Android, and macOS. I started this site as a technical guide for myself and it has grown into what I hope is a useful knowledgebase for everyone.
Copilot is your AI companion
Always by your side, ready to support you whenever and wherever you need it.

The Microsoft Group Policy Management Console (GPMC) with Service Pack 1 (SP1) unifies management of Group Policy across the enterprise. The GPMC consists of a MMC snap-in and a set of programmable interfaces for managing Group Policy.
Important! Selecting a language below will dynamically change the complete page content to that language.
-
GPMC simplifies the management of Group Policy by making it easier to understand, deploy, manage, and troubleshoot Group Policy implementations. GPMC also enables automation of Group Policy operations via scripting.
GPMC can be used to manage Windows Server 2003 as well as Windows 2000-based Group Policy implementations. Customers who have at least one valid license of Windows Server 2003 or Windows 2000 Server can obtain and use an unlimited number of copies of GPMC. Please see the End User License Agreement (EULA) provided with the GPMC software for details on licensing terms.
Key features delivered via GPMC include:
- A unified graphical user interface (GUI) that makes Group Policy much easier to use.
- Backup/restore of Group Policy objects (GPOs).
- Import/export and copy/paste of GPOs and Windows Management Instrumentation (WMI) filters.
- Simplified management of Group Policy–related security.
- HTML reporting for GPO settings and Resultant Set of Policy (RSoP) data.
- Scripting of Group Policy related tasks that are exposed within this tool (not scripting of settings within a GPO).
Prior to GPMC, administrators were required to use several Microsoft tools to manage Group Policy. GPMC integrates the existing Group Policy functionality exposed in these tools into a single, unified console, along with the new capabilities listed above.
GPMC with SP1 contains the following updates:
- Various bug fixes. GPMC with SP1 fixes customer-reported bugs found in GPMC sample scripts, GPO reporting, and in the Migration Table Editor (MTE). Furthermore, fixes have been provided to address bugs found from Dr. Watson crash data and to allow the GPMC RSoP wizard to properly function if Internet Connection Firewall (ICF) is enabled on the computer running GPMC.
- New languages. GPMC with SP1 is now also available in French, German, Japanese, Simplified Chinese, Traditional Chinese, and Spanish.
- Updated GPMC EULA. GPMC with SP1 includes an updated end-user license agreement (EULA) that allows GPMC with SP1 to be installed as long as you have a valid Windows Server 2003 or Windows 2000 Server license. For more information, see the GPMC EULA, which is shown during installation of GPMC with SP1.
- Updated MSXML4. MSXML4 has been updated from MSXML4 SP1 to MSXML4 SP2.
-
Supported Operating Systems
Windows Server 2003, Windows XP
- GPMC runs on Windows XP Professional SP1 and Windows Server 2003 computers and can manage Group Policy in either Windows 2000 or Windows Server 2003 domains.
- For Windows XP Professional users, you must have the following installed prior to installing the GPMC:
- Windows XP Service Pack 1
- .NET Framework
- Your domain controllers must be running Windows 2000 with Service Pack 2 or later. Windows 2000 Service Pack 3 is recommended. Domain controller(s) located in an external forest must have Windows 2000 Service Pack 3 or later installed if you will be accessing those domain controllers from a computer running GPMC, because GPMC requires signing and encryption of all LDAP communications. If do not have Service Pack 3 or later installed on the Windows 2000 domain controller(s) in an external forest, you can temporarily relax LDAP signing and encryption requirements by modifying the registry of the computer running GPMC, as described in Knowledge Base Article 325465.
- When installing the GPMC on Windows XP Professional with SP1, GPMC Setup prompts you to install Windows XP QFE Q326469 if it is not already present. This QFE updates your version of gpedit.dll to version 5.1.2600.1186, which is required by GPMC. This QFE will be made available in Windows XP Service Pack 2.
- If the language version of the GPMC doesn’t match the language of your operating system, GPMC will not install the QFE. You will need to separately obtain and install this QFE. To obtain this QFE, please see Knowledge Base Article 326469.
Notes:
- The GPMC does not run on 64-bit versions of Microsoft Windows.
- Setup for GPMC with SP1 automatically removes the original version before installing the new version. However, if you have installed any pre-release versions of GPMC (such as beta or release candidate versions), you must first remove the pre-release version of GPMC before installing GPMC with SP1.
- The sample scripts that shipped with the previously released version of GPMC will be replaced with new sample scripts included in GPMC with SP1. If you modified any of the sample scripts and you want to preserve those changes, rename your modified sample scripts to a different file name before installing GPMC with SP1.
-
- Click the Download link to start the download, or choose a different language from the drop-down list and click Go.
- Do one of the following:
- To start the installation immediately, click Open or Run this program from its current location.
- To copy the download to your computer for installation at a later time, click Save or Save this program to disk.
- To install the GPMC, run the gpmc.msi package. After you accept the End User License Agreement (EULA), all necessary files are installed to the “%Program Files%\GPMC” folder.
- Prior to starting and using the GPMC, please be sure to read the release notes RelNotes.rtf, which is located in the %Program Files%\GPMC» folder.
- After installation of the GPMC, you can open the snap-in using either of the following methods:
- You can open the pre-configured GPMC.msc file. To do this, click Start, click Run, type GPMC.msc and then choose OK. Alternatively, click the Group Policy Management shortcut in the Administrative Tools folder from the Control Panel.
- You can create a custom MMC console that contains the GPMC snap-in. To do this:
- Open MMC, by clicking Start, clicking Run, typing MMC, and then clicking OK.
- From the File menu, choose Add/Remove Snap-in, and then click Add.
- In the Add Standalone Snap-in dialog box, select Group Policy Management and click Add.
- Click Close, and then OK.
- GPMC includes several sample scripts. These are installed in the %ProgramFiles%\GPMC\Scripts folder. You should use cscript.exe to execute all of the sample scripts. For more details on scripts, see the ScriptingReadMe.rtf file in the scripts folder. For instructions and usage information for each script, run each script with the “/?” parameter.
Introduction to Group Policy Management Console (GPMC)
The Group Policy Management Console (GPMC) is an essential administrative tool for managing Group Policy in Windows environments. Designed primarily for system administrators, GPMC provides a unified interface for managing Group Policy Objects (GPOs), which define the operating environment of user accounts and computer accounts. This console integrates various functionalities, including the creation, modification, and application of GPOs, enabling systems administrators to maintain a coherent and secure networked environment.
Purpose of GPMC
Group Policy serves various critical functions in a Windows network, including but not limited to:
- User Configuration: Adjust settings related to user accounts such as desktop backgrounds, login scripts, and more.
- Computer Configuration: Control system behavior for hardware settings, specific software installations, and updates.
- Security Settings: Define and enforce security policies across the organization.
- Software Deployment: Deploy and manage software across multiple machines systematically.
System Requirements for GPMC
Before installing the GPMC on Windows 10, ensure that your system meets the following minimum requirements:
- Operating System: Windows 10 Professional, Enterprise, or Education editions.
- Processor: 1 gigahertz (GHz) or faster compatible processor.
- RAM: 2 GB or more.
- Free Disk Space: Several hundred MB available on the hard drive.
- Network Connection: Access to a network that has Active Directory Domain Services if you intend to manage domain-based Group Policies.
Steps to Install Group Policy Management Console
Step 1: Checking Windows 10 Edition
Not every edition of Windows 10 supports Group Policy Management. You can verify your Windows 10 edition by following these steps:
- Press Windows Key + R to open the Run dialog box.
- Type
winverand press Enter. - The window that appears will display your Windows edition.
Step 2: Enabling Windows Features
Since GPMC is not installed by default on Windows 10, you will need to enable certain Windows features. Here is how you can do it:
- Click on the Start button and select Settings (the gear icon).
- Go to Apps.
- On the left pane, click on Optional Features.
- Scroll down and click on Add a feature.
- In the search box, type RSAT to filter Remote Server Administration Tools.
- Look for RSAT: Group Policy Management Tools in the list and check the box next to it.
- Click on the Install button.
Step 3: Installation via PowerShell
If you prefer using Windows PowerShell to install GPMC, you can do so by following these steps:
- Open Windows PowerShell as an administrator:
- Right-click on the Start button.
- Select Windows PowerShell (Admin).
- Type the following command to install GPMC:
Add-WindowsCapability -Online -Name Rsat.GroupPolicy.Management.Tools~~~~0.0.1.0 - Press Enter and wait for PowerShell to complete the installation process.
Step 4: Verifying Installation
Once you have installed the Group Policy Management Tools, you can verify its correct installation by checking for GPMC on your machine:
- Press Windows Key + R to open the Run dialog box.
- Type
gpmc.mscand hit Enter or click OK. - If GPMC launches, the installation was successful. You will see the console window where you can begin configuring Group Policies.
Step 5: Accessing Group Policy Management Console
You can also access the GPMC via the Start Menu:
- Click on the Start button.
- Scroll through the applications or type “Group Policy Management” in the search box.
- When you spot the Group Policy Management app, click on it to open.
Step 6: Configure GPMC
Once you have successfully opened GPMC, you may want to familiarize yourself with a few critical components:
- Forest and Domain: In the left pane, you will see the connected forests and domains. You can expand these to explore the Group Policy Objects available.
- Group Policy Objects: This section displays a list of existing GPOs that you can manage.
- Group Policy Results: This feature allows you to simulate and view the effect of GPOs on users and computers.
Common Tasks in GPMC
Now that you have successfully installed GPMC, here are a few common tasks that you may need to perform:
Creating a Group Policy Object
- In GPMC, right-click on your domain or the organizational unit (OU) where you want to create the GPO.
- Choose Create a GPO in this domain, and Link it here.
- Provide a name for the GPO and click OK.
Editing a Group Policy Object
- Locate the GPO you wish to edit in GPMC.
- Right-click on it and select Edit.
- You can then modify configurations under either Computer Configuration or User Configuration sections as needed.
Linking a GPO
To have a GPO applied to an OU:
- Right-click on the desired OU where you want to link the existing GPO.
- Select Link an existing GPO.
- Choose the GPO from the list and click OK.
Using Group Policy Results Wizard
To analyze the applied settings and troubleshoot issues:
- Right-click on Group Policy Results in the GPMC console.
- Select Group Policy Results Wizard.
- Follow the prompts to specify the target computer and user.
Troubleshooting Installation Issues
If you experience problems during the installation of GPMC, here are some steps you can take to troubleshoot:
- Reboot Your System: Sometimes, a simple restart can solve installation issues.
- Check Windows Update: Ensure your system is up-to-date as this can affect tool accessibility.
- Command Line Verification: Use the command line to verify installation. Open PowerShell and run:
Get-WindowsCapability -Name Rsat.* -Online | Where-Object { $_.State -eq 'Installed' }This command will display all installed RSAT features including GPMC.
- Permissions: Ensure you have administrative rights on the Windows 10 machine. You may need elevated permissions to perform the installation.
- Domain Membership: If GPMC still doesn’t appear, ensure the machine is part of a domain environment. Group Policy tools are primarily utilized in domain scenarios.
Conclusion
The installation of the Group Policy Management Console (GPMC) on Windows 10 is a critical step for any administrator who manages a Windows domain environment. By following the steps laid out in this guide, you can ensure a smooth installation process. Having GPMC at your disposal allows you to configure Group Policies effectively, manage settings across the network, and ensure that devices and users comply with organizational policies.
With constant changes in technology, keeping GPMC and Windows up-to-date will provide you with enhanced functionalities, improved performance, and security features. Regularly exploring the various options within GPMC will help optimize your organizational workflow, ultimately leading to an efficient and well-managed IT environment. Whether you’re new to Group Policy or a seasoned administrator, mastering GPMC will empower your operations and help you maintain robust, secure systems within your organization.