
Windows 10 has four different projection modes that work with secondary monitors or TVs connected to your PC. To change the projection mode, you can tap the Win+P keyboard shortcut to open the Project panel and you can select whether you want to use both screens, a single screen, or duplicate your screens. If you find yourself visiting this panel often, you can change the Windows 10 projection mode with a keyboard shortcut. Here’s how to set it up.
There are several different ways to create this shortcut however, we’re going to go with possibly the easiest one. Open File Explorer and navigate to the following location.
C:\Windows\System32
Look for an app called DisplaySwitch.exe. Right-click it and select Send to> Desktop (create shortcut). Go to the desktop and right-click the newly created shortcut to DisplaySwitch.exe, and select ‘Properties’ from the context menu.
The first thing you have to do is make a change in the Target field. The change depends on the projection mode you want to use. Add a space at the end of the path in the Target field and enter one of the following.
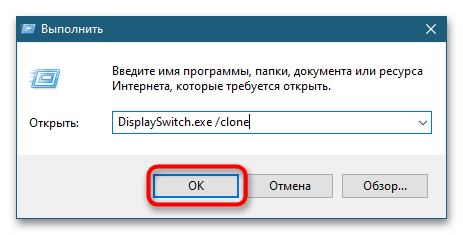
For Duplicate mode: /clone
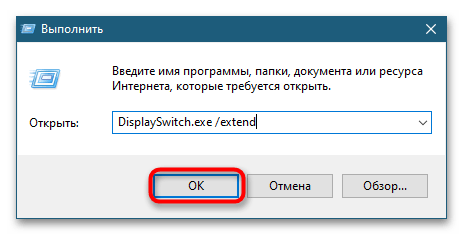
For Extend mode: /extend
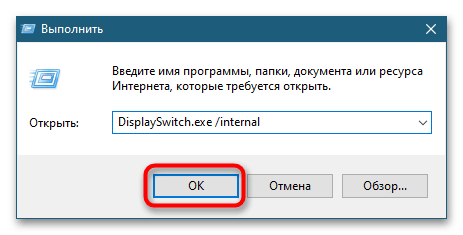
For PC screen only mode: /internal
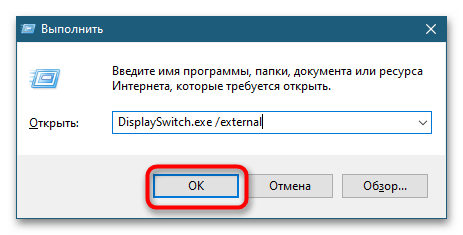
For second screen only mode: /external
You can only use one switch with one shortcut so if you want to use it for different projection modes, you’ll need to create more than one shortcut.
After you change the target field, you have to set a keyboard shortcut for it. On the same General tab on the Properties window, you will see a Shortcut key field. Click inside it and tap a letter or number key. It will be executed with the Ctrl+Alt keys. The shortcut will let you change the projection mode.
The Project side panel will still open and in some cases, it might take a second or two for the mode to switch but it will work. As for the Project panel, if you’re looking for a way to do this silently/in the background without it opening, there isn’t one. This is simple and it works.
We should mention that you will have to keep the shortcut on your desktop. You cannot move it to a different drive. To keep everything tidy, create a folder on the desktop and move the shortcut(s) to it. The keyboard shortcut will still work in this scenario. As for the Ctrl and Alt keys, there’s no avoiding them. They’re added automatically.

Fatima Wahab
Fatima has been writing for AddictiveTips for six years. She began as a junior writer and has been working as the Editor in Chief since 2014.
Fatima gets an adrenaline rush from figuring out how technology works, and how to manipulate it. A well-designed app, something that solves a common everyday problem and looks
Приведение к внешнему дисплею с компьютера с Windows
Вы можете подключить компьютер по беспроводной сети к телевизору, проектору или другому внешнему дисплею с поддержкой Miracast.
-
Включите телевизор, проектор или другой дисплей. Если вы используете ключ или адаптер Miracast, убедитесь, что он подключен к дисплею.
-
Нажмите клавишу с логотипом Windows + K, а затем выберите в списке доступных устройств дисплей, к который вы хотите привести.
-
Следуйте всем дополнительным инструкциям на экране. В противном случае, все готово.
Приведение к другому компьютеру с Windows с компьютера с Windows
-
На компьютере, на который вы хотите проецировать:
-
Нажмите кнопку Пуск > Настройки > Система > Проецирование на этот компьютер .
-
В разделе Добавление необязательной функции «Беспроводной дисплей» для проецирования на этот компьютер, выберите Необязательные функции.
-
Рядом с пунктом Добавление необязательной функции выберите Просмотр функций и введите «беспроводной дисплей».
-
Установите флажок рядом с пунктом Беспроводной дисплей в списке результатов, выберите Далее, затем нажмите Установить.
-
После установки беспроводного дисплея выберите Назад , чтобы управлять параметрами проекции на странице Проецирование на этот компьютер в разделе Параметры.
-
Запустите приложение Wireless Display, введя «беспроводной дисплей» в поле поиска на панели задач и выберите Беспроводной дисплей в списке результатов.
Примечание: Приложение Wireless Display доступно на устройствах под управлением Windows 11 версии 22H2 и более поздних версий. Если вы используете более раннюю версию Windows, запустите приложение Connect, введя connect в поле поиска на панели задач и выбрав Подключить в списке результатов.
Чтобы узнать, какую версию Windows вы используете, см. статью Какая версия операционной системы Windows используется?
-
-
На компьютере, с который вы проецироваться, выберите клавиши с логотипом Windows + K и выберите компьютер, к которому вы хотите подключиться.Вы также можете выполнить поиск по запросу Приведение на панели поиска Windows, а затем выбрать Подключиться к беспроводному дисплею. На странице Параметры отображения в разделе Несколько дисплеев выберите Подключиться к беспроводному дисплею, а затем выберите Подключиться.
Примечание: Если не удается найти компьютер, на который нужно проецироваться, убедитесь, что на нем Wi-Fi включен и установлено и запущено приложение для беспроводного отображения.
Подключение к внешнему дисплею с помощью док-станции WiGig
Беспроводное подключение компьютера к монитору, проектору или другому внешнему дисплею, подключенном к док-станции WiGig .
-
Включите телевизор или проектор.
-
Включите свою док-станцию WiGig и убедитесь, что она подключена к дисплею.
-
Убедитесь, что компьютер поддерживает WiGig и что он включен. Если ваш компьютер поддерживает WiGig, вы увидите элемент управления WiGig в разделе Параметры > сеть & Интернет > режиме в самолете.
-
Нажмите клавишу с логотипом Windows + K, а затем выберите свою док-станцию.
-
Следуйте всем дополнительным инструкциям на экране. В противном случае, все готово.
Проверьте, поддерживает ли ваш компьютер WiGig
Выбор варианта отображения
Чтобы изменить то, что отображается на ваших дисплеях, нажмите клавишу Windows + P. Вот параметры, которые можно выбрать.
|
Если необходимо: |
Выберите |
|
Просматривать элементы только на одном мониторе. |
Только экран компьютера |
|
Просматривать одинаковые элементы на всех мониторах. |
Повторяющийся |
|
Просматривать рабочий стол на нескольких экранах. При расширении мониторов вы можете перемещать элементы между двумя экранами. |
Расширить |
|
Просматривать все только на втором мониторе. |
Только второй экран |
Все способы:
- Способ 1: Горячая клавиша
- Способ 2: Быстрые команды
- Способ 3: Приложение «Параметры»
- Способ 4: Сторонние программы
- Вопросы и ответы: 0
Способ 1: Горячая клавиша
Для быстрого и простого переключения между основным и дополнительным дисплеями в Windows 10 разработчиками предусмотрена простая функция.
- Нажмите на клавиатуре комбинацию клавиш Win + P, чтобы вызвать панель проецирования изображения.
- Выберите вариант «Только второй экран».
- Для возвращения на основной экран выберите вариант «Только экран компьютера».
Панель проецирования также содержит варианты «Повторяющийся» и «Расширить». Первый дублирует изображение основного монитора на дополнительные устройства вывода, второй — создает общую область экрана для всех мониторов, позволяя тем самым перетаскивать окна из одного экрана в другой.
Способ 2: Быстрые команды
Для переключения между дисплеями в Windows 10 также можно использовать короткие команды.
- Откройте нажатием комбинации клавиш Win + R окошко выполнения команд.
- Используйте одну из этих четырех команд в зависимости от того, какое действие нужно выполнить:
DisplaySwitch.exe /external– переключение на дополнительный дисплей.DisplaySwitch.exe /internal– переключение на основной дисплей.DisplaySwitch.exe /clone– дублирование изображения на все дополнительные дисплеи.DisplaySwitch.exe /extend– создание общей области для всех дополнительных мониторов.

Способ 3: Приложение «Параметры»
Очевидным, но менее удобным способом переключения между мониторами в Windows 10 является использование приложения «Параметры».
- Откройте приложение «Параметры» и зайдите в раздел «Система».
- На вкладке «Дисплей» справа в блоке «Несколько дисплеев» вызовите выпадающее меню и выберите нужный вариант переключения.
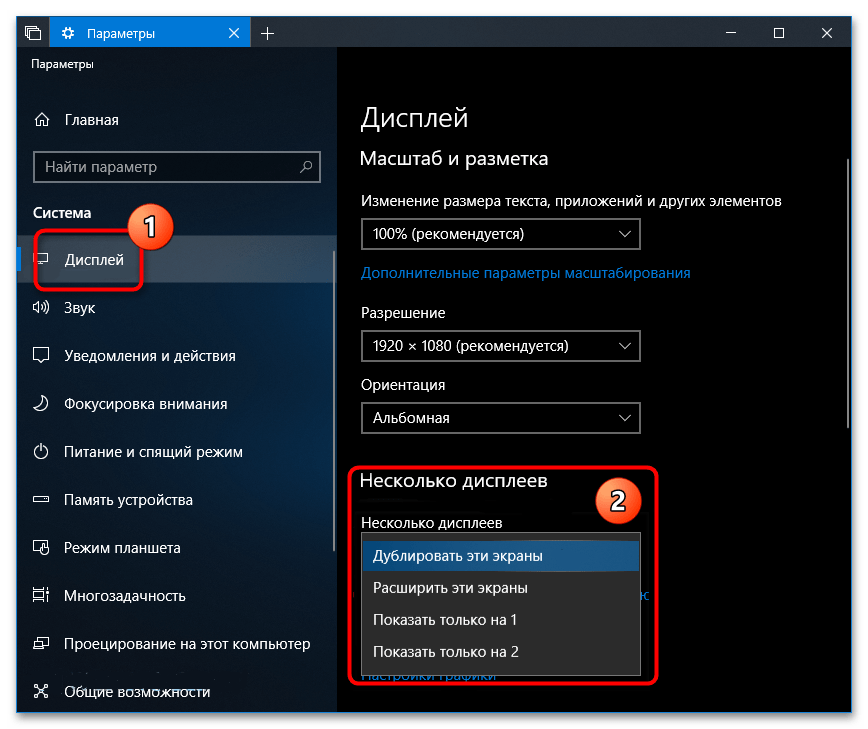
Варианты будут доступны те же, что и в Способе 1 и Способе 2.
Способ 4: Сторонние программы
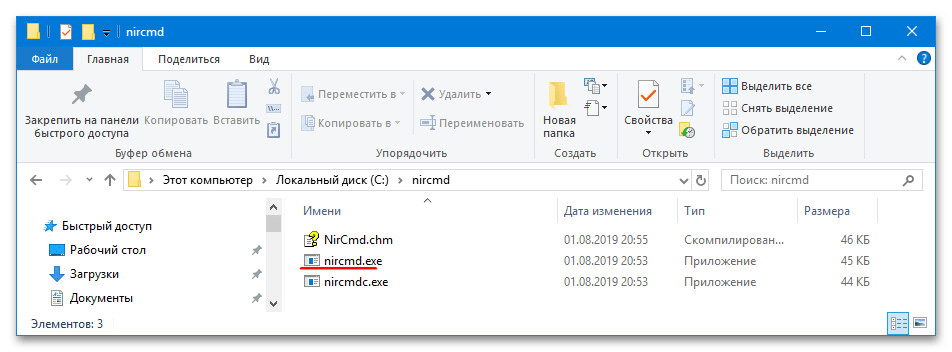
Альтернативным вариантом является использование сторонних приложений и утилит. Так, воспользовавшись бесплатной утилитой NirCmd, можно создать и разместить на рабочем столе ярлыки для переключения между мониторами.
Скачать NirCmd с официального сайта
- Скачайте архив с утилитой сайта разработчика и распакуйте его в любое удобное расположение.
- Откройте приложение «Параметры», зайдите в раздел «Система» → «Дисплей» или «Экран» и посмотрите, какие номера имеют основной и дополнительный мониторы. Запомните или запишите номера.
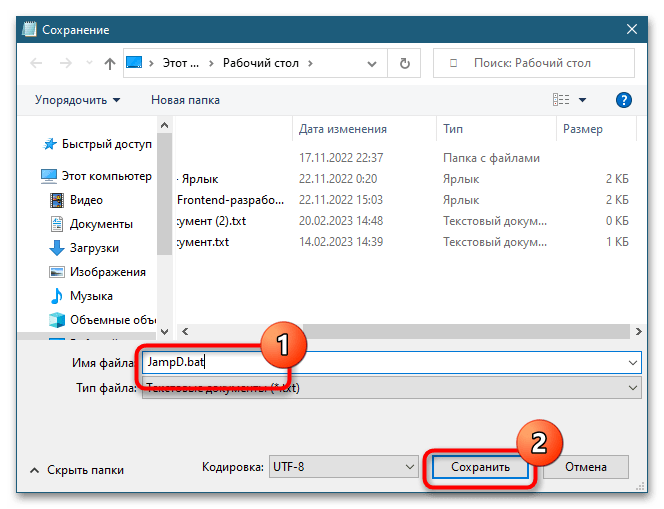
- Создайте в «Блокноте» или любом другом редакторе текстовый файл и вставьте в него следующий код:
@echo off

cd "полный путь к папке с NirCmd"

nircmd.exe setprimarydisplay 1
Во второй команде в двойных кавычках должен быть указан полный путь к папке с утилитой версии, в третьей команде указывается номер основного монитора. - Сохраните файл с произвольным названием, например «Основной монитор», но обязательно с расширением CMD или BAT.
- Создайте второй точно такой же файл, указав в третьей команде номер дополнительного монитора.

Готово, можете использовать эти файлы как быстрые переключатели между дисплеями. Также для них можно создать ярлыки и закрепить их на «Панели задач».
Наша группа в TelegramПолезные советы и помощь
To boost workflow efficiency and experience significant advantages, many users prefer to use two or more monitors. In Windows 10, setting up multiple monitors is pretty easy as you are allowed to connect a decent number of virtual desktops without taking the help of any third-party software. Such setup doesn’t only look great but significantly improves productivity moreover keeps the PC organized.
Multi-monitor setup is more efficient when you know how to switch between monitors in Windows 10 furthermore configure them properly. By dragging your mouse, pressing a particular hotkey, and adjusting settings, you can easily switch between the screens plugged into your GPU.
Switch between monitors windows 10
Here is how to switch between monitors windows 10 –
1] Using the mouse
The most convenient approach to switch between screens is using the mouse pointer. By moving the cursor toward the right or left edge of your main screen, you can shift from one display to another. Before you can use the mouse to move between displays, you must know if the second monitor is on the right edge or left. For that –
- Press – Windows + I.
- Click – System.
- Select – Display.
- From the right-pane hover and click the display as you want to switch.
- Click – Apply.
2] Keyboard shortcut to switch monitors
- Press – Windows + P.
- From the Project menu, choose the display you want to keep active. For example, PC screen only or Second screen only.
- Now, you will see the image on opted screen only.
3] Adjust Display settings
You can switch between monitors windows 10 through the Windows settings app too. To do so –
- Press – Windows + D.
- Right-click on an empty space and choose – Display settings.
- Move to the right-hand side.
- Click the drop-down list present beneath Multiple displays.
- Pick the display you want to work with.
See – How to Use SensorExplorer 2.0 to Check Dual Screen in Windows 10.
Methods list:
1] Move between monitors using mouse
2] Make use of keyboard shortcut
3] Adjust Display settings
That’s all!!!
If you want to mirror your screen onto a projector or multiple monitors so that both or all displays would show the same contents, this short tutorial will show you a few methods on how to quickly duplicate screen on Windows 10 or Windows 11.
Also see: How to Use Snap Layouts in Windows 11
How to duplicate screen on Windows 11/10
Mirroring screen on Windows 11 or Windows 10 can be done without any third party software. It’s a built-in Windows feature that allows you not only to duplicate but also to extend or to show only certain screen. There are two ways to access to this feature – by using shortcut key to quickly switch modes to duplicate, or by changing the multiple displays option in the Settings.
If this is not what you were looking for, try the following:
- Windows 11 Different Wallpaper on Each Monitor
- How to Display Different Things on Two Monitors on Windows 11
Duplicate screen with shortcut keys
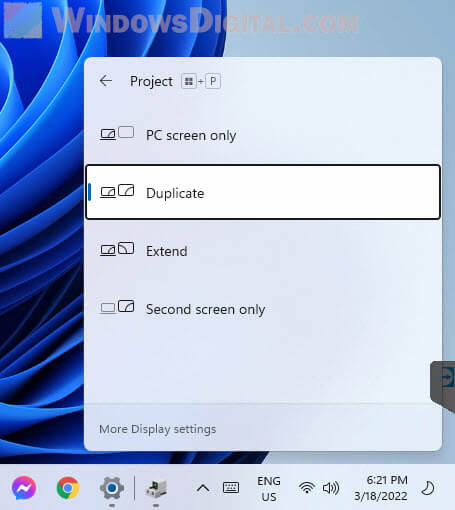
To quickly switch to duplicate screen mode in Windows 11/10, press and hold the Windows key and then press the P key.
To switch to any of the available modes, press the P key again while holding the Windows key to toggle between the available modes:
- PC screen only – when selected, Windows will only display your primary screen / PC screen.
- Duplicate – Windows will duplicate the primary screen onto all other available displays.
- Extend – The accessible screen will be extended to other display.
- Second screen only – when selected, Windows will only display the second screen / TV.
Windows 10
Windows 11
If you want to mirror or clone your primary screen onto all other displays, select Duplicate from the list of available options. When selected, windows will immediately duplicate the screen across all your connected displays.
Change to duplicate screen via Display Settings
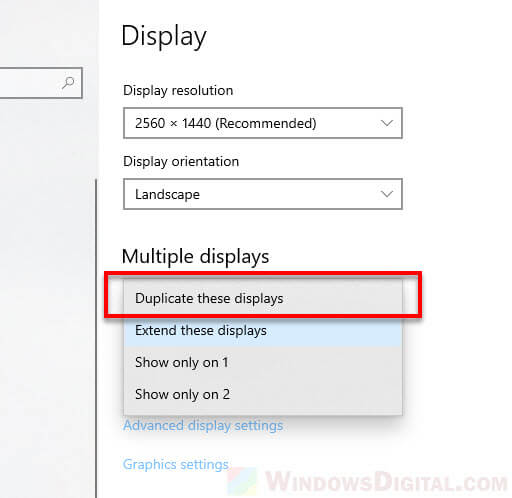
If the shortcut keys method doesn’t work for you, you can change the display mode to duplicate screen from the display settings. To do so, follow the steps below.
- Right-click anywhere on your desktop, then select Display settings.
- In the Display settings, scroll down until you see the Multiple displays option.
- Click on the drop-down menu and select “Duplicate these displays” to duplicate the primary screen on all displays.

Options unavailable or monitor not detected
If you’re plugging in a new monitor or projector, make sure they are plugged correctly using the correct cable and connected to the correct port.
If there is any driver CD that comes with the hardware, make sure to also install it so that it can be detected and work with Windows properly.
Optionally, to manually detect a newly plugged monitor, projector or other types of displays, do the following.
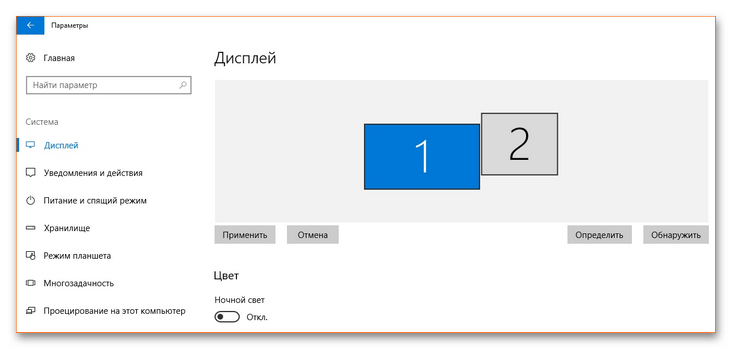
Right-click anywhere on your desktop and select Display settings. Under rearrange your displays, click on Detect to tell Windows to detect any newly plugged display.

In the same window, you can drag and drop the display to any direction to rearrange them if you are to extend the display. To identify the display so that you know which number represents which display, click on Identify.
Main display accidentally switched to other display
If in any case the main display switched to a monitor, TV or projector that you do not wish to be the primary display, especially after switching back from “duplicate mode” which often causes the issue, you can change the main display back to your preferred monitor in the Display settings.
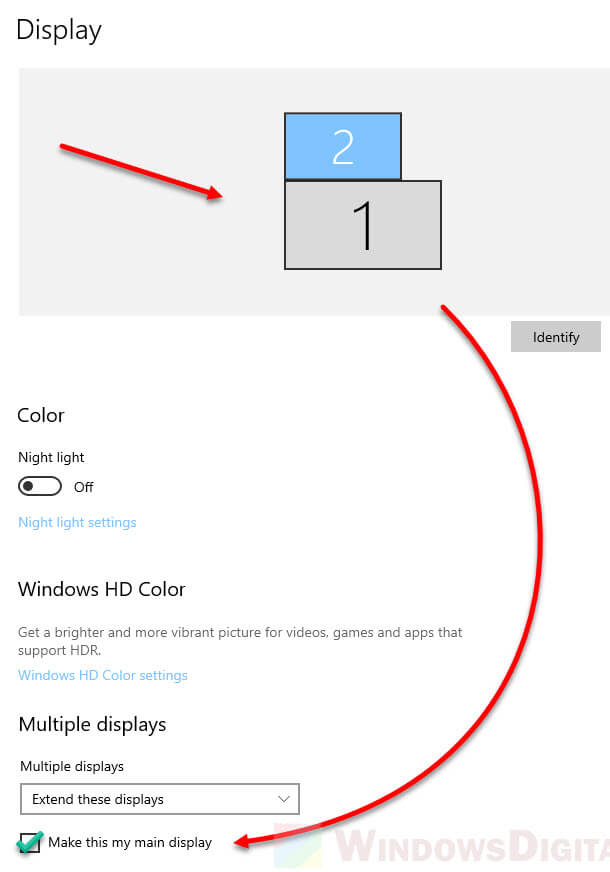
Open display settings (right-click desktop > display settings). First, select the monitor by clicking on the number that represents the monitor you want to change as main display. Then, under Multiple display, click on the “Make this my main display” checkbox. Doing so will immediately make the selected display your main display.