
Download Windows Speedup Tool to fix errors and make PC run faster
In Windows 11/10, you can easily adjust the volume level of individual devices and apps, in some cases, you may just want to mute and unmute the volume as needed without affecting the set volume level. In this post, we will show you how to mute or unmute Sound Volume in Windows 11/10.
We can mute or unmute Sound Volume on Windows 11/10 in 8 quick and easy ways. We’ll explore this topic under the methods outlined below in this section:
- Using Keyboard
- Via Volume icon on Taskbar
- Via Volume Mixer
- Via Game Bar
- Via Settings app
- Via Advanced Sound Options
- Via Control Panel
- Via Windows Mobility Center
Let’s take a look at the description of the step-by-step process in relation to each of the methods.
1] Using Keyboard

To mute or unmute Sound Volume on Windows 10 using the keyboard, do the following:
- Press the Mute key on the keyboard to toggle to mute and unmute the volume per requirement.
Note: The actual key you press on the keyboard will vary per manufacturer. The key usually falls within the Function keys on the keyboard.
2] Volume icon on Taskbar
To mute or unmute Sound Volume on Windows 10 via Volume icon on Taskbar, do the following:
- Click on the Volume icon on the taskbar notification area.
- Click on the chevron (upward pointing arrow head) above the master volume control.
Note: You will not see an expansion arrow if you do not have multiple audio playback devices.
- Click the playback device you want to mute or unmute volume for.
- Click on the volume icon to toggle mute or unmute per requirement.
3] Volume Mixer

To mute or unmute Sound Volume on Windows 10 via Volume Mixer, do the following:
- Right-click the Volume icon on the taskbar notification area,
- Click on Open Volume Mixer.
- Click the volume icon of devices and apps to toggle mute or unmute per requirement.
Note: Muting the default playback device (system volume) will mute all by default.
4] Game Bar
To mute or unmute Sound Volume on Windows 10 via Game Bar, do the following:
- Press Windows key + G to open Game Bar.
- In the Audio overlay, click the volume icon of devices and apps to toggle mute or unmute per requirement.
- Exit Game Bar when done.
5] Settings app

To mute or unmute Sound Volume on Windows 10 via the Settings app, do the following:
- Press the Windows key + I to open Settings.
- Click System.
- Click Sound on the left pane.
- On the right pane, under the Ouput section, for the Choose your output device option, click the drop-down and select the ouput device you want to mute or unmute.
- Click the volume icon to toggle mute or unmute per requirement.
- Exit Settings app when done.
6] Advanced Sound Options

To mute or unmute Sound Volume on Windows 10 via Advanced Sound Options, do the following:
- Open Settings app.
- Click System.
- Click Sound on the left pane.
- On the right pane, scroll down to Advanced sound options section.
- Click on App volume device preferences.
- Click the volume icon of devices and apps to toggle mute or unmute per requirement.
- Exit Settings app when done.
7] Control Panel

To mute or unmute Sound Volume on Windows 10 via Control Panel, do the following:
- Press Windows key + R to invoke the Run dialog.
- In the Run dialog box, copy and paste the command below and hit Enter to open Sound settings.
rundll32.exe shell32.dll,Control_RunDLL mmsys.cpl,,0
- Click the Playback tab.
- Double-click the device you want to mute or unmute.
- Click the Levels tab.
- Click the volume icon to toggle mute or unmute per requirement.
- Click OK.
- Click OK again to exit Sound settings panel.
8] Windows Mobility Center

To mute or unmute Sound Volume on Windows 10 via Windows Mobility Center, do the following:
- Press Windows key + R to invoke the Run dialog.
- In the Run dialog box, type mblctr and hit Enter to open Windows Mobility Center.
- Per requirement, check or uncheck the Mute box in the Volume section.
- Exit Windows Mobility Center when done.
That’s it!
Related post: How to mute the Microphone with a shortcut.
Obinna has completed B.Tech in Information & Communication Technology. He has worked as a System Support Engineer, primarily on User Endpoint Administration, as well as a Technical Analyst, primarily on Server/System Administration. He also has experience as a Network and Communications Officer. He has been a Windows Insider MVP (2020) and currently owns and runs a Computer Clinic.
Reader Interactions
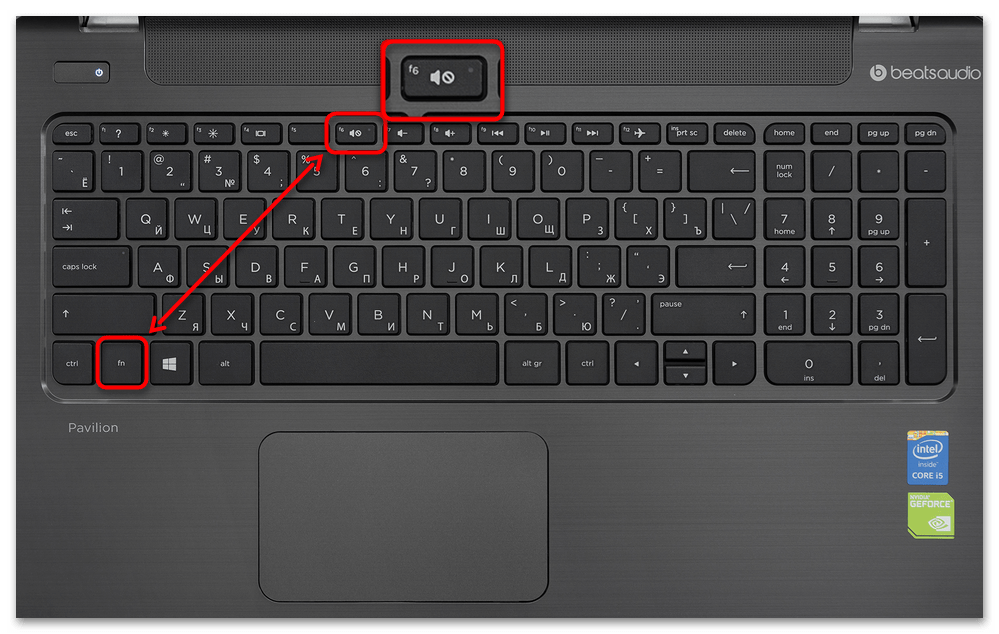
Most of the keyboards come with a specific key to mute/unmute the speakers. And, if there isn’t any specific key, you can find media controls options in function keys. For example, on my keyboard, the F4 key is dedicated to Mute the sound. So, by pressing it with the Fn key, I can mute and unmute speakers. But, there is not any keyboard key to mute the microphone. Because you can control microphone access through Windows settings easily. And, the mic only gets turned on when an application accesses it. But, in Windows 10, when an application does access a microphone, you can see a mic icon in the Taskbar. And, you can even disable mic permission for that Application by going into Windows Settings App > Privacy > Microphone.
Even, chrome browser comes with an option to disable microphone access. But, it could be possible that a third-party Application or site is using your mic. In that case, disabling the mic is a good idea if it’s not in use. But, disabling/enabling microphone access from the settings App is time-consuming. So, In this article, you will get to know a way to mute the mic using a keyboard Shortcut.
Apps to Mute Microphone using Keyboard Shortcut
1. Mute the Microphone using a Keyboard Shortcut.
Though, there are some ways to create a Keyboard Shortcut to mute the mic. But, not that easy. So, I will suggest you install this free application, ‘MicMute’. After installing this small application, you will be able to mute the mic using any Keyboard key. That means you can configure any keyboard key you want. MicMute application runs in this taskbar and adds a microphone icon. The icon is to show the status of the microphone. If the mic icon is red, that means the mic is ‘on’. And, if it’s black, that means ‘off’.
Apart from mute mic using a Keyboard shortcut, some other helpful features also feature this application. For example, MicMute App can mute the microphone at startup. And, it does detect all audio input devices. The “Push to talk” feature is also available. But, this means the mic will only work when a key is pressed or held.
How to mute a microphone in Windows using Hotkey.
1. Download the MicMute Application from the SourceForge site. And, Install it on your Windows 10/11 Computer.
2. After completing the installation, you will see a mic icon on the right side of the Taskbar.
3. Right-Click on the MicMute icon from the system tray. And, then click on Setup Shortcut.
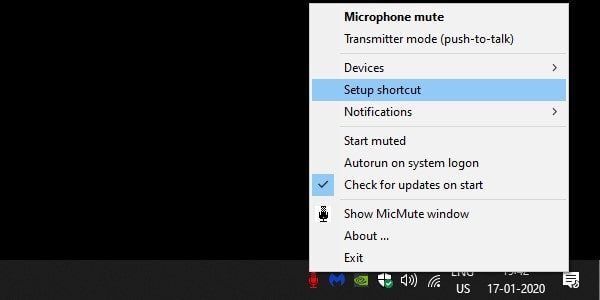
4. A small configure window will appear, click on it. And, press the keyboard key that you want to use. And, click on ok.
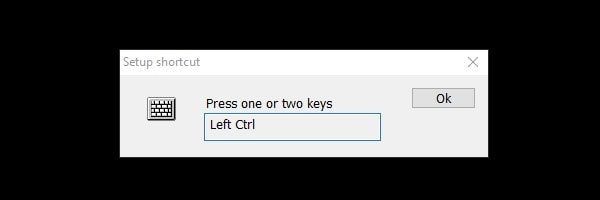
(You can also create a key combination. The keyboard can recognize normal keys as well as special keys on the keyboard.)
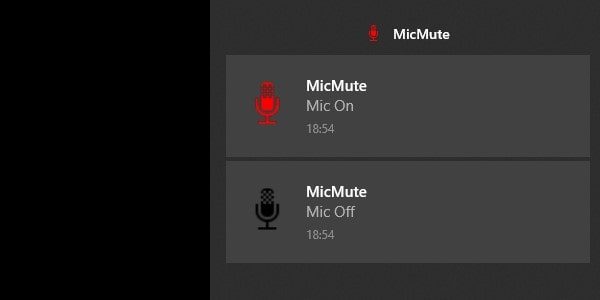
5. Every time, you mute and unmute the microphone using a keyboard key. You will receive an alert on the Desktop.
If your microphone is not getting muted with the Application. Then, you have to configure it from Devices. (Just right-click on the App icon to access device settings.)
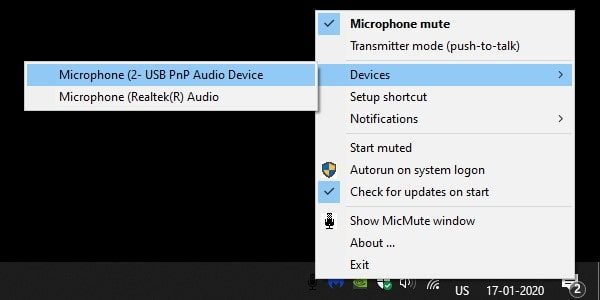
After selecting the right microphone keyboard shortcuts will start working.
2. PowerToys (Video Conference Mute)
Microsoft PowerToys is a suite of utilities that maximizes the productivity of Windows systems; it’s free. Recently, Microsoft introduced the Video Conference Mute utility in the experimental version of PowerToys. It allows users to turn off the microphone alongside the webcam using keyboard shortcuts. You have to install the experimental version of PowerToys and enable Video Conference Mute feature in it. After that, you can use the shortcuts shown in the App.
1. First, download the Experimental version of PowerToys from Github. (Check the assets section for the setup file.)
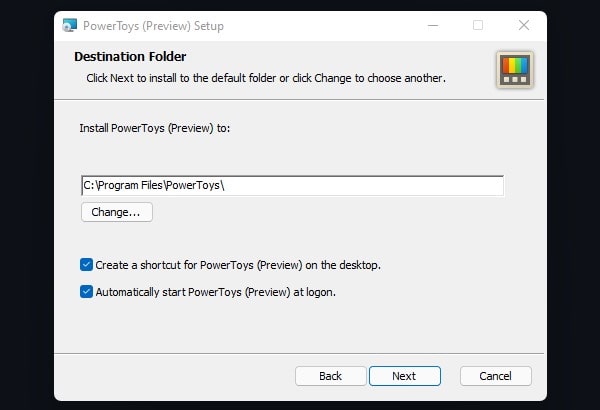
2. Once it gets downloaded, install it in your system. (Don’t forget to enable the “Automatically start PowerToys at logon option during installation.)
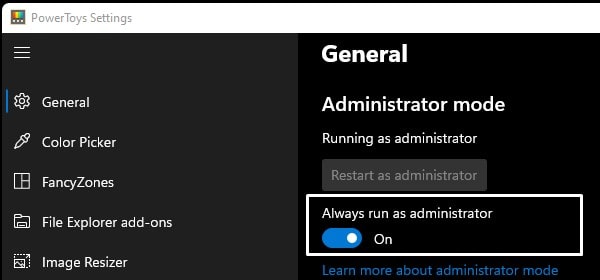
3. Open PowerToys App and click on settings. First-time PowerToys will get open in user mode. To open it with administrator privileges, click on “Restart as administrator” from general settings. Once it gets restarted, do enable the “Always run as administrator” option.
4. Now, go to Video Conference Mute and Enable Video Conference.
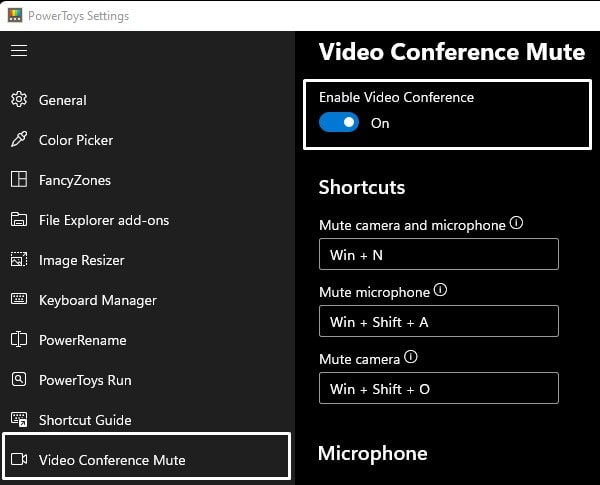
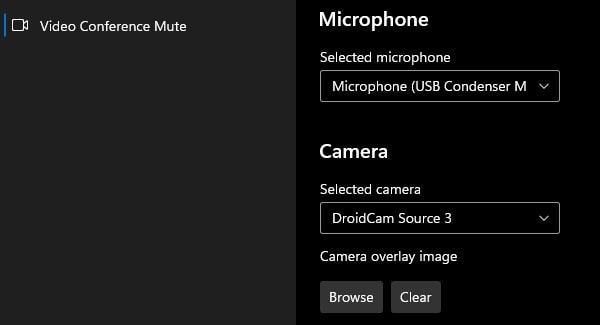
5. After that, select your camera and microphone so that you can turn them off using keyboard shortcuts.
On the same page, you will find three shortcuts that you can use.
Mute camera and microphone - Win + N
Mute Mic - Win + Shift + A
Mute Camera - Win + Shift + O
6. So, that’s how you can mute your microphone with a webcam using PowerToys.
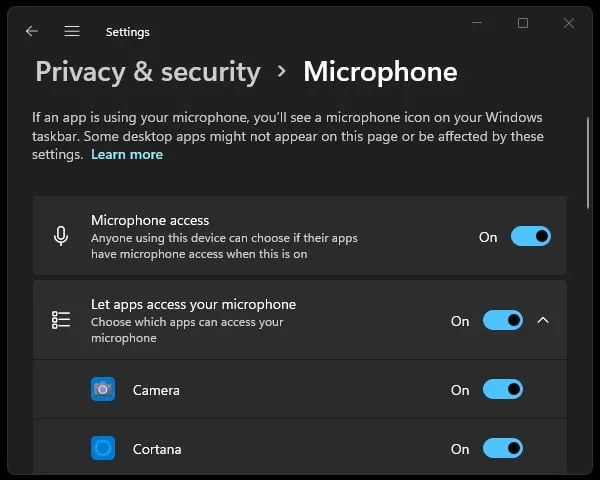
3. Windows 11 Microphone Access Settings.
If you’re using Windows 11, then you will see a Microphone icon in Taskbar, when an app is using your mic. And, latest Windows also gives you an option to enable or disable microphone access for selected Apps.
1. Do click on the Microphone icon from Windows 11 Taskbar.

Alternatively, you can just open the Settings App. Click on Privacy & Security. After that, scroll down and click on Microphone from the App permission section.
2. Now, you can either disable microphone access completely for all Windows Apps. Or, you can select an App from the list.
4. Use the Realtek Audio Console.
Suppose the Realtek Audio driver is installed on your Windows 11/10 PC. Then, with the Realtek Audio Control, you can mute Mic. You can download it from the Microsoft Store. Just install the App, and then mark the “Mute” option. That’s it; the Microphone will get muted.
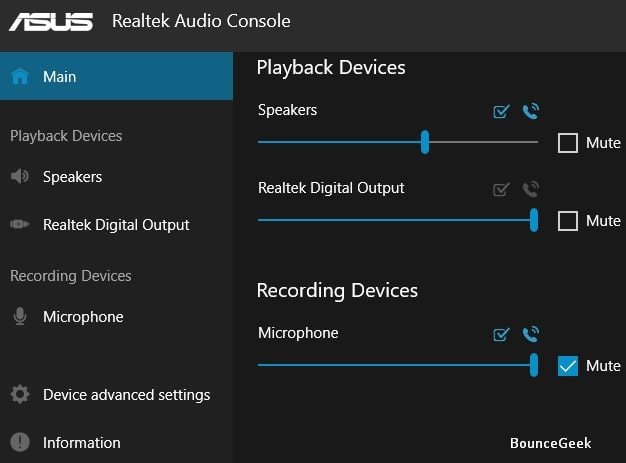
This is better than going into the Settings App. You just have to keep this App always open. That’s it, so these are the ways to mute the microphone using a Keyboard shortcut.
Keyboards have a dedicated key to mute sound from speakers. Even if they don’t come with special keys still have the function (fn) row of keys which double as controls for managing media. One of those keys will be able to mute the speakers.
A similar key does not exist for muting the mic. This is generally because the mic isn’t always on. It only turns on when an app accesses it.
That’s why users are expected to use the mute button within the app. That obviously works, but it’s not quick.
You likely have to click the button with the mouse and that’s not as fast as a keyboard shortcut. So here’s how you can mute and unmute the mic with a keyboard shortcut on Windows 10.
RELATED: Need to mute/unmute the mic with a keyboard shortcut on macOS?
How to mute microphone with keyboard shortcup
To mute/unmute the mic with a keyboard shortcut, we’re going to use a free app called MicMute. Download and install it.
The app runs in the system tray and adds a mic icon to it. You can access the app’s settings and configure the keyboard shortcut from this icon, and it will also show you the current state of the mic.
Black means the mic is Off, and red means it is On.
The app has some useful features e.g., it can mute the mic immediately when it starts, it can list the detected audio input devices, and it has a ‘Push to talk’ mode where the mic only works if a button is held down.
To configure the shortcut to mute/unmute the mic, right-click the app’s icon in the system tray and select ‘Setup shortcut’.
A small window will open. Click inside it and tap the key or keys you want to use to mute/unmute the mic. The app can detect ordinary keys on a keyboard, and it can also work with special keys on the keyboard.
I was able to bind the speaker mute/unmute button on my keyboard to this app and when I tap it, it now mutes and unmutes the speakers and the mic at the same time.
Each time the mic is muted or unmuted, you get a desktop alert. If you don’t want to get the alerts, you can disable them from the app’s settings.
This app has not been updated since 2015 but it works flawlessly on Windows 10 1909.
Quick Tip: If you like the app, you should probably set it to run at startup.
Parting words
Windows 10 shows a mic icon in the system tray when an app is accessing the mic and the icon could have been more functional. If you click it, it doesn’t mute the mic.
Instead, it opens the Settings app to the mic settings which, while useful, could have been best left as a context menu function.

Fatima Wahab
Fatima has been writing for AddictiveTips for six years. She began as a junior writer and has been working as the Editor in Chief since 2014.
Fatima gets an adrenaline rush from figuring out how technology works, and how to manipulate it. A well-designed app, something that solves a common everyday problem and looks
Включение звука на клавиатуре
Для регулировки уровня звука на ноутбуке предусмотрена одна или две горячие клавиши. Это удобно при просмотре фильма или во время игры, поскольку не нужно сворачивать окно и изменять громкость через панель управления системы. Чтобы включить звук на клавиатуре, изучите верхние функциональные клавиши «F1» — «F12». На той, которая включает и выключает звук, есть пиктограмма в виде перечеркнутого громкоговорителя.
У некоторых моделей лэптопов F-ряд клавиш выполняет свое мультимедийное значение только при одновременном нажатии с «Fn», которая находится внизу клавиатуры. Если вам такой вариант неудобен, измените режим работы всего F-ряда при помощи статьи по ссылке ниже.
Подробнее: Изменение режима работы клавиш F1-F12 на ноутбуке
Приведем в пример самые распространенные варианты известных производителей:
| Производитель | Горячая клавиша |
|---|---|
| Dell | F1 |
| ASUS | F10 |
| Samsung | F6 / F9 |
| Acer | F8 / F9 |
| HP | F6 / F11 |
| Toshiba | Fn + Esc |
| Sony Vaio | F2 |
| MSI | F9 |
| Lenovo | F1 |
У других ноутбуков включение звука на клавиатуре может осуществляться иначе, но разобраться в этом несложно. Достаточно осмотреть маркировку клавиш или инструкцию по использованию.
Выключение звука происходит аналогичным образом, при этом «заблокированный» уровень громкости остается прежним.
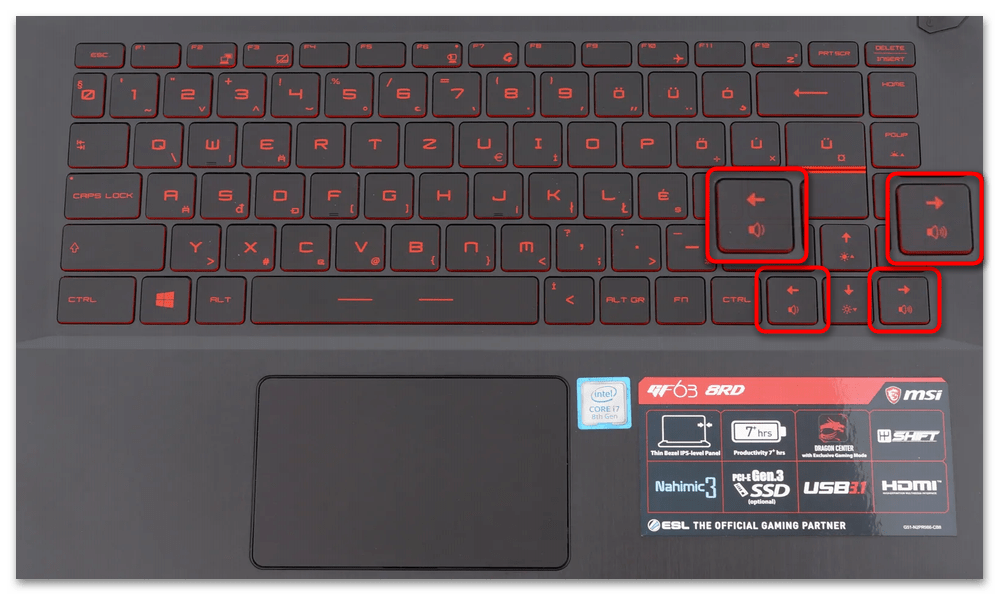
Регулировка уровня громкости
Клавиши для регулировки громкости динамиков ноутбука на разных моделях отличаются. Одно нажатие изменяет уровень на фиксированное значение: в большинстве случаев на 5 единиц. Во время этого на экране должен на несколько секунд появиться индикатор, с помощью которого удастся определить громкость звучания.
Например, на ноутбуке Lenovo для уменьшения громкости нужно нажимать «F2», а для увеличения – «F3». Причем второй вариант включает звук, если он не активен: достаточно нажать всего один раз.
На клавишах с управлением громкости нанесены иконки в виде громкоговорителя со знаком «плюс» или «минус». Если по отдельности они не работают, то попробуйте зажимать их вместе с «Fn».
| Производитель | Горячие клавиши |
|---|---|
| Dell | F2 и F3 |
| ASUS | F11 и F12 |
| Samsung | F7 и F8 |
| Acer | F9 и F10 / F11 и F12. Иногда требуется воспользоваться клавишами со стрелками с зажатой клавишей Fn |
| HP | F7 и F8 / F10 и F11 |
| Toshiba | F9 и F10 |
| Sony Vaio | F3 и F4 |
| MSI | F7 и F8 |
| Lenovo | F2 и F3 |

У определенных моделей ноутбуков, например от Samsung и MSI, клавиши уменьшения и повышения громкости находятся на стрелках влево и вправо соответственно. Управлять ей в такой ситуации, конечно, придется с помощью «Fn».
Некоторые модели лэптопов оснащаются дополнительной панелью с механическими или сенсорными клавишами, которые предназначены для управления воспроизведением. Иногда найти их можно даже на боковой части корпуса. Если мультимедийная панель в основном — удел старых ноутбуков, то боковые регуляторы громкости есть, наоборот, на современных девайсах-трансформерах.

Если звук на ноутбуке не работает, то причиной могут стать отсутствие/неправильная работа драйвера аудиооборудования, некорректные системные настройки или ошибки в Windows. В этом случае клавиши для включения и регулировки ожидаемо не сработают и понадобится исправить возникшую неполадку. В наших отдельных статьях описаны самые распространенные причины, а также способы их устранения.
Подробнее: Не работает звук в Windows 10 / Windows 7 / Windows XP
Наша группа в TelegramПолезные советы и помощь
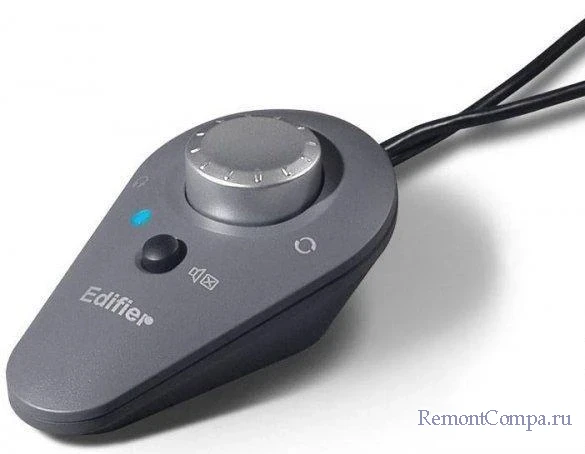
В этой публикации, друзья, рассмотрим, как можно организовать аппаратные кнопки громкости для компьютера. Такие чрезвычайно удобны, обеспечивают быстрый доступ к регулировке громкости, позволяют управлять громкостью без использования мыши. Необходимы, когда нам нужно быстро изменить уровень звука, без возни с запуском системного ползунка громкости и накрутки его мышью. Использовать аппаратные кнопки громкости можно на мультимедийных клавиатурах или выносных регуляторах громкости аудиосистемы. Но как быть, если таких устройств нет?
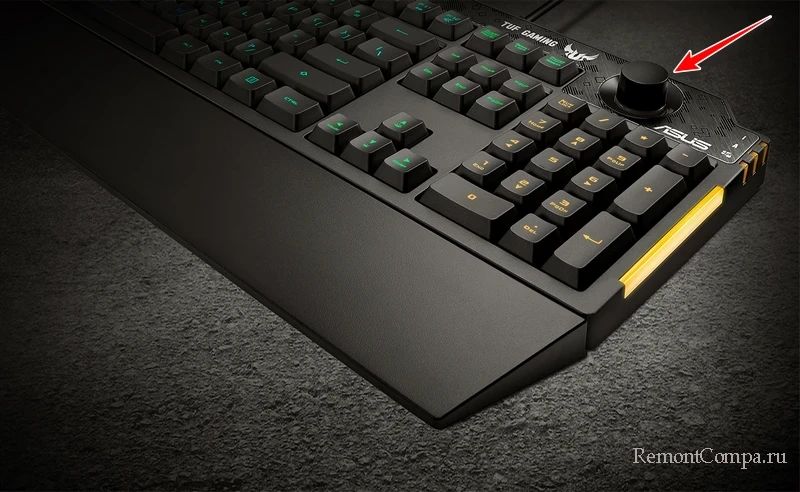
Друзья, самый удобный способ управлять громкостью звука на компьютере – клавиатура со встроенным тумблером регулировки громкости. Увы, такие клавиатуры не из дешёвых, обычно из числа продвинутых геймерских. И это единичные модели даже не у каждого производителя клавиатур. Есть, например, у Asus.
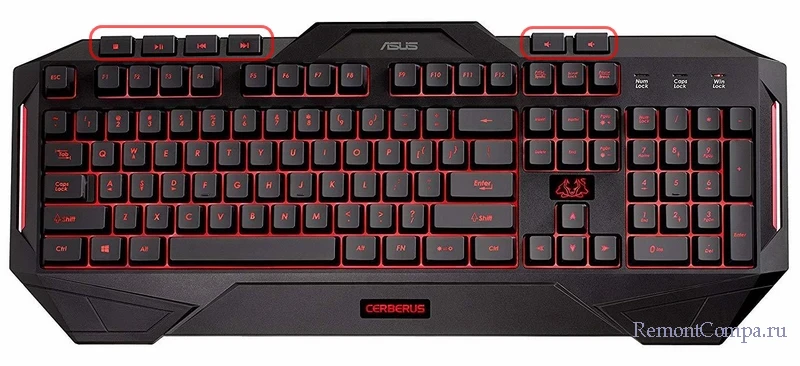
Более доступны по цене мультимедийные клавиатуры со встроенным колесом или кнопками регулировки громкости. Могут предусматривать другие кнопки управления медиа. Тоже хороший вариант.
Клавиатура с мультимедийными функциями – Must Have для тех из вас, кто активно работает с мультимедиа.
Многие клавиатуры – подключаемые или интегрированные в ноутбуки – предусматривают возможность управления громкостью и её отключения с помощью клавиш функционального ряда F1-F12 в комбинации с клавишей-модификатором Fn. Это могут быть клавиши Fn+F2, Fn+F3, Fn+F4 для, соответственно, уменьшения, увеличения громкости и отключения звука. Или могут быть Fn+F10, Fn+F11, Fn+F12 для, соответственно, отключения звука, уменьшения и увеличения громкости. На таких клавиатурах обычно ряд клавиш F1-F12 содержит обозначения функций, выполняемых с зажатой клавишей Fn.
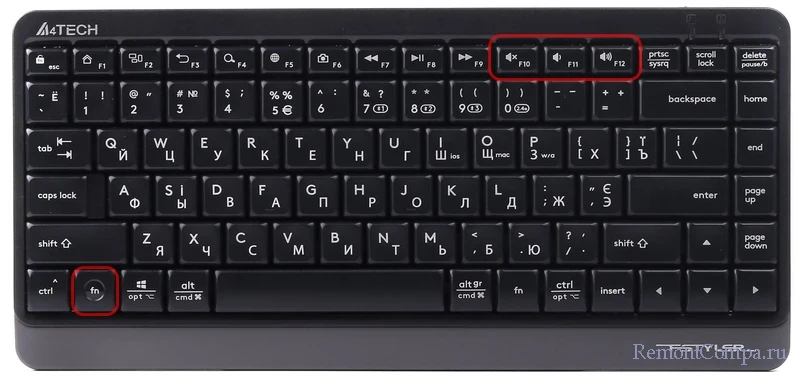
Если обозначений нет, но сама клавиша Fn есть, можно посмотреть инструкцию к клавиатуре. Возможно, мультимедийные функции с использованием клавиши Fn клавиатура всё же поддерживает.
Клавиатура может быть программируемой и предусматривать назначение нами функций на какие-то клавиши или комбинации с Fn. Нам нужно назначить управление громкостью на удобные клавиши или сочетания. Программируемая ли клавиатура, как её программировать – всё это смотрим в её инструкции.
Аппаратная регулировка громкости предусматриваются любой аудиосистемой. На многих аудиосистемах регулятор громкости реализован на одной из колонок или сабвуфере. Что не всегда удобно для использования, поскольку колонка с регулятором может быть размещена дальше нашей возможности дотянуться к ней, не вставая с компьютерного кресла. Ну а за регулятором на сабвуфере многим придётся лезть под стол.
Друзья, если вы рассматриваете возможность приобретения аудиосистемы, обращайте внимание на модели с выносным (внешним) регулятором громкости. У более дорогостоящих систем таковой может быть как отдельный пульт, включающий тумблер громкости. Такой пульт можно разместить на компьютерном столе, в зоне удобного доступа. У бюджетных аудиосистем это простейший выносной регулятор громкости, нечто того, что встроен в провода наушников.
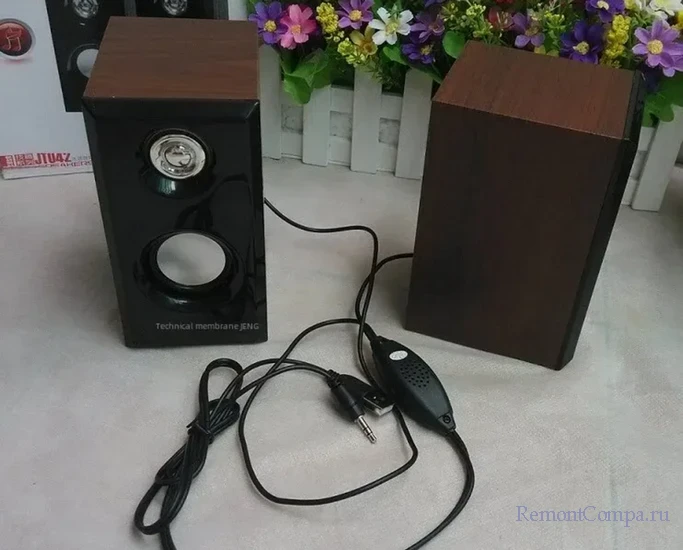
Тем не менее даже такой регулятор, размещённый в удобном месте на столе, будет лучшим решением, чем постоянно тянуться к одной из колонок, если она не в зоне быстрого доступа.
Примечание: друзья, смотрите, как выбрать аудиосистему для компьютера.
Если аудиосистема у вас уже есть, выносной регулятор громкости можно приобрести отдельно. Но нужно точно знать, будет ли он совместим с вашей аудиосистемой, возможно ли его подключение к ней.
За неимением выносного регулятора громкости, мультимедийной или программируемой клавиатуры можно обойтись решениями для обычной клавиатуры или мыши. Для начала можно попробовать поуправлять системным регулятором громкости с помощью клавиатуры и штатных горячих клавиш. В Windows 11 жмём клавиши Win+A, далее 4 раза клавишу Tab, затем стрелками навигации влево или вправо накручиваем нужную громкость.
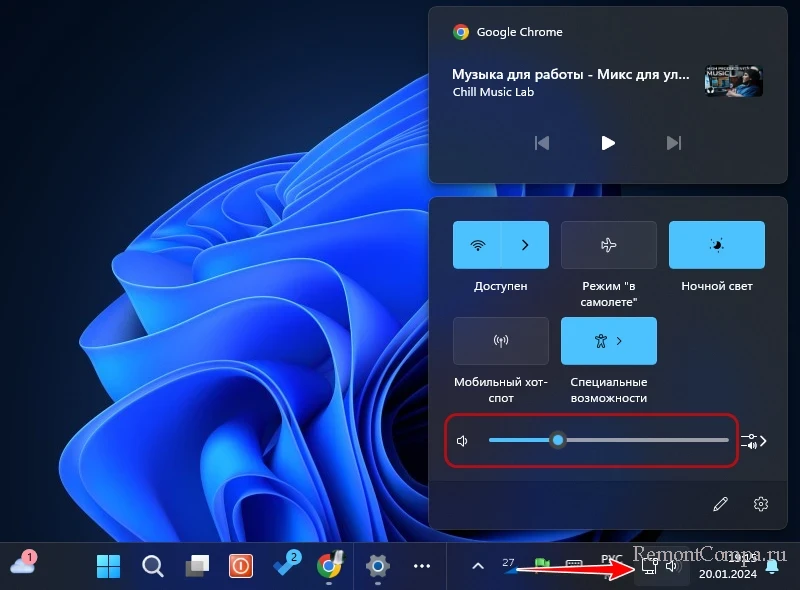
Клавиши Win+A запускают панель быстрых настроек Windows 11. 4-кратное нажатие Tab переключит нас на ползунок громкости. А стрелки навигации будут уменьшать или увеличивать громкость.
В плане удобства решение, конечно, так себе. Больше удобства получим с помощью сторонних программ, умеющих переназначать клавиши клавиатуры, кнопки и колесо мыши, чтобы они функционировали так, нам нужно. В том числе регулировали громкость, например, клавишей Win и стрелками вверх-вниз, клавишей Win и накруткой колеса мыши, боковыми кнопками мыши, наклоном или накруткой её колеса. О таких программах, друзья, смотрите в статье «Программы для регулировки громкости на компьютере».