
Libraries and tools for interacting with Google Cloud products and services. Cloud SDK is available at no charge for users with a Google Cloud account.
Key features
Key features
SDK Client Libraries for popular programming languages
Cloud SDK provides language-specific Cloud Client Libraries supporting each language’s natural conventions and styles. This makes it easier for you to interact with Google Cloud APIs in your language of choice. Client libraries also handle authentication, reduce the amount of necessary boilerplate code, and provide helper functions for pagination of large datasets and asynchronous handling of long-running operations.
Google Cloud Command Line Interface (gcloud CLI)
The gcloud CLI manages authentication, local configuration, developer workflow, and general interactions with Google Cloud resources. With the Google Cloud CLI, it’s easy to perform many common cloud tasks like creating a Compute Engine VM instance, managing a Google Kubernetes Engine cluster, and deploying an App Engine application, either from the command line or in scripts and other automations.
All features
Cloud SDKs by language
Pricing
Pricing
Cloud SDK is available at no charge for users with a Google Cloud account.
Take the next step
New customers get $300 in free credits to try Cloud SDK and other Google Cloud products.
-
Need help getting started?
Contact sales
-
Work with a trusted partner
Find a partner
-
Continue browsing
See all products
If you want to interact with Google Cloud through gcloud CLI or through code, you need to setup the gcloud CLI & SDK on your workstation.
For example, if you want to write a python script that interacts with google cloud, you should have the gcloud sdk installed so that all the required packages for python will be available for your script.
This tutorial will guide you through the steps for setting up Google Cloud gcloud CLI SDK on your workstation.
Also, I have added some of the tips and tricks that I have learned while using gcloud CLI utility in my workstation.
Install gloud CLI SDK
Note: If you’re using a google cloud instance, SDK is installed by default.
Step 1: Head over to https://cloud.google.com/sdk/ and copy the link to the appropriate installation package. This package is common for all Linux distributions.
For Windows users: Download the installation package from https://cloud.google.com/sdk/windows and install it directly on your systems. You will have the gcloud command available in the terminal.
Step 2: Download the package.
wget https://dl.google.com/dl/cloudsdk/channels/rapid/downloads/google-cloud-cli-470.0.0-linux-x86_64.tar.gzStep 3: Untar the sdk package.
tar -xvf google-cloud-sdk*Step 4: Install the SDK using the install.sh script. It will detect the appropriate package for your Linux distribution and installs it.
./google-cloud-sdk/install.shStep 5: Follow through the installation prompts and select the required options. It is pretty self-explanatory. It will take a couple of minutes for the setup.
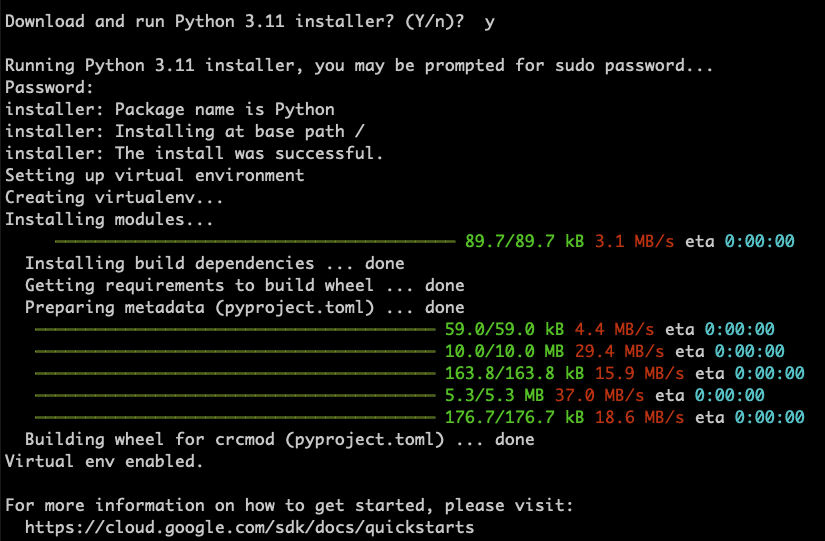
Step 6: Restart the terminal or source the .bashrc or .zshrc file based on the shell profile preference you chose during the installation.
source ~/.bashrc
source ~/.zshrc
If you dont open a new terminal session or source the relevant shell profile, you might see the following error.
-bash: gcloud: command not foundStep 7: Now, to validate the installation, open a new terminal session and execute the gcloud command.
$ gcloud --version

Google Cloud SDK 470.0.0
bq 2.1.2
core 2024.03.22
gcloud-crc32c 1.0.0
gsutil 5.27
Configuring gcloud CLI With Google Project
Now that we have the SDK installed, we need to configure the Google cloud SDK to talk to a specific project.
We use the gcloud utility from the installed SDK for CLI based google cloud access.
Follow the steps given below to configure gcloud with a specific google project.
Step 1: Initialise the project configuration using the following command.
gcloud init --console-onlyStep 2: You will see the following prompt. Select «Y».
To continue, you must log in. Would you like to log in (Y/n)? Y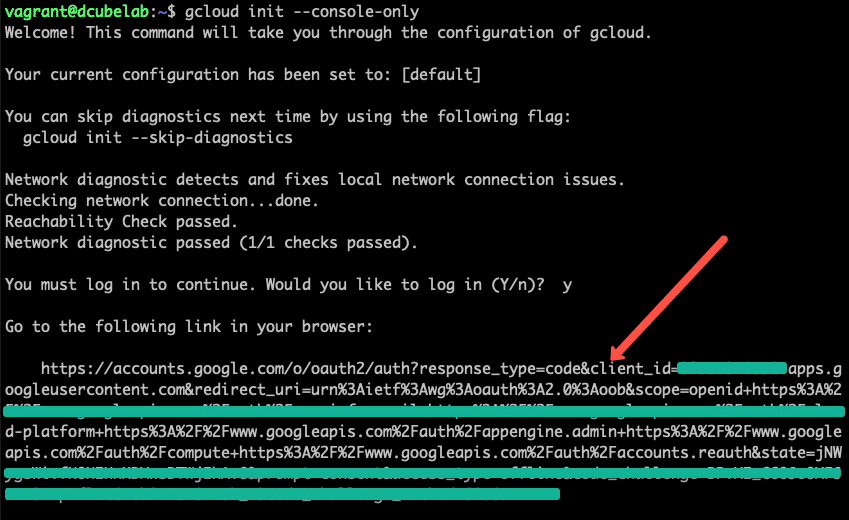
Copy and paste the URL in the browser. Then log in to your google cloud account and grant permissions to access google cloud resources.
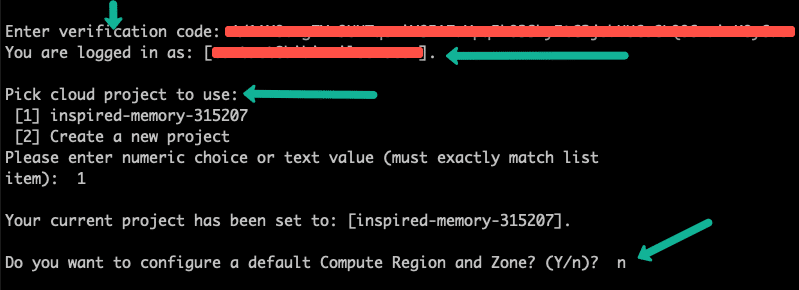
You will see a page with a token. Copy the token and enter in the terminal.
Now you will be logged in, and you can select the project that you want to set as default, as shown in the image below.
Like this, you can add multiple gcloud configurations if you work with multiple google cloud accounts. You can switch between different accounts. I have explained this in the next section.
gcloud CLI SDK Auth Config Location
To know all the configuration location of gcloud CLI SDK, execute the following command.
gcloud info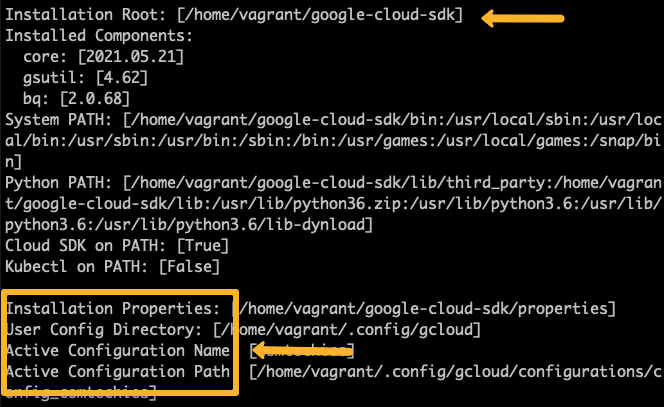
All the SDK configs get stored in the .config folder in your workstation home location.
If I run a tree from the .config folder, this is what I have. The JSON files under legacy_credentials have the client id and client secret to connect to the google cloud account.
Validate gcloud CLI Authentication
Now that we have a valid cloud configuration, let’s run some basic gcloud CLI commands to verify the installation.
Step 1: List the credential account.
gcloud auth listIn my case, I have two google cloud accounts configured in my workstation. So it lists two accounts, and there is a * in the active account.
When you have multiple gcloud accounts, you can switch between accounts using the following command
gcloud config set account account@devopscube.comStep 2: To view your default gcloud configs of the active configuration, use the following command.
gcloud config listYou can also manually change the configuration by editing the config file from the ~/.config/gcloud/configurations folder.
Sometimes when you have multiple accounts configured, there could be a mismatch between activated account and active configuration. To solve this, first list the configruations.
gcloud config configurations list
If there is a mismatch, you can activate the correct configuration using the following command, assuming you activate the default configuration.
gcloud config configurations activate defaultStep 3: To list all the gcloud commands, use the following command.
gcloud helpgcloud Cheat Sheet
Well, I don’t have any cheat sheet for gcloud.
However, there is a cool gcloud cheat sheet command which displays the gcloud cheat sheet.
gcloud cheat-sheetAlso you can use the cheat sheet from google cloud documentation.
Other gcloud Components
When you install the google SDK, only the core google cloud libraries get installed.
But there are other components that are part of google cloud sdk.
For example kubectl. A utility required to interact with Google Kubernetes cluster.
To list all the available components execute the following command.
gcloud components list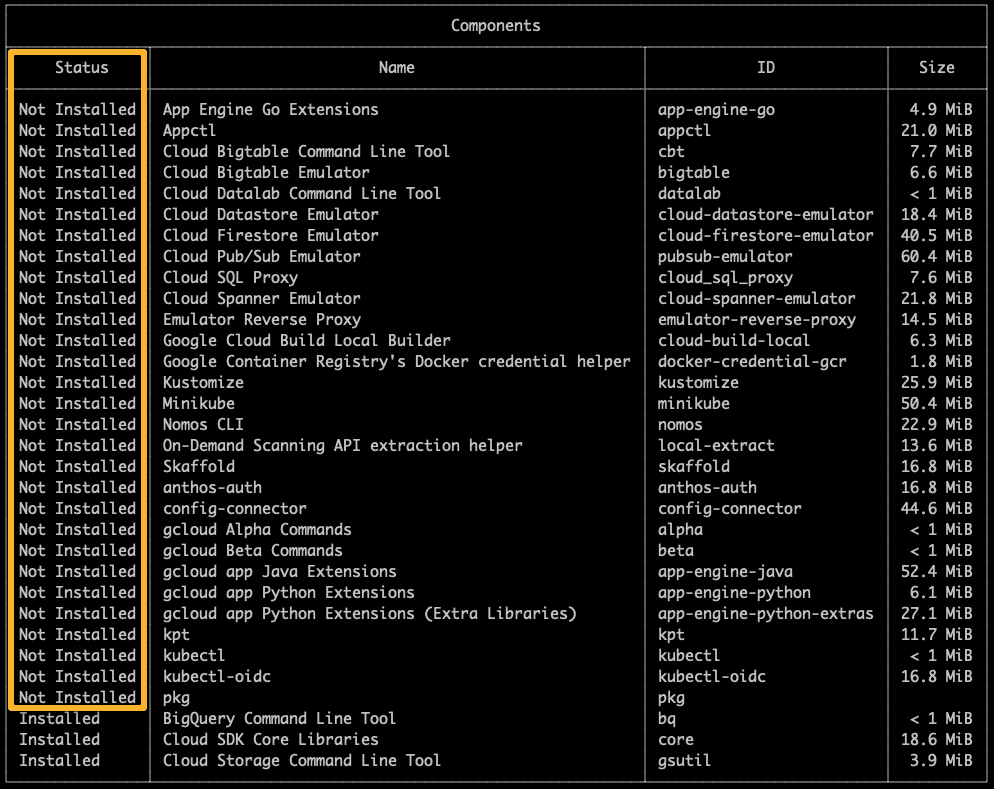
Updating gcloud CLI Components
Updating gcloud CLI is pretty simple.
Use the following one-line to update gcloud components.
gcloud components updateCreate a Google Compute Instance Using CLI
This section is only optional.
If you want to have a little hands-on with the gcloud command-line utility, you can follow this section to create a compute instance, access it, and then delete it.
To start with, we will create a instance using the CLI.
Step 1: Get the list of images using the following command.
gcloud compute images list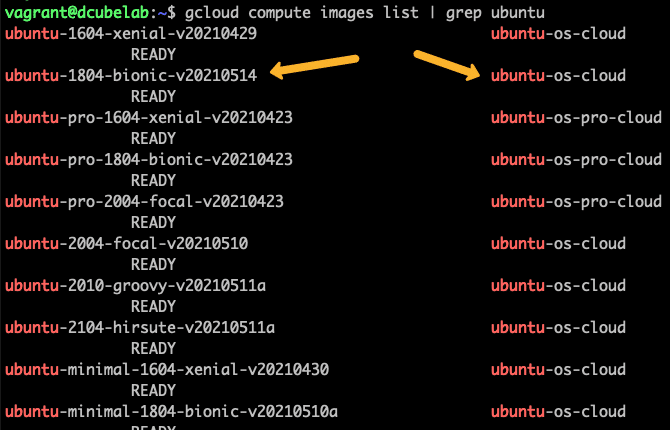
Step 2: The following command will create an f1 micro ubuntu instance with the ubuntu image from the highlighted image family.
gcloud compute instances create devopscube-demo-instance \
 --image centos-7-v20170523 \
 --image-project centos-cloud --set-machine-type f1-micro --zone us-central1-a
There are so many flags associated with instance creations. Refer to this official documentation for more information on the flags.
Step 3: To connect the instance via ssh, just execute the following command. The gcloud command will automatically create the ssh key in your ~/.ssh folder if it doesn’t exist and connects to your instance.
Security Note: Do not deploy any public images in enterprise accounts even if you have permissions. Always use security-approved images in enterprise accounts to stay out of trouble.
gcloud compute ssh (instance-name)
For example,
gcloud compute ssh devopscube-demo-instanceStep 4: Delete the created instance using the following command.
gcloud compute instances delete (instance name)For example,
gcloud compute instances delete devopscube-demo-instanceConclusion
In this blog I have covered the steps to setup google cloud SDK and using it with gcloud CLI
Hope it helped or you might have more tips that can add value to the existing content.
Either way, please drop a comment.
Google Cloud Platform (GCP) is a set of cloud computing services offered by Google. GCP is a public platform that offers IT resources, such as storage, compute, database, Big Data, application development tools, networking, and more. The GCP services run on the same cloud infrastructure that Google internally uses to run its end-user products, such as Google Photos, Gmail, Google Search, Google Drive, YouTube, etc. Software engineers, IT professionals, and cloud administrators can access the services provided by Google Cloud Platform over a dedicated network connection or the Internet.
Cloud SDK ((Software Development Kit) is a set of tools that users can use to manage applications and resources hosted on the Google Cloud Platform. These tools include the gsutil, gcloud, and bq command-line tools. The gcloud command-line tool gets automatically downloaded along with the Google Cloud SDK installation. Google Cloud SDK can run on Linux, Windows, macOS and requires Python 2.7.x. In this tutorial, we will learn about the steps to install and initialize Google Cloud SDK on a Windows instance.
Install the Latest Cloud SDK Version (352.0.0)
To install the latest Cloud SDK version on the Google Cloud’s Windows instance, follow the below steps:
1. First, download the Cloud SDK installer by clicking here. Alternatively, go to the command prompt and type powershell to open the PowerShell terminal. After that, execute the following commands in that terminal to download the Cloud SDK installer.
(New-Object Net.WebClient).DownloadFile("https://dl.google.com/dl/cloudsdk/channels/rapid/GoogleCloudSDKInstaller.exe", "$env:Temp\GoogleCloudSDKInstaller.exe")
& $env:Temp\GoogleCloudSDKInstaller.exe
2. After the download, launch the Cloud SDK installer and follow the prompts. Google LLC will sign the installer. For a more streamlined screen reader experience, select the Turn on screen reader mode option if the user wants to enable screen reader mode.
3. Cloud SDK requires Python to work smoothly. The supported versions are Python 2 (2.7.9 or higher) and Python 3 ( the installer comes with Python 3 bundled by default; preferred, 3.5 to 3.8). The user operating system must run one of these supported Python versions for Cloud SDK to run properly. The Cloud SDK installer installs all necessary dependencies, including the needed Python version. By default, Google Cloud SDK will currently install and manage Python 3. Users can uncheck the Install Bundled Python option if they don’t want to install a new Python installation or to use an existing Python installation.
4. The Cloud SDK installer presents several options after completing the installation.
Ensure that the following options are selected:
- Start Google Cloud SDK Shell
- Run gcloud init
The Cloud SDK installer will start a terminal window and run the gcloud init command.
5. The default installation does not provide the App Engine extensions that are required to deploy an application using the gcloud commands. Users can install these App Engine extensions using the Cloud SDK component manager.
Troubleshooting
- If the Cloud SDK installer installation is unsuccessful due to the find command not being recognized issue, make sure that the user’s PATH environment variable is set to include the folder containing find. Usually, this is C:\WINDOWS\system32.
- If the user has just uninstalled Cloud SDK, they will need to reboot the system before installing it again.
Install the Latest Google Cloud Client Libraries (Optional)
Users can download the Cloud Client Libraries for supported languages from the following URL:
https://cloud.google.com/apis/docs/cloud-client-libraries
Initialize Cloud SDK
Users can use the gcloud init command to perform several everyday Cloud SDK setup tasks. These include setting up the default configuration and authorizing the Cloud SDK tools to access Google Cloud using the user account credentials. To initialize the Cloud SDK, follow the below steps:
1. First, execute the following command at the command prompt:
gcloud init
>>Note: Users can execute the gcloud init –console-only command instead to prevent the command from launching a web browser. To authorize without a web browser and non-interactively, create a service account with the appropriate scopes using the Google Cloud Console and execute the gcloud auth activate-service-account command with the corresponding JSON key file.
2. Then, accept the option to log in using the Google user account:
To continue, you must log in. Would you like to log in (Y/n)? Y
3. In the web browser, log in to the user’s Google user account when prompted and click Allow to grant permission to access its resources.
4. At the command prompt, select a Google Cloud project from the list of those where the users have Owner, Viewer, or Editor permissions:
Pick cloud project to use:
 [1] [my-project-1]
 [2] [my-project-2]
 ...
 Please enter your numeric choice:
5. If the users only have one project, the gcloud init command will select it for the user. If the users have access to more than 200 projects, the system will prompt the user to enter a project id, list projects, or create a new project.
This account has a lot of projects! Listing them all can take a while.
 [1] Enter a project ID
 [2] Create a new project
 [3] List projects
Please enter your numeric choice:
6. If the user has the Google Compute Engine API enabled, the gcloud init command will allow the users to choose a default Compute Engine zone:
Which compute zone would you like to use as project default?
 [1] [asia-east1-a]
 [2] [asia-east1-b]
 ...
 [14] Do not use default zone
 Please enter your numeric choice:
The gcloud init command will confirm that we have completed the setup steps successfully, as shown below:
gcloud has now been configured!
You can use [gcloud config] to change more gcloud settings.

Your active configuration is: [default]
7. This step is optional. If the user wants a more streamlined screen reader experience, the gcloud command-line tool has an accessibility/screen_reader property. To enable this property, execute the following:
gcloud config set accessibility/screen_reader true
Conclusion
This tutorial presents the steps to install and initialize Google Cloud SDK on a Windows instance. Hope this tutorial was helpful, and do reach out to us if you have any queries or suggestions.
-
Download the Cloud SDK installer.
Alternatively, open a PowerShell terminal and run the following PowerShell commands.
(New\-Object Net.WebClient).DownloadFile("https://dl.google.com/dl/cloudsdk/channels/rapid/GoogleCloudSDKInstaller.exe", "$env:Temp\\GoogleCloudSDKInstaller.exe")

& $env:Temp\\GoogleCloudSDKInstaller.exe
-
Launch the installer and follow the prompts. The installer is signed by Google LLC.
If you’d like to enable screen reader mode, select the Turn on screen reader mode option for a more streamlined screen reader experience. To read more about the Cloud SDK screen reader experience, refer to the Accessibility features guide.
-
Cloud SDK requires Python; supported versions are Python 3 (preferred, 3.5 to 3.8) and Python 2 (2.7.9 or higher).
The installer will install all necessary dependencies, including the needed Python version. While Cloud SDK currently uses Python 3 by default, you can use an existing Python installation if necessary by unchecking the option to Install Bundled Python.
-
After installation has completed, the installer presents several options:
Make sure that the following are selected:
- Start Google Cloud SDK Shell
- Run
gcloud init
The installer starts a terminal window and runs the
gcloud initcommand. -
The default installation does not include the App Engine extensions required to deploy an application using
gcloudcommands. These components can be installed using the Cloud SDK component manager.
Troubleshooting tips:
- If the Cloud SDK fails to run after installing version 274.0.0, please refer to this tracking bug for the latest workarounds.
- If your installation is unsuccessful due to the
findcommand not being recognized, ensure yourPATHenvironment variable is set to include the folder containingfind. Usually, this isC:\WINDOWS\system32;. - If you have just uninstalled Cloud SDK, you will need to reboot your system before installing Cloud SDK again.
Optional: Install the latest Google Cloud Client Libraries⚑
You can download Cloud Client Libraries for supported languages.
Other installation options⚑
Depending on your development needs, instead of the recommended installation, you can use an alternative method of installing Cloud SDK:
- Using Cloud SDK with scripts or Continuous Integration/Deployment? Download a versioned archive for a non-interactive installation of a specific version of Cloud SDK.
- Need to run Cloud SDK as a Docker image? Use the Cloud SDK Docker image for the latest release (or specific version) of Cloud SDK.
- Running Ubuntu and prefer automatic updates? Use a snap package to install the Cloud SDK.
- For Windows and macOS interactive installations, and all other use cases, run the interactive installer to install the latest release of Cloud SDK.
What’s in the box?⚑
All of the installation methods above install the default Cloud SDK components, which include gcloud, gsutil and bq command-line tools.
You can install additional components using the gcloud components install command, or by installing the appropriate deb or RPM packages.
Managing an installation⚑
After you have installed Cloud SDK, you can use commands in the gcloud components command group to manage your installation. This includes viewing installed components, adding and removing components, and upgrading to a new version (or downgrading to a specific version) of Cloud SDK.
Note: Updating and removing components using gcloud components is disabled if you installed Cloud SDK using apt-get or yum. To manage the Cloud SDK in this case, continue using the package management tool used during installation.
Older versions of Cloud SDK⚑
If you’d need an older version of Cloud SDK to revert to, you can find all previous releases available to download from this archive.
Links: Install gcloud SDK on Ubuntu | [[GCP/Google Cloud Setup Notes]] Source: Installing Google Cloud SDK (Windows) | Cloud SDK Documentation
In this article we are going to cover Download google cloud sdk for windows, install Google Cloud CLI on windows step by step in detailed explaination.
What is CLI in Google Cloud ?
The Google Cloud CLI (Command Line Interface) is a command-line tool provided by Google Cloud Platform (GCP) that allows you to manage and interact with various services and resources on the Google Cloud platform.
You can use the CLI to perform tasks such as deploying and managing applications, configuring virtual machines, managing storage buckets, working with databases, and more.
Pre-requisite :-
- Windows 8.1 and later and Windows Server 2012 and later
Installation steps of Google cloud CLI on Windows:-
Step #1:Download Google CLI for Windows
The Cloud SDK is the package that includes the Google Cloud CLI. You can download it from the following link based on your operating system:
Google Cloud SDK download page
OR
open power shell terminal and run the below command.
(New-Object Net.WebClient).DownloadFile("https://dl.google.com/dl/cloudsdk/channels/rapid/GoogleCloudSDKInstaller.exe", "$env:Temp\GoogleCloudSDKInstaller.exe")
& $env:Temp\GoogleCloudSDKInstaller.exe
![How to Install Google Cloud CLI on Windows [2 Steps] 1](https://www.devopshint.com/wp-content/uploads/2023/05/gcloud-installer-download.png)
Launch the downloaded installer and follow the instruction for installing packages. The installer will install all required dependencies including Python 3. (Note: If you already have Python 3 installed, uncheck the “Install Bundled Python” checkbox. Check the “Turn on screen reader mode” checkbox if you use a screen reader.)
Follow the instructions provided by the installer to install the Cloud SDK on your machine. Make sure to select the appropriate components during the installation process.
![How to Install Google Cloud CLI on Windows [2 Steps] 2](https://www.devopshint.com/wp-content/uploads/2023/05/next.png)
Click on next until you did not get finish to close setup.
![How to Install Google Cloud CLI on Windows [2 Steps] 3](https://www.devopshint.com/wp-content/uploads/2023/05/finish.png)
After the click on finish opens a terminal window to execute the command.
Step #3:Authenticate Google Cloud CLI with Gmail
You get message like you must log in to continue? Then enter y.
![How to Install Google Cloud CLI on Windows [2 Steps] 4](https://www.devopshint.com/wp-content/uploads/2023/05/y.png)
After your page navigate to sign in google. Choose an account or email id
![How to Install Google Cloud CLI on Windows [2 Steps] 5](https://www.devopshint.com/wp-content/uploads/2023/05/login.png)
Click on allow.
You will get authentication message like below
![How to Install Google Cloud CLI on Windows [2 Steps] 7](https://www.devopshint.com/wp-content/uploads/2023/05/msg-get.png)
Once the installation is complete, you need to initialize the SDK by running the following command in your terminal or command prompt:
gcloud init
This command will guide you through the process of setting up your GCP account, selecting a project, and configuring authentication.
After initializing the SDK, you’ll need to authenticate by running the following command:
gcloud auth login- This will open a browser window where you can log in to your Google Cloud account and grant the necessary permissions to the CLI.
Once you have completed the setup, you can start using the Google Cloud CLI by running various commands. The general syntax for executing commands is:
gcloud <service> <command> <flags>For example, to list the instances in your Compute Engine project, you would run:
gcloud compute instances listThe gcloud command provides a wide range of services and commands, and you can get detailed help on any command by appending the --help flag. For example:
gcloud compute instances list --helpThis will display the documentation and available options for the specified command.
Note that the Google Cloud CLI supports tab completion, so you can press the Tab key while typing commands to auto-complete them or display available options.
I hope this helps you get started with the Google Cloud CLI! If you have any further questions, feel free to ask.
We have covered Google Cloud CLI on windows Step by step in detailed explaination
Conclusion:
We have covered Download Google CLI for Windows, install Google Cloud CLI on windows, Authenticate Google Cloud CLI with Gmail
Related Articles:
How to Install Apache Kafka on Ubuntu 22.04 LTS