
Applies ToWindows 10
Голосовой доступ заменил функцию распознавания речи Windows (WSR) в Windows 11 22H2 и более поздних версиях в сентябре 2024 года. WSR доступен в старых версиях Windows. Дополнительные сведения о голосовом доступе см. в статье Использование голосового доступа для управления компьютером и создания текста с помощью голоса.
Настройка микрофона
Перед настройкой распознавания речи убедитесь, что у вас настроен микрофон.
-
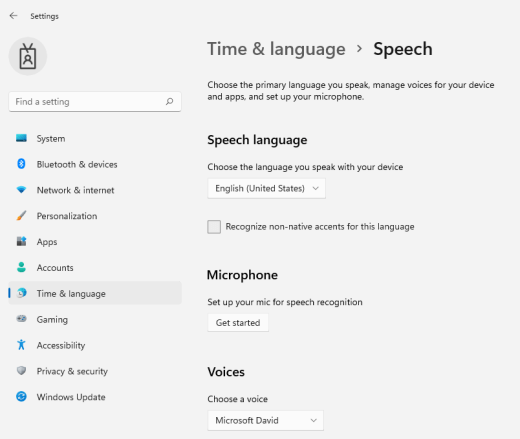
Выберите (Пуск) > Параметры > время & язык > речь.
-
В разделе Микрофоннажмите кнопку Начать.

-
Откроется окно мастера распознавания речи , и настройка запускается автоматически. Если мастер обнаружит проблемы с микрофоном, они будут перечислены в диалоговом окне мастера. В диалоговом окне можно выбрать параметры, чтобы указать проблему и помочь мастеру в ее решении.
Помогите компьютеру распознавать ваш голос
Вы можете научить Windows 11 распознавать свой голос. Настройка приложения
-
Нажмите клавишу с логотипом Windows +CTRL+S. Откроется окно Мастера настройки распознавания речи с введением на странице Добро пожаловать в распознавание речи .
Совет: Если вы уже настроили распознавание речи, нажмите клавишу с логотипом Windows +CTRL+S , и вы готовы к использованию. Если вы хотите переучить компьютер для распознавания голоса, нажмите клавишу с логотипом Windows, введите Панель управления и выберите Панель управления в списке результатов. На панели управления выберите Специальные возможности > распознавание речи > Обучить компьютер, чтобы лучше понимать вас.
-
Выберите Далее. Следуйте инструкциям на экране, чтобы настроить распознавание речи. Мастер поможет вам выполнить инструкции по настройке.
-
После завершения настройки можно воспользоваться учебником, чтобы узнать больше о распознавании речи. Чтобы использовать это руководство, выберите Запустить учебник в окне мастера. Чтобы пропустить учебник, выберите Пропустить учебник. Теперь вы можете приступить к использованию распознавания речи.
См. также
Команды распознавания речи Windows
Нужна дополнительная помощь?
Нужны дополнительные параметры?
Изучите преимущества подписки, просмотрите учебные курсы, узнайте, как защитить свое устройство и т. д.

Crystal Cox/Business Insider
- You can add text-to-speech voices to Windows 10 through your PC’s Settings app.
- Once you’ve added a text-to-speech voice to Windows, you can use it in programs like Microsoft Word, OneNote, and Edge.
- Visit Business Insider’s Tech Reference library for more stories.
Microsoft has a text-to-speech feature built into a number of Windows programs, including Microsoft Office, the Edge web browser, and OneNote.
By default, the voices for your computer’s current language are already installed. But if you need to install a second language, or if additional voices are released for your primary language, you can install them as well.
The text-to-speech voices for all Microsoft apps are installed in the Settings app. Here’s how to find and add them to Windows.
Check out the products mentioned in this article:
Windows 10 (From $139.99 at Best Buy)
Acer Chromebook 15 (From $179.99 at Walmart)
How to add text-to-speech voices in Windows 10
1. Click the Start button in the bottom-left, and then click the Settings icon, which looks like a gear.
2. In Settings, click «Time & Language.»
Dave Johnson/Business Insider
3. In the navigation pane on the left, click «Language.»
4. Click «Add a preferred language» and then scroll through the list until you see the language you want to add. Click it, and then click «Next.» It’ll be installed.
Dave Johnson/Business Insider
5. After it’s installed, select it in the list of languages and click «Options.»
Dave Johnson/Business Insider
6. On the language’s details page, click «Download.» This will install the language pack, which includes the voices for this language.
How to choose a voice for text-to-speech in Windows 10
After you’ve downloaded voices, you can choose which one Windows uses for text-to-speech.
1. While still in the «Time & Language» section of Settings, click «Speech» in the left sidebar.
2. Underneath «Speech language,» make sure it’s set to the language you want text-to-speech to use.
3. Underneath «Voices,» click the «Choose a voice» drop-down menu and select the voice you want to use by default. You can vary its speed and preview the voice here as well.
Dave Johnson/Business Insider
Some programs let you pick a text-to-speech voice that’s different from the one the rest of Windows uses.
In Word, for example, click «Review» and then click «Read Aloud.» A playback control menu will appear in the top-right of the screen. Click the gear icon to open the Read Aloud settings. Here, you can choose the voice you want to use in Word.
Dave Johnson/Business Insider
Likewise, the Edge browser has a similar option. When you choose «Read aloud» from the three-dot menu, «Voice options» appears at the top of the page. Click it to change voices.
Related coverage from Tech Reference:
-
How to use speech-to-text on a Windows computer to quickly dictate text without typing
-
You can use text-to-speech in the Kindle app on an iPad using an accessibility feature— here’s how to turn it on
-
How to use text-to-speech on Discord, and have the desktop app read your messages aloud
-
How to use Google text-to-speech on your Android phone to hear text instead of reading it
-
2 ways to lock a Windows computer from your keyboard and quickly secure your data
Dave Johnson
Freelance Writer
Dave Johnson is a technology journalist who writes about consumer tech and how the industry is transforming the speculative world of science fiction into modern-day real life. Dave grew up in New Jersey before entering the Air Force to operate satellites, teach space operations, and do space launch planning. He then spent eight years as a content lead on the Windows team at Microsoft. As a photographer, Dave has photographed wolves in their natural environment; he’s also a scuba instructor and co-host of several podcasts. Dave is the author of more than two dozen books and has contributed to many sites and publications including CNET, Forbes, PC World, How To Geek, and Insider.
Read more
Read less
Insider Inc. receives a commission when you buy through our links.
Back to Top
A white circle with a black border surrounding a chevron pointing up. It
indicates ‘click here to go back to the top of the page.’
Read next
The Fall Creators Update to Windows 10 brought a new dictation feature that allows you to translate spoken words into text a lot easier than before — and in any app and across the desktop experience.
Dictation joins the touch keyboard and handwriting as input options, and is very similar to Speech Recognition that’s also part of Windows 10. Dictation focuses exclusively on converting voice into text, so you can’t you can’t use it to navigate the desktop and apps using your voice as you can with Speech Recognition.
In this Windows 10 guide, we’ll walk you through the easy steps to start using voice dictation on your device.
How to get started with dictation on Windows 10
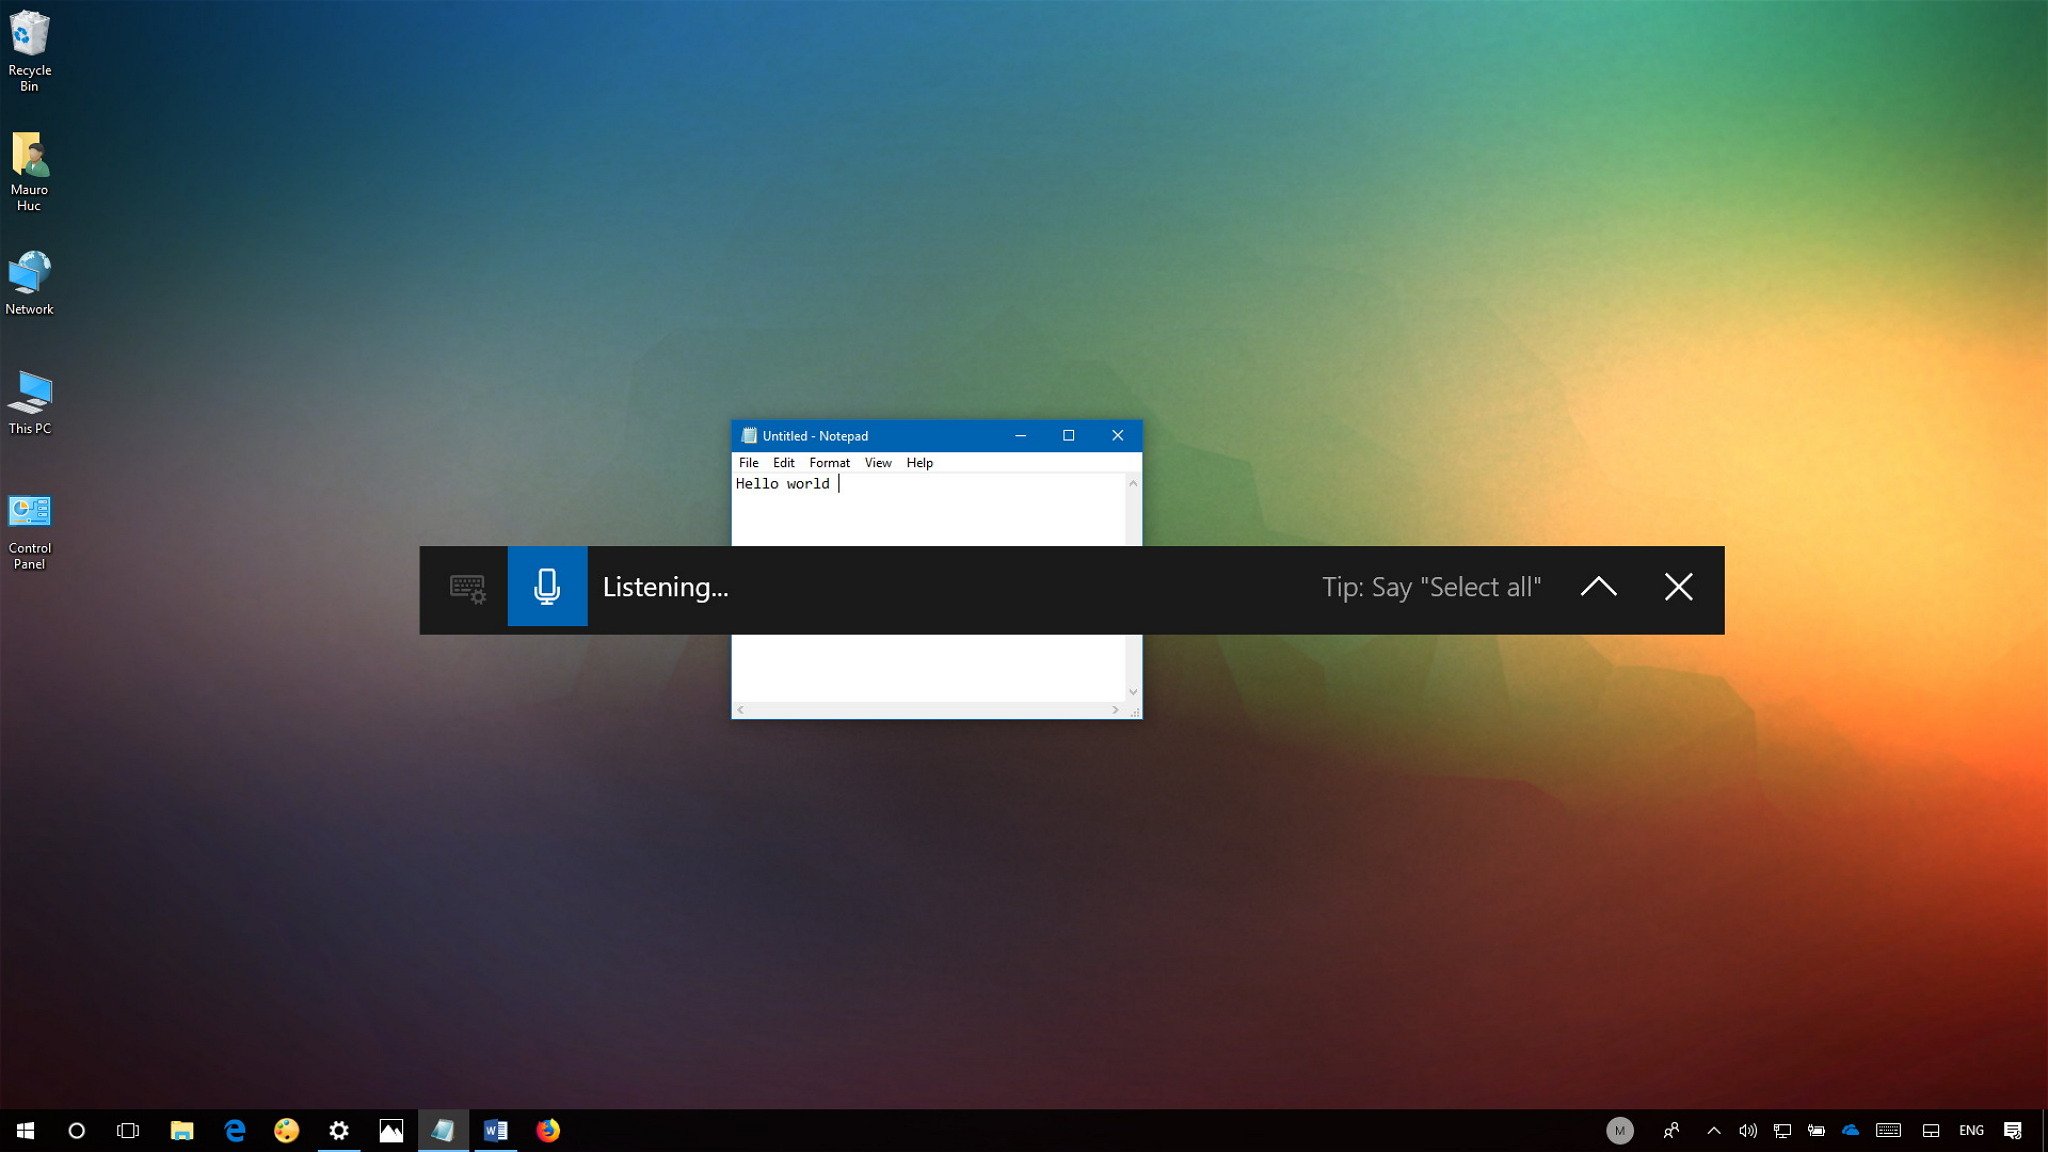
If you have a microphone connected to your device, dictation will be enabled by default, and you’ll be able to access it using the Windows key + H keyboard shortcut or clicking the microphone button in the touch keyboard experience.
In order to properly invoke the dictation panel, make sure to place the mouse cursor on any text field, and then use the Windows key + H shortcut.
When the voice dictation panel appears, and you see the microphone icon in blue, you can immediately start dictating. However, bear in mind that using this experience, you’ll also need to speak the punctuation and to dictate a symbol or letter, you’ll need to use the «start spelling» command, and then speak the symbol or letter.

For example, if you want to say «Microsoft sells software, hardware, and accessories.» with the quotation marks, you’ll need to say open quote microsoft sells software comma hardware comma and accessories period close quote.
All the latest news, reviews, and guides for Windows and Xbox diehards.
In the same way, to input a letter using uppercase, you must use the «uppercase» command, followed by the letter. For example, uppercase m will give you an M.
Once you’re done, say «stop dictating,» or after five seconds of inactivity, dictation will turn off automatically.
If the panel gets in the way, you can always drag it around the desktop. When you’re done dictating, you can dismiss it pressing any key in the keyboard, clicking anywhere outside of the experience, or clicking the close (X) button on the right.
The up arrow button allows you to open the touch keyboard or handwriting experience, whichever you were using last.

Windows 10 dictation commands
Here’s a list of the most common dictation commands that you can use. The words using «quotation marks» are just examples. You’ll need to replace them with different words to perform your task.
Swipe to scroll horizontally
| Voice commands | Actions |
|---|---|
| Select «word» | Selects specific word or phrase |
| Select that | Selects recent dictation result |
| Select the «next three words»Select the «previous two paragraphs» | Selects multiple blocks of text |
| Start spellingStop spelling | Enables and disables spelling mode |
| Clear selectionUnselect that | Clear current selection |
| Delete thatStrike that | Deletes recent dication result or selected text |
| Delete «word» | Deletes current word |
| Go after thatMove after «word»Go to the end of «paragraph»Move to the end of that | Moves cursor to the first character after specified word or phrase |
| Go after «word»Move after «word»Go to the end of thatMove to the end of «paragraph» | Moves cursor to the end of the text |
| Go up to the previous «paragraph»Move back to the previous «word» | Moves cursor backwards to the beginning of the previous block of text |
| Go to the start of the «word» | Moves cursor to the first character before a specified word or phrase |
| Go before thatMove to the start of that | Moves cursor to the start of a text block |
| Go down to the next «paragraph»Move forward to the next «word» | Moves cursor forward to the beginning of the next block of text |
| Go to the end of the «paragraph»Move to the end of the «word» | Moves cursor to the end of a text block |
| Press «key»Tap «key» | Supported keys: Tab, Enter, End, Home, Page up, Page down, Backspace, Delete |
If you want to learn more about the punctuation and symbol commands you can use, check out this Microsoft support page.
Wrapping things up
Overall the experience using dictation on Windows 10 is good, but not perfect, as you may find it not very reliable all the time. For example, during my test, repeatedly saying «uppercase w» would keep on writing the words «uppercase» and «W.»
In addition, it’s not capable of recognizing punctuations automatically. It’s limited to users running the US English version of Windows 10. And despite the fact that you can use some of the Speech Recognition commands, you’ll notice the absence of the commands to navigate the desktop or app using your voice.
However, improvements and changes to dictation, such as an updated interface and customization options in the Settings app are expected to arrive in the next version of Windows 10.
More Windows 10 resources
For more helpful articles, coverage, and answers to common questions about Windows 10, visit the following resources:
- Windows 10 on Windows Central – All you need to know
- Windows 10 help, tips, and tricks
- Windows 10 forums on Windows Central
Mauro Huculak has been a Windows How-To Expert contributor for WindowsCentral.com for nearly a decade and has over 15 years of experience writing comprehensive guides. He also has an IT background and has achieved different professional certifications from Microsoft, Cisco, VMware, and CompTIA. He has been recognized as a Microsoft MVP for many years.
Are you ready to start dictating your documents and text using just your voice? Instead of offering separated dictation or speech-to-text capabilities, Windows 10 conveniently groups its voice commands under Speech Recognition, which interprets the spoken word across the operating system for various tasks. We’ll teach you how to get everything ready, as well as how to enable speech-to-text in Windows 10, so you can start chatting away to your favorite OS and improve Windows’ “ear” for your voice.
Related Guides
- How to use Windows 10
- Best dictation software
Note: Speech recognition is only currently available in English, French, Italian, Spanish, German, Japanese, Portuguese, Simplified Chinese, and Traditional Chinese.
Finding a mic
Before you start, you must be sure that you have the correct hardware for speech-to-text options. It’s easy to overlook this step as we assume that all devices come with built-in mics these days.
However, the issue here is quality. Built-in mics can work well for simple tasks, like Skype conversations or voice commands, but they can also cause distortion, especially with speech-to-text options. In the past, Microsoft has warned that its speech-recognition features are best suited for headset microphones that interpret sounds with greater clarity and are less susceptible to ambient noise. If you really want to use speech recognition on Windows 10, you should get a quality headset that works well with your computer.
If you’re going to invest in hardware, you should do it as soon as possible. Once you train the speech features, it can be difficult to switch devices. Should you decide to buy a mic, follow these steps to make sure Windows knows that you want it to be your primary microphone, even over previous mics:
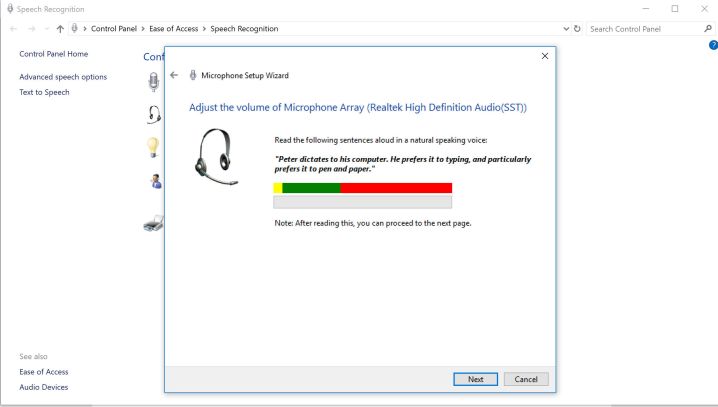
Step 1: In the Windows search box, type “speech.” Doing so will bring up an option to go to Speech Recognition in the Control Panel. Select this. When the window opens, select Set Up Microphone to begin.
Step 2: Now, choose whether you are using a headset mic or a desktop mic and select Next. Windows will give you some tips on mic placement, then ask you to read a sentence. Read the sentence into your mic, and select Next (there’s no grade or test to pass).
Step 3: If everything worked well, your mic should now be set up. Select Finish to complete the task.
Setting up speech recognition

With your mic ready, it’s time to start configuring your various speech-recognition capabilities. In Windows 10, this is a more seamless process than it has been in the past. These steps and tutorials will affect an array of Windows programs, but you may also want to make sure dictation is enabled in any writing apps that you prefer to use. Begin with the steps below.
Step 1: In the Windows 10 search box, type “speech,” and select Windows Speech Recognition in the results.
Step 2: Select Start Speech Recognition to begin. If Windows 10 still doesn’t recognize your mic, it will have you go through the mic setup steps again at this point, then begin the speech recognition setup.
Step 3: One of the choices in the setup process is whether to enable Document Review or not. This option tells Windows to look at your emails and documents in your search index and look at the words you frequently use. It can help with the recognition software, but it isn’t a necessary step, so choose what you feel comfortable with.
Step 4: Now decide whether you want speech-to-text to be activated with a keyboard or vocal command and click Next. Use the reference sheet to familiarize yourself with commands you can make and continue through the other preferences. While Windows offers to print out the commands for you, you can easily access them on Microsoft’s website by going here.
Step 5: Windows will also ask if you want to start speech recognition every time you start the computer. If you are using speech recognition for accessibility reasons, this may be an excellent mode to enable.
You should now be ready to go. You can enable or disable speech to text by pressing the Ctrl + Windows keys at any time.
Training your computer and more
You’re all set at this point to use speech-to-text with a variety of files within Windows Docs. But first, you might want to take the time to fine-tune Windows’ voice-recognition capabilities. With a little training, Microsoft’s latest software can learn your voice and process it to text with greater accuracy.

Step 1: Go to the Ease of Access menu. Click on Speech Recognition.
Step 2: Select Train Your Computer to Better Understand You.
Step 3: Windows will have you read out extended sequences of text, which will help it learn the particular quirks of your voice and intonation, allowing it to understand your voice better.
Near the bottom of the speech-recognition menu is the Speech Reference Card, which is a helpful tool. It provides a cheat sheet on controlling software programs verbally, for those new to voice commands. You can access the cheats in either a small side screen or a print-out.
Windows 10 comes with two default voices installed to be used with the text-to-speech engines. These two voices (namely Microsoft Zira and Microsoft David) that come pre-installed in Windows 10 are to be used with both apps and desktop applications. In case you are installing a third party voice pack for TTS then most probably it will be available for the desktop applications only. Here is how you can install third party TTS voices, set them as default and use them in Windows desktop applications:
Download and install TTS Voice Packs in Windows 10
One of the sources for downloading free Microsoft and LTS TTS voices is Zero2000. You can also purchase very high quality TTS voices for Windows from companies like Ivona, Cepstral or CereProc. But if you want to try out these high quality voices in Windows 10, then you can also download the 30-day trial versions too. You can download these various packs from http://visionaid.com/phpincludes/en/support/voices/voices.php where you will find voice packs from Ivona and Nuance (no longer work in Windows 10).
Installation of these packs is usually very simple. All you have to do is launch and go through the setup installer package and it will automatically install all the voices included in the package in your Windows 10 PC.

Testing VisionAid Voices Packs in Windows 10
If you have downloaded the speech packs from VisionAid website (link above), then the setup package installs some extra tools in your PC. You can open the Start Menu icon and search for Speech Test to find a small speech testing tool. The other tool installed is for managing the installed voice licenses on your PC.
The Speech Test tool can be used to check the proper installation of these voices in your PC. You can select one of the installed voices from the drop-down list, then type something in the text box and click on the Speak button. There are some other options for this tool like speak punctuation and parsing XML files.

Setting a Default Voice for TTS in Windows 10
Some voices in Windows 10 are only meant for apps, and some for only desktop applications, while others can be used both for apps and traditional desktop applications. Most of the third party voices are designed to be used with the desktop applications. In order to use them, you have open Control Panel and choose the default voice.
You can press the Win+X and select Control Panel from the menu. In the Control Panel, search for “speech” and then click on the Change text to speech settings. In the window that opens, you can choose a default voice from Voice Selection list-box and then finally click on OK button.
Note: Not all voice packs installed may show up in these settings depending on the API used by them. Even the same voice pack may use different API for different versions of the voice packs. For using them, use specific apps like TTSReader mentioned below.

Using the Newly Installed Voice in Desktop Application
For using the newly installed voices in Windows 10 requires you to either use a Windows app that you can download from the official Microsoft apps store or a desktop application like TTSReader that you can download from http://www.softpedia.com/get/Office-tools/Other-Office-Tools/TTSReader.shtml.
TTSReader is a free application and can read all the text that you have copied to the clipboard automatically. In the application, you can choose one of the available TTS voices and control its speech, volume and pitch. TTSReader can also save the speech output to an MP3 or WAV audio file.

Conclusion: If you are not happy with the default Microsoft Zira and Microsoft David TTS voices available in Windows 10, then you can get third party TTS voices for free or buy them online. Using the third party TTS voices in Windows 10 is a breeze if you know what type of voice packs you have installed.