
This project is a fork of the well-known GNU Awk (https://www.gnu.org/software/gawk/).

The goal of the fork is to implement a fully functional native gawk interpreter for Windows, which is not inferior in capabilities to the Linux version of gawk.


Highlights of this fork.

1. Support for UTF-8 encoding.

When starting gawk, it is enough to specify the UTF-8 encoding, for example, using the "--locale=ru_RU.UTF-8" switch.
If the "--locale" switch is not specified, then the values of the environment variables LC_ALL, LC_CTYPE, LC_COLLATE, LC_MONETARY, LC_NUMERIC, LC_TIME and LANG are taken into account, just as it is done in the UNIX environment.

The "--locale" switch recognizes various forms of locale names, both standard in the UNIX environment, for example "ru_RU.UTF-8", and accepted in Windows, for example "Russian_Russia.65001".
Various combinations of the name of the same locale are possible, for example: "ru-RU.UTF8", "Russian_Russia.utf-8", "Russian_Russia.cp65001", etc.

2. Support for all unicode characters in regular expressions (when using UTF-8 encoding).

Internal gawk functions operate on 32-bit unicode characters (encoded in UTF-32).

3. Support for escaping double quotes using two consecutive double quotes in command line arguments, which allows to embed the gawk call in the cmd.exe interpreter chain of commands:

(echo.a) | gawk "{ gsub(/a/, ""&b""); print }"
ab

Note:
gawk also supports the traditional way of escaping double quotes with a backslash, like \".
But since cmd.exe does not interpret backslashes in a special way, it is easier to use two double quotes to escape a double quote:

(echo.a) | gawk "{ gsub(/a/, \"^&b\"); print }"
ab

4. Ported all 13 standard gawk extensions (dynamically loaded plugins):

- filefuncs.dll implements the functions: chdir, stat, fts
- fnmatch.dll   implements the functions: fnmatch
- inplace.dll   implements the functions: begin, end
- intdiv.dll    implements the functions: intdiv
- ordchr.dll    implements the functions: ord, chr
- readdir.dll   implements the functions: readdir
- readfile.dll  implements the functions: readfile
- revoutput.dll implements the functions: revoutput
- revtwoway.dll implements the functions: revtwoway
- rwarray.dll   implements the functions: writea, reada
- rwarray0.dll  implements the functions: writea, reada
- time.dll      implements the functions: gettimeofday, sleep
- testext.dll   is used for testing gawk API for extensions

5. Almost all tests (more than 500) are ported, with the exception of a few, very platform-dependent:

poundbang, devfd devfd1 devfd2, pty1 pty2, timeout, fork fork2, ignrcas3

6. Full support for WindowsXP (only 32-bit version of gawk, built with MinGW.org).

7. Statically linked executable files and dynamic extensions - no external dependencies, simple copying is enough for installation.


Internal changes to the codebase:

1. Avoiding the use of the platform-dependent integer type "long" (for 64-bit UNIX - "long" is 8 bytes, but for 64-bit Windows - "long" is 4 bytes). Instead of long, the awk_long_t type was introduced, whose size does not depend on the OS type.
2. The maximum possible use of unsigned types to represent non-negative values.
3. Ability to build with a C++ compiler.
4. Code cleanup - most warnings of C/C++ compilers in pedantic build mode have been eliminated or suppressed.
5. Support for 3 build environments: MinGW.org (gcc-32), mingw-64 (gcc-32/64, clang-32/64), MSVC (cl-32/64, clang-32/64).
6. Support for building with the activation of the static code analysis mode by the compiler (build.bat supports the "analyze" option).
7. The interface for dynamic extensions has been significantly redesigned - all the functions of the standard C library are taken over by the executable file, it also stores the global state of the program (for example, locale settings).


Building gawk from the sources.

1) For the build, the batch file build.bat is used, which should be launched in the cmd.exe window.

2) It is enough to install one of the following 3 build environments.

 1. MinGW.org (http://www.mingw.org/, installer - https://osdn.net/projects/mingw/downloads/68260/mingw-get-setup.exe/)

    After installing mingw-get, install gcc and mpfr:

    C:\MinGW\bin\mingw-get.exe install gcc
    C:\MinGW\bin\mingw-get.exe install mpfr

    Before building, in the cmd.exe window, you need to set the following environment variables:

    set "PATH=C:\MinGW\bin"
    set "PATH=%PATH%;%SystemRoot%\System32;%SystemRoot%;%SystemRoot%\System32\Wbem"

 2. mingw-64 (http://mingw-w64.org/doku.php, msys2 installer - https://sourceforge.net/projects/msys2/files/Base/x86_64/)

    After installing msys2, launch the msys2 window, in which we execute:

    $ pacman -Syu

    After restarting the terminal, run again:

    $ pacman -Su

    Install at least one of the 4 sets of compilers:

    $ pacman -S mingw-w64-x86_64-gcc
    $ pacman -S mingw-w64-i686-gcc
    $ pacman -S mingw-w64-x86_64-clang  mingw-w64-x86_64-lld
    $ pacman -S mingw-w64-i686-clang    mingw-w64-i686-lld

    Before building, in the cmd.exe window, you need to set the following environment variables:

    - to build a 32-bit version of gawk:

    set "PATH=C:\msys64\mingw32\bin"
    set "PATH=%PATH%;%SystemRoot%\System32;%SystemRoot%;%SystemRoot%\System32\Wbem"

    - to build a 64-bit version of gawk:

    set "PATH=C:\msys64\mingw64\bin"
    set "PATH=%PATH%;%SystemRoot%\System32;%SystemRoot%;%SystemRoot%\System32\Wbem"

 3. MSVC (https://visualstudio.microsoft.com/).

    Install Visual Studio or Build Tools for Visual Studio.

    To use the clang compiler in the Visual Studio environment, make sure it is installed, run:

    "C:\Program Files (x86)\Microsoft Visual Studio\Installer\vs_installer.exe"

    Please select
    Modify -> Individual components -> Search components -> clang -> C++ Clang Compiler for Windows

    Click the "Modify" button or, if clang is already installed, then "Close".

    Setting up the environment for the build is carried out by running the following commands in the cmd.exe window:

    for /f "tokens=1 delims==" %f in ('set ^| %SystemRoot%\System32\find.exe /i "Microsoft Visual Studio"') do set %f=
    set "PATH=%SystemRoot%\System32;%SystemRoot%;%SystemRoot%\System32\Wbem"

    to build a 32-bit version of gawk:

    - when using Build Tools for Visual Studio

    "C:\Program Files (x86)\Microsoft Visual Studio\2019\BuildTools\VC\Auxiliary\Build\vcvarsall.bat" x86

    - when using Visual Studio Community

    "C:\Program Files (x86)\Microsoft Visual Studio\2019\Community\VC\Auxiliary\Build\vcvarsall.bat" x86

    or, to build a 64-bit version of gawk:

    - when using Build Tools for Visual Studio

    "C:\Program Files (x86)\Microsoft Visual Studio\2019\BuildTools\VC\Auxiliary\Build\vcvarsall.bat" x64

    - when using Visual Studio Community

    "C:\Program Files (x86)\Microsoft Visual Studio\2019\Community\VC\Auxiliary\Build\vcvarsall.bat" x64

    To be able to use clang, additionally set environment variables:

    set LLVMAR="%VCINSTALLDIR%Tools\Llvm\bin\llvm-ar.exe"
    set CLANGMSVC="%VCINSTALLDIR%Tools\Llvm\bin\clang.exe"
    set CLANGMSVCXX="%VCINSTALLDIR%Tools\Llvm\bin\clang++.exe"

    or, to use 64-bit versions of compilers:

    set LLVMAR="%VCINSTALLDIR%Tools\Llvm\x64\bin\llvm-ar.exe"
    set CLANGMSVC="%VCINSTALLDIR%Tools\Llvm\x64\bin\clang.exe"
    set CLANGMSVCXX="%VCINSTALLDIR%Tools\Llvm\x64\bin\clang++.exe"

3) You need to download and set the paths to three 3-party projects:

 https://github.com/mbuilov/mscrtx.git
 https://github.com/mbuilov/libutf16.git
 https://github.com/mbuilov/unicode_ctype.git

 If you unzip the .zip files of projects in C:\projects

 then, before building, you need to set the following environment variables:

 set "MSCRTX=C:\projects\mscrtx-master"
 set "LIBUTF16=C:\projects\libutf16-master"
 set "UNICODE_CTYPE=C:\projects\unicode_ctype-master"

4) Now, in the gawk source directory, you need to run build.bat.

 build.bat requires the specification of build parameters - depending on the used build environment, compiler, build type, bitness, etc.
 If build.bat is called without parameters, then a brief help on the allowed parameters will be displayed.

 Examples of running build.bat:

 - for MinGW.org

   build all gcc

   to build a debug version (debugging - using C:\MinGW\bin\gdb.exe, installed by the command "C:\MinGW\bin\mingw-get.exe install gdb"):

   build all gcc c++ pedantic debug 32

 - for mingw-64

   build all clang 64

 - for MSVC

   build all cl c++ pedantic debug 32

   build all clang-msvc c++ pedantic 64

 Etc.

 The result of the build (in the "dist" directory) is a statically linked GNU Awk interpreter, for installation of which you just need to copy gawk.exe to your work computer.
 Dynamic extensions are also installed by copying them into the directory next to gawk.exe.


Running tests.

 To test gawk, standard Windows programs are sufficient, nothing additional is required.
 The only thing to do to perform optional gawk networking tests, you need to enable standard Windows components - "Simple TCP/IP Services".

 The tests themselves are supplied with the gawk source code - in the "test" directory.
 Test.bat is used to run tests.

 test.bat assumes there is a tested gawk instance in the "dist" directory, however, this location can be overridden by setting the BLD_DIST environment variable, e.g.:

 set "BLD_DIST=C:\projects\gawk-windows\dist"

 By default, running test.bat without parameters, will execute all tests.
 However, you can also specify which test suite to run.
 A list of test suites can be found by running:

 test.bat help


The author of this fork is Michael M. Builov (mbuilov@gmail.com).

The changes made are published under the same license as the original GNU Awk source codes - GNU GPLv3.
Are you a Windows user who would like to take advantage of all the powerful features of Linux AWK? If so, you’ll be happy to know that it’s possible to install Linux AWK for Windows.
In this tutorial, you will learn how to do just that. You will go over the different methods for installing Linux AWK for Windows. After following the instructions in this tutorial, you can use AWK’s features from your Windows computer.
Read on to get started!
Prerequisites
This tutorial will be a hands-on demonstration. If you’d like to follow along, be sure you have a Windows computer handy. This tutorial uses Windows 10.
Installing AWK For Windows Using Installer
One way to install Linux AWK for Windows is by using an installer. Installers are usually the easiest way to get started with new software for typical users. The installer handles all of the necessary file placement and configuration for you.
Luckily, AWK for Windows comes with an installer.
Downloading the AWK for Windows Installer
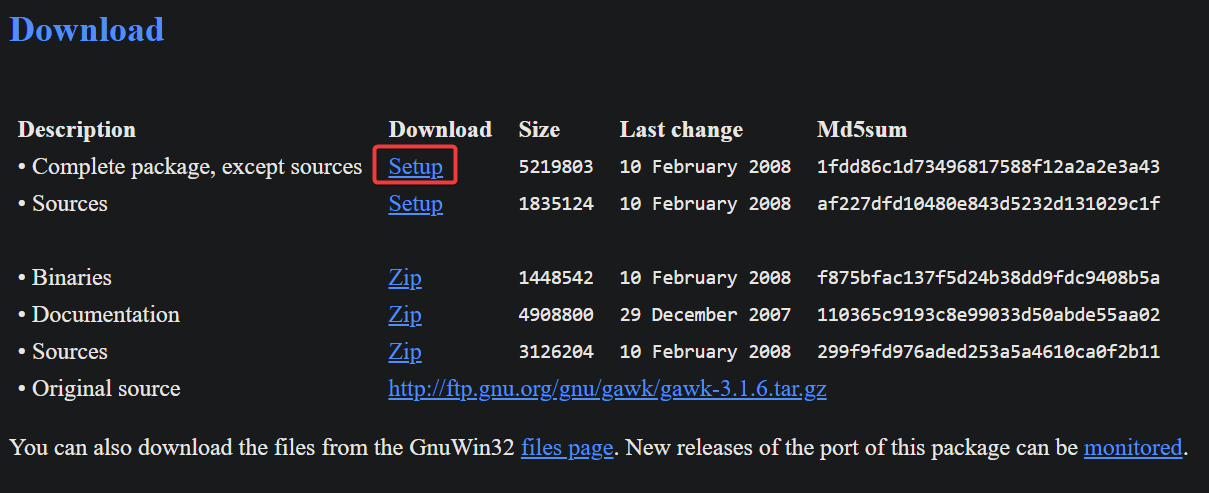
1. Launch your browser and open the Gawk for Windows URL.
2. Scroll down to the Download section and click the Setup link next to Complete package, except sources.
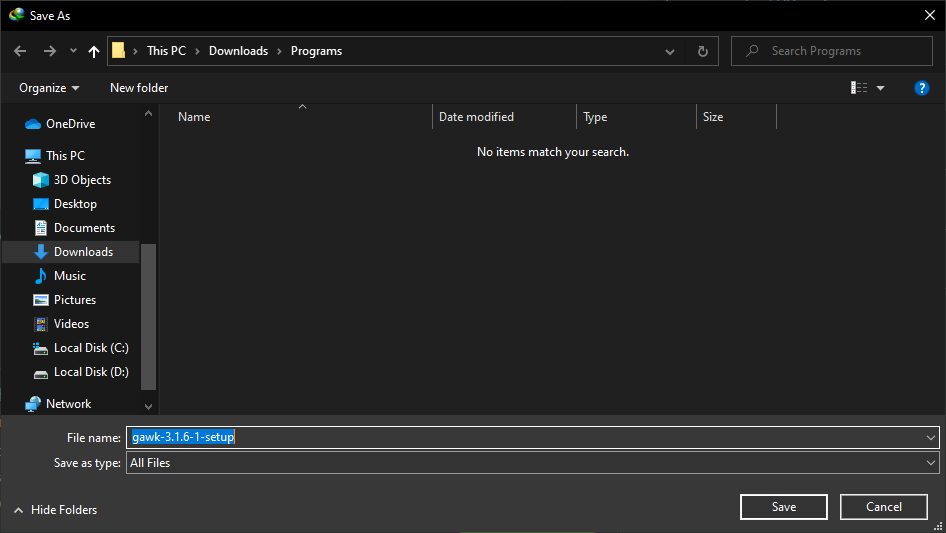
3. Save the file to a convenient location. This example uses ~\Downloads\Programs as the download location.
Verifying the Installer File Integrity
To ensure you downloaded the correct file or that the file is intact, you must compare the MD5 sum value of the file against the one shown on the download page. This step is optional but recommended for security.
1. First, copy the MD5sum value from the download page.

2. Next, open PowerShell as admin and change the working directory to where you downloaded the AWK for Windows installer.
3. Run the Get-FileHash cmdlet to generate the file’s MD5 checksum and compare the hash value with the value you copied from the website. In this example, the Md5sum value from the is 1fdd86c1d73496817588f12a2a2e3a43.
(Get-FileHash -Path .\gawk-3.1.6-1-setup.exe -Algorithm MD5).Hash `
-eq '1fdd86c1d73496817588f12a2a2e3a43'
If the MD5 hash comparison result is True, the installer file is correct and not corrupted. Otherwise, you must re-download the file.

Installing AWK For Windows Using Installer
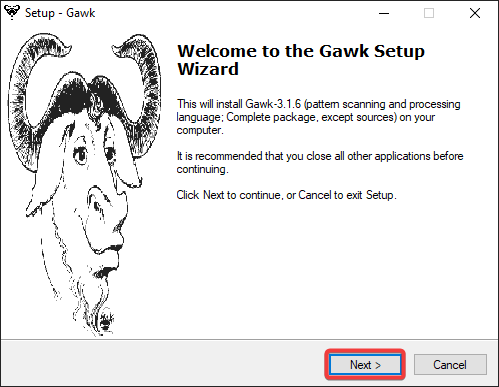
Now that you have verified that the file is safe, it’s time to install AWS for Windows on your computer.
1. Double-click the installer file from File Explorer or run the executable file in PowerShell.
2. Click Next on the Welcome to the Gawk Setup Wizard page.
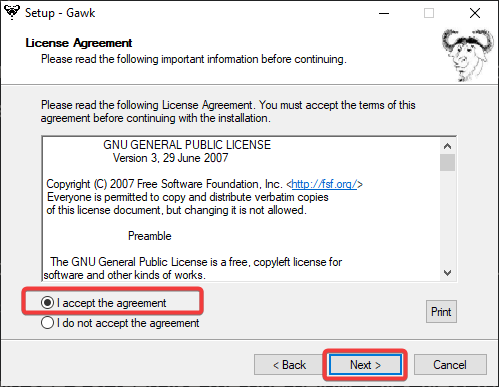
3. On the License Agreement, click I accept the agreement and click Next.
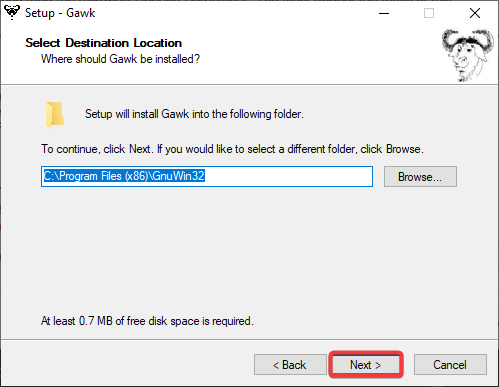
4. On the next page, leave the destination path and click Next.
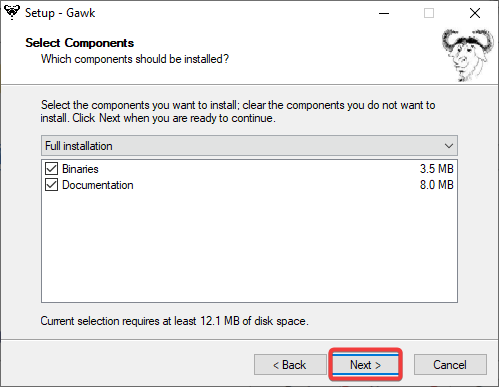
5. On the Select Components page, leave all options checked and click Next.
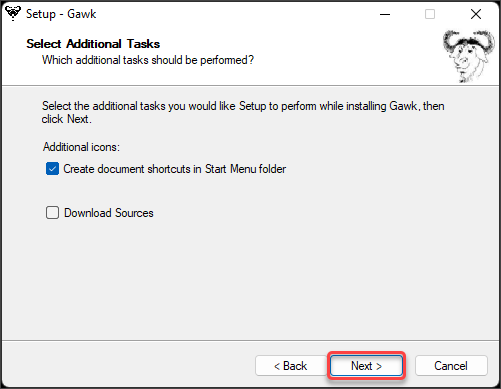
6. The next screen will ask you to select additional tasks. For this tutorial, leave the defaults and click Next.
7. Finally, click Install to begin the installation process.

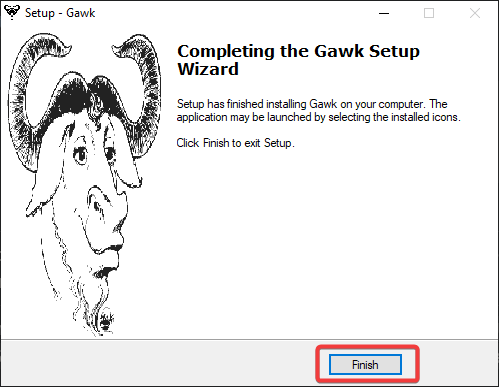
8. Once the installation is complete, click Finish to close the installer. You’ve now installed AWS for Windows.
Configuring the PATH Variable
The final step is to configure your PATH environment variable so that you can run the awk command from any working directory. Otherwise, you can only run awk from its location (C:\Program Files (x86)\GnuWin32\bin\).
While still in PowerShell, follow the below instructions to add the awk binary path to the PATH environment variable.
1. For good measure, run the below command to back up the current PATH to a text file.
[Environment]::GetEnvironmentVariable('Path') | Out-File origPath.txt2. Get the current PATH variable value and append C:\Program Files (x86)\GnuWin32\bin\.
$newPath = [Environment]::GetEnvironmentVariable('Path')+";C:\Program Files (x86)\GnuWin32\bin\"3. Now, save the new PATH.
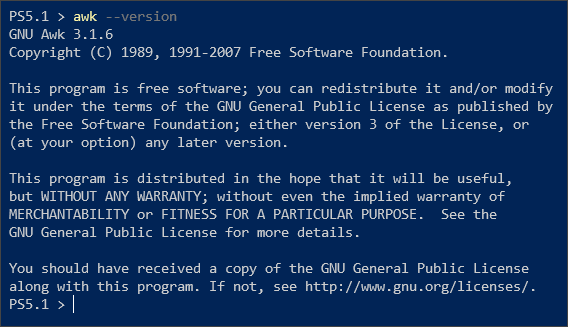
[Environment]::SetEnvironmentVariable('Path',$newPath,'Machine')4. Close and reopen PowerShell to verify the changes. You can now run awk from any directory on your computer. For example, run the below command to check the version of AWK for Windows.
Installing AWK For Windows Using Chocolatey
Chocolatey is a command line package manager for Windows. Chocolatey helps you automate software installs. With this method, you always get the latest version of awk.
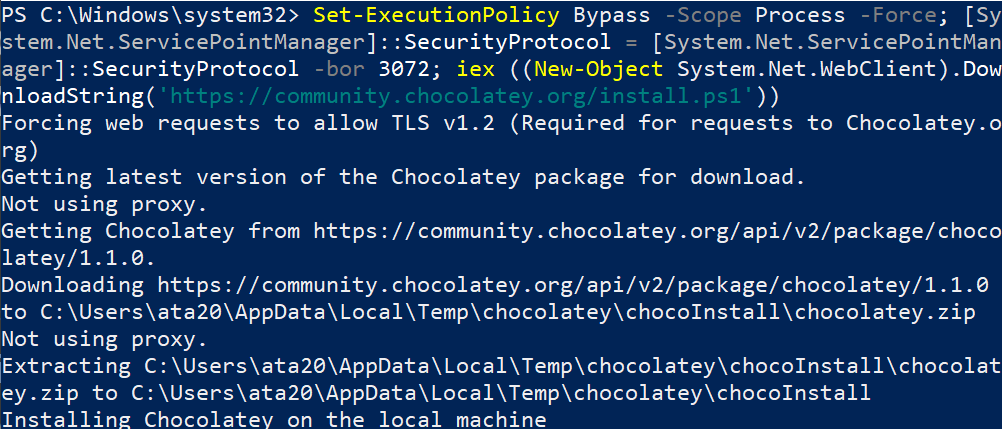
1. Since Chocolatey does not ship with Windows out of the box, run the below command in an elevated PowerShell session to install Chocolatey.
Set-ExecutionPolicy Bypass -Scope Process -Force; [System.Net.ServicePointManager]::SecurityProtocol = [System.Net.ServicePointManager]::SecurityProtocol -bor 3072; iex ((New-Object System.Net.WebClient).DownloadString('https://community.chocolatey.org/install.ps1'))Wait for the installation to finish, which could last a few minutes.
2. Restart the PowerShell session and run the below command to install awk using Chocolatey.

3. Finally, verify the installation by running the below command.
Using AWK for Windows (Examples)
Now that you have installed awk, you can perform some of the basic things it can do. You can use awk to extract information from a file or stream and print it to the screen.
Extracting Date Elements
For example, the date command prints the current date to the terminal in the following format.
Suppose you need to extract the month and year. First, break down the output into fields.
| Field Number | Value |
| 1 | 06 |
| 2 | September |
| 3 | 2022 |
| 4 | 23:43:38 |
In this case, you’ll extract fields 2 and 3. To do so, run the date command and pipe its output to the awk command. The ‘{print $2,$3}’ part means to print the value of fields 2 and 3. Each field starts with the $ followed by the field number.
date | awk '{print $2,$3}'
As you can see below, only the fields you specified in the awk command return.

Specifying a Custom Field Separator
You can append the OFS (output field separator) variable to specify what character to use to concatenate the output.
date | awk '{print $2,$3}' OFS="-"

Calculating Fields
You can also use awk to perform mathematical operations on fields and print the result to the terminal. The below command prints the sum of the first and third fields.
echo "10 20 30" | awk '{print $1+$3}'

Conclusion
In this article, you learned ways to install AWK for Windows. You also learned how to use awk to print fields and perform mathematical operations on them.
This tutorial barely scratched the surface of AWK for Windows. You could do more complex operations, such as printing only the odd-numbered fields or mail merge and word counting. Read the documentation for more information about what you can do with awk.
How to Use the GitHub Actions Matrix Strategy in Deployments
AWK — это мощный текстовый процессор и язык программирования, который
широко используется для обработки файлов, анализа логов, извлечения
данных и автоматизации. Наиболее распространённая реализация — GNU AWK
(gawk), которая доступна практически на всех платформах. Ниже
рассмотрены методы установки AWK в популярных операционных системах.
Большинство дистрибутивов Linux уже поставляются с установленной
версией AWK или gawk.
Проверка наличия AWK:
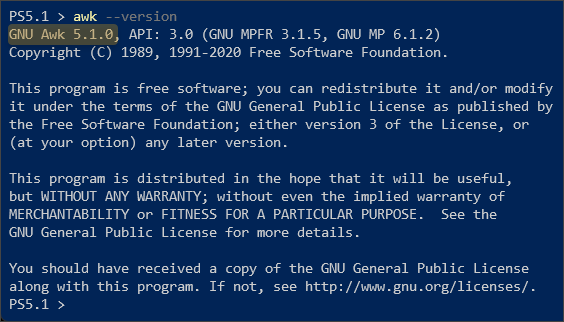
awk --versionЕсли команда вернула версию, например:
GNU Awk 5.1.0, Copyright (C) 1989, 1991-2020 Free Software Foundation.то AWK уже установлен.
Установка gawk в
популярных дистрибутивах:
- Debian, Ubuntu и производные:
sudo apt update
sudo apt install gawk- Fedora, RHEL, CentOS:
sudo dnf install gawkили для более старых систем:
sudo yum install gawk- Arch Linux и производные (Manjaro):
sudo pacman -S gawkПосле установки снова проверьте версию командой
awk --version.
Где находится исполняемый
файл:
which awkРезультат обычно:
/usr/bin/awkМожно также явно указать, что вы хотите использовать GNU AWK:
/usr/bin/gawkmacOS
На macOS AWK обычно предустановлен, однако это может быть устаревшая
версия. Чтобы использовать последнюю версию GNU AWK, рекомендуется
установить его через Homebrew.
Установка Homebrew
(если ещё не установлен):
/bin/bash -c "$(curl -fsSL https://raw.githubusercontent.com/Homebrew/install/HEAD/install.sh)"Установка gawk через
Homebrew:
brew install gawkПосле установки можно убедиться в наличии:
gawk --versionИспользование gawk по
умолчанию:
По умолчанию команда awk может ссылаться на встроенную
версию AWK. Чтобы использовать gawk как основной
awk-интерпретатор, можно создать алиас:
echo 'alias awk="gawk"' >> ~/.zshrc
source ~/.zshrc
или, если используется bash:
echo 'alias awk="gawk"' >> ~/.bashrc
source ~/.bashrc
Windows
На Windows AWK не предустановлен, но его можно легко установить
несколькими способами.
Вариант
1: Установка через пакетный менеджер Chocolatey
Если Chocolatey уже установлен:
choco install gawkПосле этого gawk.exe будет доступен в системном
PATH.
Вариант 2: Установка
GnuWin32 версии
- Перейдите на сайт: https://sourceforge.net/projects/gnuwin32/files/gawk/
- Скачайте установочный
.exeфайл
(gawk-*.exe) и следуйте инструкциям. - Добавьте путь к установленному
gawk.exeв переменную
окруженияPATH.
Вариант 3: Использование
среды MSYS2
- Скачайте и установите MSYS2 с официального сайта: https://www.msys2.org/
- Запустите
MSYS2 MSYSтерминал. - Установите gawk:
pacman -S gawkЭто позволит использовать gawk в Unix-подобной среде в Windows.
Проверка установки:
gawk --versionЕсли всё настроено правильно, команда выдаст версию GNU AWK.
Настройка окружения
Установка переменной
окружения AWKPATH
AWKPATH определяет пути, по которым AWK ищет файлы при
использовании директивы @include в gawk.
Пример (для Linux/macOS):
export AWKPATH=.:~/awk_libsДобавьте эту строку в .bashrc, .zshrc или
другой инициализационный файл оболочки.
Для Windows через PowerShell:
$env:AWKPATH = ".;C:\Users\Username\awk_libs"Настройка alias’ов
Чтобы ускорить работу и явно использовать gawk, можно настроить
алиас:
alias awk='gawk'Проверка работоспособности
Создайте простой файл test.txt:
one 1
two 2
three 3
Выполните:
awk '{ print $1 }' test.txtРезультат:
one
two
three
Если результат верный — AWK работает корректно.
Сборка AWK из исходников
(по желанию)
Для пользователей, желающих использовать последнюю версию, можно
собрать gawk из исходного кода:
- Скачайте исходники: https://ftp.gnu.org/gnu/gawk/
- Распакуйте архив:
tar -xvzf gawk-*.tar.gz
cd gawk-*- Выполните сборку и установку:
./configure
make
sudo make install- Проверьте установку:
gawk --versionAWK готов к использованию в вашей системе.
You can download and run the setup file. This should install your AWK in ” C:\Program Files (x86)\GnuWin32 “. You can run the awk or gawk command from the bin folder or add the folder “C:\Program Files (x86)\GnuWin32\bin to your PATH`.
Is there awk for Windows?
The awk utility interprets a special-purpose programming language that makes it easy to handle simple data-reformatting jobs. The GNU implementation of awk is called gawk; it is fully compatible with the System V Release 4 version of awk. gawk is also compatible with the POSIX specification of the awk language.
What is the difference between awk and gawk?
gawk is the GNU implementation of the Awk programming language, first developed for the UNIX operating system in the 1970s. The Awk programming language specializes in dealing with data formatting in text files, particularly text data organized in columns.
What is Pgawk?
Pgawk is the profiling version of gawk. It is identical in every way to gawk, except that programs run more slowly, and it automatically produces an execution profile in the file awkprof. out when done. See the –profile option, below.
Is gawk faster than Awk?
Gawk provides the additional features found in the current version of Brian Kernighan’s awk and a number of GNU-specific extensions. … As for speed, using gawk as “plain” awk should make no difference – often, when gawk is installed, awk will just be a symlink to gawk which means they’ll be exactly the same program.
What is sed programming?
sed (“stream editor”) is a Unix utility that parses and transforms text, using a simple, compact programming language. sed was developed from 1973 to 1974 by Lee E. McMahon of Bell Labs, and is available today for most operating systems.
What can I use instead of grep in Windows?
findstr is the command equivalent to grep.
Can I use sed in Windows?
SED is a great tool and blindingly fast at processing even large files. If you haven’t already got it I’d recommend downloading this open source utility and adding it your Windows toolbox today.
What is gawk for Windows?
gawk {whatisit} Gawk for Windows Gawk: pattern scanning and processing language Version 3.1.6 Description Several kinds of tasks occur repeatedly when working with text files. You might want to extract certain lines and discard the rest. Or you may need to make changes wherever certain patterns appear, but leave the rest of the file alone.
Where can I find a gawk manual?
The main gawk manual is available online . A separate gawkinet manual for the special TCP/IP networking features of GNU awk is also available. A separate gawkworkflow manual describing how to contribute to GNU awk developement is also available. Bug reports and feature suggestions for gawk should be sent to [email protected] .
Is there a native gawk interpreter for Windows?
The goal of the fork is to implement a fully functional native gawk interpreter for Windows, which is not inferior in capabilities to the Linux version of gawk. Highlights of this fork. 1. Support for UTF-8 encoding. When starting gawk, it is enough to specify the UTF-8 encoding, for example, using the “–locale=ru_RU.UTF-8” switch.
How to perform optional gawk networking tests?
The only thing to do to perform optional gawk networking tests, you need to enable standard Windows components – “Simple TCP/IP Services”. The tests themselves are supplied with the gawk source code – in the “test” directory.

Join our monthly Unpacking Software livestream to hear about the latest news, chat and opinion on packaging, software deployment and lifecycle management!
Learn More

Join the Chocolatey Team on our regular monthly stream where we put a spotlight on the most recent Chocolatey product releases. You’ll have a chance to have your questions answered in a live Ask Me Anything format.
Learn More

Join us for the Chocolatey Coding Livestream, where members of our team dive into the heart of open source development by coding live on various Chocolatey projects. Tune in to witness real-time coding, ask questions, and gain insights into the world of package management. Don’t miss this opportunity to engage with our team and contribute to the future of Chocolatey!
Learn More

Webinar from
Wednesday, 17 January 2024
We are delighted to announce the release of Chocolatey Central Management v0.12.0, featuring seamless Deployment Plan creation, time-saving duplications, insightful Group Details, an upgraded Dashboard, bug fixes, user interface polishing, and refined documentation. As an added bonus we’ll have members of our Solutions Engineering team on-hand to dive into some interesting ways you can leverage the new features available!
Watch On-Demand

Join the Chocolatey Team as we discuss all things Community, what we do, how you can get involved and answer your Chocolatey questions.
Watch The Replays

Webinar Replay from
Wednesday, 30 March 2022
At Chocolatey Software we strive for simple, and teaching others. Let us teach you just how simple it could be to keep your 3rd party applications updated across your devices, all with Intune!
Watch On-Demand

Livestream from
Thursday, 9 June 2022
Join James and Josh to show you how you can get the Chocolatey For Business recommended infrastructure and workflow, created, in Azure, in around 20 minutes.
Watch On-Demand

Livestream from
Thursday, 04 August 2022
Join Paul and Gary to hear more about the plans for the Chocolatey CLI in the not so distant future. We’ll talk about some cool new features, long term asks from Customers and Community and how you can get involved!
Watch On-Demand

Livestreams from
October 2022
For Hacktoberfest, Chocolatey ran a livestream every Tuesday! Re-watch Cory, James, Gary, and Rain as they share knowledge on how to contribute to open-source projects such as Chocolatey CLI.
Watch On-Demand