
- Tier: Free, Premium, Ultimate
- Offering: GitLab.com, GitLab Self-Managed, GitLab Dedicated
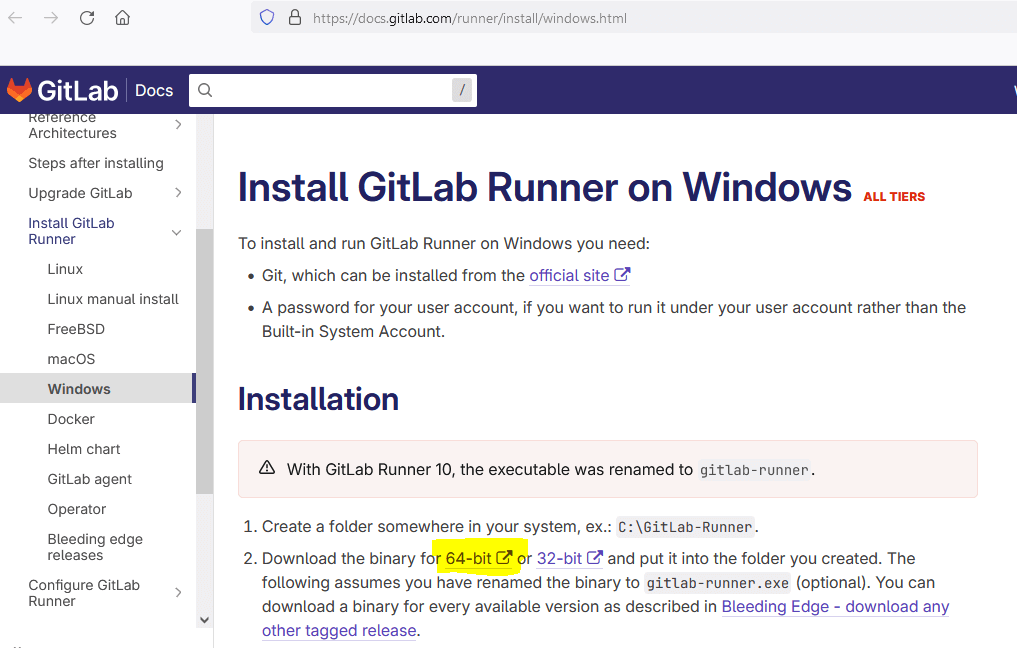
To install and run GitLab Runner on Windows you need:
- Git, which can be installed from the official site
- A password for your user account, if you want to run it under your user
account rather than the Built-in System Account. - The system locale set to English (United States) to avoid character encoding issues.
For more information, see issue 38702.
Installation
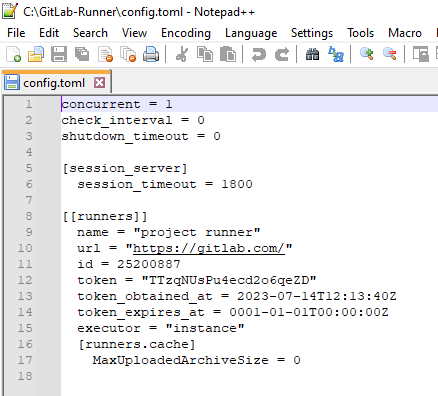
-
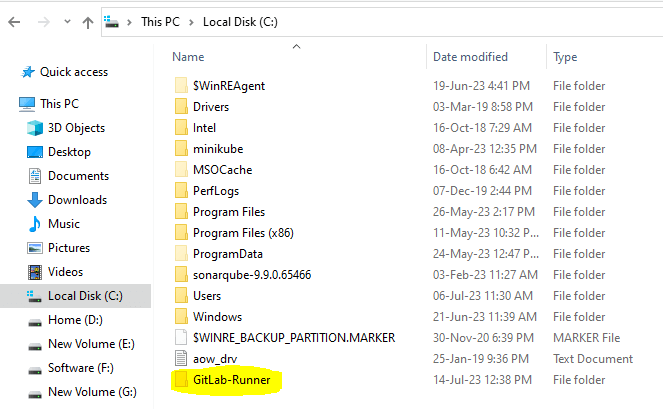
Create a folder somewhere in your system, for example,
C:\GitLab-Runner. -
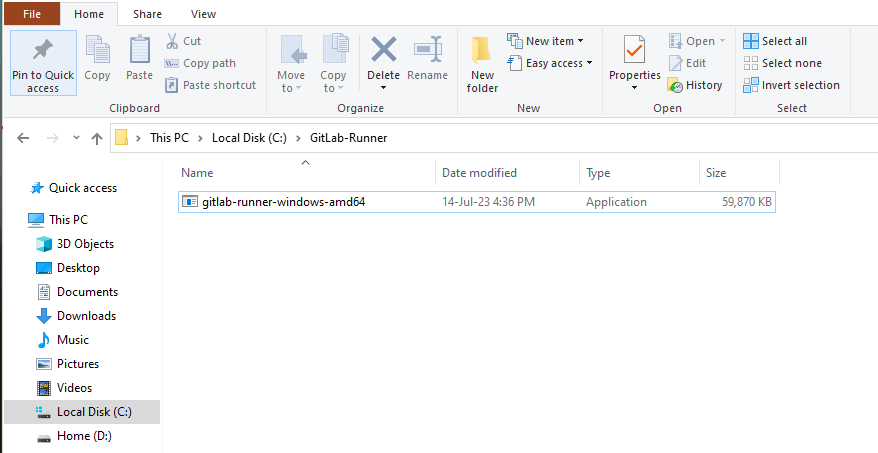
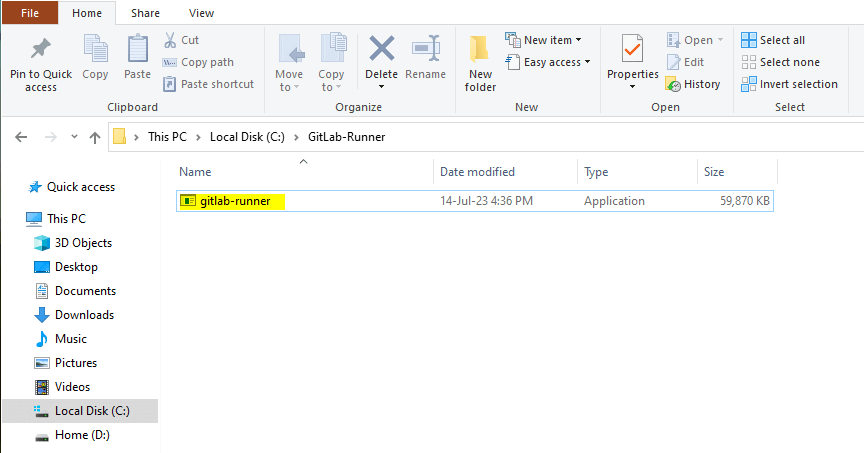
Download the binary for 64-bit or 32-bit and put it into the folder you
created. The following assumes you have renamed the binary togitlab-runner.exe(optional).
You can download a binary for every available version as described in
Bleeding Edge — download any other tagged release. -
Make sure to restrict the
Writepermissions on the GitLab Runner directory and executable.
If you do not set these permissions, regular users can replace the executable with their own and run arbitrary code with elevated privileges. -
Run an elevated command prompt:
-
Register a runner.
-
Install GitLab Runner as a service and start it. You can either run the service
using the Built-in System Account (recommended) or using a user account.Run service using Built-in System Account (under the example directory created in step 1,
C:\GitLab-Runner)cd C:\GitLab-Runner .\gitlab-runner.exe install .\gitlab-runner.exe startRun service using user account (under the example directory created in step 1,
C:\GitLab-Runner)You have to enter a valid password for the current user account, because
it’s required to start the service by Windows:cd C:\GitLab-Runner .\gitlab-runner.exe install --user ENTER-YOUR-USERNAME --password ENTER-YOUR-PASSWORD .\gitlab-runner.exe startSee the troubleshooting section if you encounter any
errors during the GitLab Runner installation. -
(Optional) Update the runner’s
concurrentvalue inC:\GitLab-Runner\config.toml
to allow multiple concurrent jobs as detailed in advanced configuration details.
Additionally, you can use the advanced configuration details to update your
shell executor to use Bash or PowerShell rather than Batch.
Voila! Runner is installed, running, and starts again after each system reboot.
Logs are stored in Windows Event Log.
Upgrade
-
Stop the service (you need an elevated command prompt as before):
cd C:\GitLab-Runner .\gitlab-runner.exe stop -
Download the binary for 64-bit or 32-bit and replace runner’s executable.
You can download a binary for every available version as described in
Bleeding Edge — download any other tagged release. -
Start the service:
.\gitlab-runner.exe start
Uninstall
From an elevated command prompt:
cd C:\GitLab-Runner
.\gitlab-runner.exe stop
.\gitlab-runner.exe uninstall
cd ..
rmdir /s GitLab-Runner
Windows troubleshooting
Make sure that you read the FAQ section which describes
some of the most common problems with GitLab Runner.
If you encounter an error like The account name is invalid, try:
# Add \. before the username
.\gitlab-runner.exe install --user ".\ENTER-YOUR-USERNAME" --password "ENTER-YOUR-PASSWORD"
If you encounter a The service did not start due to a logon failure error
while starting the service, see the FAQ section to check how to resolve the problem.
If you don’t have a Windows Password, you cannot start the GitLab Runner service but you can
use the Built-in System Account.
For Built-in System Account issues, see
Configure the Service to Start Up with the Built-in System Account
on the Microsoft support website.
Get runner logs
When you run .\gitlab-runner.exe install it installs gitlab-runner
as a Windows service. You can find the logs in the Event Viewer
with the provider name gitlab-runner.
If you don’t have access to the GUI, in PowerShell, you can run
Get-WinEvent.
PS C:\> Get-WinEvent -ProviderName gitlab-runner

   ProviderName: gitlab-runner

TimeCreated                     Id LevelDisplayName Message
-----------                     -- ---------------- -------
2/4/2021 6:20:14 AM              1 Information      [session_server].listen_address not defined, session endpoints disabled  builds=0...
2/4/2021 6:20:14 AM              1 Information      listen_address not defined, metrics & debug endpoints disabled  builds=0...
2/4/2021 6:20:14 AM              1 Information      Configuration loaded                                builds=0...
2/4/2021 6:20:14 AM              1 Information      Starting multi-runner from C:\config.toml...        builds=0...
I get a PathTooLongException during my builds on Windows
This error is caused by tools like npm which sometimes generate directory structures
with paths more than 260 characters in length. To solve the problem, adopt one of the
following solutions.
-
Use Git with
core.longpathsenabled:You can avoid the problem by using Git to clean your directory structure.
- Run
git config --system core.longpaths truefrom the command line. - Set your project to use
git fetchfrom the GitLab CI project settings page.
- Run
-
Use NTFSSecurity tools for PowerShell:
The NTFSSecurity PowerShell module provides
a “Remove-Item2” method which supports long paths. GitLab Runner
detects it if it is available and automatically make use of it.
A regression introduced in GitLab Runner 16.9.1 is fixed in GitLab Runner 17.10.0.
If you intend to use the GitLab Runner versions with regressions, use one of the following workarounds:
Use
pre_get_sources_scriptto re-enable Git system-level settings (by unsettingGit_CONFIG_NOSYSTEM).
This action enablescore.longpathsby default on Windows.build: hooks: pre_get_sources_script: - $env:GIT_CONFIG_NOSYSTEM=''Build a custom
GitLab-runner-helperimage:FROM registry.gitlab.com/gitlab-org/gitlab-runner/gitlab-runner-helper:x86_64-v17.8.3-servercore21H2 ENV GIT_CONFIG_NOSYSTEM=
I can’t run Windows bash scripts; I’m getting The system cannot find the batch label specified - buildscript
You need to prepend call to your Batch file line in .gitlab-ci.yml so that it looks like call C:\path\to\test.bat. Here
is a more complete example:
before_script:
  - call C:\path\to\test.bat
For more information, see issue 1025.
How can I get colored output on the web terminal?
Short answer:
Make sure that you have the ANSI color codes in your program’s output. For the purposes of text formatting, assume that you’re
running in a UNIX ANSI terminal emulator (because it is the web interface output).
Long Answer:
The web interface for GitLab CI emulates a UNIX ANSI terminal (at least partially). The gitlab-runner pipes any output from the build
directly to the web interface. That means that any ANSI color codes that are present are honored.
Older versions of Windows’ command prompt terminal (before Windows 10, version 1511) do not support
ANSI color codes. They use win32 (ANSI.SYS) calls instead which are not present in
the string to be displayed. When writing cross-platform programs, developers typically use ANSI color codes by default. These codes are converted
to win32 calls when running on a Windows system, for example, Colorama.
If your program is doing the above, you must disable that conversion for the CI builds so that the ANSI codes remain in the string.
For more information, see GitLab CI YAML documentation
for an example using PowerShell and issue 332.
The service did not start due to a logon failure error when starting service
When installing and starting the GitLab Runner service on Windows you can
meet with such error:
gitlab-runner install --password WINDOWS_MACHINE_PASSWORD
gitlab-runner start
FATA[0000] Failed to start GitLab Runner: The service did not start due to a logon failure.
This error can occur when the user used to execute the service doesn’t have
the SeServiceLogonRight permission. In this case, you need to add this
permission for the chosen user and then try to start the service again.
- Go to Control Panel > System and Security > Administrative Tools.
- Open the Local Security Policy tool.
- Select Security Settings > Local Policies > User Rights Assignment on the
list on the left. - Open the Log on as a service on the list on the right.
- Select Add User or Group….
- Add the user (“by hand” or using Advanced…) and apply the settings.
According to Microsoft documentation,
this should work for:
- Windows Vista
- Windows Server 2008
- Windows 7
- Windows 8.1
- Windows Server 2008 R2
- Windows Server 2012 R2
- Windows Server 2012
- Windows 8
The Local Security Policy tool may be not available in some
Windows versions, for example in “Home Edition” variant of each version.
After adding the SeServiceLogonRight for the user used in service configuration,
the command gitlab-runner start should finish without failures
and the service should be started properly.
Job marked as success or failed incorrectly
Most Windows programs output exit code 0 for success. However, some programs don’t
return an exit code or have a different value for success. An example is the Windows
tool robocopy. The following .gitlab-ci.yml fails, even though it should be successful,
due to the exit code output by robocopy:
test:
  stage: test
  script:
    - New-Item -type Directory -Path ./source
    - New-Item -type Directory -Path ./dest
    - Write-Output "Hello World!" > ./source/file.txt
    - robocopy ./source ./dest
  tags:
    - windows
In the case above, you need to manually add an exit code check to the script:. For example,
you can create a PowerShell script:
$exitCodes = 0,1

robocopy ./source ./dest

if ( $exitCodes.Contains($LastExitCode) ) {
    exit 0
} else {
    exit 1
}
And change the .gitlab-ci.yml file to:
test:
  stage: test
  script:
    - New-Item -type Directory -Path ./source
    - New-Item -type Directory -Path ./dest
    - Write-Output "Hello World!" > ./source/file.txt
    - ./robocopyCommand.ps1
  tags:
    - windows
Also, be careful of the difference between return and exit when using PowerShell
functions. While exit 1 marks a job as failed, return 1 does not.
Job marked as success and terminated midway using Kubernetes executor
For more information, see Job execution.
Docker executor: unsupported Windows Version
GitLab Runner checks the version of Windows Server to verify that it’s supported.
It does this by running docker info.
If GitLab Runner fails to start and displays an error without
specifying a Windows Server version, then the Docker
version might be outdated.
Preparation failed: detecting base image: unsupported Windows Version: Windows Server DatacenterThe error should contain detailed information about the Windows Server
version, which is then compared with the versions that GitLab Runner supports.
unsupported Windows Version: Windows Server Datacenter Version (OS Build 18363.720)Docker 17.06.2 on Windows Server returns the following in the output
of docker info.
Operating System: Windows Server DatacenterThe fix in this case is to upgrade the Docker version of similar age, or later,
than the Windows Server release.
Kubernetes executor: unsupported Windows Version
Kubernetes executor on Windows might fail with the following error:
Using Kubernetes namespace: gitlab-runner
ERROR: Preparation failed: prepare helper image: detecting base image: unsupported Windows Version:
Will be retried in 3s ...
ERROR: Job failed (system failure): prepare helper image: detecting base image: unsupported Windows Version:
To fix it, add node.kubernetes.io/windows-build node selector in the section [runners.kubernetes.node_selector]
of your GitLab Runner configuration file, For example:
   [runners.kubernetes.node_selector]
     "kubernetes.io/arch" = "amd64"
     "kubernetes.io/os" = "windows"
     "node.kubernetes.io/windows-build" = "10.0.17763"
I’m using a mapped network drive and my build cannot find the correct path
When GitLab Runner runs under a standard user account instead of an administrator
account, it cannot access mapped network drives.
When you try to use mapped network drives, you get the
The system cannot find the path specified. error.
This error occurs because service logon sessions have
security limitations
when accessing resources. Use the UNC path
of your drive instead.
The build container is unable to connect to service containers
To use services with Windows containers:
- Use the networking mode that creates a network for each job.
- Ensure that the
FF_NETWORK_PER_BUILDfeature flag is enabled.
The job cannot create a build directory and fails with an error
When you use the GitLab-Runner with the Docker-Windows executor, a job might fail with an error like:
fatal: cannot chdir to c:/builds/gitlab/test: Permission denied`When this error occurs, ensure the user the Docker engine is running as has full permissions to C:\Program Data\Docker.
The Docker engine must be able to write to this directory for certain actions, and without the correct permissions it fails.
Read more about configuring Docker Engine on Windows.
Blank lines for Windows Subsystem for Linux (WSL) STDOUT output in job logs
By default the STDOUT output for the Windows Subsystem for Linux (WSL) is not UTF8 encoded and displays as blank lines in the job logs. To display the STDOUT output, you can force UTF8 encoding for WSL by setting the WSL_UTF8 environment variable.
job:
  variables:
WSL_UTF8: "1"GitLab Runner is the open source project that is used to run your CI/CD jobs and send the results back to GitLab.
Command Line
Download Links For Version 17.9.0
Download Links For Version 17.5.0
Download Links For Version 17.4.1
Download Links For Version 17.4.0
Download Links For Version 17.3.1
Download Links For Version 17.2.1
Download Links For Version 17.1.0
Download Links For Version 17.2.0
Download Links For Version 17.0.0
Download Links For Version 16.9.0
Download Links For Version 16.8.0
Download Links For Version 16.7.0
Download Links For Version 16.6.1
Download Links For Version 16.6.0
Download Links For Version 16.5.0
Download Links For Version 16.4.1
Download Links For Version 16.4.0
Download Links For Version 16.3.1
Download Links For Version 16.3.0
Download Links For Version 16.2.0
Download Links For Version 16.1.0
Download Links For Version 16.0.1
Download Links For Version 16.0.0
Download Links For Version 15.7.1
Download Links For Version 15.2.1
Download Links For Version 13.2.0
Info
last updated 2/20/2025 12:00:00 AM
Publisher:
GitLab Inc.
License:
MIT
Dependencies
No dependency information
Share
In this article we are going to cover How to download and install GitLab runner on windows, Register GitLab Runner and GitLab Runner commands.
Table of Contents
What is GitLab Runner ?
GitLab Runner is used in GitLab CI/CD(continuous integration/continuous delivery) to run jobs in a pipeline. It is open source continuous integration service. GitLab runner is a build instance which is used to run the jobs over multiple machines and send the results to GitLab and which can be placed on separate users, servers, and local machine. You can register the runner as shared or group or project after installing it.
Types of GitLab runner
- Share Runners
- Group Runners
- Project Runner
Share Runners: Share runner are available for jobs that have same requirement for multiple projects. If you use multiple runner for many jobs/projects then it avoid using single runner or minimum runners for many projects. It is use FIFO (first in first out) queue. Share runners are available to all groups and projects in a GitLab executor.
Group Runners: Group Runner are available for many projects or multiple subgroup in single group to have access to a set of runners. It is use FIFO (first in first out) queue.
Project Runner: Project runner are available for specific requirement for jobs in one project at a time.
Step #1:Download and install GibLab Runner on windows
Go to official GitLab Runner download web page and download binary exe file.
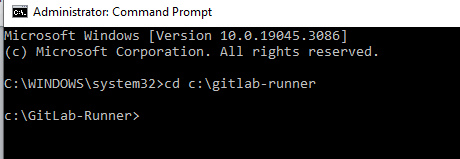
After downloaded binary File copy it , Go to c drive and create new folder ex: C:\GitLab-Runner
and paste binary in that folder which you created.
Rename downloaded file ex: gitlab-runner
Open command prompt and go to directory where GitLab Runner file saved using below command.
cd c:\GitLab-Runner
To install GitLab Runner run the below command.
.\gitlab-runner.exe install
To verify GitLab Runner version using below command
.\gitlab-runner –v

Step #2:Register GitLab Runner on Windows
To register GitLab runner run below command
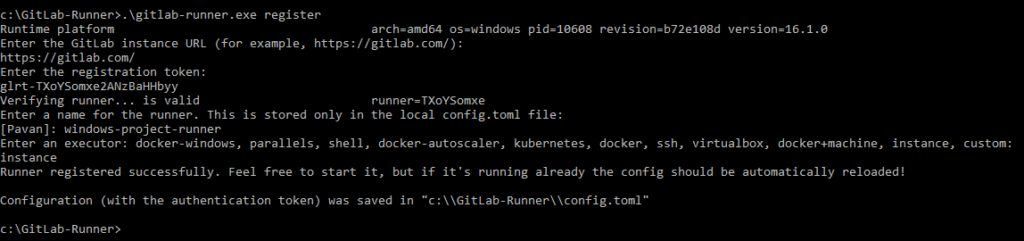
.\gitlab-runner.exe register
Enter the GitLab instance URL
https://gitlab.com/

Enter the registration token:
To get token, you have to go your GitLab project -> setting -> CI/CD -> Runner
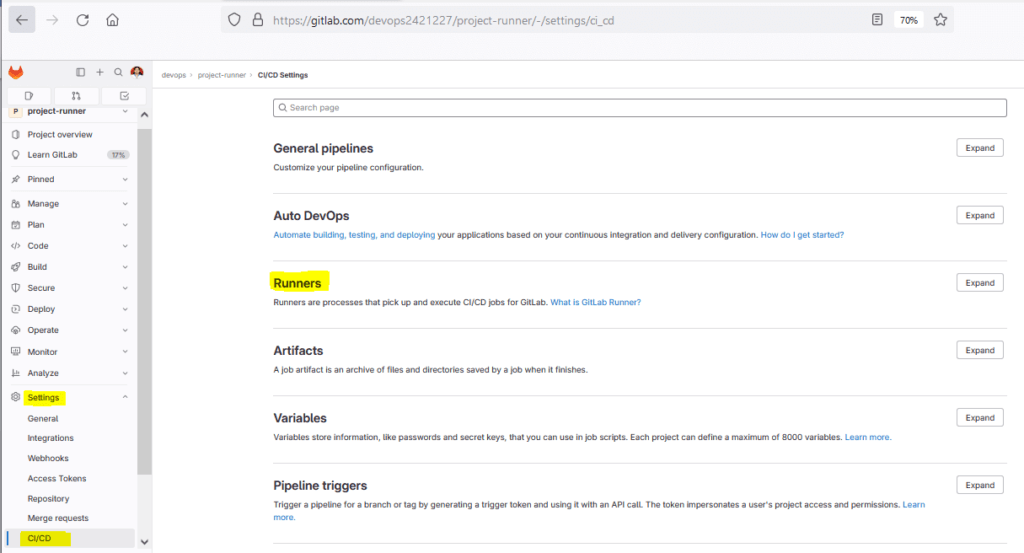
Expand runner to access token

glrt-TXoYSomxe2ANzBaHHbyy
Enter a description for the runner:
Project runner
Enter tags for the runner (comma-separated):
windows
Enter an executor:
instance
Then you will get Runner registered successfully.
If you are refresh the gitlab page and again go to project -> setting -> CI/CD -> runner -> expand it then you can see assigned project runner.
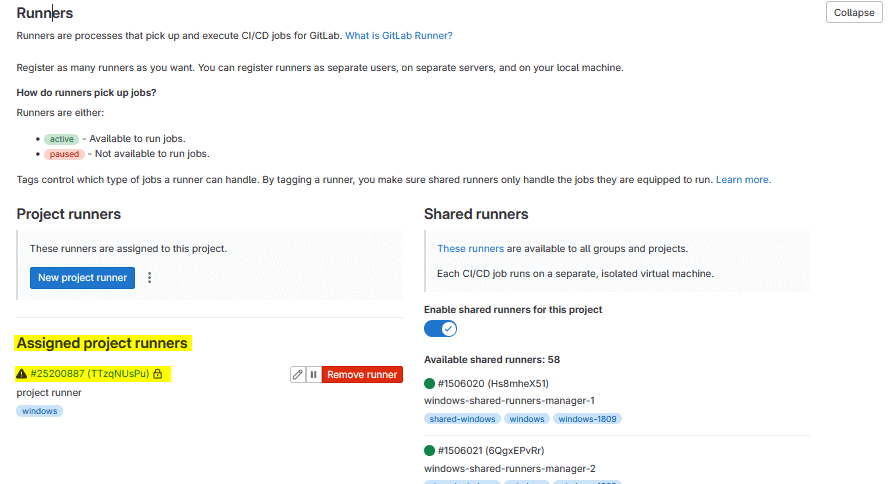
You can see the GitLab Runner configuration in the config.toml file under the GitLab-Runner folder as shown below.
Step #3:GitLab Runner Service command
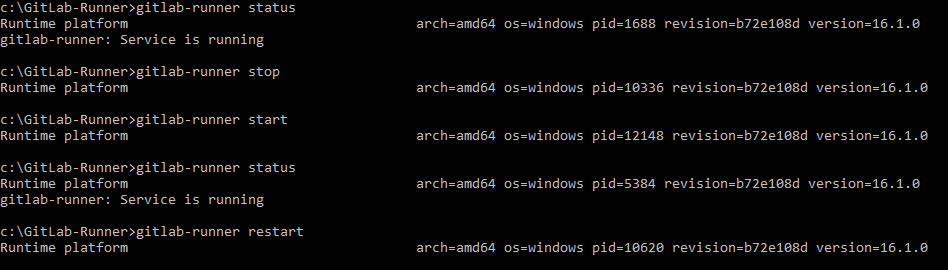
To prints the status of the GitLab Runner service.
gitlab-runner status
To start gitlab runner service
gitlab-runner start
To stop the gitlab runner service.
gitlab-runner stop
To stop and then start the gitlab runner service
gitlab-runner restart
Step #4:Uninstall GitLab runner on Windows
To uninstall gitlab runner on your system.
gitlab-runner uninstall
In this article we have covered How to download and install GitLab runner on windows, Register GitLab Runner, GitLab Runner Services.
Conclusion:
In this article we have covered How to download and install GitLab runner on windows, Register GitLab Runner and GitLab Runner commands.
Related Articles:
How to Create Group and Users in GitLab [2 Steps]
Last Updated :
16 Sep, 2024
GitLab is a popular DevOps platform that provides a robust solution for source code management, continuous integration/continuous deployment (CI/CD), and other development workflows. While GitLab is typically hosted on Linux servers, it can also be installed on Windows using a virtual machine or Docker.
In this article, we will walk you through the steps to install GitLab on Windows using Docker, which provides a manageable and efficient way to run GitLab without needing to configure a full Linux environment.
Prerequisites
Before installing GitLab on Windows, ensure you have the following prerequisites:
- Windows 10 Pro, Enterprise, or Education: Required for Docker Desktop.
- Docker Desktop: A platform that allows you to run Docker containers on Windows.
- Sufficient System Resources: At least 4 CPU cores and 4GB of RAM for GitLab to run smoothly. Higher specifications are recommended for production environments.
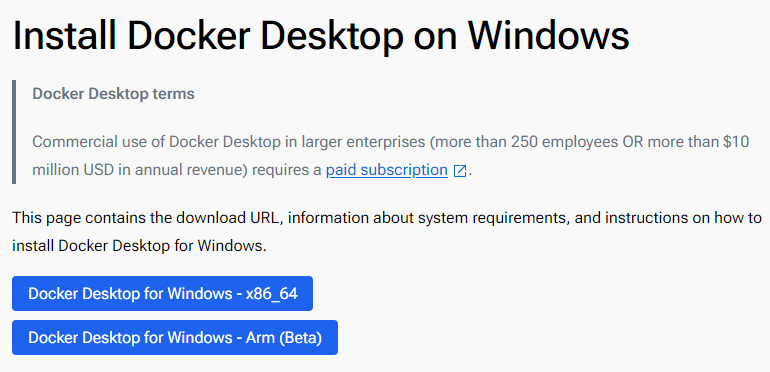
Installing Docker on Windows
To run GitLab on Windows, you’ll need to install Docker Desktop, which enables running containers on Windows systems.
Step 1: Download Docker Desktop
Go to the Docker Desktop website and download the installer for Windows.
Step 2: Install Docker Desktop
- Run the installer and follow the on-screen instructions.
- When prompted, enable the option for Windows Subsystem for Linux (WSL 2) for better performance.
Step 3: Start Docker Desktop
- Once installed, launch Docker Desktop and ensure it is running. You should see the Docker icon in the system tray.
Step 4: Verify Docker Installation
Open Command Prompt or PowerShell and type:
docker --version
You should see the version of Docker installed, confirming that Docker is set up correctly.
Downloading and Running GitLab Using Docker
With Docker installed, you can now download and run GitLab using Docker containers.
Step 1: Pull the GitLab Docker Image
Open PowerShell or Command Prompt and pull the GitLab image from Docker Hub:
docker pull gitlab/gitlab-ee:latest
This command pulls the latest version of GitLab Enterprise Edition. If you prefer the Community Edition, use gitlab/gitlab-ce:latest.
Step 2: Run GitLab in a Docker Container
Create a new directory on your Windows system to store GitLab configuration and data. This ensures data persists even if the container is removed:
mkdir C:\gitlab\data
mkdir C:\gitlab\logs
mkdir C:\gitlab\config
Step 3: Start the GitLab container:
docker run --detach `
  --hostname gitlab.local `
  --publish 443:443 --publish 80:80 --publish 22:22 `
  --name gitlab `
  --restart always `
  --volume C:\gitlab\config:/etc/gitlab `
  --volume C:\gitlab\logs:/var/log/gitlab `
  --volume C:\gitlab\data:/var/opt/gitlab `
  gitlab/gitlab-ee:latest
Options:
- —hostname: Sets the hostname for GitLab (e.g., gitlab.local).
- —publish: Maps ports from the container to the host (HTTP, HTTPS, and SSH).
- —name: Names the container gitlab.
- —restart always: Ensures GitLab restarts automatically if the container stops or the host reboots.
- —volume: Maps local directories to container directories for persistent storage.
Step 3: Wait for GitLab to Initialize:
It may take several minutes for GitLab to initialize. You can monitor the process using:
docker logs -f gitlab
Wait until you see the message indicating that GitLab is ready.
Configuring GitLab
After GitLab starts, you can configure it through the GitLab interface:
Step 1: Access GitLab
- Open a web browser and navigate to http://localhost.
- You should see the GitLab login screen.
Step 2: Set Up the Root Password
The first time you access GitLab, you’ll be prompted to set the root password. Enter a secure password and save it.
Step 3: Log In:
Log in using the username root and the password you just set.
Step 4: Configure GitLab Settings
Navigate to the Admin area to configure GitLab settings, such as email notifications, user management, and project settings.
Accessing GitLab
To access GitLab, simply navigate to the hostname you set during the Docker run command (e.g., http://localhost if using the default setup). If you mapped the ports differently or used a different hostname, adjust the URL accordingly.
Setting Up GitLab Runner (Optional)
GitLab Runner is a tool used for running CI/CD jobs on your GitLab instance. Installing GitLab Runner on Windows allows you to leverage GitLab’s powerful CI/CD pipelines.
Step 1: Download GitLab Runner
Visit the GitLab Runner downloads page and download the binary for Windows.
Step 2: Install GitLab Runner:
- Extract the binary to a directory, for example, C:\GitLab-Runner.
- Open Command Prompt as Administrator and register the runner:
C:\GitLab-Runner\gitlab-runner.exe register
- Follow the prompts to configure the runner with your GitLab instance, including:
- GitLab URL.
- Registration token (found in GitLab’s Admin area under Runners).
- Runner description, tags, and executor type (use shell for simplicity on Windows).
Step 3: Start the Runner
Install and start GitLab Runner as a service:
C:\GitLab-Runner\gitlab-runner.exe install
C:\GitLab-Runner\gitlab-runner.exe start
Overview
What is GitLab Runner?
GitLab Runner is an open-source project that allows you to run jobs and send the results back to GitLab. It is a lightweight, easy-to-use tool that helps automate your CI/CD pipelines. With GitLab Runner, you can deploy your applications, test your code, and even build and package your software. It supports various platforms and can be easily installed on Windows, Linux, and macOS. So, whether you’re a developer, a tester, or a DevOps engineer, GitLab Runner is a must-have tool for streamlining your development process.
Why use GitLab Runner?
GitLab Runner is a powerful tool that allows you to automate continuous integration and deployment with GitHub Actions. It simplifies the process of building, testing, and deploying your applications, making it easier to deliver high-quality software faster. With GitLab Runner, you can run your CI/CD pipelines on your own infrastructure, ensuring better control and security. Whether you are a developer or a DevOps engineer, GitLab Runner is a must-have tool in your toolbox.
Installation requirements
To install GitLab Runner on Windows, you need to meet a few requirements. First, make sure you have a Windows operating system installed on your machine. Second, ensure that you have administrative privileges to install software. Third, ensure that you have a stable internet connection to download the necessary files. Lastly, make sure you have a compatible version of GitLab installed on your system. By meeting these requirements, you can easily set up GitLab Runner and start using it for your Jenkins CI/CD Pipeline.
Downloading GitLab Runner

Finding the latest version
To get started with installing GitLab Runner on Windows, you need to find the latest version available. The Windows GitLab Runner is an essential tool for running your CI/CD pipelines on Windows machines. It allows you to execute jobs and tasks on your Windows environment, ensuring seamless integration with your GitLab repository. By keeping your GitLab Runner up to date, you can take advantage of the latest features, bug fixes, and security enhancements. To find the latest version, you can visit the official GitLab Runner website or check the release notes on the GitLab documentation. Once you have identified the latest version, you can proceed with the installation process.
Choosing the appropriate architecture
When it comes to choosing the appropriate architecture for GitLab Runner on Windows, there are a few factors to consider. First and foremost, you need to ensure that your architecture supports the version of GitLab Runner you are planning to install. It is recommended to always use the latest version to take advantage of the latest features and bug fixes. Additionally, you should consider the hardware requirements of GitLab Runner and make sure that your architecture meets or exceeds them. This will ensure optimal performance and stability. Lastly, it is important to check for any compatibility issues with other software or tools that you are using in your development environment. By considering these factors, you can ensure a smooth installation and usage of GitLab Runner on Windows.
Downloading the installer
To get started with GitLab Runner on Windows, you’ll need to download the installer from the official GitLab website. The installer is a convenient way to set up GitLab Runner on your machine without any hassle. Simply visit the website, navigate to the downloads section, and look for the Windows installer. Once you’ve found it, click on the download button and the installer will be saved to your computer. This is an essential step in the process of setting up GitLab Runner and integrating it into your development processes.
Installing GitLab Runner
Running the installer
To install GitLab Runner on Windows, you need to run the installer file that you downloaded from the GitLab website. The installer will guide you through the installation process, and you just need to follow the on-screen instructions. Once the installation is complete, you can start using GitLab Runner for your software testing needs. It’s a simple and straightforward process that doesn’t require any technical expertise.
Accepting the license agreement
Alright, now that we’ve got all the technical stuff out of the way, it’s time to accept the license agreement. I know, I know, reading through all that legal jargon can be a real snooze-fest. But trust me, it’s important to know what you’re getting yourself into. So grab a cup of coffee, sit back, and let’s dive into the exciting world of software licenses. Oh, and by the way, did you hear about the Spiceworks CI/CD tool review? It’s been making waves in the tech community, and we’ll be taking a closer look at it later on. But for now, let’s focus on accepting that license agreement.
Choosing the installation directory
When it comes to choosing the installation directory for GitLab Runner on Windows, you have the freedom to decide where it should be located. You can choose any folder that suits your needs and preferences. It’s recommended to select a directory that is easily accessible and has enough space to accommodate the runner and its associated files. This will ensure smooth operation and efficient management of repositories. So, take your time and pick the perfect installation directory for GitLab Runner on Windows.
Configuring GitLab Runner
Registering the Runner
Now that you have installed GitLab Runner, it’s time to register it. Registration is a crucial step as it allows the Runner to connect to your GitLab instance and start running jobs. To register the Runner, open a command prompt and navigate to the directory where GitLab Runner is installed. Run the command ‘gitlab-runner register’ and follow the prompts. You will be asked to provide the URL of your GitLab instance, as well as a registration token. Once the Runner is registered, it will be ready to start executing jobs. Congratulations, you have completed the registration process and your GitLab Runner is now ready for the ultimate upgrade!
Configuring the Runner
Now that you have successfully installed GitLab Runner on your Windows machine, it’s time to configure it. The configuration process is straightforward and only requires a few simple steps. First, open the GitLab Runner configuration file, which is located at C:\GitLab-Runner\config.toml. In this file, you will find various options that you can customize according to your needs. One important option to configure is the ‘concurrent’ parameter, which determines the maximum number of jobs that the Runner can handle simultaneously. By default, this value is set to 1, but you can increase it to improve performance. Another key configuration option is the ‘executor’, which defines the type of environment in which your jobs will run. The most common executor is ‘shell’, which runs jobs in a shell environment. Finally, don’t forget to save the configuration file and restart the GitLab Runner service for the changes to take effect.
Setting up tags and runners
Now that you have installed GitLab Runner on your Windows machine, it’s time to set up tags and runners. Tags are used to categorize and group your jobs, allowing you to easily manage and organize your software development process. Runners, on the other hand, are the machines or virtual environments that execute your jobs. By setting up tags and runners, you can control where and how your jobs are executed, ensuring efficient and optimized performance. So, let’s dive into the process of setting up tags and runners!
Running Jobs with GitLab Runner

Creating a .gitlab-ci.yml file
Once you have GitLab Runner installed on your Windows machine, the next step is to create a .gitlab-ci.yml file in your project’s repository. This file is used to define the pipeline configuration for your project. It contains a set of instructions that specify how your code should be built, tested, and deployed. The .gitlab-ci.yml file uses a YAML syntax, which is easy to read and write. You can integrate security checks into your pipeline by adding specific stages and jobs that scan your code for vulnerabilities and potential security issues. By including these security checks in your pipeline, you can ensure that your code is secure and free from any potential risks.
Defining stages and jobs
Now that we have set up our GitLab Runner on Windows, let’s move on to defining stages and jobs. Stages are used to group jobs together, allowing you to control the order in which they are executed. Jobs, on the other hand, define the tasks that need to be performed. You can think of stages as different phases of your CI/CD pipeline, and jobs as the individual steps within each stage.
To define stages, you can use the `stages` keyword in your `.gitlab-ci.yml` file. This allows you to specify an ordered list of stages that will be executed. For example, you can have stages like `build`, `test`, and `deploy`.
To define jobs, you can use the `jobs` keyword. Each job is defined as a separate block under the `jobs` keyword. You can specify the name of the job, the script or commands to be executed, and any other configuration options.
By defining stages and jobs, you can unlock the full power of GitLab Runner on Windows and automate your CI/CD pipeline.
Running the pipeline
Once you have set up your GitLab Runner on Windows, you are ready to start running your pipeline. The pipeline is a series of steps that automate the software development process. It allows you to build, test, and deploy your applications with ease. To run the pipeline, navigate to your GitLab project and go to the CI/CD settings. Here, you can configure the pipeline to run automatically whenever changes are pushed to your repository. You can also manually trigger the pipeline whenever you want. Once the pipeline is triggered, GitLab Runner will execute the defined steps and provide feedback on each stage of the process. It will notify you of any errors or failures, allowing you to quickly identify and resolve issues. By running the pipeline, you can ensure that your software development process is streamlined and efficient.
Conclusion
Benefits of using GitLab Runner
GitLab Runner provides numerous benefits for developers. One of the key advantages is its support for CI/CD workflows. With GitLab Runner, developers can automate the process of building, testing, and deploying their applications. This not only saves time and effort but also ensures consistent and reliable results. By integrating GitLab Runner into their development workflow, developers can easily manage and track their CI/CD pipelines, enabling them to deliver high-quality software faster. Additionally, GitLab Runner offers a wide range of features and integrations, making it a versatile tool for any development team.
Next steps
Now that you have successfully installed GitLab Runner on Windows, you are ready to take your software development to the next level. With GitLab Runner, you can easily automate your CI/CD pipelines, run tests, and deploy your applications with ease. Say goodbye to manual processes and hello to efficient and streamlined development. So what are you waiting for? Start exploring the powerful features of GitLab Runner and supercharge your development workflow today!
Final thoughts
In conclusion, installing GitLab Runner on Windows is a straightforward process that can greatly enhance your development workflow. With GitLab Runner, you can easily automate your CI/CD pipelines and ensure faster and more efficient software delivery. Whether you are a beginner or an experienced developer, GitLab Runner provides a user-friendly interface and comprehensive documentation to help you get started. So why wait? Start using GitLab Runner today and experience the benefits it brings to your development process.
In conclusion, the Home Page – DevSecOps website offers a comprehensive guide to implementing DevSecOps practices. With a focus on security, this website provides valuable insights and resources for developers, security professionals, and IT teams. Whether you are new to DevSecOps or looking to enhance your existing practices, the Home Page – DevSecOps website is your go-to resource. Visit the website today to access the latest articles, tutorials, and tools to help you succeed in your DevSecOps journey.