
- Tier: Free, Premium, Ultimate
- Offering: GitLab.com, GitLab Self-Managed, GitLab Dedicated
To install and run GitLab Runner on Windows you need:
- Git, which can be installed from the official site
- A password for your user account, if you want to run it under your user
account rather than the Built-in System Account. - The system locale set to English (United States) to avoid character encoding issues.
For more information, see issue 38702.
Installation
-
Create a folder somewhere in your system, for example,
C:\GitLab-Runner. -
Download the binary for 64-bit or 32-bit and put it into the folder you
created. The following assumes you have renamed the binary togitlab-runner.exe(optional).
You can download a binary for every available version as described in
Bleeding Edge — download any other tagged release. -
Make sure to restrict the
Writepermissions on the GitLab Runner directory and executable.
If you do not set these permissions, regular users can replace the executable with their own and run arbitrary code with elevated privileges. -
Run an elevated command prompt:
-
Register a runner.
-
Install GitLab Runner as a service and start it. You can either run the service
using the Built-in System Account (recommended) or using a user account.Run service using Built-in System Account (under the example directory created in step 1,
C:\GitLab-Runner)cd C:\GitLab-Runner .\gitlab-runner.exe install .\gitlab-runner.exe startRun service using user account (under the example directory created in step 1,
C:\GitLab-Runner)You have to enter a valid password for the current user account, because
it’s required to start the service by Windows:cd C:\GitLab-Runner .\gitlab-runner.exe install --user ENTER-YOUR-USERNAME --password ENTER-YOUR-PASSWORD .\gitlab-runner.exe startSee the troubleshooting section if you encounter any
errors during the GitLab Runner installation. -
(Optional) Update the runner’s
concurrentvalue inC:\GitLab-Runner\config.toml
to allow multiple concurrent jobs as detailed in advanced configuration details.
Additionally, you can use the advanced configuration details to update your
shell executor to use Bash or PowerShell rather than Batch.
Voila! Runner is installed, running, and starts again after each system reboot.
Logs are stored in Windows Event Log.
Upgrade
-
Stop the service (you need an elevated command prompt as before):
cd C:\GitLab-Runner .\gitlab-runner.exe stop -
Download the binary for 64-bit or 32-bit and replace runner’s executable.
You can download a binary for every available version as described in
Bleeding Edge — download any other tagged release. -
Start the service:
.\gitlab-runner.exe start
Uninstall
From an elevated command prompt:
cd C:\GitLab-Runner
.\gitlab-runner.exe stop
.\gitlab-runner.exe uninstall
cd ..
rmdir /s GitLab-Runner
Windows troubleshooting
Make sure that you read the FAQ section which describes
some of the most common problems with GitLab Runner.
If you encounter an error like The account name is invalid, try:
# Add \. before the username
.\gitlab-runner.exe install --user ".\ENTER-YOUR-USERNAME" --password "ENTER-YOUR-PASSWORD"
If you encounter a The service did not start due to a logon failure error
while starting the service, see the FAQ section to check how to resolve the problem.
If you don’t have a Windows Password, you cannot start the GitLab Runner service but you can
use the Built-in System Account.
For Built-in System Account issues, see
Configure the Service to Start Up with the Built-in System Account
on the Microsoft support website.
Get runner logs
When you run .\gitlab-runner.exe install it installs gitlab-runner
as a Windows service. You can find the logs in the Event Viewer
with the provider name gitlab-runner.
If you don’t have access to the GUI, in PowerShell, you can run
Get-WinEvent.
PS C:\> Get-WinEvent -ProviderName gitlab-runner

   ProviderName: gitlab-runner

TimeCreated                     Id LevelDisplayName Message
-----------                     -- ---------------- -------
2/4/2021 6:20:14 AM              1 Information      [session_server].listen_address not defined, session endpoints disabled  builds=0...
2/4/2021 6:20:14 AM              1 Information      listen_address not defined, metrics & debug endpoints disabled  builds=0...
2/4/2021 6:20:14 AM              1 Information      Configuration loaded                                builds=0...
2/4/2021 6:20:14 AM              1 Information      Starting multi-runner from C:\config.toml...        builds=0...
I get a PathTooLongException during my builds on Windows
This error is caused by tools like npm which sometimes generate directory structures
with paths more than 260 characters in length. To solve the problem, adopt one of the
following solutions.
-
Use Git with
core.longpathsenabled:You can avoid the problem by using Git to clean your directory structure.
- Run
git config --system core.longpaths truefrom the command line. - Set your project to use
git fetchfrom the GitLab CI project settings page.
- Run
-
Use NTFSSecurity tools for PowerShell:
The NTFSSecurity PowerShell module provides
a “Remove-Item2” method which supports long paths. GitLab Runner
detects it if it is available and automatically make use of it.
A regression introduced in GitLab Runner 16.9.1 is fixed in GitLab Runner 17.10.0.
If you intend to use the GitLab Runner versions with regressions, use one of the following workarounds:
Use
pre_get_sources_scriptto re-enable Git system-level settings (by unsettingGit_CONFIG_NOSYSTEM).
This action enablescore.longpathsby default on Windows.build: hooks: pre_get_sources_script: - $env:GIT_CONFIG_NOSYSTEM=''Build a custom
GitLab-runner-helperimage:FROM registry.gitlab.com/gitlab-org/gitlab-runner/gitlab-runner-helper:x86_64-v17.8.3-servercore21H2 ENV GIT_CONFIG_NOSYSTEM=
I can’t run Windows bash scripts; I’m getting The system cannot find the batch label specified - buildscript
You need to prepend call to your Batch file line in .gitlab-ci.yml so that it looks like call C:\path\to\test.bat. Here
is a more complete example:
before_script:
  - call C:\path\to\test.bat
For more information, see issue 1025.
How can I get colored output on the web terminal?
Short answer:
Make sure that you have the ANSI color codes in your program’s output. For the purposes of text formatting, assume that you’re
running in a UNIX ANSI terminal emulator (because it is the web interface output).
Long Answer:
The web interface for GitLab CI emulates a UNIX ANSI terminal (at least partially). The gitlab-runner pipes any output from the build
directly to the web interface. That means that any ANSI color codes that are present are honored.
Older versions of Windows’ command prompt terminal (before Windows 10, version 1511) do not support
ANSI color codes. They use win32 (ANSI.SYS) calls instead which are not present in
the string to be displayed. When writing cross-platform programs, developers typically use ANSI color codes by default. These codes are converted
to win32 calls when running on a Windows system, for example, Colorama.
If your program is doing the above, you must disable that conversion for the CI builds so that the ANSI codes remain in the string.
For more information, see GitLab CI YAML documentation
for an example using PowerShell and issue 332.
The service did not start due to a logon failure error when starting service
When installing and starting the GitLab Runner service on Windows you can
meet with such error:
gitlab-runner install --password WINDOWS_MACHINE_PASSWORD
gitlab-runner start
FATA[0000] Failed to start GitLab Runner: The service did not start due to a logon failure.
This error can occur when the user used to execute the service doesn’t have
the SeServiceLogonRight permission. In this case, you need to add this
permission for the chosen user and then try to start the service again.
- Go to Control Panel > System and Security > Administrative Tools.
- Open the Local Security Policy tool.
- Select Security Settings > Local Policies > User Rights Assignment on the
list on the left. - Open the Log on as a service on the list on the right.
- Select Add User or Group….
- Add the user (“by hand” or using Advanced…) and apply the settings.
According to Microsoft documentation,
this should work for:
- Windows Vista
- Windows Server 2008
- Windows 7
- Windows 8.1
- Windows Server 2008 R2
- Windows Server 2012 R2
- Windows Server 2012
- Windows 8
The Local Security Policy tool may be not available in some
Windows versions, for example in “Home Edition” variant of each version.
After adding the SeServiceLogonRight for the user used in service configuration,
the command gitlab-runner start should finish without failures
and the service should be started properly.
Job marked as success or failed incorrectly
Most Windows programs output exit code 0 for success. However, some programs don’t
return an exit code or have a different value for success. An example is the Windows
tool robocopy. The following .gitlab-ci.yml fails, even though it should be successful,
due to the exit code output by robocopy:
test:
  stage: test
  script:
    - New-Item -type Directory -Path ./source
    - New-Item -type Directory -Path ./dest
    - Write-Output "Hello World!" > ./source/file.txt
    - robocopy ./source ./dest
  tags:
    - windows
In the case above, you need to manually add an exit code check to the script:. For example,
you can create a PowerShell script:
$exitCodes = 0,1

robocopy ./source ./dest

if ( $exitCodes.Contains($LastExitCode) ) {
    exit 0
} else {
    exit 1
}
And change the .gitlab-ci.yml file to:
test:
  stage: test
  script:
    - New-Item -type Directory -Path ./source
    - New-Item -type Directory -Path ./dest
    - Write-Output "Hello World!" > ./source/file.txt
    - ./robocopyCommand.ps1
  tags:
    - windows
Also, be careful of the difference between return and exit when using PowerShell
functions. While exit 1 marks a job as failed, return 1 does not.
Job marked as success and terminated midway using Kubernetes executor
For more information, see Job execution.
Docker executor: unsupported Windows Version
GitLab Runner checks the version of Windows Server to verify that it’s supported.
It does this by running docker info.
If GitLab Runner fails to start and displays an error without
specifying a Windows Server version, then the Docker
version might be outdated.
Preparation failed: detecting base image: unsupported Windows Version: Windows Server DatacenterThe error should contain detailed information about the Windows Server
version, which is then compared with the versions that GitLab Runner supports.
unsupported Windows Version: Windows Server Datacenter Version (OS Build 18363.720)Docker 17.06.2 on Windows Server returns the following in the output
of docker info.
Operating System: Windows Server DatacenterThe fix in this case is to upgrade the Docker version of similar age, or later,
than the Windows Server release.
Kubernetes executor: unsupported Windows Version
Kubernetes executor on Windows might fail with the following error:
Using Kubernetes namespace: gitlab-runner
ERROR: Preparation failed: prepare helper image: detecting base image: unsupported Windows Version:
Will be retried in 3s ...
ERROR: Job failed (system failure): prepare helper image: detecting base image: unsupported Windows Version:
To fix it, add node.kubernetes.io/windows-build node selector in the section [runners.kubernetes.node_selector]
of your GitLab Runner configuration file, For example:
   [runners.kubernetes.node_selector]
     "kubernetes.io/arch" = "amd64"
     "kubernetes.io/os" = "windows"
     "node.kubernetes.io/windows-build" = "10.0.17763"
I’m using a mapped network drive and my build cannot find the correct path
When GitLab Runner runs under a standard user account instead of an administrator
account, it cannot access mapped network drives.
When you try to use mapped network drives, you get the
The system cannot find the path specified. error.
This error occurs because service logon sessions have
security limitations
when accessing resources. Use the UNC path
of your drive instead.
The build container is unable to connect to service containers
To use services with Windows containers:
- Use the networking mode that creates a network for each job.
- Ensure that the
FF_NETWORK_PER_BUILDfeature flag is enabled.
The job cannot create a build directory and fails with an error
When you use the GitLab-Runner with the Docker-Windows executor, a job might fail with an error like:
fatal: cannot chdir to c:/builds/gitlab/test: Permission denied`When this error occurs, ensure the user the Docker engine is running as has full permissions to C:\Program Data\Docker.
The Docker engine must be able to write to this directory for certain actions, and without the correct permissions it fails.
Read more about configuring Docker Engine on Windows.
Blank lines for Windows Subsystem for Linux (WSL) STDOUT output in job logs
By default the STDOUT output for the Windows Subsystem for Linux (WSL) is not UTF8 encoded and displays as blank lines in the job logs. To display the STDOUT output, you can force UTF8 encoding for WSL by setting the WSL_UTF8 environment variable.
job:
  variables:
WSL_UTF8: "1"Last Updated :
16 Sep, 2024
GitLab is a popular DevOps platform that provides a robust solution for source code management, continuous integration/continuous deployment (CI/CD), and other development workflows. While GitLab is typically hosted on Linux servers, it can also be installed on Windows using a virtual machine or Docker.
In this article, we will walk you through the steps to install GitLab on Windows using Docker, which provides a manageable and efficient way to run GitLab without needing to configure a full Linux environment.
Prerequisites
Before installing GitLab on Windows, ensure you have the following prerequisites:
- Windows 10 Pro, Enterprise, or Education: Required for Docker Desktop.
- Docker Desktop: A platform that allows you to run Docker containers on Windows.
- Sufficient System Resources: At least 4 CPU cores and 4GB of RAM for GitLab to run smoothly. Higher specifications are recommended for production environments.
Installing Docker on Windows
To run GitLab on Windows, you’ll need to install Docker Desktop, which enables running containers on Windows systems.
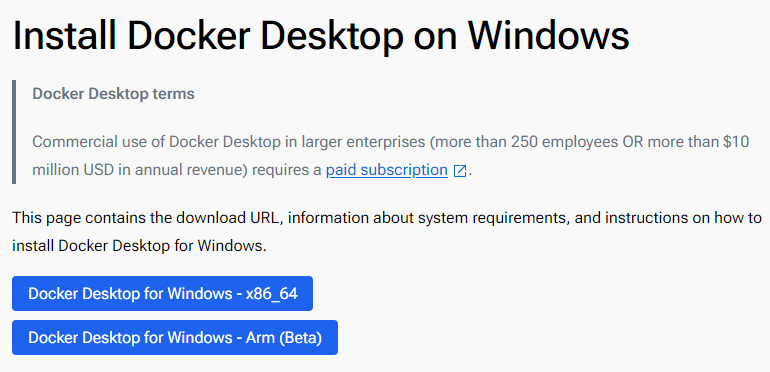
Step 1: Download Docker Desktop
Go to the Docker Desktop website and download the installer for Windows.
Step 2: Install Docker Desktop
- Run the installer and follow the on-screen instructions.
- When prompted, enable the option for Windows Subsystem for Linux (WSL 2) for better performance.
Step 3: Start Docker Desktop
- Once installed, launch Docker Desktop and ensure it is running. You should see the Docker icon in the system tray.
Step 4: Verify Docker Installation
Open Command Prompt or PowerShell and type:
docker --version
You should see the version of Docker installed, confirming that Docker is set up correctly.
Downloading and Running GitLab Using Docker
With Docker installed, you can now download and run GitLab using Docker containers.
Step 1: Pull the GitLab Docker Image
Open PowerShell or Command Prompt and pull the GitLab image from Docker Hub:
docker pull gitlab/gitlab-ee:latest
This command pulls the latest version of GitLab Enterprise Edition. If you prefer the Community Edition, use gitlab/gitlab-ce:latest.
Step 2: Run GitLab in a Docker Container
Create a new directory on your Windows system to store GitLab configuration and data. This ensures data persists even if the container is removed:
mkdir C:\gitlab\data
mkdir C:\gitlab\logs
mkdir C:\gitlab\config
Step 3: Start the GitLab container:
docker run --detach `
  --hostname gitlab.local `
  --publish 443:443 --publish 80:80 --publish 22:22 `
  --name gitlab `
  --restart always `
  --volume C:\gitlab\config:/etc/gitlab `
  --volume C:\gitlab\logs:/var/log/gitlab `
  --volume C:\gitlab\data:/var/opt/gitlab `
  gitlab/gitlab-ee:latest
Options:
- —hostname: Sets the hostname for GitLab (e.g., gitlab.local).
- —publish: Maps ports from the container to the host (HTTP, HTTPS, and SSH).
- —name: Names the container gitlab.
- —restart always: Ensures GitLab restarts automatically if the container stops or the host reboots.
- —volume: Maps local directories to container directories for persistent storage.
Step 3: Wait for GitLab to Initialize:
It may take several minutes for GitLab to initialize. You can monitor the process using:
docker logs -f gitlab
Wait until you see the message indicating that GitLab is ready.
Configuring GitLab
After GitLab starts, you can configure it through the GitLab interface:
Step 1: Access GitLab
- Open a web browser and navigate to http://localhost.
- You should see the GitLab login screen.
Step 2: Set Up the Root Password
The first time you access GitLab, you’ll be prompted to set the root password. Enter a secure password and save it.
Step 3: Log In:
Log in using the username root and the password you just set.
Step 4: Configure GitLab Settings
Navigate to the Admin area to configure GitLab settings, such as email notifications, user management, and project settings.
Accessing GitLab
To access GitLab, simply navigate to the hostname you set during the Docker run command (e.g., http://localhost if using the default setup). If you mapped the ports differently or used a different hostname, adjust the URL accordingly.
Setting Up GitLab Runner (Optional)
GitLab Runner is a tool used for running CI/CD jobs on your GitLab instance. Installing GitLab Runner on Windows allows you to leverage GitLab’s powerful CI/CD pipelines.
Step 1: Download GitLab Runner
Visit the GitLab Runner downloads page and download the binary for Windows.
Step 2: Install GitLab Runner:
- Extract the binary to a directory, for example, C:\GitLab-Runner.
- Open Command Prompt as Administrator and register the runner:
C:\GitLab-Runner\gitlab-runner.exe register
- Follow the prompts to configure the runner with your GitLab instance, including:
- GitLab URL.
- Registration token (found in GitLab’s Admin area under Runners).
- Runner description, tags, and executor type (use shell for simplicity on Windows).
Step 3: Start the Runner
Install and start GitLab Runner as a service:
C:\GitLab-Runner\gitlab-runner.exe install
C:\GitLab-Runner\gitlab-runner.exe start
Introduction to GitLab Desktop
GitLab Desktop is the client application that integrates with GitLab, a web-based Git repository manager. It enhances the Git workflow by providing a graphical interface for managing repositories, branches, commits, and merges. This desktop application is designed to simplify the interaction with Git repositories, making version control more accessible to developers of all skill levels.
Key Features and Benefits
GitLab Desktop offers several features that distinguish it from other Git clients:
-
Graphical Interface: Unlike command-line Git, GitLab Desktop provides a visual representation of repositories and branches, making it easier to navigate and manage projects.
-
Repository Management: Users can clone, create, and delete repositories directly from the desktop application, streamlining the setup process for new projects.
-
Branching and Merging: Handling branches and merging changes is simplified with intuitive tools, reducing the complexity of collaborative development.
-
Commit History: Visualize commit history, compare changes, and revert to previous versions effortlessly, enhancing project traceability and stability.
-
Integration with GitLab: Seamless integration with GitLab’s web interface ensures synchronization between desktop and web versions, enabling consistent project management.
-
Cross-Platform Compatibility: GitLab Desktop supports Windows, macOS, and Linux platforms, catering to diverse development environments.
Getting Started with GitLab Desktop
To begin using GitLab Desktop, follow these simple steps:
-
Download and Install: Visit the GitLab website to download the desktop application compatible with your operating system. Install the application following the setup instructions provided.
-
Authenticate with GitLab: Upon launching GitLab Desktop, log in to your GitLab account to synchronize your repositories and access project data.
-
Clone a Repository: Clone an existing repository from GitLab or create a new one directly from the desktop interface. This step initializes your local copy of the project.
-
Branching and Committing: Create branches to work on specific features or fixes. Make changes to files, commit them with descriptive messages, and push your commits to the remote repository.
-
Collaborate and Merge: Collaborate with team members by pulling their changes, reviewing merge requests, and resolving conflicts using GitLab Desktop’s integrated tools.
Installation Methods for GitLab: Official and Unofficial Approaches
GitLab, a comprehensive DevOps platform, offers various installation methods tailored to different environments and needs. These methods are divided into official, supported installations and unofficial, unsupported installations. Understanding the nuances of these approaches helps users choose the best option for their specific use cases.
Official, Supported Installation Methods
-
DockerDocker provides a streamlined way to deploy GitLab using containerization technology. Official GitLab Docker images are maintained to ensure compatibility and ease of use. Docker allows for quick setup, scaling, and management of GitLab instances, making it a popular choice for those familiar with container orchestration. Users can follow the detailed install instructions provided by GitLab to deploy and manage their GitLab instances via Docker effectively.
-
Reference ArchitecturesGitLab’s reference architectures offer recommended deployment topologies that cater to different scales and needs. These architectures are designed to provide optimal performance, reliability, and scalability for GitLab deployments. By following these architected guidelines, users can ensure that their GitLab instance is deployed in a manner consistent with best practices. Detailed installation instructions help users implement these recommended topologies efficiently.
-
Installation from SourceFor users who prefer or require direct access to the source files, GitLab provides instructions for installing from source on Debian/Ubuntu systems. This method offers greater control and customization, allowing users to tailor the GitLab installation to their specific requirements. While this approach may be more complex and time-consuming, it provides flexibility for advanced configurations.
-
GitLab Environment Toolkit (GET)The GitLab Environment Toolkit automates the deployment of GitLab reference architectures using Terraform and Ansible. This toolkit simplifies the process of setting up a robust and scalable GitLab environment by leveraging infrastructure as code (IaC) principles. By following the provided install instructions, users can efficiently deploy GitLab with minimal manual intervention.
Unofficial, Unsupported Installation Methods
-
Debian Native PackageMaintained by Pirate Praveen, this method involves installing GitLab as a native Debian package. While not officially supported by GitLab, this approach may be suitable for users who prefer using Debian’s package management system. Detailed instructions guide users through the installation process.
-
FreeBSD PackageTorsten Zühlsdorff maintains an unofficial FreeBSD package for GitLab. This method caters to users running FreeBSD systems, providing them with a way to deploy GitLab within their preferred operating environment. Installation instructions are available to assist users in setting up GitLab on FreeBSD.
-
Arch Linux PackageThe Arch Linux community maintains an unofficial package for installing GitLab on Arch Linux. This method is ideal for Arch Linux enthusiasts who want to integrate GitLab into their system. The community-provided instructions help users navigate the installation process.
-
Puppet ModuleVox Pupuli offers an unofficial Puppet module for GitLab installation. This approach is useful for users who use Puppet for configuration management and want to deploy GitLab using this tool. Installation instructions provided by Vox Pupuli assist in setting up GitLab with Puppet.
-
Ansible PlaybookJeff Geerling maintains an unofficial Ansible playbook for GitLab installation. This method is suitable for users who prefer using Ansible for automation and configuration management. The provided instructions guide users through deploying GitLab using this playbook.
-
GitLab Virtual Appliance (KVM)OpenNebula provides an unofficial GitLab virtual appliance for KVM environments. This method is designed for users who prefer deploying GitLab as a virtual appliance within their KVM infrastructure. Detailed installation instructions assist users in setting up GitLab as a virtual appliance.
-
GitLab on CloudronCloudron offers an unofficial method for deploying GitLab via the Cloudron App Library. This approach is convenient for users who manage applications using Cloudron. The provided instructions help users install and manage GitLab within the Cloudron environment.
Advanced Features and Tips
Explore these advanced features to maximize your GitLab Desktop experience:
-
Issue Tracking: Link commits to GitLab issues directly from the desktop, improving project management and traceability.
-
Extensions and Customizations: Customize GitLab Desktop with extensions and plugins to enhance functionality tailored to your workflow requirements.
-
Automation and CI/CD Integration: Integrate GitLab Desktop with GitLab CI/CD pipelines for automated testing, deployment, and continuous integration workflows.
Key Takeaway
-
User-Friendly Interface: GitLab Desktop offers a graphical interface that simplifies Git repository management compared to command-line tools.
-
Seamless Integration: It integrates smoothly with GitLab’s web interface, ensuring synchronization and consistency in project management.
-
Cross-Platform Support: Compatible with Windows, macOS, and Linux, catering to diverse developer environments.
-
Enhanced Collaboration: Facilitates efficient teamwork through features like branching, merging, and integrated issue tracking.
-
Free and Open-Source: Available for free, aligning with GitLab’s commitment to open-source collaboration tools.
Conclusion
GitLab Desktop stands out as a powerful tool for version control, offering a user-friendly interface coupled with robust Git capabilities. Whether you’re a solo developer or part of a large team, GitLab Desktop enhances productivity and facilitates efficient collaboration through seamless integration with GitLab repositories. Embrace the future of software development with GitLab Desktop and streamline your workflow today.
FAQ
Q1: Can I use GitLab Desktop with GitLab.com and self-hosted GitLab instances?
Yes, GitLab Desktop supports both GitLab.com and self-hosted GitLab instances, providing flexibility based on your hosting preferences.
Q2: Does GitLab Desktop support SSH authentication for secure repository access?
Yes, GitLab Desktop supports SSH authentication, ensuring secure communication between the desktop client and GitLab repositories.
Q3: Is GitLab Desktop free to use?
Yes, GitLab Desktop is available for free, aligning with GitLab’s commitment to open-source collaboration tools.
Article Sources
-
GitLab Official Website: GitLab
-
GitLab Desktop Documentation
-
GitLab Official Website
-
GitLab Desktop GitHub Repository
-
GitLab Desktop Support Community
-
GitLab Desktop Blog
GitLab is a popular tool for managing Git repositories, allowing developers to work together on code, handle projects, and automate software testing and deployment. This article provides a step-by-step guide to installing GitLab on a Windows system, making it easy for developers to get started with this powerful platform.
Key Takeaways
- GitLab is a web-based tool for managing Git repositories and streamlining the development process.
- Before installing GitLab on Windows, ensure your computer meets the minimum system requirements and you have the necessary user permissions.
- The installation process includes downloading GitLab Runner, setting it up, and registering it with your GitLab account.
- Configuring GitLab Runner involves obtaining a registration token, setting up tags, and choosing executors.
- Verifying and running GitLab involves starting the GitLab Runner, checking the installation, and troubleshooting any issues.
Checking System Requirements
Before you dive into installing GitLab on your Windows machine, it’s crucial to ensure your system meets the necessary requirements. This will help GitLab run smoothly and efficiently.
Minimum Hardware Specifications
To get started, your system should at least have:
- Processor: 4 cores
- Memory: 4 GB RAM
- Disk Space: 25 GB
While these are the minimum requirements, having a more powerful system will provide a better experience.
Operating System Compatibility
GitLab is compatible with Windows 7 and later versions. Make sure your operating system is up-to-date to avoid any compatibility issues.
User Privileges Needed
You’ll need administrative privileges to install GitLab. This ensures you can make the necessary changes to your system during the installation process.
Important: Ensure you have a GitLab account ready for registration during the setup process.
Installing Prerequisite Software
Downloading Git for Windows
First, you need to download Git for Windows. Head over to the official Git website and grab the installer. Run the installer and follow the on-screen instructions. Make sure to select the default options unless you have specific needs.
Setting Up Docker for Windows
Next, you’ll need Docker. Visit the Docker website and download Docker Desktop for Windows. Run the installer and follow the prompts. After installation, open Docker Desktop and complete the initial setup. Ensure Docker is running before moving on.
Installing OpenSSH
Finally, you need OpenSSH. Open your PowerShell as an administrator and run the following command:
Add-WindowsCapability -Online -Name OpenSSH.Client~~~~0.0.1.0
This will install the OpenSSH client on your system. To verify the installation, type ssh in your command prompt. If you see a list of SSH commands, you’re good to go.
Pro Tip: Always keep your software up to date to avoid security vulnerabilities.
Downloading and Setting Up GitLab Runner
Creating a Dedicated Folder
First, create a folder on your system to keep things organized. For example, you can create a folder named C:\GitLab-Runner. This will be the home for all your GitLab Runner files.
Downloading the GitLab Runner Binary
Next, download the GitLab Runner binary. You can find the latest version on the official GitLab website. Choose the appropriate version for your system, either 64-bit or 32-bit. Once downloaded, move the binary to the folder you created earlier.
Renaming and Organizing the Binary
After moving the binary, rename it to gitlab-runner.exe for simplicity. This makes it easier to run commands later. Ensure that the folder and the binary have restricted write permissions to prevent unauthorized changes. This step is crucial for maintaining security.
> **Pro Tip:** Keeping your binaries organized and properly named can save you a lot of headaches down the line.
Installing GitLab on Windows

Running the GitLab Installer
First, you need to run the GitLab installer. Download the installer from the official GitLab website. Once downloaded, open the installer and follow the on-screen instructions. Make sure to run the installer as an administrator to avoid any permission issues.
Choosing Installation Components
During the installation, you’ll be prompted to choose which components to install. Select the components that are necessary for your setup. Typically, you’ll want to install the GitLab Runner and any additional tools that you might need for your projects.
Selecting the Installation Directory
Next, you’ll need to choose the installation directory. By default, GitLab will suggest a directory, but you can change it if needed. Ensure that the directory has enough space to accommodate GitLab and its dependencies.
It’s crucial to select a directory with sufficient disk space to avoid running into issues later on.
Once you’ve completed these steps, GitLab will begin the installation process. This might take a few minutes, so be patient. After the installation is complete, you can proceed to configure GitLab Runner and start using GitLab on your Windows machine.
Configuring GitLab Runner
Registering the GitLab Runner
Before using the runner to execute jobs, it must be registered with GitLab. Open a command prompt and navigate to the directory where GitLab Runner is installed. Then, run the following command:
gitlab-runner.exe register
This command will prompt you to enter the URL of your GitLab instance and the registration token. After providing this information, you will be prompted to configure the runner. Follow the prompts to configure the runner as needed.
Obtaining a Registration Token
To get the token, log in to your GitLab account. Go to your project and click on the CI/CD option under the Settings tab. Expand the Runners Settings option. Under the Runners Settings section, you will get the token. Make sure to keep this token secure as it is essential for registering the runner.
Setting Up Tags and Executors
After entering the registration token, you will be asked to enter a description for the runner. Next, you will be prompted to enter tags for the runner. These tags help in identifying the runner and can be changed later in the GitLab user interface. You can lock the runner to the current project by setting it to true.
Finally, you will be asked to enter the executor for building the project. Executors can be of various types like shell, docker, or virtualbox. Choose the one that best fits your needs. Once done, you will see a message saying ‘Runner registered successfully’.
To the right of the runner, you want to edit, select edit ( ). In the maximum job timeout field, enter a value in seconds. The minimum amount is 600 seconds (10 minutes).
Verifying and Running GitLab
Starting GitLab Runner
To start the GitLab Runner, open PowerShell or Command Prompt and navigate to the directory where you installed it. Run the following commands:
cd C:\GitLab-Runner
.\GitLab-runner.exe start
This will start the GitLab Runner service. Make sure it runs without errors.
Checking the Installation
After starting the GitLab Runner, you need to verify that everything is set up correctly. Open your web browser and go to the URL where you installed GitLab. Log in with your admin credentials.
- Navigate to the Admin Area.
- Check the status of your GitLab instance.
- Ensure all services are running smoothly.
Troubleshooting Common Issues
If you encounter any issues, here are some common problems and their solutions:
- Runner not starting: Ensure you have the correct permissions and that no other service is using the same port.
- Cannot access GitLab URL: Double-check your DNS settings and make sure your firewall allows inbound HTTP/HTTPS traffic.
- Services not running: Restart the GitLab services using the command
sudo gitlab-ctl restart.
If problems persist, consult the GitLab documentation or seek help from the GitLab community.
By following these steps, you should have a fully functional GitLab instance running on your Windows machine. Enjoy your new setup!
Automating GitLab Runner as a Service
Automating GitLab Runner as a service ensures that the runner is always available to execute pipelines. This section will guide you through the process of setting up GitLab Runner as a service on Windows and managing it effectively.
Frequently Asked Questions
What are the minimum hardware requirements for installing GitLab on Windows?
You need a Windows machine with at least 4GB of RAM and 2 CPU cores. It’s recommended to have a more powerful system for better performance.
Can I install GitLab directly on Windows?
No, GitLab itself cannot be installed directly on Windows. However, you can use GitLab Runner on Windows to interact with a GitLab instance running on a Linux server.
Do I need administrative privileges to install GitLab Runner on Windows?
Yes, you need administrative privileges to install and configure GitLab Runner on a Windows machine.
What software do I need to install before setting up GitLab Runner on Windows?
You need to install Git for Windows, Docker for Windows, and OpenSSH before setting up GitLab Runner.
Where can I find the registration token for GitLab Runner?
You can find the registration token in your GitLab project under Settings > CI/CD > Runner settings.
How do I start GitLab Runner as a service on Windows?
You can set up GitLab Runner to run as a service by configuring it to start automatically and managing it through the Windows Services interface.
In the last article, we saw the various parts of GitLab, its architecture and how GitLab works. If you haven’t already, I suggest reading the previous article first before reading this one. Here is the link
GitLab, A Complete Beginner’s Guide!
In this article lets look at how to set it up locally on your Windows PC, so that you can have your very own GitLab setup running right at your home or organization!
If you are using Mac or Linux, you can follow the links below.
Complete Guide To Setting Up GitLab Locally On Mac.
Complete Guide To Setting Up GitLab Locally On Linux PC..!!
So let’s begin!
Things you will need
All you need are a computer running Windows OS with enough resources (CPU, memory, and disk space) for running the GitLab Server and GitLab Runner. How much resources is enough depends on how much performance you need, the more you have the better it is!
You can also set it up on the cloud over at Gitlab.com, but
- the free plans have some limitations in terms of processing power and hard disk space.
- Also doing it locally gives you more control over the setup and
- it will also be an opportunity to learn you more about GitLab
Hence I suggest taking this route of a local installation.
If you are part of a larger organization, and you wish to install it on the cloud, then you can always take a look at the paid plans of GitLab here link
Approach to install GitLab on Windows
Okay, let’s get back to the task in hand.
As we saw in the previous article GitLab consists of 2 parts.
- GitLab Server and
- GitLab Runner
Also, we have learned in the previous article that it is preferable to set the GitLab server and runners on separate computers. But I am going for a home set up, so I will be setting them both upon the same Windows computer.
The GitLab Server relies heavily on Linux technologies and hence it cannot be installed in our Windows PC natively. If you do some research, there are ways you can do it through the Linux subsystem in windows, but we are not going to take that approach.
The
problem with these workarounds are
- The installation process is a bit complicated and is not recommended for beginners.
- They are only guaranteed to work on a version to version basis. What I mean by that is you need to have a particular version of Windows and a particular version of GitLab for everything to run smoothly. If you update your Windows or if you wish to upgrade your GitLab then you might break your GtiLab set up. Since both Windows and GitLab updates come frequently, it is not such a good idea to waste time trying to fix things every few months.
- It is unofficial and hence support for future versions cannot be guaranteed.
- These unofficial methods will bring their own limitations as opposed to running natively on Linux
Due to these above reasons, we are going to go for a more stable approach of installing the GitLab server in a virtual environment. We will also see in this article the ways to make it run as smoothly and efficiently as possible while making sure it consumes as few resources as possible.
So this
is what we are going to do
- Install the GitLab Server on a Virtual Box running Ubuntu server
- Install GitLab runner natively on Windows.
This approach takes away the cons of using unofficial hacks, as it will work on all versions of you Windows and GitLab and you don’t need to worry too much while updating your software either!
By following the step by step guide shown below you should be able to set everything up and running in an hour or 2 (depending upon how good your internet connection is, it can take longer!)
GitLab Installation Process
STEP#1: Download and install VirtualBox
You can download and install VirtualBox from this link
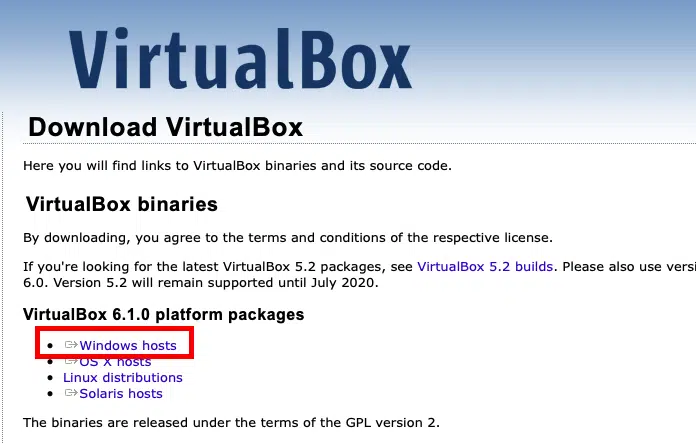
Just click on the Windows hosts and the download should start automatically. The installation process is pretty straightforward, you can just accept the default options and click through to complete the process.
Once the installation is completed you can open VirtualBox from the Start menu in Windows.
STEP#2: Install Ubuntu Server as a Virtual Machine in your Windows PC.
The next step is to get a Linux distro to install our GitLab server. For this purpose, I recommend Ubuntu Server. I chose this particular distro for 2 reasons.
- Ubuntu is known for its stability.
- GitLab Server software has support for Ubuntu
- The server edition is chosen so that it will consume fewer resources on your computer.
For this first, you need the Ubuntu Server image. You can download it from this link.
Ubuntu usually offers 2 sets of packages for us to choose from.
- Long term support version: Has a support period of 5 years
- Latest Version: has all the latest features.
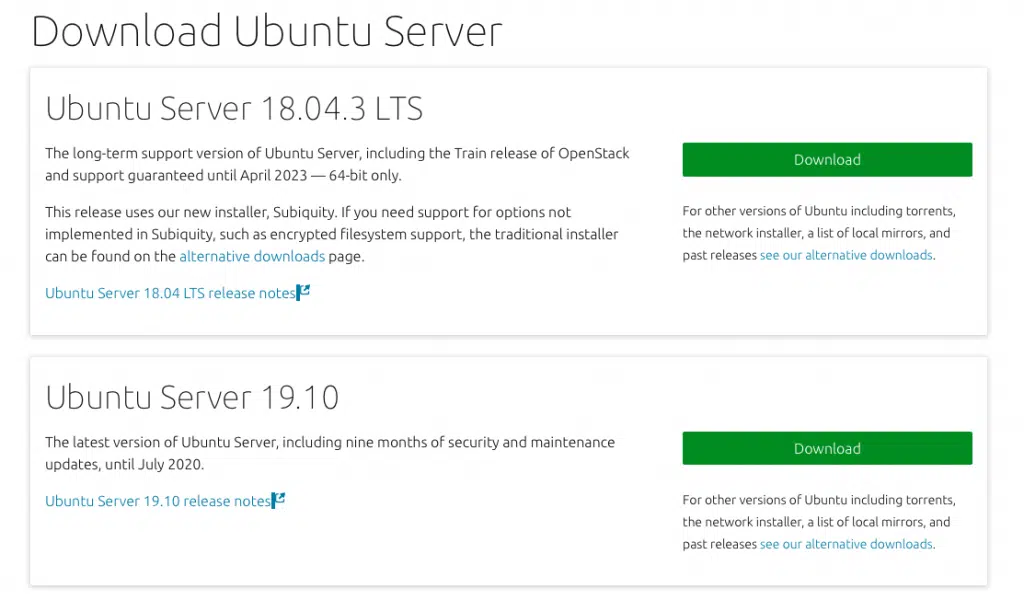
I suggest you go for the LTS one, but then the latest version should also work just fine. So click on a “Download” button and your download should start automatically. It will take some time to complete as the iso is around 900MB.
Once the download is complete you can proceed to the installation process on VirtualBox.
STEP#3: Install Ubuntu Server on VirtualBox
Open VirtualBox Application and click on the “New” button

A window like this should pop up
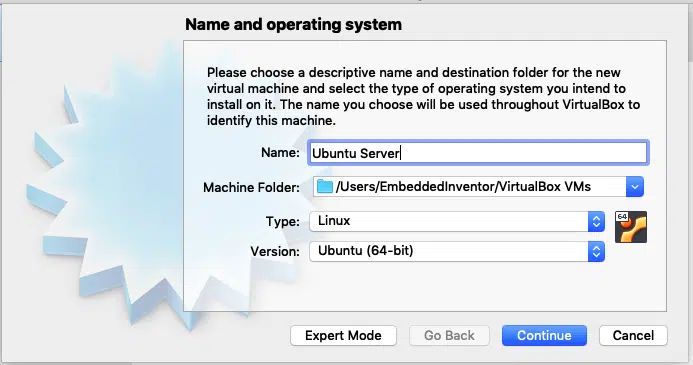
Give your virtual machine a name and choose Linux for type and ubuntu 64 bit for version and click “Continue”.
The next screen usually asks for RAM. GitLab recommends 8GB for a GitLab system with 100 users, I suggest a minimum of 2GB RAM for a home set up, you can give more if you can, just make sure you don’t allot more than 50% of your total available RAM.
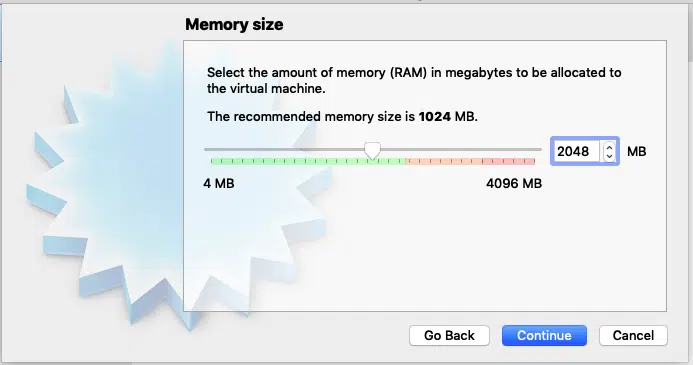
Once you have allocated RAM space, Click “Continue” to the next page.
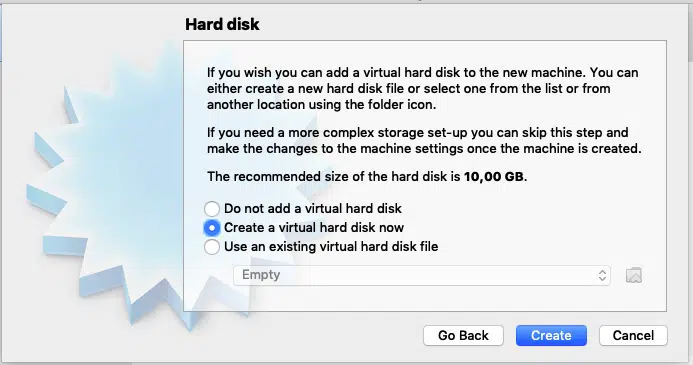
Next, you will be prompted for hard disk. Make sure “Create a virtual hard disk now” is selected and click “Create”
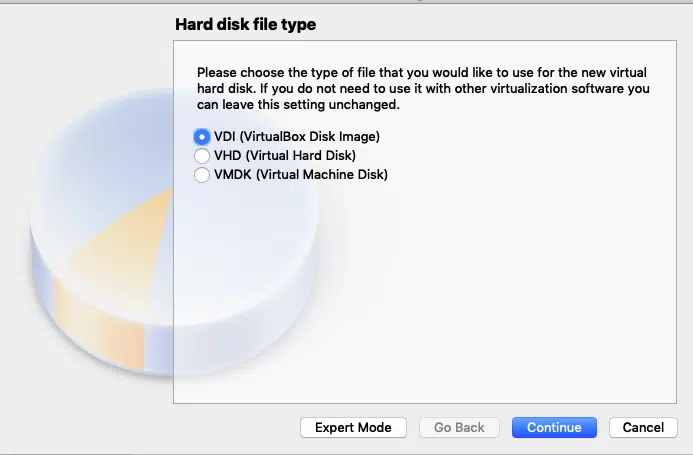
Accept
the default “VDI (VirtualBox Disk Image)” and click
“Continue”
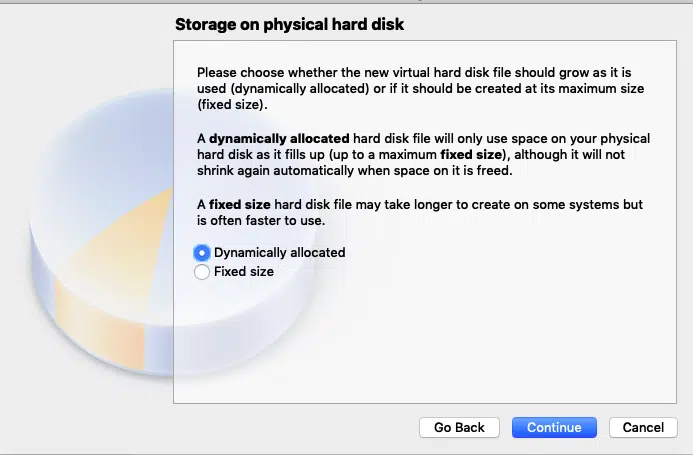
Accept “Dynamically Allocated” and Press continue. This option allocates hard disk space to the virtual machine on the run, so that as you use the more space, more will be allocated.
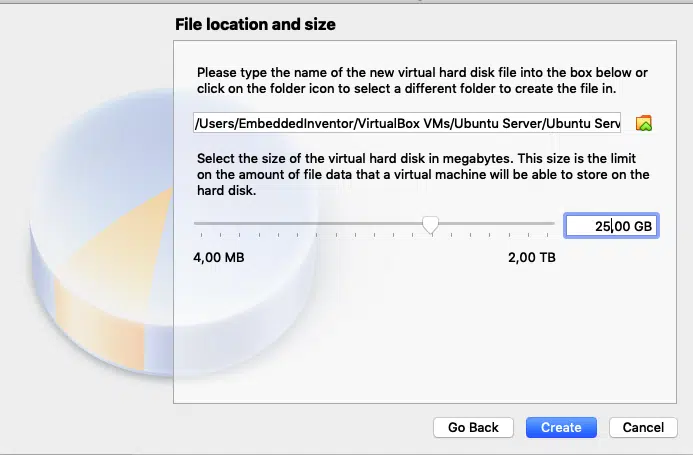
I suggest you allocate at least 25GB of space to the virtual machine, you can allot more if you can. Once you have chosen the disk space click create
Once you have done this, you should be taken back to the main window of VirtualBox and you should see the virtual machine you just created on the left pane of the window as shown in the screenshot below.

Next click on the “Settings”

And click on storage -> empty -> disk icon -> “Choose a disk file”

Select the ubuntu server iso image you have just downloaded and press ok. This is equivalent to inserting the Ubuntu disk in a real machine.

Next, go to settings->Network and choose “Bridged Adapter” in the “Attached to:” drop-down menu and press “OK”
I have explained the reason behind using these network settings in detail in this article, you can go ahead and read that if you are into computer networks.
The short explanation is, we will not be able to access the GitLab server from our other machines on the network unless we choose this option.
That’s it, the configuration is done!
You can now go ahead and click the start button!

Now the installation process will start. Since we have chosen to go with “Ubuntu server” in order to minimize the resource consumption (so that GitLab can take up as many resources as it needs) we don’t get a fancy Graphical UI, like in the desktop version of Ubuntu. You need to navigate the menus during installation only using Keyboard (tab, enter and arrow keys) since the Ubuntu server doesn’t come with mouse support. So go through the process and get it done.
STEP#4: Get the IP address of your ubuntu server
Okay now
once you got the Ubuntu server up and running, you need to find its IP address
and make a note of it.
To do that, use the “ifconfig” command on your Ubuntu server’s terminal

STEP#5: Download and install GitLab server
To download GitLab server, go to the official link on the Gitlab’s Website
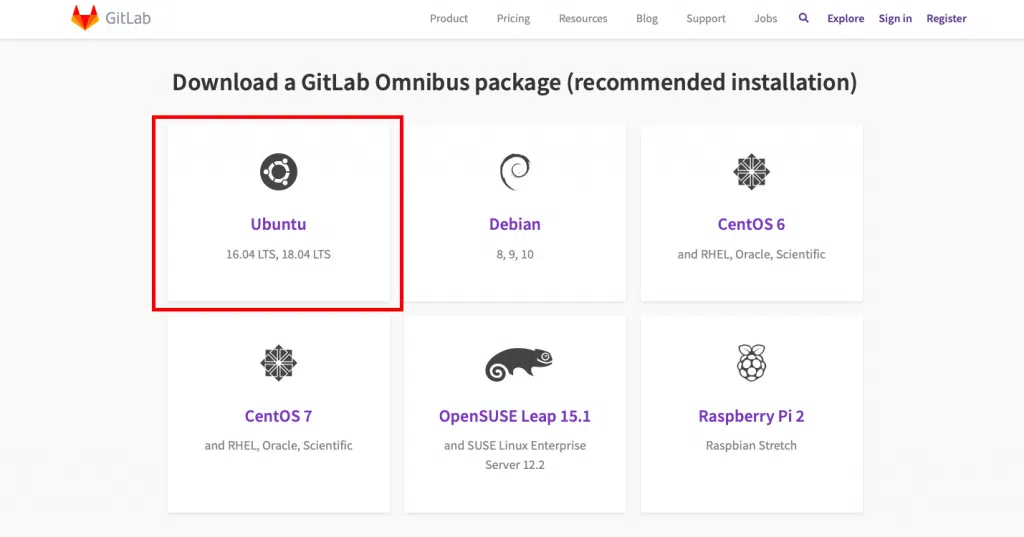
As you can see GitLab official supports several Linux distros, even a Raspberry Pi 2’s Raspbian! We are interested in Ubuntu, so click on the Omnibus Ubuntu Link on as shown in the screenshot above.
Once you click on Ubuntu, the commands you need to enter to install GitLab server will be shown to you.
I am not showing each instruction here since GitLab updates the information presented on their website all the time and that can make this section of the article outdated. Just follow the step by step instructions given in the link to install the GitLab Server on your VM.
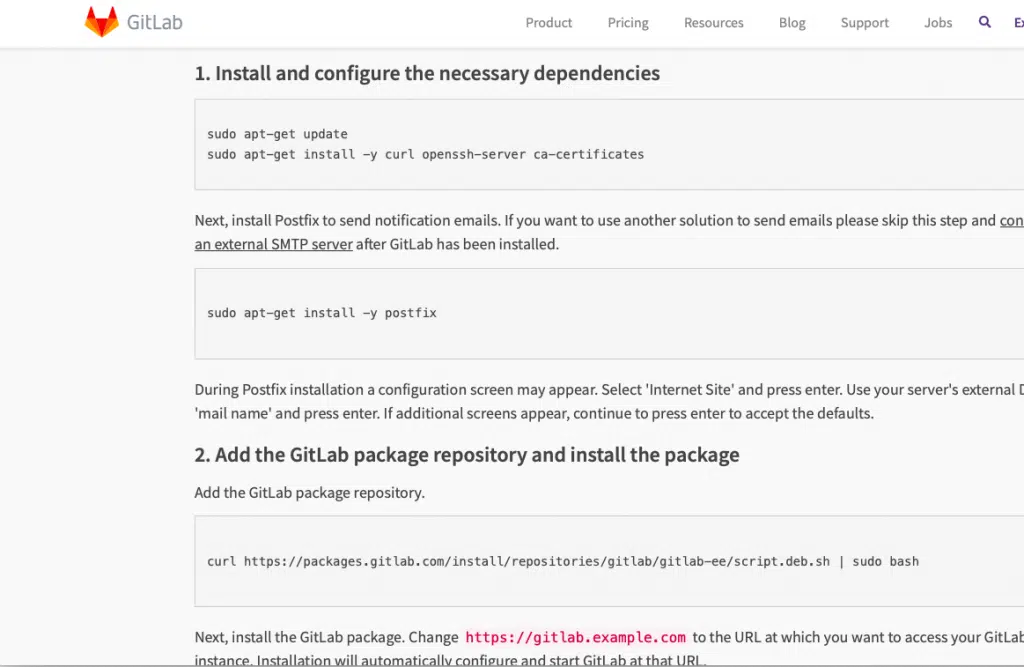
Just type in the commands shown there on you Ubuntu server’s terminal one by one to get GitLab Server installed.
A couple of tips on the GitLab installation instructions
Tip#1
In the postfix installation step (step 1 last command on the GitLab website)
sudo apt-get install -y postfix
you can skip the mail option by choosing the “no configuration” option as shown in the screenshot below.

Tip#2
In the last command of step 2 at GitLab website
sudo EXTERNAL_URL="https://gitlab.example.com" apt-get install gitlab-ee
Make sure you replace the URL with the IP address of the VM that we have made a note of in Step 5 above like this
sudo EXTERNAL_URL="192.168.0.116" apt-get install gitlab-ee
Or to be more precise just place the VM’s IP address that we obtained in Step#4 in its appropriate place
sudo EXTERNAL_URL=”<Your VM’s IP address>” apt-get install gitlab-ee
This step will take a while, so be patient. In my machine it took 4 minutes 48 seconds as shown in the screenshot below, yours can vary depending on the processing power it has.
Once done it will show u something like in the screenshot below.

Once it’s done, you can go ahead to your favorite browser and type in the IP address of your VM and check if the installation has succeeded.

And voila! GitLab server installation has succeeded!
Go ahead and follow the onscreen instructions to set up your password, accounts and everything else!
STEP#6: Download GitLab runners
Before installing GitLab runners you need to install Git on your Windows PC. You can download the latest version of Git in this link.
Now that we have set up the Gitlab server and Git, the next step is to set up the GitLab runner!
At the time of writing this article, the installation process goes like this:
Make a folder on your computer and go to either this link for 32bit version or this link for 64bit version to download the binaries and put them in the folder you created
For getting the most up to date instruction, I am gonna ask you to follow the process given in the GitLab website
STEP#7: Connect the GitLab server to the GitLab runner
GitLab
calls this process of connecting the Server to Runner as “Registering the
GitLab Runner to the Server”
You can follow the instructions for Windows in this link to do the same.
Scroll down to the windows section and you will see something similar to this

Step# 7.1: Start the registration process
To enter these commands you need to open a command prompt with administrator privileges. For this just type cmd on the search menu, right-click on Command prompt and choose run as administrator

After that, just go to the folder to which you have downloaded the Gitlab Runner to and copy the path to that folder

Next, go back to the command line and give the following command
cd <path you copied>
Run the following command to start the registration process
gitlab-runner-windows-amd64.exe register

As shown in the screenshots above, enter your Virtual Machine’s IP address when prompted. Make sure you add “http://” before the IP address.
Once the IP address is entered, the next prompt appears asking you to enter a token, so let’s first go get a token from our GitLab server.
Step#7.2: Obtain token from GitLab Server
Go to your browser and enter the GitLab Server’s IP address. Once you have logged in you can create your first project by clicking on the respective pane as shown in the screenshot below.
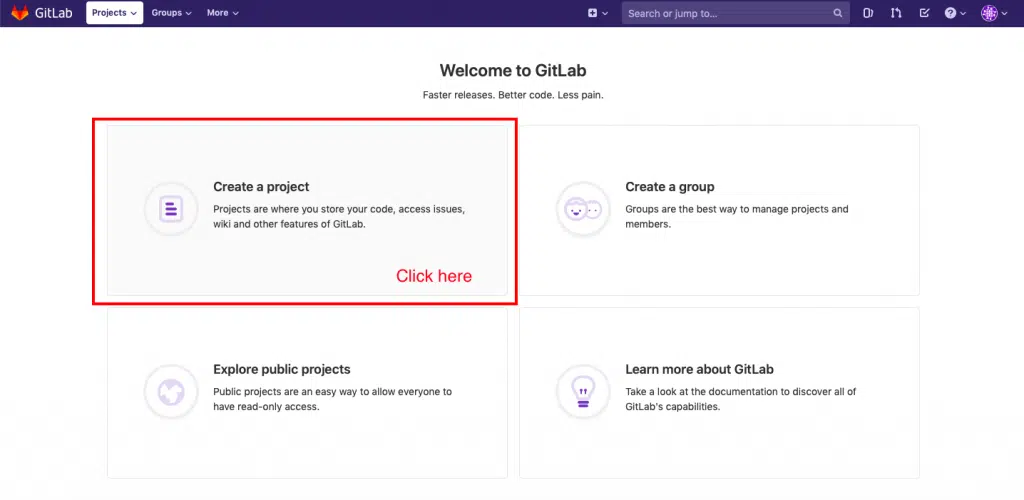
Just give the project a name and click on the create project button. The other field should get populated automatically.

Once you click the button as shown in the screenshot above, you will be taken to your project page.
From there just click on Settings->CI/CD and scroll down a bit and click the “Expand” button next to “Runners” and you will find the token you need as shown in the screenshot below.

This token basically connects your project on the GitLab Server to the GitLab runner.
Step#7.3: Enter the token
Now that we have the token let’s enter it on the Command prompt

Once
entering the token, you will be prompted to give the runner a description, go
ahead and do that.
After that, you will be asked to enter some tags.
What are tags? Why are they needed for GitLab runners?
The
better term for tags can be capabilities.
Consider
this scenario.
Assume you are working in a large team of 1000 developers, who are doing say 50 different projects and your GitLab system has 100 different runners set up with several capabilities to do specific tasks. Some projects may need C compilers, while others may need python interpreters.
Now in order to connect a given project with a free-runner, we need some sort of parameter to tell the GitLab server that this particular free runner is capable of running the scripts needed for that particular job.
This is where tags come into the picture. By giving tags like “C” or “Python” a single runner can be connected to multiple projects and a single project can execute its jobs on several runners to ensure the best possible performance.
Using
these tags the Gitlab server can find a runner with the specific capability to
use for a given job. So give some suitable tags that will imply the
capabilities of your runner.
Once that is done, you will be prompted to enter “executor”.
Executors are programs that run our CI/CD scripts. Type shell and press enter

This will end the registration process the Runner to the server
Once registered you can start the GitLab runner as a Service (background task) by issuing the commands
gitlab-runner-windows-amd64.exe install
gitlab-runner-windows-amd64.exe start

As you can see in the screenshot below, in the task manager app we can see that our gitlab-runner service is running!

Test to see if everything works
By following the 7 steps above, you should have a set up with GitLab Server and Runner running on your system. Its time to test and see if everything works the way it is supposed to work!
First, let’s test the GitLab server by creating a repo and pushing it to the server.
Testing GitLab Server
STEP#1: Make a test git repo
Let’s make a simple git repo on a new folder on our Desktop and push it to the GitLab server.
So open your Git-Bash app, which got installed as you were installing git.

Once opened type in the following commands
cd
cd Desktop
mkdir test_project
cd test_project
touch test.c
The above lines of command are just the fancy way of creating a folder named test_project on your Desktop and a file named test.c inside it. You can also do it through the Graphical User Interface if you want to.
So next, please open the C file using your favorite text editor and type in a simple program for testing, something like the following.
#include <stdio.h>

int main()
{
	printf("Hello Embedded Inventors!");
	return 0;
}
Next, let’s initialize a git repository on our test_project folder. So go back to the terminal cd into the test_project folder and type in the following command
You should receive a reply saying “Initialized empty Git repository”
STEP#2: Push it to the server
Now that we have our git repo ready, let’s push it to our git server. To do that login to your GitLab and go to the project we created earlier. There GitLab shows us the commands needed to push our repo to the server.
First, let’s configure our name and email on the git repository to the ones set on the GitLab server
So enter
the following command.
git config --global user.name "<enter your name here>"
git config --global user.email "<enter your email here>"
Next, we need to connect our server and our repository. To do that just enter the following commands
git remote add origin <your project URL>.git
In my case it is
git remote add origin http://192.168.0.115/EI/test-project.git
To find your project URL, just copy the address bar of your browser while you are on your project’s page in GitLab
Then add our test.c file and commit the changes using the following commands
git add .
git commit -m"first commit"
Then push
your git repo onto the GitLab using the command
git push -u origin master
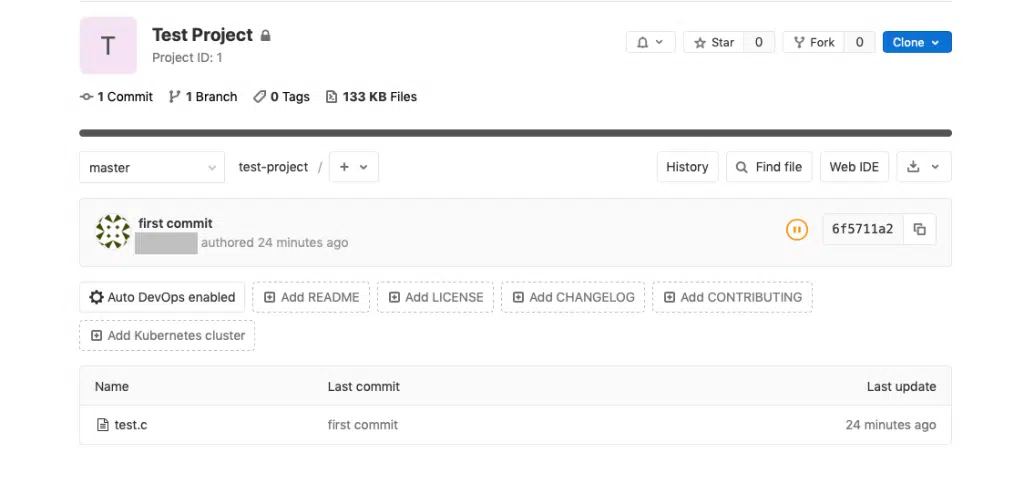
You will be prompted to enter the user name and password of your GitLab account, once done go to your browser and just refresh the page and you should be able to see your test project page in GitLab!
Testing GitLab Runner
STEP#3: Make a simple bash script to build the test.c
file
Create a bash script on your project folder
cd
cd Desktop/test_project
touch build.ps1
Edit it so that it looks something like this
gcc test.c -o test
echo "Build completed"
STEP#4: Create and edit .gitlab_ci.yml to run the
above script
What is .gitlab-ci.yml and why it is needed? This is the file that contains the instructions for the GitLab runners to execute the CI/CD tasks. It should be present in the project’s root folder. It can be used to test if a commit builds correctly, passes some unit tests and if it needs packaging and deployment.
You can
learn more about how to configure it from the official quick start tutorial
here
For the
purpose of testing our installation let’s create a file named .gitlab-ci.yml in
the test_project folder and put the following lines in there.
Make sure you are in the right directory
cd
cd Desktop/test_project
Create the file using the command
Open it with your favorite text editor and type the following lines into it.
build:
  script:
    - powershell -File build.ps1
  tags:
    - test
The last line tells the GitLab server to use the GitLab runner with the tag named “test”. If you gave your GitLab runner installation a different tag, make sure you make the appropriate change to the above lines.
Also,
make sure you use spaces instead of tabs at the beginning of the above lines.
Now add it to the git repository and push it to the Gitlab server
git add .
git commit -m"gitlab yml added"
git push
Now let’s get back to our GitLab server’s URL and see if it worked. Go to the project page and click on CI/CD
You will
be taken to the pipeline page which shows the result of your latest commit.

It will
take a minute or so before it completes the pipeline and as you can see in the
screenshot above, mine took 41 seconds to complete and the status is
“passed”
If you
click on “jobs” under the CI/CD menu, you will be taken to another
page which shows you more information about the execution of our yml file
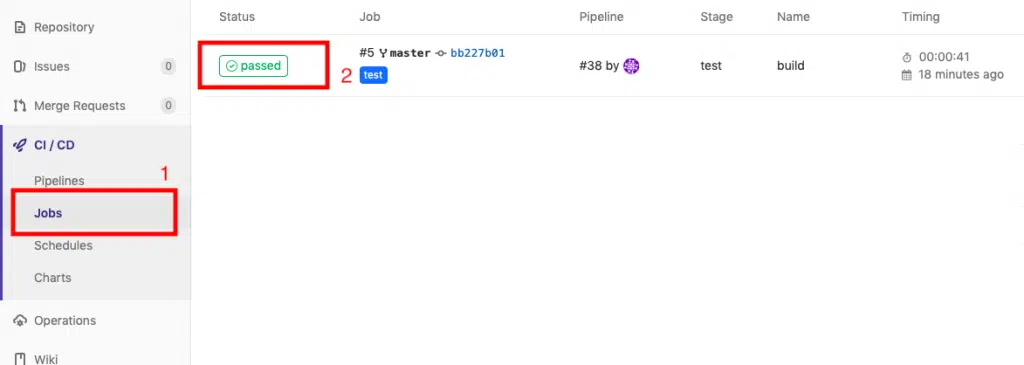
Next click on “passed” as shown in the screenshot above, this will take you to another page which will look something like this.

As you can see, our build.ps1 gets executed by the GitLab runner and it succeeds to compile our project.
And with that, I will conclude this tutorial!
I leave the rest to you to play, explore, experiment and learn GitLab!
I hope you guys enjoyed this article and learned something useful.
You can email us or contact us through this link if you have any questions or suggestions.
If you liked the post, feel free to share this post with your friends and colleagues!