
Last Updated :
04 Apr, 2025
The «Permission denied (public key)» error is a common issue encountered when using Git with GitLab on Windows. This error occurs when GitLab is unable to authenticate your system using SSH (Secure Shell). This usually happens due to a misconfiguration of SSH keys, where either the key is missing, not added to the SSH agent, or not linked to your GitLab account.
In this article, we will walk you through the steps to resolve this issue, ensuring that your SSH keys are properly configured and recognized by GitLab. By the end of this guide, you should be able to fix the «Permission denied (public key)» error and work smoothly with GitLab on your Windows machine.
Prerequisites
Before we begin, ensure you have the following:
- Git Installed
- GitLab Account
- Basic Git Command
Understanding the Error: «Permission denied (public key)»
The error «Permission denied (public key)» occurs when your SSH client (Git) attempts to connect to GitLab but fails to authenticate because GitLab does not recognize your SSH key. This can happen due to:
- The SSH key not being generated or missing.
- The SSH key not being added to the SSH agent.
- The SSH key not being registered with your GitLab account.
- Incorrect file permissions on the SSH keys.
Understanding these potential causes will help you systematically resolve the error.
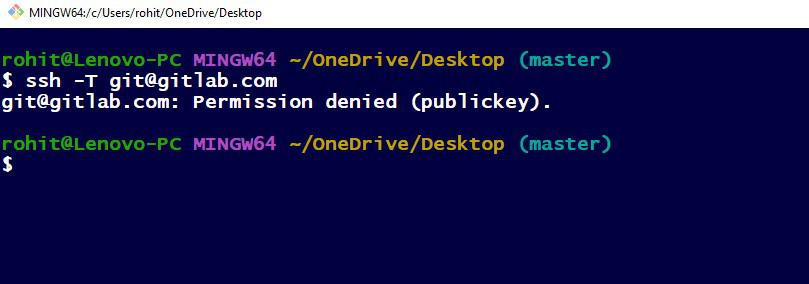
Verifying SSH Connection:
ssh -T git@gitlab.com
If you found this error means that your GitLab Account does not recognizes your SSH key.
Steps To Fix the «Permission denied (public key)» Error
Step 1: Verify SSH Key Pair
Check for Existing SSH Keys: Open Git Bash and execute the following command to check if you already have an SSH key:
ls -al ~/.ssh
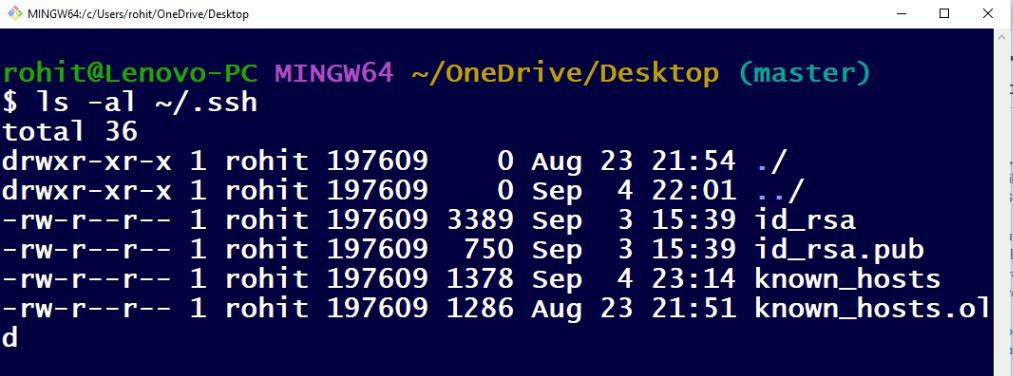
- This will list the contents of your .ssh directory. If you see files like id_rsa and id_rsa.pub, you already have an SSH key pair.
- If you see files named id_rsa.pub and id_rsa, you already have an SSH key. If not, proceed to the next step to generate one.
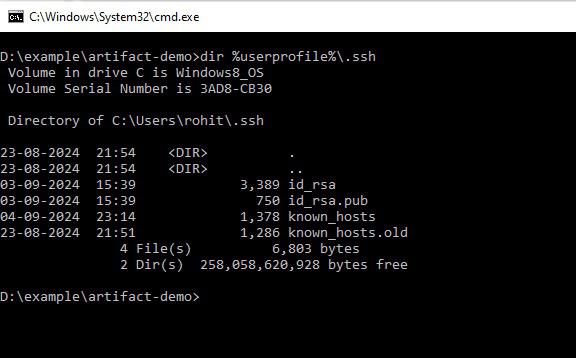
Or Open Command Prompt or PowerShell and run:
dir %userprofile%\.ssh
Generate a New SSH Key (if needed):
- If the .ssh directory does not contain id_rsa or id_rsa.pub, generate a new SSH key pair:
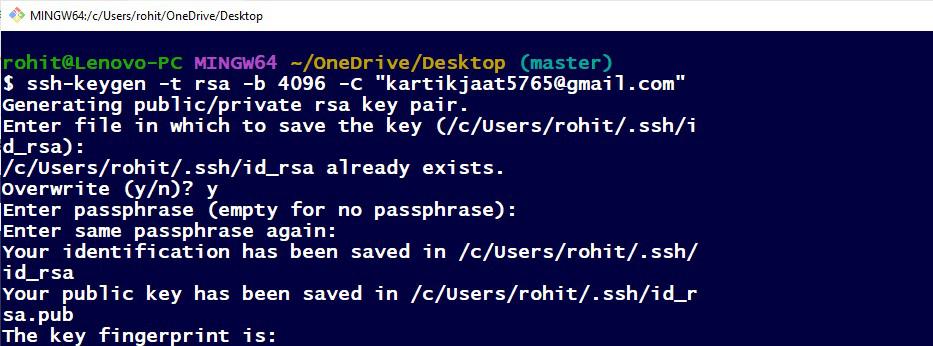
- Open Git Bash, and use the following command to generate a new SSH key:
ssh-keygen -t rsa -b 4096 -C "your_email@example.com"
- Press Enter to accept the default file location (/c/Users/YourName/.ssh/id_rsa).
- Optionally, enter a passphrase for added security.
Step 2: Add the SSH Key to the SSH Agent
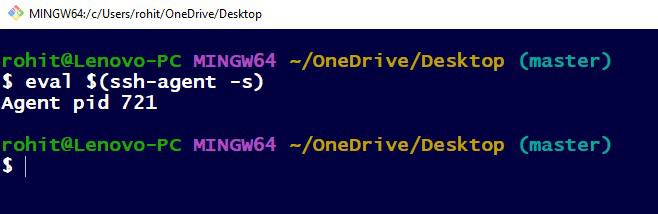
Start the SSH Agent: Run the following command to start the SSH agent:
eval $(ssh-agent -s)
This will start the agent and display a process ID, indicating that it’s running.
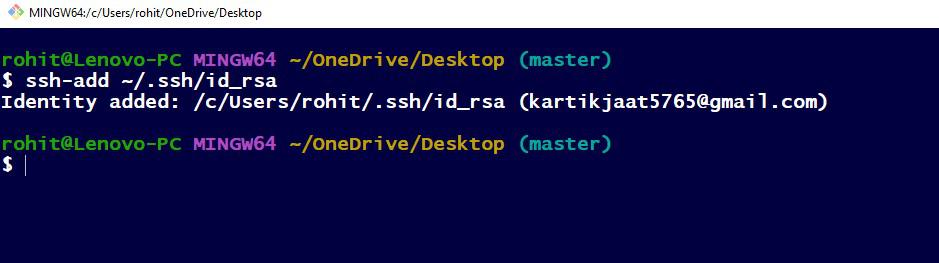
Add Your SSH Key to the Agent:
Now, add your SSH private key to the ssh-agent. In Git Bash, use:
ssh-add ~/.ssh/id_rsa
Step 3: Add SSH Key to GitLab
Copy Your SSH Key to Clipboard: First, copy your SSH public key to the clipboard. In Git Bash, you can use:
clip < ~/.ssh/id_rsa.pub
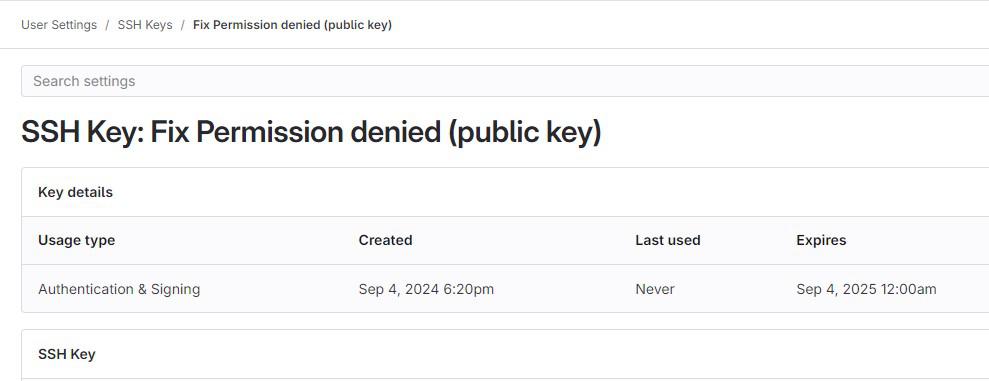
Add SSH Key to GitLab:
- Log in to your GitLab account.
- Navigate to your GitLab account settings
- Click on “SSH Keys” under “User Settings”
- Give it a title (e.g., «Fix Permission denied (public key)») and click Add Key.
You should now be able to push to your GitLab repository without the “Permission denied (publickey)” error.
Step 4: Verify SSH Connection to GitLab
To confirm that your SSH key is correctly set up, test the SSH connection to GitLab:
ssh -T git@gitlab.com
If your setup is correct, you should see a message like:
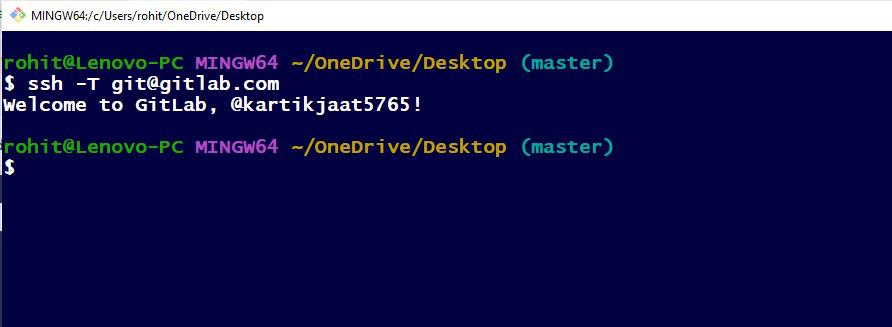
- This above output shows that we have successfully FIX the error Fix Permission denied (public key).
- You should now be able to push to your GitLab repository without the “Permission denied (publickey)” error.
Table of Contents
- Understanding the Git Publickey Error
- Solution 1: Verify SSH Keys Exist
- Solution 2: Add SSH Key to ssh-agent
- Solution 3: Generate a New SSH Key and Add It to the Git Server
- Solution 4: Check SSH Configuration
- Conclusion
Understanding the Git Publickey Error
The ‘Permission denied (publickey)’ error in Git stems from an authentication issue between your local machine and the Git server, specifically related to SSH public key authentication failures. This error can occur when trying to push to or pull from a Git repository without a proper SSH key setup or with incorrect SSH configurations.
Solution 1: Verify SSH Keys Exist
Before proceeding with any advanced troubleshooting, ensure that an SSH key exists on your machine and is added to the ssh-agent.
- Open your terminal.
- Enter
ls -al ~/.sshto list all files in your.sshdirectory. - Look for files named
id_rsa.puborid_ecdsa.pub.
If the key exists, move on to adding it to the ssh-agent. Otherwise, you must generate a new SSH key.
Example:
$ ls -al ~/.ssh
# Lists the files in your .ssh directory

total 16
drwx------   5 username  staff  160 Mar 29 10:00 .
drwxr-xr-x+ 54 username  staff 1728 Mar 29 09:47 ..
-rw-------   1 username  staff 1679 Mar 29 09:57 id_rsa
-rw-r--r--   1 username  staff  403 Mar 29 09:57 id_rsa.pub
If you see id_rsa.pub or another public key file, your SSH key exists.
Notes: Having SSH keys doesn’t guarantee they are added to the Git server or are correctly configured. You must also ensure the public key is correctly set up on the Git server.
Solution 2: Add SSH Key to ssh-agent
If an SSH key exists but still faces the error, you may need to add the key to the ssh-agent, a program that holds private keys used for public key authentication.
- Start the ssh-agent in the background with the command
eval "$(ssh-agent -s)". - Add your SSH private key to the ssh-agent using
ssh-add ~/.ssh/id_rsa.
Example:
$ eval "$(ssh-agent -s)"
Agent pid 59566

$ ssh-add ~/.ssh/id_rsa
Identity added: /Users/username/.ssh/id_rsa ([email protected])
If successful, you should see a message stating your identity was added.
Notes: You can automate this process by adding your SSH key to the ssh-agent and storing your passphrase in the keychain.
Solution 3: Generate a New SSH Key and Add It to the Git Server
If no SSH key is present or you want to create a new one, follow these steps to generate and add it to the Git server.
- Generate a new SSH key using
ssh-keygen -t rsa -b 4096 -C "[email protected]". - When prompted, press Enter to accept the default file location and file name. Optionally, provide a passphrase for extra security.
- Start the ssh-agent using
eval "$(ssh-agent -s)". - Add the new SSH key to your agent with
ssh-add ~/.ssh/id_rsa. - Log in to your Git server and navigate to SSH key settings.
- Copy the contents of your public key file with
pbcopy < ~/.ssh/id_rsa.pub(this command may vary depending on your OS). - Paste your key into the appropriate field on the Git server and save it.
Notes: Consider using a passphrase for additional security on your SSH keys. However, you will need to enter this passphrase whenever you use the key unless you use an ssh-agent.
Solution 4: Check SSH Configuration
Your SSH configuration might not be correctly pointing to your SSH key or may have incorrect settings.
- Open or create the SSH config file with
nano ~/.ssh/config. - Ensure it includes the following:
Host github.com
   HostName github.com
   User git
   IdentityFile ~/.ssh/id_rsa
Replace github.com with your Git server and id_rsa with the name of your private key if different.
Notes: Make sure the SSH configuration matches the host you are trying to connect to, and the User typically should be ‘git’.
Conclusion
Authentication errors with Git via SSH can be frustrating, but troubleshooting them usually involves checking your SSH key setup. By verifying existing keys, ensuring the ssh-agent has them, generating new keys when necessary, and checking your SSH configurations, you can usually resolve ‘Permission denied (publickey)’ errors and get back to work quickly.
import Image from ‘@components/Image.astro’
This tutorial explains about solution for [email protected]: Permission denied (publickey).
Gitlab is a cloud hosting for managing git repositories.
When you are working with source code repositories, You need to clone code, add/change code, and push changes to the gitlab repository.
When you are pushing changes to GitLab using the git push command, It gives the following error.
The error says you don’t have access rights from your machine to the GitLab repository.
You need to create a public key with a password and copy the ssh keys to gitlab dashboard..
Following are steps
- Open the Terminal or command prompt
- Run the below command to generate
On entering the command, It asks for a password and repeats password to set it
Here is an output
It creates C:\Users\user/.ssh/id_ed25519 file and copy the public key into it.
- Next, Go to Gitlab Dashboard
- Click on right icon in the header navigation
- Select Edit Profile
- Select SSH keys,
- Open
C:\Users\user/.ssh/id_ed25519and copy the content - paste into key text area of below SSH KEYS screen
- Click on
Add Keybutton - you added the key with to SSH Keys.
Next time, below command to authenticate the user by entering passphrase
Now you are free to push the changes
The error message «Permission denied (publickey)» in GitLab typically indicates that your SSH key is not correctly set up or recognized, preventing you from accessing your repository.
ssh-keygen -t rsa -b 4096 -C "your_email@example.com" # Generate a new SSH key
ssh-add ~/.ssh/id_rsa # Add your SSH key to the ssh-agent
Understanding the Permission Denied Error
What is the Permission Denied Error?
The «Permission denied (publickey)» error is a common message encountered when trying to connect to GitLab using SSH. This error usually indicates that the SSH key being used for authentication is either not present, not recognized by GitLab, or incorrectly configured. When users see this error, it can hinder collaboration and access to repositories, making it imperative to understand its origins.
Why Public Key Authentication is Important
Public key authentication serves as a secure method of verifying users accessing remote servers. Unlike traditional password authentication, which can be vulnerable to brute-force attacks, public key authentication relies on a cryptographic key pair: a public key shared with the server and a private key kept secure by the user. This method enhances security by making it significantly harder for unauthorized users to gain access to sensitive resources, such as your GitLab repositories.
git Bitbucket Org Permission Denied Publickey Explained
Prerequisites for Using Git with GitLab
Setting Up Git
Before diving into SSH authentication, you need to have Git installed on your machine. It’s essential to ensure that you have the latest version of Git and to configure it with your user details:
git config --global user.name "Your Name"
git config --global user.email "your_email@example.com"
By setting these configurations, you ensure that your commits are attributed correctly to you.
Creating an SSH Key Pair
To authenticate with GitLab via SSH, you must first create an SSH key pair. Follow these steps to generate your keys:
- Open your terminal.
- Run the following command (replace `»your_email@example.com»` with your email address):
ssh-keygen -t rsa -b 4096 -C "your_email@example.com"
This command generates a new SSH key using the RSA algorithm. During the process, you can accept the default file location by pressing Enter. You may also choose to set a passphrase for added security.
The two essential components created are:
- Public Key: This key can be shared and is generally saved in `~/.ssh/id_rsa.pub`.
- Private Key: This key must remain confidential and is stored in `~/.ssh/id_rsa`.
git Clone Permission Denied: Quick Fix Guide
Configuring Your GitLab Account
Adding Your SSH Key to GitLab
Once you have created your SSH keys, the next step is to add the public key to your GitLab account. Here’s how:
- Copy the contents of your public key:
cat ~/.ssh/id_rsa.pub
- Log in to your GitLab account.
- Go to User Settings > SSH Keys.
- Paste your copied public key into the provided field and give it a relevant title for easy identification.
- Click Add key.
With the SSH key set up in GitLab, you’re ready to authenticate your Git operations.
Ensuring Correct SSH Key is Used
It’s essential to ensure that the correct SSH key is used when connecting. You can check your SSH agent to confirm which keys are added. Run the following command:
ssh-add -l
If your key is not listed, you can add it using:
ssh-add ~/.ssh/id_rsa
git Push Permission Denied: Troubleshooting Tips Explained
Diagnosing the Issue
If you encounter the «Permission denied (publickey)» error while interacting with GitLab, first check several common causes. Ensure that:
- Your SSH key has been added to your GitLab account.
- You’re using the correct email associated with the key.
Testing the SSH Connection
To test your SSH connection to GitLab, execute:
ssh -T git@gitlab.com
If everything is configured correctly, you should receive a success message stating that you’ve successfully authenticated.
Examining SSH Configuration
You can check the `~/.ssh/config` file for proper SSH configurations. If it doesn’t exist, you can create one to manage your SSH keys effectively. A straightforward example of the configuration could look like:
Host gitlab.com
    HostName gitlab.com
    User git
    IdentityFile ~/.ssh/id_rsa
This ensures that when you connect to GitLab, it uses the specified SSH key.
Permissions and Ownership Issues
Permissions and ownership of your SSH files are critical to prevent unauthorized access. Check permissions using:
ls -l ~/.ssh
Ensure the private key has the correct permissions:
chmod 600 ~/.ssh/id_rsa
If the file ownership is incorrect, adjust it with:
chown $(whoami) ~/.ssh/id_rsa
Permission Denied Git: Quick Fixes and Tips
Advanced Troubleshooting Techniques
Checking for Multiple SSH Keys
If you have multiple SSH keys, it may lead to confusion about which key is used for which Git service. To clarify, ensure that the correct key is specified in the `~/.ssh/config` file or use `ssh-add` to manage loaded keys effectively.
Debugging SSH Connections
To gain more insight into your SSH connection issues, you can enable verbose mode with:
ssh -vvv git@gitlab.com
The output will provide detailed information on the connection process, helping you pinpoint where the authentication is failing and allowing for more targeted troubleshooting.

Master Git Add and Commit in One Line Effortlessly
Conclusion
In summary, overcoming the git gitlab com permission denied publickey error involves understanding how SSH works, ensuring your keys are correctly set up, and troubleshooting any authentication issues that arise. By following best practices for SSH key management and connection testing, you’ll enable smooth interactions with GitLab, enhancing your collaborative development process.
git Cannot Open .git/fetch_head Permission Denied Explained
Frequently Asked Questions
What if I don’t have an SSH key?
If you’re starting from scratch, follow the steps outlined earlier regarding SSH key generation. Be sure to add this key to GitLab once created.
Can I switch back to password authentication?
Yes, you can switch to HTTPS to authenticate using a username and password. However, using SSH is recommended for its enhanced security.
How do I revoke an old SSH key?
To remove an outdated SSH key, log into your GitLab account, navigate to User Settings > SSH Keys, find the key you wish to revoke, and click Remove.
How to Git Get Commit ID Effortlessly
Additional Resources
Useful Links
- [GitLab Documentation on SSH](https://docs.gitlab.com/ee/ssh/)
- [Tutorials and Courses for Mastering Git Commands](https://www.codecademy.com/learn/learn-git)
Recommended Tools and Software
- Git GUI Clients (e.g., Sourcetree, GitKraken)
- SSH management tools (e.g., PuTTY, OpenSSH)
By understanding these concepts and following the provided steps, you can effectively navigate the pitfalls of SSH authentication with GitLab and enhance your development workflow.