GitLab is a self-hosted alternative to source control websites like GitHub. Like GitHub, it allows teams to collaborate on developing projects using the Git version control system.
Hosting your own GitLab server on Windows Server is easier than it sounds. This guide will show you how to install and set up GitLab. However, ensure you have administrative access to your Windows Server before we begin.
How to install a Linux virtual machine
Running GitLab on Windows Server requires a Linux virtual machine. The reason for this is that the developers of GitLab have no plans to directly support Microsoft Windows. Additionally, GitLab is Linux software, and they do not plan to port it.
There are a few ways to run VMs on Windows Server. In this guide, we’ll be using Hyper-V. Why? Hyper-V has native Windows integration, supports performance and scalability, as well as great compatibility with Windows Server.
To get started, ensure you have Hyper-V installed and configured on your Windows Server. If you do not have Hyper-V configured, do the following. First, open up the Windows Server Manager tool.
When you’ve loaded up the Windows Server Manager app, locate the “add roles and features” option, and click on it. Look for the “Hyper-V” option, and check the box next to it to enable it. You must reboot your Windows Server once you enable Hyper-V to use it.
With Hyper-V up and running, download the latest version of Ubuntu Server from the official website. Once you’ve downloaded the latest version of Ubuntu Server to your Windows Server, launch the Hyper-V Manager app on Windows Server.
Once it is open, right-click on your server in the sidebar. Then, after right-clicking on your server, select “New” in the menu. Finally, inside the “New” menu, locate “Virtual Machine” and click on it to create a new VM.
When you click on the “Virtual Machine” button, a wizard will appear. Read the “Before you Begin” message. Once you’ve finished reading, click the “Next” button to move to the next page.
On the next page, you’ll need to choose your VM’s name. Enter “Ubuntu Server (GitLab).” Then, choose where Hyper-V should save the VM if you wish to store it in a different location than the default settings. When done, click the “Next” button.
After naming your VM, you’ll need to choose what generation of VM Hyper-V will use. Generation 1 supports 32 and 64-bit, but not UEFI. Generation 2 does support UEFI. When you’ve made your choice, click the “Next” button to move to the next page.
After specifying the generation, set your VM’s memory allocation. Ideally, Ubuntu Server should have at least 4 GB of available RAM to function best. Click the “Next” button when done.
With the memory configured, networking must be set up. Connect the new VM to your Hyper-V virtual switch. Then, click the “Next” button to continue.
You must now install Ubuntu Server in the VM. To do this, select “Install an operating system from a bootable CD/DVD-ROM” and choose the Ubuntu Server ISO file. After loading up the Ubuntu Server ISO, click “Finish”.
Upon clicking the “Finish” button, you’ll need to go through the process of installing the Ubuntu Server to the VM. Once Ubuntu is installed, reboot it to use Ubuntu Server in Hyper-V.
How to deploy GitLab in the Ubuntu VM on Windows Server
Deploying GitLab on the Ubuntu VM is a pretty involved process with a lot of steps. As a result, we have a dedicated article on how you can deploy GitLab on Ubuntu Server. These instructions are perfect for Ubuntu virtual machines, as well as Ubuntu containers, and bare-metal deployments of Ubuntu.
Once you’ve installed GitLab in your Ubuntu VM, all users will be able to interact with your self-hosted Git repo for programming collaborations and source control. There are many ways to interact with the repo, including the GitKraken tool, TortiseGit, GitHub Desktop, GitExtensions, and SourceTree.
Accessing GitLab via the web
Source control applications are great as they simplify the use of Git, and can be a great asset when interacting with your GitLab instance on Windows Server. However, you can also interact with GitLab directly with the website.
To access your GitLab instance, simply point your favorite browser to the GitLab URL and log in. For more information on accessing GitLab hosted on your Ubuntu VM in Windows Server, view our Gitlab installation guide.

Last Updated :
16 Sep, 2024
GitLab is a popular DevOps platform that provides a robust solution for source code management, continuous integration/continuous deployment (CI/CD), and other development workflows. While GitLab is typically hosted on Linux servers, it can also be installed on Windows using a virtual machine or Docker.
In this article, we will walk you through the steps to install GitLab on Windows using Docker, which provides a manageable and efficient way to run GitLab without needing to configure a full Linux environment.
Prerequisites
Before installing GitLab on Windows, ensure you have the following prerequisites:
- Windows 10 Pro, Enterprise, or Education: Required for Docker Desktop.
- Docker Desktop: A platform that allows you to run Docker containers on Windows.
- Sufficient System Resources: At least 4 CPU cores and 4GB of RAM for GitLab to run smoothly. Higher specifications are recommended for production environments.
Installing Docker on Windows
To run GitLab on Windows, you’ll need to install Docker Desktop, which enables running containers on Windows systems.
Step 1: Download Docker Desktop
Go to the Docker Desktop website and download the installer for Windows.
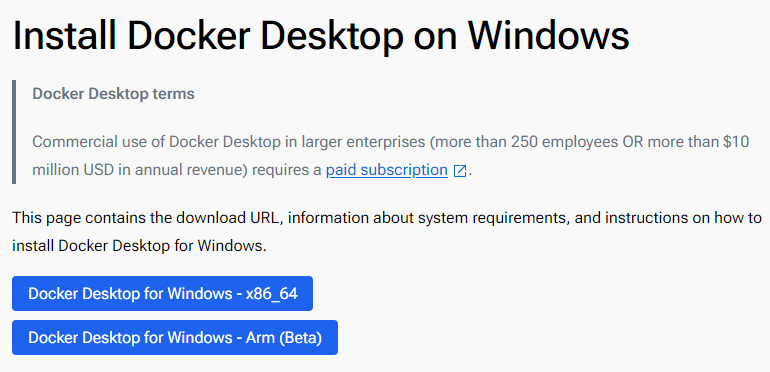
Step 2: Install Docker Desktop
- Run the installer and follow the on-screen instructions.
- When prompted, enable the option for Windows Subsystem for Linux (WSL 2) for better performance.
Step 3: Start Docker Desktop
- Once installed, launch Docker Desktop and ensure it is running. You should see the Docker icon in the system tray.
Step 4: Verify Docker Installation
Open Command Prompt or PowerShell and type:
docker --version
You should see the version of Docker installed, confirming that Docker is set up correctly.
Downloading and Running GitLab Using Docker
With Docker installed, you can now download and run GitLab using Docker containers.
Step 1: Pull the GitLab Docker Image
Open PowerShell or Command Prompt and pull the GitLab image from Docker Hub:
docker pull gitlab/gitlab-ee:latest
This command pulls the latest version of GitLab Enterprise Edition. If you prefer the Community Edition, use gitlab/gitlab-ce:latest.
Step 2: Run GitLab in a Docker Container
Create a new directory on your Windows system to store GitLab configuration and data. This ensures data persists even if the container is removed:
mkdir C:\gitlab\data
mkdir C:\gitlab\logs
mkdir C:\gitlab\config
Step 3: Start the GitLab container:
docker run --detach `
  --hostname gitlab.local `
  --publish 443:443 --publish 80:80 --publish 22:22 `
  --name gitlab `
  --restart always `
  --volume C:\gitlab\config:/etc/gitlab `
  --volume C:\gitlab\logs:/var/log/gitlab `
  --volume C:\gitlab\data:/var/opt/gitlab `
  gitlab/gitlab-ee:latest
Options:
- —hostname: Sets the hostname for GitLab (e.g., gitlab.local).
- —publish: Maps ports from the container to the host (HTTP, HTTPS, and SSH).
- —name: Names the container gitlab.
- —restart always: Ensures GitLab restarts automatically if the container stops or the host reboots.
- —volume: Maps local directories to container directories for persistent storage.
Step 3: Wait for GitLab to Initialize:
It may take several minutes for GitLab to initialize. You can monitor the process using:
docker logs -f gitlab
Wait until you see the message indicating that GitLab is ready.
Configuring GitLab
After GitLab starts, you can configure it through the GitLab interface:
Step 1: Access GitLab
- Open a web browser and navigate to http://localhost.
- You should see the GitLab login screen.
Step 2: Set Up the Root Password
The first time you access GitLab, you’ll be prompted to set the root password. Enter a secure password and save it.
Step 3: Log In:
Log in using the username root and the password you just set.
Step 4: Configure GitLab Settings
Navigate to the Admin area to configure GitLab settings, such as email notifications, user management, and project settings.
Accessing GitLab
To access GitLab, simply navigate to the hostname you set during the Docker run command (e.g., http://localhost if using the default setup). If you mapped the ports differently or used a different hostname, adjust the URL accordingly.
Setting Up GitLab Runner (Optional)
GitLab Runner is a tool used for running CI/CD jobs on your GitLab instance. Installing GitLab Runner on Windows allows you to leverage GitLab’s powerful CI/CD pipelines.
Step 1: Download GitLab Runner
Visit the GitLab Runner downloads page and download the binary for Windows.
Step 2: Install GitLab Runner:
- Extract the binary to a directory, for example, C:\GitLab-Runner.
- Open Command Prompt as Administrator and register the runner:
C:\GitLab-Runner\gitlab-runner.exe register
- Follow the prompts to configure the runner with your GitLab instance, including:
- GitLab URL.
- Registration token (found in GitLab’s Admin area under Runners).
- Runner description, tags, and executor type (use shell for simplicity on Windows).
Step 3: Start the Runner
Install and start GitLab Runner as a service:
C:\GitLab-Runner\gitlab-runner.exe install
C:\GitLab-Runner\gitlab-runner.exe start
This article provides a step-by-step guide on how to configure GitLab in Windows. It covers the installation process, setting up the GitLab server, working with GitLab repositories, integrating GitLab with CI/CD, and securing GitLab. By following this guide, you will be able to effectively use GitLab for version control and collaboration in your Windows environment.
Key Takeaways
- Install GitLab on Windows by following the provided steps.
- Create a new project, manage users and permissions, and configure webhooks in GitLab.
- Learn how to clone a repository, push and pull changes, and perform branching and merging in GitLab.
- Configure CI/CD pipelines, run tests and deployments, and monitor and log activities in GitLab.
- Implement security measures such as enabling two-factor authentication, setting up SSL/TLS, and implementing access controls in GitLab.
Installing GitLab on Windows

Prerequisites
Before you can configure GitLab, there are a few things you need to have in place. First, make sure you have all the necessary requirements to use this module. For more details, check out the Requirements section. Once you have everything set up, follow these steps to create a configuration source provider from GitLab:
- Open the navigation menu and click on Developer Services.
- Under Resource Manager, click on Configuration Source Providers.
- On the Configuration source providers page, select a compartment.
- Click on Create configuration source provider.
- In the Create configuration source provider panel, enter a name and optional description for the configuration source provider. Avoid entering confidential information.
- Select the compartment where you want to create the configuration source provider.
That’s it! Once you have completed these steps, you will be ready to move on to the next section and start configuring GitLab.
Downloading GitLab
To download GitLab, follow these steps:
- Go to the GitLab website.
- Click on the ‘Download’ button.
- Select the appropriate version for your operating system.
- Choose the installation method that suits your needs.
- Follow the on-screen instructions to complete the installation.
Once GitLab is downloaded and installed, you can start configuring it to meet your requirements.
Configuring GitLab
To configure GitLab, follow these steps:
- Open the GitLab settings page.
- Navigate to the ‘Server URL’ section and enter the service endpoint. Examples include:
- GitLab.com product: https://gitlab.com/
- GitLab installation (relative URL): https://example.com/gitlab
- GitLab installation (subdomain): https://gitlab.example.com/
- Provide the personal access token (PAT) in the designated field.
- (Optional) Click ‘Show advanced options’ to assign tags to the configuration source provider. You can add a defined tag by selecting an existing namespace or add a free-form tag by leaving the value blank.
Remember to save your changes after configuring GitLab.
Setting up GitLab Server

Creating a New Project
To create a new project in GitLab, follow these steps:
- Open GitLab and click on ‘Create a project’ to start the project creation process.
- Select the ‘Blank Project’ option and provide a name and slug for your project.
- For better security, it is recommended to set the visibility level of the repository to private.
- Once you have configured the project settings, click on ‘Create project’ to proceed.
If you are importing an existing project, you can also associate it with a Git repository. Simply go to ‘VCS’ and select ‘Create Git Repository’. Specify the directory where the repository will be created and follow the prompts.
Remember to regularly commit and push your changes to ensure continuous delivery of your project.
Managing Users and Permissions
To manage users and permissions in GitLab, you must have the Owner role for the project. This role gives you full control over the project and its settings. To access the project settings, go to the left sidebar and select Search or find your project. Then, navigate to Settings > General. In the Visibility, project features, permissions section, you can enable or disable various features by toggling the corresponding options. Make sure to save your changes.
It is important to note that GitLab Premium offers additional features and capabilities for managing users and permissions. With GitLab Premium, you can take advantage of advanced access controls, group-level permissions, and more. If you’re looking for enhanced user management capabilities, consider upgrading to GitLab Premium.
For more information on managing users and permissions in GitLab, refer to the GitLab documentation or reach out to the GitLab support team for assistance.
Configuring Webhooks
To configure webhooks in GitLab, follow these steps:
- Go to the project’s settings in GitLab.
- Navigate to the ‘Webhooks’ section.
- Click on ‘Add webhook’ to create a new webhook.
- Enter the webhook URL and choose the events you want to trigger the webhook.
- Optionally, you can add a secret token for added security.
- Save the webhook configuration.
Once the webhook is set up, GitLab will send HTTP POST requests to the specified URL whenever the selected events occur. This allows you to integrate GitLab with other tools and services for automated actions and notifications.
Working with GitLab Repositories

Cloning a Repository
When cloning a repository, you have a few options depending on your specific situation. If you have already logged in to the selected hosting service, completion will suggest the list of available repositories that you can clone. Simply click on the Clone button to initiate the cloning process. If you want to create a project based on the sources you have cloned, click Yes in the confirmation dialog. Git root mapping will be automatically set to the project root directory. If your project contains submodules, they will also be cloned and automatically registered as project roots.
Pushing and Pulling Changes
When you are ready to push your commits, you can do so by selecting Git | Push from the main menu or pressing Control+Shift+K. If you haven’t added any remotes yet, you can click the Define remote link to add a remote. In the dialog that opens, specify the remote name and the URL where it will be hosted, and click OK. Once you have added a remote, you can push your commits by selecting Git | Push from the main menu or pressing Control+Shift+K. GitLab provides a direct link to create a merge request in response to the git push. Simply copy the link and paste it in your browser to create the merge request.
Branching and Merging
To create a merge request in GitLab, there are several methods you can use. Here are a few options:
-
From the merge request list: Go to your project and select Code > Merge requests. Click on New merge request in the upper-right corner. Choose the source and target branches, then click on Compare branches and continue. Fill out the required fields on the New merge request page and click on Create merge request.
-
When adding, editing, or uploading a file: If you’re making changes to a file in the repository, you can create a merge request directly from there. After making your changes, enter a commit message and select the target branch or create a new branch. Make sure to check the ‘Start a new merge request with these changes’ checkbox. Click on Commit changes to create the merge request.
-
When creating a new branch: If you’re creating a new branch, you can also create a merge request at the same time. Go to your project and select Code > Branches. Enter a branch name and click on New branch. On the right side, click on ‘Create merge request’ to open the merge request page. Fill out the necessary details and click on Create merge request.
Remember to provide a clear and concise description of the changes you’re proposing in the merge request. This will help reviewers understand the purpose and impact of your changes.
Integrating GitLab with CI/CD

Configuring CI/CD Pipelines
In GitLab, CI/CD Pipelines are a powerful tool for automating the build, test, and deployment processes of your software projects. With CI/CD Pipelines, you can ensure that your code is continuously integrated, tested, and delivered to production with ease. Here are some key points to keep in mind when configuring CI/CD Pipelines in GitLab:
- Use components to create modular and reusable pipeline configurations. Components can be listed in the CI/CD Catalog and released with specific versions, allowing for better organization and versioning of your pipeline configurations.
- Tag pipelines can be used to test components before running the release job. By configuring the tag pipeline, you can ensure that your components are thoroughly tested before being released.
- Take advantage of GitLab’s extensive documentation and resources to learn more about CI/CD Pipelines and how to configure them effectively. GitLab provides a wealth of resources, including videos, ebooks, and webcasts, to help you get started and optimize your CI/CD workflows.
Implementing CI/CD Pipelines in GitLab can greatly streamline your software development process and improve the quality and reliability of your code. By automating the build, test, and deployment processes, you can ensure that your software is always ready for production.
Running Tests and Deployments
In this section, we will cover the process of running tests and deployments in GitLab. Running tests and deployments is a crucial step in ensuring the quality and reliability of your code. It allows you to test your code changes and deploy them to your live environment.
To run tests and deployments in GitLab, follow these steps:
- Configure your CI/CD pipelines to include the necessary tests for your project.
- Once your pipelines are set up, GitLab will automatically run the tests whenever a new commit is pushed to the relevant branch.
- Monitor the test results in the CI/CD pipelines dashboard.
- If the tests pass, you can proceed with the deployment process.
- Configure your deployment settings in GitLab to specify the target environment and any additional configurations.
- GitLab will automatically deploy the code changes to your live environment based on your configuration.
Remember to regularly monitor the test results and ensure that your deployments are successful. This will help you catch any issues early and maintain the stability of your application.
Monitoring and Logging
Monitoring and logging are crucial aspects of managing a GitLab server. They provide valuable insights into the performance and security of your system. Separate machines should be dedicated to monitoring and logging to ensure accurate and reliable data. Here are some key points to consider:
- Implement a table for presenting structured, quantitative data. Ensure it’s succinct and formatted correctly in Markdown.
- Use a bulleted or numbered list for less structured content, like steps, qualitative points, or a series of related items.
Additionally, it’s important to regularly review the monitoring and logging data to identify any issues or anomalies. This can help in troubleshooting server errors, debugging performance problems, and ensuring the overall health of your GitLab environment.
Tip: Make sure to configure alerts and notifications based on specific metrics or events to proactively address any potential issues.
By following these best practices, you can effectively monitor and log activities in your GitLab server.
Securing GitLab

Enabling Two-Factor Authentication
To enable two-factor authentication for your GitLab account, follow these steps:
- Go to your GitLab account settings.
- Select the ‘Security’ tab.
- Under the ‘Two-Factor Authentication’ section, click on the ‘Enable’ button.
- Follow the prompts to set up two-factor authentication using an authentication app on your mobile device.
- Once set up, you will be required to enter a verification code from your authentication app every time you log in to GitLab.
By enabling two-factor authentication, you add an extra layer of security to your GitLab account, protecting it from unauthorized access even if your password is compromised.
Setting up SSL/TLS
To set up SSL/TLS for your GitLab server, follow these steps:
- Get the certificate information for your private Git server.
- Install the OpenSSL command line application.
- Get the certificate chain.
- Get the server certificate.
To get the certificate information, you can select the certificate in the Certificates service when creating the configuration source provider. For Linux, run the command sudo yum install openssl. For MacOS, run brew install openssl. For Windows, download the openssl binary from Win32/Win64 OpenSSL and configure the environment. To get the certificate chain, run the command openssl s_client -connect $SERVERNAME:$PORT -servername $SERVERNAME -showcerts 2>&1 < /dev/null | sed -n '/-----BEGIN/,/-----END/p' > certChain.pem. Finally, to get the server certificate, run the command openssl s_client -connect $SERVERNAME:$PORT -servername $SERVERNAME -showcerts 2>&1 < /dev/null | sed -n '/-----BEGIN/,/-----END/p' > serverCert.pem.
Implementing Access Controls
To implement access controls for your project, you must have the Owner role. On the left sidebar, select Search or go to and find your project. Select Settings > General. Expand Visibility, project features, permissions. From the Project visibility dropdown list, select an option. The visibility setting for a project must be at least as restrictive as the visibility of its parent group. Select Save changes.
You can also change the visibility of individual features in a project. Prerequisites: You must have the Owner role for the project. On the left sidebar, select Search or go to and find your project. Select Settings > General. Expand Visibility, project features, permissions. To enable or disable a feature, turn on or turn off the feature toggle. Select Save changes.
Additionally, you have the ability to change the visibility of all groups. On the left sidebar, select Search or go to and find your group. Select Settings > General. Expand Naming, visibility. For Visibility level, select an option. The visibility setting for a project must be at least as restrictive as the visibility of its parent group. Select Save changes.
Administrators can also restrict the use of public or internal projects. This setting helps prevent users from publicly exposing their projects. Public projects and groups have certain access permissions for unauthenticated users, including users with the Guest role. Public groups can have public, internal, or private subgroups.
Remember, to implement access controls, you must have the Owner role for the project or group. Make sure to save your changes and consider the visibility settings of your parent group.
Securing GitLab is crucial for maintaining the security of your codebase. With the increasing number of cyber threats, it is important to implement robust security measures to protect your GitLab instance. At Home Page – DevSecOps, we specialize in providing comprehensive security solutions for GitLab. Our team of experts can help you secure your GitLab environment by implementing best practices, conducting security audits, and providing ongoing support. Don’t wait until it’s too late, take action now and ensure the security of your GitLab instance. Contact us today to learn more about our services and how we can help you secure your GitLab environment.
Conclusion
Configuring GitLab on Windows is a straightforward process that allows you to take advantage of powerful version control and collaboration features. By following the steps outlined in this article, you can easily install GitLab, set up a GitLab server, work with repositories, integrate with CI/CD, and secure your GitLab environment. Whether you’re a developer, project manager, or system administrator, GitLab provides a robust platform for managing your code and streamlining your development workflow. So, get started with GitLab on Windows and unlock the full potential of your software projects!
Frequently Asked Questions
What are the prerequisites for installing GitLab on Windows?
The prerequisites for installing GitLab on Windows include a compatible version of Windows, a supported version of Git, and a server with sufficient resources.
How do I download GitLab on Windows?
To download GitLab on Windows, you can visit the official GitLab website and download the installer for Windows. Follow the installation instructions to complete the installation process.
What are the steps to configure GitLab on Windows?
The steps to configure GitLab on Windows include setting up the server, creating a new project, managing users and permissions, and configuring webhooks.
How do I clone a repository in GitLab?
To clone a repository in GitLab, you can use the ‘git clone’ command followed by the repository URL. This will create a local copy of the repository on your machine.
How do I push and pull changes in GitLab?
To push changes to GitLab, you can use the ‘git push’ command. To pull changes from GitLab, you can use the ‘git pull’ command. Make sure you are in the correct branch before executing these commands.
How do I create a new project in GitLab?
To create a new project in GitLab, you can navigate to the GitLab interface and click on the ‘New Project’ button. Follow the prompts to set up the project and configure its settings.
How do I configure the GitLab CI/CD pipeline?
To configure the GitLab CI/CD pipeline, you can create a ‘.gitlab-ci.yml’ file in your project repository and define the stages, jobs, and scripts for your pipeline. GitLab will automatically run the pipeline based on the configuration.
How do I enable two-factor authentication in GitLab?
To enable two-factor authentication in GitLab, you can navigate to your account settings and enable the option for two-factor authentication. Follow the prompts to set up and verify your authentication method.
In the last article, we saw the various parts of GitLab, its architecture and how GitLab works. If you haven’t already, I suggest reading the previous article first before reading this one. Here is the link
GitLab, A Complete Beginner’s Guide!
In this article lets look at how to set it up locally on your Windows PC, so that you can have your very own GitLab setup running right at your home or organization!
If you are using Mac or Linux, you can follow the links below.
Complete Guide To Setting Up GitLab Locally On Mac.
Complete Guide To Setting Up GitLab Locally On Linux PC..!!
So let’s begin!
Things you will need
All you need are a computer running Windows OS with enough resources (CPU, memory, and disk space) for running the GitLab Server and GitLab Runner. How much resources is enough depends on how much performance you need, the more you have the better it is!
You can also set it up on the cloud over at Gitlab.com, but
- the free plans have some limitations in terms of processing power and hard disk space.
- Also doing it locally gives you more control over the setup and
- it will also be an opportunity to learn you more about GitLab
Hence I suggest taking this route of a local installation.
If you are part of a larger organization, and you wish to install it on the cloud, then you can always take a look at the paid plans of GitLab here link
Approach to install GitLab on Windows
Okay, let’s get back to the task in hand.
As we saw in the previous article GitLab consists of 2 parts.
- GitLab Server and
- GitLab Runner
Also, we have learned in the previous article that it is preferable to set the GitLab server and runners on separate computers. But I am going for a home set up, so I will be setting them both upon the same Windows computer.
The GitLab Server relies heavily on Linux technologies and hence it cannot be installed in our Windows PC natively. If you do some research, there are ways you can do it through the Linux subsystem in windows, but we are not going to take that approach.
The
problem with these workarounds are
- The installation process is a bit complicated and is not recommended for beginners.
- They are only guaranteed to work on a version to version basis. What I mean by that is you need to have a particular version of Windows and a particular version of GitLab for everything to run smoothly. If you update your Windows or if you wish to upgrade your GitLab then you might break your GtiLab set up. Since both Windows and GitLab updates come frequently, it is not such a good idea to waste time trying to fix things every few months.
- It is unofficial and hence support for future versions cannot be guaranteed.
- These unofficial methods will bring their own limitations as opposed to running natively on Linux
Due to these above reasons, we are going to go for a more stable approach of installing the GitLab server in a virtual environment. We will also see in this article the ways to make it run as smoothly and efficiently as possible while making sure it consumes as few resources as possible.
So this
is what we are going to do
- Install the GitLab Server on a Virtual Box running Ubuntu server
- Install GitLab runner natively on Windows.
This approach takes away the cons of using unofficial hacks, as it will work on all versions of you Windows and GitLab and you don’t need to worry too much while updating your software either!
By following the step by step guide shown below you should be able to set everything up and running in an hour or 2 (depending upon how good your internet connection is, it can take longer!)
GitLab Installation Process
STEP#1: Download and install VirtualBox
You can download and install VirtualBox from this link

Just click on the Windows hosts and the download should start automatically. The installation process is pretty straightforward, you can just accept the default options and click through to complete the process.
Once the installation is completed you can open VirtualBox from the Start menu in Windows.
STEP#2: Install Ubuntu Server as a Virtual Machine in your Windows PC.
The next step is to get a Linux distro to install our GitLab server. For this purpose, I recommend Ubuntu Server. I chose this particular distro for 2 reasons.
- Ubuntu is known for its stability.
- GitLab Server software has support for Ubuntu
- The server edition is chosen so that it will consume fewer resources on your computer.
For this first, you need the Ubuntu Server image. You can download it from this link.
Ubuntu usually offers 2 sets of packages for us to choose from.
- Long term support version: Has a support period of 5 years
- Latest Version: has all the latest features.
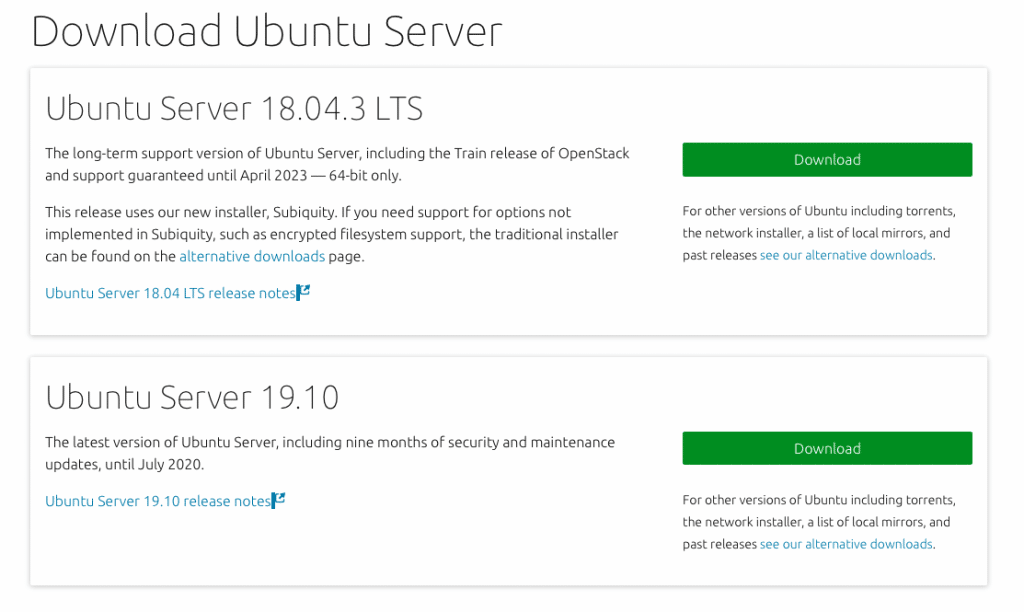
I suggest you go for the LTS one, but then the latest version should also work just fine. So click on a “Download” button and your download should start automatically. It will take some time to complete as the iso is around 900MB.
Once the download is complete you can proceed to the installation process on VirtualBox.
STEP#3: Install Ubuntu Server on VirtualBox
Open VirtualBox Application and click on the “New” button
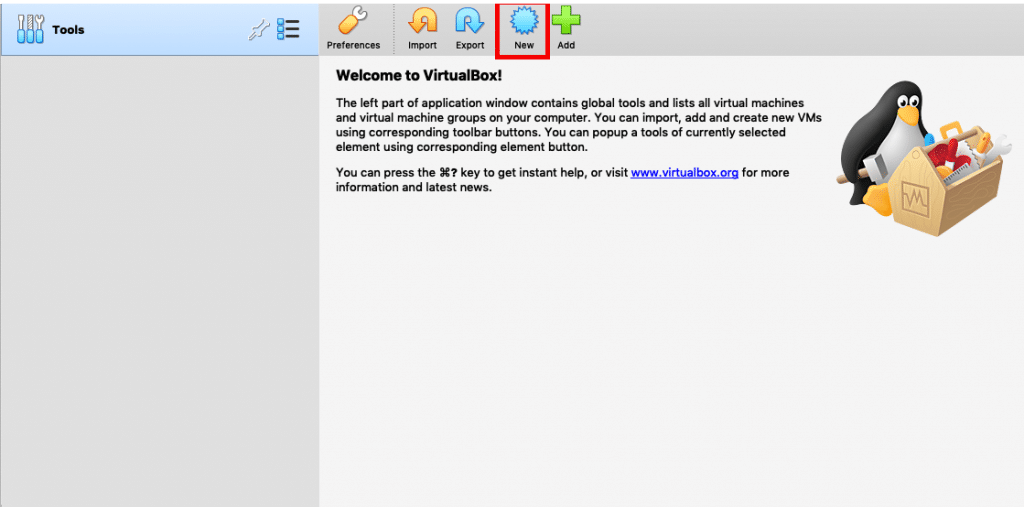
A window like this should pop up

Give your virtual machine a name and choose Linux for type and ubuntu 64 bit for version and click “Continue”.
The next screen usually asks for RAM. GitLab recommends 8GB for a GitLab system with 100 users, I suggest a minimum of 2GB RAM for a home set up, you can give more if you can, just make sure you don’t allot more than 50% of your total available RAM.

Once you have allocated RAM space, Click “Continue” to the next page.

Next, you will be prompted for hard disk. Make sure “Create a virtual hard disk now” is selected and click “Create”

Accept
the default “VDI (VirtualBox Disk Image)” and click
“Continue”

Accept “Dynamically Allocated” and Press continue. This option allocates hard disk space to the virtual machine on the run, so that as you use the more space, more will be allocated.

I suggest you allocate at least 25GB of space to the virtual machine, you can allot more if you can. Once you have chosen the disk space click create
Once you have done this, you should be taken back to the main window of VirtualBox and you should see the virtual machine you just created on the left pane of the window as shown in the screenshot below.
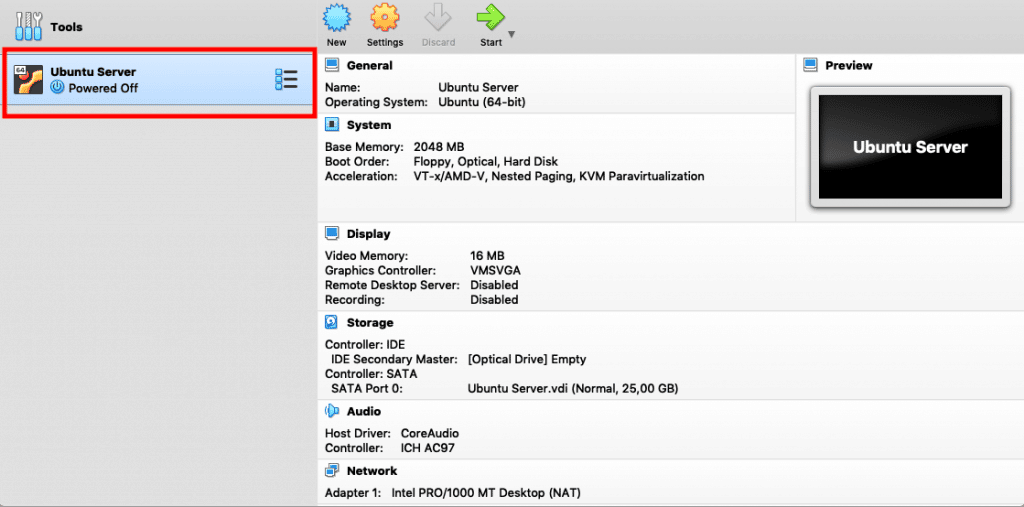
Next click on the “Settings”
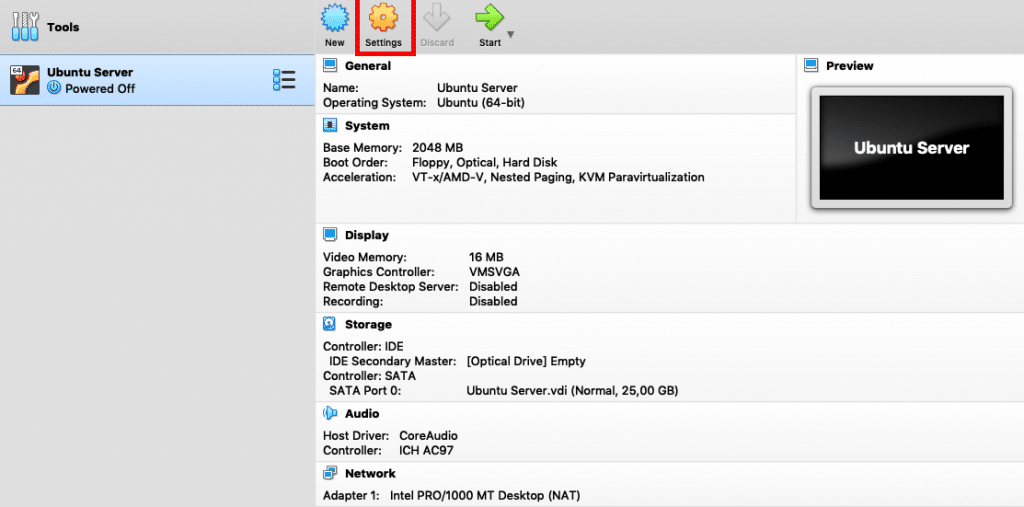
And click on storage -> empty -> disk icon -> “Choose a disk file”

Select the ubuntu server iso image you have just downloaded and press ok. This is equivalent to inserting the Ubuntu disk in a real machine.

Next, go to settings->Network and choose “Bridged Adapter” in the “Attached to:” drop-down menu and press “OK”
I have explained the reason behind using these network settings in detail in this article, you can go ahead and read that if you are into computer networks.
The short explanation is, we will not be able to access the GitLab server from our other machines on the network unless we choose this option.
That’s it, the configuration is done!
You can now go ahead and click the start button!
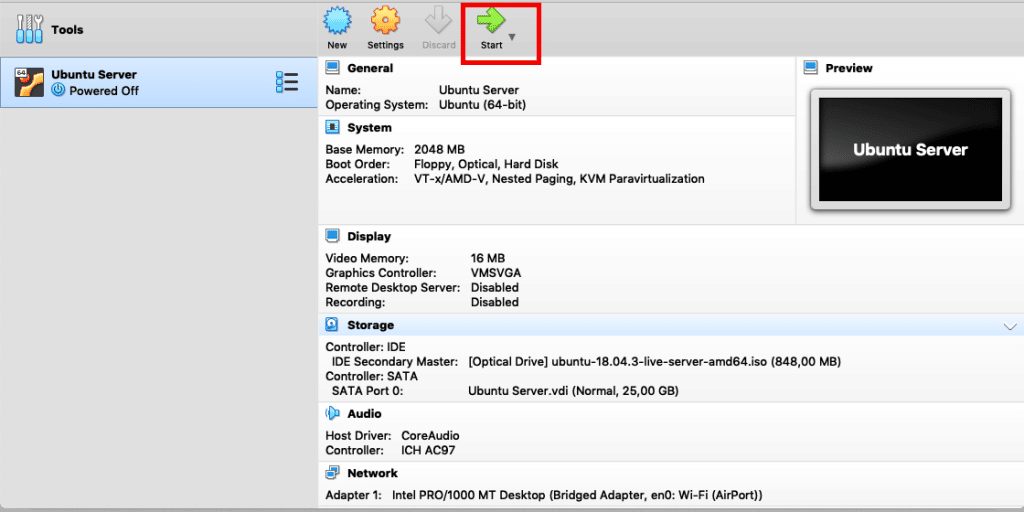
Now the installation process will start. Since we have chosen to go with “Ubuntu server” in order to minimize the resource consumption (so that GitLab can take up as many resources as it needs) we don’t get a fancy Graphical UI, like in the desktop version of Ubuntu. You need to navigate the menus during installation only using Keyboard (tab, enter and arrow keys) since the Ubuntu server doesn’t come with mouse support. So go through the process and get it done.
STEP#4: Get the IP address of your ubuntu server
Okay now
once you got the Ubuntu server up and running, you need to find its IP address
and make a note of it.
To do that, use the “ifconfig” command on your Ubuntu server’s terminal

STEP#5: Download and install GitLab server
To download GitLab server, go to the official link on the Gitlab’s Website
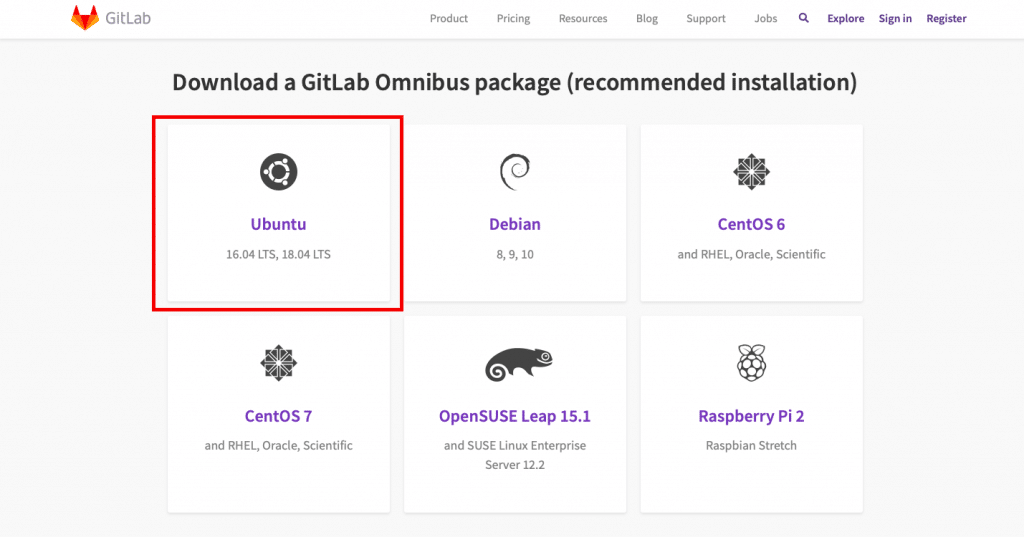
As you can see GitLab official supports several Linux distros, even a Raspberry Pi 2’s Raspbian! We are interested in Ubuntu, so click on the Omnibus Ubuntu Link on as shown in the screenshot above.
Once you click on Ubuntu, the commands you need to enter to install GitLab server will be shown to you.
I am not showing each instruction here since GitLab updates the information presented on their website all the time and that can make this section of the article outdated. Just follow the step by step instructions given in the link to install the GitLab Server on your VM.
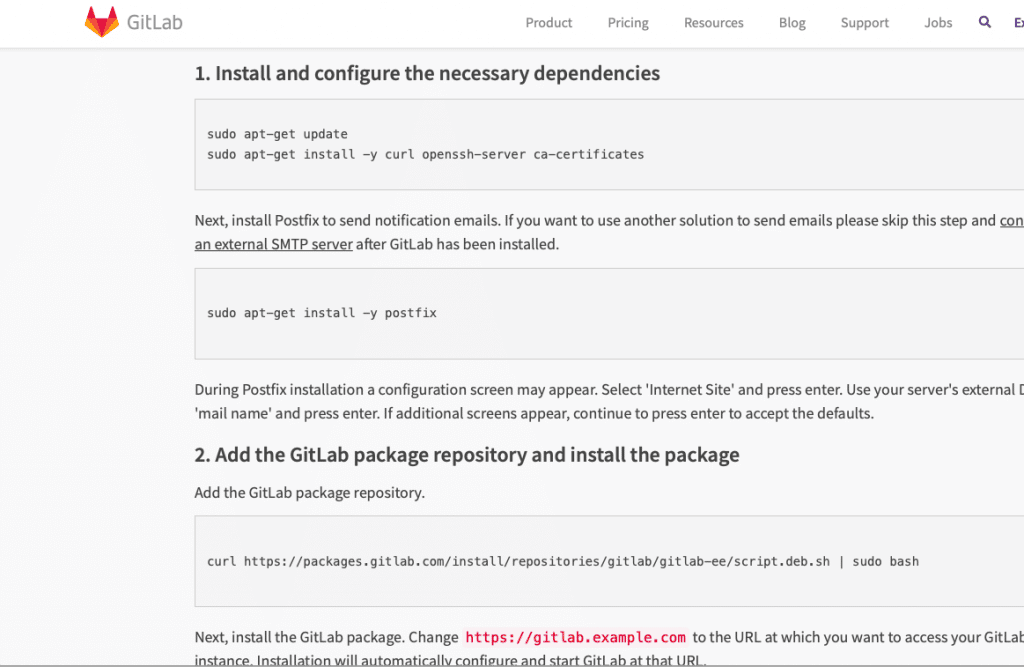
Just type in the commands shown there on you Ubuntu server’s terminal one by one to get GitLab Server installed.
A couple of tips on the GitLab installation instructions
Tip#1
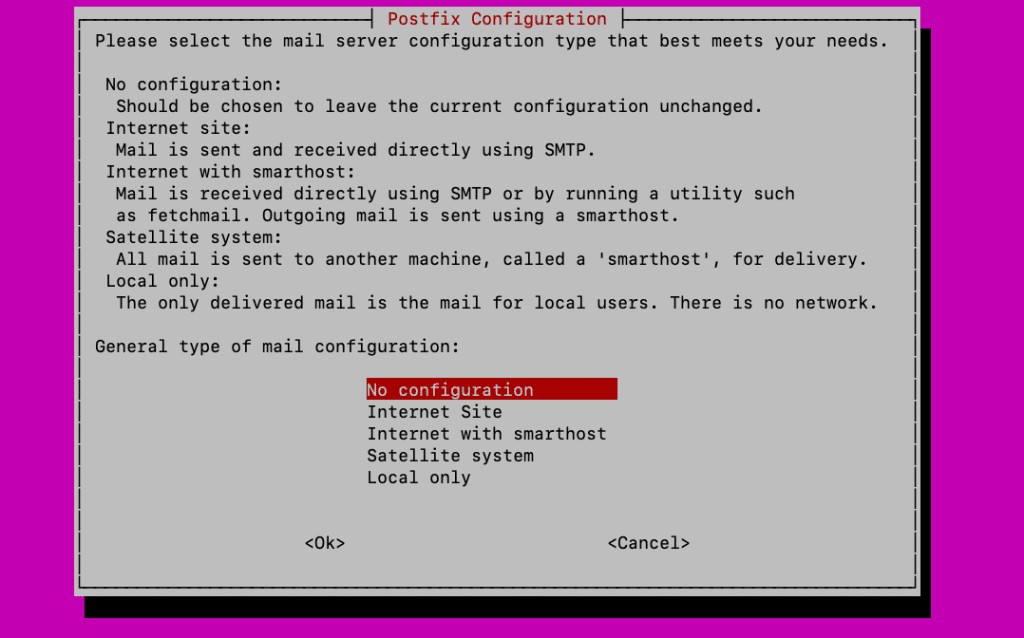
In the postfix installation step (step 1 last command on the GitLab website)
sudo apt-get install -y postfix
you can skip the mail option by choosing the “no configuration” option as shown in the screenshot below.
Tip#2
In the last command of step 2 at GitLab website
sudo EXTERNAL_URL="https://gitlab.example.com" apt-get install gitlab-ee
Make sure you replace the URL with the IP address of the VM that we have made a note of in Step 5 above like this
sudo EXTERNAL_URL="192.168.0.116" apt-get install gitlab-ee
Or to be more precise just place the VM’s IP address that we obtained in Step#4 in its appropriate place
sudo EXTERNAL_URL=”<Your VM’s IP address>” apt-get install gitlab-ee
This step will take a while, so be patient. In my machine it took 4 minutes 48 seconds as shown in the screenshot below, yours can vary depending on the processing power it has.
Once done it will show u something like in the screenshot below.

Once it’s done, you can go ahead to your favorite browser and type in the IP address of your VM and check if the installation has succeeded.

And voila! GitLab server installation has succeeded!
Go ahead and follow the onscreen instructions to set up your password, accounts and everything else!
STEP#6: Download GitLab runners
Before installing GitLab runners you need to install Git on your Windows PC. You can download the latest version of Git in this link.
Now that we have set up the Gitlab server and Git, the next step is to set up the GitLab runner!
At the time of writing this article, the installation process goes like this:
Make a folder on your computer and go to either this link for 32bit version or this link for 64bit version to download the binaries and put them in the folder you created
For getting the most up to date instruction, I am gonna ask you to follow the process given in the GitLab website
STEP#7: Connect the GitLab server to the GitLab runner
GitLab
calls this process of connecting the Server to Runner as “Registering the
GitLab Runner to the Server”
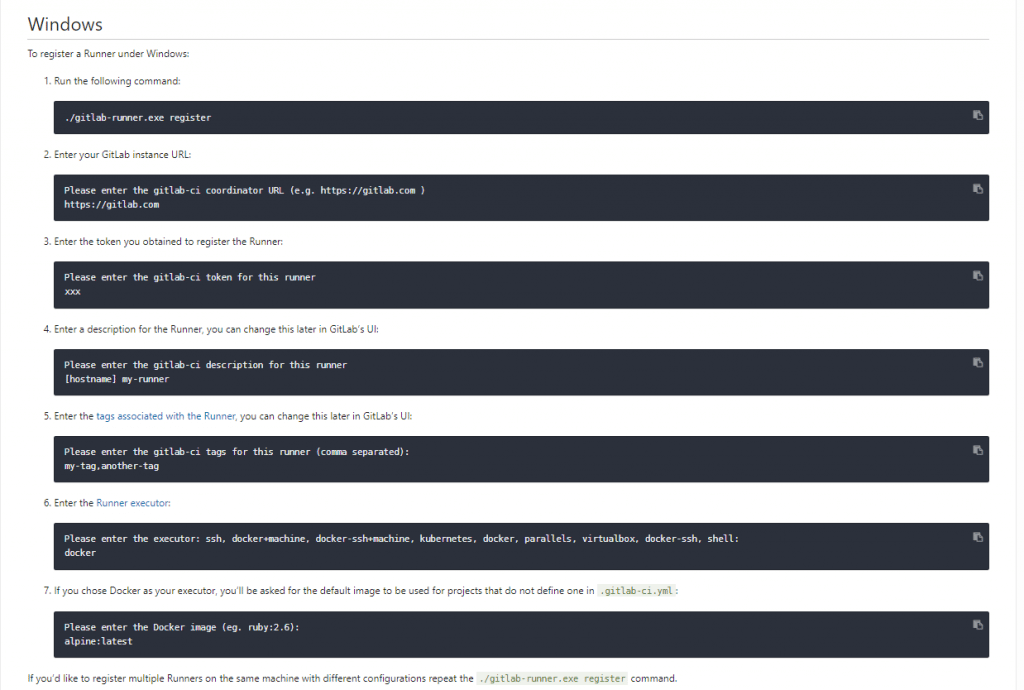
You can follow the instructions for Windows in this link to do the same.
Scroll down to the windows section and you will see something similar to this
Step# 7.1: Start the registration process
To enter these commands you need to open a command prompt with administrator privileges. For this just type cmd on the search menu, right-click on Command prompt and choose run as administrator

After that, just go to the folder to which you have downloaded the Gitlab Runner to and copy the path to that folder

Next, go back to the command line and give the following command
cd <path you copied>
Run the following command to start the registration process
gitlab-runner-windows-amd64.exe register

As shown in the screenshots above, enter your Virtual Machine’s IP address when prompted. Make sure you add “http://” before the IP address.
Once the IP address is entered, the next prompt appears asking you to enter a token, so let’s first go get a token from our GitLab server.
Step#7.2: Obtain token from GitLab Server
Go to your browser and enter the GitLab Server’s IP address. Once you have logged in you can create your first project by clicking on the respective pane as shown in the screenshot below.
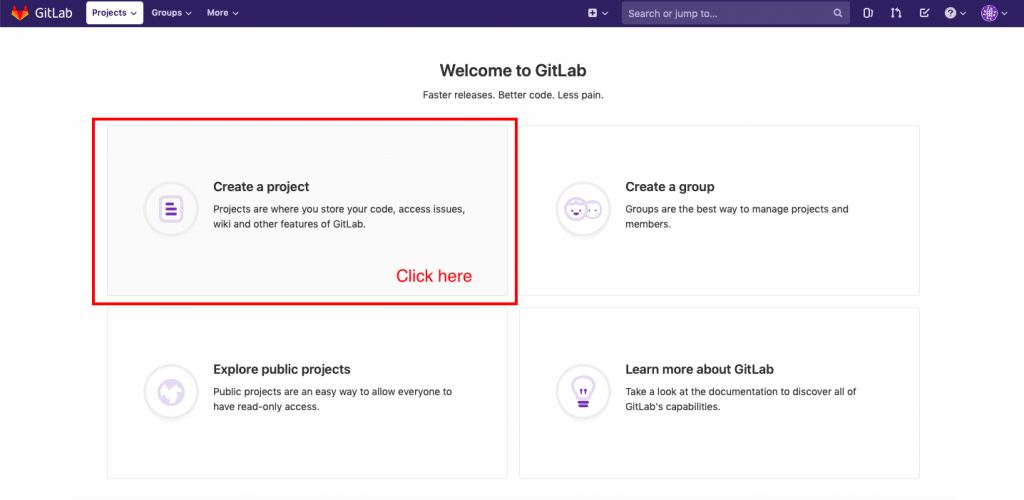
Just give the project a name and click on the create project button. The other field should get populated automatically.

Once you click the button as shown in the screenshot above, you will be taken to your project page.
From there just click on Settings->CI/CD and scroll down a bit and click the “Expand” button next to “Runners” and you will find the token you need as shown in the screenshot below.
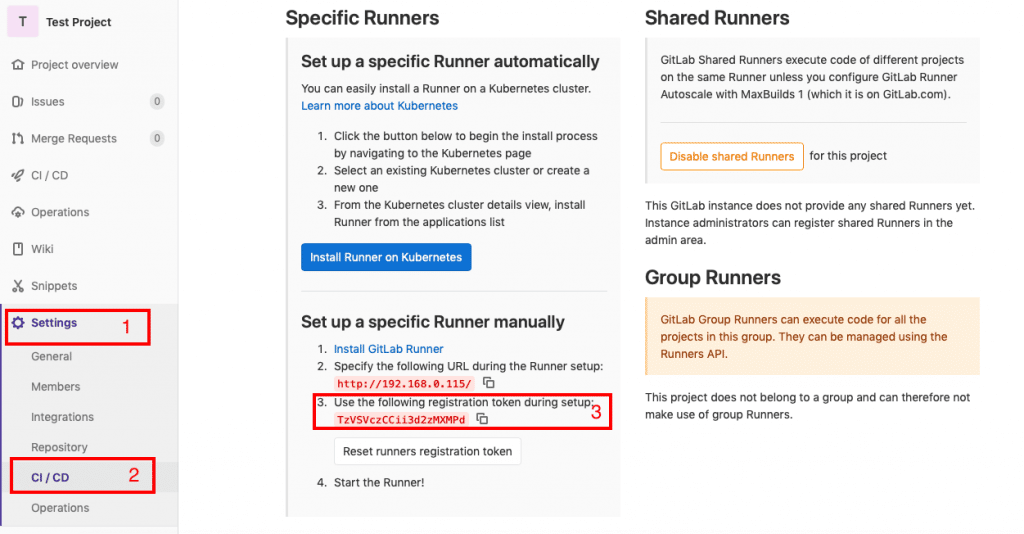
This token basically connects your project on the GitLab Server to the GitLab runner.
Step#7.3: Enter the token
Now that we have the token let’s enter it on the Command prompt

Once
entering the token, you will be prompted to give the runner a description, go
ahead and do that.
After that, you will be asked to enter some tags.
What are tags? Why are they needed for GitLab runners?
The
better term for tags can be capabilities.
Consider
this scenario.
Assume you are working in a large team of 1000 developers, who are doing say 50 different projects and your GitLab system has 100 different runners set up with several capabilities to do specific tasks. Some projects may need C compilers, while others may need python interpreters.
Now in order to connect a given project with a free-runner, we need some sort of parameter to tell the GitLab server that this particular free runner is capable of running the scripts needed for that particular job.
This is where tags come into the picture. By giving tags like “C” or “Python” a single runner can be connected to multiple projects and a single project can execute its jobs on several runners to ensure the best possible performance.
Using
these tags the Gitlab server can find a runner with the specific capability to
use for a given job. So give some suitable tags that will imply the
capabilities of your runner.
Once that is done, you will be prompted to enter “executor”.
Executors are programs that run our CI/CD scripts. Type shell and press enter

This will end the registration process the Runner to the server
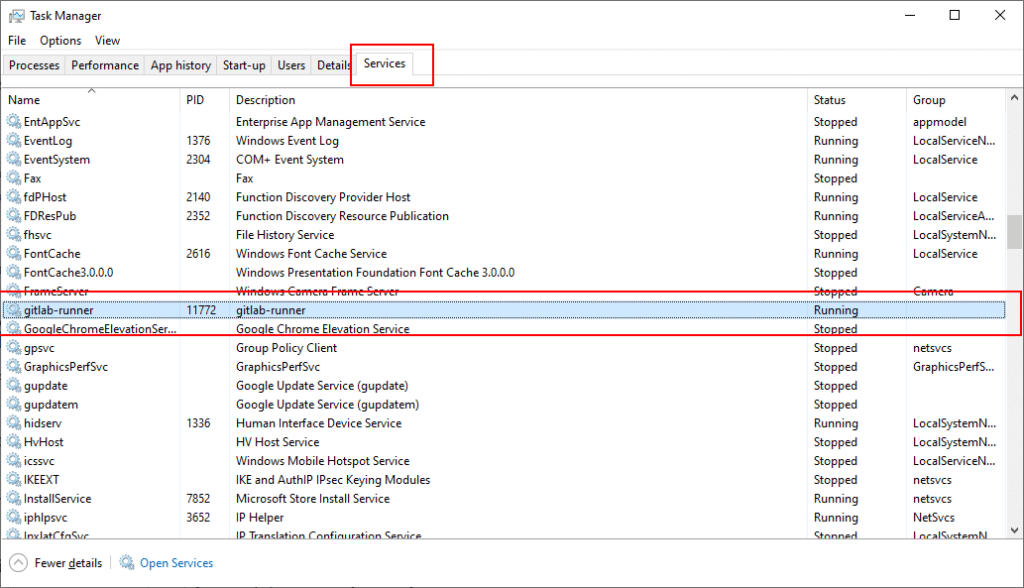
Once registered you can start the GitLab runner as a Service (background task) by issuing the commands
gitlab-runner-windows-amd64.exe install
gitlab-runner-windows-amd64.exe start

As you can see in the screenshot below, in the task manager app we can see that our gitlab-runner service is running!
Test to see if everything works
By following the 7 steps above, you should have a set up with GitLab Server and Runner running on your system. Its time to test and see if everything works the way it is supposed to work!
First, let’s test the GitLab server by creating a repo and pushing it to the server.
Testing GitLab Server
STEP#1: Make a test git repo
Let’s make a simple git repo on a new folder on our Desktop and push it to the GitLab server.
So open your Git-Bash app, which got installed as you were installing git.

Once opened type in the following commands
cd
cd Desktop
mkdir test_project
cd test_project
touch test.c
The above lines of command are just the fancy way of creating a folder named test_project on your Desktop and a file named test.c inside it. You can also do it through the Graphical User Interface if you want to.
So next, please open the C file using your favorite text editor and type in a simple program for testing, something like the following.
#include <stdio.h>

int main()
{
	printf("Hello Embedded Inventors!");
	return 0;
}
Next, let’s initialize a git repository on our test_project folder. So go back to the terminal cd into the test_project folder and type in the following command
You should receive a reply saying “Initialized empty Git repository”
STEP#2: Push it to the server
Now that we have our git repo ready, let’s push it to our git server. To do that login to your GitLab and go to the project we created earlier. There GitLab shows us the commands needed to push our repo to the server.
First, let’s configure our name and email on the git repository to the ones set on the GitLab server
So enter
the following command.
git config --global user.name "<enter your name here>"
git config --global user.email "<enter your email here>"
Next, we need to connect our server and our repository. To do that just enter the following commands
git remote add origin <your project URL>.git
In my case it is
git remote add origin http://192.168.0.115/EI/test-project.git
To find your project URL, just copy the address bar of your browser while you are on your project’s page in GitLab
Then add our test.c file and commit the changes using the following commands
git add .
git commit -m"first commit"
Then push
your git repo onto the GitLab using the command
git push -u origin master
You will be prompted to enter the user name and password of your GitLab account, once done go to your browser and just refresh the page and you should be able to see your test project page in GitLab!
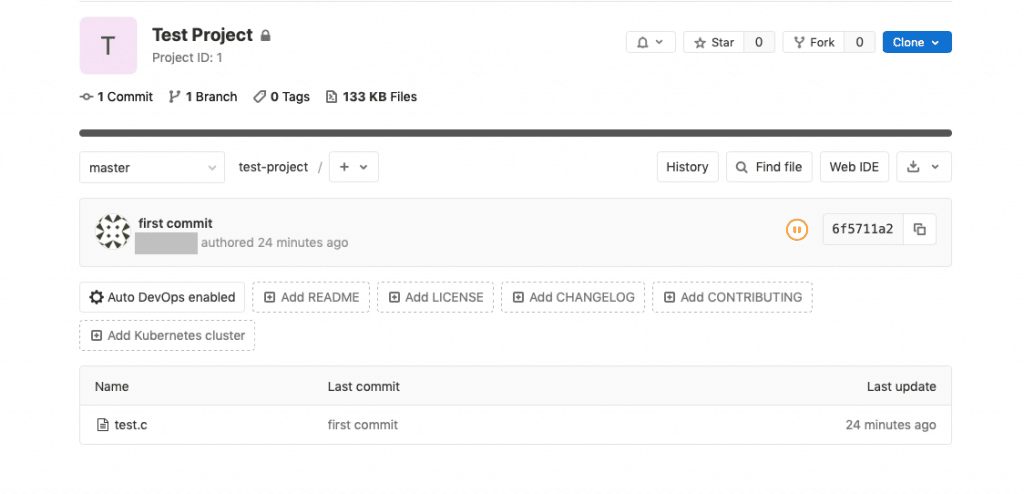
Testing GitLab Runner
STEP#3: Make a simple bash script to build the test.c
file
Create a bash script on your project folder
cd
cd Desktop/test_project
touch build.ps1
Edit it so that it looks something like this
gcc test.c -o test
echo "Build completed"
STEP#4: Create and edit .gitlab_ci.yml to run the
above script
What is .gitlab-ci.yml and why it is needed? This is the file that contains the instructions for the GitLab runners to execute the CI/CD tasks. It should be present in the project’s root folder. It can be used to test if a commit builds correctly, passes some unit tests and if it needs packaging and deployment.
You can
learn more about how to configure it from the official quick start tutorial
here
For the
purpose of testing our installation let’s create a file named .gitlab-ci.yml in
the test_project folder and put the following lines in there.
Make sure you are in the right directory
cd
cd Desktop/test_project
Create the file using the command
Open it with your favorite text editor and type the following lines into it.
build:
  script:
    - powershell -File build.ps1
  tags:
    - test
The last line tells the GitLab server to use the GitLab runner with the tag named “test”. If you gave your GitLab runner installation a different tag, make sure you make the appropriate change to the above lines.
Also,
make sure you use spaces instead of tabs at the beginning of the above lines.
Now add it to the git repository and push it to the Gitlab server
git add .
git commit -m"gitlab yml added"
git push
Now let’s get back to our GitLab server’s URL and see if it worked. Go to the project page and click on CI/CD
You will
be taken to the pipeline page which shows the result of your latest commit.

It will
take a minute or so before it completes the pipeline and as you can see in the
screenshot above, mine took 41 seconds to complete and the status is
“passed”
If you
click on “jobs” under the CI/CD menu, you will be taken to another
page which shows you more information about the execution of our yml file
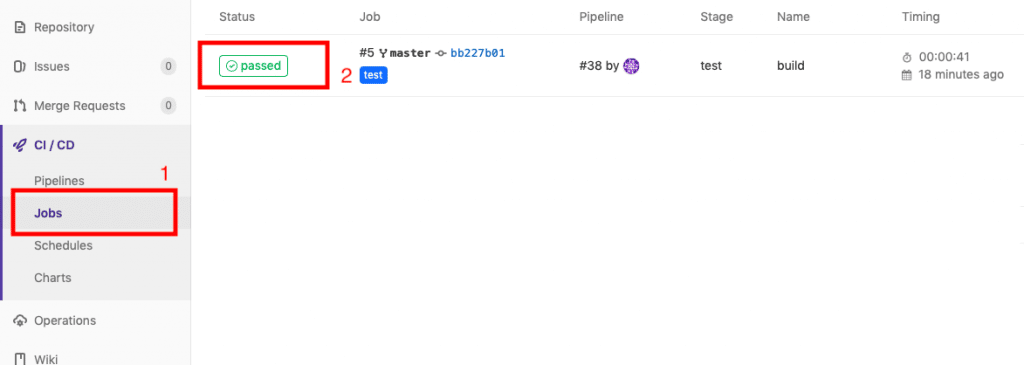
Next click on “passed” as shown in the screenshot above, this will take you to another page which will look something like this.
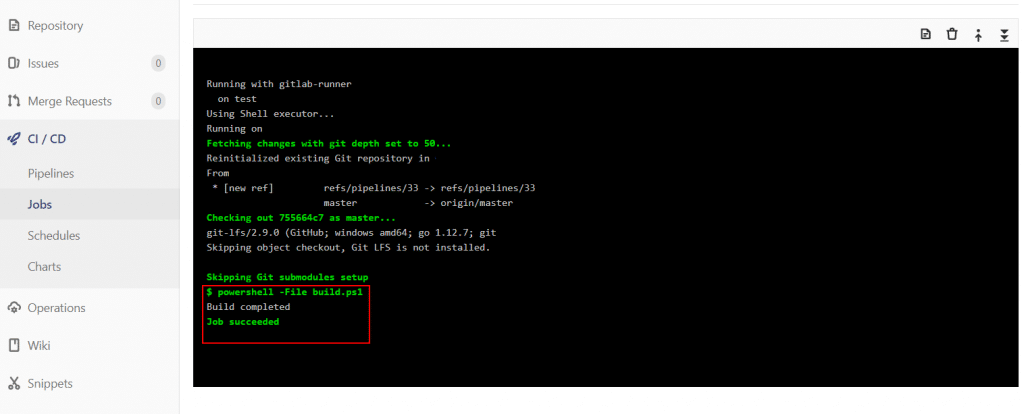
As you can see, our build.ps1 gets executed by the GitLab runner and it succeeds to compile our project.
And with that, I will conclude this tutorial!
I leave the rest to you to play, explore, experiment and learn GitLab!
I hope you guys enjoyed this article and learned something useful.
You can email us or contact us through this link if you have any questions or suggestions.
If you liked the post, feel free to share this post with your friends and colleagues!
-
1c2d8136Remove development links — Systems — Batch 20/24
·
1c2d8136
Suzanne Selhorn authored
1c2d8136Remove development links — Systems — Batch 20/24Suzanne Selhorn authored
