
Provide feedback
Saved searches
Use saved searches to filter your results more quickly
Sign up
Updated: 2023-03-31
Generally, these are what I did:
- Install git-with-openssh
- Create SSH-key
- Add SSH-key to ssh-agent
- Create ~/.bashrc for auto-launching ssh-agent
Common problems
Netwrok folder not accessable
- Unable to push to origin with this error message.
ssh: Could not resolve hostname personal: Name or service not known
fatal: Could not read from remote repository.

Please make sure you have the correct access rights
and the repository exists.
It could be that access to folder .ssh in drive H: is not available. Check that drive H: is accessable.
Warning: Remote Host Identification has changed
You might not able to access to your remote account and get this message:
WARNING: REMOTE HOST IDENTIFICATION HAS CHANGED!

IT IS POSSIBLE THAT SOMEONE IS DOING SOMETHING NASTY!
Someone could be eavesdropping on you right now (man-in-the-middle attack)!
It is also possible that a host key has just been changed.
You need to remove the old key in known_hosts file in folder .ssh by running this command in Git bash
The next git connection will ask you if you trust the new SSH key.
openSSH
Windows 10 include openSSH. But I can’t make it work with git so I use git-with-openssh installed
via scoop. This will install Git and openSSH together. After installation, it’s important to check
where is your ~/.ssh root folder via Git bash. This is the folder where you will save your SSH-key.
Since I use Emacs, I add this code to use git-bash in shell. This is taken from StackExchange.
  (if (equal system-type 'windows-nt)
      (progn (setq explicit-shell-file-name
                   "C:/Users/ybka/scoop/apps/git-with-openssh/current/bin/bash.exe")
             (setq shell-file-name explicit-shell-file-name)
             (setq explicit-bash.exe-args '("--login" "-i"))
             (add-to-list 'exec-path "C:/Users/ybka/scoop/apps/git-with-openssh/current/bin")
             (setenv "SHELL" shell-file-name)
             (add-hook 'comint-output-filter-functions 'comint-strip-ctrl-m)))

  (defun git-bash () (interactive)
         (let ((explicit-shell-file-name "C:/Users/ybka/scoop/apps/git-with-openssh/current/bin/bash.exe" ))
           (call-interactively 'shell)))
Then as suggested from StackExchange, I created ~/.bash_profile (root for Git-bash) and add the
codes below to display shell prompt properly in Emacs.
  if [ -n "$INSIDE_EMACS" ]; then
  export PS1='\[\033[32m\]\u@\h \[\033[33m\]\w\[\033[36m\]`__git_ps1`\[\033[0m\]\n$ '
  fi
To be on the safe side, I also add git-with-openssh the PATH in Windows Environment. You can find guides for doing it
in many places eg. here. In my pc, the path is:
C:/Users/ybka/scoop/apps/git-with-openssh/current/bin/
Create SSH key
If you haven’t created an SSH-key then do so by running the code below in your Git bash. Else you
can read more here.
$  ssh-keygen -t rsa -b 4096 -C "your_email@example.com"
Generating public/private rsa key pair.
Enter file in which to save the key (/c/Users/ybka/.ssh/id_rsa): id_rsa_personal
The file id_rsa_personal will be placed at inside /c/Users/ybka/.ssh/ if you
don’t specify the path explicitly. Two files will be created ie.
- id_rsa_personal
- id_rsa_personal.pub
Paramters specification:
-tis to specify RSA as the type of key to generate-bfor 4096-bit keys-Cfor comment
Then add your newly created SSH-key to ssh-agent to manage your key. If your ssh-agent haven’t been
started then you can do so silently and has it running in the background. You will get an output
something like > Agent pid 4353. Run this command to start ssh-agent for Windows in PowerShell:
or run silently with eval $(ssh-agent -s). Then adding your ssh-key with:
ssh-add ~/.ssh/id_rsa_personal
For Windows user, you can auto-launching the ssh-agent by following the guide
here. Basically adding file ~/.profile or ~/.bashrc in your git ssh root
which you find via Git bash. The content of ~/.bashrc file is:
env=~/.ssh/agent.env

agent_load_env () { test -f "$env" && . "$env" >| /dev/null ; }

agent_start () {
(umask 077; ssh-agent >| "$env")
. "$env" >| /dev/null ; }

agent_load_env

# agent_run_state: 0=agent running w/ key; 1=agent w/o key; 2= agent not running
agent_run_state=$(ssh-add -l >| /dev/null 2>&1; echo $?)

if [ ! "$SSH_AUTH_SOCK" ] || [ $agent_run_state = 2 ]; then
agent_start
ssh-add
elif [ "$SSH_AUTH_SOCK" ] && [ $agent_run_state = 1 ]; then
ssh-add
fi

unset env
Copy your public SSH-key either manually or by running clip which will copy it to clipboard then add
it to your GitHub account.
clip < ~/.ssh/id_rsa_personal.pub
You can test the connection and verify your loaded SSH-key
  # Check connection
  ssh -T git@github.com

  # Verify
  ssh-add -l -E md5
SSH-Agent and OpenSSH are tools in Windows that can be used to authenticate to remote Git repositories, such as GitLab, GitHub, Azure DevOps, etc. Once set up as a service that stores your various SSH keys, this can facilitate authentication without entering a password each time, removing the irritation of entering a password every time you wish to push/pull/etc. from a Git repository.
Prerequisites
- The OpenSSH Client optional service must be enabled on your machine, and OpenSSH must be added to your PATH environment variable. You can read how to do that here.
- A remote Git repository that you wish to access. We will use a GitLab repository for this article; however, the process will be similar for other Git management providers.
- Git must be installed on your machine.
How to Install the SSH-Agent Service in Windows
Using an elevated PowerShell window (run as admin), execute the following command to install the SSH-Agent service and configure it to start automatically when you log into your machine:
Get-Service ssh-agent | Set-Service -StartupType Automatic -PassThru | Start-Service

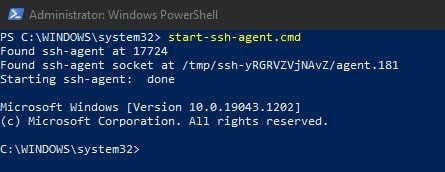
To avoid needing to restart your system to get the service running for the first time, execute this command:
start-ssh-agent.cmd
Setting up an SSH Key Pair to Access a Git Remote Provider
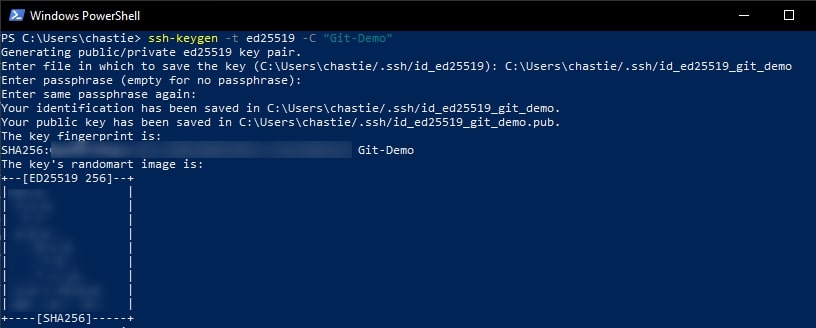
Using a command line tool such as Bash or PowerShell, you should be able to follow these steps to create a local SSH key pair. For our example, we will create an ED25519 key, but you can create other keys such as an RSA.
Create a new SSH ED25519 key, giving it a useful comment:
ssh-keygen -t ed25519 -C "Git-Demo"
By default, the file will be stored in your local user’s SSH repository in Windows. You can choose another storage location if you wish or rename the file by entering a new file path to save the key. Leave it blank to stick with the default.
In our example, we rename the file from the default id_ed25519 to id_ed25519_git_demo:

You can also add a password if you like or leave this blank:

You will then be shown the key’s randomart image to confirm creation:
Copy the contents of the public key to your clipboard. You can read this key with the following command:
cat path\to\ssh\key.pub
For example, our code is likely:
cat C:\Users\chastie/.ssh\id_ed25519_git_demo.pub
Note: We access the public key with the .pub suffix.
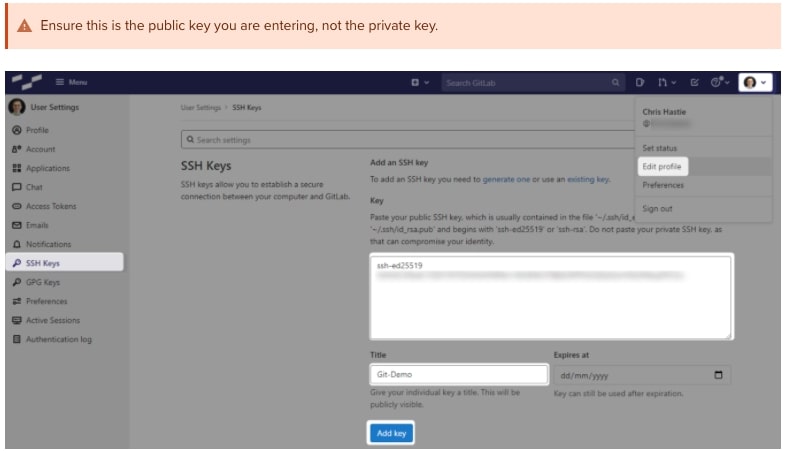
A sample is shown here. You can then select this and copy it with a right-click of your mouse:

In GitLab (or the appropriate location of your Git remote repository), you can now add this public key to your user profile. In GitLab, you can do this by adding it under the SSH Keys section of your user settings:
Test that you can connect to the repository when using the SSH private key directly with this command:
ssh -i path/to/ssh/private/key -T git@host
For example, our command could be:
ssh -i C:\Users\chastie/.ssh\id_ed25519_git_demo -T git@gitlab.mycompany.com

or

ssh -i C:\Users\chastie/.ssh\id_ed25519_git_demo -T git@github.com

We have now established an SSH key pair that can authenticate to our Git remote provider. It remains to set this up in the SSH-Agent service to automatically provide access. We can demonstrate the issue by attempting the same connection, but without specifically naming the SSH key, with the command below:
ssh -T git@host
As we can see, if we execute this command without specifying an SSH key, we are prompted for a password:

Adding the SSH Key to the SSH-Agent Service
Our goal is to be able to connect to a Git repository without entering a password. At this stage, we have a working SSH key pair and the SSH-Agent service installed and running.
Execute the following command to add your SSH key to your SSH-Agent service:
ssh-add path/to/ssh/private/key
For our example, our command could be:
ssh-add C:\Users\chastie/.ssh\id_ed25519_git_demo

We can now test our connection to our Git remote provider without specifying a key and connect successfully:
ssh -T git@host

Configuring Git to Leverage the Windows SSH-Agent

In an elevated console (run as admin), execute the following command to modify your existing Git configuration to leverage the windows OpenSSH service as the core SSH command:
git config --global core.sshCommand C:/Windows/System32/OpenSSH/ssh.exe

Congratulations! You have now set up your environment to automatically authenticate to your Git remote provider through an SSH key pair, without using passwords. If you wish to facilitate access to any other Git remote providers, simply follow the same steps to generate a key pair ( as outlined above) and add it to your existing SSH-Agent service.
I needed to run git natively in windows (no wsl) for a recent project. I use ssh certificates with passphrases to authenticate with my git provider.
Ssh requires the certificate passphrase every time you use a connection. It’s annoying typing this passphrase in to terminal when using a git command.
The Problem
On most *nix systems there is an ssh-agent installed that will store your pass phrases so you don’t have to enter them when using Git with ssh.
Ssh-agent is harder to configure on windows because some of the default settings and paths are different to *nix systems.
I didn’t want to use Git for Windows because it uses GitBash. I couldn’t use WSL because I wanted git to work on any terminal in windows.
These are the steps I had to research to use Git on Windows with the built in Windows ssh-agent.
Note: You must be an administrator to perform the required actions.
Open ssl on Windows
If you use Windows 10 or higher there is a built-in openssl instance. You can turn it on in the Optional Features settings pane.
Microsoft provide more instructions here: https://learn.microsoft.com/en-us/windows-server/administration/openssh/openssh_install_firstuse?tabs=gui
Follow the instructions to install it if you don’t have it.
A note on certificates
I’ll assume that you have ssh certificates available and any ssh aliases are set in the config file
The default location for the config file on windows is
$HOME\.ssh\config
You should create that file if you need ssh aliases. You can read more about this in my article on ssh for git accounts — /2021/05/04/configure-multiple-github-accounts-one-computer/
Enabling Ssh agent
Open a powershell terminal as administrator and run the following to have ssh-agent available.
# Have ssh agent start automatically
Get-Service ssh-agent | Set-Service -StartupType Automatic

# Start ssh agent now
Start-Service ssh-agent

# Should work successfully
Get-Service ssh-agent
Configure git to use Windows ssh
# tell git to use ssh.exe
git config --global core.sshCommand "'C:\Windows\System32\OpenSSH\ssh.exe'"
Load keys into ssh agent
Copy your keys into a folder that ssh-agent can access. Anywhere in the $HOME/.ssh should be ok.
Then add the key to ssh-agent. You will be prompted for a password and ssh agent will remember it for you.
ssh-add "C:\Users\darragh\.ssh\authorized_keys\darraghPersonalGithub"
Installing Git for Windows
- Download git for windows
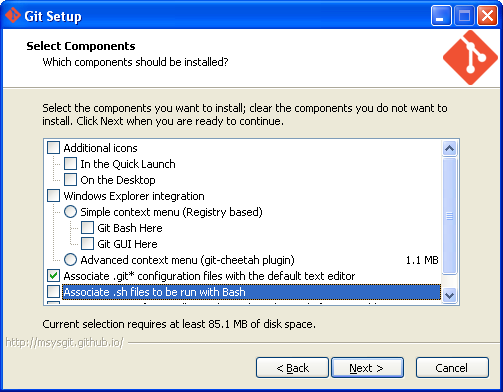
- Run the downloaded installer and pay attention to the following settings
- You may prefer installing the git context menu, but I like to keep things simple so I just unchecked it

- Choose “Use Git from the Windows command prompt”
- Choose “Checkout windows-style, commit Unix-style line endings”


Installing SSH tools
The most common SSH windows utilities are the ones coming with Putty.
Downloading Putty binaries
First you need to go to Putty binaries repository and download the following resources:
- puttygen.exe
- plink.exe
- pageant.exe
Generating SSH keys
If you don’t have a SSH public/private key pair you can generate it using the puttygen utility.
From now on I’ll use %USER_HOME% whenever I refer to your Windows user home folder, which depending on your Windows version may be located in:
| Version | Path | ||
|---|---|---|---|
| Windows XP | C:\Documents and Settings\vlad | ||
| Windows 7 and later | C:\Users\vlad | ||
You need to create a %USER_HOME%.ssh folder to store your SSH private key.
mkdir .ssh
- Open puttygen and click Generate

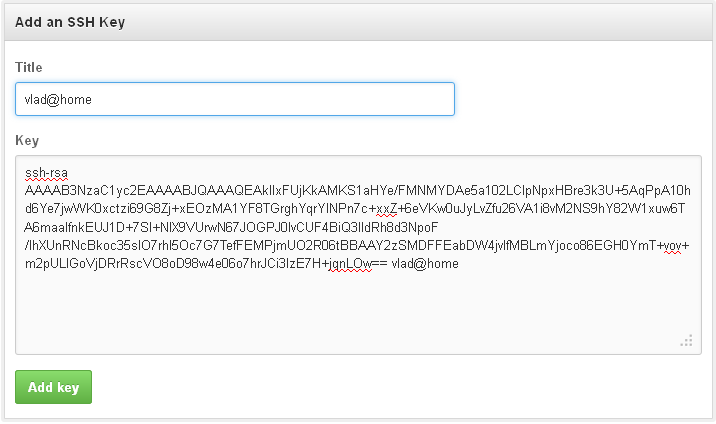
- Copy the public key to clipboard
- Go to your GitHub account, open the Account settings menu and navigate to the SSH Keys section. There you need to paste your public key

- Add a strong key passphrase for securing your private key usage and click “Save the private key”. You need to save it to the %USER_HOME%\.ssh folder.
You should now have a %USER_HOME%\.ssh\github-rsa.ppk file.

Setting up the SSH agent
- Create a shortcut of pageant.exe and save it in the Startup folder.
In Windows 10, you can access the Startup folder associated with your user account under this path:
C:\Users\%USERNAME%\AppData\Roaming\Microsoft\
Windows\Start Menu\Programs\StartupMake sure the shortcut’s target contains the path to your key as well.
C:\Putty\pageant.exe %USER_HOME%\.ssh\github-rsa.ppk
In order to set a parameter to a shortcut, you can right-click the shortcut, choose Properties, and edit the Target text area to set the parameter you wish to send to the shortcut executable.
- Run pageant and it should go to your System Tray
- Double-click the pageant System Tray icon
- Make sure the %USER_HOME%\.ssh\github-rsa.ppk private key is listed
- Go to environment variables and add the GIT_SSH variable to reference the plink.exe system path.
Setting up your identity
Now, you need to set up your username and email address that will be used when issuing a commit:
$ git config --global user.name "Vlad Mihalcea"
$ git config --global user.email mail@vladmihalcea.com
Testing time
First, you need to establish a Plink connection, to make sure the SSH authentication works:
D:\kits\Putty>plink.exe -v git@github.com
Looking up host "github.com"
Connecting to 192.30.252.129 port 22
Server version: SSH-2.0-libssh-0.6.0
Using SSH protocol version 2
We claim version: SSH-2.0-PuTTY_Release_0.63
Using Diffie-Hellman with standard group "group14"
Doing Diffie-Hellman key exchange with hash SHA-1
Host key fingerprint is:
ssh-rsa 2048 16:27:ac:a5:76:28:2d:36:63:1b:56:4d:eb:df:a6:48
Initialised AES-256 SDCTR client->server encryption
Initialised HMAC-SHA-256 client->server MAC algorithm
Initialised AES-256 SDCTR server->client encryption
Initialised HMAC-SHA-256 server->client MAC algorithm
Pageant is running. Requesting keys.
Pageant has 1 SSH-2 keys
Using username "git".
Trying Pageant key #0
Authenticating with public key "artsoft96" from agent
Sending Pageant's response
Access granted
Opening session as main channel
Opened main channel
Server refused to allocate pty
Started a shell/command
Server sent command exit status 1
Hi vladmihalcea! You've successfully authenticated, but GitHub does not provide shell access.
Disconnected: All channels closed
Now clone one of your GitHub repositories and play with git. You shouldn’t be asked for your username/password.
D:\vlad\GitHub>git clone git@github.com:vladmihalcea/db-util.git
Cloning into 'db-util'...
remote: Reusing existing pack: 213, done.
remote: Total 213 (delta 0), reused 0 (delta 0)
Receiving objects: 100% (213/213), 150.94 KiB | 97.00 KiB/s, done.
Resolving deltas: 100% (86/86), done.
Checking connectivity... done.
D:\vlad\GitHub>cd db-util
D:\vlad\GitHub\db-util>git commit -a -m "Change developer id to author"
[master 93ee2bf] Change developer id to author
 1 file changed, 1 insertion(+), 1 deletion(-)
D:\vlad\GitHub\db-util>git push
Counting objects: 7, done.
Delta compression using up to 2 threads.
Compressing objects: 100% (3/3), done.
Writing objects: 100% (3/3), 337 bytes | 0 bytes/s, done.
Total 3 (delta 2), reused 0 (delta 0)
To git@github.com:vladmihalcea/db-util.git
   21e9c0e..93ee2bf  master -> master
