
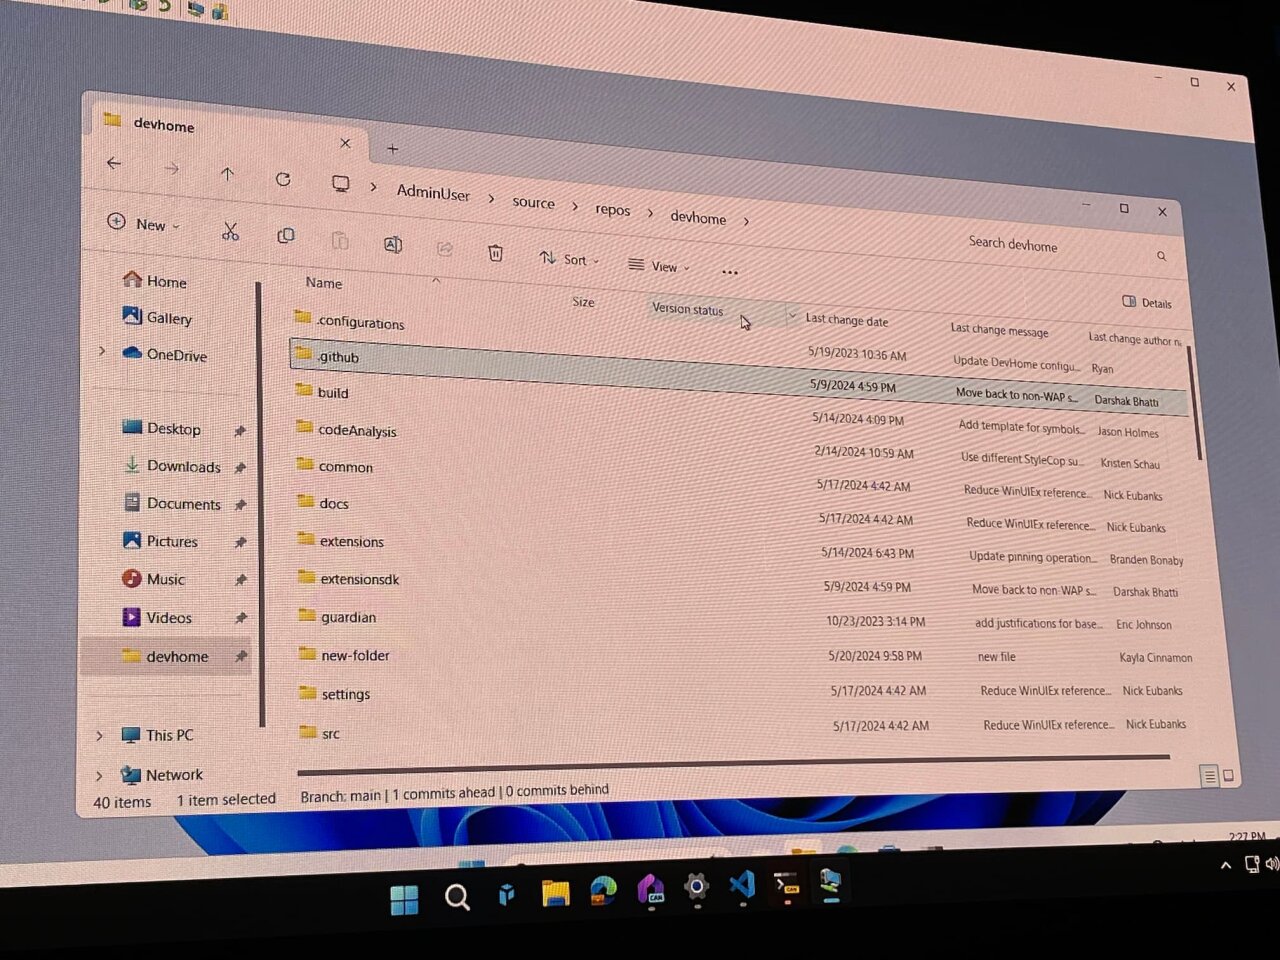
Microsoft объявила, что «Проводник» в Windows 11 получит интеграцию с системами контроля версий, такими как Git. Это позволит отслеживать изменения и комментарии в проектах без необходимости запуска специализированных приложений или открытия веб-сервисов.
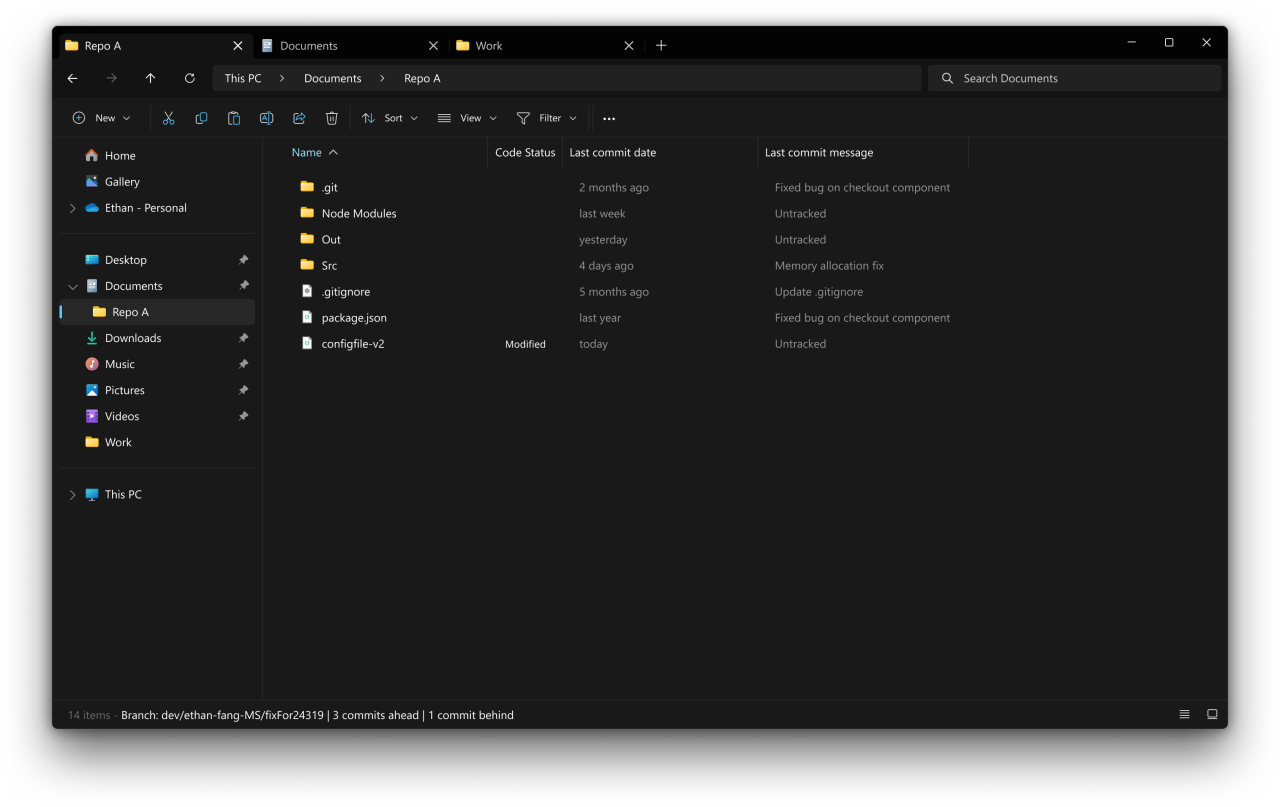
На текущий момент неизвестно, появится ли в «Проводнике» возможность быстро подключить необходимый репозиторий Git без установки дополнительного ПО.
Также Microsoft напомнила, что в контекстном меню «Проводника» вскоре появится функция для создания архивов в форматах 7-Zip и TAR.
Introduction
Git Extensions is a powerful toolkit designed to simplify the process of working with Git on Windows. By providing a user-friendly interface and integrating seamlessly with Windows Explorer and Visual Studio, Git Extensions makes it easier for developers to manage their Git repositories and collaborate with others. In this article, we will delve into the features and benefits of Git Extensions, exploring how it can enhance your Git experience on Windows.
Key Features of Git Extensions
Windows Explorer Integration for Git
One of the standout features of Git Extensions is its ability to integrate with Windows Explorer. This allows you to right-click on files and directories in Explorer and access a range of Git commands, including commit, push, and pull. This integration makes it easy to manage your Git repositories without having to switch between multiple applications.
Why is Windows Explorer integration important?
- It saves time by allowing you to access Git commands directly from Explorer.
- It reduces the need to switch between multiple applications, making your workflow more efficient.
- It provides a more intuitive way of managing your Git repositories.
Visual Studio (2005/2008) Plug-in for Git
Git Extensions also provides a Visual Studio plug-in that allows you to use Git from within Visual Studio. This plug-in provides a range of features, including the ability to commit, push, and pull changes directly from within Visual Studio.
Why is the Visual Studio plug-in important?
- It allows you to manage your Git repositories directly from within Visual Studio.
- It reduces the need to switch between multiple applications, making your workflow more efficient.
- It provides a more intuitive way of managing your Git repositories.
Feature Rich User Interface for Git
Git Extensions provides a feature-rich user interface that makes it easy to manage your Git repositories. The interface is intuitive and easy to use, providing a range of features, including the ability to commit, push, and pull changes.
Why is the feature-rich user interface important?
- It makes it easy to manage your Git repositories.
- It reduces the need to learn complex Git commands.
- It provides a more intuitive way of managing your Git repositories.
Single Installer Installs Git, Git Extensions, and the Merge Tool KDiff3
Git Extensions provides a single installer that installs Git, Git Extensions, and the merge tool KDiff3. This makes it easy to get started with Git Extensions, as you don’t need to install multiple applications separately.
Why is the single installer important?
- It saves time by allowing you to install Git Extensions and its dependencies in one step.
- It reduces the need to install multiple applications separately.
- It provides a more streamlined installation process.
32bit and 64bit Support
Git Extensions provides support for both 32bit and 64bit systems, making it compatible with a wide range of Windows systems.
Why is 32bit and 64bit support important?
- It makes Git Extensions compatible with a wide range of Windows systems.
- It provides flexibility in terms of system architecture.
- It reduces the need to install separate versions of Git Extensions for different system architectures.
Benefits of Using Git Extensions
Improved Productivity
Git Extensions makes it easy to manage your Git repositories, reducing the need to learn complex Git commands and providing a more intuitive way of working with Git.
Why is improved productivity important?
- It saves time by allowing you to manage your Git repositories more efficiently.
- It reduces the need to learn complex Git commands.
- It provides a more streamlined workflow.
Enhanced Collaboration
Git Extensions provides a range of features that make it easy to collaborate with others, including the ability to commit, push, and pull changes.
Why is enhanced collaboration important?
- It makes it easy to collaborate with others.
- It reduces the need to learn complex Git commands.
- It provides a more intuitive way of working with Git.
Increased Flexibility
Git Extensions provides support for both 32bit and 64bit systems, making it compatible with a wide range of Windows systems.
Why is increased flexibility important?
- It makes Git Extensions compatible with a wide range of Windows systems.
- It provides flexibility in terms of system architecture.
- It reduces the need to install separate versions of Git Extensions for different system architectures.
Conclusion
Git Extensions is a powerful toolkit that makes it easy to work with Git on Windows. By providing a user-friendly interface and integrating seamlessly with Windows Explorer and Visual Studio, Git Extensions reduces the need to learn complex Git commands and provides a more intuitive way of managing your Git repositories. Whether you’re a seasoned developer or just starting out with Git, Git Extensions is an essential tool that can help you improve your productivity, enhance your collaboration, and increase your flexibility.
Why should you use Git Extensions?
- It makes it easy to manage your Git repositories.
- It reduces the need to learn complex Git commands.
- It provides a more intuitive way of working with Git.
What are the benefits of using Git Extensions?
- Improved productivity.
- Enhanced collaboration.
- Increased flexibility.
How can you get started with Git Extensions?
- Download the Git Extensions installer from the official website.
- Follow the installation instructions to install Git Extensions and its dependencies.
- Start using Git Extensions to manage your Git repositories.
Q: What is Git Extensions?
A: Git Extensions is a toolkit designed to make working with Git on Windows more intuitive. It provides a user-friendly interface and integrates seamlessly with Windows Explorer and Visual Studio, making it easier to manage your Git repositories.
Q: What are the key features of Git Extensions?
A: The key features of Git Extensions include:
- Windows Explorer integration for Git
- Visual Studio (2005/2008) plug-in for Git
- Feature-rich user interface for Git
- Single installer installs Git, Git Extensions, and the merge tool KDiff3
- 32bit and 64bit support
Q: How does Git Extensions integrate with Windows Explorer?
A: Git Extensions integrates with Windows Explorer by providing a context menu that allows you to access a range of Git commands, including commit, push, and pull. This makes it easy to manage your Git repositories without having to switch between multiple applications.
Q: What is the Visual Studio plug-in for Git Extensions?
A: The Visual Studio plug-in for Git Extensions allows you to use Git from within Visual Studio. This plug-in provides a range of features, including the ability to commit, push, and pull changes directly from within Visual Studio.
Q: What is the feature-rich user interface for Git Extensions?
A: The feature-rich user interface for Git Extensions makes it easy to manage your Git repositories. The interface is intuitive and easy to use, providing a range of features, including the ability to commit, push, and pull changes.
Q: What is the single installer for Git Extensions?
A: The single installer for Git Extensions installs Git, Git Extensions, and the merge tool KDiff3 in one step. This makes it easy to get started with Git Extensions, as you don’t need to install multiple applications separately.
Q: What is the 32bit and 64bit support for Git Extensions?
A: Git Extensions provides support for both 32bit and 64bit systems, making it compatible with a wide range of Windows systems.
Q: How can I get started with Git Extensions?
A: To get started with Git Extensions, you can:
- Download the Git Extensions installer from the official website.
- Follow the installation instructions to install Git Extensions and its dependencies.
- Start using Git Extensions to manage your Git repositories.
Q: What are the benefits of using Git Extensions?
A: The benefits of using Git Extensions include:
- Improved productivity
- Enhanced collaboration
- Increased flexibility
Q: What are the system requirements for Git Extensions?
A: The system requirements for Git Extensions are:
- Windows XP or later
- .NET Framework 2.0 or later
- 32bit or 64bit system
Q: Is Git Extensions free?
A: Yes, Git Extensions is free to use. However, donations are appreciated to support the development of the tool.
Q: Where can I find more information about Git Extensions?
A: You can find more information about Git Extensions on the official website, including documentation, tutorials, and support forums.
Q: How can I contribute to the development of Git Extensions?
A: You can contribute to the development of Git Extensions by:
- Reporting bugs and issues
- Suggesting new features and improvements
- Contributing code and patches
By following these steps, you can get started with Git Extensions and start enjoying the benefits of a more intuitive and streamlined Git experience.
Installing Git on Windows 11 is a straightforward process. You just need to download the installer from the official website, run it, and follow the on-screen instructions to set it up. After that, you’ll be ready to start using Git for version control on your projects.
In this section, we’ll guide you through the easy steps to install Git on your Windows 11 machine. By the end of these steps, you’ll have Git up and running.
Step 1: Download the Git Installer
Go to the official Git website and download the Windows installer.
You can find the Git installer at https://git-scm.com/. Navigate to the «Downloads» section and select the Windows version. The website will automatically detect your OS version and recommend the correct installer.
Step 2: Run the Git Installer
Locate the downloaded installer file and double-click it to run the setup.
Once the file is downloaded, open your Downloads folder or the location where you saved the file. Double-click the file named something like “Git-2.x.x-64-bit.exe.”
Step 3: Accept the License Agreement
Read through the license information, and then click «Next» to proceed.
The installer will open with a license agreement. While it’s good to read it, most people usually just hit «Next» to move on.
Step 4: Select Installation Location
Choose the folder where you want Git to be installed, and click «Next.»
The default location is usually fine for most users. If you have a specific folder in mind, you can change it here. Otherwise, just click «Next» to continue.
Step 5: Select Components
Choose the components you want to install, then click «Next.»
The installer offers several options like a Git Bash, a Git GUI, and integration with Windows Explorer. You can leave these at their default settings, which are typically what most users need.
Step 6: Select Start Menu Folder
Choose a Start Menu folder for the Git shortcuts, and click «Next.»
You can let the installer create a new Start Menu folder or choose an existing one. Just click «Next» after making your selection.
Step 7: Adjust Path Environment
Choose how Git should be used from the command line and click «Next.»
This step allows you to adjust how Git is added to your system PATH. The default recommendation is usually sufficient unless you have specific needs.
Step 8: Configure Line Ending Conversions
Select how Git should handle line endings and click «Next.»
This setting affects how files are stored and retrieved. The default option is fine for most users unless you’re collaborating on projects with different OS users regularly.
Step 9: Configure Terminal Emulator
Choose the terminal emulator to be used with Git Bash and click «Next.»
The default terminal emulator (MinTTY) is usually the best choice, but you can opt for the Windows default console if you prefer.
Step 10: Complete the Installation
Review your settings and click «Install» to complete the setup.
The installer will now copy all the necessary files to your system. This may take a few minutes. Once it’s done, click «Finish» to exit the installer.
After completing these steps, Git will be installed on your Windows 11 computer, ready for use in your projects.
Tips for Installing Git on Windows 11
- Ensure Stable Internet Connection: Make sure you have a stable internet connection before starting the download to avoid interruptions.
- Verify Administrator Rights: You might need administrator privileges to install software, so make sure you’re logged in as an admin.
- Leave Default Settings: The default settings are usually the best for most users unless you have specific needs.
- Familiarize Yourself with Git Bash: Git Bash offers a powerful interface for using Git commands, so take some time to get comfortable with it.
- Enable Windows Explorer Integration: This feature can make using Git much easier by adding Git commands to your context menu.
Frequently Asked Questions
What is Git?
Git is a version control system that tracks changes in your files, allowing multiple people to collaborate on the same project.
Can I use Git with other operating systems?
Yes, Git is compatible with macOS, Linux, and Windows.
Do I need to configure Git after installing it?
Yes, you’ll need to set up your username and email. Use the commands git config --global user.name "Your Name" and git config --global user.email "[email protected]".
Is Git free to use?
Yes, Git is open-source and free for everyone.
Can I uninstall Git easily if I don’t need it anymore?
Yes, you can uninstall Git via the Control Panel like any other software.
Summary
- Download the Git installer.
- Run the Git installer.
- Accept the license agreement.
- Select the installation location.
- Select components.
- Select Start Menu folder.
- Adjust path environment.
- Configure line ending conversions.
- Configure terminal emulator.
- Complete the installation.
Conclusion
Installing Git on Windows 11 is a simple process that can be completed in just a few minutes. Whether you’re a newbie to version control or a seasoned developer, Git offers powerful tools to manage your projects. By following the steps outlined in this guide, you’ll have Git installed and ready to use.
Once installed, I recommend taking some time to learn basic Git commands. You can find numerous tutorials and guides online, or even check out the official Git documentation. Mastering Git will make you more efficient in managing your project files and collaborating with others. So, dive in and start exploring what Git has to offer!
Matt Jacobs has been working as an IT consultant for small businesses since receiving his Master’s degree in 2003. While he still does some consulting work, his primary focus now is on creating technology support content for SupportYourTech.com.
His work can be found on many websites and focuses on topics such as Microsoft Office, Apple devices, Android devices, Photoshop, and more.
Git Extensions is a toolkit aimed at making working with Git under Windows more intuitive.
The shell
extension will integrate in Windows Explorer and presents a context menu on files and directories.
There is also a Visual Studio extension to use Git from the Visual Studio IDE.
Features
- Windows Explorer integration for Git
- Feature rich user interface for Git
- 32bit and 64bit support
- Visual Studio extension (2015-2017)
Specific in 2.5x releases:
- Visual Studio (2010 — 2015) add-in
- Runs under Linux or Mac OS X using Mono
- Basic SVN functionality
For description of 2.x specific features, see the 2.x documentation
Git Extensions
Git Extensions is a standalone UI tool for managing git repositories.
It also integrates with Windows Explorer and Microsoft Visual Studio (2015/2017/2019).
Have a question? Come and talk to us: or send us a tweet
Online manual
git-extensions-documentation.readthedocs.org
Current Status
Next Version (build instructions)
| Windows only | |
|---|---|
| Runtime environment | MS Windows 7SP1+ // .NET 8.0 SDK |
| Development | MS Visual Studio 2022 (v17.8+), C# 12 // VC++ (inc. ATL for x86/x64 for installer) |
| Current dev status | |
| Translations |
Older versions
See build instructions
Downloads
Download it now or install it with Chocolatey or Winget.
If you want to update a portable version, you should delete all the files and the subfolders from the existing folder except:
- GitExtensions.settings
- WindowPositions.xml
- User defined themes in folder Themes
| Latest Release: v5.2.1 | [ Download ] |
|
Current dev stream NB: expect 🦄 🦄 and 🐉 🐉 |
[ Download ] |
| Visual Studio VSIX (2022) | [ Download ] or install from Visual Studio via Extensions |
| Visual Studio VSIX (2015/2017/2019) | [ Download ] or install from Visual Studio via Extensions |
|
Visual Studio Code VSIX Kudos to @pmiossec |
[ Download ] or install via VSCode NB: Please direct all discussions about the VSIX to its own repo. |
|
IntelliJ platform IDEs Kudos to @DmitryZhelnin |
[ Download ] or install via IDE Plugins settings NB: Please direct all discussions about this plugin to its own repo. |
|
Git Extensions for VS Code Kudos to @Carl-Hugo |
This extension allows users to Browse with Git Extensions from the Explorer and the Editor. It supports a single folder and workspaces. Nothing fancier. [ Download ] from the Marketplace or install via VS Code |
Conduct
Project maintainers pledge to foster an open and welcoming environment, and ask contributors to do the same.
For more information see our code of conduct.
Shoutouts
- We thank all the people who contribute, the project exists because of you

- We thank Transifex for helping us with translations
- We thank SignPath.io for the free code signing
- We thank SignPath Foundation for the signing certificate
- We thank Yusuke Kamiyamane for the icons (CCA/3.0)
Backers
Thank you to all our backers! 🙏 [Become a backer]
Sponsors
Support this project by becoming a sponsor. Your logo will show up here with a link to your website. [Become a sponsor]
Useful Links
- Website: gitextensions.github.io Git repo
- Source code: github.com/gitextensions/gitextensions
- Online manual: git-extensions-documentation.readthedocs.org Git repo
- Issue tracker: github.com/gitextensions/gitextensions/issues
- Wiki: github.com/gitextensions/gitextensions/wiki
- Gitter chat: gitter.im/gitextensions/gitextensions