
Время на прочтение9 мин
Количество просмотров29K
Я работаю в операционной системе «Windows 10». У меня на компьютере установлена программа «Git for Windows» версии 2.35.1. В принципе, «Git for Windows» — это та же знаменитая программа (набор программ) «Git» (система управления версиями), только скомпилированная из исходного кода в исполняемый файл, который может запускаться в операционных системах «Windows» (изначально исходный код «Git» был написан для компиляции в исполняемый файл, запускаемый в операционной системе «Linux»).
Дистрибутив «Git for Windows» кроме программы «Git» содержит разные полезные для работы с «Git» программы, вроде программы-оболочки «Git Bash» с интерфейсом командной строки и программы «Git GUI» с графическим оконным интерфейсом. В документации сказано, что «Git for Windows» является подмножеством платформы (набора инструментов и библиотек) «MSYS2». Как я понимаю, для компиляции используется компилятор из набора инструментов «MinGW-w64».
Окончания строк в разных операционных системах
Как известно (возможно, не всем), в операционных системах «Windows» окончание строки обычно представляется двумя символами, в таблице Юникода они обозначены кодами U+000D (возврат каретки, по-английски «Carriage Return», сокращенно «CR») и U+000A (подача бумаги на следующую строку, по-английски «Line Feed», сокращенно «LF»). В мир компьютеров эти управляющие коды пришли из мира печатных (пишущих) машинок.
В Unix-подобных операционных системах окончание строки обычно представляется одним символом «LF». (Говорят, в операционных системах от компании «Apple» до появления операционной системы «Mac OS X», которая вышла в 2001 году, окончание строки представлялось одним символом «CR». Сейчас в операционных системах «macOS» окончание строки представляется одним символом «LF», как и в других Unix-подобных операционных системах.)
Из-за того, что большинство текстовых редакторов (даже заточенных под написание текстов программ) плохо умеет работать с окончаниями строк разного вида, вышеописанная разница приносит проблемы, если над одним и тем же проектом работают программисты из разных операционных систем.
Я подготовил для экспериментов текстовый файл, содержащий несколько строк с окончаниями разного вида. Для работы с кодом я обычно использую программы «VS Code» и «Notepad++». Обе эти программы могут правильно отображать строки с окончаниями разного вида. Однако, программа «VS Code» не отображает отдельные символы, входящие в окончания строк, поэтому в ней не получается понять, где и какое окончание строки использовано. Для просмотра и определения видов окончаний строк я обычно использую программу «Notepad++», она умеет отображать отдельные символы, входящие в окончания строк. Вот как у меня на компьютере выглядит в программе «Notepad++» тестовый файл «myfile.txt» (включено отображение всех символов, то есть и тех, которые обычно не отображаются в текстовых редакторах):

На иллюстрации выше видно, что две строки имеют окончания в виде пары символов CR и LF (эту пару символов часто обозначают как «CRLF»), а другие две строки — в виде LF. В программе «Notepad++» у меня не получилось создать разные виды окончаний строк в одном и том же файле (хотя можно скопировать и вставить существующие с помощью инструмента специальной вставки), поэтому я сначала ввел текст файла в программе «Notepad++» с одинаковыми окончаниями строк, а потом подправил два из этих окончаний строк в шестнадцатеричном (двоичном) редакторе. Кодировка файла «myfile.txt» — UTF-8 (как видно на иллюстрации, размер файла — 222 байта, русские буквы занимают по два байта).
Также на иллюстрации выше видно, что в строке состояния программы «Notepad++» режим работы с окончаниями строк показан как «Windows (CR LF)». Этот режим не влияет на отображение символов только что открытого файла. Он лишь говорит о том, что при вставке нового окончания строки (нажатием клавиши «Enter») будет вставлено окончание строки вида CRLF. Этот режим можно переключить на «Unix (LF)» или на «Macintosh (CR)», после чего можно будет клавишей «Enter» вставлять окончания строк вида LF или CR. Однако, переключение этого режима не дает возможности работать в одном файле одновременно с несколькими видами окончаний строк, так как при переключении этого режима меняются сразу все окончания строк в файле на выбранный в режиме вид окончаний строк.
Тестовый файл «myfile.txt» я разместил в папке C:\Users\Илья\source\repos\test\. Пока он в этой папке один. Будем считать эту папку папкой нашего проекта.
Создание Git-репозитория и параметр «core.autocrlf»
С программой «Git» можно работать множеством способов, но я предпочитаю самый универсальный — из командной строки. Для этого я обычно использую программу-оболочку «PowerShell» версии 7, а запускаю ее в программе-«эмуляторе терминала» «Windows Terminal». Итак, проверим, что программа «Git» установлена на компьютере и доступна в папке нашего проекта:
PS C:\Users\Илья\source\repos\test> git --version
git version 2.35.1.windows.2
Создадим Git-репозиторий для нашего проекта:
PS C:\Users\Илья\source\repos\test> git init
Initialized empty Git repository in C:/Users/Илья/source/repos/test/.git/
«Репозиторием» обычно называют папку (хранилище, базу данных), в которой хранится исходный код программы (папку проекта). А «Git-репозиторием» называют базу данных, в которой хранятся разные версии файлов нашего проекта, информация о них и об изменениях, вносимых в эти файлы. Сама программа (система программ) «Git» у меня установлена в папке C:\Program Files\Git\. Чтобы обеспечить управление версиями файлов нашего проекта, в папке нашего проекта с помощью вышеприведенной команды была создана скрытая папка «.git» (у меня в программе «Проводник Windows» включено отображение скрытых папок, поэтому ее там видно), в которой хранятся база данных с версиями файлов нашего проекта и разные служебные файлы.
Сразу после создания папки «.git» в ней уже есть файлы базы данных и разные служебные файлы. Но пока что эта база данных пуста (пока еще не содержит версий файлов нашего проекта). Чтобы файлы нашего проекта попали под отслеживание в них изменений от программы «Git», они должны быть добавлены в базу данных в папке «.git» посредством коммитов («коммит» — это операция регистрации изменений в файлах проекта).
Настройка работы программы «Git» может быть произведена на трех разных уровнях: на уровне операционной системы (для всех ее пользователей), на уровне отдельного пользователя (global) и на уровне проекта (local). При установке программы «Git» программа-установщик обычно задает умолчательные настройки на уровне текущего пользователя операционной системы. В рамках данного поста мы затронем только настройки на уровне текущего проекта, они хранятся в файле \.git\config (этот файл не имеет расширения) текущего проекта. Этот файл был создан в результате вышеприведенной команды «git init», он — текстовый, но нет нужды редактировать его вручную, для этого есть отдельная команда «git config».
Если какой-либо параметр не определен в вышеупомянутом файле настроек текущего проекта, то значение этого параметра будет автоматически взято из файла настроек текущего пользователя операционной системы. Для чистоты эксперимента мы будем прямо прописывать нужное значение нужного параметра в файле настроек текущего проекта с помощью следующей команды:
PS C:\Users\Илья\source\repos\test> git config --local core.autocrlf trueКак работает параметр «core.autocrlf» мы проверим экспериментально, после чего станет понятно, для чего этот параметр можно использовать.
1. Параметр «core.autocrlf», значение «true»
Итак, с помощью команды, приведенной выше, мы установили для параметра «core.autocrlf» значение «true». Совершим первый коммит, в который включим текущую версию нашего тестового файла «myfile.txt»:
PS C:\Users\Илья\source\repos\test> git add "myfile.txt"
warning: LF will be replaced by CRLF in myfile.txt.
The file will have its original line endings in your working directory

PS C:\Users\Илья\source\repos\test> git commit -m "Первый коммит"
[master (root-commit) 4d71045] Первый коммит
 1 file changed, 4 insertions(+)
 create mode 100644 myfile.txt
В блоке кода выше приведены сразу две команды подряд. Команда «git add» формирует список содержимого будущего коммита. Когда содержимое коммита сформировано, делаем сам коммит (регистрацию изменений в коде программы в базе данных в папке «.git» нашего проекта) с помощью команды «git commit».
Два сообщения, выданные после первой команды в блоке кода выше, могут запутать неопытного пользователя. Первое сообщает о том, что окончания строк вида LF будут заменены окончаниями строк вида CRLF в нашем тестовом файле «myfile.txt». Второе сообщает, что версия файла «myfile.txt», находящаяся в папке проекта, сохранит окончания строк в оригинальном виде. На первый взгляд, эти сообщения противоречат друг другу. Путаница возникает из-за того, что в обоих сообщениях употреблено будущее время, но не уточняется, что события, о которых идет речь, хоть и произойдут в будущем, но произойдут НЕ одновременно.
На самом деле, во втором сообщении имеется в виду, что оригинальные окончания строк в файле «myfile.txt» останутся нетронутыми работой запущенной команды «git add». А первое сообщение предупреждает о том, что в будущем, после извлечения версии файла «myfile.txt» из базы данных в папку проекта, окончания строк вида LF будут затерты окончаниями строк CRLF из-за текущего значения настройки «core.autocrlf».
Проверим это на практике. После окончания работы двух команд, показанных в блоке кода выше, я заглянул в файл «myfile.txt», находящийся в папке проекта (в терминах программы «Git» ее называют «рабочей папкой» [working directory], так как именно тут мы работаем с файлами проекта, вносим в них изменения), и убедился, что окончания строк в нем остались без изменений (две строки с окончаниями вида CRLF, две строки с окончаниями вида LF). То есть обещание «The file will have its original line endings in your working directory» сбылось.
После этого я удалил файл «myfile.txt» из папки проекта в корзину операционной системы. Представим, что я потерял рабочие файлы своего проекта. Восстановим их (конкретно в нашем проекте один файл, но в общем случае их может быть много) в папку проекта из базы данных, созданной ранее средствами программы «Git» для нашего проекта:
PS C:\Users\Илья\source\repos\test> git checkout -f master
Already on 'master'
В результате этой команды в папке проекта снова появился файл «myfile.txt». Однако, все четыре окончания строк в этом файле теперь стали одного вида: CRLF. Сбылось обещание из предупреждения «warning: LF will be replaced by CRLF in myfile.txt.».
Как работает настройка «core.autocrlf» со значением «true»? Если при такой настройке мы помещаем версию измененного файла в базу данных «Git» данного проекта, то все найденные в этом файле окончания строк вида CRLF конвертируются в окончания строк вида LF. Если при такой настройке мы извлекаем версию файла, хранящуюся в базе данных «Git» данного проекта, то все найденные в этой версии файла окончания строк вида LF конвертируются в окончания строк вида CRLF. Вот как это можно показать схематично:
  add, commit       База        checkout
-------------->  данных Git  -------------->
 (CRLF -> LF)       (LF)      (LF -> CRLF)
Подчеркну, что на этой схеме внесение в базу данных (коммит) и извлечение из нее (checkout) разнесены во времени. Если внесение в базу данных произошло при настройке «core.autocrlf» со значением «true», а извлечение из базы данных произошло при настройке «core.autocrlf» со значением «false», то конвертация при извлечении не произойдет и все четыре окончания строк в извлеченном файле окажутся вида LF (в том виде, в котором этот файл был помещен в базу данных и хранится там). Это замечание может быть сходным образом применено и к другим значениям настройки «core.autocrlf».
2. Параметр «core.autocrlf», значение «false»
Схема работы при такой настройке:
    add, commit            База             checkout
------------------->    данных Git     ------------------->
 (без конвертации)    (CRLF и/или LF)   (без конвертации)
При такой настройке в базе данных «Git» будет храниться именно то, что мы туда положили. И будет извлечено именно то, что хранится в базе данных, без изменений.
3. Параметр «core.autocrlf», значение «input»
Схема работы при такой настройке:
  add, commit       База          checkout
-------------->  данных Git  ------------------->
 (CRLF -> LF)       (LF)      (без конвертации)
Зачем нужны эти три настройки
Параметр «core.autocrlf» со значением «false» — это естественный режим работы программы «Git», который использовался бы, если б не было разницы в представлении окончаний строк в разных операционных системах.
Собственно, параметр «core.autocrlf» придумали для обеспечения работы над одним проектом программистов из разных операционных систем. Предполагается, что программист в операционной системе «Windows» будет работать с файлами, в которых окончания строк только вида CRLF. При этом предполагается, что он включит для проекта настройку «core.autocrlf» со значением «true». Тогда он будет работать в своей папке проекта с файлами, в которых окончания строк будут вида CRLF, при этом в базе данных «Git» эти же файлы будут сохранены с окончаниями вида LF. Программист в операционной системе «Windows» этого даже не заметит, ведь конвертация происходит автоматически, как было показано выше в пункте 1.
В тот же момент программист в Unix-подобной операционной системе будет работать с той же базой данных «Git», но у него для проекта будет включена настройка «core.autocrlf» со значением «input» (или со значением «false»). Он будет получать из базы данных файлы с окончаниями строк вида LF, как и принято в Unix-подобных операционных системах.
В принципе, программист в операционной системе «Windows» тоже может использовать параметр «core.autocrlf» со значением «false» в случае, если он работает со своей базой данных «Git» один и пишет код только для операционных систем Windows. Либо он работает вместе с другими программистами, но все участники проекта работают в операционных системах «Windows» и проект предназначен только для операционных систем «Windows». Либо, еще один вариант, в коде есть файлы с окончаниями строк разного вида (CRLF и/или LF) и программист хочет сам отслеживать виды окончаний строк в своих файлах, без вмешательства программ, без автоматической конвертации.
Полезные ссылки
-
В книге «Pro Git» (вторая редакция, вышла в 2014 году), авторы: Scott Chacon (Скотт Чакон) и Ben Straub (Бен Страуб), в главе 8 «Настройка Git», в подглаве 8.1 «Конфигурация Git» (статья большая, ищите в ее последней трети раздел «Форматирование и пробелы»).
-
Хороший, развернутый ответ на вопрос «Git replacing LF with CRLF» на известном сайте «Stack Overflow».
Символы конца строки EOL для текстовых файлов различаются в зависимости от операционной системы. Linux использует перевод строки LF, Windows использует возврат каретки + перевод строки CRLF. Если несколько разработчиков работают над одним проектом на GitHub под разными операционными системами — бардак практически гарантирован.
Главное, что нужно помнить — в репозитории все текстовые файлы должны быть с окончаниями LF.
Настройки EOL для Git
Настройка core.eol имеет значение по умолчанию native, другие возможные значения — это lf и crlf. Git использует значение этой настройки, когда записывает файлы в рабочую директорию при выполнении таких команд, как git checkout или git clone. Имеет смысл, только если core.autocrlf равно true.
Настройка core.autocrlf имеет значение по умолчанию false, другие возможные значения — это true и input. Настройка определяет, будет ли Git выполнять какие-либо преобразования EOL при записи/чтении в/из репозитория. Значение по умолчанию опасно, потому что может привести к записи в репозиторий CRLF файлов.
core.autocrlf=false— ничего не делать при записи в репозиторий, ничего не делать при чтении из репозиторияcore.autocrlf=input— при записи в репозиторий заменять CRLF на LF, при чтении из репозитория ничего не делатьcore.autocrlf=true— при записи в репозиторий заменять CRLF на LF, при чтении из репозитория заменять LF наcore.eol
Значение input подходит при работе под Linux:
$ git config --local core.eol native
$ git config --local core.autocrlf input
Значение true подходит при работе под Windows:
$ git config --local core.eol native
$ git config --local core.autocrlf true
При выполнении этих команд будет создан файл .git/config в директории проекта:
[core]
eol = native
autocrlf = input
[core]
eol = native
autocrlf = true
Можно записать эти значения в глобальный файл конфигурации Git ~/.gitconfig, если заменить --local на --global.
Все настройки Git
Поскольку мы тут работаем с настройками Git, есть смысл упомянуть, какие они бывают и как их посмотреть.
- Системная конфигурация Git управляет настройками для всех пользователей и всех репозиториев на компьютере.
- Глобальная конфигурация Git управляет настройками текущего вошедшего пользователя и всех его репозиториев.
- Локальная конфигурация Git управляет настройками для отдельно взятого репозитория.
Эти три файла конфигурации выполняются в каскадном порядке — сначала системный, затем глобальный, и наконец, локальный. Это означает, что локальная конфигурация Git всегда будет перезаписывать настройки, установленные в глобальной или системной конфигурации.
$ git config --list
$ git config --list --system
$ git config --list --global
$ git config --list --local
Если не указать, какую конфигурацию надо показать (первая команда) — будут показаны все три конфигурации, объединенные в вывод консоли. Чтобы посмотреть настройки вместе с именем файла конфигурации, можно использовать ключ show-origin.
$ git config --list --show-origin
file:C:/Program Files/Git/etc/gitconfig http.sslcainfo=C:/Program Files/Git/mingw64/ssl/certs/ca-bundle.crt
file:C:/Program Files/Git/etc/gitconfig http.sslbackend=openssl
file:C:/Program Files/Git/etc/gitconfig diff.astextplain.textconv=astextplain
..........
file:C:/Users/Evgeniy/.gitconfig        user.name=Evgeniy Tokmakov
file:C:/Users/Evgeniy/.gitconfig        user.email=...............
file:C:/Users/Evgeniy/.gitconfig        core.autocrlf=false
..........
file:.git/config        core.repositoryformatversion=0
file:.git/config        core.filemode=false
file:.git/config        core.bare=false
..........
$ git config --list --show-origin | grep autocrlf
file:C:/Program Files/Git/etc/gitconfig core.autocrlf=true
file:C:/Users/Evgeniy/.gitconfig        core.autocrlf=false
file:.git/config                        core.autocrlf=true
Небольшой эксперимент
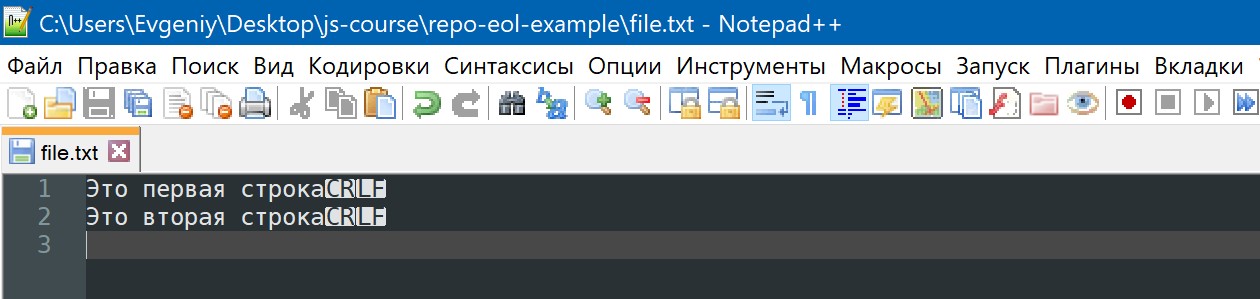
У меня операционная система Windows. Создаем директорию repo-eol-example, внутри нее — текстовой файл file.txt. Добавим в файл пару строк и убедимся, что окончания строк — CRLF.
Переходим в директорию проекта, выполняем три команды
$ git init
$ git config --local core.eol native
$ git config --local core.autocrlf true
Добавляем наш файл в индекс и фиксируем изменения
$ git add file.txt
$ git commit -m "add file.txt"
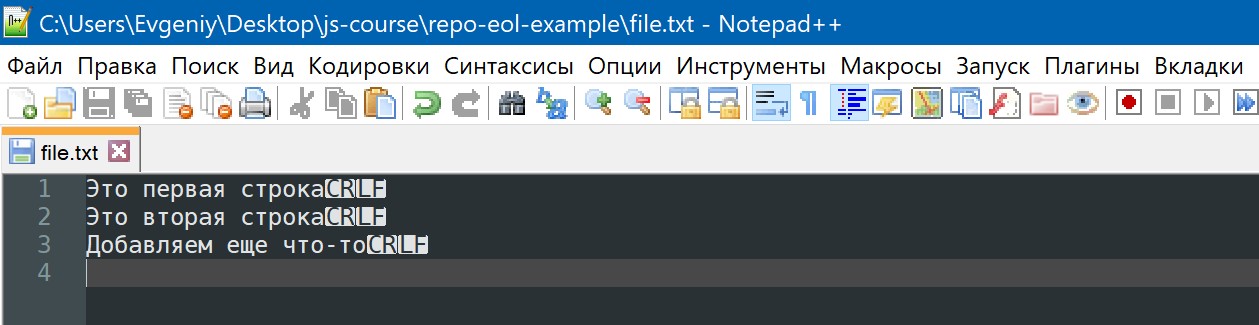
Добавляем в наш файл еще строку, чтобы он изменился

И восстановим его из репозитория в изначальном виде
$ git checkout -- file.txt

Что произошло? При добавлении файла в репозиторий (commit) символы CRLF были заменены на LF. При извлечении файла в рабочую директорию (checkout) — символы LF были заменены на CRLF.
Давайте убедимся в том, что в репозитории у нас символы LF. Для этого изменим настройку Git, чтобы вообще никаких замен не было. Добавим в файл строку, а потом восстановим из репозитория в изначальном виде.
$ git config --local core.autocrlf false
$ git checkout -- file.txt

Что произошло? При извлечении файла в рабочую директорию — символы EOL остались без изменений, как они сохранены в репозитории.
Предупреждения от Git
Когда случается нештатная ситуация — Git предупреждает об этом. Например, если мы установили следующие настройки для Git:
$ git config --local core.eol native
$ git config --local core.autocrlf input
И пытаемся записать CRLF файл в репозиторий — Git предупреждает, что символы CRLF будут заменены на LF (при записи в репозиторий). Тут ситуация явно нештатная — вроде бы настройки соответствуют Linux, но при этом в рабочей директории откуда-то взялся CRLF файл, а этого быть не должно.
$ git add other.txt
warning: CRLF will be replaced by LF in other.txt.
The file will have its original line endings in your working directory
При извлечении такого файла из репозитория в рабочую директорию — никаких преобразований EOL не будет, потому что input работает только при записи в репозиторий. И мы получим LF окончания строк в этом файле — так, как и должно быть в Linux.
Еще одна нештатная ситуация — мы установили следующие настройки для Git:
$ git config --local core.eol native
$ git config --local core.autocrlf true
И пытаемся записать LF файл в репозиторий — Git предупреждает, что символы LF будут заменены на CRLF (при чтении из репозитория). Тут ситуация явно нештатная — вроде бы настройки соответствуют Windows, но при этом в рабочей директории откуда-то взялся LF файл, а этого быть не должно.
$ git add another.txt
warning: LF will be replaced by CRLF in another.txt.
The file will have its original line endings in your working directory
При извлечении такого файла из репозитория в рабочую директорию — будет выполнена замена LF на CRLF. И мы получим CRLF окончания строк в этом файле — так, как и должно быть в Windows.
Тут важно то, что как в первой, так и во второй ситуации — файл будет сохранен в репозитории с LF окончаниями строк, как и должно быть.
Настройка core.safecrlf
Как Git узнает, что файл является текстовым? У Git есть внутренний метод эвристической проверки, является ли файл двоичным или нет. Файл считается текстовым, если он не является двоичным. Git иногда может ошибаться — и по этой причине существует настройка core.safecrlf.
Эту настройку нужно установить в значение true. Тогда при подготовке к замене CRLF на LF — Git проверит, что сможет успешно отменить операцию. Это защита от того, чтобы выполнить замену в файле, который не является текстовым — и, тем самым, безнадежно его испортить.
Работа под Windows
Лично мне удобно везде использовать LF, хотя у меня основная система Windows — поэтому установил себе настройки, чтобы вообще не заменять EOL.
$ git config --global core.eol lf
$ git config --global core.autocrlf false
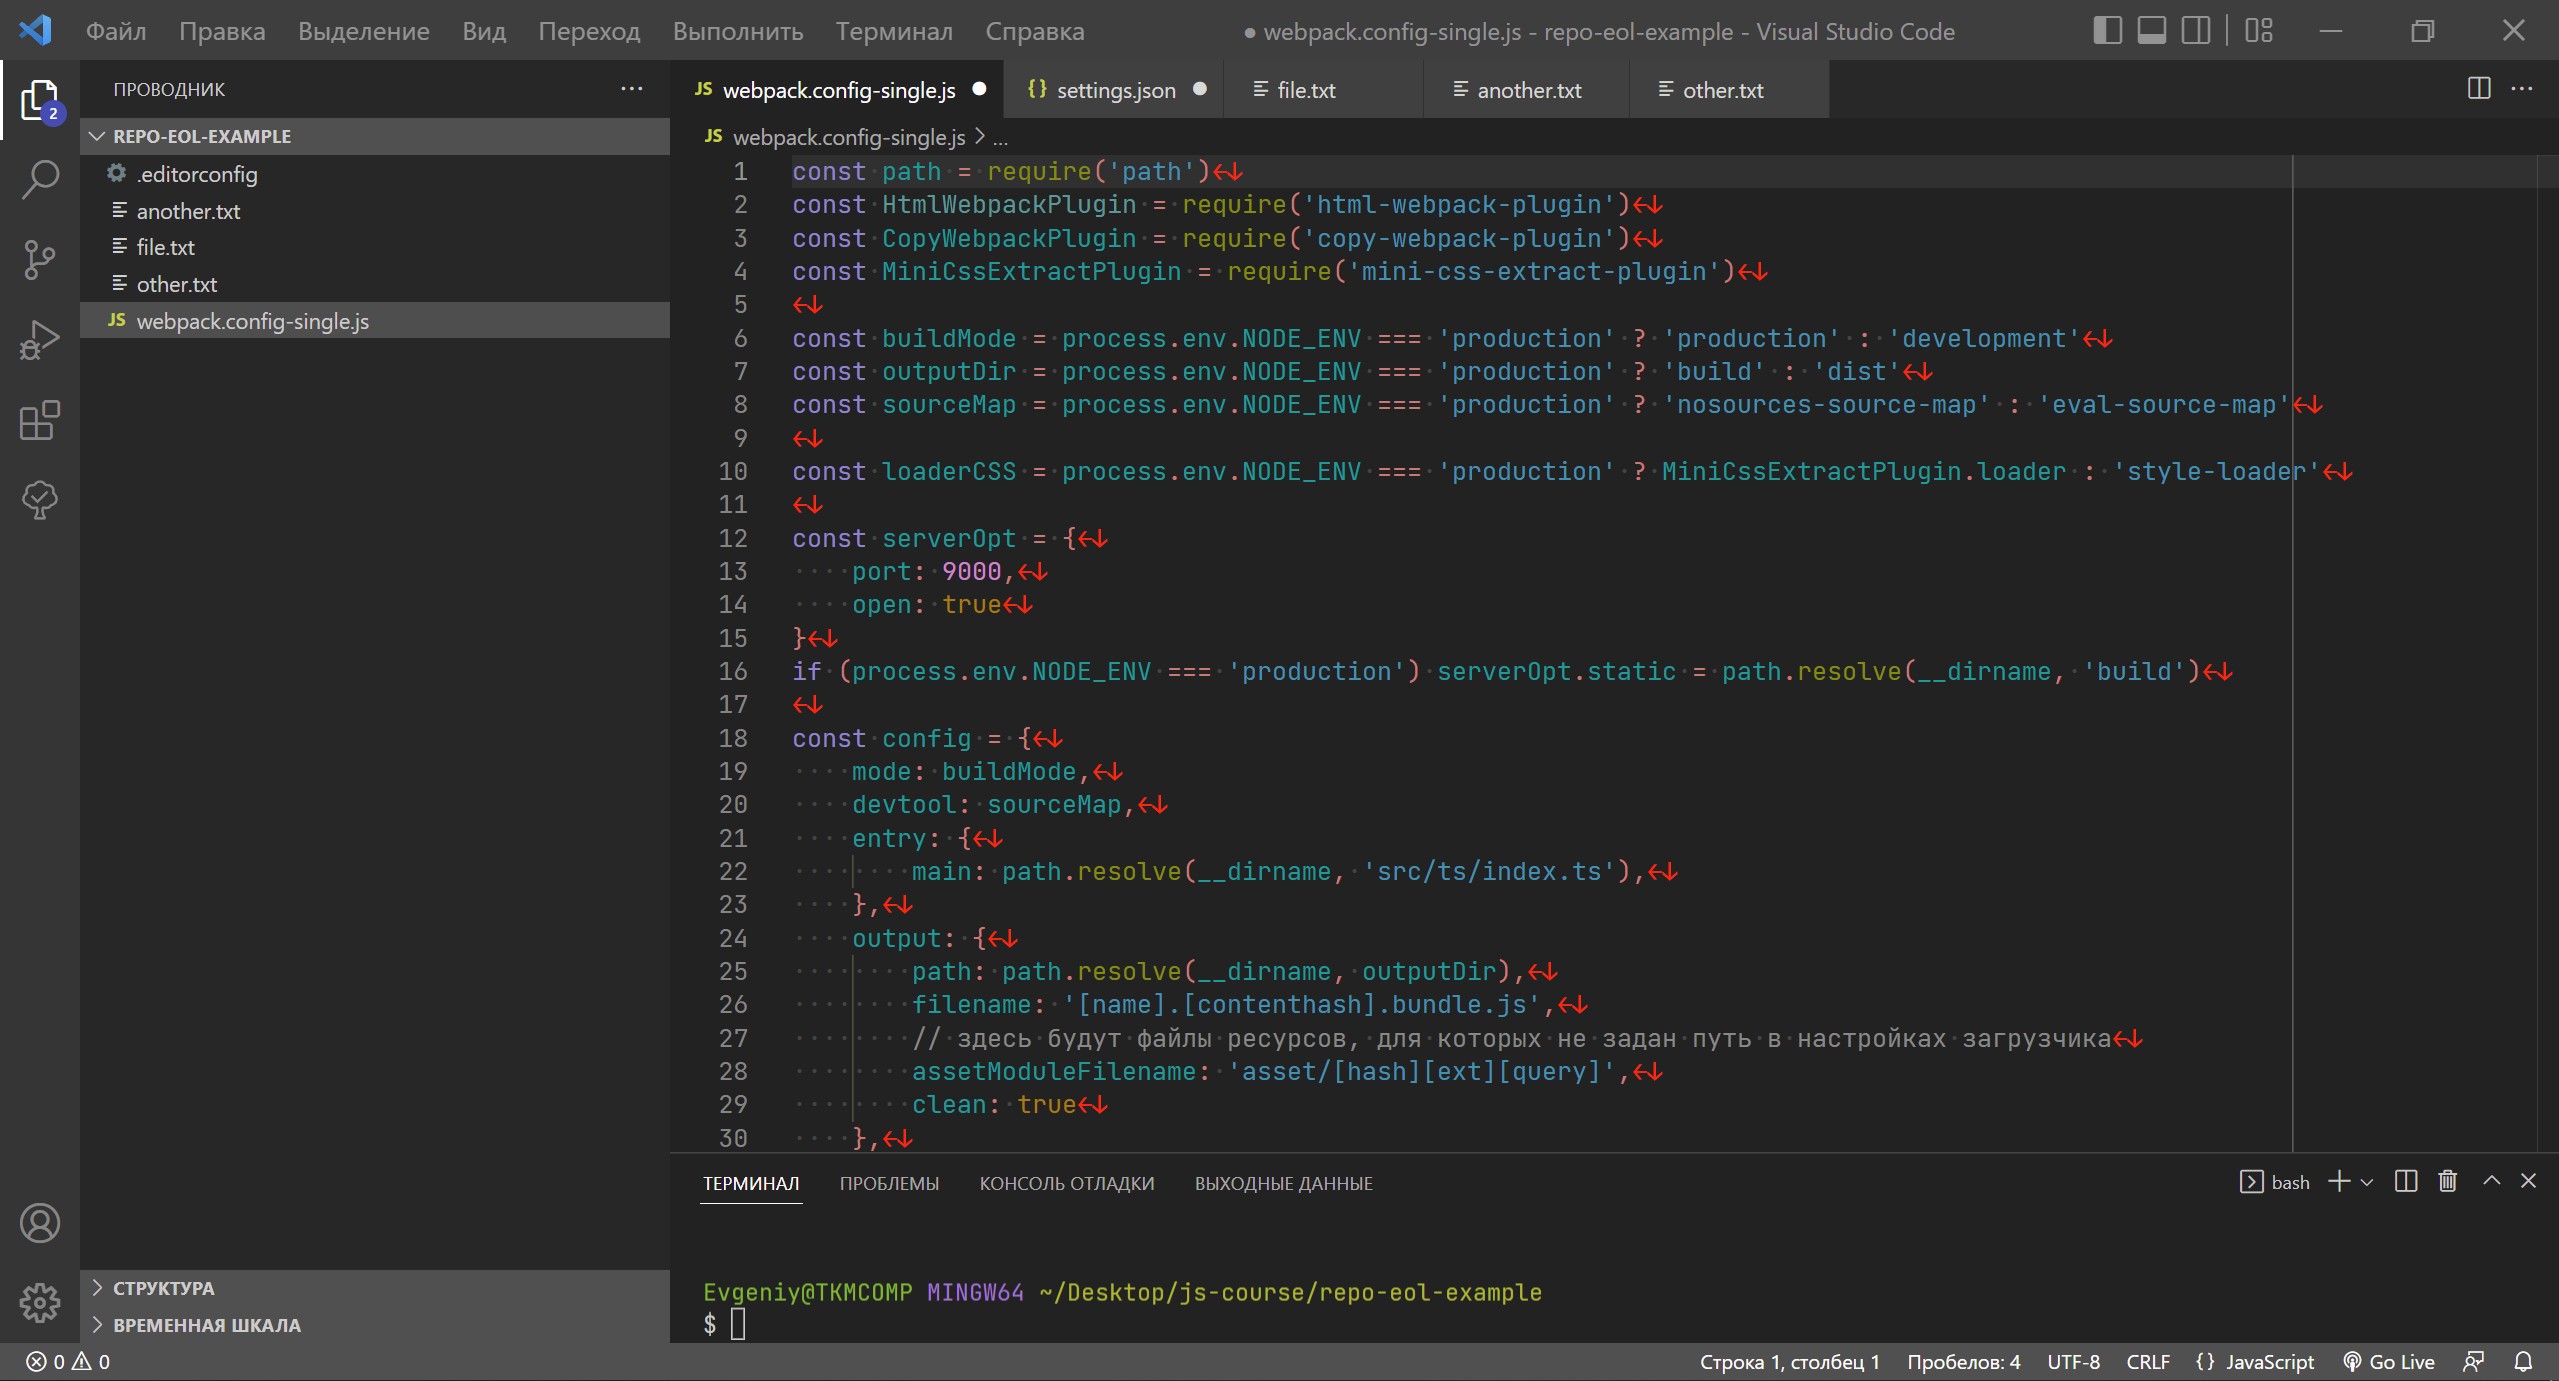
Современные IDE способны работать под Windows с EOL как в Linux, так что необходимости в заменах просто нет. В настройках VS Code у меня установлено значение LF для EOL.
{
    ..........
    "files.eol": "\n", // символ конца строки как в linux
    ..........
}
Чтобы следить за символами конца строки — можно установить расширение «Render Line Endings», которое показывает символы LF и CRLF.
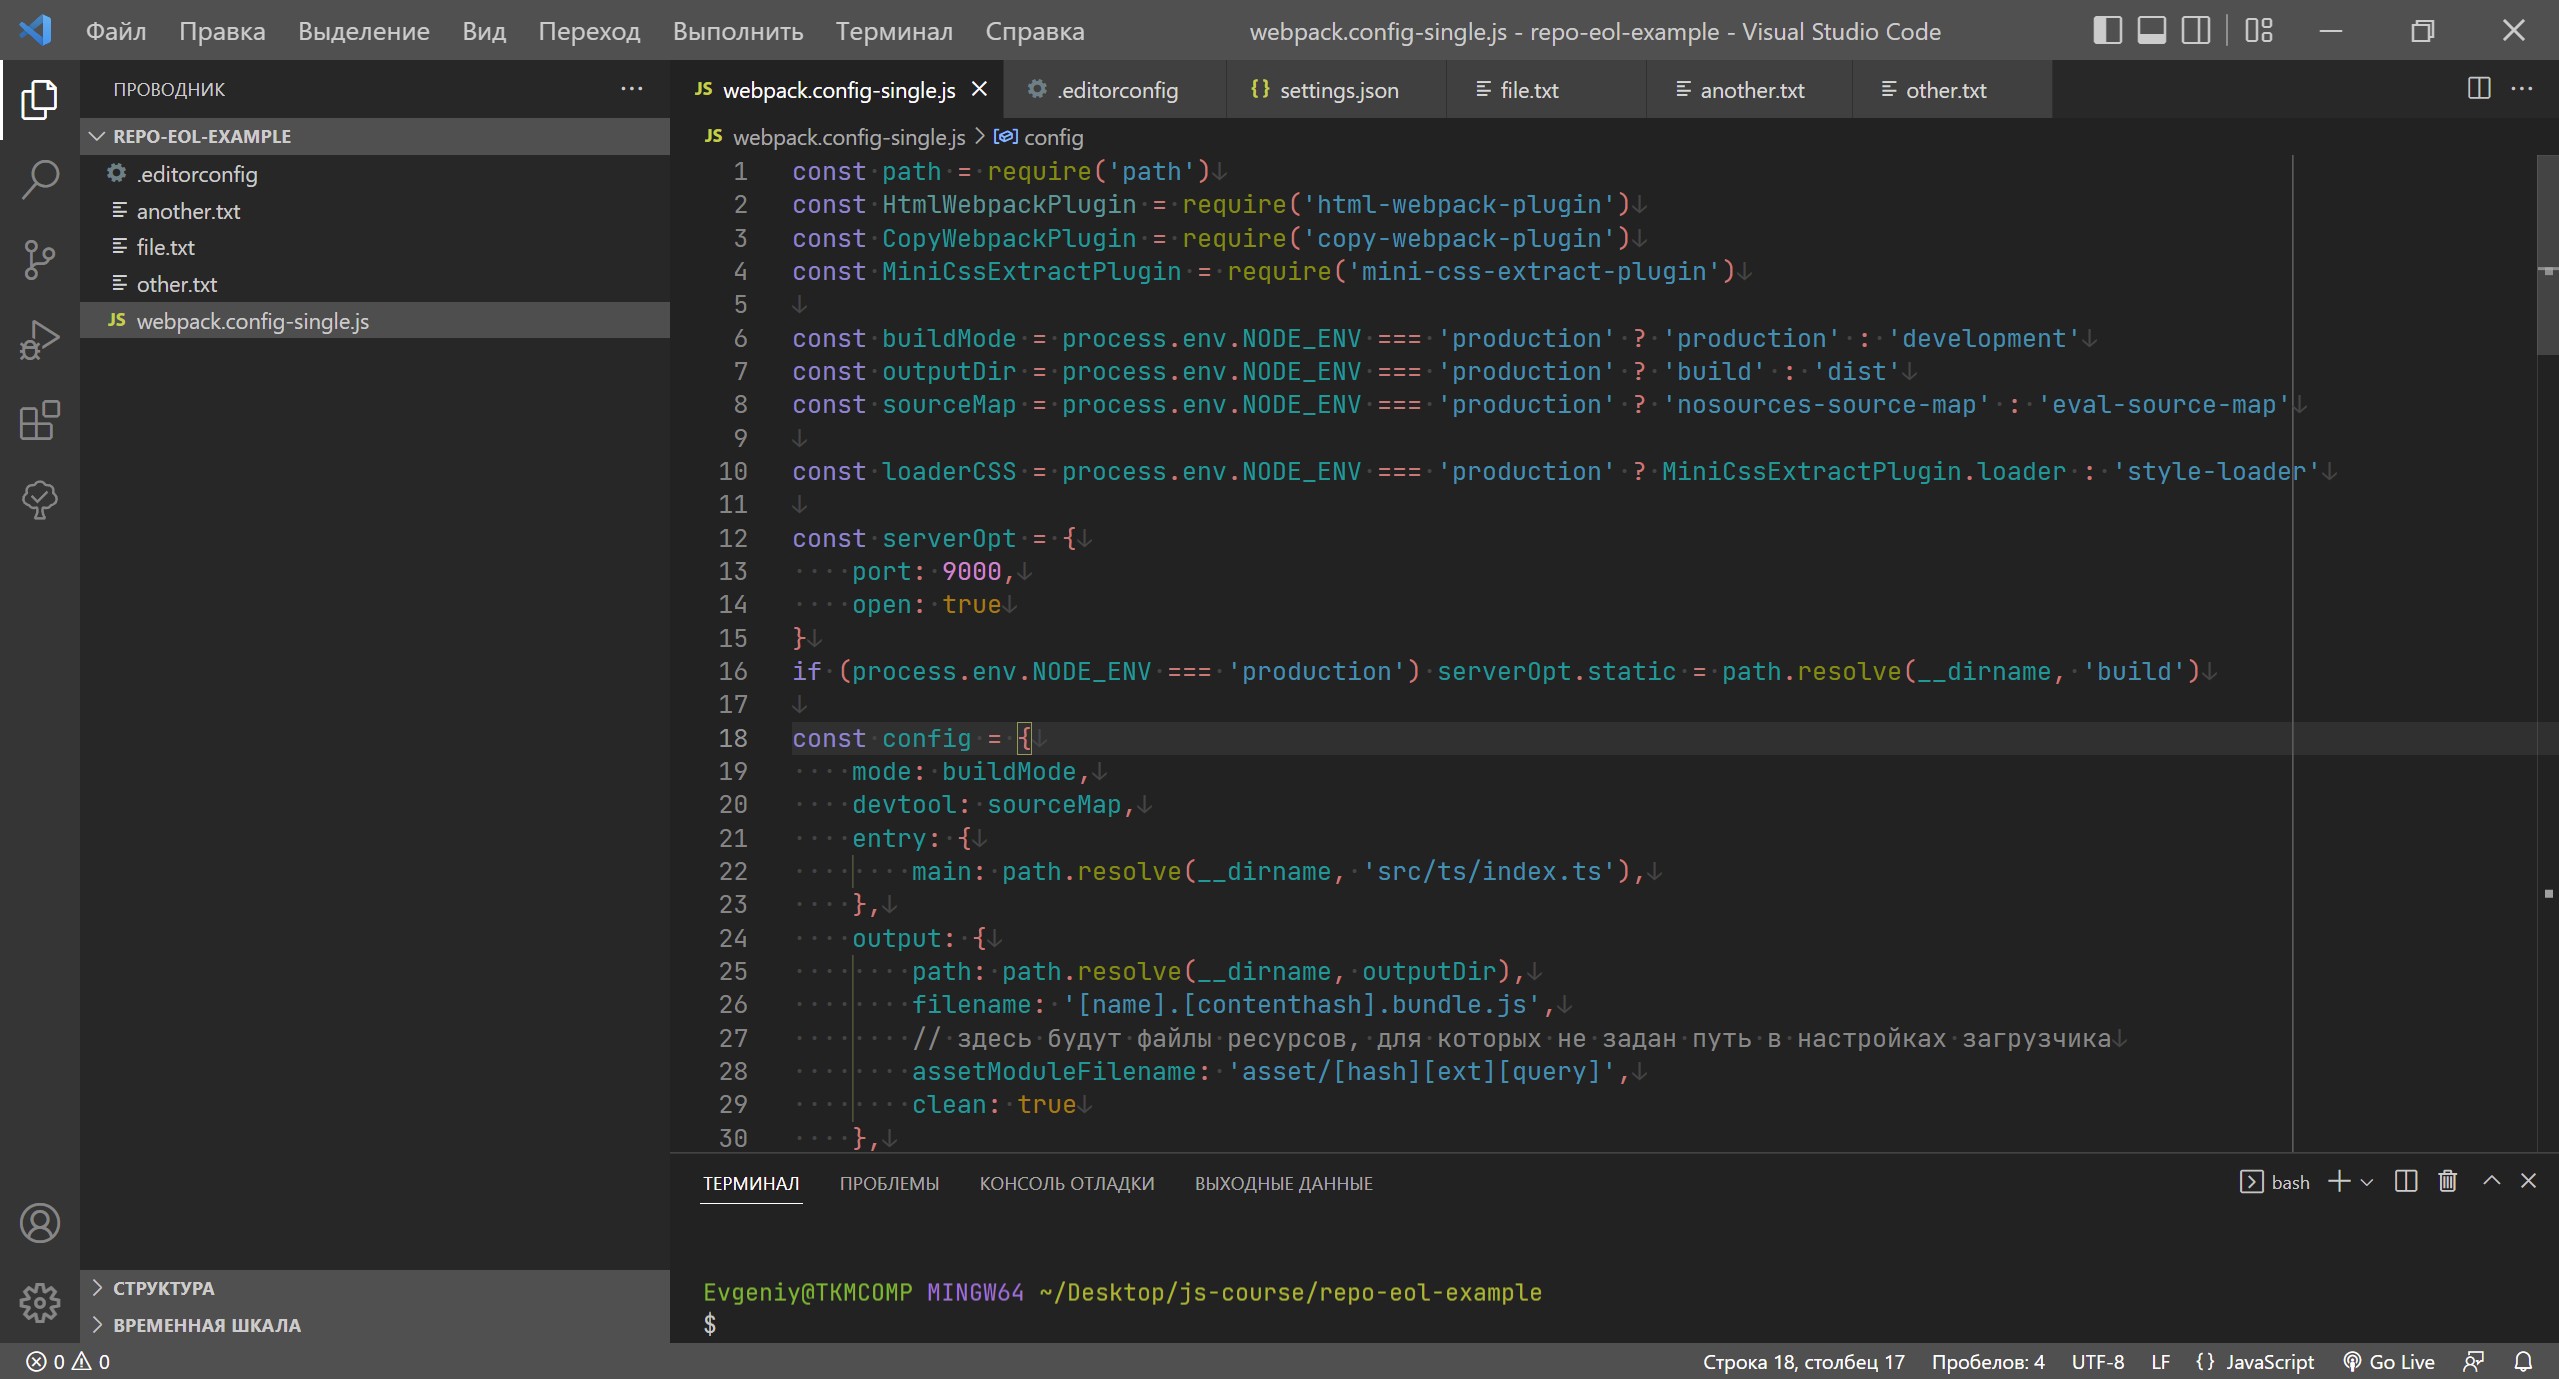
{
    ..........
    "editor.renderWhitespace": "all", // показывать символы пробелов
    "files.eol": "\n", // символ конца строки как в linux
    ..........
    "code-eol.newlineCharacter": "↓", // символ LF
    "code-eol.crlfCharacter": "←↓", // символы CRLF
    // подсвечивать как ошибку EOL в файле, если не совпадает с настройкой files.eol
    "code-eol.highlightNonDefault": true,
}
Когда в проект случайно попадёт файл с CRLF символами конца строки — эти символы будут подсвечены красным цветом (вообще, цветом errorForeground темы).
Но такая подсветка будет всего секунду, потому что у меня еще настроено автосохранение открытых файлов — и файл будет сохранен с окончаниями LF.
{
    ..........
    "editor.renderWhitespace": "all", // показывать символы пробелов
    "files.eol": "\n", // символ конца строки как в linux
    "files.autoSave": "afterDelay", // автоматическое сохранение файла
    "files.autoSaveDelay": 1000, // задержка перед сохранением файла
    ..........
    "code-eol.newlineCharacter": "↓", // символ LF
    "code-eol.crlfCharacter": "←↓", // символы CRLF
    // подсвечивать как ошибку EOL в файле, если не совпадает с настройкой files.eol
    "code-eol.highlightNonDefault": true,
}
Чтобы настройки VS Code всегда были правильными, можно создать файл .editorconfig в корне проекта и установить расширение «EditorConfig for VS Code». Расширение читает файл .editorconfig и устанавливает правильные настройки VS Code.
# эта настройка должна быть в самом начале; если установлена в true,
# парсер не будет искать другие конфиги родительских директориях
root = true

# правила для текстовых файлов
[*.{txt,md,html,css,scss,js,jsx,ts,tsx,py,php,json,xml,sh}]
# кодировка файлов
charset = utf-8
# концы строк как в linux
end_of_line = lf
# пустая строка в конце файла
insert_final_newline = true
# удалять пробелы в конце строк
trim_trailing_whitespace = true
# заменять табуляцию на пробелы
indent_style = space
# табуляция заменяется 4 пробелами
indent_size = 4
{
    ..........
    "files.encoding": "utf8", // кодировка файлов
    "files.eol": "\n", // концы строк как в linux
    "files.insertFinalNewline": true, // пустая строка в конце файла
    "files.trimTrailingWhitespace": true, // удалять пробелы в конце строк
    "editor.insertSpaces": true, // заменять табуляцию на пробелы
    "editor.tabSize": 4, // табуляция заменяется 4 пробелами
    ..........
}
Еще лучше — разместить файл .editorconfig в корне директории, которая содержит все проекты, над которыми идет работа. Тогда при открытии любого проекта VS Code будет подхватывать этот файл и его не надо будет создавать отдельно для каждого проекта.
Работа в команде
В настоящее время настройку core.autocrlf использовать нежелательно. На смену ей пришел файл .gitattributes в корне рабочей директории проекта, который нужно добавить под наблюдение Git.
* text=auto
$ git add .gitattributes
$ git commit -m "Add .gitattributes"
Тем самым мы говорим Git, чтобы он самостоятельно определял текстовые файлы и заменял CRLF на LF при записи в репозиторий. Это эквивалентно установке core.autocrlf=true в файле конфигурации, но файл .gitattributes имеет приоритет над файлом конфигурации.
Таким образом, у всех разработчиков, которые работают над одним проектом, будет одинаковое поведение Git при записи в репозиторий. А вот настройка core.eol у каждого разработчика будет своя, из файла конфигурации на компьютере. И извлекать файлы в рабочую директорию разработчик может с любыми окончаниями — LF или CRLF.
Если файла .gitattributes нет — Git по старинке будет использовать core.autocrlf из файла конфигурации для замены символов EOL.
Если случилась беда
Все-таки это произошло — в репозиторий попали CRLF файлы. Проверить это можно с помощью команды
$ git ls-files --eol
i/crlf  w/crlf  attr/                   file-crlf-one.txt
i/crlf  w/crlf  attr/                   file-crlf-two.txt
i/lf    w/lf    attr/                   file-lf-one.txt
i/lf    w/lf    attr/                   file-lf-two.txt
Первая колонка — окончания строк в репозитории, вторая колонка — окончания строк в рабочей директории. Такая команда может выдать несколько тысяч строк, а нам интересно — есть ли вообще в репозитории такие файлы, так что нужен фильтр.
$ git ls-files --eol | grep "i/crlf"
i/crlf  w/crlf  attr/                   file-crlf-one.txt
i/crlf  w/crlf  attr/                   file-crlf-two.txt
Давайте наведем порядок — создадим файл .gitattributes, добавим его в репозиторий, выполним команду нормализации EOL в репозитории.
* text=auto
$ git add .gitattributes
$ git commit -m "Add .gitattributes"
[master 347c98e] Add .gitattributes
 1 file changed, 1 insertion(+)
 create mode 100644 .gitattributes
$ git add --renormalize .
$ git status
On branch master
Changes to be committed:
  (use "git restore --staged <file>..." to unstage)
        modified:   file-crlf-one.txt
        modified:   file-crlf-two.txt
$ git commit -m "Normalize eol"
[master e54c4b7] Normalize eol
 2 files changed, 4 insertions(+), 4 deletions(-)
Смотрим, что у нас теперь в репозитории — все хорошо, все окончания строк сейчас LF:
$ git ls-files --eol
i/none  w/none  attr/text=auto          .gitattributes
i/lf    w/crlf  attr/text=auto          file-crlf-one.txt
i/lf    w/crlf  attr/text=auto          file-crlf-two.txt
i/lf    w/lf    attr/text=auto          file-lf-one.txt
i/lf    w/lf    attr/text=auto          file-lf-two.txt
Теперь надо заменить файлы в рабочей директории, для этого выполняем две команды:
$ git rm --cached -r .
rm '.gitattributes'
rm 'file-crlf-one.txt'
rm 'file-crlf-two.txt'
rm 'file-lf-one.txt'
rm 'file-lf-two.txt'
$ git reset --hard
HEAD is now at e54c4b7 Normalize eol
Смотрим, что у нас теперь в рабочей директории (у меня Windows и core.eol установлена в native):
$ git ls-files --eol
i/none  w/none  attr/text=auto          .gitattributes
i/lf    w/crlf  attr/text=auto          file-crlf-one.txt
i/lf    w/crlf  attr/text=auto          file-crlf-two.txt
i/lf    w/crlf  attr/text=auto          file-lf-one.txt
i/lf    w/crlf  attr/text=auto          file-lf-two.txt
Дополнительно
- Mind the End of Your Line
- Normalizing Line Endings in Git
Поиск:
Git • Linux • Web-разработка • Windows • Конфигурация • Настройка • EOL • CRLF • LF • Файл • IDE
Каталог оборудования
Lorem ipsum dolor sit amet, consectetur adipiscing elit, sed do eiusmod tempor incididunt ut labore et dolore magna aliqua.
Производители
Lorem ipsum dolor sit amet, consectetur adipiscing elit, sed do eiusmod tempor incididunt ut labore et dolore magna aliqua.
Функциональные группы
Lorem ipsum dolor sit amet, consectetur adipiscing elit, sed do eiusmod tempor incididunt ut labore et dolore magna aliqua.
If you’ve ever worked on a project where developers use different operating systems, you know that line endings can be a peculiar source of frustration. This issue of CRLF vs. LF line endings is actually fairly popular—you’ll find tons of questions on StackOverflow about how to configure software like Git to play nicely with different operating systems.
The typical advice is to configure your local Git to handle line ending conversions for you. For the sake of comprehensiveness, we’ll look at how that can be done in this article, but it isn’t ideal if you’re on a large team of developers. If just one person forgets to configure their line endings correctly, you’ll need to re-normalize your line endings and recommit your files every time a change is made.
A better solution is to add a .gitattributes file to your repo so you can enforce line endings consistently in your codebase regardless of what operating systems your developers are using. Before we look at how that’s done, we’ll briefly review the history behind line endings on Windows and Unix so we can understand why this issue exists in the first place.
History can be boring, though, so if you stumbled upon this post after hours of frustrated research, you can skip straight to A Simple .gitattributes Config and grab the code. However, I do encourage reading the full post to understand how these things work under the hood—you’ll (hopefully) never have to Google line endings again!
Table of Contents
What Are Line Endings?
To really understand this problem of CRLF vs. LF line endings, we need to brush up on a bit of typesetting history.
People use letters, numbers, and symbols to communicate with one another. It’s how you’re reading this post right now! But computers can only understand and work with numbers. Since the files on your computer consist of strings of human-readable characters, we need a system that allows us to convert back and forth between these two formats. The Unicode standard is that system—it maps characters like A and z to numbers, bridging the gap between human languages and the language of computers.
Notably, the Unicode standard isn’t just for visible characters like letters and numbers. A certain subset are control characters, also known as non-printing characters. They aren’t used to render visible characters; rather, they’re used to perform unique actions, like deleting the previous character or inserting a newline.
LF and CR are two such control characters, and they’re both related to line endings in files. Their history dates back to the era of the typewriter, so we’ll briefly look at how that works so you understand why we have two different control characters rather than just one. Then, we’ll look at how this affects the typical developer experience on a multi-OS codebase.
LF: Line Feed
LF stands for “line feed,” but you’re probably more familiar with the term newline (the escape sequence \n). Simply put, this character represents the end of a line of text. On Linux and Mac, this is equivalent to the start of a new line of text. That distinction is important because Windows does not follow this convention. We’ll discuss why once we learn about carriage returns.
CR: Carriage Return
CR (the escape sequence \r) stands for carriage return, which moves the cursor to the start of the current line. For example, if you’ve ever seen a download progress bar on your terminal, this is how it works its magic. By using the carriage return, your terminal can animate text in place by returning the cursor to the start of the current line and overwriting any existing text.
You may be wondering where the need for such a character originated (beyond just animating text, which happens to be a niche application). It’s a good question—and the answer will help us better understand why Windows uses CRLF.
Typewriters and the Carriage Return
Back when dinosaurs roamed the earth, people used to lug around these chunky devices called typewriters.

You feed the device a sheet of paper fastened to a mechanical roll known as the carriage. With each keystroke, the typewriter prints letters using ink on your sheet of paper, shifting the carriage to the left to ensure that the next letter you type will appear to the right of the previous one. You can watch a typewriter being used in action to get a better sense for how this works.
Of course, once you run out of space on the current line, you’ll need to go down to the next line on your sheet of paper. This is done by rotating the carriage to move the paper up a certain distance relative to the typewriter’s “pen.” But you also need to reset your carriage so that the next character you type will be aligned to the left-hand margin of your paper. In other words, you need some way to return the carriage to its starting position. And that’s precisely the job of the carriage return: a metal lever attached to the left side of the carriage that, when pushed, returns the carriage to its starting position.
That’s all good and well, but you’re probably wondering how this is relevant in the world of computers, where carriages, levers, and all these contraptions seem obsolete. We’re getting there!
Teletypewriters and the Birth of CRLF
Moving on to the early 20th century, we arrive at the teletypewriter, yet another device predating the modern computer. Basically, it works exactly the same way that a typewriter does, except instead of printing to a physical sheet of paper, it sends your message to a receiving party via a transmitter, either over a physical wire or radio waves.
Now we’re digital! These devices needed to use both a line feed character (LF) and a carriage return character (CR) to allow you to type from the start of the next line of text. That’s exactly how the original typewriter worked, except it didn’t have any notion of “characters” because it was a mechanically operated device. With the teletype, this process is more or less automatic and triggered by a keystroke—you don’t have to manually push some sort of “carriage” or move a sheet of paper up or down to achieve the same effect.
It’s easier to visualize this if you think of LF and CR as representing independent movements in either the horizontal or vertical direction, but not both. By itself, a line feed moves you down vertically; a carriage return resets your “cursor” to the very start of the current line. We saw the physical analogue of CR and LF with typewriters—moving to the next line of text required rotating the carriage to move the sheet of paper up (line feed), and returning your “cursor” to the start of that new line required using a mechanical piece aptly named the carriage return.
Teletypes set the standard for CRLF line endings in some of the earliest operating systems, like the popular MS-DOS. Microsoft has an excellent article explaining the history of CRLF in teletypes and early operating systems. Here’s a relevant snippet:
This protocol dates back to the days of teletypewriters. CR stands for “carriage return” – the CR control character returned the print head (“carriage”) to column 0 without advancing the paper. LF stands for “linefeed” – the LF control character advanced the paper one line without moving the print head. So if you wanted to return the print head to column zero (ready to print the next line) and advance the paper (so it prints on fresh paper), you need both CR and LF.
If you go to the various internet protocol documents, such as RFC 0821 (SMTP), RFC 1939 (POP), RFC 2060 (IMAP), or RFC 2616 (HTTP), you’ll see that they all specify CR+LF as the line termination sequence. So the the real question is not “Why do CP/M, MS-DOS, and Win32 use CR+LF as the line terminator?” but rather “Why did other people choose to differ from these standards documents and use some other line terminator?”
MS-DOS used the two-character combination of CRLF to denote line endings in files, and modern Windows computers continue to use CRLF as their line ending to this day. Meanwhile, from its very inception, Unix used LF to denote line endings, ditching CRLF for consistency and simplicity. Apple originally used only CR for Mac Classic but eventually switched to LF for OS X, consistent with Unix.
This makes it seem like Windows is the odd one out when it’s technically not. Developers usually get frustrated with line endings on Windows because CRLF is seen as an artifact of older times, when you actually needed both a carriage return and a line feed to represent newlines on devices like teletypes.
It’s easy to see why CRLF is redundant by today’s standards—using both a carriage return and a line feed assumes that you’re bound to the physical limitations of a typewriter, where you had to explicitly move your sheet of paper up and then reset the carriage to the left-hand margin. With a file, it suffices to define the newline character as implicitly doing the job of both a line feed and a carriage return under the hood. In other words, so long as your operating system defines the newline character to mean that the next line starts at the beginning and not at some arbitrary column offset, then we have no need for an explicit carriage return in addition to a line feed—one symbol can do the job of both.
While it may seem like a harmless difference between operating systems, this issue of CRLF vs. LF has been causing people headaches for a long time now. For example, basic Windows text editors like Notepad used to not be able to properly interpret LF alone as a true line ending. Thus, if you opened a file created on Linux or Mac with Notepad, the line endings would not get rendered correctly. Notepad was later updated in 2018 to support LF.
Line Endings in Git
As you can probably imagine, the lack of a universal line ending presents a dilemma for software like Git, which relies on very precise character comparisons to determine if a file has changed since the last time it was checked in. If one developer uses Windows and another uses Mac or Linux, and they each save and commit the same files, they may see line ending changes in their Git diffs—a conversion from CRLF to LF or vice versa. This leads to unnecessary noise due to single-character changes and can be quite annoying.
For this reason, Git allows you to configure line endings in one of two ways: by changing your local Git settings or by adding a .gitattributes file to your project. We’ll look at both approaches over the course of the next several sections.
Line Ending Transformations Concern the Index
Before we look at any specifics, I want to clarify one detail: All end-of-line transformations in Git occur when moving files in and out of the index—the temporary staging area that sits between your local files (working tree) and the repository that later gets pushed to your remote. When you stage files for a commit, they enter the index and may be subject to line ending normalization (depending on your settings). Conversely, when you check out a branch or a set of files, you’re moving files out of the index and into your working tree.
When normalization is enabled, line endings in your local and remote repository will always be set to LF and never CRLF. However, depending on some other settings, Git may silently check out files into the working tree as CRLF. Unlike the original problem described in this article, this will not pollute git status with actual line ending changes—it’s mainly used to ensure that Windows developers can take advantage of CRLF locally while always committing LF to the repo.
We’ll learn more about how all of this works in the next few sections.
Configuring Line Endings in Git with core.autocrlf
As I mentioned in the intro, you can tell Git how you’d like it to handle line endings on your system with the core.autocrlf setting. While this isn’t the ideal approach for configuring line endings in a project, it’s still worth taking a brief look at how it works.
You can enable end-of-line normalization in your Git settings with the following command:
git config --global core.autocrlf [true|false|input]You can also view the current Git setting using this command:
git config --listBy default, core.autocrlf is set to false on a fresh install of Git, meaning Git won’t perform any line ending normalization. Instead, Git will defer to the core.eol setting to decide what line endings should be used; core.eol defaults to native, which means it depends on the OS you’re using. That’s not ideal because it means that CRLF may make its way into your code base from Windows devs.
That leaves us with two options if we decide to configure Git locally: core.autocrlf=true and core.autocrlf=input. The line endings for these options are summarized below.
Both of these options enable automatic line ending normalization for text files, with one minor difference: core.autocrlf=true converts files to CRLF on checkout from the repo to the working tree, while core.autocrlf=input leaves the working tree untouched.
For this reason, core.autocrlf=true tends to be recommended setting for Windows developers since it guarantees LF in the remote copy of your code while allowing you to use CRLF in your working tree for full compatibility with Windows editors and file formats.
Normalizing Line Endings in Git with .gitattributes
You certainly could ask all your developers to configure their local Git. But this is tedious, and it can be confusing trying to recall what these options mean since their recommended usage depends on your operating system. If a developer installs a new environment or gets a new laptop, they’ll need to remember to reconfigure Git. And if a Windows developer forgets to read your docs, or someone from another team commits to your repo, then you may start seeing line ending changes again.
Fortunately, there’s a better solution: creating a .gitattributes file at the root of your repo to settle things once and for all. Git uses this config to apply certain attributes to your files whenever you check out or commit them. One popular use case of .gitattributes is to normalize line endings in a project. With this config-based approach, you can ensure that your line endings remain consistent in your codebase regardless of what operating systems or local Git settings your developers use since this file takes priority. You can learn more about the supported .gitattributes options in the official Git docs.
A Simple .gitattributes Config
The following .gitattributes config normalizes line endings to LF for all text files checked into your repo while leaving local line endings untouched in the working tree:
* text=autoAdd the file to the root of your workspace, commit it, and push it to your repo.
Let’s also understand how it works.
First, the wildcard selector (*) matches all files that aren’t gitignored. These files become candidates for end-of-line normalization, subject to any attributes you’ve specified. In this case, we’re using the text attribute, which normalizes all line endings to LF when checking files into your repo. However, it does not modify line endings in your working tree. This is essentially the same as setting core.autocrlf=input in your Git settings.
More specifically, the text=auto option tells Git to only normalize line endings to LF for text files while leaving binary files (images, fonts, etc.) untouched. This distinction is important—we don’t want to corrupt binary files by modifying their line endings.
After committing the .gitattributes file, your changes won’t take effect immediately for files checked into Git prior to the addition of .gitattributes. To force an update, you can use the following command since Git 2.16:
git add --renormalize .This updates all tracked files in your repo according to the rules defined in your .gitattributes config. If previously committed text files used CRLF in your repo and are converted to LF during the renormalization process, those files will be staged for a commit. You can then check if any files were modified like you would normally:
git statusThe only thing left to do is to commit those changes (if any) and push them to your repo. In the future, anytime a new file is checked into Git, it’ll use LF for line endings.
Verifying Line Endings in Git for Any File
If you want to verify that the files in your repo are using the correct line endings after all of these steps, you can run the following command:
git ls-files --eolOr only for a particular file:
git ls-files path/to/file --eolFor text files, you should see something like this:
i/lf w/crlf attr/text=auto file.txtFrom left to right, those are:
i: line endings in Git’s index (and, by extension, the repo). Should belffor text files.w: line endings in your working tree. May be eitherlforcrlffor text files.attr: The attribute that applies to the file. In this example, that’stext=auto.- The file name itself.
For binary files like images, note that you’ll see -text for both the index and working tree line endings. This means that Git correctly isolated those binary files, leaving them untouched:
i/-text w/-text attr/text=auto image.pngGit Line Endings: Working Tree vs. Index
You may see the following message when you stage files containing CRLF line endings locally (e.g., if you’re on Windows and introduced a new file, or if you’re not on Windows and renormalized the line endings for your codebase):
warning: CRLF will be replaced by LF in <file-name>.
The file will have its original line endings in your working directory.
This is working as expected—CRLF will be converted to LF when you commit your changes, meaning that when you push those files to your remote, they’ll use LF. Anyone who later pulls or checks out that code will see LF line endings locally for those files.
But the text attribute doesn’t change line endings for the local copies of your text files (i.e., the ones in Git’s working tree)—it only changes line endings for files in the repo. Hence the second line of the message, which notes that the text files you just renormalized may still continue to use CRLF locally (on your file system) if that’s the line ending with which they were originally created/cloned on your system. Rest assured that text files will never use CRLF in the remote copy of your code.
The eol Attribute: Controlling Line Endings in Git’s Working Tree
Sometimes, you actually want files to be checked out locally on your system with CRLF while still retaining LF in your repo. Usually, this is for Windows-specific files that are very sensitive to line ending changes. Batch scripts are a common example since they need CRLF line endings to run properly. It’s okay to store these files with LF line endings in your repo, so long as they later get checked out with the correct line endings on a Windows machine. You can find a more comprehensive list of files that need CRLF line endings in the following article: .gitattributes Best Practices.
When we configured our local Git settings, we saw that you can achieve this desired behavior with core.autocrlf=true. The .gitattributes equivalent of this is using the eol attribute, which enables LF normalization for files checked into your repo but also allows you to control which line ending gets applied in Git’s working tree:
eol=lf: converts toLFon checkout.eol=crlf: converts toCRLFon checkout.
In the case of batch scripts, we’d use eol=crlf:
# All files are checked into the repo with LF
* text=auto

# These files are checked out using CRLF locally
*.bat eol=crlf
In this case, batch scripts will have two non-overlapping rules applied to them additively: text=auto and eol=crlf.
This change won’t take effect immediately, so if you run git ls-files --eol after updating your .gitattributes file, you might still see LF line endings in the working tree. To update existing line endings in your working tree so they respect the eol attribute, you’ll need to run the following set of commands per this StackOverflow answer:
git rm --cached -r .
git reset --hard
You’ll notice that this command differs from git add --renormalize ., which we previously used to update line endings in the local repo. Now, we’re updating line endings in the working tree to reflect our eol preferences. If you now you run git ls-files --eol, you should see i/lf w/crlf for any files matching the specified pattern.
One final note: In the recommended .gitattributes file, we used * text=auto to mark all text files for end-of-line normalization to LF once they’re staged in Git’s index. We could’ve also done * text=auto eol=lf, although these two are not identical. Like I mentioned before, if you only use * text=auto, you may still see some CRLF line endings locally in your working tree; this is okay and is working as expected. If you don’t want this, you can enforce * text=auto eol=lf instead. However, this is usually not necessary because the main concern is about what line endings make it into the index and your repo.
Summary: Git Config vs. .gitattributes
There are some similarities between Git’s local settings and the Git attributes we looked at. The table below lists each Git setting, its corresponding .gitattributes rule, and the line endings for text files in the index and working tree:
Bonus: Create an .editorconfig File
A .gitattributes file is technically all that you need to enforce the line endings in the remote copy of your code. However, as we just saw, you may still see CRLF line endings on Windows locally because .gitattributes doesn’t tell Git to change the working copies of your files.
Again, this doesn’t mean that Git’s normalization process isn’t working; it’s just the expected behavior. However, this can get annoying if you’re also linting your code with ESLint and Prettier, in which case they’ll constantly throw errors and tell you to delete those extra CRs:

Fortunately, we can take things a step further with an .editorconfig file; this is an editor-agnostic project that aims to create a standardized format for customizing the behavior of any given text editor. Lots of text editors (including VS Code) support and automatically read this file if it’s present. You can put something like this in the root of your workspace:
root = true

[*]
end_of_line = lf
In addition to a bunch of other settings, you can specify the line ending that should be used for any new files created through this text editor. That way, if you’re on Windows using VS Code and you create a new file, you’ll always see line endings as LF in your working tree. Linters are happy, and so is everyone on your team!
Summary
That was a lot to take in, but hopefully you now have a better understanding of the whole CRLF vs. LF debate and why this causes so many problems for teams that use a mixture of Windows and other operating systems. Whereas Windows follows the original convention of a carriage return plus a line feed (CRLF) for line endings, operating systems like Linux and Mac use only the line feed (LF) character. The history of these two control characters dates back to the era of the typewriter. While this tends to cause problems with software like Git, you can specify settings at the repo level with a .gitattributes file to normalize your line endings regardless of what operating systems your developers are using. You can also optionally add an .editorconfig file to ensure that new files are always created with LF line endings, even on Windows.
Attributions
Social media preview: Photo by Katrin Hauf (Unsplash).
NAME
gitattributes — Defining attributes per path
SYNOPSIS
$GIT_DIR/info/attributes, .gitattributes
DESCRIPTION
A gitattributes file is a simple text file that gives
attributes to pathnames.
Each line in gitattributes file is of form:
That is, a pattern followed by an attributes list,
separated by whitespaces. Leading and trailing whitespaces are
ignored. Lines that begin with # are ignored. Patterns
that begin with a double quote are quoted in C style.
When the pattern matches the path in question, the attributes
listed on the line are given to the path.
Each attribute can be in one of these states for a given path:
- Set
-
The path has the attribute with special value «true»;
this is specified by listing only the name of the
attribute in the attribute list. - Unset
-
The path has the attribute with special value «false»;
this is specified by listing the name of the attribute
prefixed with a dash-in the attribute list. - Set to a value
-
The path has the attribute with specified string value;
this is specified by listing the name of the attribute
followed by an equal sign=and its value in the
attribute list. - Unspecified
-
No pattern matches the path, and nothing says if
the path has or does not have the attribute, the
attribute for the path is said to be Unspecified.
When more than one pattern matches the path, a later line
overrides an earlier line. This overriding is done per
attribute.
The rules by which the pattern matches paths are the same as in
.gitignore files (see gitignore[5]), with a few exceptions:
-
negative patterns are forbidden
-
patterns that match a directory do not recursively match paths
inside that directory (so using the trailing-slashpath/syntax is
pointless in an attributes file; usepath/**instead)
When deciding what attributes are assigned to a path, Git
consults $GIT_DIR/info/attributes file (which has the highest
precedence), .gitattributes file in the same directory as the
path in question, and its parent directories up to the toplevel of the
work tree (the further the directory that contains .gitattributes
is from the path in question, the lower its precedence). Finally
global and system-wide files are considered (they have the lowest
precedence).
When the .gitattributes file is missing from the work tree, the
path in the index is used as a fall-back. During checkout process,
.gitattributes in the index is used and then the file in the
working tree is used as a fall-back.
If you wish to affect only a single repository (i.e., to assign
attributes to files that are particular to
one user’s workflow for that repository), then
attributes should be placed in the $GIT_DIR/info/attributes file.
Attributes which should be version-controlled and distributed to other
repositories (i.e., attributes of interest to all users) should go into
.gitattributes files. Attributes that should affect all repositories
for a single user should be placed in a file specified by the
core.attributesFile configuration option (see git-config[1]).
Its default value is $XDG_CONFIG_HOME/git/attributes. If $XDG_CONFIG_HOME
is either not set or empty, $HOME/.config/git/attributes is used instead.
Attributes for all users on a system should be placed in the
$(prefix)/etc/gitattributes file.
Sometimes you would need to override a setting of an attribute
for a path to Unspecified state. This can be done by listing
the name of the attribute prefixed with an exclamation point !.
RESERVED BUILTIN_* ATTRIBUTES
builtin_* is a reserved namespace for builtin attribute values. Any
user defined attributes under this namespace will be ignored and
trigger a warning.
builtin_objectmode
This attribute is for filtering files by their file bit modes (40000,
120000, 160000, 100755, 100644). e.g. :(attr:builtin_objectmode=160000).
You may also check these values with git check-attr builtin_objectmode -- <file>.
If the object is not in the index git check-attr --cached will return unspecified.
EFFECTS
Certain operations by Git can be influenced by assigning
particular attributes to a path. Currently, the following
operations are attributes-aware.
Checking-out and checking-in
These attributes affect how the contents stored in the
repository are copied to the working tree files when commands
such as git switch, git checkout and git merge run.
They also affect how
Git stores the contents you prepare in the working tree in the
repository upon git add and git commit.
text
This attribute marks the path as a text file, which enables end-of-line
conversion: When a matching file is added to the index, the file’s line
endings are normalized to LF in the index. Conversely, when the file is
copied from the index to the working directory, its line endings may be
converted from LF to CRLF depending on the eol attribute, the Git
config, and the platform (see explanation of eol below).
- Set
-
Setting the
textattribute on a path enables end-of-line
conversion on checkin and checkout as described above. Line endings
are normalized to LF in the index every time the file is checked in,
even if the file was previously added to Git with CRLF line endings. - Unset
-
Unsetting the
textattribute on a path tells Git not to
attempt any end-of-line conversion upon checkin or checkout. - Set to string value «auto»
-
When
textis set to «auto», Git decides by itself whether the file
is text or binary. If it is text and the file was not already in
Git with CRLF endings, line endings are converted on checkin and
checkout as described above. Otherwise, no conversion is done on
checkin or checkout. - Unspecified
-
If the
textattribute is unspecified, Git uses the
core.autocrlfconfiguration variable to determine if the
file should be converted.
Any other value causes Git to act as if text has been left
unspecified.
eol
This attribute marks a path to use a specific line-ending style in the
working tree when it is checked out. It has effect only if text or
text=auto is set (see above), but specifying eol automatically sets
text if text was left unspecified.
- Set to string value «crlf»
-
This setting converts the file’s line endings in the working
directory to CRLF when the file is checked out. - Set to string value «lf»
-
This setting uses the same line endings in the working directory as
in the index when the file is checked out. - Unspecified
-
If the
eolattribute is unspecified for a file, its line endings
in the working directory are determined by thecore.autocrlfor
core.eolconfiguration variable (see the definitions of those
options in git-config[1]). Iftextis set but neither of
those variables is, the default iseol=crlfon Windows and
eol=lfon all other platforms.
Backwards compatibility with crlf attribute
For backwards compatibility, the crlf attribute is interpreted as
follows:
crlf		text
-crlf		-text
crlf=input	eol=lf
End-of-line conversion
While Git normally leaves file contents alone, it can be configured to
normalize line endings to LF in the repository and, optionally, to
convert them to CRLF when files are checked out.
If you simply want to have CRLF line endings in your working directory
regardless of the repository you are working with, you can set the
config variable «core.autocrlf» without using any attributes.
This does not force normalization of text files, but does ensure
that text files that you introduce to the repository have their line
endings normalized to LF when they are added, and that files that are
already normalized in the repository stay normalized.
If you want to ensure that text files that any contributor introduces to
the repository have their line endings normalized, you can set the
text attribute to «auto» for all files.
The attributes allow a fine-grained control, how the line endings
are converted.
Here is an example that will make Git normalize .txt, .vcproj and .sh
files, ensure that .vcproj files have CRLF and .sh files have LF in
the working directory, and prevent .jpg files from being normalized
regardless of their content.
*               text=auto
*.txt		text
*.vcproj	text eol=crlf
*.sh		text eol=lf
*.jpg		-text
|
Note |
When text=auto conversion is enabled in a cross-platformproject using push and pull to a central repository the text files containing CRLFs should be normalized. |
From a clean working directory:
$ echo "* text=auto" >.gitattributes
$ git add --renormalize .
$ git status        # Show files that will be normalized
$ git commit -m "Introduce end-of-line normalization"
If any files that should not be normalized show up in git status,
unset their text attribute before running git add -u.
Conversely, text files that Git does not detect can have normalization
enabled manually.
If core.safecrlf is set to «true» or «warn», Git verifies if
the conversion is reversible for the current setting of
core.autocrlf. For «true», Git rejects irreversible
conversions; for «warn», Git only prints a warning but accepts
an irreversible conversion. The safety triggers to prevent such
a conversion done to the files in the work tree, but there are a
few exceptions. Even though…
-
git add itself does not touch the files in the work tree, the
next checkout would, so the safety triggers; -
git apply to update a text file with a patch does touch the files
in the work tree, but the operation is about text files and CRLF
conversion is about fixing the line ending inconsistencies, so the
safety does not trigger; -
git diff itself does not touch the files in the work tree, it is
often run to inspect the changes you intend to next git add. To
catch potential problems early, safety triggers.
working-tree-encoding
Git recognizes files encoded in ASCII or one of its supersets (e.g.
UTF-8, ISO-8859-1, …) as text files. Files encoded in certain other
encodings (e.g. UTF-16) are interpreted as binary and consequently
built-in Git text processing tools (e.g. git diff) as well as most Git
web front ends do not visualize the contents of these files by default.
In these cases you can tell Git the encoding of a file in the working
directory with the working-tree-encoding attribute. If a file with this
attribute is added to Git, then Git re-encodes the content from the
specified encoding to UTF-8. Finally, Git stores the UTF-8 encoded
content in its internal data structure (called «the index»). On checkout
the content is re-encoded back to the specified encoding.
Please note that using the working-tree-encoding attribute may have a
number of pitfalls:
-
Alternative Git implementations (e.g. JGit or libgit2) and older Git
versions (as of March 2018) do not support theworking-tree-encoding
attribute. If you decide to use theworking-tree-encodingattribute
in your repository, then it is strongly recommended to ensure that all
clients working with the repository support it.For example, Microsoft Visual Studio resources files (
*.rc) or
PowerShell script files (*.ps1) are sometimes encoded in UTF-16.
If you declare*.ps1as files as UTF-16 and you addfoo.ps1with
aworking-tree-encodingenabled Git client, thenfoo.ps1will be
stored as UTF-8 internally. A client withoutworking-tree-encoding
support will checkoutfoo.ps1as UTF-8 encoded file. This will
typically cause trouble for the users of this file.If a Git client that does not support the
working-tree-encoding
attribute adds a new filebar.ps1, thenbar.ps1will be
stored «as-is» internally (in this example probably as UTF-16).
A client withworking-tree-encodingsupport will interpret the
internal contents as UTF-8 and try to convert it to UTF-16 on checkout.
That operation will fail and cause an error. -
Reencoding content to non-UTF encodings can cause errors as the
conversion might not be UTF-8 round trip safe. If you suspect your
encoding to not be round trip safe, then add it to
core.checkRoundtripEncodingto make Git check the round trip
encoding (see git-config[1]). SHIFT-JIS (Japanese character
set) is known to have round trip issues with UTF-8 and is checked by
default. -
Reencoding content requires resources that might slow down certain
Git operations (e.g git checkout or git add).
Use the working-tree-encoding attribute only if you cannot store a file
in UTF-8 encoding and if you want Git to be able to process the content
as text.
As an example, use the following attributes if your *.ps1 files are
UTF-16 encoded with byte order mark (BOM) and you want Git to perform
automatic line ending conversion based on your platform.
*.ps1 text working-tree-encoding=UTF-16
Use the following attributes if your *.ps1 files are UTF-16 little
endian encoded without BOM and you want Git to use Windows line endings
in the working directory (use UTF-16LE-BOM instead of UTF-16LE if
you want UTF-16 little endian with BOM).
Please note, it is highly recommended to
explicitly define the line endings with eol if the working-tree-encoding
attribute is used to avoid ambiguity.
*.ps1 text working-tree-encoding=UTF-16LE eol=crlf
You can get a list of all available encodings on your platform with the
following command:
If you do not know the encoding of a file, then you can use the file
command to guess the encoding:
ident
When the attribute ident is set for a path, Git replaces
$Id$ in the blob object with $Id:, followed by the
40-character hexadecimal blob object name, followed by a dollar
sign $ upon checkout. Any byte sequence that begins with
$Id: and ends with $ in the worktree file is replaced
with $Id$ upon check-in.
filter
A filter attribute can be set to a string value that names a
filter driver specified in the configuration.
A filter driver consists of a clean command and a smudge
command, either of which can be left unspecified. Upon
checkout, when the smudge command is specified, the command is
fed the blob object from its standard input, and its standard
output is used to update the worktree file. Similarly, the
clean command is used to convert the contents of worktree file
upon checkin. By default these commands process only a single
blob and terminate. If a long running process filter is used
in place of clean and/or smudge filters, then Git can process
all blobs with a single filter command invocation for the entire
life of a single Git command, for example git add --all. If a
long running process filter is configured then it always takes
precedence over a configured single blob filter. See section
below for the description of the protocol used to communicate with
a process filter.
One use of the content filtering is to massage the content into a shape
that is more convenient for the platform, filesystem, and the user to use.
For this mode of operation, the key phrase here is «more convenient» and
not «turning something unusable into usable». In other words, the intent
is that if someone unsets the filter driver definition, or does not have
the appropriate filter program, the project should still be usable.
Another use of the content filtering is to store the content that cannot
be directly used in the repository (e.g. a UUID that refers to the true
content stored outside Git, or an encrypted content) and turn it into a
usable form upon checkout (e.g. download the external content, or decrypt
the encrypted content).
These two filters behave differently, and by default, a filter is taken as
the former, massaging the contents into more convenient shape. A missing
filter driver definition in the config, or a filter driver that exits with
a non-zero status, is not an error but makes the filter a no-op passthru.
You can declare that a filter turns a content that by itself is unusable
into a usable content by setting the filter.<driver>.required configuration
variable to true.
Note: Whenever the clean filter is changed, the repo should be renormalized:
$ git add —renormalize .
For example, in .gitattributes, you would assign the filter
attribute for paths.
Then you would define a «filter.indent.clean» and «filter.indent.smudge»
configuration in your .git/config to specify a pair of commands to
modify the contents of C programs when the source files are checked
in («clean» is run) and checked out (no change is made because the
command is «cat»).
[filter "indent"]
	clean = indent
	smudge = cat
For best results, clean should not alter its output further if it is
run twice («clean→clean» should be equivalent to «clean»), and
multiple smudge commands should not alter clean‘s output
(«smudge→smudge→clean» should be equivalent to «clean»). See the
section on merging below.
The «indent» filter is well-behaved in this regard: it will not modify
input that is already correctly indented. In this case, the lack of a
smudge filter means that the clean filter must accept its own output
without modifying it.
If a filter must succeed in order to make the stored contents usable,
you can declare that the filter is required, in the configuration:
[filter "crypt"]
	clean = openssl enc ...
	smudge = openssl enc -d ...
	required
Sequence «%f» on the filter command line is replaced with the name of
the file the filter is working on. A filter might use this in keyword
substitution. For example:
[filter "p4"]
	clean = git-p4-filter --clean %f
	smudge = git-p4-filter --smudge %f
Note that «%f» is the name of the path that is being worked on. Depending
on the version that is being filtered, the corresponding file on disk may
not exist, or may have different contents. So, smudge and clean commands
should not try to access the file on disk, but only act as filters on the
content provided to them on standard input.
Long Running Filter Process
If the filter command (a string value) is defined via
filter.<driver>.process then Git can process all blobs with a
single filter invocation for the entire life of a single Git
command. This is achieved by using the long-running process protocol
(described in Documentation/technical/long-running-process-protocol.adoc).
When Git encounters the first file that needs to be cleaned or smudged,
it starts the filter and performs the handshake. In the handshake, the
welcome message sent by Git is «git-filter-client», only version 2 is
supported, and the supported capabilities are «clean», «smudge», and
«delay».
Afterwards Git sends a list of «key=value» pairs terminated with
a flush packet. The list will contain at least the filter command
(based on the supported capabilities) and the pathname of the file
to filter relative to the repository root. Right after the flush packet
Git sends the content split in zero or more pkt-line packets and a
flush packet to terminate content. Please note, that the filter
must not send any response before it received the content and the
final flush packet. Also note that the «value» of a «key=value» pair
can contain the «=» character whereas the key would never contain
that character.
packet:          git> command=smudge
packet:          git> pathname=path/testfile.dat
packet:          git> 0000
packet:          git> CONTENT
packet:          git> 0000
The filter is expected to respond with a list of «key=value» pairs
terminated with a flush packet. If the filter does not experience
problems then the list must contain a «success» status. Right after
these packets the filter is expected to send the content in zero
or more pkt-line packets and a flush packet at the end. Finally, a
second list of «key=value» pairs terminated with a flush packet
is expected. The filter can change the status in the second list
or keep the status as is with an empty list. Please note that the
empty list must be terminated with a flush packet regardless.
packet:          git< status=success
packet:          git< 0000
packet:          git< SMUDGED_CONTENT
packet:          git< 0000
packet:          git< 0000  # empty list, keep "status=success" unchanged!
If the result content is empty then the filter is expected to respond
with a «success» status and a flush packet to signal the empty content.
packet:          git< status=success
packet:          git< 0000
packet:          git< 0000  # empty content!
packet:          git< 0000  # empty list, keep "status=success" unchanged!
In case the filter cannot or does not want to process the content,
it is expected to respond with an «error» status.
packet:          git< status=error
packet:          git< 0000
If the filter experiences an error during processing, then it can
send the status «error» after the content was (partially or
completely) sent.
packet:          git< status=success
packet:          git< 0000
packet:          git< HALF_WRITTEN_ERRONEOUS_CONTENT
packet:          git< 0000
packet:          git< status=error
packet:          git< 0000
In case the filter cannot or does not want to process the content
as well as any future content for the lifetime of the Git process,
then it is expected to respond with an «abort» status at any point
in the protocol.
packet:          git< status=abort
packet:          git< 0000
Git neither stops nor restarts the filter process in case the
«error»/»abort» status is set. However, Git sets its exit code
according to the filter.<driver>.required flag, mimicking the
behavior of the filter.<driver>.clean / filter.<driver>.smudge
mechanism.
If the filter dies during the communication or does not adhere to
the protocol then Git will stop the filter process and restart it
with the next file that needs to be processed. Depending on the
filter.<driver>.required flag Git will interpret that as error.
Delay
If the filter supports the «delay» capability, then Git can send the
flag «can-delay» after the filter command and pathname. This flag
denotes that the filter can delay filtering the current blob (e.g. to
compensate network latencies) by responding with no content but with
the status «delayed» and a flush packet.
packet:          git> command=smudge
packet:          git> pathname=path/testfile.dat
packet:          git> can-delay=1
packet:          git> 0000
packet:          git> CONTENT
packet:          git> 0000
packet:          git< status=delayed
packet:          git< 0000
If the filter supports the «delay» capability then it must support the
«list_available_blobs» command. If Git sends this command, then the
filter is expected to return a list of pathnames representing blobs
that have been delayed earlier and are now available.
The list must be terminated with a flush packet followed
by a «success» status that is also terminated with a flush packet. If
no blobs for the delayed paths are available, yet, then the filter is
expected to block the response until at least one blob becomes
available. The filter can tell Git that it has no more delayed blobs
by sending an empty list. As soon as the filter responds with an empty
list, Git stops asking. All blobs that Git has not received at this
point are considered missing and will result in an error.
packet:          git> command=list_available_blobs
packet:          git> 0000
packet:          git< pathname=path/testfile.dat
packet:          git< pathname=path/otherfile.dat
packet:          git< 0000
packet:          git< status=success
packet:          git< 0000
After Git received the pathnames, it will request the corresponding
blobs again. These requests contain a pathname and an empty content
section. The filter is expected to respond with the smudged content
in the usual way as explained above.
packet:          git> command=smudge
packet:          git> pathname=path/testfile.dat
packet:          git> 0000
packet:          git> 0000  # empty content!
packet:          git< status=success
packet:          git< 0000
packet:          git< SMUDGED_CONTENT
packet:          git< 0000
packet:          git< 0000  # empty list, keep "status=success" unchanged!
Example
A long running filter demo implementation can be found in
contrib/long-running-filter/example.pl located in the Git
core repository. If you develop your own long running filter
process then the GIT_TRACE_PACKET environment variables can be
very helpful for debugging (see git[1]).
Please note that you cannot use an existing filter.<driver>.clean
or filter.<driver>.smudge command with filter.<driver>.process
because the former two use a different inter process communication
protocol than the latter one.
Interaction between checkin/checkout attributes
In the check-in codepath, the worktree file is first converted
with filter driver (if specified and corresponding driver
defined), then the result is processed with ident (if
specified), and then finally with text (again, if specified
and applicable).
In the check-out codepath, the blob content is first converted
with text, and then ident and fed to filter.
Merging branches with differing checkin/checkout attributes
If you have added attributes to a file that cause the canonical
repository format for that file to change, such as adding a
clean/smudge filter or text/eol/ident attributes, merging anything
where the attribute is not in place would normally cause merge
conflicts.
To prevent these unnecessary merge conflicts, Git can be told to run a
virtual check-out and check-in of all three stages of each file that
needs a three-way content merge, by setting the merge.renormalize
configuration variable. This prevents changes caused by check-in
conversion from causing spurious merge conflicts when a converted file
is merged with an unconverted file.
As long as a «smudge→clean» results in the same output as a «clean»
even on files that are already smudged, this strategy will
automatically resolve all filter-related conflicts. Filters that do
not act in this way may cause additional merge conflicts that must be
resolved manually.
Generating diff text
diff
The attribute diff affects how Git generates diffs for particular
files. It can tell Git whether to generate a textual patch for the path
or to treat the path as a binary file. It can also affect what line is
shown on the hunk header @@ -k,l +n,m @@ line, tell Git to use an
external command to generate the diff, or ask Git to convert binary
files to a text format before generating the diff.
- Set
-
A path to which the
diffattribute is set is treated
as text, even when they contain byte values that
normally never appear in text files, such as NUL. - Unset
-
A path to which the
diffattribute is unset will
generateBinary files differ(or a binary patch, if
binary patches are enabled). - Unspecified
-
A path to which the
diffattribute is unspecified
first gets its contents inspected, and if it looks like
text and is smaller than core.bigFileThreshold, it is treated
as text. Otherwise it would generateBinary files differ. - String
-
Diff is shown using the specified diff driver. Each driver may
specify one or more options, as described in the following
section. The options for the diff driver «foo» are defined
by the configuration variables in the «diff.foo» section of the
Git config file.
Defining an external diff driver
The definition of a diff driver is done in gitconfig, not
gitattributes file, so strictly speaking this manual page is a
wrong place to talk about it. However…
To define an external diff driver jcdiff, add a section to your
$GIT_DIR/config file (or $HOME/.gitconfig file) like this:
[diff "jcdiff"]
	command = j-c-diff
When Git needs to show you a diff for the path with diff
attribute set to jcdiff, it calls the command you specified
with the above configuration, i.e. j-c-diff, with 7
parameters, just like GIT_EXTERNAL_DIFF program is called.
See git[1] for details.
If the program is able to ignore certain changes (similar to
git diff --ignore-space-change), then also set the option
trustExitCode to true. It is then expected to return exit code 1 if
it finds significant changes and 0 if it doesn’t.
Setting the internal diff algorithm
The diff algorithm can be set through the diff.algorithm config key, but
sometimes it may be helpful to set the diff algorithm per path. For example,
one may want to use the minimal diff algorithm for .json files, and the
histogram for .c files, and so on without having to pass in the algorithm
through the command line each time.
First, in .gitattributes, assign the diff attribute for paths.
Then, define a «diff.<name>.algorithm» configuration to specify the diff
algorithm, choosing from myers, patience, minimal, or histogram.
[diff "<name>"]
  algorithm = histogram
This diff algorithm applies to user facing diff output like git-diff(1),
git-show(1) and is used for the --stat output as well. The merge machinery
will not use the diff algorithm set through this method.
|
Note |
If diff.<name>.command is defined for path with thediff=<name> attribute, it is executed as an external diff driver(see above), and adding diff.<name>.algorithm has no effect, as thealgorithm is not passed to the external diff driver. |
Each group of changes (called a «hunk») in the textual diff output
is prefixed with a line of the form:
This is called a hunk header. The «TEXT» portion is by default a line
that begins with an alphabet, an underscore or a dollar sign; this
matches what GNU diff -p output uses. This default selection however
is not suited for some contents, and you can use a customized pattern
to make a selection.
First, in .gitattributes, you would assign the diff attribute
for paths.
Then, you would define a «diff.tex.xfuncname» configuration to
specify a regular expression that matches a line that you would
want to appear as the hunk header «TEXT». Add a section to your
$GIT_DIR/config file (or $HOME/.gitconfig file) like this:
[diff "tex"]
	xfuncname = "^(\\\\(sub)*section\\{.*)$"
Note. A single level of backslashes are eaten by the
configuration file parser, so you would need to double the
backslashes; the pattern above picks a line that begins with a
backslash, and zero or more occurrences of sub followed by
section followed by open brace, to the end of line.
There are a few built-in patterns to make this easier, and tex
is one of them, so you do not have to write the above in your
configuration file (you still need to enable this with the
attribute mechanism, via .gitattributes). The following built in
patterns are available:
-
adasuitable for source code in the Ada language. -
bashsuitable for source code in the Bourne-Again SHell language.
Covers a superset of POSIX shell function definitions. -
bibtexsuitable for files with BibTeX coded references. -
cppsuitable for source code in the C and C++ languages. -
csharpsuitable for source code in the C# language. -
csssuitable for cascading style sheets. -
dtssuitable for devicetree (DTS) files. -
elixirsuitable for source code in the Elixir language. -
fortransuitable for source code in the Fortran language. -
fountainsuitable for Fountain documents. -
golangsuitable for source code in the Go language. -
htmlsuitable for HTML/XHTML documents. -
javasuitable for source code in the Java language. -
kotlinsuitable for source code in the Kotlin language. -
markdownsuitable for Markdown documents. -
matlabsuitable for source code in the MATLAB and Octave languages. -
objcsuitable for source code in the Objective-C language. -
pascalsuitable for source code in the Pascal/Delphi language. -
perlsuitable for source code in the Perl language. -
phpsuitable for source code in the PHP language. -
pythonsuitable for source code in the Python language. -
rubysuitable for source code in the Ruby language. -
rustsuitable for source code in the Rust language. -
schemesuitable for source code in the Scheme language. -
texsuitable for source code for LaTeX documents.
Customizing word diff
You can customize the rules that git diff --word-diff uses to
split words in a line, by specifying an appropriate regular expression
in the «diff.*.wordRegex» configuration variable. For example, in TeX
a backslash followed by a sequence of letters forms a command, but
several such commands can be run together without intervening
whitespace. To separate them, use a regular expression in your
$GIT_DIR/config file (or $HOME/.gitconfig file) like this:
[diff "tex"]
	wordRegex = "\\\\[a-zA-Z]+|[{}]|\\\\.|[^\\{}[:space:]]+"
A built-in pattern is provided for all languages listed in the
previous section.
Performing text diffs of binary files
Sometimes it is desirable to see the diff of a text-converted
version of some binary files. For example, a word processor
document can be converted to an ASCII text representation, and
the diff of the text shown. Even though this conversion loses
some information, the resulting diff is useful for human
viewing (but cannot be applied directly).
The textconv config option is used to define a program for
performing such a conversion. The program should take a single
argument, the name of a file to convert, and produce the
resulting text on stdout.
For example, to show the diff of the exif information of a
file instead of the binary information (assuming you have the
exif tool installed), add the following section to your
$GIT_DIR/config file (or $HOME/.gitconfig file):
[diff "jpg"]
	textconv = exif
|
Note |
The text conversion is generally a one-way conversion; in this example, we lose the actual image contents and focus just on the text data. This means that diffs generated by textconv are not suitable for applying. For this reason, only git diff and the git log family of commands (i.e.,log, whatchanged, show) will perform text conversion. git will never generate this output. If you want tosend somebody a text-converted diff of a binary file (e.g., because it quickly conveys the changes you have made), you should generate it separately and send it as a comment in addition to the usual binary diff that you might send. |
Because text conversion can be slow, especially when doing a
large number of them with git log -p, Git provides a mechanism
to cache the output and use it in future diffs. To enable
caching, set the «cachetextconv» variable in your diff driver’s
config. For example:
[diff "jpg"]
	textconv = exif
	cachetextconv = true
This will cache the result of running «exif» on each blob
indefinitely. If you change the textconv config variable for a
diff driver, Git will automatically invalidate the cache entries
and re-run the textconv filter. If you want to invalidate the
cache manually (e.g., because your version of «exif» was updated
and now produces better output), you can remove the cache
manually with git update-ref -d refs/notes/textconv/jpg (where
«jpg» is the name of the diff driver, as in the example above).
Choosing textconv versus external diff
If you want to show differences between binary or specially-formatted
blobs in your repository, you can choose to use either an external diff
command, or to use textconv to convert them to a diff-able text format.
Which method you choose depends on your exact situation.
The advantage of using an external diff command is flexibility. You are
not bound to find line-oriented changes, nor is it necessary for the
output to resemble unified diff. You are free to locate and report
changes in the most appropriate way for your data format.
A textconv, by comparison, is much more limiting. You provide a
transformation of the data into a line-oriented text format, and Git
uses its regular diff tools to generate the output. There are several
advantages to choosing this method:
-
Ease of use. It is often much simpler to write a binary to text
transformation than it is to perform your own diff. In many cases,
existing programs can be used as textconv filters (e.g., exif,
odt2txt). -
Git diff features. By performing only the transformation step
yourself, you can still utilize many of Git’s diff features,
including colorization, word-diff, and combined diffs for merges. -
Caching. Textconv caching can speed up repeated diffs, such as those
you might trigger by runninggit log -p.
Marking files as binary
Git usually guesses correctly whether a blob contains text or binary
data by examining the beginning of the contents. However, sometimes you
may want to override its decision, either because a blob contains binary
data later in the file, or because the content, while technically
composed of text characters, is opaque to a human reader. For example,
many postscript files contain only ASCII characters, but produce noisy
and meaningless diffs.
The simplest way to mark a file as binary is to unset the diff
attribute in the .gitattributes file:
This will cause Git to generate Binary files differ (or a binary
patch, if binary patches are enabled) instead of a regular diff.
However, one may also want to specify other diff driver attributes. For
example, you might want to use textconv to convert postscript files to
an ASCII representation for human viewing, but otherwise treat them as
binary files. You cannot specify both -diff and diff=ps attributes.
The solution is to use the diff.*.binary config option:
[diff "ps"]
  textconv = ps2ascii
  binary = true
Performing a three-way merge
merge
The attribute merge affects how three versions of a file are
merged when a file-level merge is necessary during git merge,
and other commands such as git revert and git cherry-pick.
- Set
-
Built-in 3-way merge driver is used to merge the
contents in a way similar to merge command ofRCS
suite. This is suitable for ordinary text files. - Unset
-
Take the version from the current branch as the
tentative merge result, and declare that the merge has
conflicts. This is suitable for binary files that do
not have a well-defined merge semantics. - Unspecified
-
By default, this uses the same built-in 3-way merge
driver as is the case when themergeattribute is set.
However, themerge.defaultconfiguration variable can name
different merge driver to be used with paths for which the
mergeattribute is unspecified. - String
-
3-way merge is performed using the specified custom
merge driver. The built-in 3-way merge driver can be
explicitly specified by asking for «text» driver; the
built-in «take the current branch» driver can be
requested with «binary».
Built-in merge drivers
There are a few built-in low-level merge drivers defined that
can be asked for via the merge attribute.
- text
-
Usual 3-way file level merge for text files. Conflicted
regions are marked with conflict markers<<<<<<<,
=======and>>>>>>>. The version from your branch
appears before the=======marker, and the version
from the merged branch appears after the=======
marker. - binary
-
Keep the version from your branch in the work tree, but
leave the path in the conflicted state for the user to
sort out. - union
-
Run 3-way file level merge for text files, but take
lines from both versions, instead of leaving conflict
markers. This tends to leave the added lines in the
resulting file in random order and the user should
verify the result. Do not use this if you do not
understand the implications.
Defining a custom merge driver
The definition of a merge driver is done in the .git/config
file, not in the gitattributes file, so strictly speaking this
manual page is a wrong place to talk about it. However…
To define a custom merge driver filfre, add a section to your
$GIT_DIR/config file (or $HOME/.gitconfig file) like this:
[merge "filfre"]
	name = feel-free merge driver
	driver = filfre %O %A %B %L %P
	recursive = binary
The merge.*.name variable gives the driver a human-readable
name.
The merge.*.driver variable’s value is used to construct a
command to run to common ancestor’s version (%O), current
version (%A) and the other branches’ version (%B). These
three tokens are replaced with the names of temporary files that
hold the contents of these versions when the command line is
built. Additionally, %L will be replaced with the conflict marker
size (see below).
The merge driver is expected to leave the result of the merge in
the file named with %A by overwriting it, and exit with zero
status if it managed to merge them cleanly, or non-zero if there
were conflicts. When the driver crashes (e.g. killed by SEGV),
it is expected to exit with non-zero status that are higher than
128, and in such a case, the merge results in a failure (which is
different from producing a conflict).
The merge.*.recursive variable specifies what other merge
driver to use when the merge driver is called for an internal
merge between common ancestors, when there are more than one.
When left unspecified, the driver itself is used for both
internal merge and the final merge.
The merge driver can learn the pathname in which the merged result
will be stored via placeholder %P. The conflict labels to be used
for the common ancestor, local head and other head can be passed by
using %S, %X and %Y respectively.
conflict-marker-size
This attribute controls the length of conflict markers left in
the work tree file during a conflicted merge. Only a positive
integer has a meaningful effect.
For example, this line in .gitattributes can be used to tell the merge
machinery to leave much longer (instead of the usual 7-character-long)
conflict markers when merging the file Documentation/git-merge.adoc
results in a conflict.
Documentation/git-merge.adoc conflict-marker-size=32
Checking whitespace errors
whitespace
The core.whitespace configuration variable allows you to define what
diff and apply should consider whitespace errors for all paths in
the project (See git-config[1]). This attribute gives you finer
control per path.
- Set
-
Notice all types of potential whitespace errors known to Git.
The tab width is taken from the value of thecore.whitespace
configuration variable. - Unset
-
Do not notice anything as error.
- Unspecified
-
Use the value of the
core.whitespaceconfiguration variable to
decide what to notice as error. - String
-
Specify a comma separated list of common whitespace problems to
notice in the same format as thecore.whitespaceconfiguration
variable.
Creating an archive
export-ignore
Files and directories with the attribute export-ignore won’t be added to
archive files.
export-subst
If the attribute export-subst is set for a file then Git will expand
several placeholders when adding this file to an archive. The
expansion depends on the availability of a commit ID, i.e., if
git-archive[1] has been given a tree instead of a commit or a
tag then no replacement will be done. The placeholders are the same
as those for the option --pretty=format: of git-log[1],
except that they need to be wrapped like this: $Format:PLACEHOLDERS$
in the file. E.g. the string $Format:%H$ will be replaced by the
commit hash. However, only one %(describe) placeholder is expanded
per archive to avoid denial-of-service attacks.
Packing objects
delta
Delta compression will not be attempted for blobs for paths with the
attribute delta set to false.
Viewing files in GUI tools
encoding
The value of this attribute specifies the character encoding that should
be used by GUI tools (e.g. gitk[1] and git-gui[1]) to
display the contents of the relevant file. Note that due to performance
considerations gitk[1] does not use this attribute unless you
manually enable per-file encodings in its options.
If this attribute is not set or has an invalid value, the value of the
gui.encoding configuration variable is used instead
(See git-config[1]).
USING MACRO ATTRIBUTES
You do not want any end-of-line conversions applied to, nor textual diffs
produced for, any binary file you track. You would need to specify e.g.
but that may become cumbersome, when you have many attributes. Using
macro attributes, you can define an attribute that, when set, also
sets or unsets a number of other attributes at the same time. The
system knows a built-in macro attribute, binary:
Setting the «binary» attribute also unsets the «text» and «diff»
attributes as above. Note that macro attributes can only be «Set»,
though setting one might have the effect of setting or unsetting other
attributes or even returning other attributes to the «Unspecified»
state.
DEFINING MACRO ATTRIBUTES
Custom macro attributes can be defined only in top-level gitattributes
files ($GIT_DIR/info/attributes, the .gitattributes file at the
top level of the working tree, or the global or system-wide
gitattributes files), not in .gitattributes files in working tree
subdirectories. The built-in macro attribute «binary» is equivalent
to:
[attr]binary -diff -merge -text
NOTES
Git does not follow symbolic links when accessing a .gitattributes
file in the working tree. This keeps behavior consistent when the file
is accessed from the index or a tree versus from the filesystem.
EXAMPLES
If you have these three gitattributes file:
(in $GIT_DIR/info/attributes)

a*	foo !bar -baz

(in .gitattributes)
abc	foo bar baz

(in t/.gitattributes)
ab*	merge=filfre
abc	-foo -bar
*.c	frotz
the attributes given to path t/abc are computed as follows:
-
By examining
t/.gitattributes(which is in the same
directory as the path in question), Git finds that the first
line matches.mergeattribute is set. It also finds that
the second line matches, and attributesfooandbar
are unset. -
Then it examines
.gitattributes(which is in the parent
directory), and finds that the first line matches, but
t/.gitattributesfile already decided howmerge,foo
andbarattributes should be given to this path, so it
leavesfooandbarunset. Attributebazis set. -
Finally it examines
$GIT_DIR/info/attributes. This file
is used to override the in-tree settings. The first line is
a match, andfoois set,baris reverted to unspecified
state, andbazis unset.
As the result, the attributes assignment to t/abc becomes:
foo	set to true
bar	unspecified
baz	set to false
merge	set to string value "filfre"
frotz	unspecified
SEE ALSO
When working with Git in an environment where developers use different operating systems, handling line endings can become tricky. Line endings refer to the characters used to mark the end of a line in text files, and they vary between Windows (CRLF or \r\n) and Unix-like systems such as Linux and macOS (LF or \n). This guide will explore how to configure Git to handle line endings properly, ensuring a smooth workflow across different environments.
Understanding line endings in Git
Before diving into configurations, it’s important to understand the terms:
- CRLF: Carriage return and line feed, used by Windows.
- LF: Line feed, used by Unix-based systems.
- EOL (End Of Line): Refers to the marker at the end of each line.
Configuring Git to ignore line endings
Git provides several settings that help manage how line endings are handled in your repository. These settings can be applied globally (for all your projects) or on a per-repository basis.
-
Setting up a global
.gitconfigfor line endingsTo ensure consistent line endings in all your repositories, you can configure Git globally:
git config --global core.autocrlf true
This command sets Git to:
- Automatically convert
LFtoCRLFwhen you check out code on a Windows machine. - Convert
CRLFback toLFwhen changes are staged (added to the index).
On Unix-based systems, you might use:
git config --global core.autocrlf input
This setting converts
CRLFtoLFon commit but does not changeLFtoCRLFwhen checking out code, which is usually not necessary on Unix-like systems. - Automatically convert
-
Repository-specific configuration
Sometimes, you might need to override global settings for a specific project. This is useful when the project has specific requirements or when contributing to projects with their own predefined line ending configurations.
Navigate to your project directory in your terminal and run:
git config core.autocrlf true
This command applies the line ending configuration only to the current repository.
-
Handling
.gitattributesfor finer controlA
.gitattributesfile in your repository allows you to define rules that override both local and global Git configurations. Here’s how to set up a.gitattributesfile to manage line endings:-
Create a
.gitattributesfile in the root directory of your repository: -
This configuration ensures that all files detected as text will have their line endings normalized when added to the repository. When these files are checked out, Git will apply the appropriate line endings for the OS.
-
-
Dealing with existing repository files
If your repository already has files with mixed line endings, you can normalize them:
This command re-normalizes all files in the repository based on the current settings in
.gitconfigor.gitattributes. -
Checking configuration
To verify your configurations, use:
git config --get core.autocrlf
This command displays the current
core.autocrlfsetting for your project.
Best practices and considerations
- Consistency: Always aim for consistent line ending configurations across your development team to avoid unnecessary diffs and merge conflicts.
- Documentation: Document your line ending policies in project READMEs or contribution guidelines to inform new contributors.
- Tooling: Some editors and IDEs might have their own settings for handling line endings. Ensure these settings are aligned with your Git configuration to prevent conflicts.
For further reading on how Git handles line endings see the official Git documentation.