
Chapters ▾
-
1. Getting Started
-
1.1
About Version Control -
1.2
A Short History of Git -
1.3
What is Git? -
1.4
The Command Line -
1.5
Installing Git -
1.6
First-Time Git Setup -
1.7
Getting Help -
1.8
Summary
-
1.1
-
2. Git Basics
-
2.1
Getting a Git Repository -
2.2
Recording Changes to the Repository -
2.3
Viewing the Commit History -
2.4
Undoing Things -
2.5
Working with Remotes -
2.6
Tagging -
2.7
Git Aliases -
2.8
Summary
-
2.1
-
3. Git Branching
-
3.1
Branches in a Nutshell -
3.2
Basic Branching and Merging -
3.3
Branch Management -
3.4
Branching Workflows -
3.5
Remote Branches -
3.6
Rebasing -
3.7
Summary
-
3.1
-
4. Git on the Server
-
4.1
The Protocols -
4.2
Getting Git on a Server -
4.3
Generating Your SSH Public Key -
4.4
Setting Up the Server -
4.5
Git Daemon -
4.6
Smart HTTP -
4.7
GitWeb -
4.8
GitLab -
4.9
Third Party Hosted Options -
4.10
Summary
-
4.1
-
5. Distributed Git
-
5.1
Distributed Workflows -
5.2
Contributing to a Project -
5.3
Maintaining a Project -
5.4
Summary
-
5.1
-
6. GitHub
-
6.1
Account Setup and Configuration -
6.2
Contributing to a Project -
6.3
Maintaining a Project -
6.4
Managing an organization -
6.5
Scripting GitHub -
6.6
Summary
-
6.1
-
7. Git Tools
-
7.1
Revision Selection -
7.2
Interactive Staging -
7.3
Stashing and Cleaning -
7.4
Signing Your Work -
7.5
Searching -
7.6
Rewriting History -
7.7
Reset Demystified -
7.8
Advanced Merging -
7.9
Rerere -
7.10
Debugging with Git -
7.11
Submodules -
7.12
Bundling -
7.13
Replace -
7.14
Credential Storage -
7.15
Summary
-
7.1
-
8. Customizing Git
-
8.1
Git Configuration -
8.2
Git Attributes -
8.3
Git Hooks -
8.4
An Example Git-Enforced Policy -
8.5
Summary
-
8.1
-
9. Git and Other Systems
-
9.1
Git as a Client -
9.2
Migrating to Git -
9.3
Summary
-
9.1
-
10. Git Internals
-
10.1
Plumbing and Porcelain -
10.2
Git Objects -
10.3
Git References -
10.4
Packfiles -
10.5
The Refspec -
10.6
Transfer Protocols -
10.7
Maintenance and Data Recovery -
10.8
Environment Variables -
10.9
Summary
-
10.1
-
A1. Appendix A: Git in Other Environments
-
A1.1
Graphical Interfaces -
A1.2
Git in Visual Studio -
A1.3
Git in Visual Studio Code -
A1.4
Git in IntelliJ / PyCharm / WebStorm / PhpStorm / RubyMine -
A1.5
Git in Sublime Text -
A1.6
Git in Bash -
A1.7
Git in Zsh -
A1.8
Git in PowerShell -
A1.9
Summary
-
A1.1
-
A2. Appendix B: Embedding Git in your Applications
-
A2.1
Command-line Git -
A2.2
Libgit2 -
A2.3
JGit -
A2.4
go-git -
A2.5
Dulwich
-
A2.1
-
A3. Appendix C: Git Commands
-
A3.1
Setup and Config -
A3.2
Getting and Creating Projects -
A3.3
Basic Snapshotting -
A3.4
Branching and Merging -
A3.5
Sharing and Updating Projects -
A3.6
Inspection and Comparison -
A3.7
Debugging -
A3.8
Patching -
A3.9
Email -
A3.10
External Systems -
A3.11
Administration -
A3.12
Plumbing Commands
-
A3.1
2nd Edition
4.3 Git on the Server — Generating Your SSH Public Key
Many Git servers authenticate using SSH public keys.
In order to provide a public key, each user in your system must generate one if they don’t already have one.
This process is similar across all operating systems.
First, you should check to make sure you don’t already have a key.
By default, a user’s SSH keys are stored in that user’s ~/.ssh directory.
You can easily check to see if you have a key already by going to that directory and listing the contents:
$ cd ~/.ssh
$ ls
authorized_keys2  id_dsa       known_hosts
config            id_dsa.pub
You’re looking for a pair of files named something like id_dsa or id_rsa and a matching file with a .pub extension.
The .pub file is your public key, and the other file is the corresponding private key.
If you don’t have these files (or you don’t even have a .ssh directory), you can create them by running a program called ssh-keygen, which is provided with the SSH package on Linux/macOS systems and comes with Git for Windows:
$ ssh-keygen -o
Generating public/private rsa key pair.
Enter file in which to save the key (/home/schacon/.ssh/id_rsa):
Created directory '/home/schacon/.ssh'.
Enter passphrase (empty for no passphrase):
Enter same passphrase again:
Your identification has been saved in /home/schacon/.ssh/id_rsa.
Your public key has been saved in /home/schacon/.ssh/id_rsa.pub.
The key fingerprint is:
d0:82:24:8e:d7:f1:bb:9b:33:53:96:93:49:da:9b:e3 schacon@mylaptop.local
First it confirms where you want to save the key (.ssh/id_rsa), and then it asks twice for a passphrase, which you can leave empty if you don’t want to type a password when you use the key.
However, if you do use a password, make sure to add the -o option; it saves the private key in a format that is more resistant to brute-force password cracking than is the default format.
You can also use the ssh-agent tool to prevent having to enter the password each time.
Now, each user that does this has to send their public key to you or whoever is administrating the Git server (assuming you’re using an SSH server setup that requires public keys).
All they have to do is copy the contents of the .pub file and email it.
The public keys look something like this:
$ cat ~/.ssh/id_rsa.pub
ssh-rsa AAAAB3NzaC1yc2EAAAABIwAAAQEAklOUpkDHrfHY17SbrmTIpNLTGK9Tjom/BWDSU
GPl+nafzlHDTYW7hdI4yZ5ew18JH4JW9jbhUFrviQzM7xlELEVf4h9lFX5QVkbPppSwg0cda3
Pbv7kOdJ/MTyBlWXFCR+HAo3FXRitBqxiX1nKhXpHAZsMciLq8V6RjsNAQwdsdMFvSlVK/7XA
t3FaoJoAsncM1Q9x5+3V0Ww68/eIFmb1zuUFljQJKprrX88XypNDvjYNby6vw/Pb0rwert/En
mZ+AW4OZPnTPI89ZPmVMLuayrD2cE86Z/il8b+gw3r3+1nKatmIkjn2so1d01QraTlMqVSsbx
NrRFi9wrf+M7Q== schacon@mylaptop.local Introduction
Git connects to remotes by default via HTTPS, which requires you to enter your login and password every time you run a command like Git pull or git push, using the SSH protocol. You may connect to servers and authenticate to access their services. The three services listed allow Git to connect through SSH rather than HTTPS. Using public-key encryption eliminates the need to type a login and password for each Git command.
Make sure a Git is installed
Make sure Git is installed before you start. Run the following command in your Windows terminal to see if Git is installed on your computer:
git --version
Enter fullscreen mode
Exit fullscreen mode
Install Git
To install Git, you can download the latest version from the official Git website. You can also install Git using Chocolatey or Winget package manager.
Install Git official website
To install Git from the official website, follow the steps below:
- Go to the official Git website and download the latest version of Git for Windows.
- Run the installer and follow the steps below:
- Click Next on the first two screens to accept the default options.
- Click Next on the Select Components screen.
- Click Next on the Choosing the default editor used by Git screen.
- Click Next on the Choosing the default terminal emulator screen.
- Select the Use Git from the Windows Command Prompt option.
- Select the Checkout Windows-style, commit Unix-style line endings option.
- Select the Use Windows’ default console window option.
- Click Next on the Configuring the line ending conversions screen.
- Click Next on the Configuring the terminal emulator to use with Git Bash screen.
- Click Install on the Choosing HTTPS transport backend screen.
- Click Finish on the Completing the Git Setup screen.
- Open a new command prompt window and verify that Git is installed correctly by typing
git --version.
Install Git using Chocolatey
To install Git using Chocolatey, follow the steps below:
- Open Windows Terminal.
- Run the following command to install Git:
choco install git -y
Enter fullscreen mode
Exit fullscreen mode
- Verify that Git is installed correctly by typing
git --version.
Install Git using Winget
To install Git using Winget, follow the steps below:
- Open Windows Terminal.
- Run the following command to install Git:
winget install --id=Git.Git -e
Enter fullscreen mode
Exit fullscreen mode
- Verify that Git is installed correctly by typing
git --version.
Note: Don’t forget to specify global Git settings using the following command after installing git:
git config --global user.name 'USERNAME'
git config --global user.email 'YOUR_EMAIL@EXAMPLE.COM'
Enter fullscreen mode
Exit fullscreen mode
Generate SSH keys
To generate SSH keys, follow the steps below:
- Open Windows Terminal.
- Run the following command (change your
YOUR_EMAIL@EXAMPLE.COMwith your email address) to establish a new SSH key pair:
ssh-keygen -t rsa -b 4096 -C "YOUR_EMAIL@EXAMPLE.COM"
Enter fullscreen mode
Exit fullscreen mode
- It will ask you where you want to save the private key (id rsa), and you may accept the default location by pressing Enter.
Whether you already have a private key, it will ask if you want to override it:
Overwrite (y/n)?
Enter fullscreen mode
Exit fullscreen mode
- If this happens, hit Enter and type y. Then, enter and re-enter the following passcode (think of it as a password):
Enter a file in which to save the key (/c/Users/you/.ssh/id_rsa): [Press enter]
Enter fullscreen mode
Exit fullscreen mode
- Enter a secure passphrase.
Enter passphrase (empty for no passphrase): [Type a passphrase]
Enter same passphrase again: [Type passphrase again]
Enter fullscreen mode
Exit fullscreen mode
- The SSH key pair is created in ~/.ssh, and the whole interaction should look like this:
Enter fullscreen mode
Exit fullscreen mode
- Verify that the SSH key was created by running the following command:
ls .\.ssh\
Enter fullscreen mode
Exit fullscreen mode
Add SSH key to the ssh-agent to your account
Copy the SSH key to your clipboard by running the following command:
Get-Content .\.ssh\id_rsa.pub | Set-Clipboard
Enter fullscreen mode
Exit fullscreen mode
GitHub
Sign in to your GitHub account using a browser by going to github.com and entering your username and password. Click your profile photo in the upper-right corner of the page, then Settings:

Select SSH and GPG keys from the user settings sidebar. Then select New SSH key from the drop-down menu. Put a descriptive label for the new key in the Title area (for example, your computer’s name) and paste your public key into the Key field. Last but not least, click Add SSH key:
The key is now visible in the list of SSH keys linked to your account:

GitLab
Sign in to your GitLab account using a browser by going to gitlab.com and entering your username and password. Click your profile photo in the upper-right corner of the page, then Settings:

Click SSH Keys in the User Settings sidebar. In the Key area, paste your public key. Fill in the Title area for the new key with a descriptive term (for example, the name of your computer). Finally, click the Add key:

The key is now visible in the list of SSH keys linked to your account:

Bitbucket
Log in to your Bitbucket account using a browser by going to bitbucket.org and entering your username and password. Click your profile photo in the lower-left corner of the website, then Bitbucket settings:
SSH keys may be found in the Settings sidebar’s Security section. After that, select Add key from the drop-down menu. Fill up the Description box with a descriptive label for the new key (such as your computer’s name), and then paste your public key into the Key field. Last but not least, choose to Add key:
The key has now been added to your account’s list of SSH keys:

Test connecting via SSH
Before utilizing SSH with Git, GitHub, GitLab, and Bitbucket allow you to verify whether the connection has been set up successfully.
GitHub Test Connecting via SSH
Open the terminal once you’ve added your SSH key to your GitHub account and type:
ssh -T git@github.com
Enter fullscreen mode
Exit fullscreen mode
If you’re connecting to GitHub over SSH for the first time, the SSH client will ask if you trust the GitHub server’s public key:
The authenticity of host 'github.com (140.82.113.4)' can't be established.
RSA key fingerprint is SHA256:a5d6c20b1790b4c144b9d26c9b201bbee3797aa010f2701c09c1b3a6262d2c02.
Are you sure you want to continue connecting (yes/no)?
Enter fullscreen mode
Exit fullscreen mode
Press Enter after typing yes. GitHub has been added to the list of trustworthy hosts in the SSH client:
Warning: Permanently added 'github.com,140.82.113.4' (RSA) to the list of known hosts.
Enter fullscreen mode
Exit fullscreen mode
You won’t be asked about GitHub’s public key again once you’ve added it to the list of known hosts.
The server notifies you that you have successfully authenticated and ends the connection: Because this remote access through SSH is offered by GitHub only for testing purposes and not for practical usage, the server informs you that you have successfully authenticated and terminates the connection:
Hi YOUR_USER_NAME! You've successfully authenticated, but GitHub does not provide shell access.
Enter fullscreen mode
Exit fullscreen mode
If you passed the test, you may now utilize SSH with GitHub.
The entire interaction should look something like this:
ssh -T git@github.com

The authenticity of host 'github.com (140.82.113.4)' can't be established.
RSA key fingerprint is SHA256:a5d6c20b1790b4c144b9d26c9b201bbee3797aa010f2701c09c1b3a6262d2c02.
Are you sure you want to continue connecting (yes/no)? yes
Warning: Permanently added 'github.com,140.82.113.4' (RSA) to the list of known hosts.
Hi your_user_name! You've successfully authenticated, but GitHub does not provide shell access.
YOUR_USER_NAME@YOUR_HOST_NAME:~>
Enter fullscreen mode
Exit fullscreen mode
GitLab Test Connecting via SSH
The test is pretty similar if you’ve added your SSH key to your GitLab account:
ssh -T git@gitlab.com

The authenticity of host 'gitlab.com (35.231.145.151)' can't be established.
ECDSA key fingerprint is SHA256:4ac7a7fd4296d5e6267c9188346375ff78f6097a802e83c0feaf25277c9e70cc.
Are you sure you want to continue connecting (yes/no)? yes
Warning: Permanently added 'gitlab.com,35.231.145.151' (ECDSA) to the list of known hosts.
Welcome to GitLab, @YOUR_USER_NAME!
Enter fullscreen mode
Exit fullscreen mode
If you passed the test, you may now utilize SSH with GitLab.
Bitbucket Test Connecting via SSH
The test is pretty similar if you’ve added your SSH key to your Bitbucket account:
ssh -T git@bitbucket.org

The authenticity of host 'bitbucket.org (104.192.143.1)' can't be established.
RSA key fingerprint is SHA256:fb7d37d5497c43f73325e0a98638cac8dda3b01a8c31f4ee11e2e953c19e0252.
Are you sure you want to continue connecting (yes/no)? yes
Warning: Permanently added 'bitbucket.org,104.192.143.1' (RSA) to the list of known hosts.
logged in as YOUR_USER_NAME.

You can use git or hg to connect to Bitbucket. Shell access is disabled.
Enter fullscreen mode
Exit fullscreen mode
If you passed the test, you may now utilize SSH with Bitbucket.
References
- GitHub SSH Key Setup
- GitLab SSH Key Setup
- Bitbucket SSH Key Setup
SSH auth vs password based auth
SSH authentication is generally preferred over password-based authentication for several reasons:
-
Security: Passwords are easily guessed or hacked, whereas SSH authentication relies on cryptographic keys, which are much more difficult to crack.
-
Convenience: Once you’ve configured SSH authentication, logging in to a remote system becomes much easier. You don’t need to remember or type in a password every time you log in; instead, you just need to have your SSH key handy.
OpenSSH for Windows
Both OpenSSH for Windows and Git Bash offer SSH functionality on Windows. Both include tools to help support key management and authentication, namely:
- ssh-keygen for generating secure keys
- ssh-agent and ssh-add for securely storing private keys
- scp and sftp to securely copy public key files during initial use of a server.
But we will use OpenSSH for Windows in this case.
Why not use Gitbash for Windows ?
I prefer OpenSSH for Windows over Gitbash due to the following reasons:
- In GitBash, you have to start the SSH agent and add the private key(s) each time your system restarts. Whereas in OpenSSH for Windows, the keys that you add are persistent even after a system restart.
You may achieve the same in GitBash by modifying the .bashrc file. However this means increase in the time taken to start the GitBash terminal.
Check whether the OpenSSH client is installed on your sysytem
You can either use CLI method (Powershell) or GUI method to check this.
Using powershell
In an elevated (run as administrator) powershell session, run:
Get-WindowsCapability -Online | Where-Object Name -like 'OpenSSH*'Using UI
In the start menu search for ‘optional features’ and naviagte to the ‘Manage optional features’ system setting.
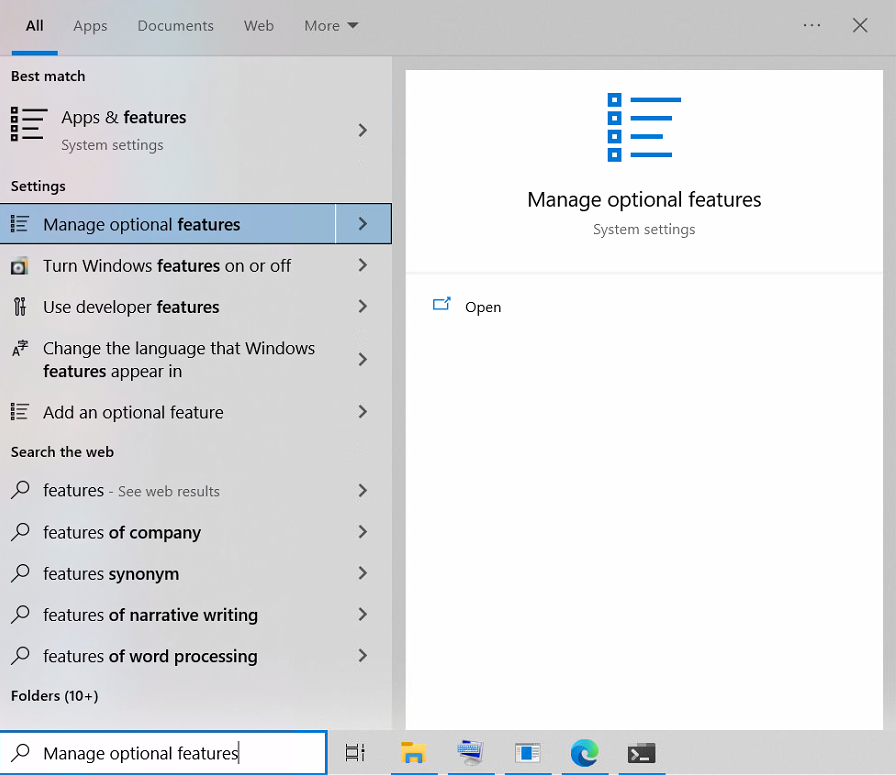
Check if openSSH client is listed under the installed features.
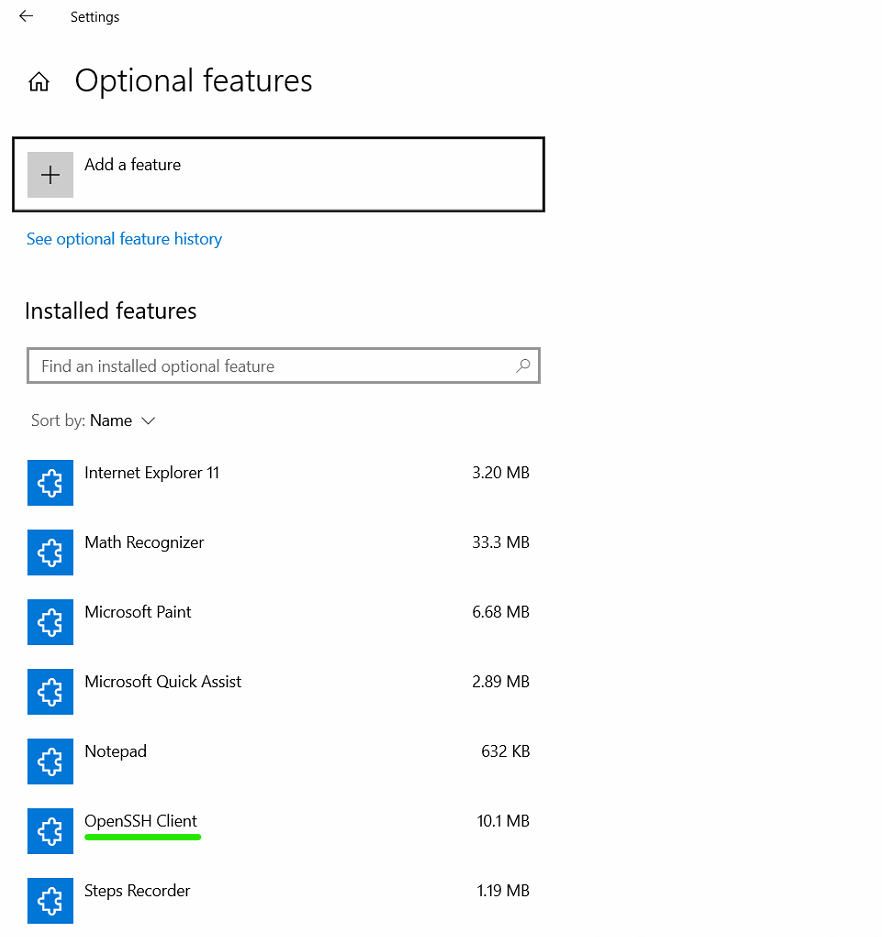
Install OpenSSH client if not present
# Install the OpenSSH Client
Add-WindowsCapability -Online -Name OpenSSH.Client~~~~0.0.1.0
If the installation was successful, you should see
Path          :
Online        : True
RestartNeeded : False
Key generation
You can generate a new SSH key pair, by using the following command.
ssh-keygen -t ed25519 -C "abc@mail.com"You should get a prompt like the following.
Generating public/private ed25519 key pair.
Enter file in which to save the key (C:\Users\Employee1/.ssh/id_ed25519):
Now, you have to enter the file name (with its location) for the private key. The public key will be stored in the same folder. The private key file doesn’t have any file extension, whereas the public key file has an .pub extension.
C:\Users\Employee1/.ssh/sid_githubIf you have added a valid path, you will now be prompted to enter a passphrase.
Enter passphrase (empty for no passphrase):
Enter same passphrase again:
Your identification has been saved in C:\Users\Employee1/.ssh/sid_github.
Your public key has been saved in C:\Users\Employee1/.ssh/sid_github.pub.
The key fingerprint is:
SHA256:IY7AZRAIwCoOjGIasdfgha3GOiuazirYsONJvr606cs abc@mail.com
The key's randomart image is:
+--[ED25519 256]--+
|Oo=+++           |
|++ +o .          |
|+.o. ... .        |
|Co .+o . .       |
|D. o. . S        |
|o.o              |
|.* o             |
|%.*              |
|%E+              |
+----[SHA256]-----+
Now you have a public/private ed25519 key pair in the location specified. The .pub files are public keys, and files without an extension are private keys.
Add private key to ssh agent
By default, the ssh-agent service is disabled. We should start it as well as configure it to start automatically whenever the system starts.
To start the ssh-agent service each time your computer is rebooted, enter the following command in an elevated PowerShell session:
Get-Service ssh-agent | Set-Service -StartupType AutomaticNow you can start the ssh-agent service by running the following command.
Additionally. you may verify the same by checking the running status of ssh-agent. You can use the Get-Service cmdlet to perform this.
If everything is alright, you should see an output similar to the following.
Status   Name               DisplayName
------   ----               -----------
Running  ssh-agent          OpenSSH Authentication Agent
Add private key to ssh-agent
ssh-add $env:USERPROFILE\.ssh\id_ed25519It is recommended that you store your private key in a secure location and then delete it from the local system. The private key cannot be retrieved from the agent since a strong algorithm has been used, such as Ed25519 in this example. If you lose access to the private key, you will have to create a new key pair and update the public key on all systems you interact with.
Verify whether key was added successfully
You can run the following command to see a list of all private keys added to the ssh-agent.
If the key addition was successful, you should see an output of the following format.
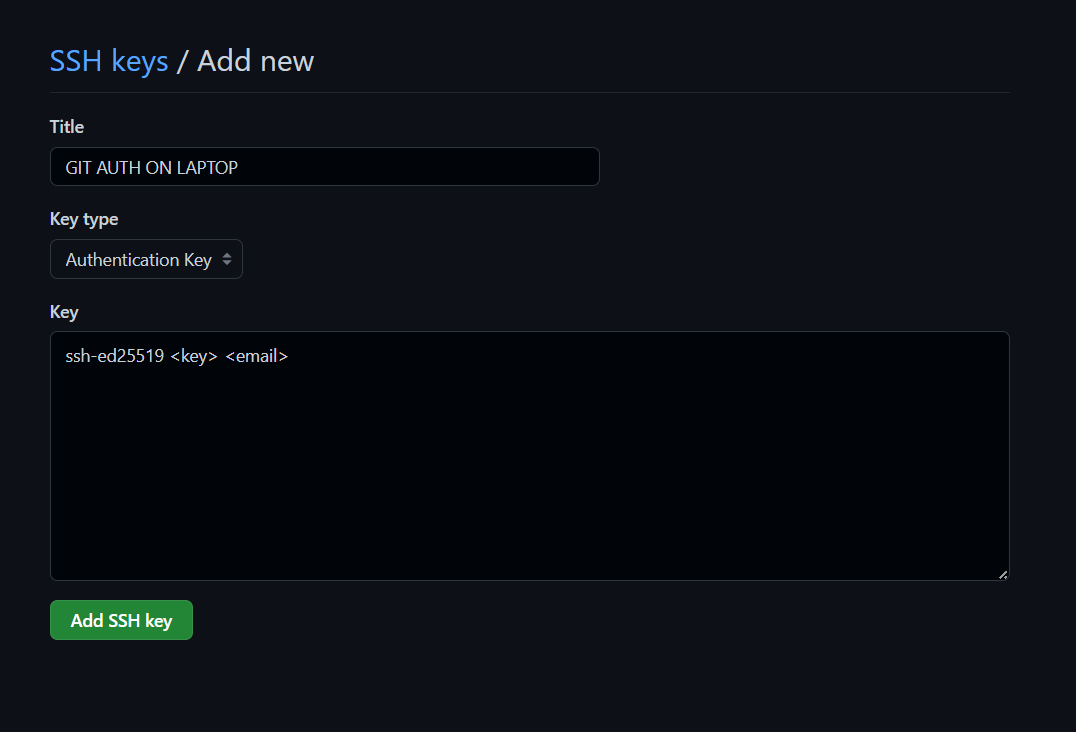
256 SHA256:<key> <email> (ED25519)Add public key to GitHub
You can copy the contents of the public key (say sid_github.pub) by using the following command:
Get-Content -Raw $env:USERPROFILE\.ssh\sid_github.pub | clipThen, you can navigate to https://github.com/settings/ssh/new, in order to add a new public key to GitHub.
Check connection to GitHub
As a final step, it’s time to check whether you are able to authenticate with GitHub servers using SSH credentials. You can use the following command to do so:
If you have multiple SSH keys to authenticate with different GitHub accounts, then you can specify the private key that you want to use.
For example, if you want to test authenticating with GitHub using the sid_github private key, you can use the following command to do so. Basically, we specify the private key to be used for authentication using the -i option.
ssh -T git@github.com -i $env:USERPROFILE\.ssh\sid_githubYou should see an output similar to the following if you are doing this for the first time on your system.
The authenticity of host 'github.com (IP ADDRESS)' can't be established.
RSA key fingerprint is SHA256:+DiY3wvvV6TuJJhbpZisF/zLDA0zPMSvHdkr4UvCOqU.
Are you sure you want to continue connecting (yes/no)?
You can check if the hash shown above matches the one provided by GitHub here: [https://docs.github.com/en/authentication/keeping-your-account-and-data-secure/githubs-ssh-key-fingerprints].
If they match, then the connection is indeed safe and you can enter ‘yes’ to proceed further.
Finally you should see the following, if the authentication was successful.
Hi USERNAME! You've successfully authenticated, but GitHub does not
provide shell access.We discussed the perks and usage of SSH Authentication in the last tutorial and in this tutorial we will learn about Git SSH Authentication. The advantages of SSH indicated that SSH is more secure and convenient to use once the initial set up finalized and ready. But that was just the theory. To make use of SSH keys, we must generate them and add them to our GitHub account. In this tutorial, we will cover the following:
- How to Authenticate via SSH in Git?
- The procedure of Generating public and private keys in SSH.
- How to Add SSH keys to the GitHub Account?
- The method of Verifying the SSH keys through Git Bash.
How to establish Git SSH Authentication?
Authentication provides us with a method to let only authorized users access the confidential data or any data if I say. Authentication and authorization is a broad topic. If you are interested, you can learn more from authentication and authorization to brush up the concepts. In Git and GitHub, while we learned the authentication through HTTPS in the repository cloning tutorial, it time for authenticating using another option that GitHub provides.
You might wonder that just like we copied the URL by pressing clone in GitHub; Similarly, we will choose the SSH option and follow the steps. Well, let’s try that and see what happens.
1.Navigate to the ToolsQA repository page
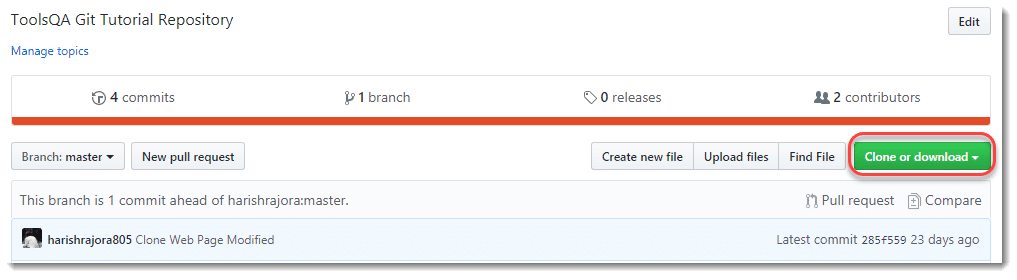
- You will find the Clone or download button. Click on the button to open the cloning options.
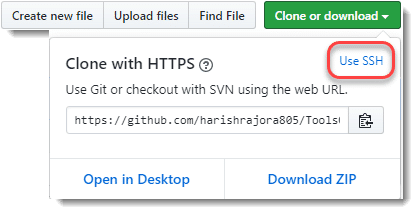
- Go to the Use SSH button to see if it takes us somewhere.
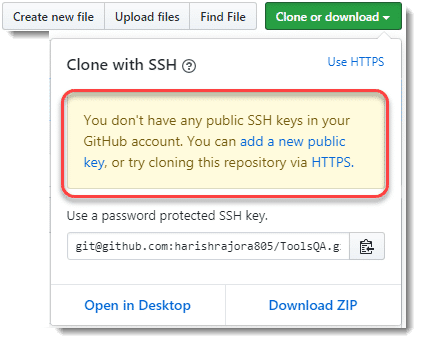
We get a note that we currently do not have any public SSH keys in our GitHub account and followed by the links to generate one. So, our learning in the SSH authentication post is quite right. We need the keys to communicate with the server via SSH. In the next section, we will generate the SSH keys, but before that, as a precaution, you should remember a note. It might so happen in some cases that the user already has the SSH keys pair in their repository. So, before generating the keys, it is a good practice first to check the existing SSH keys, if any.
Checking SSH Keys In Local Repository
Checking the SSH keys in the local repository is a few-step simple process.
-
Open Git Bash on your system.
-
Type the following command and press enter:
ls -l ~/.ssh
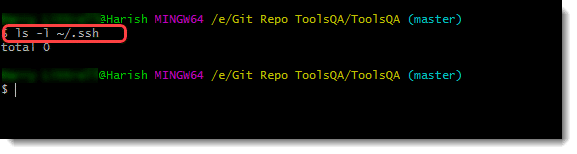
Once the command executes, you will see the result as a total 0 if you do not have the keys. Whereas, if you do have the keys, it will display as the following:
It shows that two keys are present. If you have the keys present, you can skip the next section, which details about generating public and private keys in GitHub. Type the following command to check whether you have the ssh keys present or not.
ls ~/.ssh
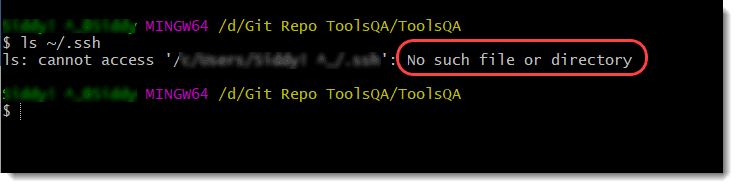
Since I do not have any such directory and the keys, of course, I get the appropriate message. In the next section, we will generate ssh keys.
Generating Public and Private Keys in GitHub
Now that I am sure I have no keys associated with my remote account let’s go ahead and use SSH for authentication. For this, we generate two types of keys.
- Private Keys
- Public Keys
Private Keys in Cryptography
As mentioned above, the user generates two types of keys while communicating with other people over the internet. Out of those two keys, the user keeps one with themselves and does not share it with anybody. This key is the private key of the SSH protocol. For security purposes and to increase the permutations of guesses that a hacker can make, this key is generally very lengthy. It can be as long as 1024 or 2048 bits. Therefore, we use a private key for decrypting the data. If one loses the private key, the data will remain decrypted forever.
Public Keys in Cryptography
The other key that the user generates is the public key. The public key gets shared with everyone, and through public key only, a user will encrypt the data they are trying to send. On the other end, the receiver will decrypt the data with the private key. User can decrypt the data if and only if the public key is of the same person to which you sent the data. Once decrypted, the user gets assurance that the correct person has sent the data, and the sender gets the guarantee that the right person has decrypted the data.
To generate the pair of ssh keys through Git, type the following command:
ssh-keygen -t rsa -C "myFirstSSHKeys"
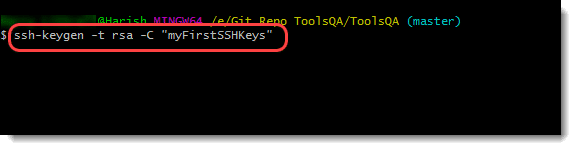
If we break this command into elements that make it, we get the following entities:
-
ssh-keygen: ssh-keygen is a standard cryptographic key generation tool. It depicts that we are requesting the ssh key generation from Git. It comes pre-installed with Unix systems and Windows 10 onwards. Before Windows 10, PuTTY achieved the same goal.
-
-t: This option defines that we are about to describe the type of key we want to generate. The keys can be of DSA or RSA type.
-
rsa: This asks Git to generate RSA keys only.
-
-C: This option depicts that we are about to mention a comment next to this option.
-
myFirstSSHKeys: This is the comment. It is essential when we have multiple keys associated with our account.
Press enter to execute the command.
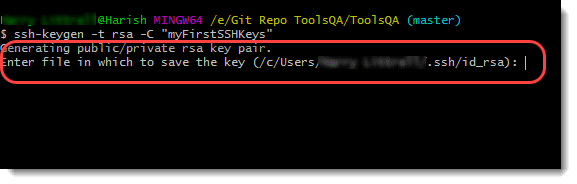
You will see the message as Generating a public/private rsa key pair, which shows that ssh-keygen is generating the keys. Once generated, it will ask the file in which you want to save the keys. Ssh-Keygen will show you the default location. For now, we will be going ahead with the default location, so just press enter.
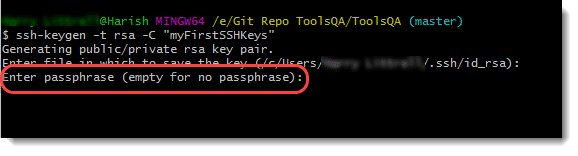
Next, you will be prompted to enter the passphrase. For now, we will go ahead with the empty passphrase. Press enter and enter the same passphrase (nothing) again to generate the keys.
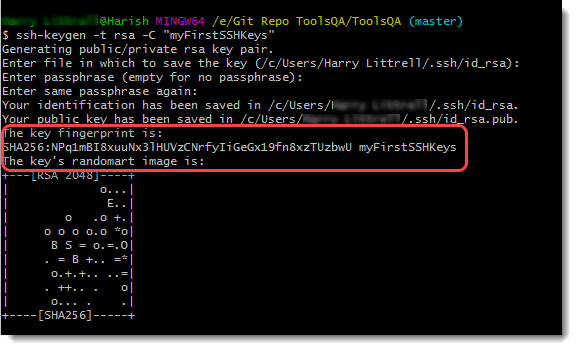
Congratulations, if you are getting the same screen! The generation of your keys is successful. The highlighted line, however, shows the shorter version or the fingerprint of the public key.
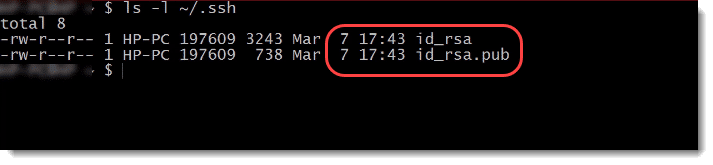
Let’s see the keys in the directory now by again typing the following command:
ls -l ~/.ssh
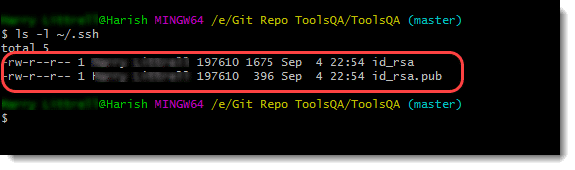
This note confirms that we have successfully generated the keys. Now, we need to add the public key to our GitHub account so that we can communicate from Git on the local machine to a remote GitHub server via SSH.
Adding SSH keys to GitHub
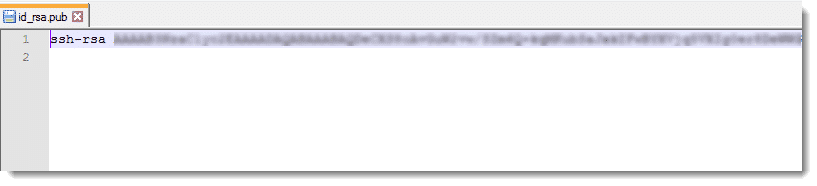
- To add the SSH key to our GitHub account, first, we need to copy the key. To copy the key, open the public key that we generated in the above section in your favorite text editor:

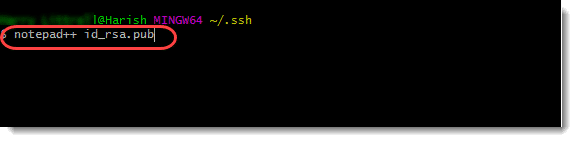
*Note: We are using Notepad++ as a text editor, while you can use any one of your choices. For more information, you can refer to text editors in Git.
- The key will open in Notepad++. Copy this key.
- Open your GitHub account and go to settings by pressing your profile picture on the top-right corner of the page.
-
Navigate to SSH and GPG keys option from the side panel.
-
Press the New SSH key to enter a new key in GitHub.

- Enter the title, and the key in the text field given and press Add SSH Key.
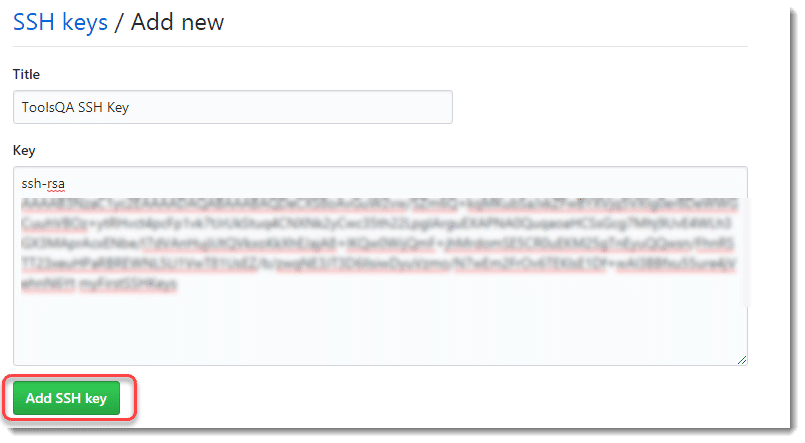
Once done, you will see that the key has been added successfully, which is recognized by the title given in point 6.
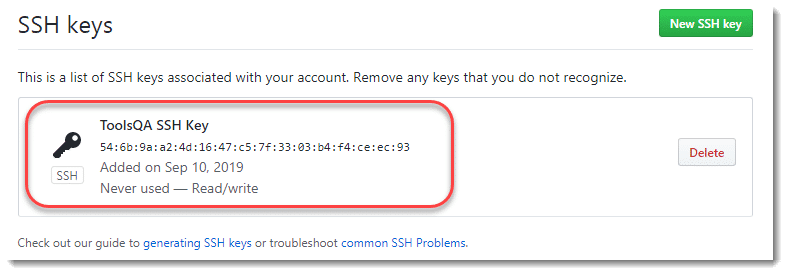
If this is the screen you are getting, you have successfully added the SSH key to your GitHub account. Now, we need to verify that the key has been linked correctly or not.
Verifying Added SSH Key in GitHub Account
Now that the SSH key has generated and added in our GitHub account, it is time we check the key with our GitHub account with the help of ssh and GitBash.
Go to the Git Bash and type the following command:
ssh -T [email protected]
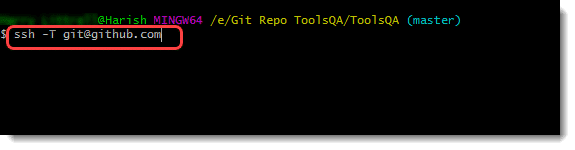
Press enter to see the following message on the screen. It will prompt you to confirm if you want to authenticate or not. Press Yes.

Press enter, and if you see a message with your name, you have verified successfully the key that you have generated.
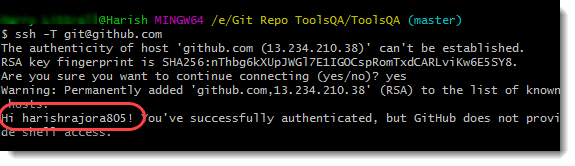
Successful verification of our keys brings us to the end of this tutorial of Git SSH Authentication. It was a lot to generate, add, and verify keys to the account, which we have done happily. Before ending, I must say that the use of HTTPS or SSH depends entirely on the user and their convenience. If you feel more comfortable using HTTPS, you should go through it (after giving a read to its advantages and disadvantages). For now, we will move on to our next post.
Аутентификация SSH происходит с помощью асимметричного шифрования. В отличие от симметричного, в котором всё шифруется и расшифровывается одним и тем же ключом, ассиметричное устроено сложнее. В нем уже два ключа, и один из них можно показывать всем (private key и public key). Ассиметричное шифрование используется, например, в протоколах SSL/TLS для безопасной передачи данных по сети (вроде HTTPS для HTTP). Ниже видео с простым объяснением работы ассиметричного шифрования на английском языке.
Для аутентификации в Git используются два основных способа: с помощью логина и пароля HTTP и с помощью SSH ключей. Использование SSH ключей имеет ряд преимуществ. Они проще в эксплуатации и более безопасны.
Генерируем ключи
Чтобы сгенерировать пару SSH ключей нам понадобиться утилита ssh-keygen. В Linux она идет в поставке с пакетом openssh, в Windows ставится при установке Git.
|
|
На 3 строке ssh-keygen запросит куда сохранить ключи. Здесь просто жмем (если только вы не генерируете ключи для нестандартного использования). На 4 и 5 строках можно ввести кодовое слово для доступа к закрытому (private) ключу. Советую это сделать для дополнительной безопасности (если вдруг у вас “уведут” ключи).
Все, ключи готовы. Как видим ssh-keygen сохранил их в /home/zhanibek/.ssh/id_ed25519 (закрытый ключ) и /home/zhanibek/.ssh/id_ed25519.pub (открытый ключ). Закрытый ключ нельзя никому передавать (храните его как зеницу ока), а открытый можно свободно распростанять (хоть на странице в инстаграм выкладывать 😉).
Добавляем открытый ключ на удаленном (remote) репозитории
Теперь нам нужно сообщить наш открытый ключ серверу, центральному репозиторию. Обычно это делается на странице настроек профиля. Мы, для примера, посмотрим как это делается в GitLab и GitHub.
Сначала скопируем открытый ключ,
❯ cat ~/.ssh/id_ed25519.pub
ssh-ed25519 AAAAC3NzaC1lZDI1NTE5AAAAIEgMoq+Ih17NXY5t+tzHs3sZPb4R7NfE/LfFB1Uqml87 zhanibek@arch-t580
Совет
Для удобства можно сразу скопировать ключ в буфер обмена воспользовавшись утилитами xsel, xclip или wl-copy (если Wayland):
❯ xsel -ib < ~/.ssh/id_ed25519.pub
… или …
❯ xclip -i < ~/.ssh/id_ed25519.pub
… или …
❯ wl-copy < ~/.ssh/id_ed25519.pub
GitHub
Settings → SSH and GPG keys → New SSH key → вставляем, ранее скопированный, открытый ключ в поле Key → Add SSH Key.
GitLab
Settings → SSH Keys → вставляем, ранее скопированный, открытый ключ в поле Key → Add key.
Клонируем репозиторий
Отлично, мы сгенерировали и добавили ключи. Теперь клонируем репозиторий с помощью SSH ссылки.

❯ git clone [email protected]:onetech/anthill/api/arm-api.git
Cloning into 'arm-api'...
###############################################################
#                   Welcome to forte.bank                     #
#        All connections are monitored and recorded           #
# Disconnect IMMEDIATELY if you are not an authorized user!   #
###############################################################
Enter passphrase for key '/home/zhanibek/.ssh/id_ed25519':
remote: Enumerating objects: 101, done.
remote: Counting objects: 100% (101/101), done.
remote: Compressing objects: 100% (79/79), done.
remote: Total 7520 (delta 36), reused 21 (delta 4), pack-reused 7419
Receiving objects: 100% (7520/7520), 817.81 KiB | 3.35 MiB/s, done.
Resolving deltas: 100% (3207/3207), done.
На строке 9 git запрашивает кодовое слово, которое вы задавали при генерации ключей. Если git запрашивает ввод кодового слова при каждой команде, взаимодействующей с удаленным репозиторием (git clone, git fetch, git push, …), значит у вас в системе не установлен и/или не запущен сервис ssh-agent.
Совет
Для существующих репозиториев (если вы до этого клонировали репозиторий с помощью HTTPS адреса, а не SSH) можно поменять URL удаленного репозитория:
ssh-agent
ssh-agent – программа для хранения (кэширования) закрытых ключей на время работы. Другими словами вы расшифровываете закрытый ключ кодовым словом, добавляете его в агент, и пока агент запущен вам не нужно расшифровывать ключ (вводить кодовое слово).
Добавить ключ можно командой:
❯ ssh-add ~/.ssh/id_ed25519
Enter passphrase for /home/zhanibek/.ssh/id_ed25519:
Identity added: /home/zhanibek/.ssh/id_ed25519 (zhanibek@arch-t580)
Если в ответ вы получили сообщение “Could not open a connection to your authentication agent.”, значит агент не запущен.
Запустить агент можно командой:
❯ eval "$(ssh-agent)"
Agent pid 501070
… и снова попробовать ssh-add.
Чтобы агент запускался при старте системы добавьте в файл ~/.bashrc:
if ! pgrep -u "$USER" ssh-agent > /dev/null; then
    ssh-agent -t 1h > "$XDG_RUNTIME_DIR/ssh-agent.env"
fi
if [[ ! "$SSH_AUTH_SOCK" ]]; then
    source "$XDG_RUNTIME_DIR/ssh-agent.env" >/dev/null
fi
Теперь после добавления ключа в агент вам не нужно будет вводить кодовое слово (passphrase).
Автоматическое добавление ключа в агент
SSH можно настроить так, чтобы при первой попытке авторизации ключом, SSH клиенты, включая git, автоматически добавляли ключ в агент. Таким образом, вам не нужно вручную добавлять ключ командой ssh-add, а при первом git pull, команда запросит кодовое слово и сама добавит ключ в агент. Все последующие команды не будут требовать ввода кодового слова.
Для этого добавьте в файл ~/.ssh/config строку AddKeysToAgent yes:
Отлично, теперь работать с Git стало гораздо проще и безопаснее 😉
Для тех, кому не нужна безопасность
Если вы, по каким-то причинам, не хотитене можете использовать SSH, можно сделать HTTPS аутентификацию немного удобнее.
Чтобы не вводить каждый раз логин и пароль включите в настройках Git хранилище учетных данных:
git config --global credential.helper cache
Хранилище запоминает логин и пароль в оперативной памяти на некоторое время, по умолчанию 15 минут. Кроме cache есть варианты:
cache– хранит учетные данные в памяти на определенное время, можно настроить (предпочтительно для Linux)store– хранит учетные данные в файле в открытом ввиде, не истекает (не безопасно)osxkeychain– хранит учетные данные в системном keychain (предпочтительно для macOS
… но лучше используйте SSH аутентификацию ☝.