
Инструменты
Git SSH Windows — пошаговое руководство
Дата размещения статьи 08/12/2019 👁31067
Git SSH Windows — пошаговое руководство
Настроим пошагово Git SSH для Windows 10. Это позволит вам выполнять команды git без ввода пароля от своей учетной записи GitHub.
Порядок действий:
- Генерация ключа SSH.
- Добавление SSH-ключа в ssh-agent.
- Добавление ключа SSH в учетную запись GitHub.
Генерация ключа SSH
Откройте bash/терминал. Добавьте следующий текст, подставив свой адрес электронной почты GitHub.
ssh-keygen -t rsa -b 4096 -C "ваша@почта.com"Будет создан ключ ssh, используя e-mail в качестве метки.
Когда вам будет предложено «Введите файл, в котором вы хотите сохранить ключ», нажмите Enter. Это установит в местоположение по умолчанию.
Enter a file in which to save the key (/c/Users/you/.ssh/id_rsa):[Press enter]
Далее введите безопасную фразу-пароль дважды или просто нажмите Enter.
Enter passphrase (empty for no passphrase): [Type a passphrase]
Enter same passphrase again: [Type passphrase again]
Добавление SSH-ключа в ssh-agent
Чтобы запустить ssh-агент введите следующую команду.
На экране отобразится похожая строка.
Agent pid 31724
Добавим свой закрытый ключ SSH в ssh-agent. Если вы создали свой ключ с другим именем (или добавляете существующий ключ с другим именем), замените в команде id_rsa на имя вашего файла закрытого (приватного) ключа.
Ключ будет успешно добавлен в ssh-агент.
Добавление ключа SSH в учетную запись GitHub
Мы сгенерировали у себя на компьютере закрытый ключ SSH и добавили его в ssh-агент. Теперь нам необходимо добавить SSH ключ в учетную запись GitHub.
Сейчас нам необходимо скопировать SSH ключ в буфер обмена.
Способов есть несколько, но я же вам предлагаю следующее решения для Windows 10: введите команду ниже.
Прямо в терминале вы увидите содержимое необходимого файла с ключем. Скопируйте его в буфер.
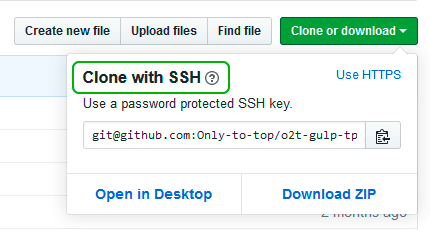
Теперь зайдите на вашу страницу GitHub » Settings.
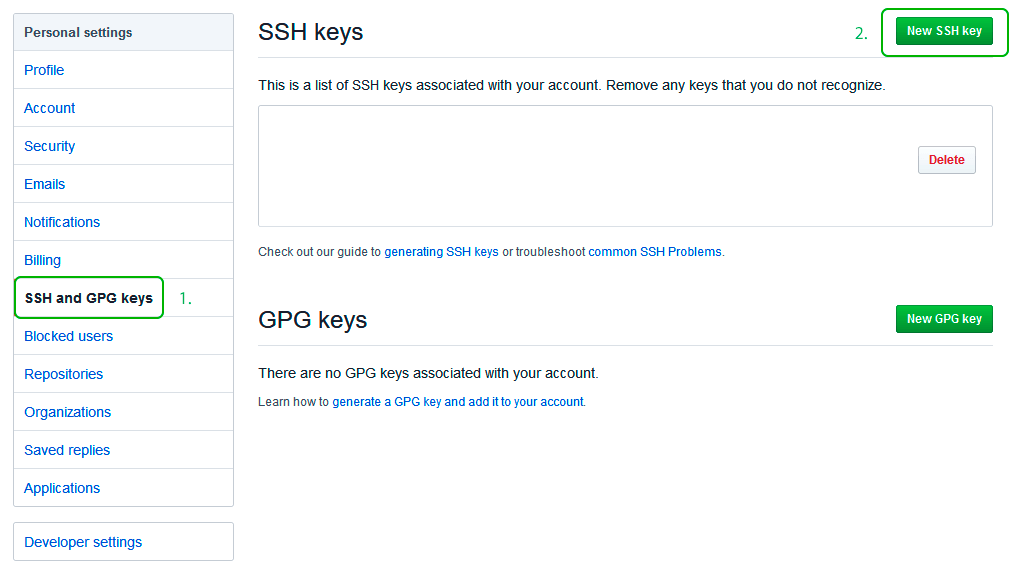
Перейдите во вкладку SSH and GPG keys и нажмите на кнопку New SSH key для добавления SSH ключа в вашу учетную запись GitHub.
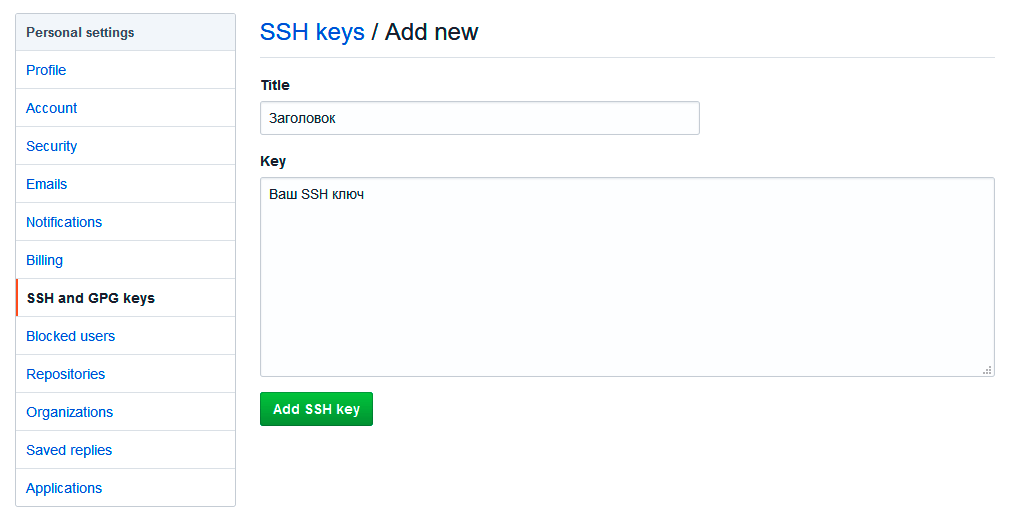
В поле Title добавьте заголовок для данного ключа. Например, если вы захотите настроить SSH доступ на нескольких устройствах, то вы будите понимать какой ключ принадлежит какому устройству.
В поле Key добавьте свой ssh-ключ, который вы скопировали в буфер обмена на предыдущем шаге.
Нажмите Add SSH key.
Для подтверждения вам потребуется ввести свой пароль от учетной записи GitHub.
На этом настройка SSH для вашего устройства завершена, теперь вы можете работать с git без ввода пароля от своей учетной записи.
Если вам понравилась данная статья, можете прочитать как настроить моментальную загрузку сайта на хостинг и синхронизацию файлов.
JavaScript: Window Location Checkbox Checked — Проверка Состояния Чекбокса ✔️
Надеюсь, вам понравилась данная информация. Если вам интересна тема web-разработки,
то можете следить за выходом новых статей в Telegram.
- Настройка Gulp Babel
- Микроразметка сайта
- Как перенести сайт WordPress на хостинг
- Настройте показ всего текста во время загрузки веб-шрифтов
- Сниппеты в VS Code
- Не удается проверить так как не задан исполняемый PHP-файл
Introduction
In this article, I’ll walk through the process of setting up and troubleshooting SSH key authentication for connecting to GitHub repositories on a Windows system using Git Bash. SSH key authentication provides a secure and convenient way to interact with GitHub without entering your username and password repeatedly.
Prerequisites
Before you begin, ensure you have the following:
- Git installed on your Windows machine. Download here
- A GitHub account. If you don’t have one, you can sign up at GitHub.
Steps to Set Up SSH Key Authentication
1. Generate SSH Key Pair
- Open Git Bash on your Windows machine.
- Create a new ssh folder:
mkdir ssh
Enter fullscreen mode
Exit fullscreen mode
- Change your directory into that folder:
cd ssh
Enter fullscreen mode
Exit fullscreen mode
- Generate a new SSH key pair by running the following command:
ssh-keygen -t rsa -C "your-email-address" -f "github-username"
Enter fullscreen mode
Exit fullscreen mode
Replace with your email address and username associated with your GitHub account.
- Optionally, provide a passphrase for extra security.
2. Start SSH Agent and Add SSH Key
- You can now change directory back into your default root:
cd ..
Enter fullscreen mode
Exit fullscreen mode
- Start the SSH agent by running:
eval $(ssh-agent -s)
Enter fullscreen mode
Exit fullscreen mode
- Add your SSH private key to the SSH agent:
ssh-add /c/Users/USER/.ssh/id_rsa
Enter fullscreen mode
Exit fullscreen mode
Replace /c/Users/USER/.ssh/id_rsa with the actual file location.
3. Add SSH Public Key to GitHub Account
- Change directory into the ssh folder again:
cd ssh
Enter fullscreen mode
Exit fullscreen mode
- Copy the contents of your SSH public key (
id_rsa.pub):
cat id_rsa.pub
Enter fullscreen mode
Exit fullscreen mode
replace «id_rsa.pub» with the name of your ssh with the .pub extension.
- Log in to your GitHub account.
- Navigate to
Settings > SSH and GPG keys. - Click on
New SSH key. - Paste your SSH public key into the
Keyfield and give it a descriptive title. - Click
Add SSH keyto save.
4. Configure SSH for GitHub
- Change directory into the ssh folder again:
cd ssh
Enter fullscreen mode
Exit fullscreen mode
- Open or create the SSH configuration file (
config) in the.sshdirectory:
touch config.txt
Enter fullscreen mode
Exit fullscreen mode
it is a normal txt file so fine ways to add the information below to it, you can use vim too.
- Add the following SSH configuration for GitHub in the config file:
   Host github.com
     HostName github.com
     User git
     IdentityFile "/c/Users/USER/.ssh/id_rsa"
Enter fullscreen mode
Exit fullscreen mode
Replace /c/Users/USER/.ssh/id_rsa with the path to your SSH private key. Don’t forget the double quote if you are on windows, use this if you are on mac:
~/.ssh/id_rsa
Enter fullscreen mode
Exit fullscreen mode
5. Test SSH Connection to GitHub
- Test the SSH connection to GitHub:
ssh -T git@github.com
Enter fullscreen mode
Exit fullscreen mode
- If prompted to confirm the authenticity of the host, type
yesand pressEnter.
Troubleshooting
- Permission Denied (publickey) Error: If you encounter this error, ensure that your SSH key is added to the SSH agent and correctly configured in your GitHub account and SSH configuration file.
-
Path Formatting (Windows): Use forward slashes (
/) and quotes (" ") for file paths in the SSH configuration file (config) on Windows.
Conclusion
By following these steps, you should now have SSH key authentication set up and working with GitHub on your Windows machine. This method provides a secure and efficient way to interact with GitHub repositories using Git commands without the need to enter your GitHub credentials repeatedly.
Feel free to share this article with others who may encounter similar issues when setting up SSH key authentication with GitHub on Windows.
Last Updated :
03 Jun, 2024
An SSH (Secure Shell) key is a pair of cryptographic keys used for authenticating and securing network communications over the SSH protocol. SSH keys are commonly used to securely access remote systems, transfer files, and execute commands on remote machines without passwords.
Components of an SSH Key
Private Key:
- The private key is kept secret and stored securely on the user’s local machine.
- It is used to decrypt encrypted messages with the corresponding public key.
Public Key:
- The public key is meant to be shared with the remote systems you want to access.
- It encrypts messages that can only be decrypted with the corresponding private key.
Now let’s start by generating an SSH key to be used in our Github account:
Step 1: Generate a New SSH Key
If you don’t already have an SSH key, you’ll need to generate one. If you already have one, you can skip to Step 2.
- Open a terminal on your computer.
- Generate a new SSH key using the ssh-keygen command:
ssh-keygen -t ed25519 -C "your_email@example.com"
- If your system doesn’t support the ed25519 algorithm, you can use rsa:
ssh-keygen -t rsa -b 4096 -C "your_email@example.com"
Replace «your_email@example.com» with your GitHub email address.
Follow the prompts:
- When asked to «Enter a file in which to save the key,» you can press Enter to accept the default location.
- When prompted, you can optionally enter a passphrase for added security.
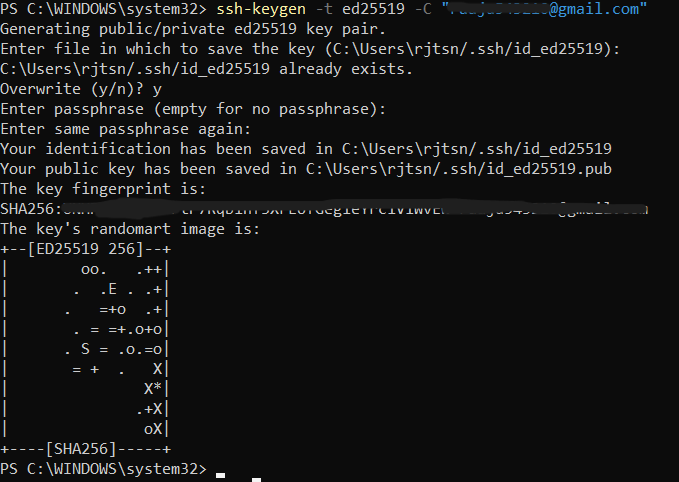
Note: It is asking for overwrite because i have already generated a ssh key earlier.
Step 2: Start the SSH Agent
- Start the SSH agent in the background:
Start-Service ssh-agent
- Add your SSH private key to the SSH agent:
ssh-add ~/.ssh/id_ed25519
- If you used the RSA algorithm, the command will be:
ssh-add ~/.ssh/id_rsa
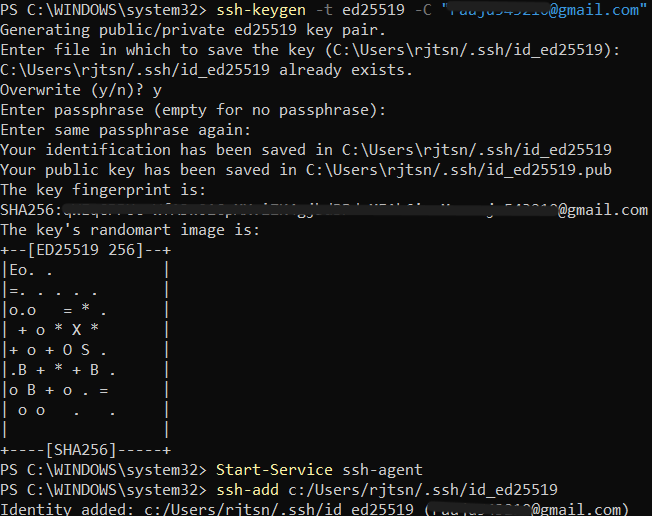
Started the ssh-agent and added the private key.
Step 3: Add the SSH Key to Your GitHub Account
- Copy the SSH public key to your clipboard:
cat ~/.ssh/id_ed25519.pub
If you used RSA:
cat ~/.ssh/id_rsa.pub
- Select and copy the output starting with ssh-ed25519 or ssh-rsa.
Log in to your GitHub account.
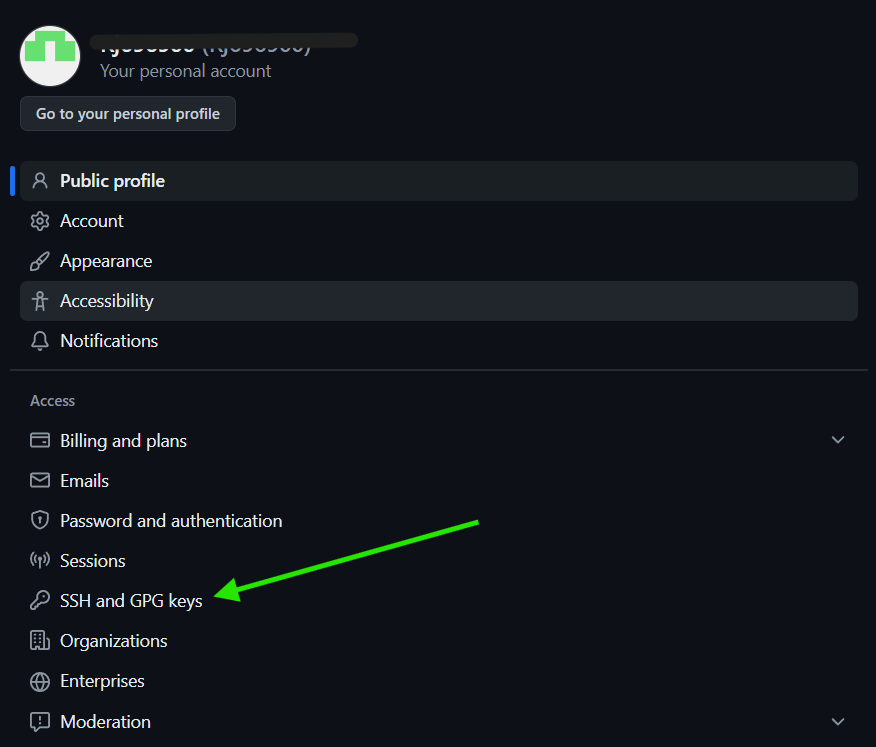
Navigate to SSH and GPG keys settings:
- Click on your profile picture in the top-right corner and select «Settings».
- In the left sidebar, click on «SSH and GPG keys».
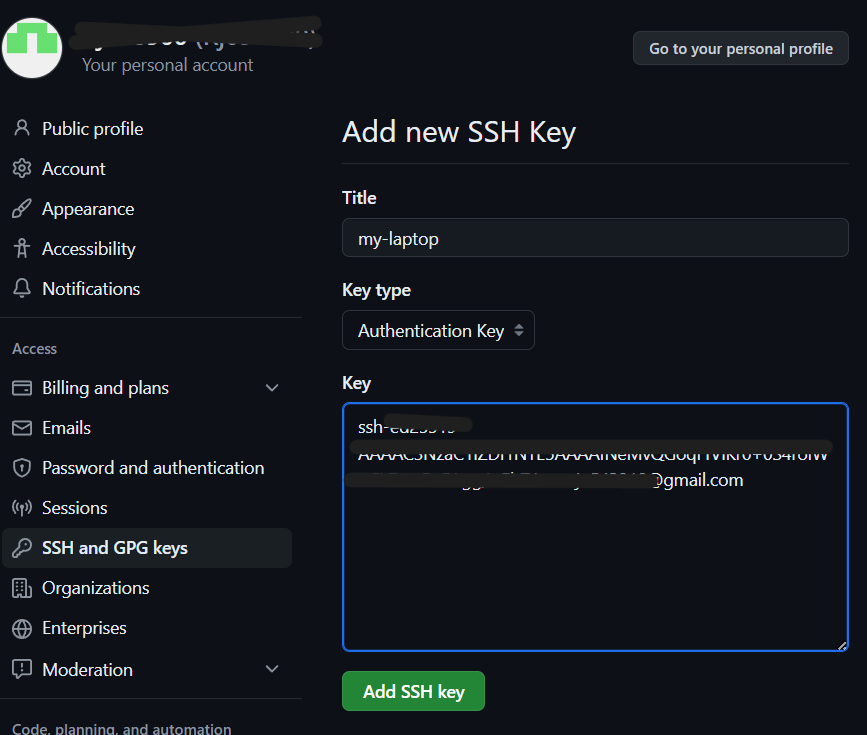
Add a new SSH key:
- Click on the «New SSH key» button.
- In the «Title» field, add a descriptive label for the new key (e.g., «My Laptop»).
- In the «Key» field, paste the SSH key you copied in Step 3.1.
- Click «Add SSH key».
Confirm your GitHub password to complete the process.
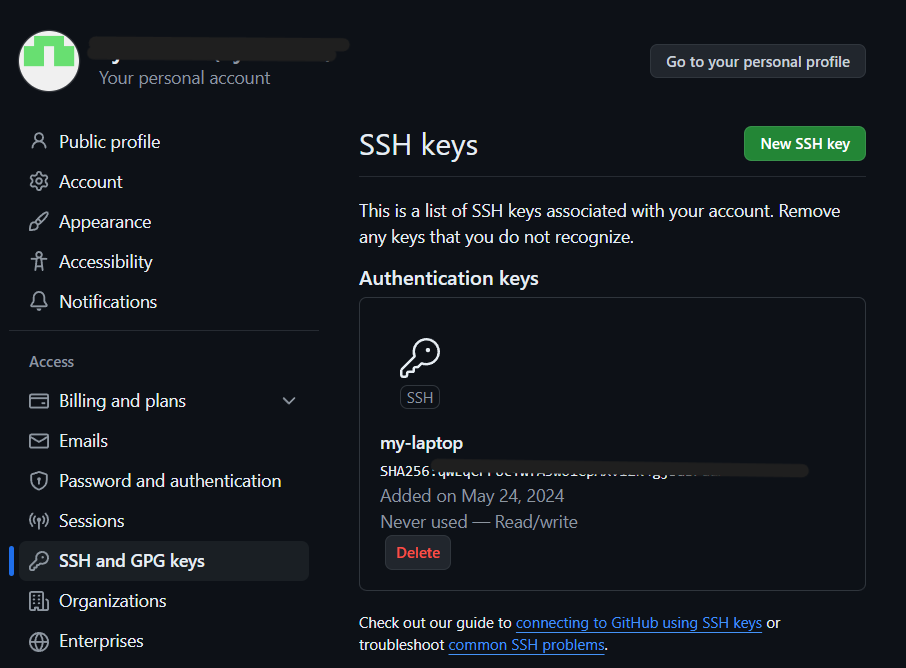
Successfully added ssh key:
Step 4: Test Your SSH Connection
- Open a terminal.
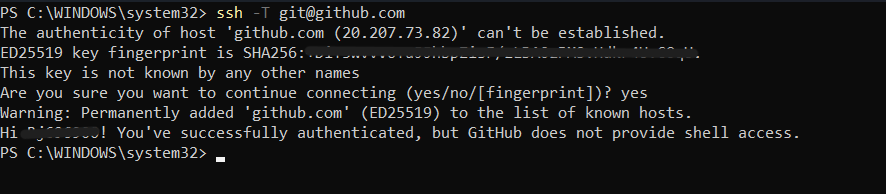
- Test the connection to GitHub
ssh -T git@github.com
You might see a warning the first time you connect:
The authenticity of host 'github.com (IP ADDRESS)' can't be established.
RSA key fingerprint is SHA256:...
Are you sure you want to continue connecting (yes/no)?
Type yes to continue.
- Verify successful connection:
If everything is set up correctly, you should see a message like:
Hi username! You've successfully authenticated, but GitHub does not provide shell access
You’ve successfully added an SSH key to your GitHub account.
Now you can clone repositories, push changes, and perform other Git operations over SSH without needing to enter your password each time.
22 Sep 2019
Reading time ~4 minutes
Table Of Contents
- Pre-requisites
- When to use SSH keys instead of HTTPS
- Git Bash
- Github Desktop Application
- Generate new SSH key
- Add public SSH key to your GitHub account
- Add private SSH key to the ssh-agent
- Use SSH over HTTPS
- Verification
- References
Pre-requisites
- Git Bash
When to use SSH keys instead of HTTPS
- Your corporate firewall blocks port 22, then even if you have set the remote origin to use HTTPS url, the authentication will fail as it is done via SSH.
Remedy is to set up SSH keys and use SSH over HTTPS port 443.
Below are some of the errors different applications throw when the port is blocked and HTTPS remote url is used.
Git Bash
When you try to push your changes, both Github Login and OpenSSH prompt asking for your username and password will fail with error remote no anonymous write access. fatal authentication failed for github.
Github Desktop Application
You will be able to login to your github desktop application as the authentication is done via HTTPS. However, when you try to push your changes it will result in authentication failure.
Below is the logs captured by the desktop application showing that the git push is trying to authenticate via SSH.
2019-09-22T13:16:46.927Z - info: [ui] Executing push: git -c credential.helper= -c protocol.version=2 push origin master:master --progress (took 21.740s)
2019-09-22T13:16:46.927Z - error: [ui] `git -c credential.helper= -c protocol.version=2 push origin master:master --progress` exited with an unexpected code: 128.
stderr:
ssh: connect to host github.com port 22: Connection timed out
fatal: Could not read from remote repository.

Please make sure you have the correct access rights
and the repository exists.

(The error was parsed as 2: Authentication failed. Some common reasons include:

- You are not logged in to your account: see File > Options.
- You may need to log out and log back in to refresh your token.
- You do not have permission to access this repository.
- The repository is archived on GitHub. Check the repository settings to confirm you are still permitted to push commits.
- If you use SSH authentication, check that your key is added to the ssh-agent and associated with your account.)
Generate new SSH key
-
Run Git Bash.
-
Generate SSH key with your email id as comment.
$ ssh-keygen -t rsa -b 4096 -C "your_email@example.com"
-
When you’re prompted to “Enter a file in which to save the key,” press Enter to save the key in the default location (/c/Users/username/.ssh/id_rsa). Your public key will also get saved here.
-
Copy the public key to clipboard.
$ clip < ~/.ssh/id_rsa.pub
Add public SSH key to your GitHub account
Go to Settings in your Github account to add the SSH public key.
Under SSH keys tab, select New SSH key.
Give a title and paste the key in the text area.

Like the content ?
Add private SSH key to the ssh-agent
Git bash tool comes with a ssh-agent.
Create a new ~/.profile (or) ~/.bashrc file by running below command in git bash.
Paste below script into your ~/.profile (or) ~/.bashrc file to auto launch the ssh-agent whenever you run your git bash shell.
env=~/.ssh/agent.env

agent_load_env () { test -f "$env" && . "$env" >| /dev/null ; }

agent_start () {
    (umask 077; ssh-agent >| "$env")
    . "$env" >| /dev/null ; }

agent_load_env

# agent_run_state: 0=agent running w/ key; 1=agent w/o key; 2= agent not running
agent_run_state=$(ssh-add -l >| /dev/null 2>&1; echo $?)

if [ ! "$SSH_AUTH_SOCK" ] || [ $agent_run_state = 2 ]; then
    agent_start
    ssh-add
elif [ "$SSH_AUTH_SOCK" ] && [ $agent_run_state = 1 ]; then
    ssh-add
fi

unset env
This script will load the identities in the ssh agent from your default location ~/.ssh/id_rsa.
Identity added: /c/Users/username/.ssh/id_rsa (your_email@example.com)
Use SSH over HTTPS
This step is required only if your corporate firewall is blocking port 22.
Create a new config file in your .ssh directory i.e. /c/Users/username/.ssh/config
Paste below contents in the file to use port 443 for SSH connections to host ssh.github.com.
Host github.com
  Hostname ssh.github.com
  Port 443
Run below command in git bash to verify that the configuration is working. Ignore any authentication failures.
$ ssh -vT git@github.com

OpenSSH_8.0p1, OpenSSL 1.1.1c  28 May 2019
debug1: Reading configuration data /c/Users/username/.ssh/config
debug1: /c/Users/username/.ssh/config line 1: Applying options for github.com
debug1: Connecting to ssh.github.com [192.30.253.122] port 443.
debug1: Connection established.
You can see that the SSH connection is now established via port 443.
Verification
To check if everything works as expected perform below steps:
-
Run new git bash shell.
-
Check if the identity has been added to the ssh agent.
- Check that the key is being used by trying to connect to git@github.com.
$ ssh -vT git@github.com

OpenSSH_8.0p1, OpenSSL 1.1.1c  28 May 2019
debug1: Reading configuration data
debug1: Offering public key
debug1: Server accepts key
debug1: Authentication succeeded (publickey).
Authenticated to ssh.github.com
- Clone the repo using the SSH url.
Going forward, every push/pull will use the SSH keys to authenticate with Github.
Like the content ?
References
https://help.github.com/en/articles/connecting-to-github-with-ssh
https://help.github.com/en/articles/using-ssh-over-the-https-port
In this article, we will see how to configure SSH keys in git for windows.
What is SSH?
SSH (secure shell) is a protocol used for secure communication between two computers. SSH uses a key-pair also known as public key and private key for the secure authentication between the client & server.
The public key is stored on the server side whereas the private key is stored on the client side (Local machine). During the connection, server uses public key to authenticate with the client i.e. local machine.
Generating SSH key pair
To work with git, we will need to generate an SSH key pair.
Install the git from the following link
After installing the git, we will get a Git bash terminal. Run the following command in the git bash terminal.
ssh-keygen -t rsa -b 4096 -C "[email protected]"After entering the above command, we will be prompted to enter a file and passphrase for the private key. We need this private key file to configure the git. Now, we will get a new RSA key pair with a length of 4096 bits and it will be associated with the above specified email address.
On windows, the default location for the SSH keys are %userprofile%\.ssh\. In file explorer, open the above directory and you will see two files i.e. id_rsa & id_rsa.pub. These are the private and public key files.
On Linux, the default location for SSH keys are <strong>/home/<username>/.ssh/</strong>
Configuring the git with SSH keys in windows:
Now, we need to configure the git with SSH keys that we generated in the previous step. Run the following command in the git bash:
ssh-add ~/.ssh/id_rsaPlease note, id_rsa is the default file name of the private key. If you have provided a different name while generating the private key, please use the same name.
Configuring the git server with public key
Finally, we need to configure the git server with public key. Open the id_rsa.pub file and copy its contents.
- Login to your git account.
- Open the account settings & navigate to SSH keys section.
- Click the “Add SSH key” button and paste the public key into the text box and save the changes.