
Set up a Git for Windows SDK (or a subset thereof)
Use this Action to initialize an environment to develop Git for Windows.
Getting Started
name: Build stuff in Git for Windows' SDK
on: [push]
jobs:
  build:
    runs-on: windows-latest
    steps:
    - uses: actions/checkout@v3
    - name: Setup Git for Windows' minimal SDK
      uses: git-for-windows/setup-git-for-windows-sdk@v1
    - name: Build
      shell: bash
      run: make
Input parameters
Available flavors
This Action supports several flavors (read: subsets) of the Git for Windows SDK that can be configured like this:
- uses: git-for-windows/setup-git-for-windows-sdk
  with:
    flavor: build-installers
The supported flavors are:
-
minimal:This is the most useful flavor to build Git for Windows’ source code and run its own test suite. Only available for x86_64.
-
makepkg-git:This flavor allows packaging
mingw-w64-git, the Pacman package. It is only available for x86_64 but can be used to «cross-compile» for i686. -
build-installers:In addition to building
mingw-w64-git, this flavor allows bundling Git for Windows’ artifacts such as the installer and the Portable Git. -
full:This is the «full» SDK, as users would install it, with a pre-selected set of packages pre-installed. Additional packages can be installed via
pacman -S <package>.
CPU architecture support
Git for Windows SDK comes in variants targeting x86_64 (AKA «64-bit»), i686 (AKA 32-bit) and aarch64 (AKA arm64). The default is x86_64 and can be overridden like this:
- uses: git-for-windows/setup-git-for-windows-sdk
  with:
    flavor: build-installers
    architecture: i686
Please note that only the build-installers and the full flavors are available for i686.
Verbosity
By default, this Action prints a line whenever 250 items were extracted (this does not work for the full flavor, where this Action is silent by default). It can be overridden by setting the input parameter verbose; setting it to a number will show updates whenever that many items were extracted. Setting it to false will suppress progress updates. Setting it to true will print every extracted file (this also works for the full flavor).
Caching
To accelerate this Action, artifacts are cached once downloaded. This can be turned off by setting the input parameter cache to false.
In practice, caching the full artifacts does not provide much of a speed-up. Instead, it slows it down by spending extra minutes on caching the artifact. Therefore, caching is disabled for the full artifacts by default, corresponding to cache: auto.
Clean-up
On self-hosted runners, the SDK files persist after the workflow run is done. To remove these files, set the input parameter cleanup to true.
Developing this Action
First, you’ll need to have a reasonably modern version of
nodehandy, such as Node 12.
Install the dependencies
Build the Action and package it for distribution
$ npm run build && npm run package
Run the tests ✔️
$ npm test

> setup-git-for-windows-sdk@0.0.0 test C:\Users\me\setup-git-for-windows-sdk
> jest

PASS __tests__/main.test.ts (28.869 s)
  √ skipping tests requiring network access (224 ms)

  console.log
    If you want to run tests that access the network, set:
    export RUN_NETWORK_TESTS=true

      at __tests__/main.test.ts:26:13

PASS __tests__/downloader.test.ts (29.889 s)
  √ can obtain build ID (9 ms)

Test Suites: 2 passed, 2 total
Tests:       2 passed, 2 total
Snapshots:   0 total
Time:        31.11 s
Ran all test suites.
...
Provide feedback
Saved searches
Use saved searches to filter your results more quickly
Sign up
Appearance settings
This tutorial will show you how to use Windows to build the Raspberry Pi Pico version of OpenOCD and picotool used to debug programs on the RP2040.
Chapter 5 and Appendix B of the Getting Started with Raspberry Pi Pico PDF talk about how to build these tools. However, they focus mostly on building the tools for Linux and maxOS. Understandably, building tools on these operating systems is easier, but we can still build them on Windows.
Note that you have the option of skipping the steps below and downloading the executables that I created here. If they do not work or you don’t trust them (no hard feelings), you can continue with the steps below to build your own OpenOCD and picotool.
Directory Setup
I recommend following the steps in my first Raspberry Pi Pico on Windows tutorial to set up the RP2040 build system. We will use the directory structure in that tutorial to hold the source code and executables for these tools.
Specifically, you will want to check out the repositories mentioned in this tutorial into C:\VSARM\sdk\pico.
Install Git for Windows SDK
Git for Windows SDK is different than Git for Windows, as the former contains a number of tools that help us build programs on Windows (including a package manager). Regular Git Bash does not have these features.
Head to https://gitforwindows.org/#download-sdk and download Git for Windows SDK. Download the latest installer for your version of Windows (likely the 64-bit version).
Run the installer, accepting all the defaults. This will open a command prompt window and begin to download/install Git for Windows SDK. It will take some time, as it’s a rather large set of files.
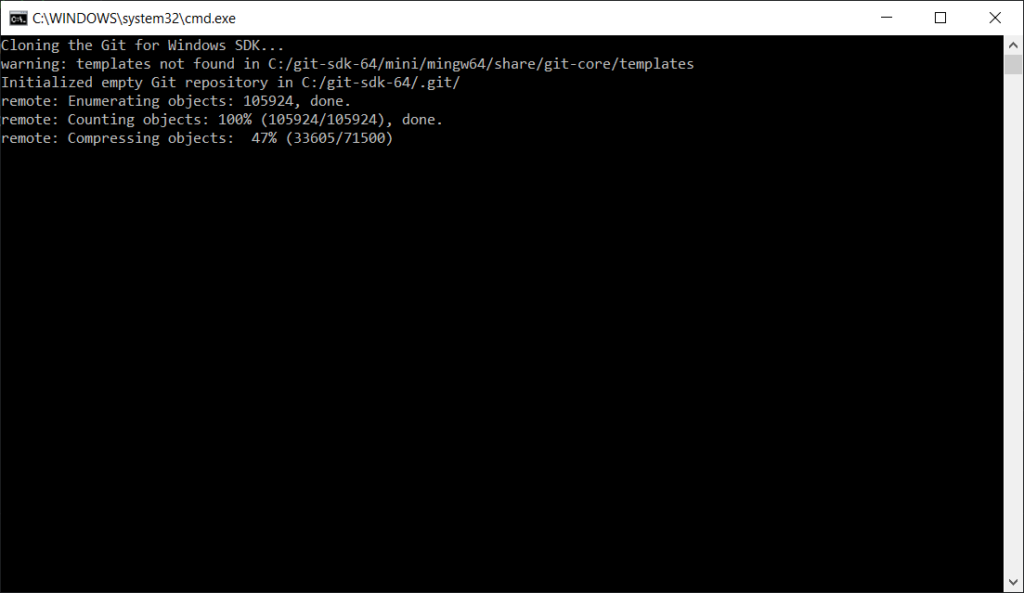
Note that Git for Windows SDK installs (by default) in C:\git-sdk-64. This directory contains everything as part of the SDK, which means you can delete the directory when you are done using it.
Install Packages
One of the best features of Git for Windows SDK is the pacman package manager. It allows you to install libraries and software similar to how you might do it in Linux.
Run C:\git-sdk-64\git-bash.exe. Note that you must use this executable to run Git for Windows SDK and not the one you may have installed in the previous tutorial! The window should say “SDK-64:/” at the top if you’re running the correct version.
In the terminal, enter the following commands:
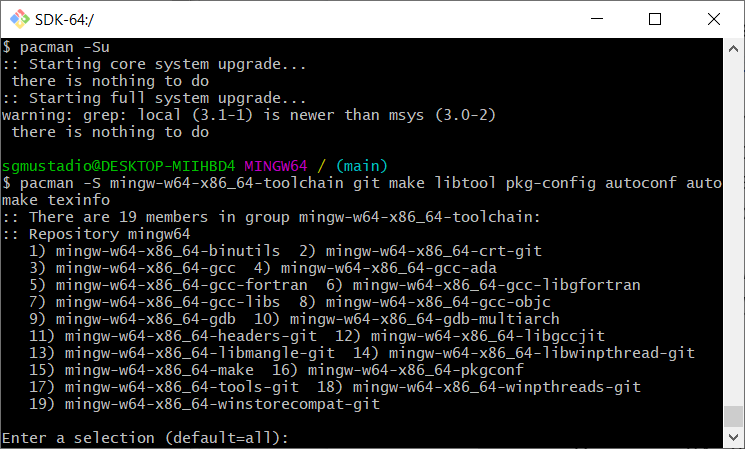
pacman -Syu
pacman -Su
pacman -S mingw-w64-x86_64-toolchain git make libtool pkg-config autoconf automake texinfo wget
When pacman asks which members to install in the mingw-w64-x86_64-toolchain, press ‘enter’ to install all.
When asked “pkg-config and pkgconf are in conflict. Remove pkgconf? [Y/n],” enter Y.
When asked “Proceed with installation? [Y/n],” enter Y again.
This will take some time to download and install all of the packages.
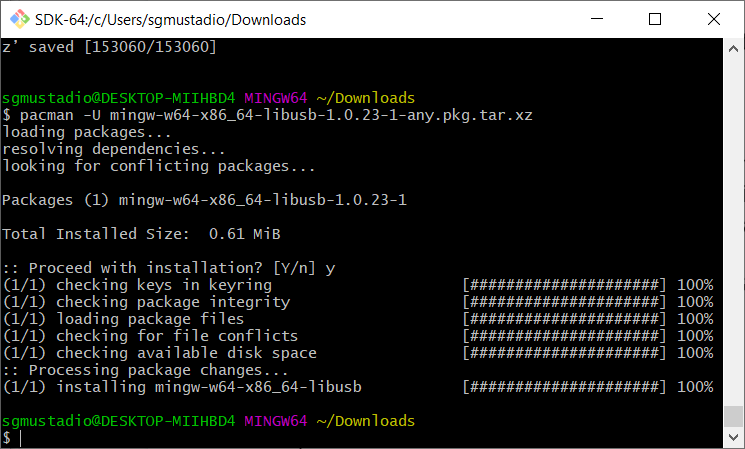
Note: there is an issue with libusb-1.0.24 on MSYS2. We will manually install v1.0.23 to prevent the segmentation fault from occurring when running OpenOCD or picotool. If you run pacman -Su to update packages after this manual installation process, it will remove version 1.0.23 and update libusb to the latest (1.0.24 at the time of writing). For more information, see this forum post.
Enter the following commands to install libusb-1.0.23:
cd ~/Downloads
wget http://repo.msys2.org/mingw/x86_64/mingw-w64-x86_64-libusb-1.0.23-1-any.pkg.tar.xz
pacman -U mingw-w64-x86_64-libusb-1.0.23-1-any.pkg.tar.xz
Enter Y when asked “Proceed with installation? [Y/n].”
At this point, we’re ready to build our tools!
Build OpenOCD
OpenOCD (Open On-Chip Debugger) is an open-source tool that communicates with GDB to send commands over JTAG or SWD to a number of different microcontrollers. The RP2040 is not officially supported in OpenOCD at the time of writing, so we need to build a special branch of OpenOCD.
In your Git for Windows SDK terminal, enter the following commands:
cd /c/VSARM/sdk/pico
git clone https://github.com/raspberrypi/openocd.git --branch picoprobe --depth=1
cd openocd
./bootstrap
./configure --enable-picoprobe --disable-werror
make
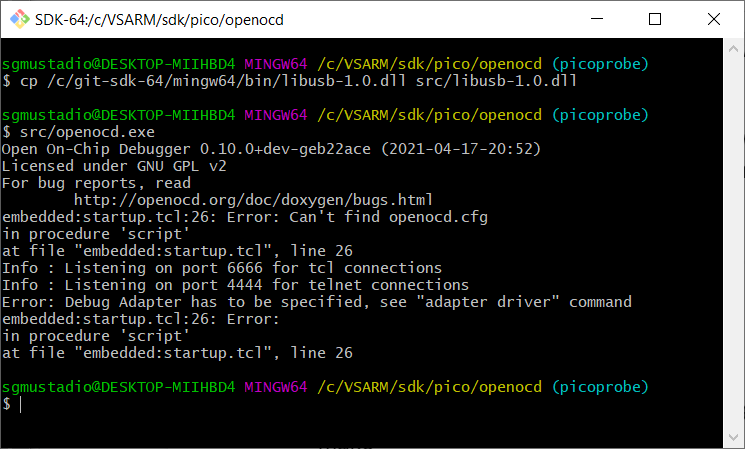
When OpenOCD is done building, you will need to copy in the libusb-1.0.dll library file from your Git for Windows SDK directory. This .dll file must be in the same directory as your openocd.exe file for the tool to work. If you move openocd.exe, you’ll need to copy libusb-1.0.dll to the same folder.
Enter the following command to copy the file into the current directory:
cp /c/git-sdk-64/mingw64/bin/libusb-1.0.dll src/libusb-1.0.dll
You can test running OpenOCD with the following command:
src/openocd.exe
You should expect it to throw some errors and exit, as we haven’t given it any parameters.
Note: I do not recommend calling make install as shown in the Getting Started guide! This will make the Pico version of OpenOCD the default OpenOCD for your whole system. If you plan to use OpenOCD for other embedded debugging, you’ll want to keep the Pico version separate. For now, just leave the executable in the src folder. You can call this executable explicitly from the command line or set VS Code to use it on a per-project basis.
Build Picotool
Picotool is a program used to inspect RP2040 binaries and interact with the RP2040 in bootloader mode.
Note that to build picotool, you will need to have the SDK_PICO_PATH environment variable set to the location of your pico-sdk (e.g. C:\VSARM\sdk\pico\pico-sdk) as we did in the previous tutorial.
Open C:\git-sdk-64\git-bash.exe (if it’s not already open).
Run the following commands to clone the picotool repository and build it:
cd /c/VSARM/sdk/pico
git clone -b master https://github.com/raspberrypi/picotool.git
cd picotool
mkdir build
cd build
cmake -G "MinGW Makefiles" -DPC_LIBUSB_INCLUDEDIR="/c/git-sdk-64/mingw64/include/libusb-1.0" ..
make
Just like with OpenOCD, we’ll need a copy of libusb-1.0.dll to be in the same folder as picotool.exe. Enter the following command to copy it into the build folder:
cp /c/git-sdk-64/mingw64/bin/libusb-1.0.dll .
We also need a copy of libgcc_s_seh-1.dll:
cp /c/git-sdk-64/mingw64/bin/libgcc_s_seh-1.dll .
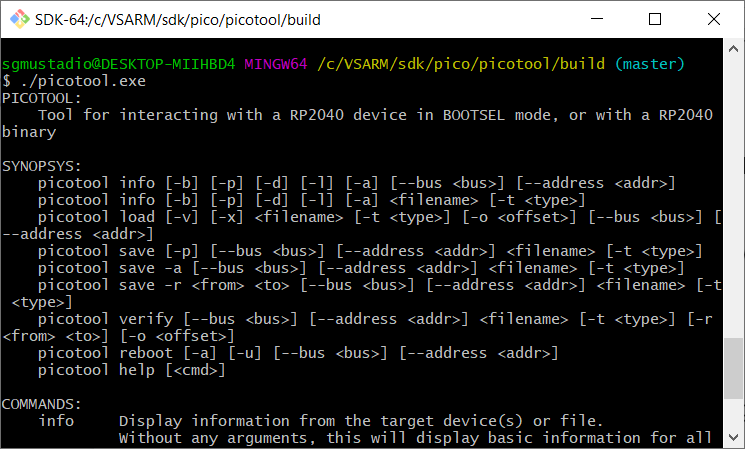
You can test picotool by entering the following:
./picotool.exe
It should spit out a help message and exit.
Optional: You can add picotool.exe to your Path, if you feel so inclined. This will allow you to call “picotool” from any terminal.
- Search for “environment variables” in the Windows search bar
- Open “Edit the system environment variables”
- Click “Environment Variables…”
- Select Path under “User variables” and click “Edit…”
- Add a new entry: C:\VSARM\sdk\pico\picotool\build (or whever you’re keeping picotool.exe)
- Click OK on all the windows to save the settings
Note: At the time of writing, I could only get this build of picotool to run inside of Git Bash. I’m assuming that the MinGW environment is somehow necessary for its execution. If I find a way to make the .exe run in Command Prompt or PowerShell, I will post it here.
Update Driver
Windows does not have a native driver to send commands over USB to the Pico from picotool. So, we have to install one manually.
Put your Pico board into bootloader mode (press and hold BOOTSEL and plug in the USB cable). It should enumerate on your computer as a storage drive.
Head to https://zadig.akeo.ie and download Zadig.
Run Zadig. Select Options > List All Devices.
You should see 2 Pico devices in the drop-down menu: RP2 Boot (Interface 0) and RP2 Boot (Interface 1). Select RP2 Boot (Interface 1).
The driver should be listed as (NONE). Select libusb-win32 (some version) as the replacement driver.
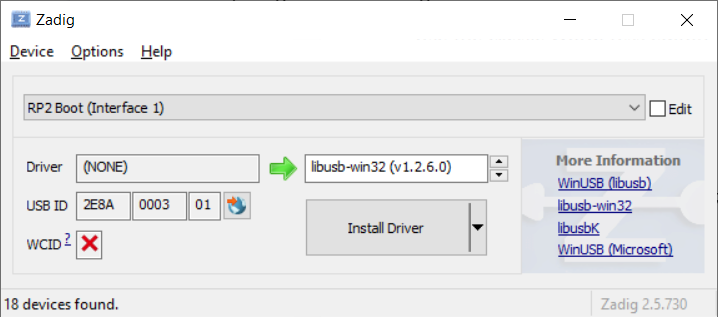
Click Install Driver. When it’s done, the current driver should be listed as “libusb-win32.”
If you break something in Zadig (like I did), you can fix it. For example, the Pico will not enumerate as a mass storage device drive in bootloader mode. Zadig will show something other than “USBSTOR” as the driver for RP2 (Interface 0). Here is how to delete the bad drivers and let Windows fix the mess you made:
- Put Pico into bootloader mode
- Open Device Manager
- Click View > Devices by container
- Expand RP2 Boot
- For all entries under RP2 Boot:
- Right-click on entry
- Select Uninstall Device
- Check “Delete the driver software for this device” (if asked)
- Click Uninstall
- Unplug Pico
- Hold BOOTSEL and plug it back in to put it into bootloader mode again
- Windows should automatically reinstall all the correct drivers
Test Picotool
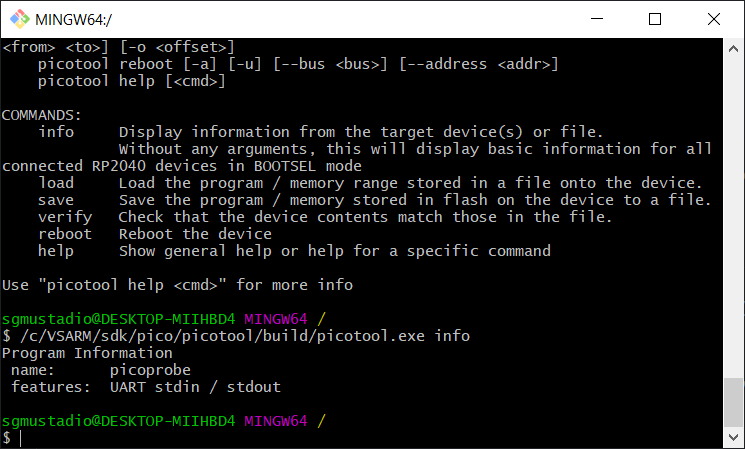
With your Pico in bootloader mode, enter the following command:
/c/VSARM/sdk/pico/picotool/build/picotool.exe info
Note that you can run picotool without specifying the path name if you added its location to your Path.
If it is able to communicate with your connected Pico, you should see that printed.
Going Further
Once you have finished building OpenOCD and picotool, you can uninstall Git for Windows SDK by simply deleting the C:\git-sdk-64 directory.
Hopefully, this has helped you get started with some advanced tools for programming and debugging on your Raspberry Pi Pico. If you would like to set up step-through debugging using VS Code, see this tutorial (link coming soon).
Happy hacking!
First git clone from this address, or download the zip package directly:
https://github.com/git-for-windows/git-sdk-64
If the downloaded zip is decompressed after downloading, I unzip the system root directory
c:\git-sdk-64
Windows-Terminal
Download the preview version of Windows terminal from the win10 application store and start it from the start menu, orwin + R Inputwt
Click the small down arrow in the title bar to open the configuration fileprofiles.json
Copy the following code to the configuration fileprofilesIn properties
{
            "acrylicOpacity": 0.9,
            "closeOnExit": true,
            "colorScheme": "Campbell",
            "commandline": "C:\\git-sdk-64\\usr\\bin\\bash.exe --login -i",     //Modify to your decompression directory
            "cursorColor": "#FFFFFF",
            "cursorShape": "emptyBox",
            "fontFace": "Consolas",
            "fontSize": 11,
            "guid": "{1c4de343-38b7-51cf-b940-2309a097f518}",                   //guid fill in whatever you want, as long as it does not repeat with others
            "icon": "C:\\git-sdk-64\\mingw64\\share\\git\\git-for-windows.ico",
            "name": "Git-Sdk-64",
            "padding": "8, 8, 8, 8",
            "snapOnInput": true,
            "startingDirectory": "C:\\Users\\xxx",                              //The terminal startup path, if not set this item will enter system32 by default
            "useAcrylic": true
},
Then in the globalglobalsSet this property in"defaultProfile": "{1c4de343-38b7-51cf-b940-2309a097f518}" //terminal guid to be loaded by default
Done!
Attach my own configuration file
// To view the default settings, hold "alt" while clicking on the "Settings" button.
// For documentation on these settings, see: https://aka.ms/terminal-documentation
{
    "$schema": "https://aka.ms/terminal-profiles-schema",
    //"defaultProfile": "{61c54bbd-c2c6-5271-96e7-009a87ff44bf}",
    "globals": {
        "alwaysShowTabs": true,
        "copyOnSelect": false,
        "defaultProfile": "{1c4de343-38b7-51cf-b940-2309a097f518}",
        "initialCols": 120,
        "initialRows": 30,
        "requestedTheme": "system",
        "showTabsInTitlebar": true,
        "showTerminalTitleInTitlebar": true,
        "wordDelimiters": " ./\\()\"'-:,.;<>~!@#$%^&*|+=[]{}~?\u2502",
        "useAcrylic": true
    },
    "profiles": [
        {
            // Make changes here to the powershell.exe profile
            "acrylicOpacity": 0.5,
            "closeOnExit": true,
            "colorScheme": "Campbell",
            "fontFace": "Consola",
            "useAcrylic": true,
            "background": "#012456",
            "guid": "{61c54bbd-c2c6-5271-96e7-009a87ff44bf}",
            "name": "Windows PowerShell",
            "commandline": "powershell.exe",
            "hidden": false
        },
        {
            // Make changes here to the cmd.exe profile
            "acrylicOpacity": 0.5,
            //"backgroundImage": "D:\\31239\\Pictures\\203420xo3ljwf7jl7jby1l.jpg",
            //"backgroundImageOpacity": 0.75,
            //"backgroundImageStretchMode": "fill",
            "closeOnExit": true,
            "colorScheme": "Campbell",
            //"colorScheme": "Solarized Dark",
            "cursorColor": "#F0E68C",
            "cursorShape": "emptyBox",
            "fontFace": "DejaVu Sans Mono",
            "useAcrylic": false,
            "snapOnInput": true,
            "startingDirectory": "%USERPROFILE%",
            "guid": "{0caa0dad-35be-5f56-a8ff-afceeeaa6101}",
            "name": "cmd",
            "commandline": "cmd.exe",
            "hidden": false
        },
        {
            "guid": "{b453ae62-4e3d-5e58-b989-0a998ec441b8}",
            "hidden": false,
            "name": "Azure Cloud Shell",
            "source": "Windows.Terminal.Azure"
        },
        {
            "acrylicOpacity": 0.5,
            "closeOnExit": true,
            "colorScheme": "Ubuntu",
            "cursorColor": "#FFFFFF",
            "cursorShape": "filledBox",
            "useAcrylic": true,
            "guid": "{2c4de342-38b7-51cf-b940-2309a097f518}",
            "hidden": false,
            "name": "Ubuntu",
            //"startingDirectory": "/home",
            "source": "Windows.Terminal.Wsl"
        },
        {
            "acrylicOpacity": 0.5,
            "closeOnExit": true,
            "colorScheme": "Solarized Dark",
            "commandline": "C:\\Program Files (x86)\\Git\\bin\\bash.exe",
            "cursorColor": "#FFFFFF",
            "cursorShape": "emptyBox",
            "fontFace": "DejaVu Sans Mono",
            "fontSize": 11,
            "guid": "{1c4de342-38b7-51cf-b940-2309a097f518}",
            "icon": "C:\\Program Files (x86)\\Git\\mingw32\\share\\git\\git-for-windows.ico",
            "name": "Git-Bash",
            "padding": "8, 8, 8, 8",
            "snapOnInput": true,
            "startingDirectory": "C:\\Users\\31239",
            "useAcrylic": true
        },
        {
            "acrylicOpacity": 0.9,
            "closeOnExit": true,
            "colorScheme": "Solarized Dark",
            "commandline": "C:\\git-sdk-64\\usr\\bin\\bash.exe --login -i",
            "cursorColor": "#FFFFFF",
            "cursorShape": "emptyBox",
            "fontFace": "Consolas",
            "fontSize": 11,
            "guid": "{1c4de343-38b7-51cf-b940-2309a097f518}",
            "icon": "C:\\git-sdk-64\\mingw64\\share\\git\\git-for-windows.ico",
            "name": "Git-Sdk-64",
            "padding": "8, 8, 8, 8",
            "snapOnInput": true,
            "startingDirectory": "C:\\Users\\31239",
            "useAcrylic": true
        },
        {
            "acrylicOpacity": 0.9,
            "closeOnExit": true,
            "colorScheme": "Campbell",
            "commandline": "C:\\Users\\31239\\.babun\\cygwin\\bin\\bash.exe",
            "cursorColor": "#FFFFFF",
            "cursorShape": "emptyBox",
            "fontFace": "Monospace",
            "fontSize": 11,
            "guid": "{4b4de342-38b7-51cf-b940-2309a097f518}",
            "icon": "D:\\31239\\Pictures\\icon\\zsh.ico",
            "name": "Babun",
            "padding": "8, 8, 8, 8",
            "snapOnInput": true,
            //"startingDirectory": "C:\\Users\\31239",
            "useAcrylic": true
        }
    ],
    // Add custom color schemes to this array
    "schemes": [
        {
            "name": "Campbell",
            "foreground": "#F2F2F2",
            "background": "#0C0C0C",
            "colors": [
                "#0C0C0C",
                "#C50F1F",
                "#13A10E",
                "#C19C00",
                "#0037DA",
                "#881798",
                "#3A96DD",
                "#CCCCCC",
                "#767676",
                "#E74856",
                "#16C60C",
                "#F9F1A5",
                "#3B78FF",
                "#B4009E",
                "#61D6D6",
                "#F2F2F2"
            ]
        },
        {
            "name": "Solarized Dark",
            "foreground": "#FDF6E3",
            "background": "#073642",
            "colors": [
                "#073642",
                "#D30102",
                "#859900",
                "#B58900",
                "#268BD2",
                "#D33682",
                "#2AA198",
                "#EEE8D5",
                "#002B36",
                "#CB4B16",
                "#586E75",
                "#657B83",
                "#839496",
                "#6C71C4",
                "#93A1A1",
                "#FDF6E3"
            ]
        },
        {
            "name": "Solarized Light",
            "foreground": "#073642",
            "background": "#FDF6E3",
            "colors": [
                "#073642",
                "#D30102",
                "#859900",
                "#B58900",
                "#268BD2",
                "#D33682",
                "#2AA198",
                "#EEE8D5",
                "#002B36",
                "#CB4B16",
                "#586E75",
                "#657B83",
                "#839496",
                "#6C71C4",
                "#93A1A1",
                "#FDF6E3"
            ]
        },
        {
            "name": "Ubuntu",
            "foreground": "#EEEEEC",
            "background": "#2C001E",
            "colors": [
                "#EEEEEC",
                "#16C60C",
                "#729FCF",
                "#B58900",
                "#268BD2",
                "#D33682",
                "#2AA198",
                "#EEE8D5",
                "#002B36",
                "#CB4B16",
                "#586E75",
                "#657B83",
                "#839496",
                "#6C71C4",
                "#93A1A1",
                "#FDF6E3"
            ]
        },
        {
            "name": "UbuntuLegit",
            "foreground": "#EEEEEE",
            "background": "#2C001E",
            "colors": [
                "#4E9A06",
                "#CC0000",
                "#300A24",
                "#C4A000",
                "#3465A4",
                "#75507B",
                "#06989A",
                "#D3D7CF",
                "#555753",
                "#EF2929",
                "#8AE234",
                "#FCE94F",
                "#729FCF",
                "#AD7FA8",
                "#34E2E2",
                "#EEEEEE"
            ]
        }
    ],
    // Add any keybinding overrides to this array.
    // To unbind a default keybinding, set the command to "unbound"
    "keybindings": [
        //{
        //    "command": "closeTab",
        //    "keys": [
        //        "ctrl+w"
        //    ]
        //},
        {
            "command": "newTab",
            "keys": [
                "ctrl+t"
            ]
        },
        {
            "command": "prevTab",
            "keys": [
                "ctrl+shift+tab"
            ]
        },
        {
            "command": "nextTab",
            "keys": [
                "ctrl+tab"
            ]
        },
        {
            "command": "switchToTab0",
            "keys": [
                "alt+1"
            ]
        },
        {
            "command": "switchToTab1",
            "keys": [
                "alt+2"
            ]
        },
        {
            "command": "switchToTab2",
            "keys": [
                "alt+3"
            ]
        },
        {
            "command": "switchToTab3",
            "keys": [
                "alt+4"
            ]
        },
        {
            "command": "switchToTab4",
            "keys": [
                "alt+5"
            ]
        },
        {
            "command": "switchToTab5",
            "keys": [
                "alt+6"
            ]
        },
        {
            "command": "switchToTab6",
            "keys": [
                "alt+7"
            ]
        },
        {
            "command": "switchToTab7",
            "keys": [
                "alt+8"
            ]
        },
        {
            "command": "switchToTab8",
            "keys": [
                "alt+9"
            ]
        }
    ]
}
Download for Windows
Click here to download
the latest (2.49.0)
x64 version of Git for Windows.
This is the most recent maintained build.
It was released on 2025-03-17.
Other Git for Windows downloads
Standalone Installer
Git for Windows/x64 Setup.
Git for Windows/ARM64 Setup.
Portable («thumbdrive edition»)
Git for Windows/x64 Portable.
Git for Windows/ARM64 Portable.
Using winget tool
Install winget tool if you don’t already have it, then type this command in command prompt or Powershell.
winget install --id Git.Git -e --source winget
The current source code release is version 2.49.0.
If you want the newer version, you can build it from the source code.
Now What?
Now that you have downloaded Git, it’s time to start using it.
-
Read the Book
Dive into the Pro Git book and learn at your own pace.
-
Download a GUI
Several free and commercial GUI tools are available for the Windows platform.
-
Get Involved
A knowledgeable Git community is available to answer your questions.